If you run a site with Windows 2000 systems, you might want to use the built-in Terminal Services (TS) in Windows 2000 (Server versions only) for remote administration.
Terminal Services is based on Microsoft’s Remote Desktop Protocol (RDP). RDP is a Microsoft proprietary protocol. Terminal Services does not provide built-in support for file transfer (see Section 4.2.2 later in this chapter). RDP uses only one port (tcp/3389), which is good. Also, TS remote administration supports two concurrent remote users.
If you want to use Terminal Services for remote administration, you can always combine it with IPSec (transport mode) to add an additional layer of security.
Follow these steps to set up Terminal Services on a bastion host:
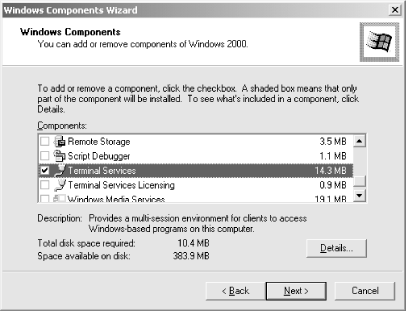
Install the Terminal Services component by clicking Add/Remove Programs in the Control Panel, and then clicking Add/Remove Windows Components. There’s no need to install the Terminal Services Licensing service when using the remote administration mode. The Windows Components dialog box is shown in Figure 4.8.
Configure Terminal Services to use the remote administration mode.
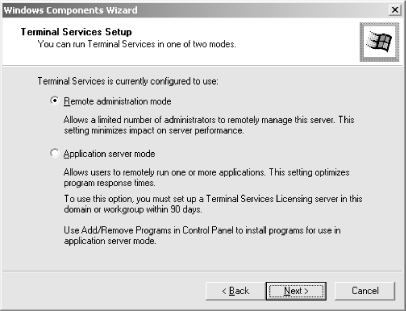
Terminal Services can run in either remote administration mode or application server mode. To set up a dedicated application server with Terminal Services, separate licenses are needed. The remote administration feature is included in the Windows 2000 Server license. In this case, I chose to configure the Terminal Services for remote administration as shown in Figure 4.9.
Remove the TsInternetUser account from the system.
Terminal Services creates a local user account on the system called “TsInternetUser” as a part of the installation procedure. This account is used for the Terminal Server Internet Connector licensing mode (anonymous Internet access to the Terminal Service). The account is not needed for remote administration, and therefore I recommend removing this account from the bastion host.
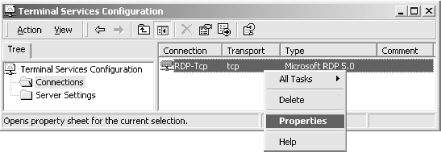
The next major task is to configure Terminal Services. This can be done by using the Terminal Services Configuration MMC snap-in available in the Programs → Administrative Tools folder on the Start menu. Bring up the RDP-Tcp Connection Method Properties, as shown in Figure 4.10.
The settings we need to configure include:
The level of encryption for connections to the Terminal Service
Terminal Services session settings
Permissions to control who is allowed to access the server using Terminal Services
RDP uses the RC4 cipher using 40-bit, 56-bit, and 128-bit encryption keys to protect against eavesdropping on Terminal Services connections. RDP supports three different methods of encryption:
- Low
Encrypts only input sent from the client to the server (like username and password information). Do not use this setting on a bastion host.
- Medium
Encrypts all data sent between the server and the client using either a 56-bit key (Windows 2000 TS clients) or a 40-bit key (older TS clients).
- High
Encrypts all data sent between the server and the client, using a 128-bit key. The Windows 2000 High Encryption Pack must be installed on both clients and servers to get 128-bit encryption. This setting will fall back to 56-bit encryption if either the client or the server doesn’t have high encryption installed.
Configure Terminal Services according to these steps:
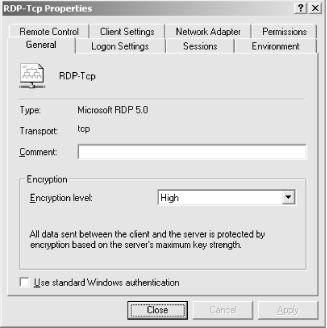
Configure Terminal Services to use the 128-bit strong (called “high” here) encryption option, as shown in Figure 4.11.
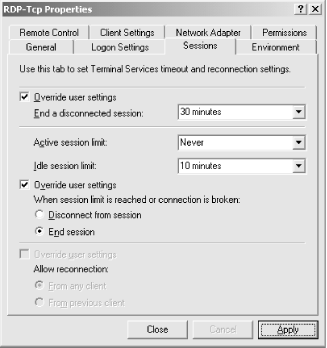
Terminal Services can be configured to disconnect idle connections and to terminate broken sessions. Since the remote administration mode only allows two concurrent sessions, you must make sure that hanging or idle connections are disconnected as soon as possible.
I recommend the settings shown in Table 4.3 on a bastion host.
Table 4-3. Recommended Session Settings for Terminal Services
|
Setting |
Description |
Recommended Value |
|---|---|---|
|
End a disconnected session |
A session is considered disconnected if the user closes the TS client application without logging out first. |
30 minutes |
|
Active session limit |
Controls how long a user’s session can remain active. |
Never (no limit) |
|
Idle session limit |
Controls how long a user’s session can remain idle before it is closed by Terminal Services. |
10 minutes |
|
When session limit is reached or connection is broken |
Setting this to “End session” terminates the user’s active processes and logs the user out if the session is broken or if one of the above limits is reached. |
End session |
Configure the settings from Table 4.3 using the Sessions tab (shown in Figure 4.12) of the RDP Properties dialog box.
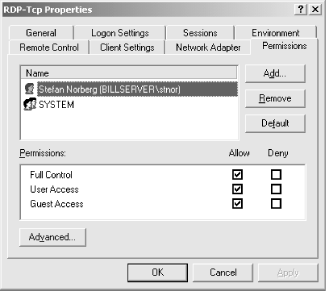
The last configuration step is to set up access control to Terminal Services. This is done using the Permissions tab (shown in Figure 4.13) in the RDP Properties dialog box. By default, all members of the Administrators group are allowed access to Terminal Services. I recommend removing the Administrators group from the allowed users and adding the individual users who need access back instead. Note that the SYSTEM account needs to be in the list. You won’t be able to log on if you remove it.
By default, there’s no way to copy files between the client and
the server using
Terminal Services. However, installing
the File Copy utility from the
Windows 2000 Server Resource Kit
(ftp://ftp.microsoft.com/reskit/win2000/rdpclip.zip)[39] will enable you to do this. The File Copy utility
provides the ability to use the Cut (Ctrl-x), Copy (Ctrl-c), and
Paste (Ctrl-v) clipboard commands to transfer files between the
client and the server. Simply select the files and/or folders to copy
in Explorer (on the client) and press Ctrl-c. Now all that is left is
to go to the Terminal Services Client application and paste the file
in a folder of your choice. The file is then transmitted over the RDP
channel to the server. Unfortunately, as with all Resource Kit
utilities, this great add-on feature is provided as is. It’s
not supported by
Microsoft.
[39] Note that there’s a hotfix for this utility available at http://download.microsoft.com/download/win2000platform/rdpclip/1.0/NT5/EN-US/rdpclip_hotfix.exe.
Get Securing Windows NT/2000 Servers for the Internet now with the O’Reilly learning platform.
O’Reilly members experience books, live events, courses curated by job role, and more from O’Reilly and nearly 200 top publishers.

