When you get right down to it, the job description of every operating system is pretty much the same. Whether it’s Mac OS X, Windows Vista, or Billy Bob’s System-Software Special, any OS must serve as the ambassador between the computer and you, its human operator. It must somehow represent your files and programs on the screen so you can open them; offer some method of organizing your files; present onscreen controls that affect your speaker volume, mouse speed, and so on; and communicate with your external gadgets, like disks, printers, and digital cameras.
In other words, Mac OS X offers roughly the same features as recent versions of Windows. That’s the good news.
The bad news is that these features are called different things and parked in different spots. As you could have predicted, this rearrangement of features can mean a good deal of confusion for you, the Macintosh foreigner. For the first few days or weeks, you may instinctively reach for certain familiar features that simply aren’t where you expect to find them, the way your tongue keeps sticking itself into the socket of a newly extracted tooth.
To minimize the frustration, therefore, read this chapter first. It makes plain the most important and dramatic differences between the Windows method and the Macintosh way.
As a critic might say, Apple is always consistent with its placement of the power button: It’s different on every model.
On iMacs and Mac Minis, the power button is on the back panel. On the Mac Pro, it’s on the front panel. And on laptop Macs, the button is near the upper-right corner of the keyboard. (Then again, if you have a laptop, you should get into the habit of just closing the lid when you’re done working and opening it to resume; the power button rarely plays a role in your life.)
In every case, though, the power button looks the same (Figure 1-1): it bears the ![]() logo.
logo.
You can get terrific mileage out of shortcut menus on the Mac, just as in Windows (Figure 1-2).
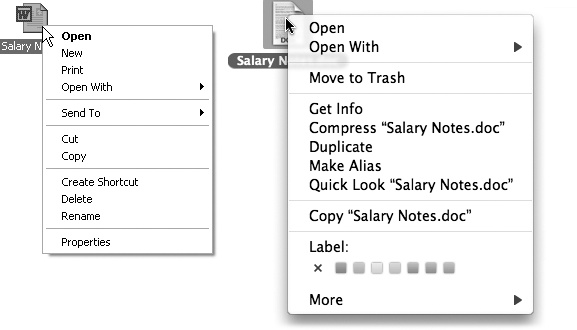
Figure 1-2. After years of resisting, Apple now includes a two-button mouse with every iMac and Mac Pro (although the right button is invisible). You can right-click on laptop trackpads, too, even though they appear to have only a single button. It’s worth learning how to right-click, because shortcut menus, shown here in Windows (left) and on the Mac (right), are so handy.
Shortcut menus are so important, in fact, that it’s worth this ink and this paper to explain the different ways you can trigger a right-click (or a secondary click, as Apple calls it, because not all these methods actually involve a second mouse button, and it doesn’t have to be the right-side one):
Control-click. You can open the shortcut menu of something on the Mac screen by Control-clicking it. That is, while pressing the Control key (bottom row), click the mouse on your target.
Right-click. Windows veterans have always used the one-handed method: right-clicking. That is, clicking something by pressing the right mouse button on a two-button mouse.
“Ah, but that’s what’s always driven me nuts about Apple,” goes the common refrain. “Their refusal to get rid of their stupid one-button mouse!”
Well, not so fast.
First of all, you can attach any old $6 USB two-button mouse to the Mac, and it’ll work flawlessly. Recycle the one from your old PC, if you like.
Furthermore, if you’ve bought a desktop Mac since late 2005, you probably already have a two-button mouse—but you might not realize it. Is your mouse a white shiny plastic capsule with tiny gray scrolling track-pea on the far end? That would be what Apple calls the Mighty Mouse. Or is it a sculpted, winglike, wireless mouse with a wide top surface? That would be the newer Magic Mouse.
Both of them have a secret: an invisible right mouse button. It doesn’t work until you ask for it.
To do that, choose
 →System Preferences. Click Mouse. There, in all its splendor, is a diagram of the mouse. (There’s a picture on The Mighty Mouse and Magic Mouse.)
Your job is to choose Secondary Button from the pop-up menu that identifies the right side of the mouse. (The reason it’s not called a “right button” is because left-handers might prefer to reverse the right and left functions.)
From now on, even though there aren’t two visible mouse buttons, your mouse does, in fact, register a left-click or a right-click depending on which side of the button you push down. It actually works a lot more easily than it sounds like it would.
Use the trackpad (old way). If you have a Mac laptop, you can “right-click” right there on the trackpad.
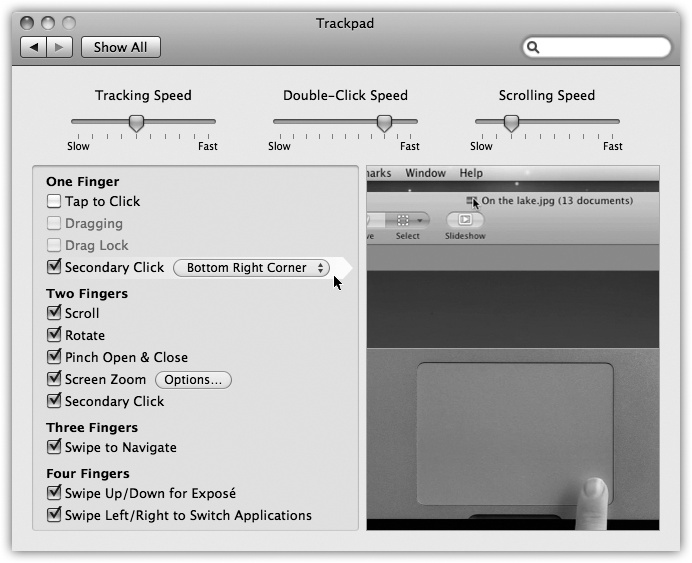
To do that, point to whatever you want to click. Rest two fingers on the trackpad—and then click. (You turn this feature on and off in System Preferences→Trackpad, where you can also see a little video on how to do it.)
Use the trackpad (new way). Two fingers plus thumb? That is quite a lot of digits just to get a right-click, and Apple knows it. So on the latest Mac laptops, you can “right-click” by clicking either the lower-right or lower-left corner of the trackpad—one finger only.
(Your laptop is eligible if it has no separate clicker button. Instead, the whole trackpad surface is a clicker. You turn on this clicking method in System Preferences→Trackpad, as shown in Figure 1-3.)
If you’re the only person who uses your Mac, finishing up a work session is simple. You can either turn off the machine or simply let it go to sleep, in any of several ways.
It’s clear that Apple expects its customers not to shut down their machines between sessions, because the company has gone to great lengths to make doing so inconvenient. (For example, you have to save your work in all open programs before you can shut down.)
That’s OK. Sleep mode (called Standby on the PC) consumes very little power, keeps everything you were doing open and in memory, and wakes the Mac up almost immediately when you press a key or click the mouse. To make your machine sleep, use any of these techniques:
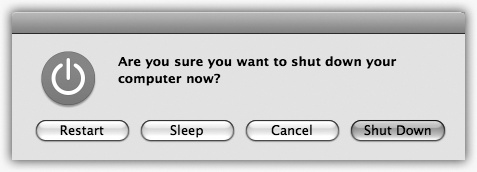
Press Control-
 (or Control-F12, if you don’t have a key). In the dialog box shown in Figure 1-4 click Sleep (or type S).
Press the power button (
 ) on your machine. On desktop models, doing so makes it sleep immediately; on laptops, you get the dialog box shown in Figure 1-4.
Hold down the Play/Pause button on your remote for 3 seconds. Many Mac models come, or used to come, with Apple’s tiny white remote control.
Just walk away, confident that the Energy Saver setting described on Color Tab will send the machine off to dreamland automatically at the specified time.
You shouldn’t have to restart the Mac very often—only in times of severe troubleshooting mystification, in fact. Here are a few ways to do it:
Choose
→Restart. A confirmation dialog box appears; click Restart (or press Return).Press Control-⌘-
. (If you don’t have that key, substitute F12.)Press Control-
to summon the dialog box shown in Figure 1-4; click Restart (or type R).
To shut down your machine completely (when you don’t plan to use it for more than a couple of days, when you plan to transport it, and so on), do one of the following:
Choose
→Shut Down. A simple confirmation dialog box appears; click Shut Down (or press Return).Press Control-Option-⌘-
. (It’s not as complex as it looks—the first three keys are all in a tidy row to the left of the space bar.)Press Control-
(or Control-F12) to summon the dialog box shown in Figure 1-4. Click Shut Down (or press Return).Wait. If you’ve set up the Energy Saver preferences (Checkbox Options) to shut down the Mac automatically at a specified time, then you don’t have to do anything.
If you share your Mac with other people, then you should log out when you’re done. Doing so ensures that your stuff is safe from the evil and the clueless when you’re out of the room. To do it, choose ![]() →Log Out (or press Shift-⌘-Q). When the confirmation dialog box appears, click Log Out (or press Return), or just wait for 2 minutes. The Mac hides your world from view and displays the login dialog box, ready for the next victim.
→Log Out (or press Shift-⌘-Q). When the confirmation dialog box appears, click Log Out (or press Return), or just wait for 2 minutes. The Mac hides your world from view and displays the login dialog box, ready for the next victim.
Another option is to use fast user switching—a feature that lets you switch from one user to another without actually logging out, just as in Windows XP or Vista. With fast user switching turned on, your Mac can have several people logged in at once, although only one person at a time actually sees his own desktop.
In either case, this whole accounts system is described in much more detail in Chapter 13.
It won’t take you long to discover that on the Macintosh, there’s only one menu bar. It’s always at the top of the screen. The names of these menus, and the commands inside them, change to suit the window you’re currently using. That’s different from Windows, where a separate menu bar appears at the top of every window.
Mac and Windows devotees can argue the relative merits of these two approaches until they’re blue in the face. All that matters, though, is that you know where to look when you want to reach for a menu command. On the Mac, you always look upward.
In Mac OS X, the “home base” program—the one that appears when you first turn on the machine and shows you the icons of all your folders and files—is called the Finder. This is where you manage your folders and files, throw things away, manipulate disks, and so on. (You may also hear it called the desktop, since the items you find there mirror the files and folders you might find on a real-life desktop.)
Getting used to the term “Finder” is worthwhile, though, because it comes up so often. For example, the first icon on your Dock is labeled Finder, and clicking it always takes you back to your desktop.
At the bottom of almost every Mac OS X screen sits a tiny row of photorealistic icons. This is the Dock, a close parallel to the Windows taskbar. (As in Windows, it may be hidden or placed on the left or right edge of the screen instead—but those are options primarily preferred by power users and eccentrics.)
The Dock displays the icons of all your open windows and programs, which are denoted by small, glowing dots beneath their icons. Clicking these icons opens the corresponding files, folders, disks, documents, and programs. If you click and hold (or right-click) an open program’s icon, you’ll see a pop-up list of the open windows in that program, along with Quit and a few other commands.
When you close a program, its icon disappears from the Dock (unless you’ve secured it there for easy access, as described on Secret menus).
Tip
You can cycle through the various open programs on your Mac by holding down the ⌘ key and pressing Tab repeatedly. (Sound familiar? It’s just like Alt-Tabbing in Windows.) And if you just tap ⌘-Tab, you bounce back and forth between the two programs you’ve used most recently.
What you may find confusing at first, though, is that the Dock also performs one function of the Windows Start menu: It provides a “short list” of programs and files that you use often, for easy access. To add a new icon to the Dock, just drag it there (put programs to the left of the divider line; everything else goes on the right). To remove an icon from the Dock, just drag it away. As long as that item isn’t actually open at the moment, it disappears from the Dock with a little animated puff of smoke when you release the mouse button.
The bottom line: On the Mac, a single interface element—the Dock—exhibits characteristics of both the Start menu (it lists frequently used programs) and the taskbar (it lists currently open programs and files). (The Windows 7 taskbar does the same thing.)
If you’re still confused, Chapter 2 should help clear things up.
Most Windows fans refer to the row of tiny status icons at the lower-right corner of the screen as the tray, even though Microsoft’s official term is the notification area. (Why use one syllable when eight will do?)
Macintosh fans wage a similar battle of terminology when it comes to the little menu-bar icons shown in Figure 1-5. Apple calls them Menu Extras, but Mac fans prefer to call them menulets.
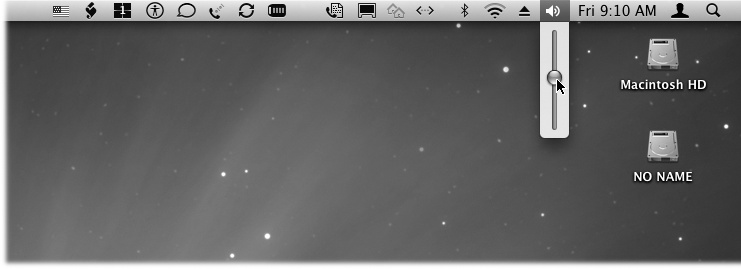
Figure 1-5. These little guys are the direct descendants of the controls once found on the Mac OS 9 Control Strip or the Windows system tray.
In any case, these menu-bar icons are cousins of the Windows tray—that is, each is both an indicator and a menu that provides direct access to certain settings in System Preferences. One menulet lets you adjust your Mac’s speaker volume, another lets you change the screen resolution, another shows you the remaining power in your laptop battery, and so on.
Making a menulet appear usually involves turning on a certain checkbox. These checkboxes lurk on the various panes of System Preferences (Chapter 15), which is the Mac equivalent of the Control Panel. (To open System Preferences, choose its name from the ![]() menu, or click the gears icon on the Dock.)
menu, or click the gears icon on the Dock.)
Here’s a rundown of the most useful Apple menulets, complete with instructions on where to find this magic on/off checkbox for each.
Tip
The following descriptions indicate the official, authorized steps for installing a menulet. There is, however, a folder on your hard drive that contains 25 of them in a single window, so that you can install any of them with a quick double-click. To find them, open your hard drive→System→Library→CoreServices→Menu Extras folder.
AirPort lets you turn your WiFi (wireless networking) circuitry on or off, join existing wireless networks, and create your own private ones. To find the “Show” checkbox: Open System Preferences→Network. Click AirPort.
Battery shows how much power remains in your laptop’s battery, how much time is left to charge it, whether it’s plugged in, and more. Using the Show submenu, you can control whether the menulet appears as an hours-and-minutes-remaining display (2:13), a percentage-remaining readout (43%), or a simple battery-icon gauge that hollows out as the charge runs down. To find the “Show” checkbox: Open System Preferences→Energy Saver.
Bluetooth connects to Bluetooth devices, “pairs” your Mac with a cellphone, lets you send or receive files wirelessly (without the hassle of setting up a wireless network), and so on. To find the “Show” checkbox: Open System Preferences→Bluetooth.
Clock is the menu-bar clock that’s been sitting at the upper-right corner of your screen from Day One. Click it to open a menu where you can check today’s date, convert the menu-bar display to a tiny analog clock, and so on. To find the “Show” checkbox: Open System Preferences→Date & Time. On the Clock tab, turn on “Show the date and time.” That’s where you can also opt to display the date and the day of the week.
Displays adjusts screen resolution. On Macs with a projector or second monitor attached, it lets you turn screen mirroring on or off—a tremendous convenience to anyone who gives PowerPoint-type presentations. To find the “Show” checkbox: Open System Preferences→Displays→Display tab.
iChat is a quick way to let the world know, via iChat and the Internet (Chapter 12), that you’re away from your keyboard, or available and ready to chat. Via the Buddy List command, it’s also a quick way to open iChat itself. To find the “Show” checkbox: Open iChat; it’s in your Applications folder. Choose iChat→Preferences→General.
Spaces ties into Snow Leopard’s virtual-screens feature (called Spaces and described in Chapter 4). The menulet lets you choose which of your multiple virtual screens you want to see. To find the “Show” checkbox: Open System Preferences→Spaces.
Sync is useful only if you have a MobileMe account (Chapter 10)—but in that case, it’s very handy. It lets you start and stop the synchronization of your Mac’s Web bookmarks, Calendar, Address Book, Keychains, and email with your other Macs, Windows PCs, and iPhones across the Internet, and it always lets you know the date of your last sync. To find the “Show” checkbox: Open System Preferences→MobileMe, and then click Sync.
TextInput switches among different text input modes. For example, if your language uses a different alphabet, like Russian—or thousands of characters, like Chinese—this menulet summons and dismisses the alternative keyboards and input methods you need. Details are on The Many Languages of Mac OS X Text. To find the “Show” checkbox: Open System Preferences→Language & Text→Input Sources.
Time Machine lets you start and stop Time Machine backups (see Monitors). To find the “Show” checkbox: Open System Preferences→Time Machine.
User identifies the account holder (Chapter 13) who’s logged in at the moment. To make this menulet appear (in bold, at the far-right end of the menu bar), turn on fast user switching, which is described on Fast User Switching.
Volume, of course, adjusts your Mac’s speaker or headphone volume. To find the “Show” checkbox: Open System Preferences→Sound.
VPN stands for virtual private networking, which allows you to tap into a corporation’s network so you can, for example, check your work email from home. You can use the menulet to connect and disconnect, for example. To find the “Show” checkbox: Open System Preferences→Network. Click the name of your VPN.
WWAN is useful only if you’ve equipped your Mac with one of those glorious cellular modems, sold by Verizon, Sprint, AT&T, or T-Mobile. These little USB sticks get you onto the Internet wirelessly at near-cable-modem speeds (in big cities, anyway), no WiFi required—for $60 a month. And this menulet lets you start and stop that connection. To find the “Show” checkbox: Open System Preferences→Network. Click the name of your cellular modem.
To remove a menulet, ⌘-drag it off your menu bar, or turn off the corresponding checkbox in System Preferences. You can also rearrange menulets by ⌘-dragging them horizontally.
These little guys are useful, good-looking, and respectful of your screen space. The world could use more inventions like menulets.
Mac and PC keyboards are subtly different. Making the switch involves two big adjustments: Figuring out where the special Windows keys went (like Alt and Ctrl)—and figuring out what to do with the special Macintosh keys (like ⌘ and Option).
Here’s how to find the Macintosh equivalents of familiar PC keyboard keys:
Ctrl key. The Macintosh offers a key labeled Control (or, on laptops, “ctrl”), but it isn’t the equivalent of the PC’s Ctrl key. The Mac’s Control key is primarily for helping you “right-click” things, as described earlier.
Instead, the Macintosh equivalent of the Windows Ctrl key is the ⌘ key. It’s right next to the space bar. It’s pronounced “command,” although novices can often be heard calling it the “pretzel key,” “Apple key,” or “clover key.”
Most Windows Ctrl-key combos correspond perfectly to ⌘ key sequences on the Mac. The Save command is now ⌘-S instead of Ctrl+S, Open is ⌘-O instead of Ctrl+O, and so on.
Note
Mac keyboard shortcuts are listed at the right side of each open menu, just as in Windows. Unfortunately, they’re represented in the menu with goofy symbols instead of their true key names. Here’s your cheat sheet to the menu keyboard symbols:
 represents the Shift key,
  means the Option key, and ^ refers to the Control key.
Alt key. On North American Mac keyboards, a key on the bottom row of the Macintosh keyboard is labeled both Alt and Option. This is the closest thing the Mac offers to the Windows Alt key.
In many situations, keyboard shortcuts that involve the Alt key in Windows use the Option key on the Mac. For example, in Microsoft Word, the keyboard shortcut for the Split Document Window command is Alt+Ctrl+S in Windows, but Option-⌘-T on the Macintosh.
Still, these two keys aren’t exactly the same. Whereas the Alt key’s most popular function is to control the menus in Windows programs, the Option key on the Mac is a “miscellaneous” key that triggers secret functions and secret characters.
For example, when you hold down the Option key as you click the Close or Minimize button on a Macintosh window, you close or minimize all open desktop windows. And if you press the Option key while you type R, G, or 2, you get the ®, ©, and ™ symbols in your document, respectively. (See Keyboard Viewer: The Return of Key Caps to find out how you can see which letters turn into which symbols when you press Option.)
 key. As you probably could have guessed, there is no Windows-logo key on the Macintosh. Then again, there’s no Start menu to open by pressing it, either.
Backspace and Delete. On the Mac, the backspace key is labeled Delete, although it’s in exactly the same place as the Windows Backspace key.
The Delete key in Windows (technically, the forward delete key, because it deletes the character to the right of the insertion point) is a different story. On a desktop Macintosh, it’s labeled with Del and the
 symbol.
On small Mac keyboards (like laptop keyboards), this key is missing. You can still perform a forward delete, however, by pressing the regular Delete key while pressing the Fn key in the corner of the keyboard.
Enter. Most full-size Windows keyboards have two Enter keys: one at the right side of the alphabet keyboard, and one in the lower-right corner of the number pad. They’re identical in function; pressing either one serves to “click” the OK button in a dialog box, for example.
On the Mac, the big key on the number pad still says Enter, but the key on the alphabet keyboard is labeled Return. Most of the time, their function is identical—once again, either can “click” the OK button of a dialog box. Every now and then, though, you’ll run across a Mac program where Return and Enter do different things. In Microsoft Word for Mac OS X, for example, Shift-Return inserts a line break, but Shift-Enter creates a page break.
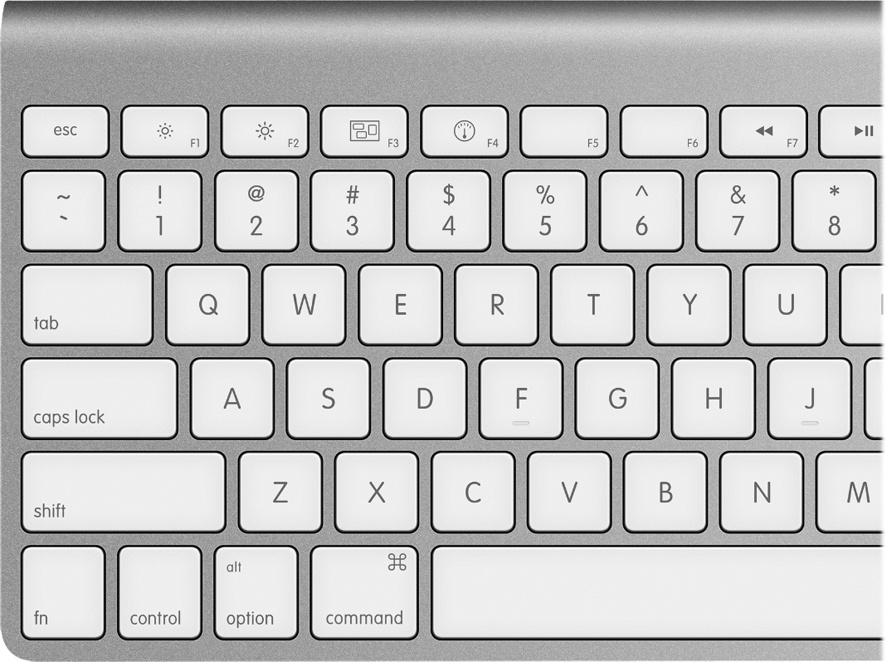
So much for finding the Windows keys you’re used to. There’s another category of keys worth discussing: those on the modern Macintosh keyboard you’ve never seen before.
To make any attempt at an explanation even more complicated, Apple’s keyboards keep changing. The one you’re using right now, however, is probably one of these models:
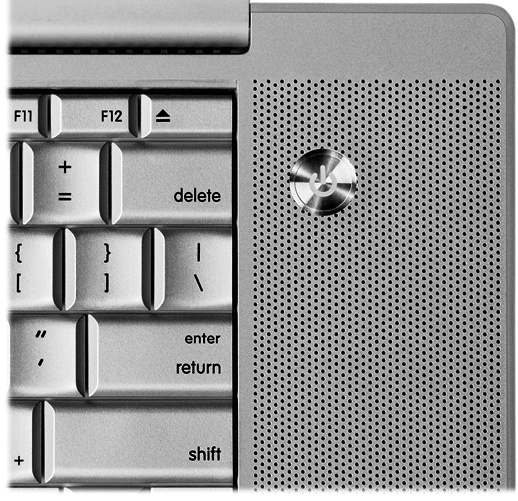
The current keyboard, usually aluminum, where the keys are flat little jobbers that poke up through square holes in the keyboard (Figure 1-6). That’s what you get on current laptops, wired keyboards, and Bluetooth wireless keyboards.
The older, plastic desktop keyboard, or the white or black plastic laptop one.
Tip
To see closeups of Apple’s current wired and wireless keyboards, visit www.apple.com/keyboard.
Here, then, is a guided tour of the non-typewriter keys on the modern Mac keyboard.
Fn. How are you supposed to pronounce Fn? Not “function,” certainly; after all, the F-keys on the top row are already known as function keys. And not “fun”; goodness knows, the Fn key isn’t particularly hilarious to press.
What it does, though, is quite clear: It changes the purpose of certain keys. That’s a big deal on laptops, which don’t have nearly as many keys as desktop keyboards. So for some of the less commonly used functions, you’re supposed to press Fn and a regular key. (For example, Fn turns the ↑, key into a Page Up key, which scrolls upward by one screenful.)
Note
On most Mac keyboards, the Fn key is in the lower-left corner. The exception is the full-size Apple desktop keyboard (the one with a numeric keypad); there, the Fn key is in the little block of keys between the letter keys and the number pad.
You’ll find many more Fn examples in the following paragraphs:
Numeric keypad. The number-pad keys do exactly the same thing as the numbers at the top of the keyboard. But with practice, typing things like phone numbers and prices is much faster with the number pad, since you don’t have to look down at what you’re doing.
 ,
,  (F1, F2). These keys control the brightness of your screen. Usually, you can tone it down a bit when you’re in a dark room, or when you want to save laptop battery power; you’ll want to crank it up in the sun.
 (F3). This one fires up Exposé, the handy window-management feature described on Exposé: Death to Window Clutter.
 (F4). Tap this key to open Dashboard, the archipelago of tiny, single-purpose widgets like Weather, Stocks, and Movies. Dashboard is described in detail beginning on Spotlight.
 ,
,  (F5, F6). Most recent Mac laptops have light-up keys, which is very handy indeed when you’re typing in the dark. The key lights are supposed to come on automatically when it’s dark out, but you can also control the illumination yourself by tapping these keys. (On most other Macs, the F5 and F6 keys aren’t assigned to anything. They’re free for you to use as you see fit.)
 ,
,  , and
, and  (F7, F8, F9). These keys work in the programs you’d expect: iTunes, QuickTime Player, DVD Player, and other programs where it’s handy to have Rewind, Play/Pause, and Fast-forward buttons.
Tip
Tap the
or key to skip to the previous or next track or chapter. Hold it down to rewind or fast-forward.Weirdly, the
key is hard-wired to open the iTunes program. And no, you can’t change that assignment! (Fortunately, when you’re already in a playback program like DVD Player or QuickTime Player, the key resumes its duties as the Play/Pause control.) ,
,  ,
,  (F10, F11, F12). These three keys control your speaker volume. The key means Mute; tap it once to cut off the sound completely and again to restore its previous level. Tap the repeatedly to make the sound level lower, the key to make it louder.
With each tap, you see a big white version of each key’s symbol on your screen, and you hear a little audio pop—your Mac’s little nod to let you know it understands your efforts. (Press Shift to silence the pop sound.)
- . This is the Eject key. When there’s a CD or DVD in your Mac, tap this key to make the computer spit it out. If your Mac has a DVD tray (rather than just a slot), then hold down this button for about a second to make the tray slide open.
Home, End. “Home” and “End” mean “jump to the top or bottom of the window.” If you’re looking at a list of files, the Home and End keys jump to the top or bottom of the list. In iPhoto, they jump to the first or last photo in your collection. In iMovie, the Home key jumps your movie to the very beginning. In Safari, they take you to the top or bottom of the Web page.
(In Word, they jump to the beginning or end of the line. But then again, Microsoft has always had its own ways of doing things.)
On keyboards without a dedicated block of number keys, you get these functions by holding down Fn as you tap the ← and → keys.
Pg Up, Pg Down. These keys scroll up or down by one screenful. The idea is to let you scroll through word processing documents, Web pages, and lists without having to use the mouse.
On keyboards without a numeric keypad, you get these functions by pressing Fn plus the ↑ and ↓ keys.
Clear. Clear (on the full-size desktop keyboard only) gets rid of whatever you’ve highlighted, but without putting a copy on the invisible Clipboard, as the Cut command would do.
Esc. Esc stands for Escape, and it means “cancel.” It’s fantastically useful. It closes dialog boxes, closes menus, and exits special modes like Quick Look, Front Row, slideshows, screen savers, and so on. Get to know it.
Delete. The backspace key.
- . Many a Mac fan goes for years without discovering the handiness of this delightful little key: the Forward Delete key. Whereas Delete backspaces over whatever letter is just to the left of the insertion point, this one (labeled Del on older keyboards) deletes whatever is just to the right of the insertion point. It really comes in handy when, for example, you’ve clicked into some text to make an edit—but wound up planting your cursor in just the wrong place.
The full-size Apple keyboard has a dedicated key for this. On all other keyboards, you get this function by holding down Fn as you tap the regular Delete key.
Return and Enter. In almost all programs, these keys do the same thing: wrap your typing to the next line. When a dialog box is on the screen, tapping the Return or Enter key is the same as clicking the confirmation button (like OK or Done). Very few programs treat these keys differently, although Microsoft Excel is one of them.
Control. The Control key triggers shortcut menus, as described on That One-Button Mouse.
Option. The Option key (labeled Alt in some countries) is sort of a “miscellaneous” key. It’s the equivalent of the Alt key in Windows.
It lets you access secret features—you’ll find them described all through this book—and type special symbols. For example, you press Option-4 to get the ¢ symbol and Option-y to get the ¥ (yen) symbol.
Help. In the Finder, Microsoft programs, and a few other places, this key opens up the electronic help screens. But you’d guessed that.
As the previous section makes clear, the F-keys at the top of modern Mac keyboards come with predefined functions. They control screen brightness, keyboard brightness, speaker volume, music playback, and so on.
But they didn’t always. Before Apple gave F9, F10, and F11 to the fast-forward and speaker-volume functions, those keys controlled the Exposé window-management function described on Exposé: Death to Window Clutter.
So the question is: What if you don’t want to trigger the hardware features of these keys? What if you want pressing F1 to mean “F1” (which opens the Help window in some programs)? What if you want F9, F10, and F11 to control Exposé’s three modes, as they once did?
For that purpose, you’re supposed to press the Fn key. The Fn key (lower-left on small keyboards, center block of keys on the big ones) switches the function of the function keys. In other words, pressing Fn and F10 triggers an Exposé feature, even though the key has a Mute symbol (![]() ) painted on it.
) painted on it.
But here’s the thing: What if you decide that you use those F-keys for software features (like Cut, Copy, Paste, and Exposé) more often than the hardware features (like brightness and volume)?
In that case, you can reverse the logic, so that pressing the F-keys alone triggers software functions, and they govern brightness and audio only when you’re pressing Fn. To do that, choose ![]() →System Preferences→Keyboard. Turn on the checkbox “Use all F1, F2, etc. keys as standard function keys.”
→System Preferences→Keyboard. Turn on the checkbox “Use all F1, F2, etc. keys as standard function keys.”
And that’s it. From now on, you press the Fn key to get the functions painted on the keys (![]() ,
, ![]() ,
, ![]() ,
, ![]() ,
, ![]() ,
, ![]() ↑
↑ ![]() ,
, ![]() and so on).
and so on).
Working with disks is very different on the Mac. Whereas Windows is designed to show the names (letters) and icons for your disk drives, the Mac shows you the names and icons of your disks. You’ll never, ever see an icon for an empty drive, as you do on Windows.
As soon as you insert, say, a CD, you see its name and icon appear on the screen. In fact, every disk inside, or attached to, a Macintosh is represented on the desktop by an icon (see Figure 1-7). (Your main hard drive’s icon may or may not appear in the upper-right corner, depending on your settings in Finder→Preferences.)
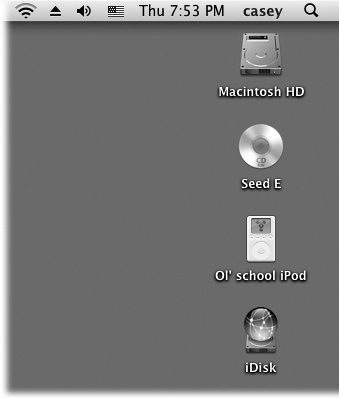
Figure 1-7. You may see all kinds of disks on the Mac OS X desktop (shown here: hard drive, CD, iPod, iDisk)—or none at all, if you’ve chosen to hide them using the Finder→Preferences command. But chances are pretty good you won’t be seeing many floppy disk icons. If you do decide to hide your disk icons, you can always get to them as you do in Windows: by opening the Computer window (Go→Computer).
If you prefer the Windows look, in which no disk icons appear on the desktop, it’s easy enough to recreate it on the Mac; choose Finder→Preferences and turn off the four checkboxes you see there (“Hard disks,” “External disks,” “CDs, DVDs, and iPods,” and “Connected servers.”)
Ejecting a disk from the Mac is a little bit different, too, whether it’s a CD, DVD, USB flash drive, shared network disk, iDisk, iPod, or external hard drive. You can go about it in any of these ways:
Right-click the disk’s desktop icon. From the shortcut menu that appears, choose “Eject [whatever the disk’s name is].”
Click the disk’s icon and then choose File→“Eject [disk’s name]” (or press ⌘-E).
Drag the icon of the disk onto the Trash icon at the end of the Dock. (You’ll see its icon turn into a giant
symbol, the Mac’s little acknowledgment that it knows what you’re trying to do.)
For you, the Windows veteran, the main thing to remember here is that you never eject a Macintosh disk by pushing the Eject button on the disk drive itself (if there even is one). Doing so usually has no effect, but on the rare occasion that it does, you could end up seriously confusing Mac OS X.
If you open the icon for your main hard drive (Macintosh HD), from the Go→Computer window, for example, all you’ll find in the Macintosh HD window is a set of folders called Applications, Library, and Users.
Most of these folders aren’t very useful to you, the Mac’s human companion. They’re there for Mac OS X’s own use (which is why Apple no longer puts the Macintosh HD icon on the desktop of a new Mac, as it did for 25 years). Think of your main hard drive window as storage for the operating system itself, which you’ll access only for occasional administrative purposes.
In fact, the folders you really do care about boil down to these:
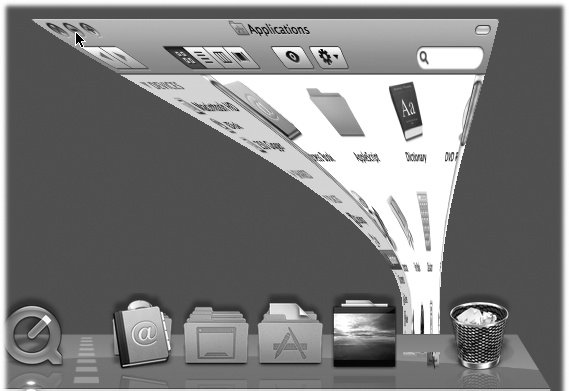
Applications is Apple’s word for programs.
When it comes to managing your programs, the Applications folder (which you can open by choosing Go→Applications) is something like the Program Files folder in Windows—but without the worry. You should feel free to open this folder and double-click things. In fact, that’s exactly what you’re supposed to do. This is your complete list of programs. (What’s on your Dock is more like a Greatest Hits subset.)
Better yet, on the Mac, programs bear their real, plain-English names, like Microsoft Word, rather than eight-letter abbreviations, like WINWORD.EXE. Most are self-contained in a single icon, too (rather than being composed of hundreds of little support files), which makes copying or deleting them extremely easy.
Your documents, files, and preferences, meanwhile, sit in an important folder called your Home folder. Inside (Figure 1-8) are folders that closely resemble the My Documents, My Pictures, and My Music folders on the Windows versions of old. (The “My” prefix disappeared in Windows Vista, but you get the point.)
Mac OS X is rife with shortcuts for opening this all-important folder.
Choose Go→Home.
Press Shift-⌘-H.
Click the Home icon in the Sidebar (Zoom Button).
Click the
 icon on the Dock. (If you don’t see it there, choose Finder→Preferences→Sidebar and turn on the checkbox in the list of Places.)
Within your Home folder, you’ll find another set of standard Mac folders. (You can tell the Mac considers them holy because they have special logos on their folder icons.) Except as noted, you’re free to rename or delete them; Mac OS X creates the following folders solely as a convenience:

Figure 1-8. Control-click (or right-click, or ⌘-click) a Finder window’s title bar to summon the hidden folder hierarchy menu. This trick also works in most other Mac OS X programs. For example, you can ⌘-click a document window’s title to find out where the document is actually saved on your hard drive.
Desktop. When you drag an icon out of a folder or disk window and onto your Mac OS X desktop, it may appear to show up on the desktop. But that’s just an optical illusion, a visual convenience. In truth, nothing in Mac OS X is really on the desktop. It’s actually in this Desktop folder, and mirrored on the desktop area.
You can entertain yourself for hours by proving this point to yourself. If you drag something out of your Desktop folder, it also disappears from the actual desktop. And vice versa. (You’re not allowed to delete or rename this folder.)
Documents. Apple suggests that you keep your actual work files in this folder. Sure enough, whenever you save a new document (when you’re working in Keynote or Word, for example), the Save As box proposes storing the new file in this folder, as described in Chapter 4.
Your programs may also create folders of their own here. For example, you may find a Microsoft User Data folder for your Entourage email, a Windows folder for use with Parallels or VMWare Fusion (Chapter 8), and so on.
Library. The main Library folder (the one in your main hard drive window) contains folders for your Mac’s system-wide fonts, preferences, help files, and so on. You have your own Library folder, too, right there in your Home folder. It stores the same kinds of things—but they’re your fonts, your preferences, and so on.
Movies, Music, Pictures. These folders, of course, are designed to store multimedia files. The various Mac OS X programs that deal with movies, music, and pictures will propose these specialized folders as storage locations. For example, when you plug a digital camera into a Mac, the iPhoto program automatically begins to download the photos on it—and stores them in the Pictures folder. Similarly, iMovie is programmed to look for the Movies folder when saving its files, and iTunes stores its MP3 files in the Music folder.
Public. If you’re on a network, or if others use the same Mac when you’re not around, this folder can be handy: It’s the “Any of you guys can look at these files” folder. Other people on your network, as well as other people who sit down at this machine, are allowed to see whatever you’ve put in here, even if they don’t have your password. (If your Mac isn’t on an office network and isn’t shared, you can throw this folder away.) More details on sharing and networking on the Mac are in Chapter 14.
Sites. Mac OS X has a built-in Web server: software that turns your Mac into a Web site that people on your network—or, via the Internet, all over the world—can connect to. This Mac OS X feature relies on a program called the Apache Web server, which is so highly regarded in the Unix community that programmers lower their voices when they mention it. This is the folder where you will put the actual Web pages you want to make available to the Internet at large.
The rationale for forcing you to keep all of your stuff in a single folder is described in Chapter 13. (Windows 2000, XP, Vista, and 7 work very similarly.) For now, it’s enough to note that the approach has some major advantages. Most notably, by keeping such tight control over which files go where, Mac OS X keeps itself pure—and very, very stable.
This folder is the same idea as the Windows or WINNT folder on a PC, in that it contains hundreds of files that are critical to the functioning of the operating system. These files are so important that moving or renaming them could render the computer useless, as it would in Windows. And although there are thousands of files within, many are hidden for your protection.
For maximum safety and stability, you should ignore Mac OS X’s System folder just as thoroughly as you ignored the old Windows folder.
As in Windows, a window on the Mac is framed by an assortment of doodads and gizmos (Figure 1-9). You’ll need these to move a window, close it, resize it, scroll it, and so on. But once you get to know the ones on a Macintosh, you’re likely to be pleased by the amount of thought those fussy perfectionists at Apple have put into their design.
Here’s an overview of the various Mac OS X window-edge gizmos and what they do.
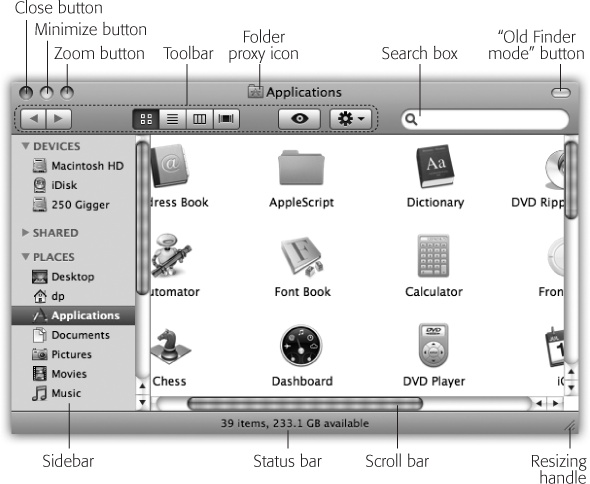
Figure 1-9. When Steve Jobs unveiled Mac OS X at a Macworld Expo in 1999, he said his goal was to oversee the creation of an interface so attractive, “you just want to lick it.” Desktop windows, with their juicy, fruit-flavored controls, are a good starting point.
When several windows are open, the darkened window name and colorful upper-left controls tell you which window is active (in front). Windows in the background have gray, dimmed lettering and gray upper-left control buttons. As in Windows, the title bar also acts as a handle that lets you move the entire window around on the screen.
Tip
Here’s a nifty keyboard shortcut with no Windows equivalent: You can cycle through the different open windows in one program without using the mouse. Just press ⌘-` (that’s the tilde key, to the left of the number 1 key). With each press, you bring a different window forward within the current program. It works both in the Finder and in your programs.
Perhaps more usefully, you can use Control-F4 to cycle through the open windows in all programs.
After you’ve opened one folder inside another, the title bar’s secret folder hierarchy menu is an efficient way to backtrack—to return to the enclosing window. Figure 1-8 reveals everything about the process after this key move: pressing the ⌘ key as you click the name of the window. (You can release the ⌘ key immediately after clicking.)
Tip
Instead of using this title bar menu, you can also jump to the enclosing window by pressing ⌘-↑. Pressing ⌘-↓. takes you back into the folder you started in. (This makes more sense when you try it than when you read it.)
One more title bar trick: By double-clicking the title bar, you minimize the window (see Close Button).
Tip
The Option key means “apply this action to all windows.” For example, Option-double-clicking any title bar minimizes all desktop windows, sending them flying to the Dock. Option-clicking the Close button closes all open desktop windows, and so on. (The Option-key trick doesn’t close all windows in every program, however—only those in the current program. Option-closing a Safari window closes Safari windows, but your desktop windows remain open. Moreover, Option-closing doesn’t work at all in Microsoft Office programs.)
Virtually every Macintosh title bar features a small icon next to the window’s name (Figure 1-10), representing the open window’s actual folder or disk icon. In the Finder, dragging this tiny icon (technically called the folder proxy icon) lets you move or copy the folder to a different folder or disk, to the Trash, or into the Dock, without having to close the window first. (When clicking this proxy icon, hold down the mouse button for half a second, or until the icon darkens. Only then are you allowed to drag it.) It’s a handy little function with no Windows equivalent.
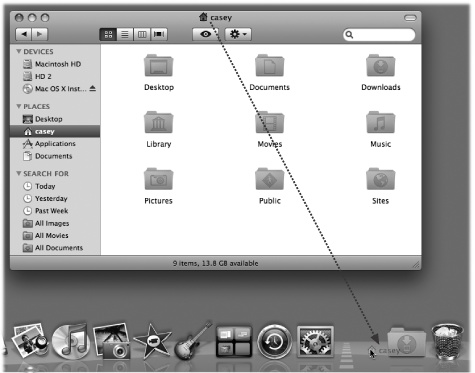
Figure 1-10. When you find yourself confronting a Finder window that contains useful stuff, consider dragging its proxy icon to the Dock. You wind up installing its folder or disk icon there for future use. That’s not the same as minimizing the window, which just puts the window icon into the Dock, and only temporarily at that. (Note: Most Mac OS X document windows also offer a proxy-icon feature, but produce only an alias when you drag the proxy to a different folder or disk.)
As the tip of your cursor crosses the three buttons at the upper-left corner of a window, tiny symbols appear inside them: x, –, and +. The most important one is the Close button, the red, droplet-like button in the upper-left corner (see Figure 1-10). It closes the window, exactly like the x button at the upper-right corner in Windows. Learning to reach for the upper-left corner instead of the upper-right will probably confound your muscle memory for the first week of using the Macintosh.
If you can’t break the old habit, learn the keyboard shortcut: ⌘-W (for window)—an easier keystroke to type than the Windows version (Alt+F4), which for most people is a two-handed operation. If you get into the habit of dismissing windows with that deft flex of your left hand, you’ll find it far easier to close several windows in a row, because you don’t have to aim for successive close buttons.
Click this yellow drop of gel to minimize any Mac window, sending it shrinking, with a genie-like animated effect, into the right end of the Dock, where it now appears as an icon. It’s exactly like minimizing a window in Windows, except that the window is now represented by a Dock icon rather than a taskbar button (Figure 1-11). To bring the window back to full size, click the newly created Dock icon. See Chapter 2 for more on the Dock.
A click on this green geltab (see Figure 1-10) makes a desktop window just large enough to show you all the icons inside it. If your monitor isn’t big enough to show all the icons in a window, then the zoom box resizes the window to show as many as possible. In either case, a second click on the zoom button restores the window to its original size. (The Window→Zoom Window command does the same thing.)
This should sound familiar: It’s a lot like the Maximize button at the top right of a Windows window. On the Macintosh, however, the window rarely springs so big that it fills the entire screen, leaving a lot of empty space around the window contents; it only grows enough to show you as much of the contents as possible.
The Sidebar is the pane at the left side of every Finder window (and, by the way, also at the left side of every Open dialog box and full-sized Save dialog box). It’s a list (identified in Figure 1-9) with as many as four different sections, each preceded by a collapsible heading:
Devices. This section lists every storage device connected to, or installed inside, your Mac: hard drives, CDs, DVDs, iPods, memory cards, USB flash drives, and so on. The removable ones (CDs, DVDs, iPods, and so on) bear a little gray
 logo, which you can click to eject that disk.
Shared. Here it is: a complete list of the other computers on your network whose owners have turned on File Sharing, ready for access. See Chapter 14 for details.
Power Users' Clinic: Smarter Minimized Document Windows
In the bad old days (up to late 2009), minimizing a bunch of documents could get really messy. Each one flew onto the Dock, creating a new icon there, creating a tighter and tighter squeeze, shrinking the Dock’s icons until they were the size of Tic Tacs.
In Snow Leopard, you can have your document windows minimize themselves into their program’s Dock icon, rather than creating new Dock icons for themselves. That way, your Dock doesn’t get any more crowded, and the icons on it don’t keep shrinking away to atoms.
To turn on this feature, choose
→System Preferences→Dock. Turn on “Minimize windows into application icon.”So how do you get those windows back out of the Dock icon? You use Dock Exposé, which is described on Desktop Exposé.
Places. This primary section of the sidebar lists places (in this case, folders) where you might look for files and folders. Into this list, you can stick the icons of anything at all—files, programs, folders, disks, or whatever—for easy access.
Each icon is a shortcut. For example, click the Applications icon to view the contents of your Applications folder in the main part of the window. And if you click the icon of a file or program here, it opens.
Searches. The “folders” in this Sidebar section are actually canned searches that execute instantly when you click one. If you click Today, for example, the main window fills with all files and folders on your computer that you’ve changed today. Yesterday and Past Week work the same way.
The All Images, All Movies, and All Documents searches round up everything in those file-type categories, no matter what folders they’re actually sitting in.
These insta-searches are very useful all by themselves, but what’s even better is how easy it is to make your own search folders to put here. Privacy Settings has the details.
The beauty of this parking lot for containers is that it’s so easy to set up with your favorite places. For example:
Remove an icon by dragging it out of the Sidebar entirely. It vanishes with a puff of smoke (and even a little whoof sound effect). You haven’t actually removed anything from your Mac; you’ve just unhitched its alias from the Sidebar.
Rearrange the icons by dragging them up or down in the list. (You’re not allowed to rearrange the computers listed in the Shared section, though.)
Install a new icon by dragging it off your desktop (or out of a window) into any spot in the Places list of the Sidebar.
Adjust the width of the Sidebar by dragging its right edge—either the skinny divider line or the extreme right edge of the vertical scroll bar, if there is one. You “feel” a snap at the point when the line covers up about half of each icon’s name. Any covered-up names sprout ellipses (…) to let you know (as in “Secret Salaries Spreadsh…”).
Hide the Sidebar by pressing ⌘-Option-S, which is the shortcut for the new View→Hide Sidebar command. Bring it back into view by pressing the same key combination (or using the Show Sidebar command).
Mac OS X prefers to keep only one Finder window open at a time. That is, if a window called United States is filled with folders for the individual states, double-clicking the New York folder doesn’t open a second window. Instead, the New York window replaces the United States window. Modern versions of Windows work exactly the same way (Figure 1-12).
So what if you’ve now opened inner folder B, and you want to backtrack to outer folder A? In that case, just click the tiny ◂ (Back) button or use one of these alternatives:
Choose Go→Back.
Press ⌘-[ (left bracket).
Press ⌘-↑.
Figure 1-12. To help you avoid window clutter, Apple has designed Mac OS X windows so that double-clicking a folder in a window (top) doesn’t actually open another window (bottom). Every time you double-click a folder in an open window (except in column view), its contents replace whatever was previously in the window. If you double-click three folders in succession, you still wind up with just one open window.
None of that helps you, however, if you want to copy a file from one folder into another, or to compare the contents of two windows. In such cases, you’ll probably want to see both windows open at the same time.
You can open a second window using any of these techniques:
Another alternative is to switch to "Old Finder mode” (not the official Apple terminology). When you click this button (shown in Figure 1-9), you enter a hidden-toolbar, hidden-Sidebar mode. (You can also enter this mode by pressing Option-⌘-T, the equivalent for the View→Hide Toolbar command.)
In this mode, two things happen. First, the Finder window toolbar slides out of sight, along with the Sidebar on the left. Second, double-clicking a folder now opens a new corresponding window.
You can return to regular Mac OS X mode by clicking the toolbar button again, by pressing Option-⌘-T again, or by choosing View→Show Toolbar.
In general, scroll bars work on the Mac just as they do in Windows.
Tip
One key difference: Out of the box, the Mac’s scroll-up arrow and scroll-down arrow are nestled together, at the same end of the scroll bar. To “fix” them so that they sit at opposite ends as in Windows, choose ![]() →System Preferences. Click Appearance. Where it says “Place scroll arrows,” click “At top and bottom.”
→System Preferences. Click Appearance. Where it says “Place scroll arrows,” click “At top and bottom.”
Mac OS X, however, offers an option called "Scroll to here.” Ordinarily, when you click into the scroll-bar track above or below the gelatinous handle, the window scrolls by one screenful. But your other option is to turn on “Scroll to here” mode in the Appearance panel of your System Preferences (see Changing Colors). Now when you click in the scroll-bar track, the Mac considers the entire scroll bar a proportional map of the document and scrolls directly to the spot you clicked. That is, if you click at the very bottom of the scroll-bar track, you see the very last page.
It’s worth noting, however, that the true speed expert eschews scroll bars altogether. The Mac has the usual complement of navigation keys: Page Up, Page Down, Home, and End. And if your mouse has a scroll wheel on the top, you can use it to scroll windows, too, without pressing any keys at all.
The lower-right corner of every standard Mac OS X window is ribbed, a design that’s meant to imply that you can grip it by dragging. Doing so lets you resize and reshape the window, just as on the PC. One little bummer: You can’t also change the shape of a Macintosh window by dragging its edges, as you can in Windows.
This little item appears when you choose View→Show Path Bar. It’s a tiny map at the bottom of the window that shows where you are in the folder hierarchy. If it says Casey►Pictures►Picnic, well, then, by golly, you’re looking at the contents of the Picnic folder, which is inside Pictures, inside your Home folder.
There are enough other differences between Mac and Windows to fill 15 pages. Indeed, that’s what you’ll find the end of this book: an alphabetical listing of every familiar Windows feature and where to find its equivalent on the Mac.
As you read both that section of the book and the chapters that precede it, however, you’ll discover that some functions are almost identical in Mac OS X and Windows, but have different names. Here’s a quick-reference summary:
Windows term | Macintosh term |
|---|---|
Control Panel | System Preferences |
Gadget | Widget |
Drop-down menu | Pop-up menu |
Program | Application |
Properties | Get Info |
Recycle Bin | Trash |
Search command | Spotlight |
Shortcuts | Aliases |
Sidebar | Dashboard |
Taskbar | Dock |
Tray (notification area) | Menulets |
Windows Explorer | Finder |
Windows folder |
With that much under your belt, you’re well on your way to learning the ways of Mac OS X.
Get Switching to the Mac: The Missing Manual, Snow Leopard Edition now with the O’Reilly learning platform.
O’Reilly members experience books, live events, courses curated by job role, and more from O’Reilly and nearly 200 top publishers.

