Chapter 4. The Process of Performance Testing
I see plans within plans.
Frank Herbert, Dune
As discussed in Chapter 1, many performance testing projects come together as a last-minute exercise. I would happily wager that you have been involved in a project that falls into this category. In such cases, you are constrained by limited time to test and pressure from the business to deploy by a certain date, even though the application may have serious performance problems. This chapter describes a performance testing approach to follow so that any new projects you participate in are unlikely to suffer from the same pitfalls.
In Chapter 3, my intention was to cover nonfunctional requirements (NFRs) in a logical but informal way. This chapter is about using these requirements to build a test plan: a performance testing checklist divided into logical stages. We’ll also look at how this plan can be applied to a couple of case studies based on real projects. Each case study will demonstrate different aspects of the performance test process and will provide some of the examples we’ll cover in Chapter 5 to explore the interpretation of performance test results. Each case study features a review of how closely (or not) the performance project aligns with the NFRs discussed in Chapter 3 and the suggested approach provided in this chapter.
Activity Duration Guidelines
Before describing a suggested approach, I thought it would be helpful to provide some guidelines on how much time to allow for typical performance testing activities. Certain activities, like building and commissioning a suitable test environment, are too varied and complex to allow meaningful estimates, but for other key tasks I can offer the following guidance:
- Scoping and NFR capture
-
It’s important to accurately determine the scope of a performance testing engagement and to allow enough time to capture all of the NFR requirements. Provided that you already have this information (and stakeholders), this activity rarely takes more than a couple of days.
- Scripting performance test use cases
-
Allow half a day per use case, assuming an experienced performance engineer is doing the work. The reality is that some use cases will take more time to script, and others less. But from my experience with many performance testing engagements, this is a realistic estimate. Note that the correct tool choice can make a huge difference to success or failure of this task.
- Creating and validating performance test scenarios
-
This is typically one to two days’ work, provided that you have created an accurate load model. This should simply be a job of work, since you will have already defined the structure and content of each performance test as part of your requirements capture. Most of your time will likely be spent conducting dress rehearsals to ensure that the tests execute correctly.
- Executing the performance test
-
For all but the simplest of projects, allow a minimum of five days. The unknown in this process is how many reruns will be required to deal with any problems that surface during test execution. Make sure that you also factor in time for database restore between performance test executions. You can get a lot of performance testing done in five days, and if you don’t actually need them all, then you don’t have to charge the client.
- Collecting data and uninstalling software
-
Allow one day. If you are testing in-house, then it’s unlikely that you’ll need to uninstall software. If you are providing a service, then you may have to remove the performance testing software. Give yourself a day to do this and to collect the results of the tests and KPI monitoring.
- Conducting the final analysis and reporting
-
Typically this takes two to three days. Make sure you allow sufficient time to complete your analysis and to prepare a comprehensive report aligned to the performance targets for the engagement. Skimping on this task is something that greatly reduces the value of many performance testing engagements.
Performance Testing Approach
To set the scene, the following list demonstrates the major steps in a suggested performance testing approach. I will then expand on each step in detail. The approach described is applicable to most performance testing projects, whether you are executing in-house or providing a service to a customer. By design, this approach does not enforce the use of any specific tools, so you can keep using your preferred project management and requirements capture solution even if it amounts to nothing more than MS Word.
-
Step 1: Nonfunctional Requirements Capture
-
Step 2: Performance Test Environment Build
-
Step 3: Use-Case Scripting
-
Step 4: Performance Test Scenario Build
-
Step 5: Performance Test Execution and Analysis
-
Step 6: Post-Test Analysis and Reporting
The steps are repeated in Appendix B as a handy quick reference.
Step 1: Nonfunctional Requirements Capture
Your first task in any performance testing project should be to set the following in motion. Gather or elicit performance NFRs from all relevant stakeholders, as discussed in Chapter 3. You will need this information to create a successful project plan or statement of work (SOW).
This is often termed a scoping exercise.
At the very minimum you should have the following NFRs agreed upon and signed off before undertaking anything else.
-
Deadlines available to complete performance testing, including the scheduled deployment date.
-
Internal or external resources to perform the tests. This decision will largely depend on time scales and in-house expertise (or lack thereof).
-
Test environment design. Remember that the test environment should be as close an approximation of the live environment as you can achieve and will require longer to create than you estimate.
-
A code freeze that applies to the test environment within each testing cycle.
-
A test environment that will not be affected by other user activity. Nobody else should be using the test environment while performance test execution is taking place; otherwise, there is a danger that the test execution and results may be compromised.
-
Identified performance targets. Most importantly, these must be agreed to by appropriate business stakeholders. See Chapter 3 for a discussion on how to achieve stakeholder consensus.
-
Key use cases. These must be identified, documented, and ready to script. Remember how vital it is to have correctly identified the key use cases to script. Otherwise, your performance testing is in danger of becoming a wasted exercise.
-
Parts of each use case (such as login or time spent on a search) that should be monitored separately. This will be used in Step 3 for checkpointing.
-
The input, target, and session data requirements for the use cases that you select. This critical consideration ensures that the use cases you script run correctly and that the target database is realistically populated in terms of size and content. As discussed in Chapter 3, quality test data is critical to performance testing. Make sure that you can create enough test data of the correct type within the timeframes of your testing project. You may need to look at some form of automated data management, and don’t forget to consider data security and confidentiality.
-
A load model created for each application in scope for performance testing.
-
Performance test scenarios identified in terms of the number, type, use-case content, and virtual user deployment. You should also have decided on the think time, pacing, and injection profile for each use-case deployment.
-
Identified and documented application, server, and network KPIs. Remember that you must monitor the hosting infrastructure as comprehensively as possible to ensure that you have the necessary information available to identify and resolve any problems that may occur.
-
Identified deliverables from the performance test in terms of a report on the test’s outcome versus the agreed-upon performance targets. It’s a good practice to produce a document template that can be used for this purpose.
-
A defined procedure for submitting any performance defects discovered during testing cycles to the development or application vendor. This is an important consideration that is often overlooked. What happens if you find major application-related problems? You need to build contingency into your test plan to accommodate this possibility. There may also be the added complexity of involving offshore resources in the defect submission and resolution process. If your plan is to carry out the performance testing using in-house resources, then you will also need to have the following in place:
-
Test team members and reporting structure. Do you have a dedicated and technically competent performance testing team? Often organizations hurriedly put together such teams by grabbing functional testers and anyone else unlucky enough to be available. To be fair, if you have only an intermittent requirement to performance test, it’s hard to justify keeping a dedicated team on standby. Larger organizations, however, should consider moving toward establishing an internal center of testing excellence. Ensure at the very minimum that you have a project manager and enough testing personnel assigned to handle the scale of the project. Even large-scale performance testing projects rarely require more than a project manager and a couple of engineers. Figure 4-1 demonstrates a sample team structure and its relationship to the customer.
-
The tools, resources, skills, and appropriate licenses for the performance test. Make sure the team has what it needs to test effectively.
-
Adequate training for all team members in the tools to be used. A lack of testing tool experience is a major reason why many companies’ introduction to performance testing is via an outsourced project.
-
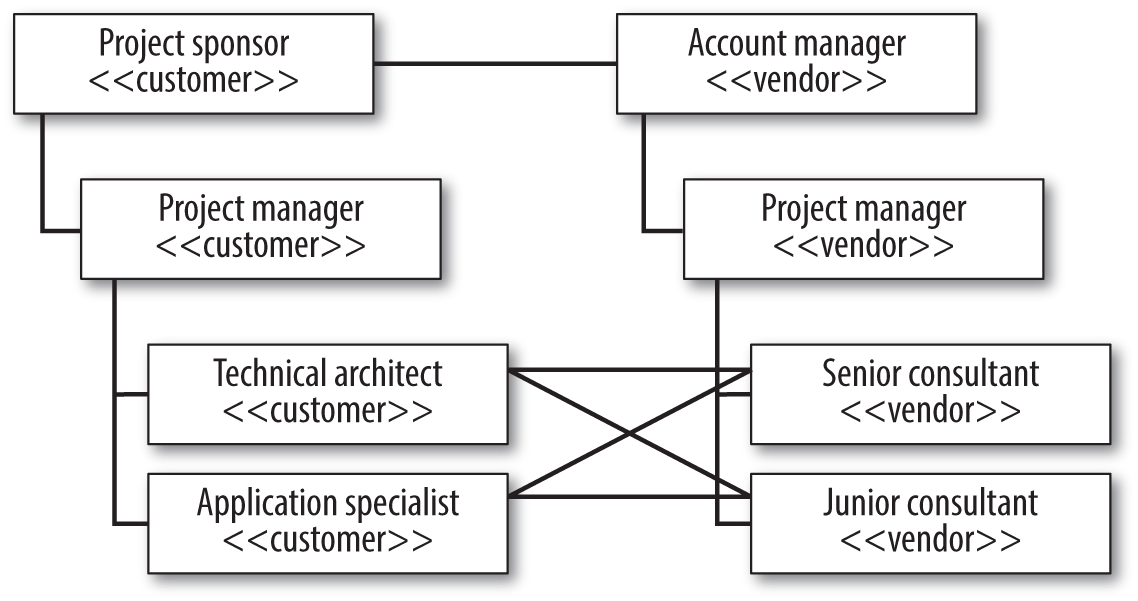
Figure 4-1. Example performance-testing team structure
With this information available, you can proceed with the following:
-
Develop a high-level plan that includes resources, timelines, and milestones based on these requirements.
-
Develop a detailed performance test plan that includes all dependencies and associated timelines, detailed scenarios and use cases, load models, and environment information.
-
Make sure that you include a risk assessment of not meeting schedule or performance targets just in case things don’t go according to plan.
Be sure to include contingency for additional testing cycles and defect resolution if problems are found with the application during performance test execution. This precaution is frequently overlooked.
With these actions under way, you can proceed through the remaining steps. Not everything mentioned may be relevant to your particular testing requirements, but the order of events is important.
See Appendix E for an example MS Project–based performance testing project plan.
Step 2: Performance Test Environment Build
You should have already identified the hardware, software, and network requirements for your performance test environment. Recall that you should strive to make your test environment a close approximation of the production environment. If this is not possible, then at a minimum your setup should reflect the server tier deployment of the production environment and your target database should be realistically populated in terms of both data content and sizing. This activity should be started as soon as possible because it frequently takes (much) longer than expected.
You may have to build a business case to justify creating your performance test environment!
The performance test environment build involves the following steps:
-
Allow enough time to source equipment and to configure and build the environment.
-
Take into account all deployment models. You may need to test several different configurations over LAN and WAN environments for your application, so you need to ensure that each of these can be created in your test environment.
-
Take into account links to external systems. You should never ignore external links, since they are a prime location for performance bottlenecks. As discussed in Chapter 3, you need either to use real links or to create some kind of stub or simulation that represents external communication working as designed.
-
Provide enough load injection capacity for the scale of testing envisaged. Think about the locations from which you will need to inject load. If these are not all local to the application infrastructure, then you must ensure that the load injector machines can be managed remotely or station local personnel at each remote site. Don’t forget about considering cloud-based load injectors if this simplifies your task.
-
Ensure that the application is correctly deployed into the test environment. I have been involved in more than one performance test engagement that was unfavorably affected by mistakes made when the application—supposedly ready for testing—was actually deployed.
-
Provide sufficient software licenses for the application and supporting software (e.g., Citrix or SAP licenses). You’d be surprised how often an oversight here causes problems.
-
Deploy and configure performance testing tools. Make sure that you correctly install and configure your performance testing solution.
-
Deploy and configure KPI monitoring. This may be part of your performance testing solution or entirely separate tooling. In either case, make sure that it is correctly configured to return the information you need.
Step 3: Use-Case Scripting
For each use case that you have selected to script, you must perform the following:
-
Identify the session data requirements. Some of this information may be available from a proof of concept (POC) exercise, although this will have focused on only a few transactions. In many cases, you will not be able to confirm session data requirements for the remaining use cases until you begin the full scripting process.
-
Confirm and apply input data requirements. These should have been identified as part of the pre-engagement requirements capture. See Appendix A for an example of the sort of detail you should provide, particularly with regard to data for each use case that will form part of your performance testing project.
-
Decide on how you will checkpoint the use case in terms of what parts you need to monitor separately for response time. This is an important consideration because it provides first-level analysis of potential problem areas within the use case. You should have addressed this after identifying the key use cases during pre-engagement NFR capture.
-
Identify and apply any scripting changes required for use cases to replay correctly. If you have already carried out a POC, then you should have a sense of the nature of these changes and the time required to implement them.
-
Ensure that the use case replays correctly—from both a single-user and multiuser perspective—before signing it off as ready to include in a performance test. Make sure that you can verify what happens on replay either by, for example, checking that database updates have occurred correctly or examining replay logfiles.
Step 4: Performance Test Scenario Build
Making use of the load model created as part of NFR capture, consider the following points for each performance test scenario that you create:
-
What kind of test will this represent—pipe-clean, volume, soak, or stress? A typical scenario is to run pipe-clean tests for each use case initially as a single user to establish a performance baseline, and then up to the target maximum currency or throughput for the use case. If problems are encountered at this stage, you may need to run isolation tests to identify and deal with what’s wrong. This would be followed by a volume test combining all use cases up to target concurrency, which would in turn be followed by further isolation tests if problems are discovered. You may then want to run stress and soak tests for the final testing cycles, followed perhaps by non–performance-related tests that focus on optimizing the load balancing configuration or perhaps exploring different disaster recovery scenarios.
-
Decide how you will represent think time and pacing for each use case included in the testing. You should normally include think time and pacing in all performance test types (except possibly the stress test); otherwise, you run the risk of creating an unrealistic throughput model.
-
For each use case, decide how many load injector deployments you require and how many virtual users to assign to each point of presence. As already mentioned, if your load injectors are widely distributed, then be sure there’s a local expert available to deal with any problems that may surface and don’t forget the option of cloud-based load injectors.
-
Decide on the injection profile for each load injector deployment Big Bang, ramp-up, ramp-up/ramp-down with step, or delayed start. Depending on what you are trying to achieve, your choices will likely involve a combination of Big Bang deployments to represent static load and one or more of the ramp variations to test for scalability. Figure 4-2 demonstrates a performance test plan using this approach. The darker rectangles on the bottom show the static load created by the Big Bang deployment, on top of which a variety of extra load tests are deployed in ramp-up steps.
-
Will the test execute for a set period of time or rather be stopped by running out of data, reaching a certain number of use-case iterations, or user intervention? If the test will be data-driven, make sure that you have created enough test data!
-
Do you need to spoof IP addresses to correctly exercise application load balancing requirements? If so, then the customer will need to provide a list of valid IP addresses, and these will have to be distributed and configured against the load injection machines.
-
Do you need to simulate different baud rates? If so, then confirm the different baud rates required. Any response-time prediction or capacity modeling carried out prior to performance testing should have already given you valuable insight into how the application reacts to bandwidth restrictions.
-
What runtime monitoring needs to be configured using the server and network KPIs that have already been set up? If appropriate, the actual monitoring software should have been deployed as part of the test environment build phase, and you should already have a clear idea of exactly what to monitor in the system under test (SUT).
-
If this is a web-based performance test, what level of browser caching simulation do you need to provide—new user, active user, returning user? This will very much depend on the capabilities of your performance testing solution. See Chapter 9 for a discussion on caching simulation.
-
Consider any effects that the application technology will have on your performance test design. For example, SAP performance tests that make use of the SAPGUI client will have a higher resource requirement than, say, a simple terminal emulator and thus will require more load injector machines to generate a given number of virtual users. Chapter 9 discusses additional considerations for SAP and other application technologies.
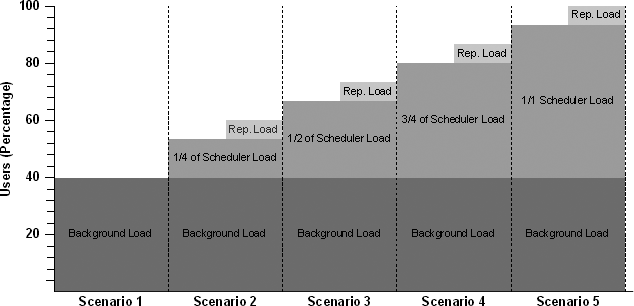
Figure 4-2. Performance test plan using background (static) load and ramp-up injection profiles
Step 5: Performance Test Execution
Run and monitor your tests. Make sure that you carry out a dress rehearsal of each performance test scenario as a final check that there are no problems accessing the application or with the test configuration.
This phase should be the most straightforward part of any performance testing project. You’ve done the hard work: preparing the test environment, creating the scripts, addressing the data requirements, and building the performance tests. In an ideal world, performance test execution would be solely a matter of validating your application performance targets. It should not become a bug-fixing exercise.
The only unknown is how many test cycles will be required before your performance testing goals are achieved. I wish I could answer this question for you, but like many things in life, this is in the hands of the gods. But if you’ve followed the suggested performance testing checklist religiously to this point, you’re in pretty good shape to be granted a miracle!
Looking at the execution process, I recommend that you run tests in the following order:
-
Execute dress-rehearsal or pipe-clean tests as a final check on your performance test environment and test scenarios to ensure that you haven’t omitted anything fundamental in your performance test configuration—for example, forgetting to include an external data file needed by a script.
-
Execute volume tests, ideally resetting target database content between test cycles. Once you have established performance baselines, the volume test is normally the next step: all scripted use cases should be apportioned among the target number of virtual users as per the application load model.
-
Execute isolation tests to explore any problems revealed by volume testing and then supply results to the developers or application vendor. This is why it’s important to allow contingency time in your test plan, since even minor problems can have a significant impact on project time scales.
-
Execute stress tests, which are crucial from a capacity perspective. You should have a clear understanding of how much spare capacity remains within the hosting infrastructure at peak load to allow for future growth. You may also use stress testing to establish horizontal scalability limits for servers at a particular application tier.
-
Execute soak tests to reveal any memory leaks or problems related to high-volume executions. Although it is not always feasible, I strongly recommend you include soak testing in your performance testing plan.
-
Execute any tests that are not performance related. For example, experiment with different load balancing configurations.
Step 6: Post-Test Analysis and Reporting
The final step involves collecting and analyzing data from all test runs, creating reports and a performance baseline, and possibly retesting:
-
Carry out final data collection (and possibly software uninstall if you are providing a service to a customer). Make sure that you capture and back up all data created as part of the performance testing project. It’s easy to overlook important metrics and then discover they’re missing as you prepare the project report.
-
Determine success or failure by comparing test results to performance targets set as part of project requirements. Consensus on performance targets and deliverables prior to the project’s commencement makes the task of presenting results and proving application compliance a great deal less painful. (See Chapter 3 for a discussion on gaining consensus.)
-
Document the results using your preferred reporting template. The format of the report will be based on your own preferences and company or customer requirements, but it should include sections for each of the performance targets defined during NFR capture. This makes it much easier to present and justify the findings to the client.
Case Study 1: Online Banking
Now let’s move on to the first case study, which I will refer to as Online Banking.
Online Banking is a critical customer-facing web application for a large multinational bank. It’s been around for some time and provides a good service to the bank’s customers. The motivation for the performance testing project that we’ll discuss was an imminent expansion in terms of customer numbers and a need to explore the capacity limits of the current application infrastructure. The aim was to establish a baseline model for horizontal scaling of servers at the web, application server, and database tiers.
Application Landscape
Figure 4-3 shows the application landscape for Online Banking, which includes the following elements:
- Clients
-
This application provides a service to customers of the bank who connect using the Internet. This means that customers use whatever Internet browser software they prefer. Microsoft’s Internet Explorer is still the most common choice, but there are many others, including Mozilla, Firefox, Opera, and Netscape. There is no requirement for the end user to have any other software installed apart from her preferred browser.
- Mid-tier servers
-
Because the application is web-based, the first tier is web servers. There are two quad-blade servers, each running Windows 2003 Server as the operating system and Microsoft’s IIS 6 as the web server software. The servers are load-balanced through Microsoft’s Network Load Balancing (NLB) technology. Behind the two web servers is a mid-tier layer of a single dual-CPU application server.
- Database servers
-
This is a single high-specification machine running MS SQL 2005 database software on Windows 2003 Server.
- Network infrastructure
-
All servers reside in a single data center with gigabit Ethernet connectivity. Internet connectivity to the data center consists of a single 8 Mb WAN link to the local Internet backbone. There is also a 100 Mb LAN connection to the company network.
Application Users
The application currently supports a maximum of approximately 380 concurrent users at the busiest point during a 24-hour period. These are mainly Internet customers, although there are likely to be a number of internal users carrying out administration tasks. Every user has a unique set of login credentials and a challenge/response security question. The services provided by the application are typical for online banking:
-
Viewing statements
-
Making payments
-
Setting up direct deposits and standing orders
-
Applying for a personal loan
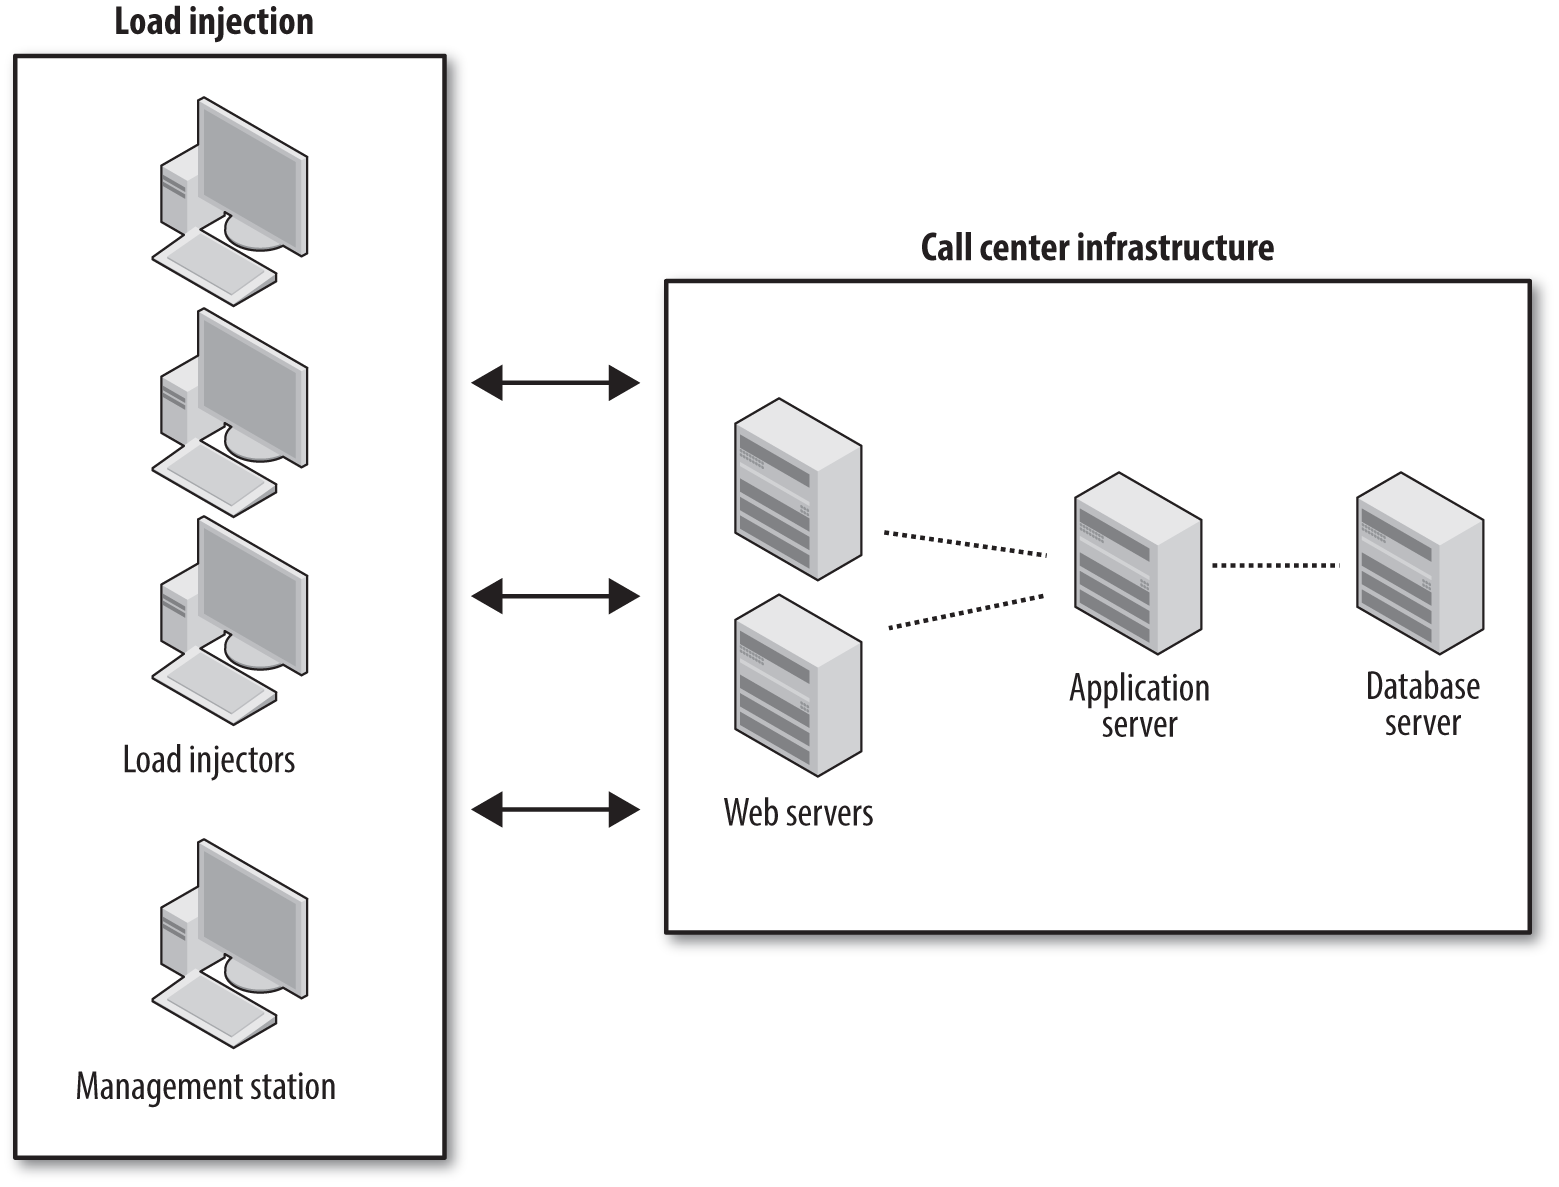
Figure 4-3. Online Banking application landscape
Step 1: Pre-Engagement NFR Capture
Project time scales amounted to a week of lead time and three days to carry out the testing engagement. The client decided to outsource the entire testing project because of the short schedule and lack of in-house testing expertise.
The test environment required little preparation, since testing was to be carried out using the production infrastructure. (More on this approach in Step 2.)
Performance targets for online banking were limited to availability and concurrency. The application had to be available and performant at a concurrent load of 1,000 virtual users. As mentioned, the application was coping with approximately 380 concurrent users at peak periods on a daily basis without problems, but this number was expected to increase significantly during the next year.
Ten use cases were identified as core to the performance testing project. Input data requirements amounted to a list of card numbers representing real user accounts and an accompanying PIN that provided an additional level of account security. Target data requirements were unusually straightforward in that the production application database was to be used with the caveat of no insert or update use cases unless the use case backed up any changes made to the database as its final action.
The only performance test identified was a progressive ramp-up (without step) to the target concurrency of 1,000 virtual users. Had more time been available, a ramp-up with step variation would have provided a more granular view of steady-state performance.
Server and network KPIs focused on generic Windows performance metrics. There was no requirement to specifically monitor the application server or database layer. It subsequently transpired that application server monitoring would have been useful to identify poorly performing Java components whose presence had to be extrapolated from slow rendering of client-side content.
Step 2: Test Environment Build
What was unusual about this project was that there was no dedicated test environment. All performance testing was carried out against the production infrastructure. This is certainly not the norm, but neither is it a unique situation.
This case study provided some unique challenges (although an accurate test environment was not one of them). The first was dealing with an application already deployed and being actively used by customers and internal users. Any testing could be affected by other user activity, so we had to take this into account when examining test results. In addition, performance test execution would definitely have an impact on the experience of real end users, particularly if high volumes of load are being generated.
So in this rather unusual situation, the performance test environment was immediately available and consisted of the following:
-
Two load-balanced web servers
-
One application server
-
One database server
The one element missing was the resource needed to inject load. This resource was identified as four PCs as injectors to provide a load of 1,000 virtual users (250 users per machine), with one PC also acting as the test management station. Another consideration was that the volume load had to be injected onto the 8 Mb WAN link that provided the connection from the Internet to the corporate data center. This involved distributing the load across a number of proxy servers to minimize the chance of overloading any single point of entry.
Because performance testing was carried out on the live environment, it was not possible to use integrated server and network monitoring capabilities of the chosen performance test tool. Corporate security constraints prevented the installation onto production servers of any software that was not part of the standard build configuration. (The infrastructure was, after all, for a live banking application, so the restrictions were hardly surprising or draconian.)
This was an example of installation constraints. Internal security policies can prohibit the installation of monitoring software onto the target servers or even connecting to them remotely. In these circumstances, the only options are to dispense with infrastructure monitoring altogether (not recommended) or to rely on whatever independent monitoring software has access to the application landscape.
For Online Banking it was possible to make use of Microsoft’s Performance Monitor (Perfmon) application to view server performance under load. This software is normally part of a default install on Windows server operating systems. A generic set of Windows server KPIs was instrumented with Perfmon and set to run in parallel with each performance test execution.
Step 3: Use-Case Scripting
The 10 use cases that were identified as key activities are listed in Table 4-1. Because this was a vanilla browser-based application, there were few challenges recording and preparing the scripts. The only complication concerned session data requirements that involved adding logic to the scripts to deal with the random selection of three characters from the account PIN at application login.
| Use case | Description |
|---|---|
MiniStatement |
Log in, view a mini statement, log out |
CustomStatement |
Log in, view a custom statement, log out |
ViewStandingOrders |
Log in, view standing orders, log out |
TextAlertCreateCancel |
Log in, create or cancel a text alert, log out |
TransferBetweenOwnAccount |
Log in, transfer an amount between personal accounts, log out |
BillPaymentCreate |
Log in, create a bill payment to a nominated beneficiary, log out |
BusMiniStatement |
Log in, generate a mini statement for nominated card numbers, log out |
BusCustomStatement |
Log in, generate a custom statement for nominated card numbers, log out |
BusTransferBetweenOwnAccounts |
Log in, transfer $5.00 between personal accounts for nominated card number, log out |
BusBillPaymentCreate |
Log in, create a $5.00 bill payment to nominated beneficiary for nominated card numbers, log out |
Once logged in, users were restricted to visibility of their own account information. This limited search activity to date/account ranges and meant that the resulting scripts were navigation-driven rather than data-driven.
Step 4: Performance Test Build
For Online Banking the performance test design was based on scaling from 1 to 1,000 concurrent virtual users. The test was designed so that all users were active after a 30-minute period. Because different numbers of users were assigned to each use case, each one had its own injection rate.
As shown in Table 4-2, the number of virtual users assigned to each use case was based on an assessment of their likely frequency during a 24-hour period (this information is displayed in the table’s fourth column). For example, the transaction MiniStatement was considered the most common activity, since most customers who use an online banking service will want to check their latest statement. (I know it’s usually my first port of call!) As a result, 416 virtual users out of the 1,000 were allocated to this activity.
| Use case | Starting virtual users | Injection rate per one virtual user | Target virtual users |
|---|---|---|---|
MiniStatement |
1 |
4 seconds |
416 |
CustomStatement |
1 |
26 seconds |
69 |
ViewStandingOrders |
1 |
26 seconds |
69 |
TextAlertCreateCancel |
1 |
2 minutes, 18 seconds |
13 |
TransferBetweenOwnAccounts |
1 |
12 seconds |
145 |
BillPaymentCreate |
1 |
8 seconds |
225 |
BusMiniStatement |
1 |
55 seconds |
33 |
BusCustomStatement |
1 |
7 minutes, 30 seconds |
4 |
BusTransferBetweenOwnAccounts |
1 |
3 minutes |
10 |
BusBillPaymentCreate |
1 |
1 minute, 52 seconds |
16 |
Differing numbers of users per use case required different injection rates to ensure that all virtual users were active after a 30-minute period; this information is demonstrated in column three, which shows how the virtual users were injected into the performance test. An important consideration to performance test design involves the accurate simulation of throughput. You may recall our discussion in Chapter 3 about concurrency and how the number of concurrent virtual users does not necessarily reflect the number of users actually logged in to the application. For Online Banking it was necessary to apply specific pacing values to the performance test and transactions; this ensured that throughput did not reach unrealistic levels during test execution.
Step 5: Performance Test Execution
Performance test execution principally involved multiple executions of ramp-up (without step) from 1 to 1,000 virtual users. As already mentioned, there was no integration of KPI monitoring of server or network data. Although the appropriate KPIs were identified as part of NFR capture, this information was monitored separately by the customer. Consequently, test execution had to be synchronized with existing monitoring tools—in this case, Perfmon.
The client also monitored the number of active users independently over the period of the performance test. This raises an interesting point concerning the definition of concurrency. For an application, concurrency measures the number of users actually logged in. But automated performance tools measure concurrency as the number of active virtual users, which exclude virtual users who are logged in but kept in a waiting state. If your performance testing use cases include logging in and logging out as part of the execution flow (as was the case with Online Banking), then the number of active virtual users will be fewer than the number of users as seen by the application. Therefore, you will need to inflate the number of virtual users or (as I did with Online Banking) use a slower pacing and execution rate to extend the time that virtual users remained logged in to the application and so create the proper concurrent load.
Online Banking Case Study Review
Let’s now assess the Online Banking case study in light of the suggested performance testing requirements checklist:
- The test team
-
The test team amounted to a single individual—certainly not the ideal situation, but not uncommon. Companies that provide performance testing as a service will generally supply a minimum of a project manager and at least one testing operative. When performance testing is carried out in-house, the situation is more fluid: many organizations do not have a dedicated performance testing team and tend to allocate resources on an ad hoc basis. For medium to large enterprises that carry out regular performance testing, a dedicated performance testing resource is a necessity in my view.
- The test environment
-
In terms of providing an accurate performance testing environment, this case was ideal in terms of similarity to the deployment environment (i.e., they were one and the same). This relatively unusual situation led to the challenges of other activity affecting the performance testing results and the potentially negative effect of scalability testing on real application users. If these challenges can be managed successfully, then this approach provides an ideal, albeit unusual, performance test environment.
- KPI monitoring
-
As mentioned previously, internal constraints prevented the use of any integrated monitoring with the performance testing tool. It was therefore necessary for customers to carry out their own monitoring, after which the testing team had to manually integrate this data with that provided by the performance testing tool. These situations are far from ideal because they complicate the analysis process and make it difficult to accurately align response time and scalability data with network and server performance metrics. However, sometimes there is no choice. In this particular case, the performance data was exported to MS Excel in CSV format to allow graphical analysis. The ability to import third-party data into the analysis module of your performance testing tool is an extremely useful feature if you are unable to use integrated KPI monitoring.
- Performance targets
-
The sole performance target was scalability based on 1,000 concurrent users. There was no formal requirement for a minimum response time, which could have been estimated fairly easily since the application was already deployed and in regular use. The 1,000-user scalability target was arrived at in a rather arbitrary manner, and there was little evidence of consensus between the application stakeholders. This can be a significant risk to any performance testing project because it opens the door to challenges to interpretation of the results. In this case, independent monitoring of application end-user activity during performance test execution allayed any fears that the stated load was not achieved. As discussed earlier, even though the performance test tool achieved 1,000 concurrent virtual users, this on its own would not have achieved the target of 1,000 concurrent application users. The difference was addressed by several hundred real users being active during performance test execution, who effectively topped up the number of concurrent application users generated by the performance testing tool.
- Use-case scripting
-
Ten use cases were selected and carefully documented in order to preclude any ambiguity over what was recorded. This followed the general trend whereby it is unusual to require more than 20 unique use cases in a performance testing engagement. The only required scripting changes involved login security.
- Data requirements
-
Input data requirements for Online Banking were limited to a list of valid card numbers. These numbers provided initial access to the application for each virtual user. The target database was the live database, which presented no problems in terms of content or realistic sizing. However, the use cases were limited in terms of what data could be committed to the database. Although there was significant testing of user activity via database reads, there was little opportunity to test the effects of significant database write activity, and this introduced an element of risk. Session data requirements involved the identification and reuse of a set of standard challenge/response questions together with random characters selected from a range of PINs associated with the card number data used as input to the test use cases.
- Performance test design
-
Performance test design focused on a single test type that I would characterize as a load test. The application was already comfortably supporting 380 users at peak periods, and the stated intention was to try to achieve 1,000 users—some five times the existing capacity. As already mentioned, the test design incorporated specific pacing changes to ensure that an accurate throughput was maintained.
Case Study 2: Call Center
The second case study involves an application that is very different from Online Banking: a typical call center that provides driver and vehicle testing services to a region of the United Kingdom. The Call Center application undergoes frequent code changes as a result of government legislation changes, and there is a requirement to performance test the application prior to each new release. Extensive user acceptance testing (UAT) is carried out to eliminate any significant functional issues before the updated application is released for performance testing.
Application Landscape
The landscape for the Call Center application is demonstrated by Figure 4-4.
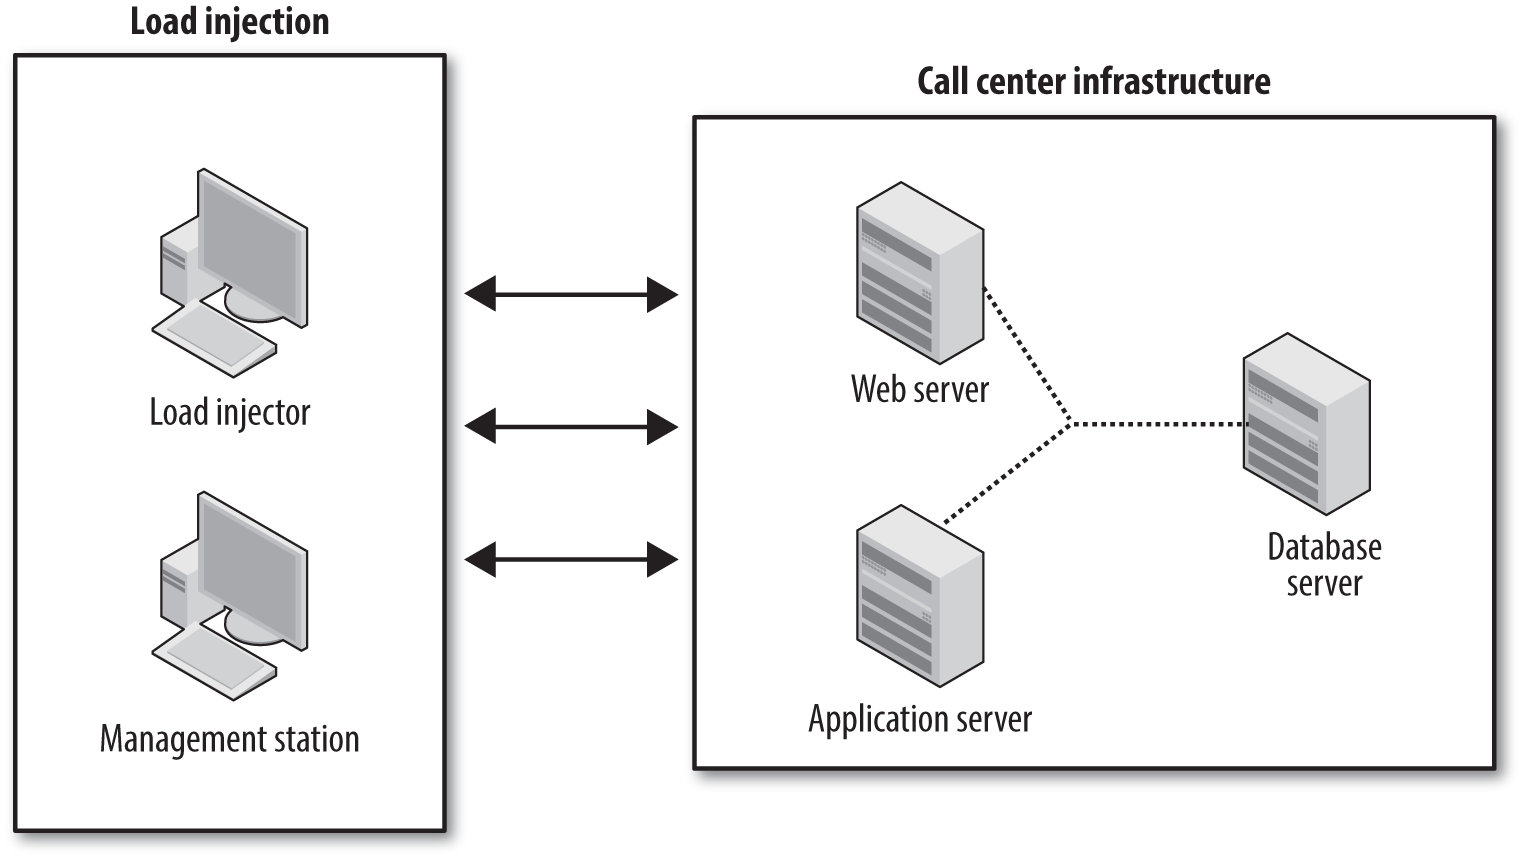
Figure 4-4. Call Center application landscape
- Clients
-
The application client is slightly unusual in that it is a traditional fat client written in Visual Basic but makes use of web services technology to connect to the application server layer. There are two versions of the fat client deployed: one for the call-center operators and another for operators at each of the regional vehicle testing centers. There is also a public-domain self-service website available with a limited set of functionality. Public users can use whatever Internet browser software they prefer.
- Mid-tier servers
-
The mid-tier application architecture consists of two load-balanced application servers running Windows 2003 Server OS directly connected to call-center clients and a web server layer providing connectivity for public domain users.
- Database servers
-
The database server is a single high-specification machine running the MS SQL database software on Windows 2003 Server.
- Network infrastructure
-
All servers reside in a single data center with gigabit Ethernet connectivity. All connectivity to the application servers is via 100 Mb LAN for call-center users or via ISP connection for public domain users.
Application Users
There is a typical maximum of 100 concurrent users during a normal working day in addition to an increasing number of self-service users through the 24/7 public-facing web portal. The call-center and regional test-center users each have their own login credentials, whereas web portal users provide information about their vehicle or driver’s license to initiate a session. Typical transaction volumes are in the order of 1,500 transactions per 24-hour period.
Step 1: Pre-Engagement NFR Capture
Project time scales were typical, amounting to a week of lead time and five days to carry out the testing engagement. The client had outsourced the entire testing project for a number of years because it lacked in-house performance testing expertise.
A dedicated performance test environment was provided, although (as is often the case) the number and specification of servers differed from the live environment.
Performance targets for the Call Center case study were availability, concurrency, and response time. The application had to be available and performant at a concurrent load of 100 virtual users. In terms of response-time targets, performance at the web service level had to match or exceed that of the previous release.
Five use cases were identified as core to the performance testing project. Input data requirements were relatively complex and involved the following types of data.
- Call-center use IDs
-
A range of call-center login credentials was needed to provide variation in user sessions. For the target concurrency of 100 users, 20 sets of credential were provided.
- Test centers
-
Drivers can book appointments at a number of regional vehicle testing centers, so a list of all possible test centers was required for a realistic simulation.
- Vehicle registration numbers
-
Because appointments could be booked by vehicle registration number, a large number of valid registration numbers needed to be made available.
- Driver’s license numbers
-
Appointments could also be booked on behalf of the driver, so the vehicle registration numbers had to be accompanied by a list of valid driver’s license numbers.
The target database was a recent copy of the live database, so there were no problems with inadequate data sizing affecting performance test results. Although normally desirable, in this case the test database was rarely restored between performance test runs (it would have required a fresh cut of live data).
Performance tests used the ramp-up-with-step approach, reaching the target of 100 concurrent users. The tests would start focusing on baseline performance for each use case, which ran with one virtual user in steady state for 10 minutes. Ramp-up then came in increments of 25 users with a steady-state period of 15 minutes at each step. The 15-minute period of stability allowed incremental observation of steady-state performance.
Server and network KPIs focused once again on generic Windows performance metrics, although this time it was possible to use the integrated monitoring capability of the performance testing tool.
The testing team for this case study was more conventional in that a project manager and testing consultant were assigned to the engagement. As mentioned before, I see this as the typical staffing requirement for the majority of performance testing projects.
Step 2: Test Environment Build
In Chapter 3 we discussed the need to set up the performance test environment correctly. What is important is to retain the deployment architecture in terms of the different types of server tiers. The test environment for our case study manages to retain the tier deployment, but it has only a single application server whereas the live environment has two that are load-balanced. This implies less capacity, which we must take into account when building our performance tests.
As shown earlier, the performance test environment for the call center comprised the following:
-
One web server
-
One application server
-
One database server
Load injection was provided by two workstations, one to inject the load and another to act as the management station.
Network analysis was carried out using packet-level sniffer technology to determine the amount of data presentation per use case and to model application performance in a WAN environment. This is a valuable exercise to carry out prior to performance testing because it enables additional tuning and optimization of an application, potentially removing a layer of problems that may affect performance and scalability.
Step 3: Use-Case Scripting
For the Call Center case study, five use cases were identified that could all be considered active. Since the call-center and regional test-center clients were similar, the test use cases were selected only from the call center. Session data requirements were complex, requiring the extraction and reuse of information relating to the appointment booking selection. It was necessary to add code to the scripts to extract the required information. Unforeseen scripting challenges can have a significant impact on performance testing projects; it is therefore extremely important to identify and resolve them in advance of the scripting phase.
To ensure that the target concurrency was achieved, login and logout were not included as iterative activities during performance test execution. Each virtual user logged in at the start of the performance test and remained logged in until test conclusion, when the final action was to log out. Table 4-3 lists the use cases tested.
| Use case | Description |
|---|---|
DriverBookingSearch |
Log in, search for first available driver booking slots, log out |
FindSlotFirstAvailable |
Log in, search for first available vehicle booking slots, log out |
FindVRN |
Log in, find vehicle by registration number, log out |
SearchForAppointment |
Log in, find appointment by appointment ID number, log out |
VehicleBooking |
Log in, make a vehicle booking, log out |
Step 4: Performance Test Scenario Build
The Call Center application architecture is based on web services that invoke stored procedure calls on the MS SQL database. Historical problems with changes to web services and stored procedure calls between releases highlighted the importance of timing each web service call and monitoring the impact on the database server. Thus, timing checkpoints were inserted between all web service calls to allow granular timing of each request.
Step 5: Performance Test Execution
Performance test execution involved the following steps:
-
Pipe-clean test execution for each use case, executing as a single user for a period of 10 minutes to establish a performance baseline.
-
Then ramp-up with step execution for each use case in increments of 25 virtual users, with a steady-state period of 15 minutes at each increment.
Since the use cases in the Call Center case study did not include login and logout within their execution loop, there were no challenges with maintaining true application user concurrency (as had occurred in the Online Banking case study).
Call Center Case Study Review
Let’s now assess the Call Center case study in terms of our checklist:
- The test team
-
The test team consisted of a project manager and a single test operative, meeting what I consider to be typical requirements for a performance testing project. Because the application was not developed in-house, any problems that arose had to be fed back to the application vendor. This meant that test execution had to be suspended while the problems were investigated, which led on more than one occasion to a postponement of the target deployment date.
- The test environment
-
The environment was typical: dedicated hardware isolated from the production infrastructure in its own network environment. Application tier deployment largely matched that of the production application; the one major difference was the single application server versus the load-balanced pair of the production environment. Any significant difference in the number of application servers between test and production could lead to a bottleneck in the mid-tier. In such cases you should approach any stress-testing requirements with caution. An excessively aggressive injection profile might result in premature application server overload and misleading results.
- KPI monitoring
-
Because a dedicated testing environment was available, there were no obstacles to using the integrated server and network monitoring capability of the chosen performance testing tool. We obtained server information by integrating the testing tool with Microsoft’s Perfmon application. This is the preferred situation, and it allowed automated correlation of response time and monitoring data at the conclusion of each performance test execution—an important benefit of using automated performance testing tools.
- Performance targets
-
Performance targets were supporting a concurrency of 100 users and ensuring that response time did not deteriorate from that observed during the previous round of testing. We used checkpointing to focus on web service performance and to provide an easy mechanism for comparing releases.
- Scripting
-
Five use cases were selected from the call-center client to be used as the basis for performance testing the application. Scripting challenges focused on the unusual nature of the application architecture, which involved large numbers of web service requests, each with an extensive set of parameters. These parameters would frequently change between releases, and the accompanying documentation was often unclear. This made it difficult to identify exactly what changes had occurred. As a result, scripting time varied considerably between testing cycles and sometimes required creation of a completely new set of scripts (rather than the preferred method of copying the scripts from the previous testing cycle and simply modifying the code). This shows the vulnerability of scripted use cases to code being invalidated by changes introduced in a new release.
- Data requirements
-
Input data requirements for the Call Center were more complex than those for Online Banking. Large numbers of valid booking and vehicle registration numbers were needed before testing could proceed. We handled this task by extracting the relevant information from the target database via SQL scripts and then outputting the information in CSV format files. The target database was a recent copy of the live database, which once again presented no problems in terms of realistic content or sizing. Since this was a true test environment, there were no restrictions on the type of end-user activity that could be represented by the scripted use cases. The one negative factor was the decision not to restore the database between test runs. I always advise that data be restored between test executions in order to avoid any effects on performance test results that are caused by changes in database content from previous test runs. Session data requirements were rather complex and involved the interception and reuse of several different data elements, which represent server-generated information about the vehicle booking process. This made creating the original scripts a nontrivial exercise requiring the involvement of the application developers.
- Performance test design
-
This test design used the ramp-up-with-step approach, which allowed observation of steady-state response time of the application at increments of 25 virtual users for intervals of approximately 15 minutes.
Summary
I hope that the case studies in this chapter have struck some chords and that the checklists provided outline a practical way for you to approach application performance testing. The next step is to look at test execution and try to make sense of the information coming back from your performance testing toolset and KPI monitoring.
Get The Art of Application Performance Testing, 2nd Edition now with the O’Reilly learning platform.
O’Reilly members experience books, live events, courses curated by job role, and more from O’Reilly and nearly 200 top publishers.

