
The ms Macros
The UNIX shell is a user interface for the kernel, the actual heart of the operating system. You can choose the C shell or Korn shell instead of the Bourne shell, without worrying about its effects on the low-level operations of the kernel. Likewise, a macro package is a user interface for accessing the capabilities of the nroff/troff formatter. Users can select either the ms or mm macro packages (as well as other packages that are available on some systems) to use with nroff/troff.
The ms package was the original Bell Labs macro package, and is available on many UNIX systems, but it is no longer officially supported by AT&T. Our main reason for giving ms equal time is that many Berkeley UNIX systems ship ms instead of mm. In addition, it is a less complex package, so it is much easier to learn the principles of macro design by studying ms than by studying mm.
A third general-purpose package, called me, is also distributed with Berkeley UNIX systems. It was written by Eric Allman and is comparable to ms and mm. (Mark Horton writes us: I think of ms as the FORTRAN of nroff, mm as the PL/I, and me as the Pascal.) The me package is not described in this book.
In addition, there are specialized packages—mv, for formatting viewgraphs, mptx, for formatting the permuted index found in the UNIX Reference Manual, and man, for formatting the reference pages in that same manual. These packages are simple and are covered in the standard UNIX documentation.
Regardless of which macro package you choose, the formatter knows only to replace each call of a macro with its definition. The macro definition contains the set of requests that the formatter executes. Whether a definition is supplied with the text in the input file or found in a macro package is irrelevant to nroff/troff. The formatter can be said to be oblivious to the idea of a macro package.
You might not expect this rather freely structured arrangement between a macro package and nroff/troff. Macros are application programs of sorts. They organize the types of functions that you need to be able to do. However, the actual work is accomplished by nroff/troff requests.
In other words, the basic formatting capabilities are inherent in nroff and troff; the user implementation of these capabilities to achieve particular formats is accomplished with a macro package. If a macro doesn’t work the way you expect, its definition may have been modified. It doesn’t mean that nroff/troff works differently on your system. It is one thing to say “nroff/troff won’t let me do it,” and another to say “I don’t have the macro to do it (but I could do it, perhaps).”
A general-purpose macro package like ms provides a way of describing the format of various kinds of documents. Each document presents its own specific problems, and macros help to provide a simple and flexible solution. The ms macro package is designed to help you format letters, proposals, memos, technical papers, and reports.
For simple documents such as letters, ms offers few advantages to the basic format requests described in Chapter 4. But as you begin to format more complex documents, you will quickly see the advantage of working with a macro package, which provides specialized tools for so many of the formatting tasks you will encounter.
A text file that contains ms macros can be processed by either nroff or troff, and the output can be displayed on a terminal screen or printed on a line printer, a laser printer, or a typesetter.
▪ Formatting a Text File with ms ▪
If you want to format an ms document for a line printer or for a terminal screen, enter this command line:
$ nroff -ms file(s)
To format for a laser printer or typesetter, enter this command line:
$ troff -ms file(s) | device postprocessor
Be sure to redirect the output to a file or pipe it to the printer; if you do not, the output will be sent to your terminal screen.
Problems in Getting Formatted Output
There are two ways for a program to handle errors. One is to have the program terminate and issue an error message. The other way is to have it keep going in hopes that the problems won’t affect the rest of the output. The ms macros take this second approach.
In general, ms does its best to carry on no matter how scrambled the output looks. Sometimes the problems do get corrected within a page or two; other times the problem continues, making the remaining pages worthless. Usually, this is because the formatter had a problem executing the codes as they were entered in the input file. Most of the time input errors are caused by not including one of the macros that must be used in pairs.
Because ms allows formatting to continue unless the error is a “fatal” one, error correction is characteristic of the ms macro definitions. Apart from the main function of the macro, some of them, such as the paragraph macro, also invoke another macro called .RT to restore certain default values.
Thus, if you forget to reset the point size or indentation, you might notice that the problem continues for a while and then stops.
▪ Page Layout ▪
As suggested in the last chapter, one of the most important functions of a macro package is that it provides basic page layout defaults. This feature makes it worthwhile to use a macro package even if you don’t enter a single macro into your source file.
At the beginning of Chapter 4, we showed how nroff alone formatted a sample letter. If we format the same letter with ms, the text will be adjusted on a page that has a default top and bottom margin of 1 inch, a default left margin, or page offset, of about 1 inch, and a default line length of 6 inches.
All of these default values are stored in number registers so that you can easily change them:
LL |
Line Length |
HM |
Header (top) Margin |
FM |
Footer (bottom) Margin |
PO |
Page offset (left margin) |
For example, if you like larger top and bottom margins, all you need to do is insert the following requests at the top of your file:
.nr HM 1.5i

.nr FM 1.5i
Registers such as these are used internally by a number of ms macros to reset the formatter to its default state. They will not take effect until one of those “reset” macros is encountered. In the case of HM and FM, they will not take effect until the next page unless they are specified at the very beginning of the file.*
▪ Paragraphs ▪
As we saw in the last chapter, paragraph transitions are natural candidates for macros because each paragraph generally will require several requests (spacing, indentation,) for proper formatting.
There are four paragraph macros in ms:
__________
*These “reset” macros (those that call the internal macro .RT) include .LP, .PP, .IP, .QP, .SH, .NH, .RS, .RE, .TS, and .TE. The very first reset macro calls a special initialization macro called .BG that is used only once, on the first page. This macro prints the cover sheet, if any (see “Cover Sheet Macros” later in this chapter), as well as performing some special first-page initialization.
.LP |
Block paragraph |
.PP |
First line of paragraph indented |
.QP |
Paragraph indented from both margins |
.IP |
Paragraph with hanging indent (list item) |
The .LP macro produces a justified, block paragraph. This is the type of paragraph used for most technical documentation. The .PP macro produces a paragraph with a temporary indent for the first line. This paragraph type is commonly used in published books and magazines, as well as in typewritten correspondence.
Let’s use the same letter to illustrate the use of these macros. In the original example (in Chapter 4), we left blank lines between paragraphs, producing an effect similar to that produced by the .LP macro.
In contrast, .PP produces a standard indented paragraph. Let’s code the letter using .PP macros. Because this is a letter, let’s also disable justification with an .na request. And of course, we want to print the address block in no-fill mode, as shown in Chapter 4. Figure 5-1 shows the coded letter and Figure 5-2 shows the formatted output.
Spacing between Paragraphs
With nroff, all of the paragraph macros produce a full space between paragraphs. However, with troff, the paragraph macros output a blank space of 0.3v. Basically, this means that a blank line will output one full space and the paragraph macros will output about a third of that space.
The amount of spacing between paragraphs is contained in the number register PD (paragraph distance). If you want to change the amount of space generated by any of the paragraph macros, simply change the contents of this register.
For example, if you don’t want to leave any space between paragraphs in the letter, you could put the following line at the start of your file:
.nr PD 0
This flexibility afforded by macro packages is a major advantage. It is often possible to completely change the appearance of a coded document by resetting only a few number registers at the start of a file. (As we’ll see, this statement is even more true of of mm than of ms.)
Quoted Paragraphs
A paragraph that is indented equally from the left and right margins is typically used to display quoted material. It is produced by .QP. For example:
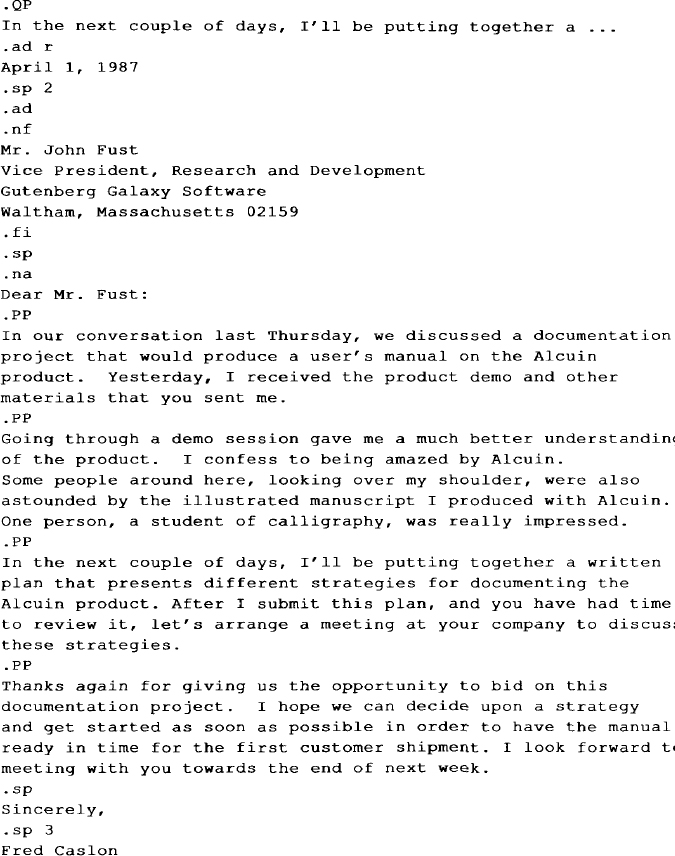
Fig. 5-1. Letter Coded with ms Macros
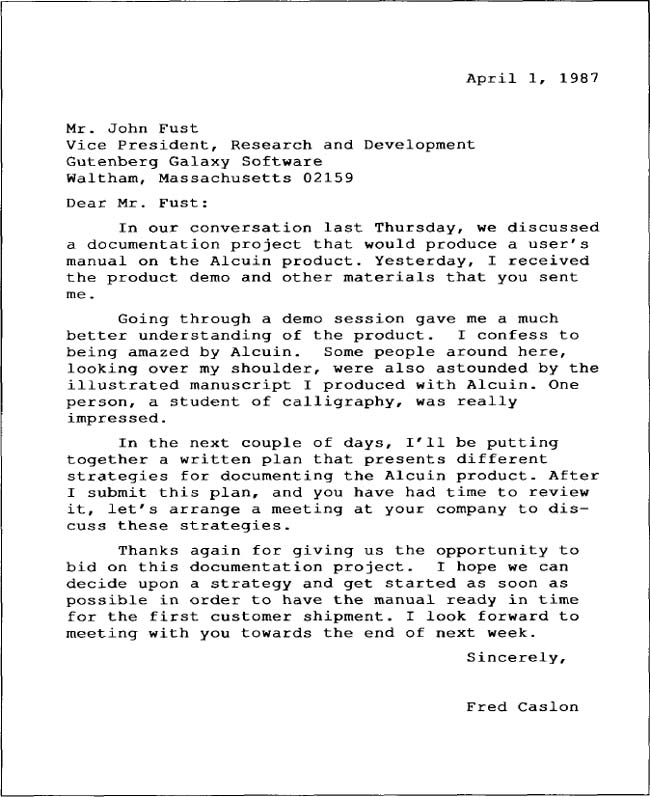
Fig. 5-2. Formatted Output
The .QP macro produces a paragraph indented on both sides. The pair of macros .QS and .QE can be used to mark a section longer than one paragraph that is indented. This is useful in reports and proposals that quote at length from another source.
.LP

I was particularly interested in the following comment

found in the product specification:

.QS

Users first need a brief introduction to what

the product does. Sometimes this is more for the

benefit of people who haven’t yet bought the

product, and are just looking at the manual.

However, it also serves to put the rest of the

manual, and the product itself, in

the proper context.

.QE
The result of formatting is:
I was particularly interested in the following comment found in the product specification:
Users first need a brief introduction to what the product does. Sometimes this is more for the benefit of people who haven’t yet bought the product, and are just looking at the manual. However, it also serves to put the rest of the manual, and the product itself, in the proper context.
Use the .QP macro inside a .QS/.QE block to break up paragraphs.
Indented Paragraphs
The .IP macro produces an entire paragraph indented from the left margin. This is especially useful for constructing lists, in which a mark of some kind (e.g., a letter or number) extends into the left margin. We call these labeled item lists.
The .IP macro takes three arguments. The first argument is a text label; if the label contains spaces, it should be enclosed within quotation marks. The second argument is optional and specifies the amount of indentation; a default of 5 is used if the second argument is not specified. A third argument of 0 inhibits spacing before the indented paragraph.
Item lists are useful in preparing command reference pages that describe various syntax items, and in glossaries that present a term in one column and its definition in the other. The following example shows a portion of the input file for a reference page:
.IP figure 10

is the name of a cataloged figure. If

a figure has not been cataloged, you need to use

the LOCATE command.

.IP f:p 10

is the scale of the

figure in relation to the page.

.IP font 10

is the two-character abbreviation or

full name of one of the available fonts

from the Alcuin library.
The following item list is produced:
figure |
is the name of a cataloged figure. If a figure has not been cataloged, you need to use the LOCATE command. |
f:p |
is the scale of the figure in relation to the page. |
font |
is the two-character abbreviation or full name of one of the available fonts from the Alcuin library. |
An .LP or .PP should be specified after the last item so that the text following the list is not also indented.
If you want to indent the label as well as the paragraph, you can use the .in request around the list. The following example:
.in 10

.IP figure 10

is the name of a cataloged figure. If

a figure has not been cataloged, you need to use

the LOCATE command.

.in 0
will produce:
figure |
is the name of a cataloged figure. If a figure has not been cataloged, you need to use the LOCATE command. |
You can specify an absolute or relative indent. To achieve the effect of a nested list, you can use the .RS (you can think of this as either relative start or right shift) and .RE (relative end or retreat) macros:
.IP font 10

is the two-character abbreviation or

full name of one of the available fonts

from the Alcuin library.

.RS

.IP CU

Cursive

.IP RS

Slanted

.RS

.IF LH 5 0

Left handed

.IP RH 5 0

Right handed

.RE

.IP BL

Block

.RE
The labels on the second level are aligned with the indented left margin of paragraphs on the first level.
font is the two-character abbreviation or full name of one of the available fonts from the Alcuin library.
|
One thing you need to watch out for in using the .IP macro is not to include space in the label argument. Because of the way the macro is coded, the space may be expanded when the finished line is adjusted. The first line will not be aligned with the rest. For example:
.IP "font name" 10

is the two-character abbreviation or full name. . .
might produce the following:
font name |
is the two-character abbreviation or full name of one of the available fonts from the Alcuin library. |
To avoid this problem, always use an unpaddable space (a backslash followed by a space) to separate words in the label argument to .IP. This caution applies to many other formatting situations as well.
Automatically numbered and alphabetized lists are not provided for in ms. (Chapter 16 shows how to write your own macros for this.) However, by specifying the number or letter as a label, you can make do with the .IP macro. For example:
User-oriented documentation recognizes three things:

.in +3n

.IP 1) 5n

that a new user needs

to learn the system in stages, getting a sense of the

system as a whole while becoming proficient in performing

particular tasks;

.IP 2) 5n

that there are different levels of users, and not

every user needs to learn all the capabilities

of the system in order to be productive;

.IP 3) 5n

that an experienced user must be able to rely on

the documentation for accurate and thorough reference

information.

.in -3n
This produces:
User–oriented documentation recognizes three things:
1) that a new user needs to learn the system in stages, getting a sense of the system as a whole while becoming proficient in performing particular tasks;
2) that there are different levels of users, and not every user needs to learn all the capabilities of the system in order to be productive;
3) that an experienced user must be able to rely on the documentation for accurate and thorough reference information.
The number is indented three ens and the text is indented five more ens. (Note: If you are using nroff, you don’t need to specify units on the indents. However, if you are using troff, the default scaling for both the .IP macro and the .in requests shown in the previous example is ems. Remember that you can append a scaling indicator to the numeric arguments of most macros and troff requests.)
▪ Changing Font and Point Size ▪
When you format with nroff and print on a line printer, you can put emphasis on individual words or phrases by underlining or overstriking. When you are use troff and send your output to a laser printer or typesetter, you can specify variations of type, font, and point size based on the capabilities of the output devices.
Roman, Italic, and Bold Fonts
Most typefaces have at least three fonts available: roman, bold, and italic. Normal body copy is printed in the roman font. You can change temporarily to a bold or italic font for emphasis. In Chapter 4, you learned how to specify font changes using the .ft request and inline \f requests. The ms package provides a set of mnemonic macros for changing fonts:
.B |
bold |
.I |
italic |
.R |
roman |
Each macro prints a single argument in a particular font. You might code a single sentence as follows:
.B Alcuin

revitalizes an

.I age-old

tradition.
The printed sentence has one word in bold and one in italic.
Alcuin revitalizes an age-old tradition.
If no argument is specified, the selected font is current until it is explicitly changed:
The art of

.B

calligraphy

.R

is, quite simply,

.I

beautiful

.R

handwriting;
The example produces:
The art of calligraphy is, quite simply, beautiful handwriting;
You’ve already seen that the first argument is changed to the selected font. If you supply a second argument, it is printed in the previous font. (You are limited to two arguments, set off by a space; a phrase must be enclosed within quotation marks to be taken as a single argument.) A good use for the alternate argument is to supply punctuation, especially because of the restriction that you cannot begin a line with a period.
its opposite is

.B cacography .
This example produces:
its opposite is cacography.
If the second argument is a word or phrase, you must supply the spacing:
The ink pen has been replaced by a

.I light " pen."
This produces:
The ink pen has been replaced by a light pen.
If you are using nroff, specifying a bold font results in character overstrike; specifying an italic font results in an underline for each character (not a continuous rule). Overstriking and underlining can cause problems on some printers and terminals.
The chief advantage of these macros over the corresponding troff constructs is the ease of entry. It is easier to type:
.B calligraphy
than:
\fBcalligraphy\fP
However, you’ll notice that using these macros changes the style of your input considerably. As shown in the examples on the preceding pages, these macros require you to code your input file using short lines that do not resemble the resulting filled output text.
This style, which clearly divorces the form of the input from the form of the output, is recommended by many nroff and troff users. They recommend that you use macros like these rather than inline codes, and that you begin each sentence or clause on a new line. There are advantages in speed of editing. However, there are others (one of the authors included) who find this style of input unreadable on the screen, and prefer to use inline codes, and to keep the input file as readable as possible. (There is no difference in the output file.)
Underlining
If you want to underline a single word, regardless of whether you are using nroff or troff, use the .UL macro:
the

.UL art

of calligraphy.
It will print a continuous rule beneath the word. You cannot specify more than a single word with this macro.
Changing Point Size
As discussed in Chapter 4, you can change the point size and vertical spacing with the .ps and .vs requests. However, if you do this in ms, you will find that the point size and vertical spacing revert to 10 and 12 points, respectively, after the next paragraph macro. This is because the paragraph macro, in addition to other tasks, resets the point size and vertical spacing (along with various other values) to default values stored in number registers.
The default point size and vertical spacing for a document are kept in the registers PS and VS, respectively. If you want to change the overall point size or vertical spacing, change the value in these registers. (The default values are 10 and 12, respectively.) For example, to change the body type to 8 points and the spacing to 10 points, enter the following requests at the top of your document:
.nr PS 8

.nr VS 12
At the top of a document, these settings will take effect immediately. Otherwise, you must wait for the next paragraph macro for the new values to be recognized. If you need both immediate and long-lasting effects, you may need a construct like:
.ps 8

.nr PS 8

.vs 12

.nr VS 12
There are also several macros for making local point size changes. The .LG macro increases the current point size by 2 points; the .SM macro decreases the point size by 2 points. The new point size remains in effect until you change it. The .NL macro changes the point size back to its default or normal setting. For example:
.LG

Alcuin

.NL

is a graphic arts product for

.SM

UNIX

.NL

systems.
The following line is produced:
Alcuin is a graphic arts product for UNIX systems.
The .LG and .SM macros simply increment or decrement the current point size by 2 points. Because you change the point size relative to the current setting, repeating a macro adds or subtracts 2 more points. If you are going to change the point size by more than 2, it makes more sense to use the .ps request. The .NL macro uses the value of the number register PS to reset the normal point size. Its default value is 10.
In the following example, the .ps request changes the point size to 12. The .LG and .SM macros increase and decrease the point size relative to 12 points. The .NL macro is not used until the end because it changes the point size back to 10.
.ps 12

.LG

Alcuin

.SM

is a graphic arts product for

.SM

UNIX

.LG

systems.

.NL
It produces the following line:
Alcuin is a graphic arts product for UNIX systems.
A change in the point size affects how much vertical space is needed for the larger or smaller characters. Vertical spacing is usually 2 points larger than the point size (10 on 12). Use the vertical spacing request to temporarily change the vertical spacing, if necessary.
▪ Displays ▪
A document often includes material—such as tables, figures, or equations—that are not a part of the running text, and must be kept together on the page. In ms and mm, such document elements are referred to generically as displays.
The macros .DS, .DE, .ID, .CD, and .LD are used to handle displays in ms. The display macros can be relied upon to provide
![]() adequate spacing before and after the display;
adequate spacing before and after the display;
![]() horizontal positioning of the display as a left-justified, indented, or centered block;
horizontal positioning of the display as a left-justified, indented, or centered block;
![]() proper page breaks, keeping the entire display together.
proper page breaks, keeping the entire display together.
The default action of the .DS macro is to indent the block of text without filling lines:
Some of the typefaces that are currently available are:

.DS

Roman

Caslon

Baskerville

Helvetica

.DE
This produces:
Some of the typefaces that are currently available are:
Roman
Caslon
Baskerville
Helvetica
You can select a different format for a display by specifying a left-justified or centered display with one of the following arguments:
I |
Indented (default) |
L |
Left-justified |
C |
Center each line |
B |
Block (center entire display) |
The L argument can be used for formatting an address block in a letter:
.DS L

Mr. John Fust

Vice President, Research and Development

Gutenberg Galaxy Software

Waltham, Massachusetts 02154

.DE
The display macro prevents these lines from being filled; it “protects” the carriage returns as they were entered in the file.
A display can be centered in two ways: either each individual line in the display is centered (C), or the entire display is centered as a block (B) based on the longest line of the display.
The use of tabs often presents a problem outside of displays. Material that has been entered with tabs in the input file should be formatted in no-fill mode, the default setting of the display macros. The following table was designed using tabs to provide the spacing.
This table appears in the output just as it looks in the file. If this material had not been processed inside a display, the columns would be improperly aligned.
Static and Floating Displays
One of the basic functions of a display is to make sure the displayed material stays together on one page. If the display is longer than the distance to the bottom of the page, there is a page break.
If the display is large, causing a page break can leave a large block of white space at the bottom of the page. To avoid this problem, ms provides a set of macros for floating displays, as well as macros for the static displays we’ve already discussed. If a floating display doesn’t fit on the page, the formatter doesn’t force a page break. Instead, it simply holds the displayed text in reserve while it fills up the remainder of the page with the text following the display. It prints the display at the top of the next page, then continues where it left off.
We have already used .DS and .DE to mark the beginning and end of a static display. To specify a floating display, the closing mark is the same but the beginning is marked by a different macro:
.ID |
Same as .DS I (indented) but floating |
.LD |
Same as .DS L (left justified) but floating |
.CD |
Same as .DS C (center each line) but floating |
.BD |
Same as .DS B (center display) but floating |
In the following example of an input file, numbers are used instead of actual lines of text to make the placement of the display more obvious:
The following two formatted pages might be produced, assuming that there are a sufficient number of lines to cause a page break:
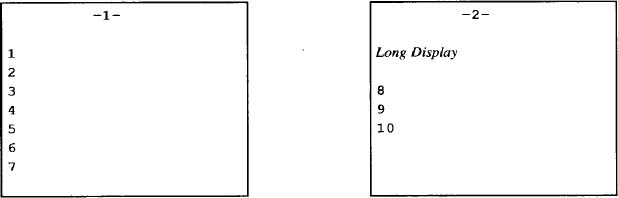
If there had been room on page 1 to fit the display, it would have been placed there, and lines 6 and 7 would have followed the display, as they did in the input file.
If a static display had been specified in the previous example, the display would be placed in the same position on the second page, and lines 6 and 7 would have followed it, leaving extra space at the bottom of page 1. A floating display attempts to make the best use of the available space on a page.
The formatter maintains a queue to hold floating displays that it has not yet output. When the top of a page is encountered, the next display in the queue is output. The queue is emptied in the order in which it was filled (first in, first out).
The macros called by the display macros to control output of a block of text are available for other uses. They are known as “keep and release” macros. The pair KS/.KE keep a block together and output it on the next available page. The pair .KF/.KE specify a floating keep; the block saved by the keep can float and lines of text following the block may appear before it in the text.
▪ Headings ▪
In ms, you can have numbered and unnumbered headings. There are two heading macros: .NH for numbered headings and .SH for unnumbered section headings.
Let’s first look at how to produce numbered headings. The syntax for the .NH macro is:
.NH [level][heading text]
.LP
(The brackets indicate optional arguments.) You can supply a numerical value indicating the level of the heading. If no value is provided for level, then a top-level heading is assumed. The heading text begins on the line following the macro and can extend over several lines. You have to use one of the paragraph macros, either .LP or .PP, after the last line of the heading. For example:
.NH

Quick Tour of Alcuin

.LP
The result is a heading preceded by a first-level heading number:
1. Quick Tour of Alcuin
The next time you use this macro the heading number will be incremented to 2, and after that, to 3.
You can add levels by specifying a numeric argument. A second-level heading is indicated by 2:
.NH 2

Introduction to Calligraphy

.LP
The first second-level heading number is printed:
1.1 Introduction to Calligraphy
When another heading is specified at the same level, the heading number is automatically incremented. If the next heading is at the second level:
.NH 2

Digest of Alcuin Commands

.LP
ms produces:
1.2 Digest of Alcuin Commands
Each time you go to a new level, .1 is appended to the number representing the existing level. That number is incremented for each call at the same level. When you back out of a level (for instance, when you go from level 5 to 4) the counter for the level (in this case level 5) is reset to 0.
The macro for unnumbered headings is .SH:
.SH

Introduction to Calligraphy

.LP
Unnumbered headings and numbered headings can be intermixed without affecting the numbering scheme:
Headings are visible keys to your document’s structure. Their appearance can contribute significantly to a reader recognizing that organization. If you are using unnumbered headings, it becomes even more important to make headings stand out. A simple thing you can do is use uppercase letters for a first-level heading.
▪ Cover Sheet Macros ▪
In their original incarnation at Bell Laboratories, the ms macros were called on to format many internal AT&T documents. Accordingly, it is not surprising that there were quite a few macros that controlled the format of specific internal document types. What is surprising is that these macros are still present in copies of the ms macros distributed outside of AT&T.
You have the option of specifying that your document contains Engineer’s Notes (.EG), an Internal Memorandum (.IM), a Memorandum for Record (.MR), a Memorandum for File (.MF), a Released Paper (.RP), a Technical Reprint (.TR), or a letter (.LT).
Many of these formats are quite useless outside of AT&T, unless you customize them heavily for other institutions. We prefer simply to ignore them.
In general, what these document type macros control is the appearance of the document’s cover sheet. The content of that cover sheet is specified using the following macros:
.TL |
Title |
.AU |
Author |
.AI |
Author’s Institution |
.AB |
Abstract Start |
.AE |
Abstract End |
These macros are general enough that you can still use them even if you aren’t from Bell Laboratories.
Each macro takes its data from the following line(s) rather than from an argument. They are typically used together. For example:
.TL

UNIX Text Processing

.AU

Dale Dougherty

.AU

Tim O’Reilly
.AI
O’Reilly & Associates, Inc.
.AB
This book provides a comprehensive introduction to the major
UNIX text-processing tools. It includes a discussion of
vi, ex, nroff, and troff, as
well as many other text-processing programs.
.AE
.LP
Exactly how the output will look depends on which document types you have selected. If you don’t specify any of the formats, you will get something like this:
UNIX Text Processing
Dale Dougherty
Tim 0’ Reilly
O’Reilly & Associates, Inc.
ABSTRACT
This book provides a comprehensive introduction to the major UNIX text-processing tools. It includes a discussion of vi, ex, nroff, and troff, as well as many other text-processing programs.
You can specify as many title lines as you want following .TL. The macro will be terminated by any of the other cover sheet macros, or by any paragraph macro. For multiple authors, .AU and .AI can be repeated up to nine times.
The cover sheet isn’t actually printed until a reset (such as that caused by any of the paragraph macros) is encountered, so if you want to print only a cover page, you should conclude it with a paragraph macro even if there is no following text.
In addition, if you use these macros without one of the overall document type macros like .RP, the cover sheet will not be printed separately. instead, the text will immediately follow. insert a .bp if you want a separate cover sheet.
▪ Miscellaneous Features ▪
Putting Information in a Box
Another way of handling special information is to place it in a box. Individual words can be boxed for emphasis using the .BX command:
This draws a box around the word RETURN.
To move to the next menu, press the


key.
As you can see, it might be a good idea to reduce the point size of the boxed word.
You can enclose a block of material within a box by using the pair of macros .B1 and .B2:
.B1

.B

.ce

Note to Reviewers

.R

.LP

Can you get a copy of a manuscript without annotations?

It seems to me that you should be

able to mark up a page with comments or

other scribbles while in Annotation Mode and

still obtain a printed copy without these marks.

Any ideas?

.sp

.B2
This example produces the following boxed section in troff:
Note to Reviewers
Can you get a copy of a manuscript without annotations? It seems to me that you should be able to mark up a page with comments or other scribbles while in Annotation Mode and still obtain a printed copy without these marks. Any ideas?
You may want to place boxed information inside a pair of keep or display macros. This will prevent the box macro from breaking if it crosses a page boundary. If you use these macros with nroff, you must also pipe your output through the col postprocessor as described in Chapter 4.
Footnotes
Footnotes present special problems—the main is printing the text at the bottom of the page. The .FS macro indicates the start of the text for the footnote, and .FE indicates the end of the text for the footnote. These macros surround the footnote text that will appear at the bottom of the page. The .FS macro is put on the line immediately following some kind of marker, such as an asterisk, that you supply in the text and in the footnote.
... in an article on desktop publishing.*

.FS

* "Publish or Perish: Start-up grabs early page language

lead," Computerworld, April 21, 1986, p. 1.

.FE
All the footnotes are collected and output at the bottom of each page underneath a short rule. The footnote text is printed in smaller type, with a slightly shorter line length then the body text. However, you can change these if you want.
Footnotes in ms use an nroff/troff feature called environments (see Chapter 14), so that parameters like line length or font that are set inside a footnote are saved independently of the body text. So, for example, if you issued the requests:
.FS

.ft B

.11 −5n

.in +5n
Some text
~

~

~

.FE
the text within the footnote would be printed in boldface, with a 5-en indent, and the line length would be shortened by 5 ens. The text following the footnote would be unaffected by those formatting requests. However, the next time a footnote was called, that special formatting would again be in effect.
*“Publish or Perish: Start-up grabs early page language
lead,” Computerworld, April 21, 1986, p. 1.
If a footnote is too long to fit on one page, it will be continued at the bottom of the next page.
Two-Column Processing
One of the nice features of the ms macros is the ease with which you can create multiple columns and format documents, such as newsletters or data sheets, that are best suited to a multicolumn format.
To switch to two-column mode, simply insert the .2C macro. To return to single-column mode, use .1C. Because of the way two-column processing works in ms, you can switch to two-column mode in the middle of a page, but switching back to a single column forces a page break. (You’ll understand the reason for this when we return to two-column processing in Chapter 16.)
The default column width for two-column processing is 7/15th of the line length. It is stored in the register CW (column width). The gutter between the columns is 1/15th of the line length, and is stored in the register GW (gutter width). By changing the values in these registers, you can change the column and gutter width.
For more than two columns, you can use the .MC macro. This macro takes two arguments, the column width and the gutter width, and creates as many columns as will fit in the line length. For example, if the line lengths are 7 inches, the request:
.MC 2i .3i
would create three columns 2 inches wide, with a gutter of .3 inches between the columns.
Again, .1C can be used to return to single-column mode. In some versions of ms, the .RC macro can be used to break columns. If you are in the left column, following text will go to the top of the next column. If you are in the right column, .RC will start a new page.
▪ Page Headers and Footers ▪
When you format a page with ms, the formatter is instructed to provide several lines at the top and the bottom of the page for a header and a footer. Beginning with the second page, a page number appears on a single line in the header and only blank lines are printed for the footer.
The ms package allows you to define strings that appear in the header or footer. You can place text in three locations in the header or footer: left justified, centered, and right justified. For example, we could place the name of the client, the title of the document, and the date in the page header and we could place the page number in the footer.
.ds LH GGS

.ds CH Alcuin Project Proposal

.ds RH \*(DY

.ds CF Page %
You may notice that we use the string DY to supply today’s date in the header. In the footer, we use a special symbol (%) to access the current page number. Here are the resulting header and footer:

Normally, you would define the header and footer strings at the start of the document, so they would take effect throughout. However, note that there is nothing to prevent you from changing one or more of them from page to page. (Changes to a footer string will take effect on the same page; changes to a header string will take effect at the top of the next page.)
▪ Problems on the First Page ▪
Because ms was originally designed to work with the cover sheet macros and one of the standard Bell document types, there are a number of problems that can occur on the first page of a document that doesn’t use these macros.*
First, headers are not printed on the first page, nor is it apparent how to get them printed there if you want them. The trick is to invoke the internal .NP (new page) macro at the top of your text. This will not actually start a new page, but will execute the various internal goings-on that normally take place at the top of a page.
Second, it is not evident how to space down from the top if you want to start your text at some distance down the page. For example, if you want to create your own title page, the sequence:
.sp 3i

.ce

\s16The Invention of Movable Type\s0
will not work.
The page top macro includes an .ns request, designed to ensure that all leftover space from the bottom of one page doesn’t carry over to the next, so that all pages start evenly. To circumvent this on all pages after the first one, precede your spacing request with an .rs (restore spacing) request. On the first page, a .fl request must precede a .rs request.
▪ Extensions to ms ▪
In many ways, ms can be used to give you a head start on defining your own macro package. Many of the features that are missing in ms can be supplied by user-defined macros. Many of these features are covered in Chapters 14 through 18, where, for example, we show macros for formatting numbered lists.
_____________________
*This problem actually can occur on any page, but is most frequently encountered on the first page.
Get UNIX° TEXT PROCESSING now with the O’Reilly learning platform.
O’Reilly members experience books, live events, courses curated by job role, and more from O’Reilly and nearly 200 top publishers.

