Chapter 4. Web Applications
The ASP.NET team at Microsoft set an ambitious goal for ASP.NET 2.0: to make it possible for web-site developers to build ASP.NET applications with 75% less coding. Their success means you will write a lot less plumbing code when you build ASP.NET 2.0-based applications, so that instead you can focus on making your web applications accessible and secure for your customers and clients. Among the improvements you’ll find in ASP.NET 2.0 are powerful new controls, including data access controls that free you from repetitive database programming, and security controls that enable you to better manage user accounts and passwords. Also available are new controls for managing access to site data and for offering a uniform user experience across your web site’s pages.
All of these features are available to C# programmers in all editions of Visual Studio 2005, with the exception of Visual C# 2005 Express Edition. Best of all, you no longer need Internet Information Server (IIS) to develop an ASP.NET application, a feature we’ll investigate in the first lab.
Develop Web Apps Without IIS
With Visual Studio 2005 you no longer need to install and use IIS to host your web applications while you develop them. Now Visual Studio gives you four choices:
- File System Web Site
This is the simplest alternative; just put all your files in a filesystem folder on your hard drive.
- Local IIS Web Site
This works just like it did with ASP.NET 1.x. You can use Visual Studio 2005 to create web applications that reside either on the local IIS root or in a virtual directory.
- Remote Web Site
You can use Visual Studio 2005 to create applications that reside on remote servers as long as those servers support FrontPage 2000 Server Extensions.
- FTP Web Site
Visual Studio 2005 allows you to create and maintain web sites on an FTP server.
How do I do that?
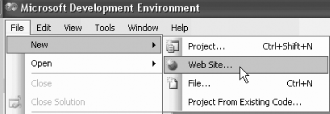
The first option, a filesystem-based web site, not only is completely new with ASP.NET 2.0, but also is one of the easiest ways to create a web application. You’re likely to use it often. Let’s explore that option here. To get started, open Visual Studio 2005 and choose File → New → Web Site..., as shown in Figure 4-1.
This menu choice opens the New Web Site dialog shown in Figure 4-2. Select ASP.NET Web Site in the Templates pane of the dialog. In the Location box choose File System. In the Language box choose Visual C# (this is, after all, a book on C#). Then in the box to the right of the Location box, choose a folder to house your ASP.NET files.

Click OK. You are placed into the Default.aspx file, in Source view. Select Design view instead.
Tip
Note two changes from Visual Studio 2003. Now the default is to put you in Source view rather than Design view, and within Design view the default is a flow layout rather than a grid layout. Thus, if you want absolute positioning, you must switch to grid layout. For this book we will follow the tradition of most web programmers and use tables for laying out pages when specific placement is needed.
Drag a label control and a button control from the Toolbox onto the form and double-click the button to open the code-behind file for the page. Notice (as noted in Chapter 1) that Visual Studio 2005 web forms use partial classes by default, so all the supporting code is not made visible to you.
In the Button1_Click event
handler, enter this code:
Label1.Text = "Hello.";
Try to run the application in debug mode. Visual Studio 2005 will interrupt to point out that you need a Web.config file with debugging enabled, as shown in Figure 4-3.

The default choice is to allow Visual Studio 2005 to create a Web.config file for you. Click OK.
What just happened?
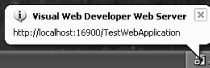
You’ll notice that a lot of things happened at once. You’ll see a notification in your taskbar that Visual Studio 2005 has started the Visual Web Developer Web Server, as shown in Figure 4-4.
Tip
Visual Studio 2005 starts an instance of Visual Web Developer Web Server to test your application. Unlike IIS, which includes a web server, FTP server, SMTP server, and other facilities, the Visual Web Developer Web Server is used only to test web applications during their development.
Clicking your web form button will cause a post back to the Visual Web Developer Web Server and an update of the button label, just as if this application were being served by IIS. A quick look at the Solution Explorer will also confirm that Visual Studio has added the Web.config file to your project files.
What about...
...editing the Web.config file that Visual Studio creates for me? Can I do that?
You can edit the file by hand, but it is much easier to edit it using the new Web Site Administration Tool (WAT).
Access the WAT by opening a browser and navigating directly to your .axd file (for example, http://localhost/TestWebApplication/Webadmin.axd) or, more easily, from Visual Studio 2005. To open the WAT from within Visual Studio 2005 choose Website → ASP.NET Configuration. The WAT for your application will open in a browser with four tabs, as shown in Figure 4-5.
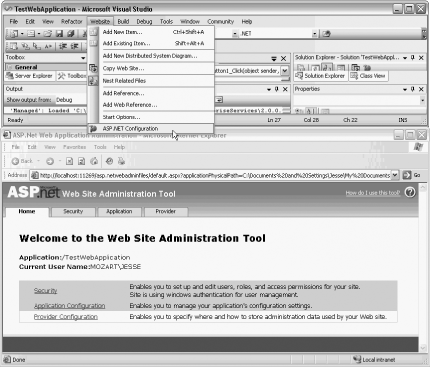
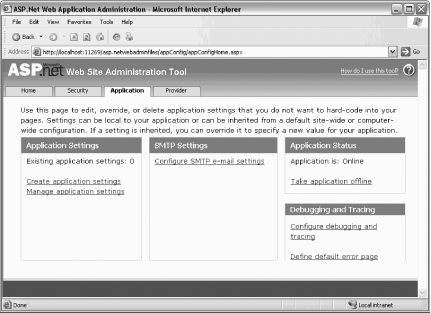
Click the Application tab for links to pages that will allow you to create Web.config settings painlessly and accurately, as shown in Figure 4-6.
Tip
The Web Site Administration Tool page shown in Figure 4-5 is actually an
ASP.NET application. You’ll find the source code on your hard drive
at c:\[WindowsDirectory]\Microsoft.NET\Framework\
[Version] \ ASP.NETWebAdminFiles.
Look closely at the URL displayed when you choose Website
→ ASP.NET Configuration. It will show you exactly which
file it is displaying (e.g., [...]
/appConfig/DebugandTrace.aspx).
...what about deploying a file-based system?
Just copy the contents of your folder to a virtual folder on the server, and you’re all set.
Where can I learn more?
The Web Site Administration Tool is reviewed in great detail in the MSDN Help files under the article “Web Site Administration Tool Overview.” Also, if you do a Google search for “ASP.NET Web Site Administration Tool” you will get literally thousands of hits, many of which will lead to articles on how to get the most out of this useful utility.
Provide Forms-Based Security Without Code
One of the most common tasks in building a publicly available web application is to create forms-based security, in which you allow your users to log in with a password (rather than, for example, not logging in, or using Windows-based authentication).
Note
Now creating forms-based security, complete with login screens and password maintenance, is provided in a set of related ASP.NET controls.
To make forms-based security work, you need to authenticate your users. In ASP.NET 2.0, adding this feature is greatly simplified by new controls that handle most of the plumbing for you.
How do I do that?
To explore new support for forms-based security in ASP.NET 2.0, let’s build a simple application. In this lab, you’ll work through the following steps:
Set up the application database.
Create the application folder as a virtual directory, setting its security type to Forms.
Create a web site.
Add login controls.
Verify that the user database is updated.
Create a Welcome page.
Create the Login page.
Set up the application database
ASP.NET 2.0 forms-based security is based on a set of tables that must be created in your database, typically SQL Server or SQL Server Express. Fortunately, ASP.NET provides a utility named aspnet_regsql.exe , located in the [Drive:] \Windows\Microsoft.NET\Framework\ [versionNumber] folder on your web server, which sets up the tables for you. This utility program will create the required database and all its tables.
The easiest way to use this utility is to run the aspnet_regsql.exe utility from the .NET command box, with no arguments. A wizard will be started that will walk you through the process. For more details, see the MSDN article “Installing the SQL Server Provider Database.”
Create a folder as a virtual directory; set its security to Forms
Start by creating an empty directory on your local drive. Call it FormsBasedSecurity. Open the IIS Manager and create a virtual directory to point to your new directory.
Tip
To open IIS Manager from the Windows Start menu select Control Panel → Administrative Tools → Internet Information Server.
To create a virtual directory, click the server name (typically your local computer) and then click Web Sites. Right-click Default Web Site, choose New → Virtual Directory, and work your way through the wizard, just as you did in ASP.NET 1.x.
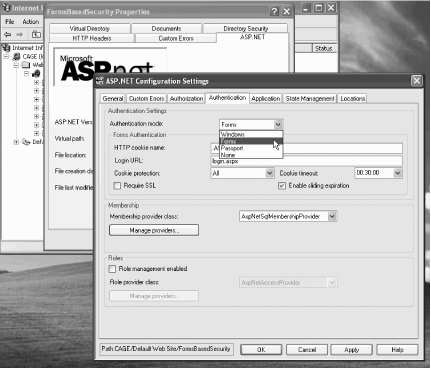
After you’ve created the virtual directory, right-click it within the IIS Administrator and choose Properties. Click the ASP.NET tab of the properties window, and then click Edit Configuration to open the ASP.NET Configuration Settings dialog.
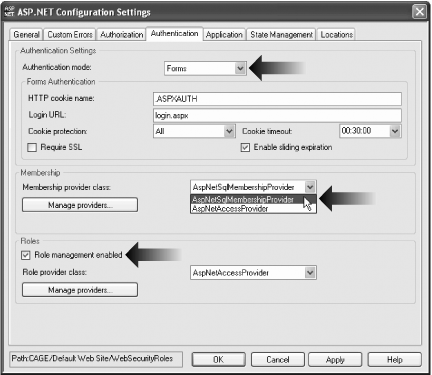
Within the ASP.NET Configuration Settings dialog click the Authentication tab, and within that tab set the “Authentication mode” to Forms and the “Membership provider class” to AspNetSqlMembershipProvider, as shown in Figure 4-7.
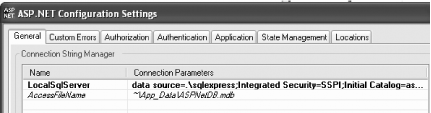
Click the General tab, and if LocalSqlServer is not set to the database
you use, set the connection parameters so that the data source is
set to your database (for example, sqlexpress), as shown in Figure 4-8.
Click OK to close the dialogs and return to the directory you created, where you’ll find a Web.config file containing the following XML:
<?xml version="1.0" encoding="utf-8"?>
<configuration>
   <connectionStrings>
  <remove name="LocalSqlServer" />
  <add name="LocalSqlServer" connectionString="data source=.\sqlexpress;
Integrated Security=SSPI;Initial Catalog=aspnetdb" />
    </connectionStrings>
    <system.web>
        <authentication mode="Forms" />
        <membership defaultProvider="AspNetSqlMembershipProvider" />
    </system.web>
</configuration>
Create the new web site
Open Visual Studio 2005 and create a new web site in the same directory. Visual Studio will interrupt and tell you that the site already exists, as shown in Figure 4-9.
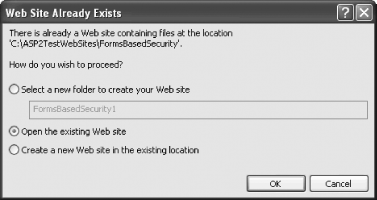
Select “Open the existing Web site” and your application should open with its Web.config file in place.
Tip
An alternative to using IIS for forms-based security is to use the ASP.NET Configuration Wizard. Select Website → ASP.NET Configuration Wizard on the Visual Studio menu bar. Click the Security tab and choose your authentication type. Choosing “From the Internet” will set up your application for forms authentication, and choosing “From a local network” will set you up for Windows authentication.
In this test application you will create three pages:
- Welcome
The Welcome page will display different information depending on whether the user has logged in.
- Login
The Login page presents a form where members can enter a username and a password.
- AddUser
For users to log in, first you must create a database of users to keep track of user accounts. This requires you to add a page to your site that lets users sign up for accounts in the first place.
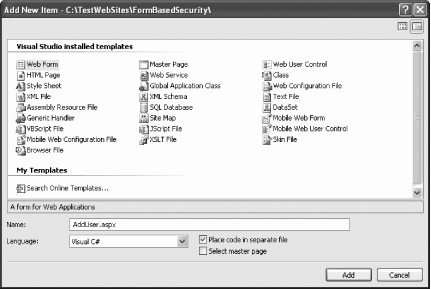
Begin by creating the AddUser web page and calling it AddUser.aspx, as shown in Figure 4-10.
Add login controls
Click the Design tab for your .aspx page, and then click the Login tab
in the Visual Studio Toolbox. Drag an instance of CreateUserWizard onto your page, as shown
in Figure
4-11.
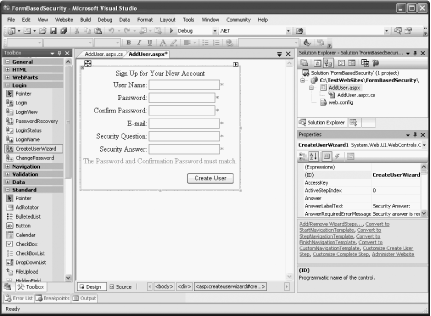
The CreateUserWizard
control will prompt the user for a username, a
password (twice), an email address, and a security question and
answer. All of this is configurable through the HTML that is created
by this control.
Click the control and scroll through the properties to find
the ContinueDestinationPageURL
property. Click the Browse button and choose the AddUser.aspx page so that you’ll be
brought back to the same page after the new user is
confirmed.
Finally, set the AddUser.aspx page as your Start page, and then test the application. After being prompted to update Web.config to allow debugging, you’ll be brought to the Create User Wizard. Fill in the form, as shown in Figure 4-12.
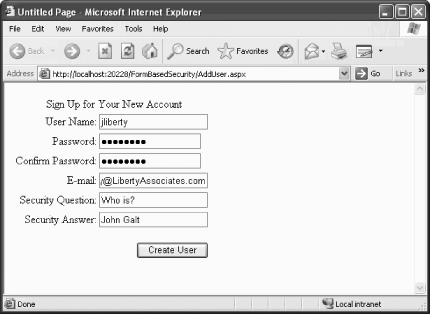
Click the Create User button. You should see a confirmation
screen and a button marked Continue. Clicking Continue will bring
you back to the Create Account form where you can add another user.
Add a few users and test the built-in validation the wizard
provides; you’ll find that you can’t enter the same username twice,
that the two passwords must match, and that the required fields must
have text. All of this is managed by FieldValidator controls within the HTML created by the Wizard control.
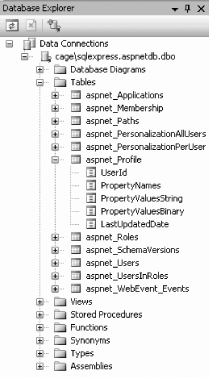
Verify that the user database is updated
Stop your project and look at the Database Explorer, where you will find the tables within the aspnetdb database you created earlier, as shown in Figure 4-13.
Create the Welcome page
With your user database in place you are ready to create the Welcome page that will welcome the logged-in user.
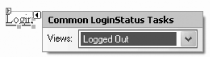
Create a new page called Default.aspx and drag a LoginStatus control from the Login section of the Toolbox.
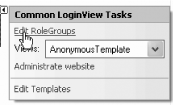
A link marked Login is placed on the page whose smart tag indicates that you are looking at the template you would see when no user is logged in, as shown in Figure 4-14.
You can set the properties of the LoginStatus control to, for example,
change the text of the link. You can also drop down the view window
to see the link and text for logged-in status.
Drag a LoginView control from the Toolbox and drop it onto the page
below the LoginStatus control.
Here you can enter text and controls that will be displayed based on
whether the user is logged in. Notice that this control has two
views: AnonymousTemplate and LoggedInTemplate. Which template is
displayed depends on whether the user has logged in.
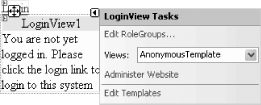
Click the smart tag, confirm that the view is set to AnonymousTemplate, and type some text in the box, as shown in Figure 4-15.
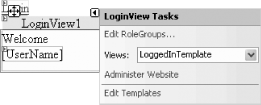
Now change the view on LoginView to LoggedInTemplate. Drag a
LoginName control onto the template so that you can welcome the
user by name, as shown in Figure 4-16.
Create the Login page
You are finally ready to create the Login page. Add a new page named Login.aspx. Change to Design view, and
drag a Login control onto the page. Just for fun, click the Auto
Format link from the smart tag, as shown in Figure 4-17.
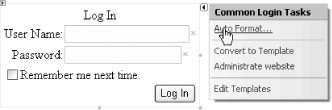
Choose a look you like for the Login control.
You’re all set. Make sure the Default.aspx page is the Start page, and run the application. The default page will inform you that you are not logged in and will offer a link to the Login page.
When you go to the Login page, enter a false login name and/or
an incorrect password. The Login
control informs you of the mistake, as shown in Figure 4-18.

Enter the correct name and password, and you are brought back to the Welcome page. Your status as logged in is noted, you are greeted by name, and you are offered the opportunity to log out.
What about . . .
...if users forget their passwords?
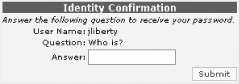
The new PasswordRecovery
control gives users a way to recover. Drag onto the
form a PasswordRecovery control
from the Login tab in the Toolbox (or create a link to a new page with
this control). The user will be prompted first for a known username,
and then with the question and answer you created earlier when you
were creating a user, as shown in Figure 4-19. If they match,
the password will be sent by email.
...what if I want users to change their passwords?
Add a ChangePassword
control to your page (for example, to
Default.aspx ). The user will be prompted for the original password
and then for the new password, as shown in Figure 4-20.
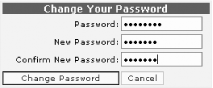
If all three fields are correct, the password will change in the database.
Where can I learn more?
For more information, see my article on forms-based security, titled “ASP.NET Forms” and available on O’Reilly’s ONDotnet.com site at http://www.ondotnet.com. In addition, an excellent article in the June 2004 issue of MSDN Magazine, titled “Security Headaches? Take ASP.NET 2.0” and written by Keith Brown, is available online. Finally, you might want to read the article “ASP.NET Web Site Security” in the MSDN Library.
Add Roles to ASP.NET Accounts
You can assign a set of permissions to a group of people. You do so in two steps: first you assign permissions to a role, and then you assign users to the roles you’ve created. Any given user can be in more than one role (e.g., administrator and manager). The permissions you assign to each role can determine access to a page or can determine the content of a given page displayed to members of that role.
How do I do that?
To demonstrate how to create roles and assign users to those
roles, you’ll need to create a new application, setting the
appropriate IIS configuration. In the previous lab you created the
directory for your application before you created the application
itself. To see that you can create the relationship between physical
and virtual directories in more than one way, this time let’s reverse
the order. Start by creating a new web application (called SecurityRoles).
Find the directory in which the Default.aspx page is held by clicking the page in the Solution Explorer and looking at the properties window. Use the IIS Administrator to create a virtual directory called SecurityRoles that points to that physical directory. Right-click the virtual directory and select Properties.
Click the ASP.NET tab and the Edit Configuration button (as you did in the previous lab). Once again click the Authentication tab and set Forms Authentication, but this time be sure to check the “Role management enabled” checkbox, as shown in Figure 4-21.
When you click OK and close the configuration dialogs, you’ll find that a Web.config file has been added to the directory:
<?xml version="1.0"?>
<configuration>
   <connectionStrings>
  <remove name="LocalSqlServer" />
  <add name="LocalSqlServer" connectionString="data source=.\sqlexpress;Integrated
Security=SSPI;Initial Catalog=aspnetdb" />
 </connectionStrings>
 <system.web>
      <membership defaultProvider="AspNetSqlMembershipProvider" />
  <authentication mode="Forms"/>
      <roleManager enabled="True" defaultProvider="AspNetSqlRoleProvider" />
      <compilation debug="true"/></system.web>
</configuration>
Notice that this time, the roleManager element has been added and its
enabled attribute has been set to
true.
Now you need to add to this lab the pages from the previous lab.
Tip
If you skipped the previous lab, simply download the source code and use the files in the directory marked FormsBasedSecurity.
One way to add these pages is to copy the .aspx and .aspx.cs files (that is all the files except Web.config) to the new directory.
Once you’ve done this, return to Visual Studio 2005 and, in the Solution Explorer, right-click the project and choose Add Existing Items to add the pages from the earlier lab to this one. Now you are set to add roles to this project.
Tip
A potentially easier way to copy your web site is to use the new Website → Copy Website command. This opens a wizard that allows you to specify which files to copy to the new web site. This is demonstrated in the next lab.
Add two HyperLink controls to the default page. The first link should
contain the words Add User and the second link
should contain the words Manage Roles. The first
link will redirect the user to the AddUser page you imported (set NavigateUrl by clicking the ellipses and
selecting the CreateAccount.aspx
page). Go to AddUser.aspx and
change the ContinueDestinationPageURL property of the
CreateUserWizard control to the default page so that each time you add a
user you will be brought back to the Default.aspx page.
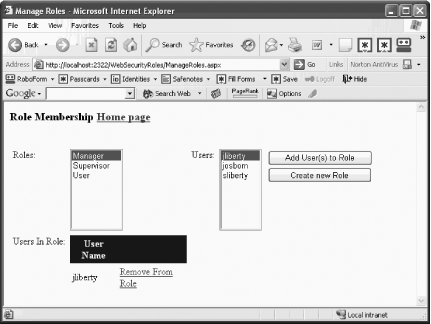
Create a new ManageRoles.aspx page. This page has a somewhat complex layout because it must display the list of roles and the list of users supported by your site, as well as which users have been assigned which roles. The complete .aspx listing is shown in Example 4-1, though it might be easier to download this code from either the O’Reilly or Liberty Associates web site.
Tip
Go back to Default.aspx
and set ContinueDestinationPageURL for the second
hyperlink to this new page.
<%@ Page Language="C#" AutoEventWireup="true"
CodeFile="ManageRoles.aspx.cs" Inherits="ManageRoles_aspx" %>
<!DOCTYPE html PUBLIC "-//W3C//DTD XHTML 1.1//EN" "http://www.w3.org/TR/xhtml11/
DTD/xhtml11.dtd">
<html xmlns="http://www.w3.org/1999/xhtml">
<head id="Head1" runat="server">
<title>Manage Roles</title>
</head>
<body>
<form id="form1" runat="server">
<h3>Role Membership
<asp:HyperLink ID="linkHome" Runat="server" NavigateUrl="~/Default.aspx">
Home page</asp:HyperLink>
</h3>
<asp:Label id="Msg" ForeColor="maroon" runat="server" /><BR>
<table CellPadding="3" border="0">
<tr>
<td valign="top">Roles:</td>
<td valign="top" style="width: 186px"><asp:ListBox id="RolesListBox"
runat="server" Rows="8" AutoPostBack="True">
</asp:ListBox></td>
<td valign="top">Users:</td>
<td valign="top"><asp:ListBox id="UsersListBox" DataTextField="Username"
Rows="8" SelectionMode="Multiple" runat="server" /></td>
<td valign="top" visible="false">
<table>
<tr>
<td>
<asp:Button Text="Add User(s) to Role" id="btnAddUsersToRole"
runat="server" OnClick="AddUsers_OnClick" />
</td>
</tr>
<tr>
<td>
<asp:Button Text="Create new Role" id="btnCreateRole"
runat="server" OnClick="CreateRole_OnClick"
Width="170px" Height="24px" />
</td>
</tr>
<tr>
<td>
<asp:Panel ID="pnlCreateRole" Runat="server" Width="259px"
Height="79px" Visible="False" BackColor="#E0E0E0">
<br />
<asp:Label ID="Label2" Runat="server" Text="New Role:"
Width="72px" Height="19px"/>
<asp:TextBox ID="txtNewRole" Runat="server"/> <br />
<br />
<asp:Button ID="btnAddRole" Runat="server"
Text="Add" OnClick="btnAddRole_Click"
Width="64px" Height="24px" /><br />
</asp:Panel>
</td>
</tr>
</table>
</td>
</tr>
<tr>
<td valign="top">Users In Role:</td>
<td valign="top" style="width: 186px">
<asp:GridView runat="server" CellPadding="4" id="UsersInRoleGrid"
AutoGenerateColumns="false" Gridlines="None"
CellSpacing="0"
OnRowCommand="UsersInRoleGrid_RemoveFromRole">
<HeaderStyle BackColor="navy" ForeColor="white" />
<Columns>
<asp:TemplateField HeaderText="User Name">
<ItemTemplate>
<%# Container.DataItem.ToString( ) %>
</ItemTemplate>
</asp:TemplateField>
<asp:ButtonField Text="Remove From Role" ButtonType="Link" />
</Columns>
</asp:GridView>
</td>
</tr>
</table>
</form>
</body>
</html>Tip
This page is designed to be useful, not pretty. It is based on a demonstration .aspx page provided by Microsoft with beta software.
The complete code associated with the ManageRoles.aspx page is listed in Example 4-2.
using System;
using System.Data;
using System.Configuration;
using System.Collections;
using System.Web;
using System.Web.Security;
using System.Web.UI;
using System.Web.UI.WebControls;
using System.Web.UI.WebControls.WebParts;
using System.Web.UI.HtmlControls;

public partial class ManageRoles_aspx : System.Web.UI.Page
{
   string[  ] rolesArray;
   MembershipUserCollection users;
   string[  ] usersInRole;

   public void Page_Load( )
   {
      Msg.Text = "";


      if (!IsPostBack)
      {
         rolesArray = Roles.GetAllRoles( );
         RolesListBox.DataSource = rolesArray;
         RolesListBox.DataBind( );

         // Bind users to ListBox.

         users = Membership.GetAllUsers( );
         UsersListBox.DataSource = users;
         UsersListBox.DataBind( );
      }

      if (RolesListBox.SelectedItem != null)
      {
         // Show users in role. Bind user list to GridView.

         usersInRole = Roles.GetUsersInRole(RolesListBox.SelectedItem.Value);
         UsersInRoleGrid.DataSource = usersInRole;
         UsersInRoleGrid.DataBind( );
      }
   }

   // void AddUsersButton_Click(object sender, EventArgs e)

   public void AddUsers_OnClick(object sender, EventArgs args)
                  {
                  // Verify that a role is selected.

      if (RolesListBox.SelectedItem =  = null)
                  {
                  Msg.Text = "Please select a role.";
                  return;
                  }

                  // Verify that at least one user is selected.

      if (UsersListBox.SelectedItem =  = null)
                  {
                  Msg.Text = "Please select one or more users.";
                  return;
                  }

                  // Create list of users to be added to the selected role.

      string[  ] newusers = new string[UsersListBox.GetSelectedIndices( ).Length];

                  for (int i = 0; i < newusers.Length; i++)
                  {
                  newusers[i] =
                  UsersListBox.Items[UsersListBox.GetSelectedIndices( )[i]].Value;
                  }


      // Add the users to the selected role.

      try
      {
         Roles.AddUsersToRole(newusers, RolesListBox.SelectedItem.Value);

         // Re-bind users in role to GridView.

         usersInRole = Roles.GetUsersInRole(RolesListBox.SelectedItem.Value);
         UsersInRoleGrid.DataSource = usersInRole;
         UsersInRoleGrid.DataBind( );
      }
      catch (HttpException e)
      {
         Msg.Text = e.Message;
      }
   }


   public void UsersInRoleGrid_RemoveFromRole(object sender, GridViewCommandEventArgs
args)
   {
      // Get the selected username to remove.

      int index = Convert.ToInt32(args.CommandArgument);

      string username = ((DataBoundLiteralControl)UsersInRoleGrid.Rows[index].
Cells[0].Controls[0]).Text;


      // Remove the user from the selected role.

      try
      {
         Roles.RemoveUserFromRole(username, RolesListBox.SelectedItem.Value);
      }
      catch (Exception e)
      {
         Msg.Text = "An exception of type " + e.GetType( ).ToString( ) +
                " was encountered removing the user from the role.";
      }


      // Re-bind users in role to GridView.

      usersInRole = Roles.GetUsersInRole(RolesListBox.SelectedItem.Value);
      UsersInRoleGrid.DataSource = usersInRole;
      UsersInRoleGrid.DataBind( );
   }
   public void CreateRole_OnClick(object sender, EventArgs e)
                  {
                  pnlCreateRole.Visible = true;
                  }
   /// <summary>
   /// Handles clicking the Add button in the panel made
   /// visible by clicking Create New Role
   /// </summary>
   public void btnAddRole_Click(object sender, EventArgs e)
   {
      // make sure you have some text in the name of the role
      if (txtNewRole.Text.Length > 0)
      {
         string newRole = txtNewRole.Text;

         // if the role does not already exist, add it
         // rebind the RolesListBox to show the new role
         if (Roles.RoleExists(newRole) =  = false)
         {
            Roles.CreateRole(newRole);
            rolesArray = Roles.GetAllRoles( );
            RolesListBox.DataSource = rolesArray;
            RolesListBox.DataBind( );
         }
      }

      pnlCreateRole.Visible = false;
   }
}
What just happened?
Here’s how the code works. The logic begins with the Create Role button’s onClick event handler, which makes the
Create Role panel visible:
void CreateRole_OnClick(object sender, EventArgs e)
{
   pnlCreateRole.Visible = true;
}
The panel contains a text box (New Role) that you use to name a new role, and a button (Add) to add the new role to the roles collection, as shown in Figure 4-22.

When you click the Add button, the btnAddRole_Click event handler is
called:
void btnAddRole_Click(object sender, EventArgs e)
{
   if (txtNewRole.Text.Length > 0)
   {
      string newRole = txtNewRole.Text;

      if (Roles.RoleExists(newRole) =  = false)
      {
         Roles.CreateRole(newRole);
               rolesArray = Roles.GetAllRoles( );
               RolesListBox.DataSource = rolesArray;
               RolesListBox.DataBind( );
      }
   }
Assuming there is text in the New Role text box, you check
whether the role already exists; if it doesn’t you create a new role
using the static CreateRole method
of the Roles class provided by .NET
2.0.
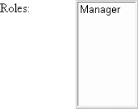
Then you get all the roles and rebind the listbox, which now will include the new role, as shown in Figure 4-23.
Once the new role is added, the panel is closed:
pnlCreateRole.Visible = false;
Run the application. If you are starting with a new database add
some users. Next, click Add Roles and add a couple of roles. Then
click a role (to highlight it) and one or more users (to highlight
them), and then click Add User(s) to Role. This invokes the AddUsers_OnClick event handler.
First you check to make sure a role has been selected:
if (RolesListBox.SelectedItem =  = null)
{
   Msg.Text = "Please select a role.";
   return;
}
and that at least one user has been selected:
if (UsersListBox.SelectedItem =  = null)
{
   Msg.Text = "Please select one or more users.";
   return;
}
Then you get an array of the users to be added:
string[ ] newusers = new string[UsersListBox.GetSelectedIndices( ).Length];
and you iterate through those users, retrieving each selected user’s name:
      for (int i = 0; i < newusers.Length; i++)
      {
         newusers[i] = UsersListBox.Items[
           UsersListBox.GetSelectedIndices( )[i]].Value;
      }
Now you call the static AddUsersToRole method on the Roles
class, passing in the array of usernames and the role you want these
users added to. Then you rebind the users who are in that role to the
UsersInRoleGrid method:
try
{
   Roles.AddUsersToRole(newusers, RolesListBox.SelectedItem.Value);

   // Re-bind users in role to GridView.

   usersInRole = Roles.GetUsersInRole(RolesListBox.SelectedItem.Value);
   UsersInRoleGrid.DataSource = usersInRole;
   UsersInRoleGrid.DataBind( );
}
catch (HttpException e)
{
   Msg.Text = e.Message;
}
The results are shown in Figure 4-24.
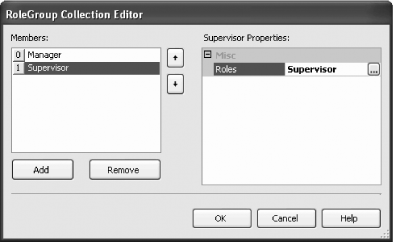
Add each user to one or more roles, and when you are done you’ll be ready to test whether these roles have any effect. To do so, stop the application and edit the default page. Click the smart tag for the LoginView control and click Edit RoleGroups, as shown in Figure 4-25. This will open the RoleGroup Collection Editor dialog box.
Add a couple of the roles you created earlier, as shown in Figure 4-26.
Switch to Source view on your Default.aspx page; a new section has been
added to the LoginView
control:
<asp:LoginView ID="LoginView1" Runat="server">
    <RoleGroups>
        <asp:RoleGroup Roles="Manager"></asp:RoleGroup>
        <asp:RoleGroup Roles="Supervisor"></asp:RoleGroup>
    </RoleGroups>
Now you can control what the members of each role will see by
using contentTemplate elements. You
add these between the opening and closing tags of each role:
<RoleGroups>
    <asp:RoleGroup Roles="Manager">
       <ContentTemplate>
         Welcome
         <asp:LoginName ID="LoginNameManager" Runat="server" />
         You are a manager
       </ContentTemplate>
    </asp:RoleGroup>
    <asp:RoleGroup Roles="Supervisor">
        <ContentTemplate>
            Supervisor tools go here
        </ContentTemplate>
    </asp:RoleGroup>
</RoleGroups>
Run the application. In the preceding example, I added josborn and sliberty to the Supervisor role, but not
jliberty, who is in the Manager
role. When I log in as josborn I
see the words “Supervisor tools go here,” but if I log in as jliberty I do not see those words. Instead,
I see the words dictated by the content template associated with
managers.
What about . . .
...restricting access to pages based on roles? Can I do that?
Yes, you can test if the logged-in user is in a particular role
by using the User.IsInRole
method:
bool isManager = User.IsInRole("Manager");You can also restrict access by adding an authorization section
to a Web.config file (which you can place in a subdirectory to control
access to all files in that subdirectory and to all of its
subdirectories), and you can use the location element to control access to
specific files:
<authorization>
  <deny users='?' />
  <allow roles='Manager' />
  <deny users='*' />
</authorization>
The first line (deny
users='?') prohibits access to anyone who is not logged in.
The second line (allow
roles='Manager') allows access to anyone in the Manager
role, and the final line (deny
users='*') disallows anyone, but is overridden by allow roles.
...what about using the ASP.NET Web Site Administration Tool to set up roles?
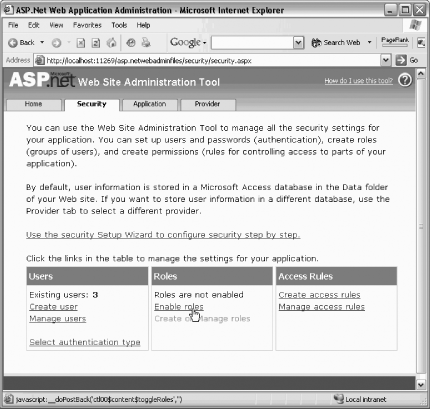
Sure! First you need to stop the application. Then, on the Visual Studio menu bar, click Website → ASP.NET Configuration and choose the Security tab. Click “Enable roles,” as shown in Figure 4-27.
Where can I learn more?
MSDN offers a good article on membership, titled “New Membership Features in ASP.NET Whidbey.” Also, see my article on roles, titled “ASP.NET Forms Security Part 2” and available on O’Reilly’s ONDotnet.com site at http://www.ondotnet.com. You’ll also find an excellent article on roles and ASP.NET 2.0 security by Alex Homer, Rob Howard, and David Sussman at http://www.informit.com/articles/article.asp?p=351414&seqNum=3.
Create Personalized Web Sites
Modern web sites that are designed to be visited by users repeatedly should support personalization for those users. Personalization enables the site to remember the user’s preferences and, if appropriate, previous user choices (for example, “You have three items in your shopping cart.”)
Tip
ASP.NET provides extensive support for personalization, allowing your site to “remember” your user’s preferences.
How do I do that?
To get started, you’ll want a new project that duplicates the work you accomplished in the previous lab. Here are the steps you need to take:
Create a new web site and name it
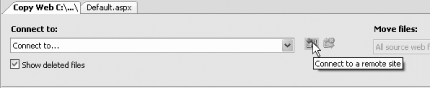
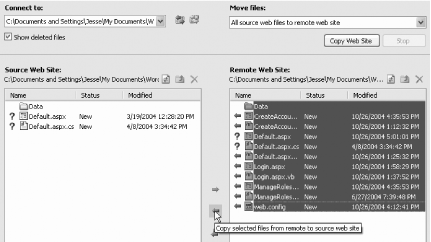
SitePersonalization.On the Visual Studio menu bar, choose Website → Copy Website and click the Connect to Website button. The relevant part of the page is shown in Figure 4-28.
Point to the previous lab and click Open. The wizard uses a question mark to identify the files that have the same name in both applications. Highlight all the files in the remote site, and then click the left-pointing arrow, as shown in Figure 4-29.
Close the wizard and, if prompted, click Yes to overwrite files and Yes to update files.
Run the program to make sure you have a duplicate of your previous lab.
The simplest form of personalization is to record information about the user, and then to make that information available whenever the user logs on. This requires a kind of persistence that goes beyond session state. To create true personalization, you’ll want to store the user’s choices and information in a database that associates the saved information with a particular user, and that persists indefinitely.
ASP.NET 2.0 provides all the plumbing required. You do not have to design, edit, or manage the database tables; all of that is done for you.
ASP.NET 2.0 has decoupled the Profile API (how you programmatically interact with profile data) from the underlying data provider (how you store the data). This allows you to use the default provider (SQL Server Express), or one of the other providers supplied (SQL Server), or even to write your own provider (for example, for an existing customer relationship management system), without changing the way you interact with the profile in the rest of your code.
To add data to the user’s profile, first you must alert the
system about the data you want to store. You do so in Web.config by adding a profile section to
the system.web element:
<?xml version="1.0"?>
<configuration>
   <connectionStrings>
  <remove name="LocalSqlServer" />
  <add name="LocalSqlServer" connectionString="data source=.\sqlexpress;Integrated
Security=SSPI;Initial Catalog=aspnetdb" />
 </connectionStrings>
 <system.web>
      <membership defaultProvider="AspNetSqlMembershipProvider" />
  <authentication mode="Forms"/>
      <roleManager enabled="True" defaultProvider="AspNetSqlRoleProvider" />
      <compilation debug="true"/>
        <profile>
               <properties>
               <add name="lastName" />
               <add name="firstName" />
               <add name="phoneNumber" />
               <add name="birthDate" type="System.DateTime"/>
               </properties>
               </profile>

    </system.web>
</configuration>
This causes the Profile API to create storage for four pieces of
information: first and last name, phone number, and birth date. The
default storage type is string.
Notice, however, that we are storing the birth date as a DateTime object.
You can gather this information in any way you want. To keep the
example simple, we’ll remove the role groups section from Default.aspx and add a new hyperlink to LoggedInTemplate:
<asp:LoginView ID="LoginView1" Runat="server">
<LoggedInTemplate>
Welcome
<asp:LoginName ID="LoginName1" Runat="server" />
<asp:HyperLink ID="linkProfile" Runat="server"
NavigateUrl="~/ProfileInfo.aspx">Add Profile Info
</asp:HyperLink>
...
</LoggedInTemplate>
...
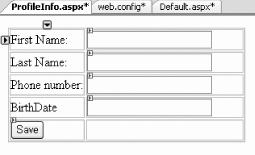
</asp:LoginView>As you can see, the link brings you to ProfileInfo.aspx, a page you’ll create now. Add a table, and within the table add labels and checkboxes as well as a Save button, as shown in Figure 4-30.
The HTML code for the Profile table is shown in Example 4-3.
<%@ Page Language="C#" AutoEventWireup="true" CodeFile="ProfileInfo.aspx.cs"
Inherits="ProfileInfo_aspx" %>
<!DOCTYPE html PUBLIC "-//W3C//DTD XHTML 1.1//EN" "http://www.w3.org/TR/xhtml11/
DTD/xhtml11.dtd">
<html xmlns="http://www.w3.org/1999/xhtml" >
<head runat="server">
<title>Profile Information</title>
</head>
<body>
<form id="form1" runat="server">
<div>
<table>
<tr>
<td>First Name: </td>
<td style="width: 193px">
<asp:TextBox ID="firstName" Runat="server" />
</td>
</tr>
<tr>
<td>Last Name: </td>
<td style="width: 193px">
<asp:TextBox ID="lastName" Runat="server" /></td>
<!-- <td>
<asp:RequiredFieldValidator ID="lastNameRequired" Runat="server"
ErrorMessage="Last name is required" ControlToValidate="lastName" Display="Dynamic">
*</asp:RequiredFieldValidator>
</td>
-->
</tr>
<tr>
<td>Phone number: </td>
<td style="width: 193px">
<asp:TextBox ID="phone" Runat="server" />
</td>
</tr>
<tr>
<td>BirthDate</td>
<td style="width: 193px"><asp:TextBox ID="birthDate"
Runat="server" /></td>
</tr>
<tr>
<td>
<asp:Button ID="save" Text="Save" Runat="server"
OnClick="save_Click" />
</td>
<td style="width: 193px"></td>
</tr>
</table>
</div>
</form>
</body>
</html>All you have to do now is add an event handler for the Save button:
void save_Click(object sender, EventArgs e)
{
   if (Profile.IsAnonymous =  = false)
   {
      Profile.lastName = this.lastName.Text;
      Profile.firstName = this.firstName.Text;
      Profile.phoneNumber = this.phone.Text;
      Profile.birthDate = Convert.ToDateTime(this.birthDate.Text);
   }
   Response.Redirect("Default.aspx");
}
When you start the application, you are asked to log in. Once
you do this, a new hyperlink, Add Profile Info appears . This was created by the hyperlink you added to
LoggedInTemplate (earlier).
Clicking that link brings you to your new Profile page.
The Profile object has properties that correspond to the properties
you added in Web.config. To test
that the Profile object has in fact
stored this data, you’ll add a panel to the bottom of the default
page, after the hyperlinks but before the closing </div> tag:
<asp:Panel ID="pnlInfo" Runat="server" Visible="False" Width="422px" Height="63px">
  <br />
  <table width="100%">
    <tr>
      <td>
        <asp:Label ID="lblFullName" Runat="server"
         Text="Full name unknown">
        </asp:Label></td>
      </tr>
    <tr>
      <td>
        <asp:Label ID="lblPhone" Runat="server"
          Text="Phone number unknown">
        </asp:Label>
      </td>
    </tr>
    <tr>
      <td>
        <asp:Label ID="lblBirthDate" Runat="server"
            Text="Birthdate  unknown">
        </asp:Label>
      </td>
    </tr>
  </table>
 </asp:Panel>
The panel has a table with three rows, and each row has a label
that is initialized to say that the value is unknown (this is not
normally needed, but it’s included here to ensure that the data you
see was in fact retrieved from the Profile object). When the page is loaded,
you check to see if you have profile data for this user and, if so,
you assign that data to the appropriate controls:
public partial class Default_aspx
{
   public void Page_Load(object sender, EventArgs e)
   {
      if (Profile.UserName != null && Profile.IsAnonymous =  = false)
      {
         this.lblFullName.Text = "Full name: " +
             Profile.firstName + " " + Profile.lastName;
         this.lblPhone.Text = "Phone: " + Profile.phoneNumber;
         this.lblBirthDate.Text = "Born: " +
           Profile.birthDate.ToShortDateString( );
         this.pnlInfo.Visible = true;
      }
      else
      {
         this.pnlInfo.Visible = false;
      }
   }      // end page load
}         // end partial class
Notice that you convert DateTime to a string for easy display in the label.
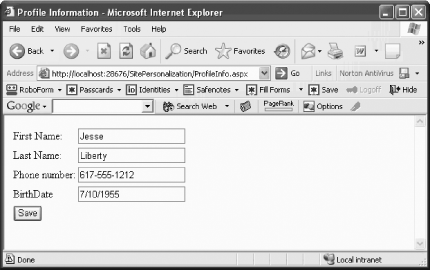
Run the application, log in, and click Add Profile Info. You will be brought to the Profile Information form, as shown in Figure 4-31.
When you return to the default page, the Page_Load event fires, both parts of the
if statement return true (that is, the UserName value in the profile is not
null), and the user is logged in
and thus is not anonymous:
if (Profile.UserName != null && Profile.IsAnonymous = = false)
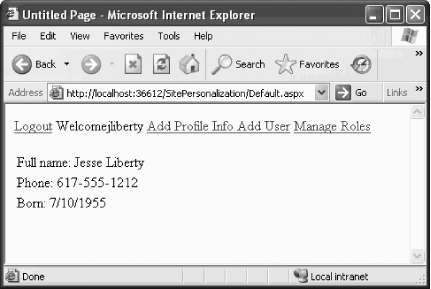
Your profile information is displayed, as shown in Figure 4-32.
What about...
...the profile information? Where is it stored?
To see where the profile information is stored, stop the
application and examine the tables in your storage database. You’ll
want to examine two tables: aspnet_Users (which lists all the users your security system knows
about) and aspnet_Profile
(which lists the profile information for those users),
as shown in Figure
4-33.
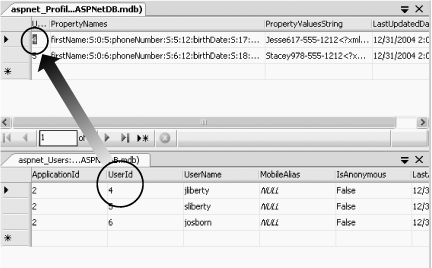
There are a number of things to notice. I’ve circled the
UserID in both tables; the entries
in the Profile table are matched to the individual user via the
UserID.
The Profile table has two significant columns in addition to
UserID: PropertyNames and PropertyValueString. The entries in the
PropertyNames columns correspond to
the entries you created in the <profile> section of Web.config:
<profile>
    <properties>
        <add name="lastName" />
        <add name="firstName" />
        <add name="phoneNumber" />
        <add name="birthDate" type="System.DateTime"/>
    </properties>
</profile>
Each property is named (for example, lastName) and is given a type (S for string), a starting offset (firstName begins at offset 7), and a length
(firstName’s value has a length of
5). This offset and value are used to find the value within the
PropertyValueString field.
...what about saving complex types?
So far you’ve seen how to save built-in types such as strings and dates. In the next lab you’ll see how to store complex types that might be needed to create a “shopping cart.”
Where can I learn more?
O’Reilly’s ONDotnet site (http://www.ondotnet.com) provides numerous articles on personalization and extensive documentation on the subject is available in the MSDN.
Personalize with Complex Types
Although personalizing a site for your users is terrific, to make a useful commercial site you often have to store complex user-defined types (classes) or collections. The ASP.NET Web Site Administration Tool (WAT) makes that easy.
Note
Commercial sites often have to store complex user-defined types (classes) or collections for individual users (for example, shopping carts).
How do I do that?
Once again you need a new web site. Create one and call it
ComplexPersonalization. Use the
Copy Web Site Wizard to copy the previous lab to a new lab, or
download the source from the previous lab and copy it to a new lab
from the SitePersonalization
folder.
In this lab you’ll create the world’s simplest shopping cart.
To create a complex profile
property you’ll need to edit the Web.config file. In this case, we’ll add a collection of strings
called CHOSENBOOKS that will allow
the user to choose one or more books and have those choices stored in
the profile.
Add a line to Web.config for your new property:
<profile>
  <properties>
    <add name="lastName" />
    <add name="firstName" />
    <add name="phoneNumber" />
    <add name="birthDate" type="System.DateTime"/>
    <add name="CHOSENBOOKS"
     type="System.Collections.Specialized.StringCollection" />
  </properties>
</profile>
To see this collection at work, drag a CheckBoxList from the Visual Studio Toolbox
onto the ProfileInfo page, which
you will populate with the names of four books. Hand-populate this
list by clicking the Items property
and filling in the ListItems Collection Editor, or by adding the
control by hand to the .aspx page
using the following code:
<td style="width: 193px">
    <asp:CheckBoxList ID="cblBooks" Runat="server" >
        <asp:ListItem>Programming C#</asp:ListItem>
        <asp:ListItem>Programming ASP.NET</asp:ListItem>
        <asp:ListItem>Programming .NET Apps</asp:ListItem>
        <asp:ListItem>Programming VB.NET</asp:ListItem>
    </asp:CheckBoxList>
</td>
Click the Save button; the handler will add the books to the profile:
void save_Click(object sender, EventArgs e)
{
   Profile.lastName = this.lastName.Text;
   Profile.firstName = this.firstName.Text;
   Profile.phoneNumber = this.phone.Text;
   Profile.birthDate = Convert.ToDateTime(this.birthDate.Text);

   Profile.CHOSENBOOKS = new System.Collections.Specialized.StringCollection( );
               foreach (ListItem item in this.cblBooks.Items)
               {
               if (item.Selected)
               {
               Profile.CHOSENBOOKS.Add(item.Value.ToString( ));
               }
               }
   Response.Redirect("Default.aspx");
}
Tip
Each time you save the books, you create an instance of the
String collection, and then you iterate through the checked
listboxes, looking for the selected items. Each selected item is
added to the String collection
within the profile (the CHOSENBOOKS property).
To confirm that this data has been stored, add a listbox
(lbBooks) to the Default.aspx page, and bind that listbox to the collection in the
profile:
public partial class Default_aspx : System.Web.UI.Page
{
    protected void Page_Load(object sender, EventArgs e)
    {
      if (Profile.UserName != null && Profile.IsAnonymous =  = false)
      {
         this.lblFullName.Text = "Full name: " +
            Profile.firstName + " " + Profile.lastName;
         this.lblPhone.Text = "Phone: " + Profile.phoneNumber;
         this.lblBirthDate.Text = "Born: " +
           Profile.birthDate.ToShortDateString( );
         this.pnlInfo.Visible = true;
      }
      else
      {
         this.pnlInfo.Visible = false;
      }

      if (Profile.CHOSENBOOKS != null)
      {
         this.lbBooks.DataSource = Profile.CHOSENBOOKS;
         this.lbBooks.DataBind( );
         this.lbBooks.Visible = true;
      }
      else
      {
         this.lbBooks.Visible = false;
      }
    }
To make your code a bit easier to maintain, you want to have the
selected values (name, phone, selected books, etc.) prefilled when you
return to the Profile Information page, so you’ll implement a bit of
code on Page_Load to get the
initial values from the Profile
object:
public partial class ProfileInfo_aspx : System.Web.UI.Page
{
    protected void Page_Load(object sender, EventArgs e)
    {
      if (!IsPostBack && Profile.UserName != null)
      {
         if (Profile.IsAnonymous =  = false)
         {
            this.lastName.Text = Profile.lastName;
            this.firstName.Text = Profile.firstName;
            this.phone.Text = Profile.phoneNumber;
            this.birthDate.Text = Profile.birthDate.ToShortDateString( );
         }

         if (Profile.CHOSENBOOKS != null)
         {
            foreach (ListItem li in this.cblBooks.Items)
            {
               foreach (string s in Profile.CHOSENBOOKS)
               {
                  if (li.Text =  = s)
                  {
                     li.Selected = true;
                  }   // end if text is the same
               }      // end foreach string in saved isbns
            }         // end foreach item in the listbox
         }            // end if savedisbns not null
      }               // end if not postback
    }            // end Page Load
Each time you navigate to the Profile Information page, the values are updated from the existing profile (if any) and you are free to change them and save the changes, as shown in Figure 4-34.

When you return to the default page, your saved profile information is reflected, as shown in Figure 4-35.

What about...
...anonymous personalization?
Most sites would like to allow the user to make choices (for example, add to a shopping cart) before logging in. In this lab that is not possible, but anonymous personalization is covered in the next lab.
Where can I learn more?
Numerous articles on personalization are available on ONDotnet (http://www.ondotnet.com), as well as in the MSDN.
Add Anonymous Personalization to Your Site
It is common to allow your users to personalize your site before identifying themselves. A classic example of this is Amazon.com, which lets you add books to your shopping cart before you log in (you need to log in only to actually purchase what is in your cart).
ASP.NET 2.0 supports personalization and, even more important, the ability to link the anonymous data with a user’s personalized data once that user logs in (you don’t want the user to lose what is in his cart when he does log in).
How do I do that?
Once again, use Copy Web Site to copy the previous lab to a new
web site called AnonymousPersonalization.
To enable anonymous personalization you must update your Web.config file:
<?xml version="1.0"?>
<configuration>
   <system.web>
      <anonymousIdentification enabled="true" />
  <authentication mode="Forms"/>
      <roleManager enabled="true"/>
      <compilation debug="true"/>
        <profile>
            <properties>
                <add name="lastName" />
                <add name="firstName" />
                <add name="phoneNumber" />
                <add name="birthDate" type="System.DateTime" />
                <add name="CHOSENBOOKS"
                 type="System.Collections.Specialized.StringCollection"
                 allowAnonymous="true" />
             </properties>
        </profile>

    </system.web>
</configuration>
Add the attribute-value pair allowAnonymous="true" to the CHOSENBOOKS element of Web.config.
Redesign your Default.aspx
page so that both the hyperlink that links to the
Profile Information page and the lbBooks listbox are outside of the LoginView control (so you can see the
hyperlink and the list, even if you are not logged in). While you are
at it, rename Add Profile Info to
Profile Info because you will be
using this link to add and edit the profile information, as shown in Example
4-4.
<%@ Page Language="C#" AutoEventWireup="true" CodeFile="Default.aspx.cs"
Inherits="Default_aspx" %>

<!DOCTYPE html PUBLIC "-//W3C//DTD XHTML 1.1//EN" "http://www.w3.org/TR/xhtml11/
DTD/xhtml11.dtd">

<html xmlns="http://www.w3.org/1999/xhtml" >
<head runat="server">
    <title>Untitled Page</title>
</head>
<body>
    <form id="form1" runat="server">
    <div>
        <asp:LoginStatus ID="LoginStatus1" Runat="server" />
        <asp:LoginView ID="LoginView1" Runat="server" >

            <LoggedInTemplate>
                Welcome
                 <asp:LoginName ID="LoginName1" Runat="server" />

            </LoggedInTemplate>
            <AnonymousTemplate>
                You are not yet logged in
            </AnonymousTemplate>
        </asp:LoginView>
        <asp:HyperLink ID="HyperLink1" Runat="server" NavigateUrl="~/AddUser.aspx">
Add User</asp:HyperLink>
        <asp:HyperLink ID="HyperLink2" Runat="server" NavigateUrl="~/
ManageRoles.aspx">Manage Roles</asp:HyperLink>
        <asp:Panel ID="pnlInfo" Runat="server" Visible="False" Width="422px"
Height="63px">
            <br />
            <table width="100%">
                <tr><td><asp:Label ID="lblFullName" Runat="server"
Text="Full name unknown"></asp:Label></td></tr>
                <tr><td><asp:Label ID="lblPhone" Runat="server"
Text="Phone number unknown"></asp:Label></td></tr>
                <tr><td><asp:Label ID="lblBirthDate" Runat="server"
Text="Birthdate  unknown"></asp:Label></td></tr>
            </table>
         </asp:Panel>

    <asp:HyperLink ID="linkProfile" Runat="server"
               NavigateUrl="~/ProfileInfo.aspx">Profile Info</
asp:HyperLink>

                  <br />  <asp:ListBox ID="lbBooks"
Runat="server" />

    </div>
    </form>
</body>
</html>
When an anonymous user chooses books, the user will
automatically be assigned a Globally Unique Identifier (GUID), and an entry will be
made in the database for that ID. However, note that only those
properties marked with allowAnonymous can be stored, so you must
modify your save_Click event
handler in ProfileInfo.aspx.cs.
Bracket the entries for all the profile elements
except CHOSENBOOKS in an if statement that tests whether the user is
currently Anonymous, as shown in
the following snippet:
               if (Profile.IsAnonymous =  = false)
{
   Profile.lastName = this.lastName.Text;
   Profile.firstName = this.firstName.Text;
   Profile.phoneNumber = this.phone.Text;
   Profile.birthDate = Convert.ToDateTime(this.birthDate.Text);
}
Profile.CHOSENBOOKS =
   new System.Collections.Specialized.StringCollection( );
When saving your profile data, you check whether the IsAnonymous property is false.
If it is false, you know you are
dealing with a logged-in user, and you can get all the properties;
otherwise, you can get only those that are allowed for anonymous
users.
Before you run the application, however, you must enable the anonymous identification feature. To do so, add the following attribute-value pair to the top of your Web.config file:
<anonymousIdentification enabled="true" />
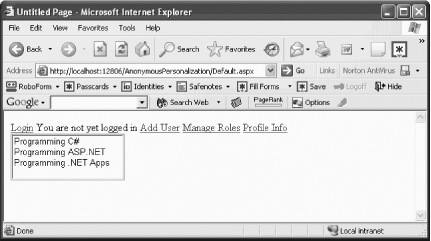
Run the application. Do not log in, but do click the Profile Info link. Select a few books and click Save. When you return to the default page, you are still not logged in, but your selected books are displayed, as shown in Figure 4-36.
Stop the application and reopen the database. You’ll see that an
ID has been created for this anonymous user and UserName has been set to the GUID generated. In addition, the shopping cart has been
stored in the corresponding record, as shown in Figure 4-37.

What about...
...migrating the anonymous data to the actual user’s data?
When the user does log in, you must migrate the profile data you’ve accumulated for the anonymous user to the appropriate authenticated user’s record (so that, for example, shopping cart items are not lost). You do this by writing a global handler in global.asax.
If your project does not yet have a global.asax file, right-click the project and choose Add New Item.
One of your choices will be Global Application Class, and it will
automatically be named global.asax. Within that class, add a
method to handle the MigrateAnonymous event that is fired when a
user logs in, as shown in the following snippet:
void Profile_MigrateAnonymous(object sender, ProfileMigrateEventArgs e)
{
  ASP.HttpProfile anonymousProfile = Profile.GetProfile(e.AnonymousId);
  if (anonymousProfile != null && anonymousProfile.CHOSENBOOKS != null)
  {
    foreach (string s in anonymousProfile.CHOSENBOOKS)
    {
      Profile.CHOSENBOOKS.Remove(s);  // avoid duplicates
      Profile.CHOSENBOOKS.Add(s);
    }
  }
}
The first step in this method is to get a reference to the
profile that matches the AnonymousID that is passed in as a property
of the ProfileMigrateEventArgs
structure:
ASP.HttpProfile anonymousProfile = Profile.GetProfile(e.AnonymousId);
If the reference is not null,
you know there is a matching anonymous profile, and you can pick up
whatever data you need from that profile. In this case, copy over the
CHOSENBOOKS collection.
Note
To associate anonymous data with a user who has decided to log in, you must write a global handler in global.asax .
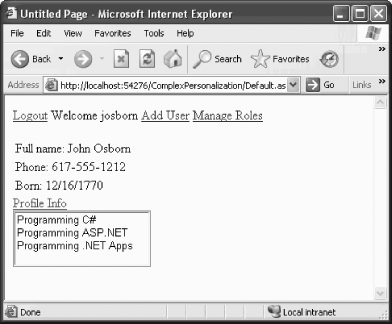
The user’s profile is updated, and the books chosen by the anonymous user are now part of that user’s profile, as shown in Figure 4-38.
Where can I learn more?
For more information, see my article “Personalization in ASP.NET 2.0” on ONDotnet (http://www.ondotnet.com), as well as the article “Personalization with ASP.NET 2.0” by Patel et. al, in the MSDN Library.
Let Users Personalize Your Site with Themes
Many users like to personalize their favorite web sites, by setting the look and feel of the site’s controls to meet their own personal aesthetic. ASP.NET 2.0 provides support for themes that enable you to offer that level of personalization to your users.
How do I do that?
A theme is a collection of skins. A skin describes how a control should look. A skin can define stylesheet attributes, images, colors, and so forth.
Having multiple themes allows your users to choose how they want your site to look by switching from one set of skins to another at the touch of a button. Combined with personalization, your site can remember the look and feel your user prefers.
Themes come in two flavors. The first, called a stylesheet theme , defines styles that the page or control can override.
These are, essentially, equivalent to CSS stylesheets. The second
type, called a customization
theme , cannot be overridden. You set a stylesheet theme by
adding the StyleSheetTheme
attribute to the page directive, and similarly, you set
a customization theme by setting the Theme attribute in the page directive.
In any given page, the properties for the controls are set in this order:
Properties are applied first from a stylesheet theme.
Properties are then overridden based on properties set in the control.
Properties are then overridden based on a customization theme.
Thus, the customization theme is guaranteed to have the final word in determining the control’s look and feel.
Skins also come in two flavors: default skins and explicitly named skins. Thus, you might create a Labels skin file with this declaration:
  <asp:Label runat="server"
  ForeColor="Blue" Font-Size="Large"
  Font-Bold="True" Font-Italic="True" />
This is a default skin for all label controls. It looks like the definition
of an ASP:Label control, but it is
housed in a skin file and thus is used to define the look and feel of
all Label objects.
In addition, however, you might decide that some labels must be
red. To accomplish this, you create a second skin, but you assign this
skin a SkinID attribute:
  <asp:Label runat="server" SkinID="RedLabel"
  ForeColor="Red" Font-Size="Large"
  Font-Bold="True" Font-Italic="True" />
Any label that does not have a SkinID attribute will get the default skin, and any label that
sets SkinID ="Red" will get your
named skin.
Here are the steps to providing a personalized web site:
Create the test site.
Organize your themes and skins.
Enable themes and skins for your site.
Specify themes declaratively or programmatically.
Create the test site
To demonstrate the use of themes and skins, once again we’ll
build on the personalization labs we’ve been incrementally improving
throughout this chapter. Use the Copy Web Site page to create a new
web site, and name it ThemesandSkins.
Tip
If you are starting here without having done the previous
labs, create a new application named ThemesandSkins, and download and copy in
the source from the ComplexPersonalization folder as a
starting point.
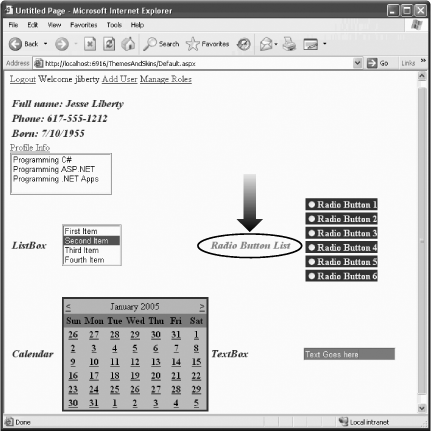
To begin your new application you’ll need some controls for which you can set the look and feel. Open Default.aspx and add controls to the page, using the code shown in Example 4-5.
<table width ="100%">
         <tr>
            <td >
                <asp:HyperLink ID="linkProfile" Runat="server"
                NavigateUrl="~/ProfileInfo.aspx">
                 Profile Info</asp:HyperLink>
            </td>
            <td >
                <asp:ListBox ID="lbBooks" Runat="server" />
            </td>
          </tr>
          <tr>
            <td >
                <asp:Label ID="lblListBox" Runat="server" Text="ListBox"/>
            </td>
            <td >
                <asp:ListBox ID="lbItems" Runat="server">
                    <asp:ListItem>First Item</asp:ListItem>
                    <asp:ListItem>Second Item</asp:ListItem>
                    <asp:ListItem>Third Item</asp:ListItem>
                    <asp:ListItem>Fourth Item</asp:ListItem>
                </asp:ListBox>
            </td>
            <td >
                <asp:Label ID="lblRadioButtonList" Runat="server"
                Text="Radio Button List"/>
            </td>
            <td >
                <asp:RadioButtonList ID="RadioButtonList1" Runat="server">
                    <asp:ListItem>Radio Button 1</asp:ListItem>
                    <asp:ListItem>Radio Button 2</asp:ListItem>
                    <asp:ListItem>Radio Button 3</asp:ListItem>
                    <asp:ListItem>Radio Button 4</asp:ListItem>
                    <asp:ListItem>Radio Button 5</asp:ListItem>
                    <asp:ListItem>Radio Button 6</asp:ListItem>
                </asp:RadioButtonList><br />
            </td>
          </tr>
             <tr>
                 <td>
                     <asp:Label ID="lblCalendar" Runat="server"
                      Text="Calendar"></asp:Label>
                 </td>
                 <td>
                     <asp:Calendar ID="Calendar1" Runat="server" />
                 </td>
                 <td>
                     <asp:Label ID="lblTextBox" Runat="server"
                      Text="TextBox"/>
                 </td>
                 <td>
                     <asp:TextBox ID="TextBox1" Runat="server"/>
                 </td>
             </tr>
         </table>
Now you want to set skins that will change the look and feel of these controls, and you want to organize those skins into themes.
Organize site themes and skins
Themes are stored in your project in a folder named App_Themes. To create this folder, go to the Solution Explorer, right-click the project folder, and choose Add Folder → Theme Folder. Name the new folder Dark Blue. The App_Themes folder will be created automatically, with a theme folder named Dark Blue immediately under it. Create a second theme folder, named Psychedelic.
Right-click the Dark Blue theme folder and choose Add New Item. From the template list choose Skin File and name the file Button.skin (to hold all the button skins for your Dark Blue theme), as shown in Figure 4-39.

Each skin file is just a text file that contains a definition for the control type, but with no ID. Thus, for example, your Label.skin file might look like this (for the Dark Blue theme):
<asp:Label Runat="server"
ForeColor="Blue" Font-Size="Large"
Font-Bold="True" Font-Italic="True" />
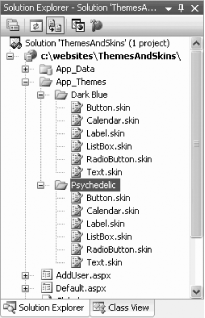
Create skin files for each of the following types in both themes:
Button.skin
Calendar.skin
Label.skin
ListBox.skin
RadioButton.skin
Text.skin
At this point your solution should look more or less like Figure 4-40.
Enable themes and skins
To let your users choose the theme they like and have it stored in
their profile, you need to add a single line to the <properties> element in the <profile> element of Web.config:
<add name="Theme" />
Specify themes
You can set the themes on your page either declaratively or
programmatically. To set a theme declaratively, simply add the
Theme attribute to the Page directive:
<%@ Page Language="C#" AutoEventWireup="true"
CodeFile="Default.aspx.cs" Inherits="Default_aspx" Theme="Dark Blue"%>
This will set the page’s theme to the Dark Blue theme you’ve created.
You can set the theme programmatically either by hardcoding it, or (even better) by settng it from the user’s profile.
You set StyleSheet themes by overriding the StyleSheetTheme property for the page, as
shown in the following code snippet:
public override string StyleSheetTheme
{
   get
   {
      if (Profile.IsAnonymous =  = false && Profile.Theme != null)
         return Profile.Theme;
      else
         return "Dark Blue";
   }

   set
   {
      Profile.Theme = value;
   }
}
If you are going to set a customization theme programmatically, however, you
must do so from the new PreInit
event handler for the page because you must set the theme before the
controls are created:
public void Page_PreInit(object sender, EventArgs e)
{
   if ( Profile.IsAnonymous =  = false )
   {
      Page.Theme = Profile.Theme;
   }
}
This presents a bit of difficulty when you want to allow the user to change the theme at runtime. If you create a control that posts the page back with a new theme, the pre-init code runs before the event handler for your button that changes the theme, so by the time the theme is changed the buttons have already been drawn.
To overcome this you must, unfortunately, refresh the page again (an alternative is to post to another page). For this lab we’ll add two buttons to the ProfileInfo.aspx page:
<tr>
    <td>
        <asp:Button ID="ThemeBlue" Text="Dark Blue"
          Runat="server" OnClick="Set_Theme" />
    </td>
    <td>
        <asp:Button ID="ThemePsych" Text="Psychedelic"
         Runat="server" OnClick="Set_Theme" />
    </td>
</tr>
Notice that the two buttons share a single Click event handler:
void Set_Theme(object sender, EventArgs e)
{
   Button btn = sender as Button;
   if (btn.Text =  = "Psychedelic")
   {
      Profile.Theme = "Psychedelic";
   }
   else
   {
      Profile.Theme = "Dark Blue";
   }
}
When the user is not logged on, the page’s default theme will be used. Once the user sets a theme in the profile, that theme will be used. Create skins for your two themes and then run the application to see the effect of applying the themes.
What about...
....overriding themes?
You can override the theme for particular controls by using named skins.
For instance, you can set the lblRadioButtonList label to be red even in
the Deep Blue theme by using a named skin. To accomplish this, create
two Label skins in the Label.skin
file within the Deep Blue
folder:
<asp:Label Runat="server"
ForeColor="Blue" Font-Size="Large"
Font-Bold="True" Font-Italic="True" />

<asp:Label Runat="server" SkinID="Red"
ForeColor="Red" Font-Size="Large"
Font-Bold="True" Font-Italic="True" />
The first skin is the default, and the second skin is a named
skin because it has a SkinID
property set to Red. Open the
source for Default.aspx, find the
label you want to make red, and add the SkinID="Red" attribute, as shown in the
following code snippet:
<asp:Label ID="lblRadioButtonList" Runat="server" Text="Radio Button List"
SkinID="Red"/>
When you log in and set your theme to Dark Blue, you’ll find that the label for the Radio Button List is red, as shown in Figure 4-41 (really, it is red; I swear).
Where can I learn more?
For more information, see my article “Skins and Themes” on ONDotnet.com (http://www.ondotnet.com). In addition, the CodeGuru web site (http://www.codeguru.com) contains an article by Bill Evjen titled “Skins and Themes,” and the 15 Seconds web site (http://www.15seconds.com) has an article by Thiru Thangarathinam titled “Code in Style with ASP.NET Themes.” Microsoft also provides a QuickStart tutorial on themes and skins at http://beta.asp.net/quickstart/aspnet/.
Unify Your Look and Feel with Master Pages
Web sites look better and are less confusing to users when they have a consistent “look and feel” as you move from page to page. ASP.NET 2.0 facilitates creating consistency with master pages.
A master page provides shared HTML, controls, and code that you can use as a template for all the pages of a site. The O’Reilly web site (http://www.oreilly.com) is a good example of a site that you can implement using a master page. With a master page, the logo (the O’Reilly tarsier) and an image (the O’Reilly header) can be shared across multiple pages.
How do I do that?
To see how to use master pages in this lab, follow these steps:
Create a new web site and add a master page.
Design the master page.
Add content pages that use the master page.
Create a new web site and add a master page
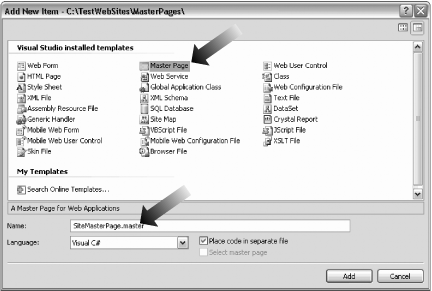
To begin, create a new web site and call it MasterPages. From the Add New Item dialog,
choose Master Page, and name your master page SiteMasterPage.master, as shown in Figure 4-42.
Design the master page
Open the page. You’ll find that an asp:contentplaceholder control has been added for you. This placeholder will
be filled by the content of the pages that use this master
page.
Within the master page itself you can add anything you want
surrounding the asp:contentplaceholder control. Whatever
you add will be replicated on all pages that use the master
page.
In this example, you’ll use the O’Reilly logos, provided for your use in the download files at the O’Reilly site for this book (see the Preface for details). Create an images directory within your application and copy into it the Animal.gif and OReillyLogo.gif files. Then add the files to the project by right-clicking the images folder and choosing Add → Existing Item....
You’ll place the logos and the asp:contentplaceholder control into a
table within the SiteMasterPage.master file, as shown in
Example 4-6.
<%@ Master Language="C#" AutoEventWireup="true"
CodeFile="SiteMastPage.master.cs" Inherits="SiteMastPage_master" %>
<!DOCTYPE html PUBLIC "-//W3C//DTD XHTML 1.1//EN" "http://www.w3.org/TR/xhtml11/
DTD/xhtml11.dtd">
<html xmlns="http://www.w3.org/1999/xhtml" >
<head runat="server">
<title>Untitled Page</title>
</head>
<body>
<form id="form1" runat="server">
<div>
<table>
<tr>
<td style="width: 71px; height: 127px">
<asp:Image ID="animalLogo" Runat="server"
ImageUrl="~/Images/Animal.gif" ImageAlign="Left" />
</td>
<td style="width: 423px; height: 127px">
<asp:Image ID="oreillyLogo" Runat="server"
ImageUrl="~/Images/OreillyLogo.gif" ImageAlign="Bottom" /></td>
</tr>
<tr>
<td colspan="2">
<div>
<asp:contentplaceholder
id="SiteMasterPageContent"
runat="server">
If you see this content,
then the master page content was not replaced<br />
</asp:contentplaceholder>
</div>
</td>
</tr>
</table>
</div>
</form>
</body>
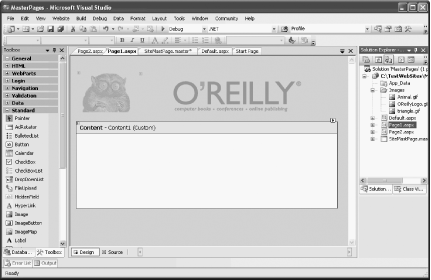
</html>If you switch to Design view in Visual Studio, you’ll see the
master page with standard logos in place and an asp:contentPlaceHolder control displaying
where content from other pages will be placed, as shown in Figure 4-43.
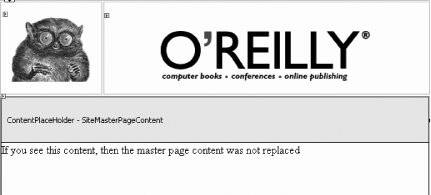
You can type directly into the placeholder area; in Figure 4-43, I typed in the words “If you see this content, then the master page content was not replaced.”
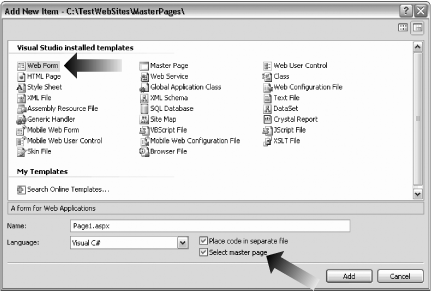
Add content pages that use the master page
To see the master page at work, create two .aspx pages. Name them Page1.aspx and Page2.aspx, respectively. Create these pages as normal web pages, but check the “Select master page” checkbox, as shown in Figure 4-44. When you click Add, you’ll be asked to pick which master page you want to use; so far we have selected only one.
Open your new page in Design mode. You’ll see exactly how the content for this new page will fit within the master page you’ve chosen, as shown in Figure 4-45.
Tip
Visual Studio 2005 assumes you want to use custom content. If you want to use the default content, click the smart tag and choose Default to Master’s Content.
Let’s add some code to Page1.aspx that will replace the default master content:
Note
Whatever is in the content area will be replaced by the content pages. You can place more than one asp:contentPlaceHolder control in a master page. Each has its own unique ID.
<%@ Page Language="C#" MasterPageFile="~/SiteMastPage.master"
AutoEventWireup="true" CodeFile="Page1.aspx.cs" Inherits="Page1_aspx"
Title="Untitled Page" %>
<asp:Content ID="Content1" ContentPlaceHolderID="SiteMasterPageContent"
Runat="Server">
<table>
<tr>
<td>
<asp:Label ID="lblFirstName" Runat="server">First Name</asp:Label>
</td>
<td>
<asp:TextBox ID="txtFirstName" Runat="server" />
</td>
</tr>
<tr>
<td>
<asp:Label ID="lblLastName" Runat="server">Last Name</asp:Label>
</td>
<td>
<asp:TextBox ID="txtLastName" Runat="server" />
</td>
</tr>
</table>
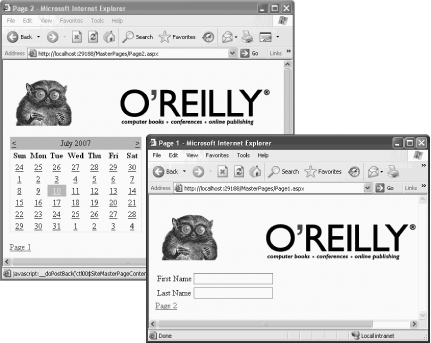
</asp:Content>Switch to Page2.aspx, and
this time drag a Calendar
control onto the content area of the page. Add
hyperlinks between your two pages so that you can move back and
forth between them. Notice that the two pages share a common look
and feel, though each page is made unique by the data and controls
you placed within the asp:contentPlaceHolder control, as shown
in Figure
4-46.
What about...
...nesting master pages within one another? Can I do that?
Yes, you can create submaster pages. To do so, create a new
master page, but within the submaster set the MasterPageFile attribute to the
parent-master page. Thus, if you create SubMaster.master, in the heading of
SubMaster.master you will have a
line such as this:
<%@  Master  MasterPageFile="SiteMasterPage.master"
language ="c#" CompileWith="Submaster.master.cs"
ClassName="Submaster" %>
...what if I want to modify properties of the master page at runtime?
You can do that, no problem. Just reach up into the master and change it from within your content page.
Sometimes you’ll want to modify the master on the fly, from within the code of the content
page. To accomplish this, you must expose a property in the master
page. Then you can use the (implicit) Master member field of your .aspx page to access that property.
Tip
You can accomplish the same thing with late-binding (FindControl(
)), but this uses reflection and is slower:
public void Page_Load(object sender,EventArgse) {Controlc = Master.FindControl("AnimalLogo");Imageimg = c asImage; if (img != null) { img.ImageUrl = "~//images//Triangle.gif"; } }
Suppose you add a property such as this to SiteMasterPage_master:
public Image AnimalLogo
{
   set { this.animalLogo = value; }
}
Now you can change the image used for animalLogo by setting that property from
within a .aspx page. Change
Page2.aspx to add this
code:
public void Page_Load(object sender, EventArgs e)
{
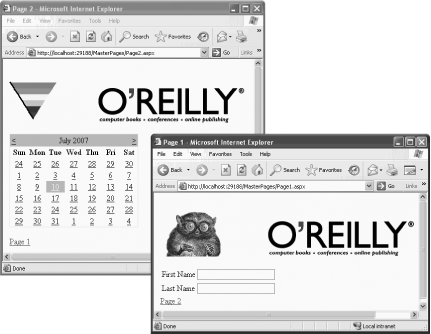
((SiteMasterPage)this.Master).AnimalLogo.ImageURL = "~//images//Triangle.gif";
}The result is shown in Figure 4-47. Page2.aspx has reached up into its master page and changed its logo. This can be very useful when implementing Emerson’s advice in Self Reliance: “A foolish consistency is the hobgoblin of little minds.”
Where can I learn more?
For more information, see my article “Master Pages in ASP.NET” on ONDotnet.com (http://www.ondotnet.com). In addition, a very helpful QuickStart tutorial titled “Creating a Layout Using Master Pages” is available on http://beta.asp.net/quickstart/aspnet/.
Get Visual C# 2005: A Developer's Notebook now with the O’Reilly learning platform.
O’Reilly members experience books, live events, courses curated by job role, and more from O’Reilly and nearly 200 top publishers.

