The most common transaction a web designer will have with a web server is the uploading of HTML documents, graphics, and other media files. Files are transferred between computers over a network via a method called FTP (File Transfer Protocol).
If you are working in a telnet session on Unix, you can run the ftp program and transfer files with a hefty collection of command-line arguments (not covered in this book).
Fortunately, if you work on a Mac or PC, there are a number of FTP programs with graphical interfaces that spare you the experience of transferring files using Unix command lines. In fact, FTP functions are now built right into most WYSIWYG HTML editors, such as GoLive Cyberstudio, Claris HomePage, and Dreamweaver, among others. On the Mac, dedicated programs that allow “drag-and-drop” file transfer such as Fetch and Anarchie are quite popular. On the PC, there are numerous simple FTP programs, such as WS_FTP and AceFTP. These (and many others) are available for download at http://www.shareware.com/ (search for “ftp”).
The Netscape Navigator and Internet Explorer browsers also function as simple FTP clients, offering the ability to both download and upload files with a drag-and-drop interface.
Regardless of the tool you use, the basic principles and processes are the same. Before you begin, you must have an account with permission to upload files to the server. Check with the server administrator to be sure this is set up. (Note: you don’t necessarily need an account to upload and download files if the server is set up as an anonymous ftp site.)
Launch the FTP program of your choice and open a connection with your server. You’ll need to enter the exact name of the server, your account name, and password.
Locate the appropriate directory into which you want to copy your files. You may also choose to create a new directory or delete existing files and directories on the remote server using the controls in your FTP program.
Specify the transfer mode. The most important decision to make during uploading is specifying whether the data should be transferred in binary or ASCII mode.
ASCII files are comprised of alphanumeric characters. Some FTP programs refer to ASCII files as “Text” files. HTML documents should be transferred as ASCII or text.
Binary files are made up of compiled data (ones and zeros), such as executable programs, graphic images, movies, etc. Some programs refer to the binary mode as “raw data” or “Image.” All graphics (
.gif,.jpeg) and multimedia files should be transferred as “binary” or “Raw Data.” Table 4.3 includes a listing of the transfer mode for a number of popular file types.In Fetch (Mac), you may see a MacBinary option, which transfers the file with its resource fork (the bit of the file containing desktop icons and other Mac-specific data) intact. It should only be used when transferring from one Mac to another. This resource fork is appropriately stripped out of Mac-generated media files when transferred under the standard raw data mode.
Some FTP programs also provide an Auto option, which enables you to transfer whole directories containing files of both types. The program examines each file and determines whether it should be transferred as text or binary information. This function is not 100% reliable on all programs, so use it with caution until you are positive you are getting good results.
Upload your files to the server. Standard FTP uses the terminology “put” (uploading files from your computer to the server) and “get” (downloading files from the server to your computer), so these terms may be used in your FTP program as well. You can also upload multiple files at a time.
Disconnect. When you have completed the transfer, be sure to disconnect from the server. You may want to test the files you’ve uploaded on a browser first to make sure everything transferred successfully.
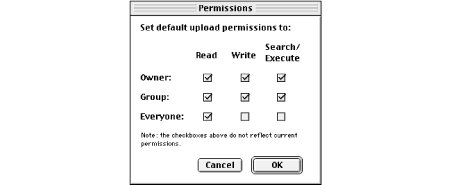
When you upload files to a web server, you need to be sure that the files’ permissions are set so that everyone is able to read your files. Permissions control who can read, write (edit), or execute the file (if it is a program), and they need to be established for the owner of the file, the file’s group, and for “everyone.” When you create or upload a file, you are automatically the owner, which may mean that only you can set the permissions.
Some FTP programs enable you to set the default upload permissions via a dialog box. Figure 4.7 shows Fetch 3.0.4’s dialog box for doing this. For most web purposes, you want to grant yourself full permissions but restrict all other users to read-only. You may want to confirm that your server administrator agrees with these settings.
The server needs to be specially configured to recognize these permissions commands, so check with your administrator to see if you can use this easy method.
If you are uploading files and creating directories via an FTP client, your client might not give anyone else in your group the proper permissions. In this case, it may be necessary to open a telnet session and set permissions on files and directories manually using the Unix chmod command. Basic chmod syntax and examples are discussed in this section, but it is best to check with your server administrator for the correct syntax for your purposes.
From within the telnet session, begin by checking the current
permissions and owner of the directories and files. You need to be
the owner to change permissions on a directory’s contents. At
the Unix prompt (% or $ ),
type ls -l to view the contents in
the long format. The system returns a listing that looks like this:
drwxrwxrwx 2 jen doc 512 May 19 11:25 chap13
The first ten characters reflect the permissions settings. The first
character shows the file type (directory, d, or
plain file,-). The next three characters show the
read (r), write (w), and
execute (x) privileges for the owner of the file
(in this example, the user jen is the owner).
The next three characters indicate the same three settings for other
members of the file’s group. The final three characters show
permissions for all other users.
In the example above, all users have complete access to the file. If certain permissions are turned off, the space is held with a dash (-). In the following example, the owner has total access to the file, but the group and other users can only read the file.
drwxr--r--
A complete explanation of all the finer points of the chmod command is beyond the scope of this
chapter, but Table 4.2 shows instructions for a
few of the most common settings you’ll need. Type the chmod command and number option as shown, and
substitute your directory name for dirname
(note, you can use a “dot” to indicate the current
directory.)
A directory’s access permissions help control access to the files in it, such as adding, deleting, and renaming files. The permissions on a file control what can be done to the file’s contents, such as reading or editing.
Table 4-2. Common chmod Settings
|
Type |
Permissions |
Command |
Result |
|---|---|---|---|
|
Directory |
Allows users in your group to add, delete, and rename files in your directory. All others can only view the directory’s contents. |
|
|
|
Directory |
Restricts access to all users except the owner. |
|
|
|
File |
Allows you and your group to read and edit the file, but allows all other users to read only. |
|
|
|
File |
Allows you to edit a file, but allows everyone else on the system to read only. |
|
|
|
File |
Makes a private file that only you can read or edit. |
|
|
Chmod syntax also has an alternative letter system. Without going into detail, the command:
chmod -R go+rx *
is a quick and powerful way to set permissions for the current directory and every directory and file within it (-R). This example gives read (r) and execute (x) privileges to the group (g) and all other users (o).
Get Web Design in a Nutshell now with the O’Reilly learning platform.
O’Reilly members experience books, live events, courses curated by job role, and more from O’Reilly and nearly 200 top publishers.

