Microsoft wants to make one thing perfectly clear: Compared with Windows XP, Windows 7 isn’t just a whole new ball game—it’s practically a different sport. It’s different on the surface, under the hood, and everywhere in between. (It’s so different, in fact, that this book includes an appendix called Appendix C which lets you look up a familiar Windows landmark and figure out where Microsoft stuck it in Windows 7.)
If you’re moving to Windows 7 from Vista, well, your new world won’t be quite as much of a shock. But the landscape still has shifted quite a bit.
Either way, it’s hard to predict exactly what you’ll see at the fateful moment when the Windows 7 screen first lights up on your monitor. You may see a big welcome screen bearing the logo of Dell or whomever; it may be the Windows 7 Setup Wizard (Appendix A); or it may be the login screen, where you’re asked to sign in by clicking your name in a list. (Skip to Logging On for details on logging in.)
The best place to start, though, might be the shining majesty of the Getting Started window shown in Figure 1-1. If it doesn’t open automatically, choose Start→Getting Started.
Getting Started is supposed to be an antidote to the moment of dizzy disorientation you’d otherwise feel the first time you fired up Windows 7. It’s basically a window full of links to useful places in the Windows empire. What’s confusing is that just clicking one of these promising-looking buttons (“Back up your files”? Hey, yeah!) doesn’t actually do anything except change the billboard in the top part of the window. You have to double-click to open up the control panel or program you need to make changes.
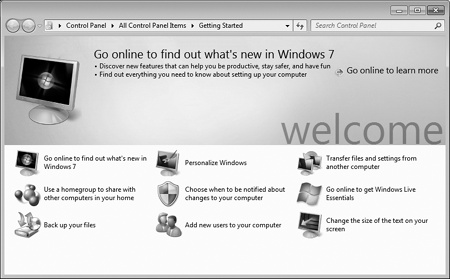
Figure 1-1. Getting Started offers links to various useful corners of the operating system. Most are designed to help you set up a new PC. (Click once to read a description, and then double-click to open the link.)
Go online to find out what’s new in Windows 7. Sure enough: Takes you to a Web page describing the new features.
Use a homegroup to share with other computers in your home. One of Microsoft’s most important promises is that it’s finally simple to set up a home network if you have more than one PC. By all means, double-click here to get started, but have Chapter 26 in front of you.
Back up your files. Fires up the Backup and Restore Center, which is described on Backup Hardware.
Personalize Windows. Sure, sure, eventually you’ll be plotting rocket trajectories and mapping the genome—but let’s not kid ourselves. The first order of business is decorating: choosing your screen saver, replacing the desktop background (wallpaper), choosing a different cursor shape, adjusting your monitor resolution, and so on. Double-click here to open the appropriate control panel.
Choose when to be notified about changes to your computer. Windows 7 has tamed one of Vista’s most ornery features: User Account Control (otherwise known as “the infuriating nag box that pops up every time I make a change, asking, ‘Are you sure?’ ‘Are you sure?’”). However, UAC still gets in your face from time to time. Double-click here to open the User Account Control settings so you can tone it down.
Add new users to your computer. If you’re the lord of the manor, the sole user of this computer, then you can ignore this little item. But if you and other family members, students, or workers share this computer, you’ll want to consult Chapter 23 about how to set up a separate account (name, password, and working environment) for each person.
Transfer files and settings from another computer. This program, now called Windows Easy Transfer, is a beefed-up version of the old Files and Settings Transfer Wizard. Its purpose is to transfer files and settings from an older PC, and it’s described on Windows Easy Transfer.
Go online to get Windows Live Essentials. Weird as it may seem, Windows 7 is the first mainstream operating system in recent memory to arrive completely stripped down. It comes with no email program, no photo or video editing app, no chat program, no calendar or address book. (In fact, if you upgraded from Vista, you’ll discover that the Windows 7 installer has actually deleted the Microsoft apps you used to have for these purposes! Big whoops!)
There’s actually a good reason (well, OK, a dumb reason) for Microsoft’s decision: Its lawyers were attempting to protect the company from more antitrust lawsuits. Whatever. The point is that if you want these standard, free programs, then you have to download them yourself by clicking this link. Details are at the beginning of Chapter 7.
Change the size of the text on your screen. Over-40-year-olds, you know who you are. Now, with one click, you can make all text in all programs 25 or 50 percent larger, thanks to this handy option.
To get rid of the Getting Started window, click its Close box—or press Alt+F4, the universal Windows keystroke for “close this window.”
Once you’ve recovered from the excitement of Getting Started, you get your first glimpse of the full Windows 7 desktop (Figure 1-2). If you’d rather not go through life staring at the Windows logo, then by all means choose one of the much more attractive Windows 7 desktop pictures, as described in Chapter 4.
All the usual Windows landmarks are here—the Start menu, the taskbar, and the Recycle Bin—but they’ve been given an extreme makeover, especially if you’re used to Windows XP.
What you’re seeing is the latest face of Windows, known to fans as Aero. (It supposedly stands for Authentic, Energetic, Reflective, and Open, but you can’t help suspecting that somebody at Microsoft retrofitted those words to fit the initials.) It debuted in Windows Vista, and it’s been refined in Windows 7.
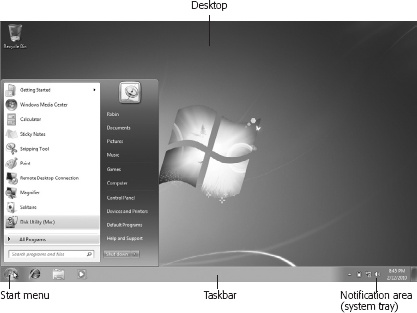
Figure 1-2. There are some gorgeous new desktop pictures in Windows 7—Microsoft evidently endured one Teletubbies joke too many during the Windows XP era—although the factory-installed wallpaper isn’t among them. See page 179 for details on choosing a better-looking background.
If you’re into this kind of thing, here’s the complete list of what makes Aero, Aero:
The edges of windows are thicker than they were in the XP days (for easier targeting with your mouse). Parts of the Start menu and window edges are transparent. Windows and dialog boxes cast subtle shadows on the background, as though they’re floating.
A new, bigger, more modern font is used for menus and labels.
When you point to a window button without clicking, the button “lights up.” The Minimize and Maximize buttons glow blue; the Close button glows red.
The default button in a dialog box—the one Microsoft thinks you really want, like Save or Print—pulses gently, using fading color intensity to draw your eye.
Little animations liven up the works, especially when you minimize, maximize, or close a window.
Aero isn’t just looks, either—it also includes a couple of features, like Flip 3D and live taskbar icons. You can read about these two useful features in Chapter 2.
The Aero design may not actually be Authentic or whatever, but it does look clean and modern. You see it, however, only if you have a fairly fast, modern PC. Basically, you need a Windows Experience Index score of 3 or higher (The Windows Desktop—Now with Aero!), meaning a good amount of memory and a recent graphics card.
Tip
If you’re not seeing the Aero goodies, and your Experience Index score indicates that you should, let the new Windows 7 Aero troubleshooter help you figure out why. Open the Start menu. Into the Search box, type aero. Click “Find and fix problems with transparency and other visual effects.” Click Next to walk through the wizard. It will check things like your video memory, your Desktop Windows Manager (DWM) service, your screen’s color settings, your chosen visual theme, your power settings, and so on. After this analysis, Windows tries to fix whatever was wrong.
Furthermore, the Aero features are not available in the Starter edition of Windows 7.
If you don’t have Aero, you can still enjoy most of Windows 7’s features—just without the transparencies, animations, and other eye candy. The pictures in this book still match the buttons and text you see on the screen, but without so much decoration around the edges.
Nobody ever said Microsoft’s specialty was making things simple.
Windows is composed of 50 million lines of computer code, scattered across your hard drive in thousands of files. The vast majority of them are support files, there for behind-the-scenes use by Windows and your applications—they’re not for you. They may as well bear a sticker reading, “No user-serviceable parts inside.”
That’s why the Start menu is so important (Figure 1-3). It lists every useful piece of software on your computer, including commands, programs, and files. Just about everything you do on your PC begins—or can begin—with your Start menu.
In Windows 7, as you’ve probably noticed, the word “Start”. doesn’t actually appear on the Start menu, as it did for years; now the Start menu is just a round, backlit, glass pebble with a Windows logo behind it. But it’s still called the Start menu, and it’s still the gateway to everything on the PC.
If you’re the type who bills by the hour, you can open the Start
menu (Figure 1-3) by
clicking it with the mouse. If you feel that life’s too short,
however, open it by tapping the ![]() key on the keyboard instead. (If your antique,
kerosene-operated keyboard has no
key on the keyboard instead. (If your antique,
kerosene-operated keyboard has no ![]() key, pressing Ctrl+Esc does the same
thing.)
key, pressing Ctrl+Esc does the same
thing.)
Tip
To find out what something is—something in your Start menu (right side), All Programs menu, or indeed anywhere on your desktop—point to it with your cursor without clicking. A tinted, rectangular tooltip bar appears, containing a text description. (If the tooltip doesn’t appear, it might be that the window you’re pointing to isn’t the active window on your desktop. Click the window and then try again.)
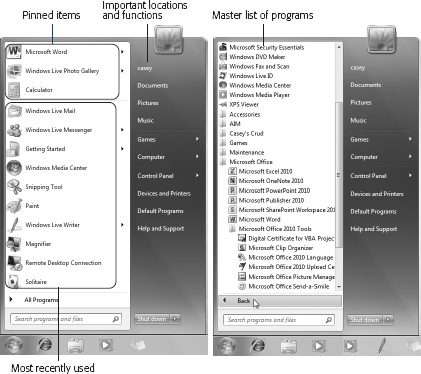
The Start menu is split down the middle into two columns:
Left side (white). At the top, above the thin divider line, is the pinned items list, which is yours to modify; it lists programs, folders, documents, and anything else you want to open quickly. This list never changes unless you change it.
(If you don’t see a divider line, then you have a brand-spankin’-fresh Windows 7 installation, and you haven’t put anything into the pinned list yet.)
Below the fine line is the standard Windows most recently used programs list. This list is. computed automatically by Windows and may change from day to day.
Figure 1-3. Left: The Start menu’s top-left section is yours to play with. You can “pin” whatever programs you want here. The lower-left section lists programs you use most often. (You can delete items here but you can’t add things or rearrange them.) The right column links to important Windows features and folders. Right: The All Programs menu replaces the left column of the Start menu, listing all your software. You can rearrange, add to, or delete items from this list.
Tip
You can, if you wish, ask Windows not to display a list of the programs you’ve used most recently. You might want to do that if, for example, it would be best that your boss or your spouse didn’t know what you’ve been up to.
If that’s your situation, then right-click the Start button; from the shortcut menu, choose Properties. In the resulting dialog box, turn off “Store and display recently opened programs in the Start menu.” (While you’re here, if you’re especially paranoid, you can also turn off “Store and display recently opened items in the Start menu and the taskbar”—a reference to the jump lists feature described on Jump Lists.) Click OK.
When you next inspect the Start menu, you’ll be happy to see that the lower-left quadrant, where the recently used programs are usually listed, is creepily blank.
If you see a submenu arrow (
 ) next to a program’s name in the Start
menu, congrats. You’ve just found a jump
list, a new Windows 7 feature that gives you quick
access to documents you’ve opened recently. See Jump Lists for details on creating, deleting, and
working with jump lists.
) next to a program’s name in the Start
menu, congrats. You’ve just found a jump
list, a new Windows 7 feature that gives you quick
access to documents you’ve opened recently. See Jump Lists for details on creating, deleting, and
working with jump lists.At the very bottom is the All Programs list described below, plus the all-important Search box, which gets a whole chapter to itself (Chapter 3).
Right side (dark). In general, the right side of the Start menu is devoted to listing important places on the computer: folders like Documents, Pictures, and Music; or special windows like Network, Control Panel, and Computer.
At the bottom is the Shut Down button, which turns the PC off. The
button next to it offers several
variations of “off,” like “Log off,” Lock (for when you’re about
to wander away for coffee, so that a password is required to
re-enter), Restart, Sleep, and Hibernate.
Tip
After many years, the “My” prefix finally disappeared from all the important folders of your PC in Windows Vista (My Pictures, My Music, My Documents, My Computer, and so on). Maybe Microsoft was tired of all the lawsuits from Fisher-Price.
In Windows 7, “My” may be gone from the libraries containing those file types. But within your own Personal folder, there they are again: My Pictures, My Music…! Your Personal Folder explains why, but in the meantime, you’re not stuck with “My.” You can rename these special icons just as you would any other icon (Renaming Your Icons). Call it “My Computer,” call it “Your Computer,” call it “Jar Jar Binks”—makes no difference to Windows.
You can navigate and control the Start menu in either of two ways:
Once the Start menu is open, you can use the arrow keys to “walk” up and down the menu. For example, press ↑ to enter the left-hand column from the bottom. Or press → to enter the right-hand column.
Either way, once you’ve highlighted something in either column, you can press the ← or → keys to hop to the opposite side of the menu; press the ↑ or ↓ keys to highlight other commands in the column (even the Shut Down button); or type the first initial of something’s name to highlight it. (If there’s more than one command that starts with, say, W, press W repeatedly to cycle through them.)
Once you’ve highlighted something, you can press Enter to
“click” it (open it), or tap the ![]() key or Esc to close the Start menu and forget the whole thing.
key or Esc to close the Start menu and forget the whole thing.
This thing is awesome. The instant you pop open the Start menu, your insertion point blinks in the new Start Search box at the bottom of the menu (Figure 1-4). That’s your cue that you can begin typing the name of whatever you want to open.
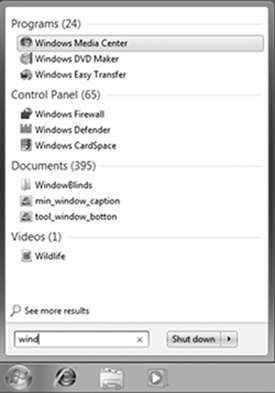
Figure 1-4. As you type, Windows winnows down the list of found items, letter by letter. (You don’t have to type the full search term and then press Enter.) If the list of results is too long to fit the Start menu, click “See more results” below the list. In any case, Windows highlights the first item in the results. If that’s what you want to open, press Enter. If not, you can click what you want to open, or use the arrow keys to walk down the list and then press Enter to open something.
The instant you start to type, you trigger Windows’s very fast, whole-computer search function. This search can find files, folders, programs, email messages, address book entries, calendar appointments, pictures, movies, PDF documents, music files, Web bookmarks, and Microsoft Office documents, among other things. It also finds anything in the Start menu, making it a very quick way to pull up something without having to click through a bunch of submenus.
You can read the meaty details about search in Chapter 3.
When you click All Programs at the bottom of the Start menu, you’re shown an important list indeed: the master catalog of every program on your computer. You can jump directly to your word processor, calendar, or favorite game, for example, just by choosing its name from the Start→All Programs menu.
Clearly, Microsoft has abandoned the superimposed-menus effect of Windows XP. Rather than covering up the regularly scheduled Start menu, the All Programs list replaces it (or at least the left-side column of it).
You can restore the original left-side column by clicking Back (at the bottom of the list) or pressing the Esc key.
Tip
When the Start menu is open, you can open the All Programs menu in a number of ways: by clicking the phrase “All Programs,” by pointing to it and keeping the mouse still for a moment, or by pressing the ↑ key (to highlight All Programs) and then tapping the Enter key, the → key, or the space bar. Just for keyboard fanatics: Once the programs list is open, you can also choose anything in it without involving the mouse. Just press the ↑ and ↓ keys, to highlight the item you want (or type a few letters of its name, as shown on the previous page). Then press Enter to seal the deal.
As you’ll quickly discover, the All Programs list doesn’t list just programs. It also houses a number of folders.
Some of them bear the names of software you’ve installed; you might see a folder called, for example, PowerSoft or Logitech. These generally contain programs, uninstallers, instruction manuals, and other related junk.
Tip
Submenus, also known as cascading menus, have been largely eliminated from the Start menu. Instead, when you open something that contains other things—like a folder listed in the Start menu—you see its contents listed beneath, indented slightly, as shown in Figure 1-3. Click the folder name again to collapse the sublisting.
Keyboard freaks should note that you can also open a highlighted folder in the list by pressing the Enter key (or the → key). Close the folder by pressing Enter again (or the ← key).
Another set of folders is designed to trim down the Programs menu by consolidating related programs, like Games, Accessories (little single-purpose programs), and Maintenance. Everything in these folders is described in Chapter 7.
This folder contains programs that open automatically every time you start Windows. This can be a very useful feature. For instance, if you check your email every morning, you may as well save yourself a few mouse clicks by putting your email program into the Startup folder. If you spend all day long word processing, you may as well put Microsoft Word in there.
In fact, although few PC users suspect it, what you put into the Startup folder doesn’t have to be an application. It can just as well be a document you consult every day. It can even be a folder or disk icon whose window you’d like to find open and waiting each time you turn on the PC. (The Documents folder is a natural example.)
Of course, you may be interested in the Startup folder for a different reason: to stop some program from launching itself. This is a particularly common syndrome if somebody else set up your PC. Some program seems to launch itself, unbidden, every time you turn the machine on.
Tip
All kinds of programs dump components into this folder. Over time, they can begin to slow down your computer. If you’re having trouble determining the purpose of one startup program or another, visit this Web page, which provides a comprehensive list of every startup software nugget known, with instructions for turning off each one: http://www.sysinfo.org/startupinfo.html.
Fortunately, it’s easy to either add or remove items from the Startup folder:
Deleting something. With the Startup folder’s listing visible in the All Programs menu, right-click whatever you want to delete. From the shortcut menu, choose Delete. Click Yes to send the icon to the Recycle Bin.
Enjoy your newfound freedom from self-launching software.
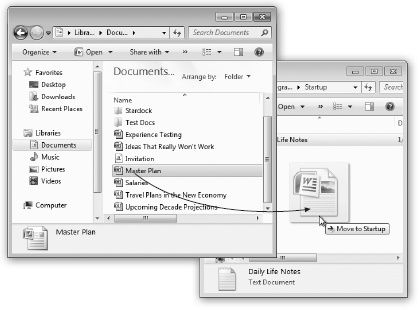
Adding something. With the All Programs list open, right-click the Startup folder and, from the shortcut menu, choose Open. You’ve just opened the Startup folder itself.
Once its window is open, navigate to the disk, folder, program, or document icon you want to add. (Navigating to your files and folders is described in the following chapters.)
Using the right mouse button, drag the icon directly into the Startup window, as shown in Figure 1-5. When you release the button, a shortcut menu appears; from the shortcut menu, choose Create Shortcuts Here.
Figure 1-5. It’s easy to add a program or document icon to your Startup folder so that it launches automatically every time you turn on the computer. Here, a document from the Documents library is being added. You may also want to add a shortcut for the Documents library itself, which ensures that its window will be open and ready each time the computer starts up.
Close any windows you’ve opened. From now on, each time you turn on or restart your computer, the program, file, disk, or folder you dragged will open by itself.
As noted earlier, the left-hand Start menu column, the white column, is your launcher for program, files, and folders you use a lot. The right side, the dark column, contains links to important functions and places. Here’s a whirlwind tour of these options, from top to bottom.
As the box on this page makes clear, Windows keeps all your stuff—your files, folders, email, pictures, music, bookmarks, even settings and preferences—in one handy, central location: your Personal folder. This folder bears your name, or whatever account name you typed when you installed Windows 7.
As described in Chapter 23, everyone with an account on your PC has a Personal folder.
Technically, your Personal folder lurks inside the C:→Users folder. But that’s a lot of burrowing when you just want a view of your entire empire. That’s why your Personal folder is also listed here, at the top of the Start menu’s right-side column. Choose this listing to open the folder that you’ll eventually fill with new folders, organize, back up, and so on.
This command opens up your Documents folder, a very important folder indeed. It’s designed to store just about all the work you do on your PC—everything except music, pictures, and videos, which get folders of their own.
Of course, you’re welcome to file your documents anywhere on the hard drive, but most programs propose depositing newly created documents into the Documents folder. That principle makes navigation easy. You never have to wonder where you filed something, since all your stuff is sitting right there in Documents.
Note
The Documents folder actually sits in the Computer→Local Disk (C:)→Users→[Your Name] folder.
If you study that path carefully, it should become clear that what’s in Documents when you log in (Logging On) isn’t the same thing other people will see when they log in. That is, each account holder (Chapter 23) has a different Documents folder, whose contents switch according to who’s logged in.
Microsoft assumes (correctly) that most people these days use their home computers for managing digital photos and music collections. As you can probably guess, the Pictures and Music folders are intended to house them—and these Start menu commands are quick ways to open them.
In fact, whatever software came with your digital camera or MP3 player probably dumps your photos into, and sucks your music files out of, these folders automatically. You’ll find much more on these topics in Chapters Chapter 14 and Chapter 15.
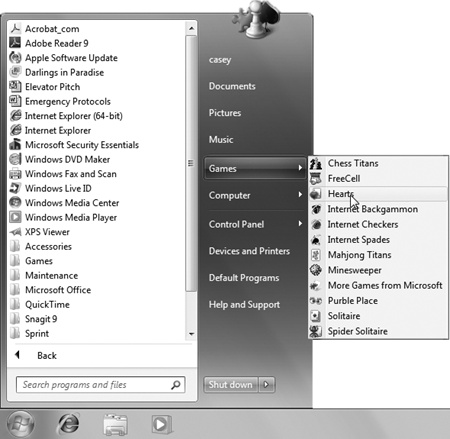
This item opens the Games folder, where Microsoft has stashed 11 computer games for your procrastination pleasure. (You get only six in the Starter edition of Windows 7.)
Note
The first time you open the Games folder, a message pops up to ask if you want to use the recommended update and folder settings. If so, Windows will notify you when updates to your games are available; auto-download rating and genre details about your games; and, in certain folder views, show when you last played a game.
The Computer command is the trunk lid, the doorway to every single shred of software on your machine. When you choose this command, a window opens to reveal icons that represent each disk drive (or drive partition) in your machine, as shown in Figure 1-6.
For example, by double-clicking your hard drive icon and then the various folders on it, you can eventually see the icons for every single file and folder on your computer.
This command opens an extremely important window: the Control Panel, which houses more than 50 mini-programs that you’ll use to change almost every important setting on your PC. It’s so important, in fact, that it gets a chapter of its own (Chapter 8).
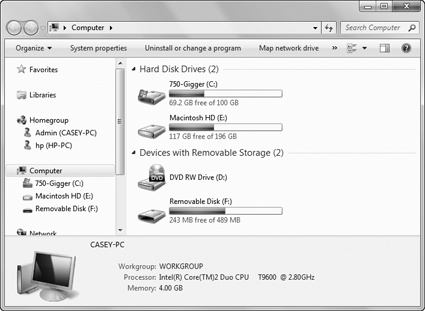
Figure 1-6. The Computer window lists your PC’s drives—hard drives, CD drives, USB flash drives, and so on; you may see networked drives listed here, too. This computer has two hard drives, a USB flash drive, and a CD-ROM drive. (If there’s a disk in the CD drive, you see its name, not just its drive letter.) When you select a disk icon, the Details pane (if visible) shows its capacity and amount of free space (bottom).
Yes, kids, it’s a direct link to the Devices and Printers pane of the Control Panel, where you can fiddle with the settings for various gadgets (cameras, cellphones, headsets, scanners, fax machines, printers, monitors, mice, and so on). Details in Chapter 18.
This command is a shortcut to the Default Programs control panel. It has two functions:
To let you specify which program (not necessarily Microsoft’s) you want to use as your Web browser, email program, instant-messaging program, Java module, and music player—choices offered by Microsoft to placate the U.S. Justice Department. Details are on Default Programs.
To specify which program opens when you double-click a certain kind of document. For example, if you double-click a JPEG graphic, do you want it to open in Picasa or Windows Photo Gallery? Details on Default Programs.
Choosing Start→Help and Support opens the Windows Help and Support Center window (Chapter 5).
What should you do with your PC when you’re finished using it for the moment?
Millions of people shut their PCs off, but they shouldn’t; it’s a colossal waste of time on both ends. When you shut down, you have to wait for all your programs to close—and then the next morning, you have to reopen everything, reposition your windows, and get everything back the way you had it.
You shouldn’t just leave your computer on all the time, either. That’s a massive waste of electricity, a security risk, and a black mark for the environment.
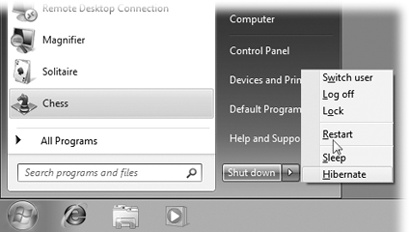
What you should do is put your PC to sleep. The Sleep command, along with Shut down, Restart, and other relevant options, appears in the “Shut down” pop-up menu at the lower-right corner of the Start menu.
Click the ![]() to see these commands. As shown in Figure 1-7, these are the
options for finishing your work session:
to see these commands. As shown in Figure 1-7, these are the
options for finishing your work session:
“Switch user.” This command refers to Windows’s accounts feature, in which each person who uses this PC gets to see her own desktop picture, email account, files, and so on. (See Chapter 23.)
When you choose “Switch user,” somebody else can log into the computer with her own name and password—to do a quick calendar or email check, for example. But whatever you had running remains open behind the scenes. After the interloper is finished, you can log in again to find all your open programs and documents exactly as you left them.
“Log off.” If you click “Log off,” Windows closes all your open programs and documents (giving you an opportunity to save any unsaved documents first). It then presents a new Welcome screen (Four Ways Life Is Different on a Domain) so that the next person can sign in.
Lock. This command locks your computer—in essence, it throws a sheet of inch-thick steel over everything you were doing, hiding your screen from view. This is an ideal way to protect your PC from nosy people who happen to wander by your desk while you’re away getting coffee or lunch.
All they’ll find on your monitor is the standard Logon screen. They (and even you) will have to enter your account password to get past it (Four Ways Life Is Different on a Domain).
Restart. This command quits all open programs, and then quits and restarts Windows again automatically. The computer doesn’t actually turn off. (You might do this to “refresh” your computer when you notice that it’s responding sluggishly, for example.)
Sleep. In the olden days, Windows offered a command called Standby. This special state of PC consciousness reduced the amount of electricity the computer used, putting it in suspended animation until you used the mouse or keyboard to begin working again. Whatever programs or documents you were working on remained in memory.
When using a laptop on battery power, Standby was a real boon. When the flight attendant handed over your microwaved chicken teriyaki, you could take a break without closing all your programs or shutting down the computer.
Unfortunately, there were two big problems with Standby, especially for laptops. First, the PC still drew a trickle of power this way. If you didn’t use your laptop for a few days, the battery would silently go dead—and everything you had open and unsaved would be lost forever. Second, drivers or programs sometimes interfered with Standby, so your laptop remained on even though it was closed inside your carrying case. Your plane would land on the opposite coast, you’d pull out the laptop for the big meeting, and you’d discover that (a) the thing was roasting hot, and (b) the battery was dead.
The command is now called Sleep, and it doesn’t present those problems anymore. First, drivers and applications are no longer allowed to interrupt the Sleep process. No more Hot Laptop Syndrome.
Second, the instant you put the computer to sleep, Windows quietly transfers a copy of everything in memory into an invisible file on the hard drive. But it still keeps everything alive in memory—the battery provides a tiny trickle of power—in case you return to the laptop (or desktop) and want to dive back into work.
If you do return soon, the next startup is lightning-fast. Everything reappears on the screen faster than you can say, “Redmond, Washington.”
If you don’t return shortly, then Windows eventually cuts power, abandoning what it had memorized in RAM. (You control when this happens using the advanced power plan settings described in Chapter 8.) Now your computer is using no power at all; it’s in hibernate mode.
Fortunately, Windows still has the hard drive copy of your work environment. So now when you tap a key to wake the computer, you may have to wait 30 seconds or so—not as fast as 2 seconds, but certainly better than the 5 minutes it would take to start up, reopen all your programs, reposition your document windows, and so on.
The bottom line: When you’re done working for the moment—or for the day—put your computer to Sleep instead of shutting it down. You save power, you save time, and you risk no data loss.
You can send a laptop to Sleep just by closing the lid. On any kind of computer, you can trigger Sleep by choosing Start→Sleep or by pushing the PC’s power button, if you’ve set it up that way (see Commands That No Longer Appear).
Hibernate. Hibernate mode is a lot like Sleep, except that it doesn’t offer a period during which the computer will wake up instantly. Hibernate equals the second phase of Sleep mode, in which your working world is saved to the hard drive. Waking the computer from Hibernate takes about 30 seconds.
Tip
You can configure your computer to sleep or hibernate automatically after a period of inactivity, or to require a password to bring it out of hibernation. See Creating your own plan for details.
Shut down. This is what most people would call “really, really off.” When you shut down your PC, Windows quits all open programs, offers you the opportunity to save any unsaved documents, exits Windows, and turns off the computer.
Truth is, there’s almost no reason to shut down your PC anymore. Sleep is almost always better all the way around.
The only exceptions have to do with hardware installation. Anytime you have to open up the PC to make a change (installing memory, hard drives, sound or video cards), or connect something external that doesn’t just use a USB or FireWire (1394) port, you should shut the thing down first.
Tip
Once again, it’s worth noting that you can trigger any of these commands entirely from the keyboard; save your mouse for Photoshop.
Hit the ![]() key to open the Start menu. Then hit the → key twice to open the menu
shown in Figure 1-7. At this
point, you can type the underlined letter of the command you want:
L for “Log off,” S for
Sleep, and so on.
key to open the Start menu. Then hit the → key twice to open the menu
shown in Figure 1-7. At this
point, you can type the underlined letter of the command you want:
L for “Log off,” S for
Sleep, and so on.
You now know how to trigger the Shut down command using the mouse (Start→Shut down) or by pressing a keyboard sequence. But there are even faster ways.
If you have a laptop, just close the lid. If you have a desktop PC, just press its power
button (![]() ).
).
In all these cases, though—menu, lid, power button—you can decide whether the computer shuts down, goes to sleep, hibernates, or just ignores you. That’s really important, because Microsoft’s proposed responses aren’t always the best ones. For example, “Shut down” is what’s listed at the bottom of the Start menu, but Sleep is what you’ll probably want more often.
Here’s how to change the factory setting when you open the Start menu, close the lid, or hit the power button:
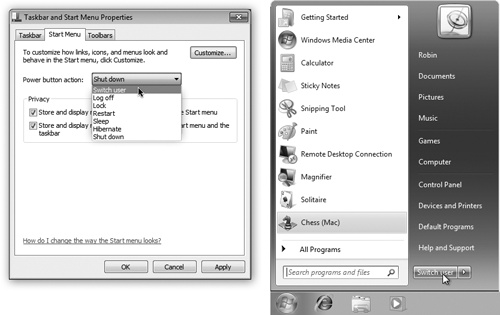
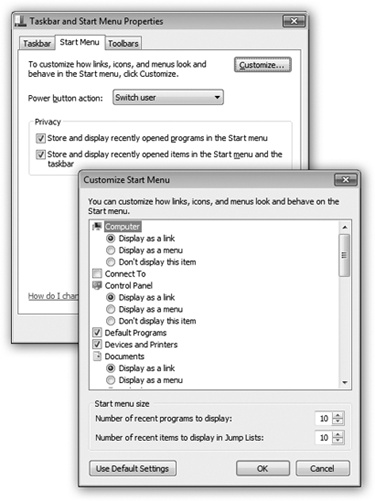
Change what the Start menu’s Shut down command says. Right-click the Start menu. From the shortcut menu, choose Properties. On the Start Menu tab of the resulting dialog box, use the “Power button action” pop-up menu. You can choose Switch user, Log off, Lock, Restart, Sleep, Hibernate, or Shut down—whichever you’d like to see listed at the bottom of the Start menu, where it started out saying “Shut down” (see Figure 1-8).
Change what happens when you close the lid. Open the Start menu. In the Search box, start typing power options until you see “Change what closing the lid does” in the search results. Click that link. In the resulting dialog box, you can choose any of the usual options (Sleep, Restart, Hibernate, and so on) for “When I close the lid.” In fact, you can even choose this setting independently for when the laptop is plugged in and when it’s running on battery, although Sleep is really the best choice in both cases.
Change what happens when you press the power button. Open the Start menu. In the Search box, start typing power options until you see “Change what the power buttons do” in the search results. Click that link. In the resulting dialog box, you can choose any of the usual options (Sleep, Restart, Hibernate, and so on) for “When I press the power button.” (You can also specify what happens “When I press the sleep button,” except that your PC probably doesn’t have a sleep button.)
It’s possible to live a long and happy life without ever tampering with the Start menu. In fact, for many people, the idea of fiddling with it comes dangerously close to nerd territory.
Still, Start-menu customizing got a big boost in Windows 7, so you may as well sniff around to see what Microsoft offers. Besides, knowing how to manipulate the Start menu listings provides an interesting glimpse into the way Windows works, and tweaking it can pay off in efficiency down the road.
Note
Thanks to the User Accounts feature described in Chapter 23, any changes you make to the Start menu apply only to you. Each person with an account on this PC has an independent, customized Start menu.
Microsoft offers a fascinating set of customization options for the Start menu. It’s hard to tell whether these options were selected by a scientific usability study or by a dartboard, but you’re likely to find something that suits you.
To view and change the basic options, right-click the Start menu; from the shortcut menu, choose Properties. Now the Taskbar and Start Menu Properties dialog box opens (Figure 1-9, top). When you click Customize, you see the dialog box shown at bottom in Figure 1-9. Here you’re offered an assortment of Start-menu tweaks, neatly listed in alphabetical order; they affect the Start menu in some fairly simple yet profound ways.
Most of the checkboxes in this scrolling list are on/off switches for things that appear on the right side of the Start menu: Games, Music, Computer, Control Panel, your Personal folder, Pictures, and so on. If you never use some of these things, then for heaven’s sake turn them off; you’ll reduce clutter and eliminate that nagging feeling that you’re not using all of Windows’s features.
Also in this list, though, are checkboxes for items Microsoft didn’t put in the Start menu but that you, the oddball fringe case, can put there if you like. Here’s what they are:
Connect To. This command opens the “Connect to a network” dialog box, a simple list of all the dial-up, VPN (virtual private networking), and wireless networks your computer can “see” at the moment. The thing is, in Windows 7, there are easier ways to see the networks around you (see Chapter 9).
Downloads. For decades, novice computer users have been baffled: They download something from the Web but then can’t find where it went. Now you’ll know. Out of the box, Internet Explorer puts your downloaded files into the Downloads folder (which is inside your Personal folder). It makes sense to add this item to your Start menu so you have quick access to it.
Favorites menu. The Favorites menu is a list of your favorite Web sites—the same ones you’ve bookmarked using Internet Explorer (Favorites (Bookmarks)). If you turn on this item, you can use the Start menu to launch Internet Explorer and travel directly to the selected site. (Of course, jump lists, described later in this chapter, provide a similar feature.)
Figure 1-9. Top: On this first screen, you can specify what your PC’s power button does (shut down? sleep? restart?) or turn off the listings of recently used programs. (Turn these off if you don’t want to risk your supervisor coming by while you’re up getting coffee and noticing that your most recently used programs are The Sims, World of Warcraft, Dragon Age, and Fallout.) Bottom: Here’s the Customize Start Menu dialog box.
Homegroup. This item adds a direct link to a list of the Windows 7 PCs on your home network, as described on Homegroups. Of course, since there’s a link to them in the Navigation pane of every Explorer window, having it in the Start menu isn’t especially critical.
Network. There’s no Network item in the Start menu, because you can see all available networked computers right there at the left side of every Explorer window. Details on networking are in Chapters Chapter 23, Chapter 24, Chapter 25, and Chapter 26.
Recorded TV. You’d have no reason to use this unless your computer came equipped with a TV tuner, meaning that it’s a Media Center PC (described on Pictures and Videos). This item is a link to the TV shows you’ve recorded on your PC.
Recent Items. The Recent Items command is a little redundant. The left side of the Start menu lists the most recently used programs, and jump lists (Jump Lists) list your most recently used documents. But if you’re a fan of Recent Items from previous Windows versions, here you go.
Run command. The Run command is a power-user tool that’s actually pretty cool. It gets a writeup of its own at the end of this chapter; for now, note that you don’t really need to put it in the Start menu to enjoy it. Just press
 +R whenever you want to run
something.
+R whenever you want to run
something.System administrative tools. This one is a folder of techie diagnostic tools like Performance Monitor, Task Scheduler, and Windows Memory Diagnostic. They’re described later in this book, and they’re way over the heads of most people who don’t do PCs for a living.
If you are in the market for this sort of tool, the options here let you install a link to these tools either (a) in the All Programs menu, or (b) both there and in the right side of the Start menu.
Videos. Do you want a link to your Movies folder to appear in the Start menu, just as Music and Pictures do? If so, knock yourself out.
Take a look at the options for Computer, Control Panel, Documents, Downloads, Games, Music, Personal folder, Pictures, Recorded TV, System administrative tools, Videos. Beneath each of these headings, you’ll find three options:
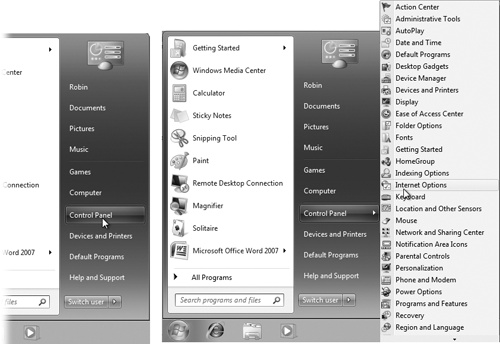
Display as a link. In other words, “list in my Start menu the usual way.”
Display as a menu. This option is extremely useful. It means that instead of simply listing the name of a folder, your Start menu sprouts a submenu listing the contents of that folder, as shown on the right in Figure 1-10.
Figure 1-10. Left: When “Display as a link” is selected for Control Panel, you can’t open a particular Control Panel program directly. Instead, you must choose Start→Control Panel, which opens the Control Panel window; then it’s up to you to open the program you want. Right: Turning on “Display as a menu” saves you a step; you now get a submenu that lists each Control Panel program. By clicking one, you can open it directly.
Don’t display this item. This option, of course, removes the folder from your Start menu altogether. That’s a good point to remember if you ever sit down at your PC and discover that, for example, the Control Panel appears to have disappeared.
A few of the checkboxes in the list aren’t on/off switches for Start menu items, but rather checkboxes that control the Start menu’s behavior. For example:
Enable context menus and dragging and dropping. There’s not much reason to turn off this checkbox; after all, it has two benefits. First, it lets you customize your Start menu simply by dragging icons onto it, as described in the next section. Second, it lets you right-click Start-menu items, which produces a useful shortcut menu containing commands like Rename and Remove from This List. (If this checkbox is turned off, then right-clicking Start menu items has no effect.)
Highlight newly installed programs. Whenever you (or some techie in the building) installs a new program into the Start menu, it shows up with colored highlighting for a few days. The idea, of course, is to grab your attention and make you aware of your expanded software suite. If you could do without this kind of reminder, then just turn off this checkbox.
Open submenus when I pause on them with the mouse pointer. When this checkbox is turned on, you don’t actually have to click a submenu to view its options.
Search other files and libraries. These options govern the Start menu’s Search command. “Search with public folders” means “search the Public folder on my computer.” (You can read more about this folder on Three Ways to Share Files.)
The third option here is “Don’t search.” If you select this, the Search command won’t search files and documents at all. Seems like that would greatly diminish the usefulness of Search. But this could be a speedy arrangement if you use Search for opening programs and nothing else. (That assumes, of course, that you leave “Search programs and Control Panel” turned on, as described next.)
Search programs and Control Panel. Suppose you never want the Search command to pull up the names of programs and Control Panel items—you want it to find only files, pictures, documents, and so on. In that case, turn off this box.
Note
This option is the inverse of “Search other files and libraries.” If you turn off both of these options, then the Start menu’s Search box will never find anything, ever. (To prevent that, select one of the two search options under “Search other files and libraries, and/or turn on “Search programs and Control Panel.”)
Sort All Programs menu by name. Yep, here it is, the feature that the world’s compulsives have been waiting for: a self-alphabetizing All Programs list. (All right, that was uncalled for; truth is, having the list in A-to-Z order can make life easier for just about anyone.)
Note
If you turn off this option, you can always make the All Programs list snap into alphabetical order on your command, as described in the tip on Tip.
Use large icons. You don’t need a book to explain this one. This option affects the little icon that appears next to each Start menu item’s name (in the left column—either the regular Start menu or the All Programs list). Bigger icons are pretty, and on today’s high-resolution monitors, they may rescue your Start-menu items from disappearing completely. On the other hand, on smaller monitors, large icons may limit the number of items the list can hold.
Below the massive list of checkboxes, two additional controls await in the Customize dialog box:
Number of recent programs to display. The number here refers to the lower-left column of the Start menu, the one that lists programs you’ve used most recently. By increasing this number, you make the Start menu taller—but you ensure that more of your favorite programs are listed and ready to launch. If this item is dimmed, it’s because you’ve turned off “Store and display recently opened items in the Start menu and the taskbar” (Pinning).
Number of recent items to display in Jump lists. For details on jump lists, see Jump Lists. If this control is dimmed, it’s because you turned off “Store and display recently opened items in the Start menu and the taskbar” (Pinning).
Usually, when you install a new program, its installer inserts the program’s name and icon in your Start→All Programs menu. There may be times, however, when you want to add something to the Start menu yourself, such as a folder, document, or even a disk.
In the following pages, you’ll read several references to the “free” portions of the Start menu. These are the two areas that you, the lowly human, are allowed to modify freely—adding, removing, renaming, or sorting as you see fit:
The top-left section of the Start menu. This little area lists what Microsoft calls pinned programs and files—things you use often enough that you want a fairly permanent list of them at your fingertips.
The All Programs menu. This, of course, is the master list of programs (and anything else—documents, folders, disks—you want to see listed).
These two areas are highlighted back in Figure 1-3.
In other words, most of the following techniques don’t work in the right column, nor the lower-left quadrant of the Start menu, where Windows lists your most recently used programs.
Microsoft wouldn’t be Microsoft if it didn’t provide at least 437 different ways to do this job. Here are two of the world’s favorites:
Locate the icon you want to add to your Start menu.
It can be a program (see the box on Restoring the Traditional Folder Listings), a document, a folder you frequently access, one of the programs in your Control Panel’s folder, or even your hard drive or DVD-drive icon. (Adding disks and folders to the Start menu is especially handy, because it lets you dive directly into their contents without having to drill down through the Computer window.)
Tip
Adding an application name to your All Programs menu requires that you find the program file, as described on What’s in the Local Disk (C:) Window. To do so, either use the Search command (Chapter 3), or just dig around for it in any Explorer window. You can find your program files in the Computer→Local Disk (C:)→Program Files folder.
Drag it directly onto the Start button.
If you release the mouse now, Windows adds the icon’s name to the bottom of the “pinned items” list (Figure 1-11, right). You’re now welcome to drag it up or down within this list.
But if you keep the mouse button pressed as you drag onto the Start button, the Start menu itself opens. As long as the button is still pressed, you can drag the new icon wherever you want among the items listed in the top-left section of the menu (Figure 1-11, left).
Note
If this drag-and-dropping business doesn’t seem to work, it’s because you’ve turned off “Enable dragging and dropping,” as described in the previous section. And if Windows doesn’t let you drag it anywhere you like, it’s because you’ve turned on “Sort All Programs menu by name,” also described earlier.
In fact, as long as you haven’t stopped pressing the mouse button, you can even drag your icon onto the words “All Programs.” Your programs list opens, and you can deposit whatever you’re dragging anywhere in that menu.
Tip
If “Sort All Programs menu by name” is not turned on, your All Programs list may gradually become something of a mess.
If you want to restore some order to it—specifically, alphabetical—then right-click anywhere on the open All Programs menu and choose Sort by Name from the shortcut menu. (This command doesn’t appear if “Sort All Programs menu by name” is already turned on.)
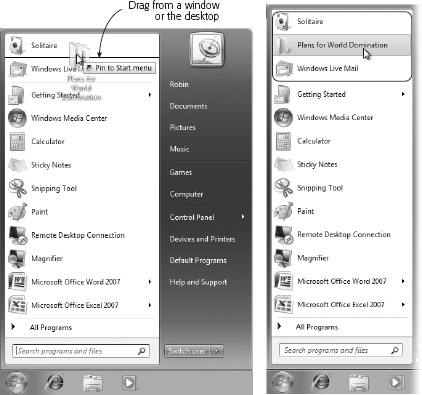
Figure 1-11. Left: You can add something to the top of your Start menu by dragging it onto the Start button to open the Start menu, and then dragging it into position. (You can also drag it onto the All Programs link and then anywhere in that list.) Right: When you release the mouse, the item is happily ensconced where you dropped it. Remember, too, that you’re free to drag anything up or down in the “free” areas: the circled area shown here, and the All Programs list. (One exception: when alphabetical sorting is on.)
Windows builds the All Programs menu by consulting two critical folders:
Local Disk (C:)→ProgramData→Microsoft→Windows→Start Menu→Programs folder. This folder contains shortcuts for programs that are available to everybody who has an account on your machine (Chapter 23).
Local Disk (C:)→Users→[your name]→AppData→Roaming→Microsoft→Windows→Start Menu→Programs folder. This invisible folder stashes shortcuts for the programs you have added to the Start menu—and they appear only when you have logged into the machine.
Therefore, instead of the fancy drag-and-drop scheme described above, you may prefer to fine-tune your Start menu the low-tech way.
Unfortunately, these folders are normally hidden. Fortunately, you don’t really care; there’s a quick shortcut to opening them, as described in Figure 1-12. Then, once you’ve opened the relevant Programs folder, you can add shortcut icons there, remove them, or rename them. Whatever changes you make are reflected in your All Programs menu.
When it comes time to prune an overgrown Start menu, there are two different sets of instructions, depending on which section of the Start menu needs purging.
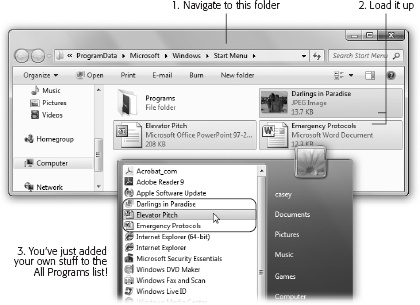
Figure 1-12. To edit your All Programs menu, edit its source folders. To begin, open the Start menu and right-click All Programs; from the shortcut menu, choose either Open All Users (to view the list of programs for the masses) or Open (to see the list of your personal programs). Those commands take you directly to the deeply buried Programs folders described above.
The left-side column, the All Programs list, and jump lists. Right-click the item you’ve targeted for extinction, and then, from the shortcut menu, choose either “Remove from this list” or “Delete.”
In both cases, you’re only deleting the shortcut on the menu. You’re not actually deleting any software.
The right-side column. Open the Properties→Customize dialog box for the Start menu (The All Programs List), and then turn off the checkboxes for all the items you want expunged.
Tip
You can spawn instant shortcuts (Auto-emptying the Recycle Bin) of anything in the left-hand column of the Start menu by dragging them off the menu—onto the desktop, for example. That’s a handy tactic if you want a desktop icon for something you use often, so you don’t even have to open the Start menu to get at it.
Although few people realize it, you can rename anything in the Start menu’s left side (or in the top half of the right side—like Pictures, Music, or Documents). Open the Start menu, right-click the item you want to rename, and choose Rename from the shortcut menu. The command sprouts a little editing box. Type the new name and then press Enter.
To change the order of listings in the “free” portions of the Start menu, including the All Programs list, just drag the items up and down the lists as you see fit. As you drag, a black line appears to show you the resulting location of your dragging action. Release the mouse when the black line is where you want the relocated icon to appear.
You can drag program names from the lower-left section of the Start menu, too—but only into one of the “free” areas.
Tip
A reminder: If you can’t seem to drag program names around in the All Programs list, it’s probably because you’ve told Windows to auto-alphabetize this list (Method 1: Drag an icon directly).
As noted earlier, some items in the All Programs list are actually folders. For example, clicking Games reveals a submenu of the games that come with Windows (see Figure 1-13).
It’s worthwhile to know that you can create All Programs menu folders of your own and stock them with whatever icons you like. For instance, you may want to create a folder for CD-ROM games, eliminating those items from a too-long All Programs menu.
To add a folder to the All Programs menu, follow these steps:
Open the Start menu. Right-click the All Programs command. From the shortcut menu, choose Open.
You’re about to create subfolders that will show up only when you are logged on. (If you want to make a change that affects everybody with an account on this computer, then choose Open All Users from the shortcut menu instead.)
In any case, the Start Menu Explorer window appears.
Figure 1-13. Some All Programs menu items have submenu folders and sub-submenu folders. As you move through the layers, you’re performing an action known as “drilling down.” This phrase shows up a lot in manuals and computer books—for example, “Drill down to the Calculator to crunch a few quick numbers.”
Open the Programs folder.
Its contents are arrayed before you, as shown in Figure 1-14.
In the window toolbar, click “New folder.”
Or, if your right mouse button hasn’t been getting enough exercise, right-click a blank spot in the window, and then choose New→Folder from the shortcut menu. (Or just press Shift+Ctrl+N.)
When the new folder appears, type a folder name and then press Enter.
Close the window, if you like.
Tip
You can even create folders within folders in your Start→All Programs menu. Just double-click to open any of the existing folders in the Programs folder, and then repeat from step 3.
Your new folder appears in the folders list of the Start→All Programs menu, already sorted into alphabetical order.
Now you can put your favorite file, folder, disk, or application icons into this new folder. To do so, drag an icon onto the Start→All Programs menu, and then, without releasing the mouse, onto the All Programs link, and then into the new folder/submenu you created.

There’s one more bit of Start-menu customization left. It’s one of the stars of Windows 7, a new feature called jump lists.
They’re handy submenus that list frequently or recently opened files in each of your programs. For example, the jump list for Internet Explorer shows the Web sites you visit most often; the jump list for Windows Media Player shows songs you’ve played a lot lately.
The point, of course, is that you can reopen a file just by clicking its name. Jump lists can save you time when you want to resume work on something you had open recently but you’re not in the mood to burrow through folders to find its icon.
Often, jump lists also include shortcut-menu-ish commands, like New Message (for an email program), Play/Pause (for a jukebox program), or Close All Windows (just about any program). As Microsoft puts it, it’s like having a separate Start menu for every single program.
Interestingly enough, the same jump lists appear both in the Start menu and in your taskbar (Figure 1-15).
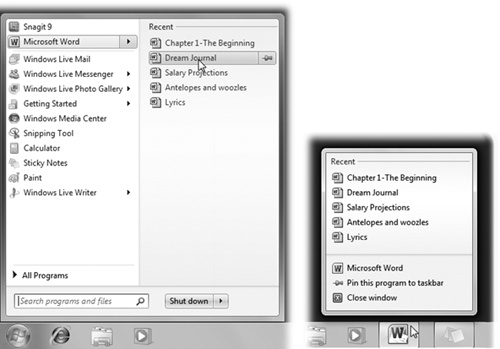
Figure 1-15. Jump lists display the most recently opened documents in each program. These submenus show up in the Start menu (left), but they also sprout from the taskbar when you right-click a program’s icon there (right).
You have several ways to make jump lists appear:
In the Start menu. A
button next to a program’s name in the
Start menu means a jump list awaits. (In general, a program
sprouts a jump list automatically if you’ve used it to open or
play files.)To open the jump list, either click the
or just point to the program’s name without
clicking. The submenu opens automatically after about half a
second.Note
If no jump lists ever appear, it’s probably because you’ve turned this feature off. To turn it back on, right-click the Start menu. From the shortcut menu, choose Properties. Turn on “Store and display recently opened items in the Start menu and the taskbar.” (Yes, that’s the on/off switch for jump lists.) Click OK.
And if the submenu doesn’t pop open by itself when you point without clicking, you’ve probably turned that feature off, too. To turn it back on, right-click the Start menu. From the shortcut menu, choose Properties. Click Customize. Turn on “Open submenus when I pause on them with the mouse pointer.” Click OK.
On the taskbar. The nearly identical jump list appears when you right-click a program’s icon on your taskbar (Taskbar 2.0).
Actually, there’s a second, secret way to make the jump list appear: Swipe upward from the program’s icon. (That is, give the mouse a flick upward while you’re clicking.)
This technique isn’t such a huge benefit when you’re using a mouse or trackpad. But if you’re using a touchscreen computer, where right-clicking can be a little hard to figure out, you’ll be glad to have this alternative.
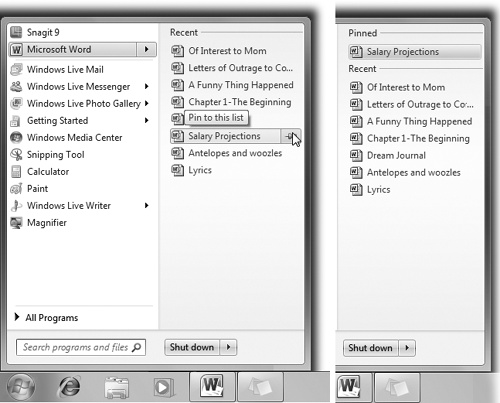
Figure 1-16. Suppose there’s a document you refer to a lot, and you don’t want it to vanish from its program’s jump list. Just point to its name without clicking, and then click the pushpin icon (left). Now there’s a new section in the jump list called Pinned, where that document will remain undisturbed until you unpin it by clicking the pushpin again (right).
In general, jump lists maintain themselves. Windows decides which files you’ve opened or played most recently or most frequently and builds the jump lists accordingly. New document listings appear, older ones vanish, all without your help.
You can, however, pin an item to a program’s jump list so it doesn’t. disappear. It’s out of Windows’s clutches, at least until you unpin it. Figure 1-16 shows the technique.
Jump lists are great and all, but you should be aware of a few things:
They don’t know when you’ve deleted a document or moved it to another folder or disk; they continue to list the file even after it’s gone. In that event, clicking the document’s listing produces only an error message. And you’re offered the chance to delete the listing (referred to as “this shortcut” in the error message) so you don’t confuse yourself again the next time.
Some people consider jump lists a privacy risk, since they reveal everything you’ve been up to recently to whatever spouse or buddy happens to wander by. (You know who you are.)
In that case, you can turn off jump lists, or just the incriminating items, as described next.
There are all kinds of ways to whip jump lists into submission. For example:
Turn off jump lists. If the whole idea of Windows (or your boss) tracking what you’ve been working on upsets you, you can turn this feature off entirely. To do that, right-click the Start menu. From the shortcut menu, choose Properties. Turn off “Store and display recently opened items in the Start menu and taskbar” and click OK.
Delete one item from a jump list. For privacy, for security, or out of utter embarrassment, you may not want some file or Web site’s name to show up in a jump list. Just right-click and, from the shortcut menu, choose “Remove from this list.”
Clear a jump list completely. At other times, you may want to wipe out all your jump lists—and all your tracks. To do that, right-click the Start menu. From the shortcut menu, choose Properties. Turn off the checkbox that says “Store and display recently opened items in the Start menu and taskbar” (that’s the master on/off switch for jump lists). Click Apply; you’ve just erased all the jump lists.
If you didn’t intend to turn off jump lists for good, though, turn the “Store and display” checkbox back on again before clicking OK. Your jump lists are now ready to start memorizing new items.
Change the number of documents in the list. Ordinarily, jump lists track the 10 most recent (or most frequently used) items, but you can goose that number up or down. To do that, right-click the Start menu. From the shortcut menu, choose Properties. Click Customize. Adjust the “Number of recent items to display in Jump Lists” item at the bottom of the dialog box, and then click OK.
The Start menu in a fresh installation of Win7 doesn’t include
the Run command. But power users and über-geeks may well want to put
it back in the Start menu, following the instructions on The All Programs List. (Or don’t bother. Whenever you
want the Run command, you can just press ![]() +R, or type run into the
Start menu’s Search box and then hit Enter.)
+R, or type run into the
Start menu’s Search box and then hit Enter.)
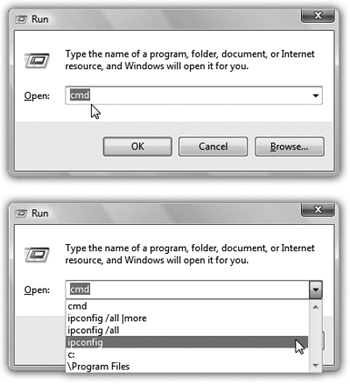
Figure 1-17. Top: The last Run command you entered appears automatically in the Open text box. You can use the drop-down list to see a list of commands you’ve previously entered. Bottom: The Run command knows the names of all your folders and also remembers the last few commands you typed here. As you go, you’re shown the best match for the characters you’re typing. When the name of the folder you’re trying to open appears in the list, click it to prevent having to type the rest of the entry.
The Run command gets you to a command line, as shown in Figure 1-17. A command line is a text-based method of performing a task. You type a command, click OK, and something happens as a result.
Note
The command line in the Run dialog box is primarily for opening things. Windows 7 also comes with a program called Command Prompt that offers a far more complete environment—not just for opening things, but for controlling and manipulating them. Power users can type long sequences of commands and symbols in Command Prompt.
Working at the command line is becoming a lost art in the world of Windows, because most people prefer to issue commands by choosing from menus using the mouse. However, some old-timers still love the command line, and even mouse-lovers encounter situations when a typed command is the only way to do something.
If you’re a PC veteran, your head probably teems with neat Run commands you’ve picked up over the years. If you’re new to this idea, however, the following are a few of the useful and timesaving functions you can perform with the Run dialog box.
For example, you can use the Run command as a program launcher. Just type any program’s program filename in the Open text box and then press Enter. For both pros and novices, it’s frequently faster to launch a program this way than to click the Start→All Programs menu with the mouse.
Unfortunately, the program filename isn’t the same as its plain-English name; it’s a cryptic, abbreviated version. For example, if you want to open Microsoft Word, you must type winword. That’s the actual name of the Word program icon as it sits in your Computer→Local Disk (C:)→Program Files→Microsoft Office→Office folder. Some other common program filenames are here:
Program’s real name | Program’s familiar name |
|---|---|
iexplore | Internet Explorer |
explorer | Windows Explorer |
write | WordPad |
msworks | Microsoft Works |
msimn | |
wmplayer | Windows Media Player |
control | Classic Control Panel |
regedit | Registry Editor |
cleanmgr | Disk Cleanup |
defrag | Disk Defragmenter |
calc | Calculator |
To discover the real filename of a certain program, open Computer→Local Disk (C:)→Program Files. Inspect the folders there; with the window in Details view, you’ll be able to spot the icons whose type is “application.”
Note
True, the Start Search box at the bottom of the Start menu offers another way to find and open any program without taking your hands off the keyboard. But the Run method is more precise, and may require less effort because you’re not typing the entire program name.
In fact, keyboard lovers, get this: You can perform this entire application-launching stunt without using the mouse at all. Just follow these steps in rapid succession:
That’s the keyboard shortcut for the Run command, whose dialog box now opens.
Type the program file’s name in the Open box.
If you’ve typed the name before, just type a couple of letters; Windows fills in the rest of the name automatically.
Press Enter.
Windows opens the requested program instantly. Keystrokes: 4; Mouse: 0.
Using the Run dialog box is handy for opening favorite applications, because it requires so few keystrokes. But you can also use the Run dialog box to open any file on the computer.
The trick here is to type in the entire path of the program or document you want. (See the box on The Path to Enlightenment about Paths if you’re new to the idea of file paths.) For example, to open the family budget spreadsheet that’s in Harold’s Documents folder, you might type C:\Users\Harold\Documents\familybudget.xls.
Of course, you probably wouldn’t actually have to type all that, since the AutoComplete pop-up menu offers to complete each folder name as you start to type it.
Tip
Typing the path in this way is also useful for opening applications that don’t appear in the Start→All Programs menu. (If a program doesn’t appear there, you must type its entire pathname—or click Browse to hunt for its icon yourself.)
For example, some advanced Windows utilities (including the Registry Editor, an advanced diagnostic program) are accessible only through the command line. You also need to use the Run command to open some older command-line programs that don’t come with a listing in the All Programs menu.
When you click Computer in your Start menu, you see that Windows assigns a letter of the alphabet to each disk drive attached to your machine—the hard drive, the DVD drive, the floppy drive, and so on. The floppy drive is A:, the hard drive is usually C:, and so on. (There hasn’t been a B: drive since the demise of the two-floppy computer.)
By typing a drive letter followed by a colon (for example, C:) into the Run box and pressing Enter, you make a window pop open, showing what’s on that drive.
You can also use the Run dialog box to open the window for any folder on your machine. To do so, type a backslash followed by the name of a folder (Figure 1-17, bottom of screen). You might type, for example, the first few letters of \Program Files to see your complete software collection.
Note
The Run command assumes you’re opening a folder on Drive C. If you want to open a folder on a different drive, add the drive letter and a colon before the name of the folder (for example, D:\data).
If you’re on a network, you can even open a folder that’s sitting on another computer on the network. To do so, type two backslashes, the computer’s name, and then the shared folder’s name. For instance, to access a shared folder called Budgets on a computer named Admin, enter \\admin\budgets. (See Chapter 26 for more on sharing folders over the network.)
It might make you feel extra proficient to know that you’ve just used the Universal Naming Convention, or UNC, for the shared folder. The UNC is simply the two-backslash, computer name\folder name format (for example: \\ComputerName\foldername).
Tip
In any of these cases, if you don’t remember the precise name of a file or folder you want to open in the Run dialog box, then click the Browse button to display the Browse dialog box, as shown in Figure 1-17, bottom.
You can jump directly to a specific Web page by typing its Web address (URL)—such as http://www.bigcompany.com—into the Run dialog box and then pressing Enter. You don’t even have to open your Web browser first.
Once again, you may not have to type very much; the drop-down list in the Run dialog box lists every URL you’ve previously entered. Simply click one (or press the ↓ key to highlight the one you want, and then press Enter) to go to that site.
UP TO SPEED: The Path to Enlightenment about Paths
Windows is too busy to think of a particular file as “that family album program in the Program Files folder, which is in the Programs folder on the C drive.” Instead, it uses shorthand to specify each icon’s location on your hard drive—a series of disk and folder names separated by backslashes, like this: C:\program files\pbsoftware\beekeeperpro.exe.
This kind of location code is that icon’s path (Capitalization doesn’t matter, even though you may see capital letters in Microsoft’s examples.)
You’ll encounter file paths when using several important Windows
features. The Run dialog box described in this section is one. The
address bar at the top of every Explorer window is another,
although Microsoft has made addresses easier to read by displaying
triangle separators in the address bar instead of slashes. (That
is, you now see Users ![]() Casey instead of Users\Casey.)
Casey instead of Users\Casey.)
Try not to be confused by the fact that Web addresses use forward slashes (/) instead of backslashes (\)!
Get Windows 7: The Missing Manual now with the O’Reilly learning platform.
O’Reilly members experience books, live events, courses curated by job role, and more from O’Reilly and nearly 200 top publishers.

