Install Windows 8, start it up, and start using it. What could be simpler? What’s there to hack?
Plenty, as it turns out. If you don’t like Windows 8’s Lock screen, you can bypass it or make it work more the way you want it to. You can speed the Windows 8 boot, or even make startup faster. And you’re not stuck with a single Windows 8 installation. You can install and run Windows 8 on a Mac, and run other versions of Windows inside Windows.
There’s all that, and plenty more, in this chapter.
Tired of being forced to click through Windows 8’s lock screen before you get to the Start screen? Here’s how to bypass it.
Boot your PC or wake it from sleep, and you go straight to Windows 8’s lock screen, which looks more like the screen you’d expect to see on your smartphone than on a PC. It tells you the time and date, and a variety of timely information—meetings taken from your calendar, updates from social networking sites, an indication of your power level, email notifications, and other similar information.
That’s all very nice, but if you’re on a PC, you probably want to get straight to work. And that means getting to the Start screen faster. If you like, you can bypass the Lock Screen.
Note
Note: If you’re using a Windows 8 tablet, you may find the Lock screen more useful, since you may want to glance at your calendar or social networking sites while you’re on the go.
To do it, you use the Local Policy Editor. Launch it by pressing Windows key+R to
open the Run bar, type gpedit.msc, and press Enter or click
OK. The Local Policy Editor launches (Figure 1-1).
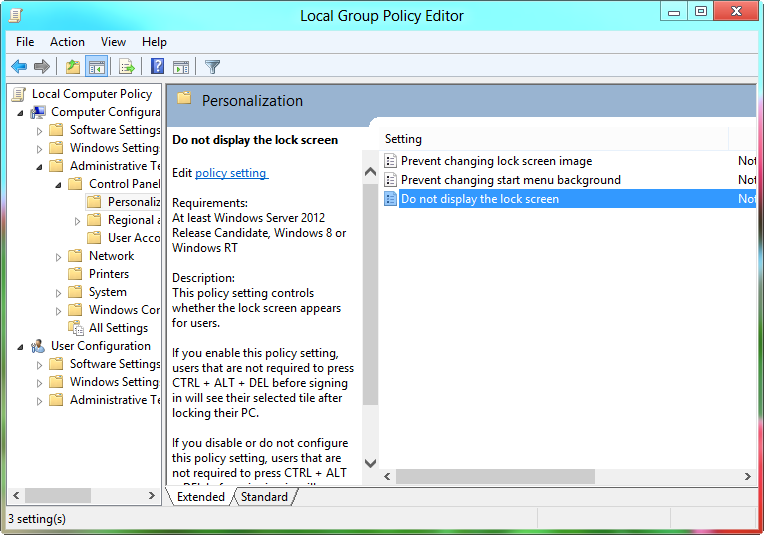
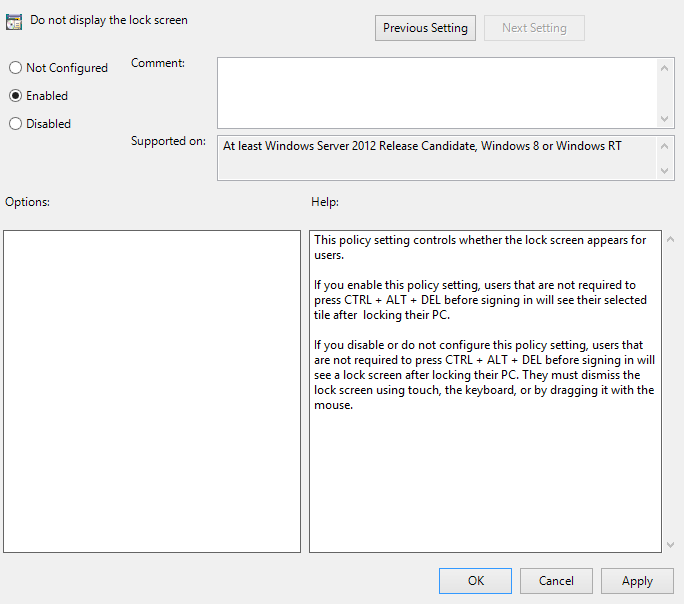
Go to Computer Configuration→Administrative Templates→Control Panel→Personalization. Double-click the “Do not display the lock screen” entry, select Enabled, then press Enter or click OK (Figure 1-2). Exit the Local Policy Editor, then reboot.
The new setting should take effect immediately. The next turn you reboot or wake your PC, you won’t see the Lock screen. Instead, you’ll go straight into logging into Windows 8.
The Local Policy Editor comes only with Windows 8 Pro and Windows 8 Enterprise. But you can still turn off the Lock screen in any version of Windows 8 by using a Registry hack. (See Chapter 11 for details on the Registry.) In the Registry Editor, go to HKEY_LOCAL_MACHINE\SOFTWARE\Policies\Microsoft\Windows\Personalization and create a DWORD called NoLockScreen. Change its value from 0 to 1, exit the Registry Editor, and exit and restart Windows 8. (Note: If you don’t find the Personalization key, you’ll have to create it before creating the NoLockScreen DWORD.)
See Also
Want to bend the Lock screen to your will? Here’s how to do it.
There’s a lot more to the Start screen than meets the eye. It’s more than just a passing-through location, because the screen can also keep you updated with information grabbed from the Internet. In this hack, you’ll learn about plenty of ways to customize it.
Note
Note: In corporate environments, an IT department may have locked down some of these options. In this case, you’ll be notified with the message, “Some settings on this page have been disabled by group policy.”
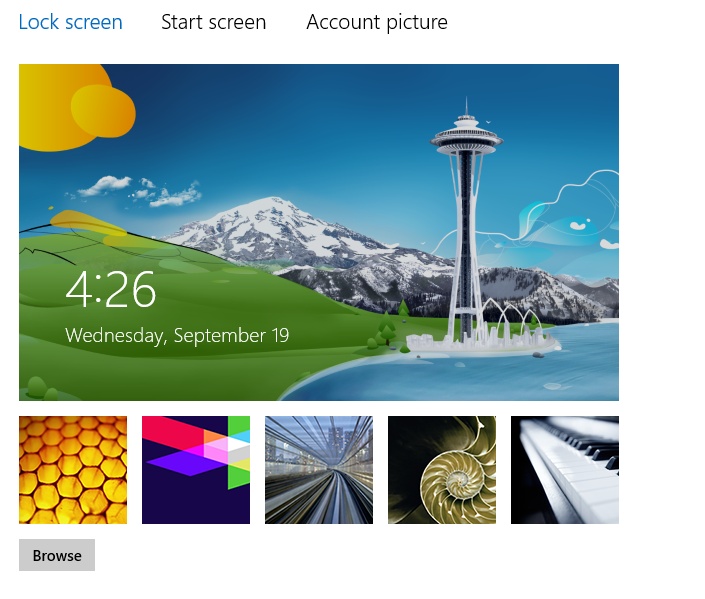
The Lock screen is mostly controlled via a single settings screen. To get there, press Windows key+C to display the Charms bar, and select Settings→Change PC Settings→Personalize→Lock Screen. A screen appears, shown in Figure 1-3, that displays your Lock screen image at the top. Just beneath it are other Lock screen images you can use. Click any one of them to make it the new Lock screen image. To find other images you can use for the Lock screen, click the Browse button and browse through your pictures. Select the one you want to use, click Choose Picture, and you’ll make it your new Lock screen image.
If you share your PC with someone, they have the same access to fiddling with it that you do. If you don’t want anyone changing your Lock screen image, you can tell Windows 8 not to let it be changed.
Launch the Local Policy Editor by pressing Windows key+R to open
the Run bar, type gpedit.msc, and press Enter or
click OK. The Local Policy Editor launches.
Go to Computer Configuration→Administrative Templates→Control Panel→Personalization. Double-click the “Prevent changing lock screen image” entry, select Enabled, then press Enter or click OK. Exit the Local Policy Editor.
Note
Note: As described at the end of the previous hack, if you don’t have Windows 8 Pro and Windows 8 Enterprise, you can change the Lock screen by using a Registry hack. In the Registry Editor (Chapter 11), go to HKEY_LOCAL_MACHINE\SOFTWARE\Policies\Microsoft\Windows\Personalization and create a DWORD called NoChangingLockScreen. Change its value from 0 to 1, exit the Registry Editor, and exit and restart Windows 8. If you don’t see the Personalization key, you’ll have to create it before creating the NoChangingLockScreen DWORD.
If you decide you want to change the Lock screen, repeat these steps, except select Disabled, press Enter or click OK, then exit the Local Policy Editor. The setting takes effect the next time you reboot.
One of Windows 8’s niftier features is that it displays notifications on the Lock screen from certain apps—email, social networking, calendar, and more. That way, if you want a quick rundown of what you need to know, it’s right there for you. You don’t even have to log into Windows 8; just check out the Lock screen.
Maybe you don’t want to see updates from your social networking sites, but do want to see the current weather, or information from another app. Customizing exactly what shows up on your Start screen is a breeze.
Press Windows key+I, and then select Change PC Settings at the bottom of the Settings pane. From the right side of the screen that appears (Figure 1-4), select Lock Screen.
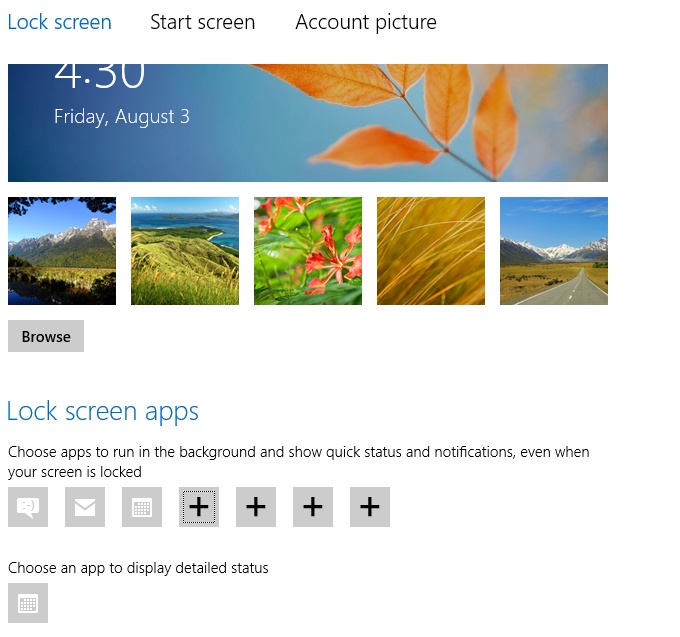
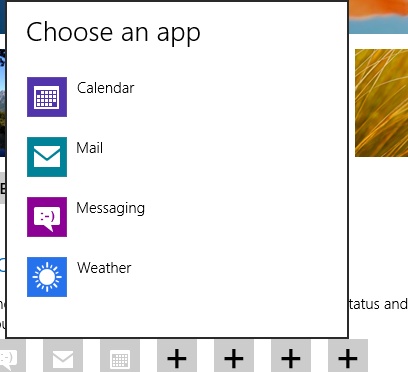
Down at the bottom-right of the screen, you’ll see icons of the apps that automatically display notifications, with some plus signs to the right (Figure 1-5). Click a plus sign to reveal a list of apps that can display notifications. Simply pick one and it will display alerts and other information on the Start screen.
Note
Note: When you click a plus sign, you’ll see both the apps that already display notifications, as well as those that don’t. If you choose one that already displays its notifications on the Start screen, nothing new happens—the app still displays notifications, with no change.
See Also
Shorten the time it takes for your desktop to appear when you turn on your PC.
No matter how fast your PC boots, it’s not fast enough. Here are several hacks to get you right to your desktop as quickly as possible after startup.
When you turn on your PC, it goes through a set of startup procedures in its BIOS before it gets around to starting Windows. So, if you speed up those initial startup procedures, you’ll make your system start faster.
You can speed up your startup procedures by changing the BIOS with the built-in setup utility. How you run this utility varies from PC to PC, but you typically get to it by pressing either the Delete, F1, F2, or F10 key during startup. You’ll come to a menu with a variety of choices. Here are the choices to make for faster system startups:
- Quick Power On Self Test (POST)
When you choose this option, your system runs an abbreviated
POSTrather than the normal, lengthy one.- Change Your Boot Order
If you change the boot order so that your BIOS checks the hard disk first for booting, it won’t check any other devices, and will speed up your startup time.
- Boot Up Floppy Seek
Disable this option. When it’s enabled, your system spends a few extra seconds looking for your floppy drive—a relatively pointless procedure, especially considering how infrequently you use your floppy drive.
- Boot Delay
Some systems let you delay booting after you turn on your PC so that your hard drive gets a chance to start spinning before bootup. Most likely, you don’t need to have this boot delay, so turn it off. If you run into problems, however, you can turn it back on.
See Also
Increase your PC’s performance and speed up startup times by shutting off applications and services that you don’t need.
One of the best ways to speed up your PC without having to spend money on extra RAM is to stop unnecessary programs and services from running whenever you start your PC. When too many programs and services run automatically every time you start up your system, startup itself takes a long time—and too many programs and services running simultaneously can bog down your CPU and hog your memory.
Some programs, such as anti-malware software, should run automatically at startup and always run on your computer. But many other programs, such as instant messenger software, serve no purpose by being run at startup. And while you need a variety of background services running on your PC for Windows to function, many services that run on startup are unnecessary.
The task of stopping programs from running at startup is particularly daunting because there’s no single place you can go to stop them all. Some run because they live in the Startup folder, others because they’re part of logon scripts, still others because of Registry settings, and so on. But with a little bit of perseverance, you should be able to stop them from running.
Start by cleaning out your Startup folder. It’s
in C:\Users\<User
Name>\\AppData\Roaming\Microsoft\Windows\Start
Menu\Programs\Startup, where <User
Name> is your Windows logon name. Delete the shortcuts
of any programs you don’t want to run on startup. As with any shortcuts,
when you delete them, you’re deleting only the shortcut, not the program
itself.
Taking the previous steps will stop the obvious programs
from running at startup, but it won’t kill them all. The best tool for
disabling hidden programs that run on startup is the Task Manager’s
Startup tab, shown in shown in Figure 1-6. To run it, press
Ctrl+Alt+Del and select Task Manager, then click the Startup tab. You
can also run Task Manager by typing Task Manager
on the Start screen and clicking the Task Manager icon that appears, or
by pressing Ctrl+Alt+Esc.
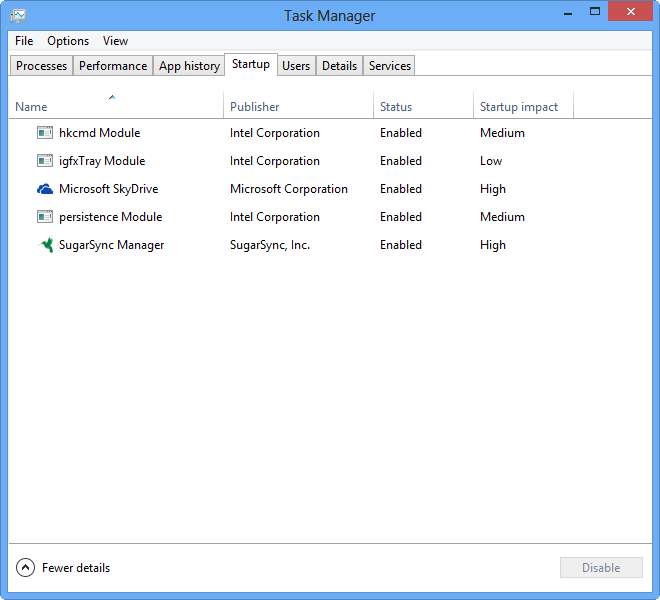
You’ll find the Startup tab exceptionally useful for deciding which programs and services should run at startup, and which can be safely disabled. Over on the right side, you’ll see a “Startup impact” column. For each service and app listed, the column tells you whether the impact on startup is Low, Medium, or High. That lets you concentrate on disabling the Low impact items.
Sometimes the name of the app makes clear what it does. For example, Microsoft SkyDrive obviously runs Microsoft’s SkyDrive client. But often, you’ll have no clue what an app does. What to make of the “hkcmd Module” shown in Figure 1-6, for example. You can see in the Publisher column it’s from Intel. But what is it, and what does it do? You’ll need information like that to decide whether to disable it or not.
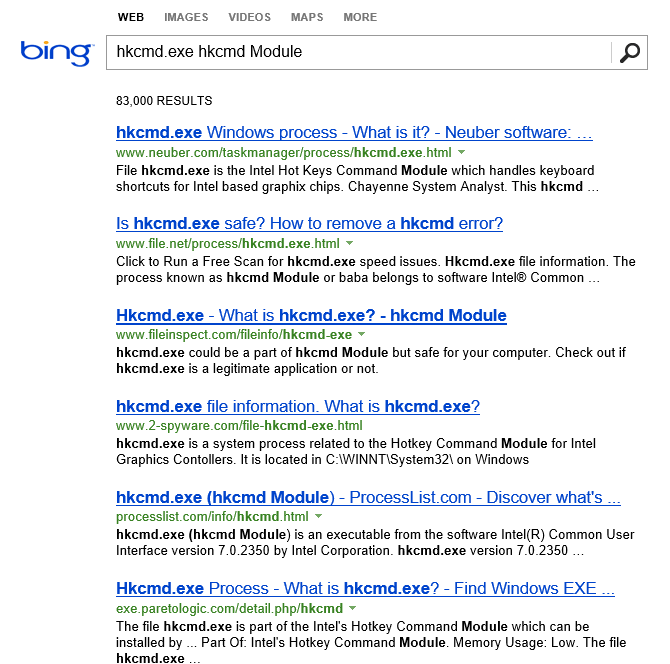
To gather information about a startup item, right-click it and select “Search online.” That launches an Internet search using your default browser and default search engine. The results usually give you links to many sites with details about the service or app. In the instance of “hkcmd Module,” for example, I was able to discover that it’s an app that lets you get access to customizing an Intel chipset’s graphics properties. See Figure 1-7 for an example of this.
To stop an app from running at startup, right-click it and select Disable. This prevents it from running, although the app will still be on your hard disk.
When you stop programs from running at startup, it’s best to stop them one at a time rather than in groups. That way, you can make sure that you’re not causing any system problems. So, stop one and restart your PC. If it runs fine, stop another and restart. Continue doing this until you’ve cleared all the programs you don’t want to run automatically.
After you’ve used the Task Manager to identify programs that run upon startup, you may want to try disabling them from within the programs themselves. Run each program that starts automatically, and see if you can find a setting that allows you to prevent it from running on startup.
Even the Task Manager won’t necessarily let you identify
and turn off all programs that run on startup. You might also need to
hack the Registry to disable them. To do so, launch the Registry Editor
by pressing Windows key+R, typing regedit in the
box that appears or at a command prompt (see Chapter 11 for details) and go to
HKEY_CURRENT_USER\Software\Microsoft\Windows\CurrentVersion\Run.
In the right pane, you will see a list of some of the programs that run
automatically at startup. The Data field tells you the path and name of
the executable so that you can determine what each program is.
Right-click any program you don’t want to run, and choose Delete. That
will kill any programs that run and are specific to your account. To
turn off programs that run for every user of the system, go to HKEY_LOCAL_MACHINE\SOFTWARE\Microsoft\Windows\CurrentVersion\Run
and follow the same instructions for deleting other programs that you
don’t want to run at startup.
Constantly running in the background of Windows are services—processes that help the operating system run, or that provide support to applications. Many of these services launch automatically at startup. Although you need many of them, many aren’t required and can slow down your system when they run in the background.
You can prevent services from running at startup using the
Services Computer Management Console snap-in, shown in
Figure 1-8. Run it by
typing services.msc at the Start screen
and clicking the icon that appears. You can also type
services.msc into the Run box or command prompt
box. The Services Computer Management Console snap-in includes a description of all services, so you can
know ahead of time whether a particular service is one you want to turn
off. It also lets you pause the service so you can test out your machine
with the service off to see whether it’s needed.
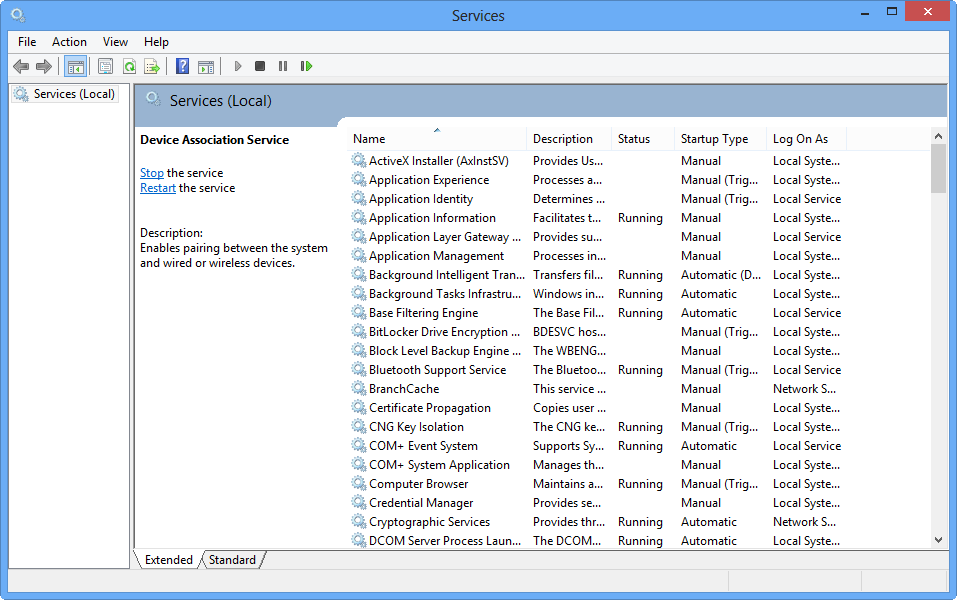
After you run the console, click the Extended tab. This view shows you a description of each service in the left pane when you highlight the service. The Startup Type column shows you which services launch upon startup—any services with “Automatic” in that column. Click the top of that column to sort together all the services that automatically launch on startup. Then highlight each service and read its description.
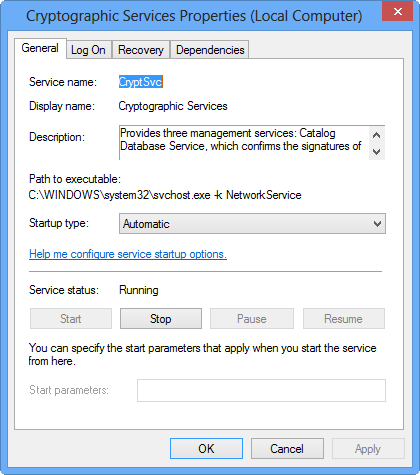
When you find a service that you want to turn off, right-click it and choose Properties. In the Properties dialog box that appears (Figure 1-9), choose Manual from the “Startup type” drop-down list. The service won’t start automatically from now on (unless another service requires it in order to start), but you can start it manually via the console. If you want the service disabled so that it can’t be run, choose Disabled. (If you disable a service that a critical Windows service depends on, that service won’t be able to start either, which could cause problems.) If the service is necessary, but you’d still like your PC to start more quickly, you can choose Automatic (Delayed Start). When you choose this, the service won’t launch immediately on startup, so your PC will start more quickly, but will wait a little bit, and load once you’re using your PC. That way, the service will still be available to you, but it won’t slow down startup.
To test the effects of turning off the service, turn off any services you don’t want to run by clicking “Stop the service” in the left pane, or by right-clicking the service and choosing Stop. Note that some services can’t be stopped while the system is running. You’ll have to set them to “manual” and reboot to see the effect of turning them off.
Table 1-1 lists some common services you might want to halt from running at startup. (Some, such as Remote Registry, are disabled by default, but might have somehow been turned on.)
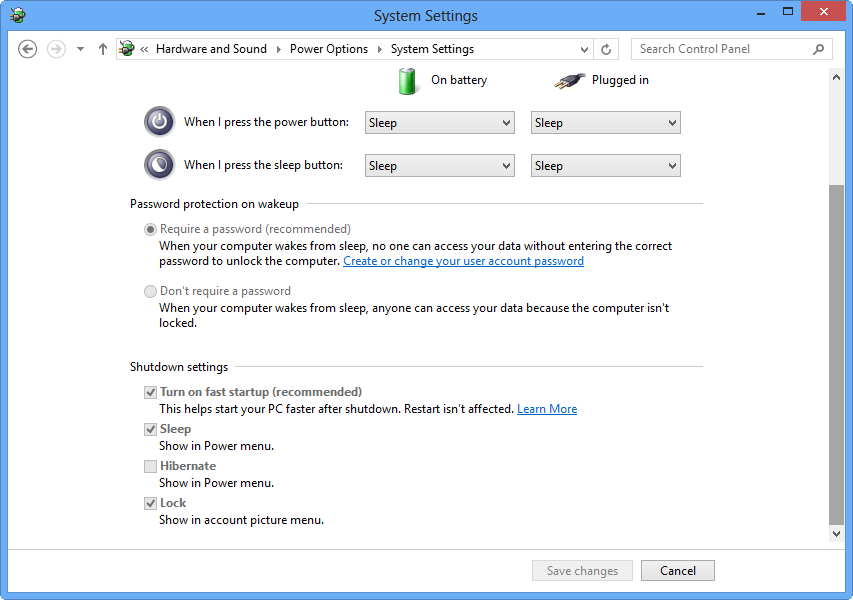
There’s a new mode in Windows 8 called Fast Startup, that starts up your PC much more quickly after you’ve shut it down. With Fast Startup, when you turn off your PC, the kernel is saved to disk, and that kernel is then used to start Windows back up, significantly decreasing startup time.
Note that this feature only works when you shut your system down
and then start it again. If you instead choose Restart rather than
shutting your system down, Fast Startup doesn’t come into play. By
default, Fast Start is enabled, but it’s a good idea to make sure it
hasn’t been turned off on your system. On the Start screen, press
Windows key+W, type Power, and then click the
Power Options icon that appears on the left side of the
screen. Click “Choose what the power buttons do,” and, on the screen
that appears, in the Shutdown settings area (Figure 1-10), make sure the “Turn
on fast startup” checkbox is turned on.
See Also
Have so many issues with Windows 8 that you need to reinstall it? There’s a simpler way: Use Windows 8’s Reset or Refresh options instead.
You know the moment, that moment when you realize that your operating system has such problems that there’s only one solution: wipe it out and start from scratch by reinstalling it.
A full reinstall is a tremendous, time-consuming headache, because you have to copy all your data somewhere, wipe your hard disk, reinstall Windows, and then restore your data. It’s rare that you’ll get it exactly right. And that assumes that you even remember where your Windows installation disc is.
Windows 8, for the first time in Windows history, gives you a much better way. It introduces two related new features that let you essentially reset Windows 8 to the state it was in when you first installed it. The two new features are called Reset and Refresh. Here’s what they do, and the differences between them:
- Reset
This option puts your PC in the condition it was in to either when you first started it —if it came with Windows 8 on it—or when you first installed Windows 8. It wipes out your data and any apps you installed and puts your PC back into its original, pure Windows 8 state. It’s a much simpler option than doing all that yourself manually. You won’t even need your Windows install disc. (More on that later in this hack.) It’s the PC equivalent of the “Restore to Factory Default” feature you’ll find on many smartphones. Think of Reset as the nuclear option. Windows 8 erases and formats your hard drives, installs a fresh copy of Windows, and then starts into that new copy of Windows. There’s even an option when you do a Reset for not just reformatting your hard disk before reinstalling Windows, but writing random patterns to every sector on the hard drive so that data, such as personal data, can’t be recovered. You might use this alternative if you’re giving away, selling, or recycling your PC.
- Refresh
This feature reinstalls Windows, but doesn’t wipe out your data, settings, or any Windows 8 native apps you’ve installed. (It does wipe out your Desktop apps, but there’s a way to tell Refresh not to wipe them out, as you’ll see later in this hack.) Your hard disks aren’t erased or formatted. When you sign into the reinstalled Windows, your data will be there waiting for you, as will your settings and Windows 8 native apps.
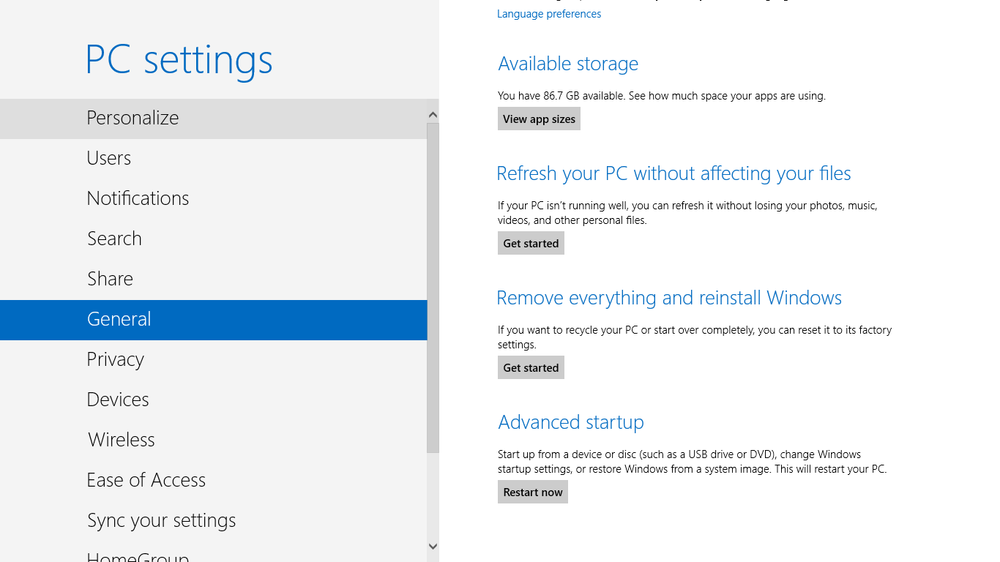
To Reset or Refresh your PC, press Windows key+C and select Settings→Change PC Settings→General. Scroll toward the bottom of the screen (Figure 1-11) and on the right side, you’ll see separate sections for Refresh and Reset. The Refresh section reads “Refresh your PC without affecting your files,” and the Reset section reads “Remove everything and reinstall Windows.” Click “Get started” in the appropriate section. Then just follow the simple prompts.
Note
Note: When you perform a Refresh, you won’t have to go through the normal initial Windows 8 Welcome and setup screens that walk you through to configure your settings and user account. That information is included already as part of the Refresh. With a Reset, however, you’ll go through all those screens.
Mostly, you’ll use the Refresh option, because you want to continue to use your files and apps. But there’s a problem with Refresh: although it keeps all your data and your Windows 8 native apps, it wipes out your Desktop apps. If, like most people, you mainly use Desktop apps, this is not a good thing.
You can, however, create a custom refresh point that takes a snapshot of your system, and then uses that snapshot to refresh your PC. Part of that snapshot includes your Desktop apps, so when you refresh your system after creating one of these custom refresh points, your Desktop apps will be back waiting for you.
How does it do that? First, a little bit of background. When Windows 8 is first installed, the system creates and stores a refresh point. When you refresh your system, it uses that refresh point as the baseline for the refresh. But because that refresh point was created before you installed Desktop apps, it doesn’t include information about them. When you create a custom refresh point, information about those apps is included, so they’ll be on your system.
To create a custom refresh point, first create a new directory where you want to store it. The refresh point will be named CustomRefresh.wim. After that, run an elevated command prompt—that is, a command prompt with Administrator rights. To do it, right-click the lower-left edge of the screen and select Command Prompt (Admin). Then type the following in the command prompt:
recimg /createimage <directory>
where <directory> is the name of the directory you’ve just created. When you do that, Refresh will use the image in that directory instead of the one created during Windows 8’s initial installation to perform a Refresh.
The recimg command gives
you quite a bit of flexibility in creating and using Refresh points.
What if you decide you want to create a new custom Refresh point because
you’ve installed new apps, and want them as part of the Refresh? Simply
create a new directory, and run the recimg command using it as the place to store
the Refresh point.
But recimg can do more as well.
If you have multiple directories with Refresh points, you can tell
Windows 8 which is the current one that it should use for doing a
Refresh. To do all that, and more, you’ll need to know all of recimg command line options. Table 1-2 shows them all:
Table 1-2. The recimg commands and what they do
See Also
For more details about Reset and Refresh, see the Microsoft blog “Refresh and Reset Your PC”.
Got a Mac and want to Run Windows 8 on it? Here’s how.
More and more, people have not just PCs, but Macs as well. Some people like Macs so much, in fact, that they like to run Windows on their Mac. That way, they get the best of both worlds—Mac OS X and Windows on the same machine.
There are several ways you can do this. One is to use the Apple program called Boot Camp. This lets you run a dual-boot system; that is, you can boot into either Mac OS X or Windows 8. Apple has ample documentation for Boot Camp, so if you’re interested in it, follow Apple’s instructions—they’re generally well done and straightforward.
Note
Note: As I write this, Boot Camp doesn’t formally support Windows 8. But, by the time you read this, it most likely will.
Also, Boot Camp requires you to boot into either Mac OS X or Windows. When you want to switch between the operating systems, you’ll have to reboot.
Note
Note: You need a registered version of Windows 8 to run it on Mac OS X. It can’t have the same registration code as the version you run on your PC, unless you have the right to run it on multiple devices. You can also use a trial version of Windows 8.
There’s another type of solution, that lets you run Windows 8 inside Mac OS X. In this case, you run your Mac as you would normally, and Windows 8 runs inside a Mac window. To do that, you use software to create a virtual machine (VM), and then run that virtual Windows 8 machine. Three popular programs let you do this: Parallels Desktop, VMWare Fusion, and VirtualBox. In this hack, I’ll show how to use all three.
Get a copy of Parallels. It costs $79.99. You’ll also need a copy of Windows 8, either on DVD or other media or as an .iso file. Before you install Windows 8, you must install Parallels Desktop, which is the same simple process as installing any Mac program.
Now you’re ready to install Windows 8. But since you’re installing Windows 8 as a virtual machine, you have to install it from within Parallels Desktop. Run Parallels and select File→New. A screen like the one shown in Figure 1-12 appears.
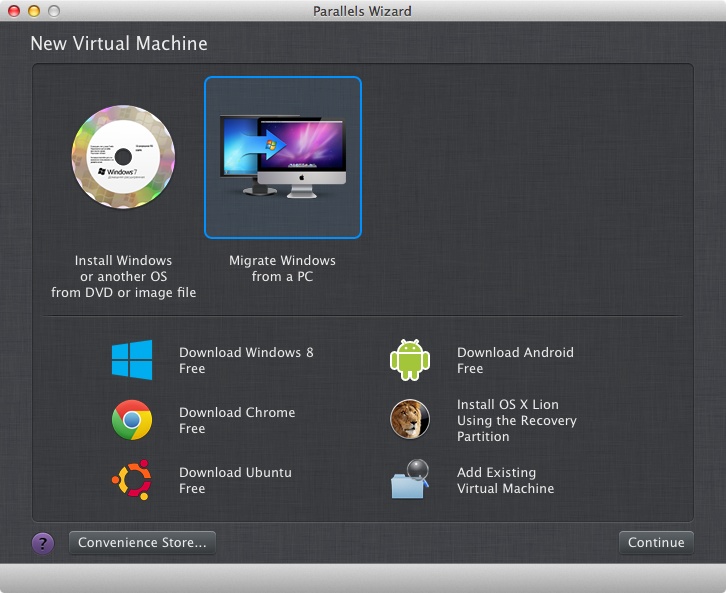
On this screen, you have the choice of migrating Windows from an existing PC (which makes sense if you already have a Windows 8 PC) or installing Windows from either a DVD or an .iso file. Down toward the bottom of the screen, there’s also an option for downloading Windows 8 for free. Keep in mind that this will be a trial version of Windows 8, not a fully paid one, so you can only use it for 90 days. It will likely be the Enterprise edition of Windows 8. You’ll download it as an .iso file.
When you migrate, you’ll choose the method you want to use for the migration: over a network, from an external storage device, or using a USB cable you can buy from Parallels in the company’s “Switch to Mac” kit. From there, follow the wizard’s instructions.
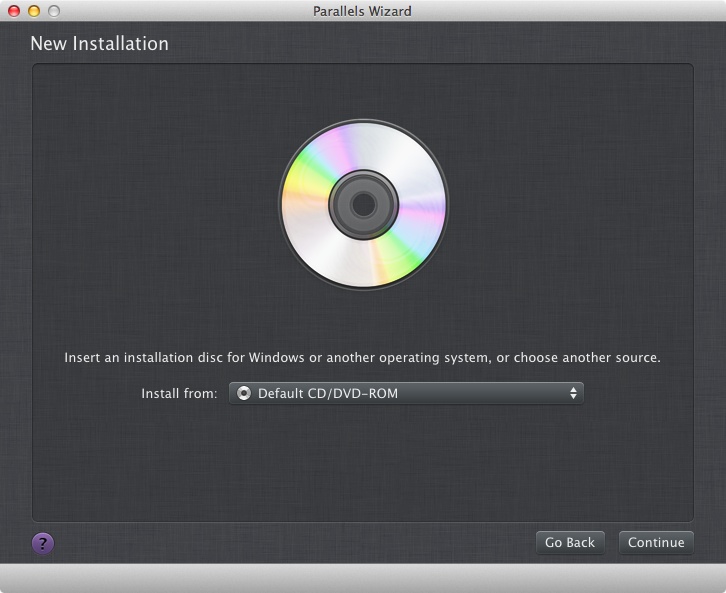
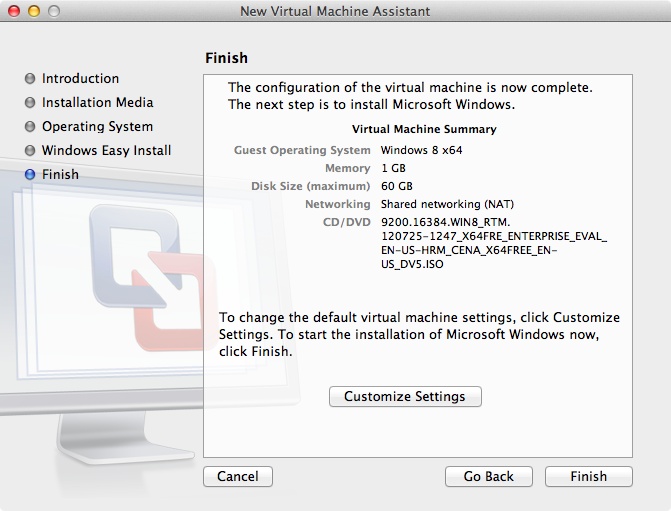
If you’re instead installing a fresh copy of Windows 8, select the “Install Windows or another OS from DVD or image file,” and click that option. On the next screen (Figure 1-13), choose whether you’re going to install from a DVD or .iso file (Parallels calls it an image file). If you’re installing from an .iso file, browse to the location of the file and choose it. Then click Continue.
On the next screen (Figure 1-14), you’ll need to enter your Windows 8 product key. If you’re using a trial version of Windows 8, turn off the “This version requires a product key” checkbox. Also, if you’re using the trial version, also turn off the “Express installation” option. (If you don’t uncheck that box, your trial version may not install.)
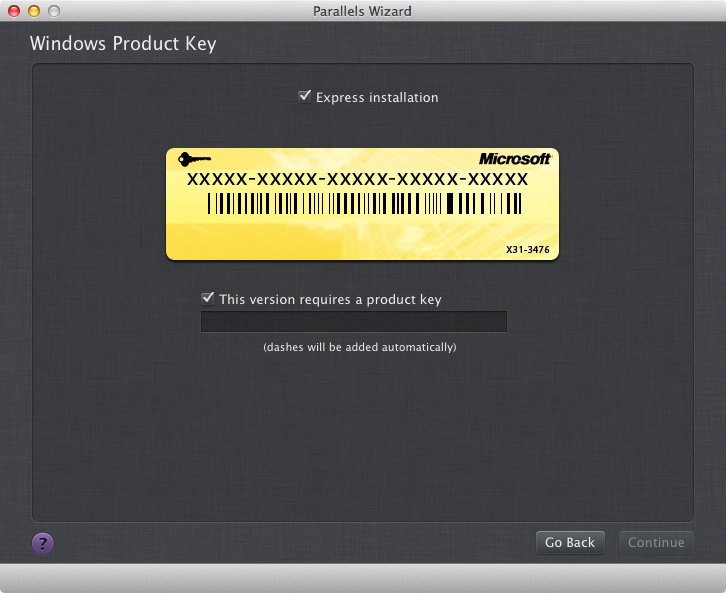
If you keep “Express installation” checked and click Continue, your installation will be straightforward. Just follow the prompts and you’re good to go. If you uncheck the box, the process will require a few more steps, so read on for the details.
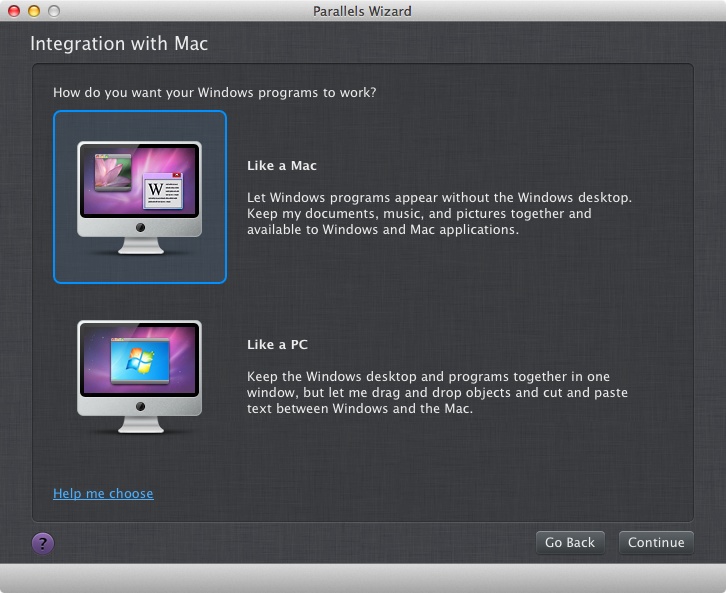
Whether you use the express installation or not, on the next screen you come to (Figure 1-15), you’ll be asked to choose between two different ways that Windows 8 can run:
- Like a Mac
If you choose this option, you won’t see the familiar Windows 8 interface, including the Start screen, Desktop, and so on. Instead, you’ll only use applications that you install onto Windows, such as Office. Each of these applications will run in their own windows on Mac OS X, like a Mac OS X app. Unless you’re only installing Windows 8 to run specific Windows programs, this isn’t a good choice.
- Like a PC
Choose this alternative, and Windows 8 runs like normal in its own Mac window, with the Start screen, Desktop, and so on. This setup is the best choice for most people.
Make a choice and click Continue (the rest of this section assumes that you’ve chosen Like a PC). On the next screen, you’ll see details of the virtual Windows 8 machine you’re creating, including its name location, and similar options. Make any changes, or leave them as is, then click Continue.
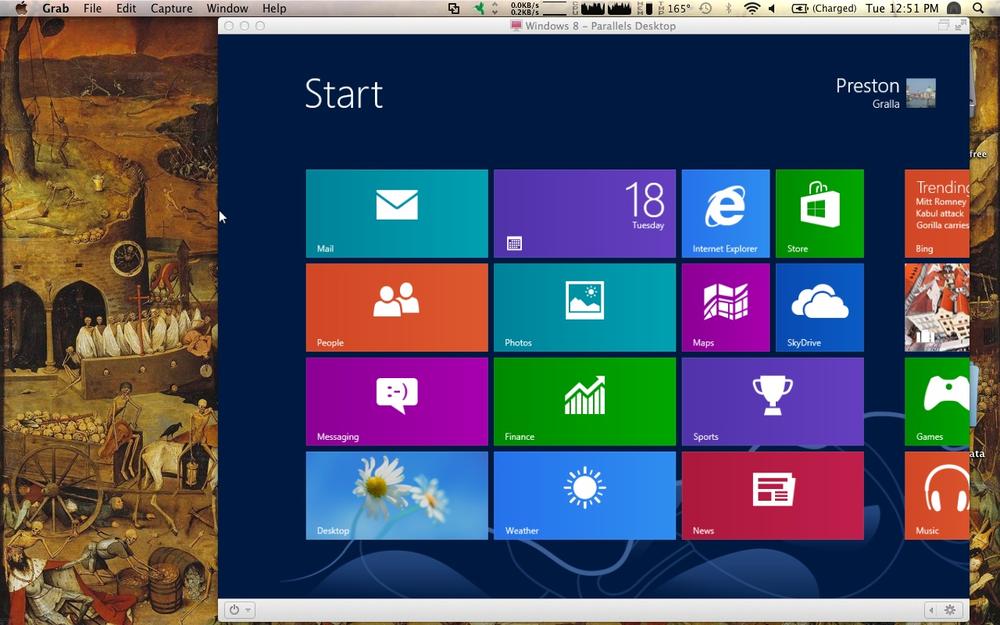
At this point, Windows 8 starts installing on your Mac in the same way that it installs on a PC. You’ll see the same prompts, choose the same options, and so on. You can see it in action in Figure 1-16. When you come to a screen asking whether to install as an Upgrade or Custom, select Custom. Then select the Mac’s hard disk as the place to install Windows and continue. After the usual restarts, Windows 8 will be installed on your Mac as a virtual machine. You’ll be able to run it every time you start Parallels (Figure 1-17).
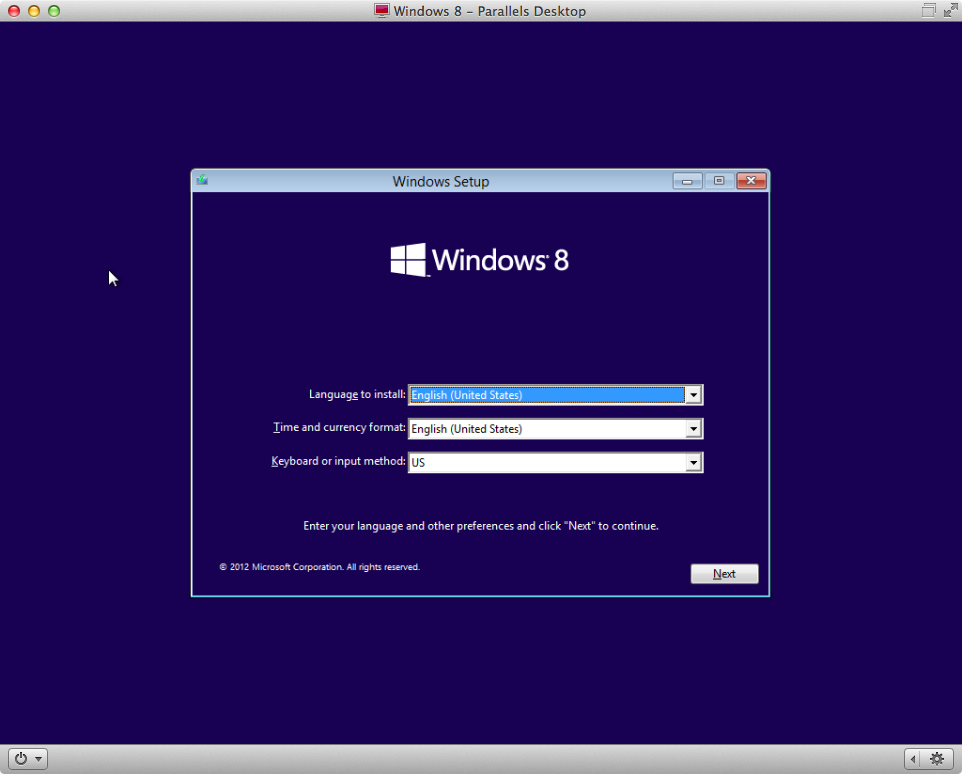
Figure 1-16. Just like a PC: from here on in, the installation looks like a normal installation on a PC
You can instead run Windows 8 on a Mac using VMWare Fusion; $49.99. The setup is much the same as with Parallels, so I won’t go into quite as much detail here: the concepts are very much the same.
As with Parallels, you can either install Windows 8 from a DVD or .iso file, or you can migrate Windows 8 from an existing PC. To migrate, both the Mac and PC must be on the same network. Select File→Migrate Your PC, and then follow the prompts.
To install using a DVD or .iso file, select File→New, put your DVD in the drive and click Continue. If you’re using an .iso file, click “Continue without disc.” Select your installation media (in the case of the .iso file, you’ll navigate to its location) and click Continue, as you can see in Figure 1-18.

On the next series of screens, choose the operating system, account name, password, and Windows product key, if you have one. If you’re installing a trial version of Windows 8, turn off the “Use Easy Install” option. You’ll be sent to a screen describing the virtual machine you’re setting up, including the memory you’ll devote to it, maximum size of disk space it will use, and so on (Figure 1-19). Your best bet is to accept them and click Finish. On the next screen, give your machine a name or accept the one VMware Fusion gives you, click Save, and sit back while installation starts (Figure 1-20).
As with Parallels, select Custom when asked for the type of Windows 8 installation you want to perform and select the Mac’s hard drive.

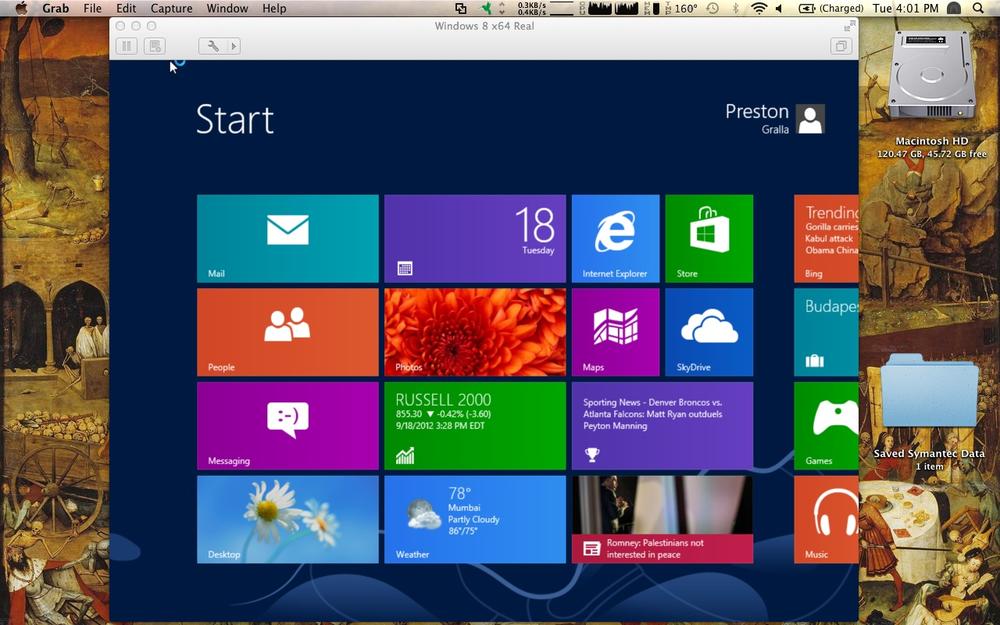
After the usual Windows setup routine, you’ll be running a copy of Windows 8 on your Mac, as you can see in Figure 1-21.
Your final choice for running Windows 8 in a virtual machine is to use the free VirtualBox software. The concepts for installing Windows 8 on it are identical to those for Parallels Desktop and VMWare Fusion, so this section is going to move pretty quickly. Refer back to the earlier sections if you need to.
One thing to keep in mind is that with VirtualBox, you can’t migrate Windows 8 from a PC to your Mac, so if that’s your plan, you’ll have to use either Parallels Desktop or VMWare Fusion.
Install VirtualBox on your Mac and start it up. Grab a Windows 8 DVD disc, or an .iso file ready for installing Windows 8. In VirtualBox, click New. On the next screen, name your virtual machine, and choose Microsoft Windows 8 as the operating system. Click Continue.
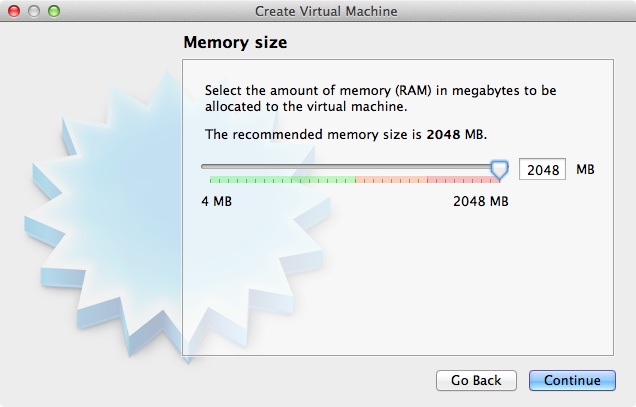
On the next screen you’re asked how much RAM to devote to Windows 8 (Figure 1-22). The default is 2 GB, but some people have reported being able to use only 1 GB. I suggest going with the default.
Next, you’re asked to create a virtual hard drive. You’ve got several other options here. Go with the default size of 25GB and click Create. For the type of hard drive to create, you’ve got half a dozen choices. For example, one of them is to create an HDD (Parallels Hard Disk), in which case you’ll also be able to use it with Parallels Desktop if the sun and stars align. But your best bet here is to go with the default, VDI (VirtualBox Disk Image).
After that, you’re asked whether the hard drive should be of a fixed size or one that dynamically changes according to how much space it requires. The default is to choose a dynamically allocated drive, and I’ve found that to be a good choice. If you prefer, you can instead choose “Fixed size.” That partition will take longer to create than a dynamically allocated one; however, it might lead to faster performance.
After all that, you come to a screen summarizing the name of the virtual drive and the size you’ve told it to be. You can make final changes here. Otherwise, click Create and the hard drive is created (Figure 1-23).
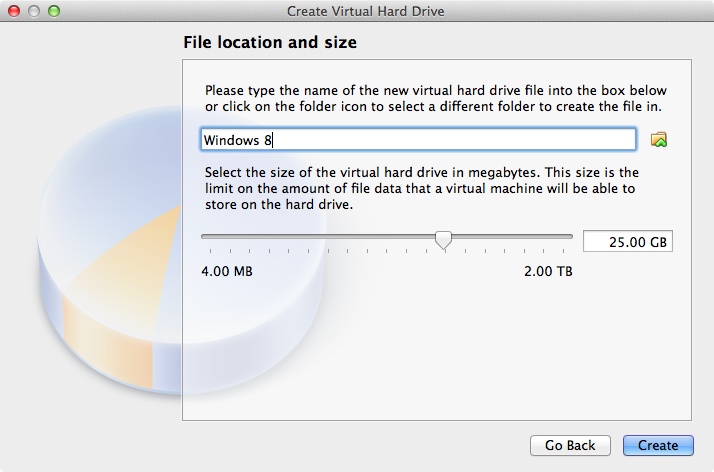
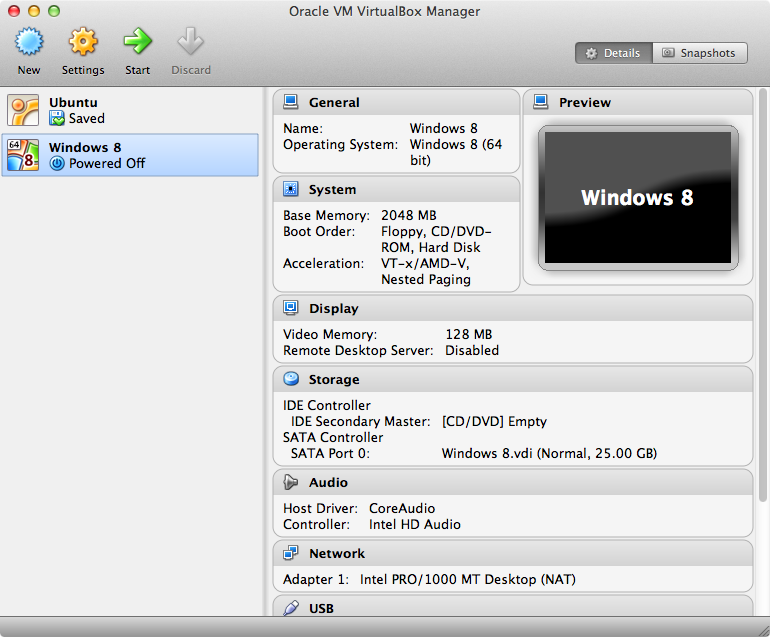
At that point, you’ve created a virtual hard drive and machine where you’ll install Windows 8. You’ll be sent to a screen, shown in Figure 1-24, that summarizes all of the settings you’ve chosen for when you install Windows 8. The screen lists all of your virtual machines. Click Windows 8. If you’re adventurous, you can try fiddling around with these settings, such as for how much video memory to use, and so on. But keep in mind that they’ve been pre-chosen to work well with Windows 8, so my suggestion is to stay with the defaults.
Now you’re ready to install Windows 8. Select the Windows 8 machine you’ve just created and click Start. On the next screen, select either the disc where you have the Windows 8 installation DVD, or else the .iso file you’re going to use. Then click Start. From here on, it’s just like a normal Windows 8 installation.
See Also
Have the need to run other versions of Windows—or even Linux—inside Windows 8? Here’s how to do it.
Some people need to run multiple versions of Windows, including Windows Vista and Windows 7, either for testing purposes, for development, or just because they’re enthusiasts. That used to mean buying and maintaining multiple computers.
If you’ve got Window 8 Pro or Windows 8 Enterprise, though, there’s a much better way—Hyper-V. This software lets you run virtual machines in Windows 8, each running their own operating system. Hyper-V works in much the same way as other virtualized environments (see [Hack #6]). For each instance of an operating system you want to test, you create a virtual machine into which you install the operating system, using either a physical disc or an .iso file.
Note
Note: If you don’t have Windows 8 Pro or Windows 8 Enterprise, there’s still a way to run other operating systems inside Windows 8. Get the free VirtualBox software. For details about using it, see the VirtualBox section of [Hack #6].
Hyper-V has some specific hardware requirements, so before getting started, get familiar with them:
- Hyper-V only works on 64-bit versions of Windows 8
So if you’ve got a 32-bit version, you’re out of luck.
- You need at least 4 GB of RAM
Also, keep in mind that more is better. When you run a VM, it uses system RAM, and Windows 8 is using system RAM as well. If you have more RAM, you can run more VMs simultaneously.
- Your hardware must be 64-bit and support Second Level Address Translation (SLAT)
If you’ve got a relatively new machine, it probably supports this. But machines with older dual-core processors probably won’t cut it.
- You won’t be able to connect to hardware attached to your PC
So you won’t, for example, be able to make use of a USB flash drive or other USB device.
If you’re not sure whether Hyper-V will work on your system, don’t fret, because when you try to install and use Hyper-V, it will tell you if it won’t work.
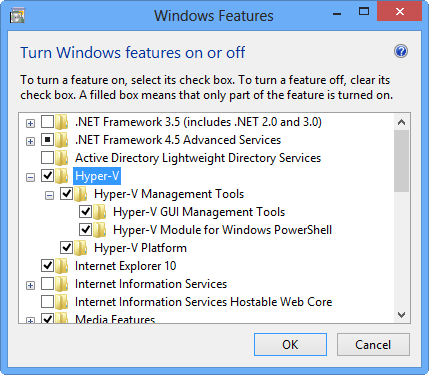
By default, Hyper-V isn’t enabled on Windows 8, so you’ve got to turn it on. Go to the Control Panel and select Programs→“Turn Windows features on or off.” You’ll see a screen like the one shown in Figure 1-25. Scroll to the Hyper-V section and turn on the checkbox next to it. Expand the category and make sure that all of the boxes underneath it are turned on as well. Then click OK.
Note
Note: If the box next to Hyper-V is grayed out, that means that your Windows 8 PC can’t run it.
Windows will spend a little while finding the files. You’ll be prompted to reboot Windows 8 in order to complete the installation. After you reboot, click the Hyper-V Manager tile that’s been added to the Start screen.
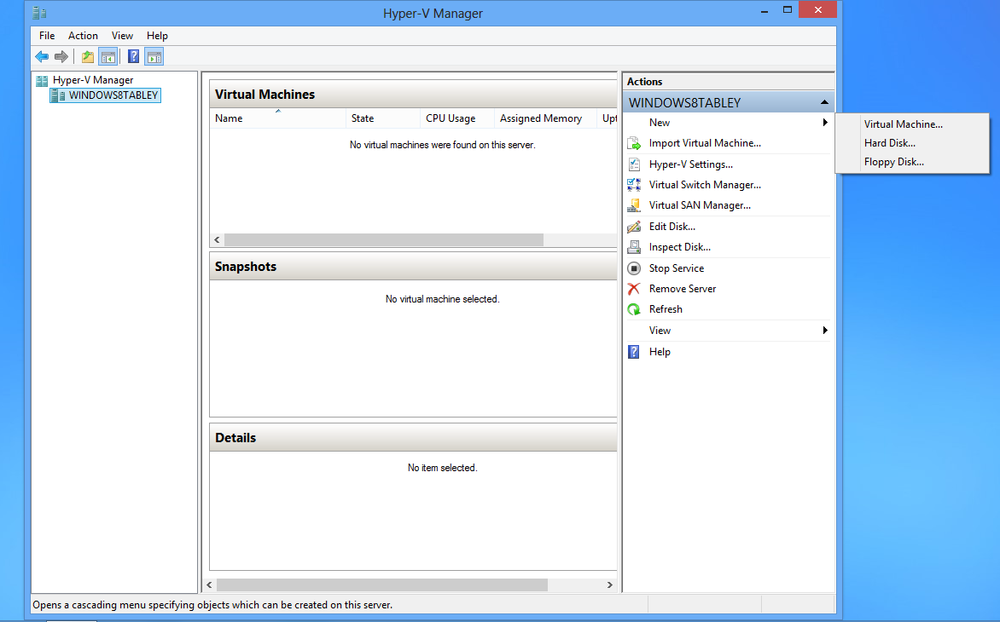
To create a new virtual machine, click the name of your Windows 8 device on the left side of the screen. Then, in the Actions panel on the right, select New→Virtual Machine, as shown in Figure 1-26.
A wizard launches. Click Next. You’re asked to give your new VM a name (Figure 1-27). Be as clear and descriptive as possible, because you might create multiple VMs and want to easily distinguish among them. At a minimum, it’s a good idea to include the version of the operating system, such as Windows 7.
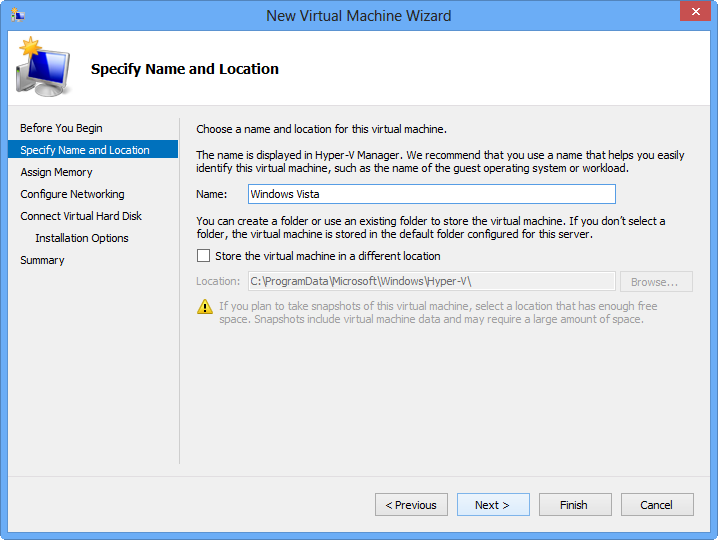
You’re also asked whether to use the default location for storing the VM’s file, which is C:\Program Data\Microsoft\Windows\Hyper-V. Generally, using the default is a good idea. However, if you’ve got a relatively small hard disk, you should consider storing the files on a different physical hard disk than your main one, because each VM uses a substantial amount of hard disk space, generally more than 25 GB.
Click Next after making your choice. On the next screen, you’re asked how much startup memory to use, and whether to use dynamic memory for the virtual machine. Consider the requirements of the operating system you’re going to install, and use that amount. If you’ve got a lot of memory on your computer, turn on the box next to “Use Dynamic Memory for this virtual machine.” Doing so allows Hyper-V to grow and shrink the amount of memory the VM uses. It’s an especially useful option if you’re going to run more than one VM at a time. Click Next.
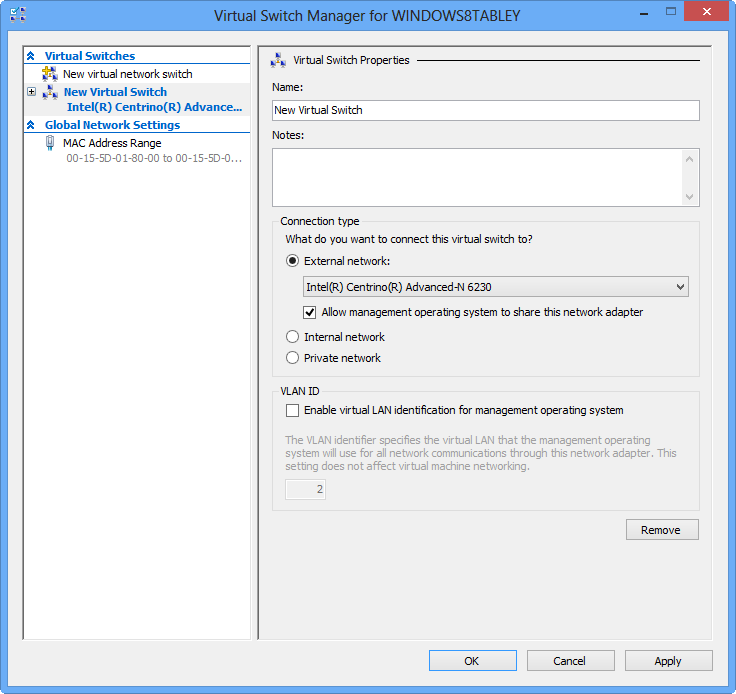
Now you’ll come to a screen that lets you configure networking for the VM. At first it appears there’s no way to do this, because in the Connection drop-down box, there’s only one choice: Not Connected. You’ll need to create a virtual switch in order to connect to a network and the Internet. Back on the Hyper-V Manager main screen, click Virtual Switch Manager at right. On the next screen, select External, and then click Create Virtual Switch. On the screen that appears, give it a name if you want (Figure 1-28). If you’ve got more than one network adapter, select it from the drop-down list. Click OK when you’re done.
Once you’ve done that, go back to the wizard, select the new network connection from the drop-down list, and then click Next. On the screen that appears, you’ll create a virtual hard disk in which to run your operating system. Again, check the operating system you’re installing to find out installation requirements. Generally, if you’re going to install Windows 7, you’ll do fine with the default size of 127 GB. Click Next.
Note
Note: You’ll need to have a registered version of Windows to run it on Hyper-V. It can’t have the same registration code as the version you run on your PC, unless you have the rights to run it on multiple devices.
On the next screen, you tell the wizard where to find the installation media for the operating system, such as a disc or .iso file. Make your selection, and you’re ready to run your new VM. You’ll go through the normal operating system installation process the first time you run it, but after then, you won’t need to run the installation process each time.
To run a VM, launch the Hyper-V Manager and run it from there.
If you want to give Linux a whirl, install it as a VM in Hyper-V Manager. Head to http://www.ubuntu.com/download/desktop and download the file you find there. It will be an .iso file. Go through the installation procedure I outlined in this hack, and use that .iso file as the Linux installation medium.
See Also
Get Windows 8 Hacks now with the O’Reilly learning platform.
O’Reilly members experience books, live events, courses curated by job role, and more from O’Reilly and nearly 200 top publishers.

