The People app is Windows 8’s address book. It’s a centralized database of everybody in your social circles: their email and mailing addresses, Twitter and Facebook handles, phone numbers, and so on (Figure 4-29).
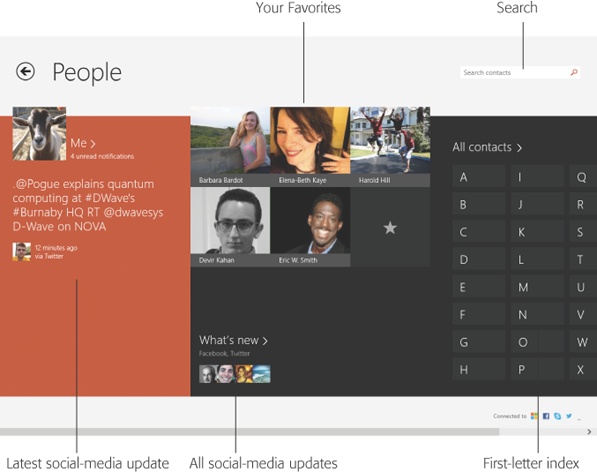
Figure 4-29. The Home screen is your dashboard for the latest updates from Facebook and Twitter; quick access to the phone numbers and email addresses of your favorites; and ways to look somebody up, either by searching or by scrolling through an alphabetical list. Save yourself some time, in that case, using the first-letter index.
But it’s more than that. It’s also where you can see what your friends are saying on Twitter and Facebook.
The Home screen offers several elements, all important; see Figure 4-29. (At any time, you can return to this Home screen by pressing the Home key—or by opening the App bar and selecting the Home tile at the top of the screen.)
Tip
This app has many screens that go many layers deep. Most of
the time, you can find your way back by tapping the
![]() at the top left of the screen. But there’s
also a Home button hiding at the left side of the App bar. Whenever
you’re feeling navigationally woozy, swipe up from the bottom of the
screen (or press
at the top left of the screen. But there’s
also a Home button hiding at the left side of the App bar. Whenever
you’re feeling navigationally woozy, swipe up from the bottom of the
screen (or press ![]() +Z) and then hit Home. You wind up back on the
screen shown in Figure 4-31.
+Z) and then hit Home. You wind up back on the
screen shown in Figure 4-31.
The People app can synchronize its contacts with online Rolodexes that may be very important to you: your contacts from Gmail (Google), Facebook, Skype, LinkedIn, Twitter, and various Microsoft email accounts.
That’s why the first thing you see, the first time you open People, is an invitation to connect those online accounts to People. Choose the name of the network you belong to (Facebook, Twitter, whatever), or choose “See all in settings” (for a list of all the settings People knows about), or hit “No, thanks” (if you plan to do that later or not at all).
Note
If the People app has people listed in it the very first time you open it, then you’ve probably signed in with a Microsoft ID—that, on some earlier date, you told all about your Facebook, Twitter, or LinkedIn accounts.
If you don’t see that invitation, or if you declined it, you can always connect your accounts later. To add an account, open the Charms bar and choose Settings, then Accounts. There, staring you in the face, are names of the accounts you’ve set up already.
To add a new one, use the “Add an account” link at the bottom. Tap the kind of account you want: Hotmail, Outlook, LinkedIn, Google, or whatever. Enter your account information, and boom—you’re done. The People app is now synced with your online accounts. Change information in one place and it’s also changed in the other.
You can repeat the process to add more accounts; in fact, you can even have multiple accounts for certain types (like Google and Microsoft email accounts).
Note
You can unsubscribe from one of your online accounts just as easily. In the Charms bar, hit Settings, then Accounts, then the account you want to dump, then “Manage this account online,” then (once Internet Explorer opens) “Remove this connection completely.” You’re not actually deleting any names or addresses from Facebook, Twitter, or whatever—just preventing them from showing up in People.
(Deleting your Microsoft account is different. If you do that, you really are deleting all your contacts—and your calendar, and your messages, and your mail.)
It’s important to understand that you’re actually linking those Internet services to your Microsoft account. You have to do that only once, and then all your TileWorld apps—Mail, Calendar, Messaging, People—can use their information. You’ve just woven Facebook, Twitter, or Gmail into your Windows world.
The big payoff comes when you sign into another Windows 8 machine (or a Windows 8 phone). To your delight and amazement, you’ll see that your address book is already filled in with all your contacts and accounts. Your Favorites list is even pre-filled with the favorites you’ve set up on other Microsoft products. Progress!
Each entry in People is like a paper Rolodex card, with predefined spaces to hold all the standard contact information.
To add a new person:
In each case, you get the “New contact” screen (Figure 4-30).
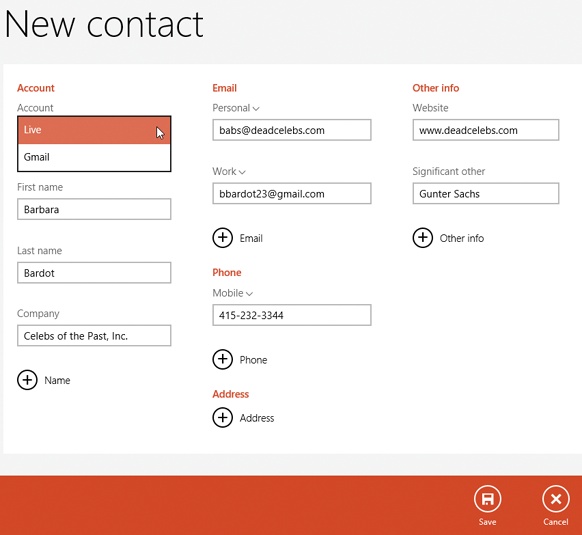
Figure 4-30. It shouldn’t take you very long to figure out how to fill
in this form: You tap in a box and type. Fill in this person’s
name, email address, phone number, and so on, pressing the Tab
key to move from field to field. To change the label for a
number (“mobile,” “home,” “work,” and so on), tap the
![]() button next to the current label.
button next to the current label.
The first box, Account, lets you specify what online email address book you want this name stored in: your Gmail account, Outlook account, or whatever. (This assumes you’ve actually set up some email accounts.)
Tip
If you have an Android phone, choose Gmail; Windows will thoughtfully add this person to your phone’s built-in address book automatically via your Google account.
Now, the trouble with people these days is that they often
have more than one phone number, more than one email address, and more than one mailing address.
Fortunately, all of these boxes are infinitely expanding. Choose
the ![]() button to add another blank box of the same
type: another phone-number field, for example.
button to add another blank box of the same
type: another phone-number field, for example.
Tip
You can also add fields for “Job title,” “Significant
other,” “Website,” or “Notes.” They’re hiding in the “Other
info” button. Select its ![]() button to see those choices.
button to see those choices.
Once you’ve added the complete dossier for this person, hit
the ![]() button (or just press Ctrl+S). Both take
you back to the main People screen.
button (or just press Ctrl+S). Both take
you back to the main People screen.
People move, people quit, people switch cellphone carriers. To make changes to somebody’s card manually, open the App bar and choose Edit.
GEM IN THE ROUGH: Linking Contacts
As you know, the People app can sync up with different accounts. It might list three sets of names and numbers: one from Facebook, one from Twitter, and one from your corporate Exchange server at work. In the old days, therefore, certain names might have shown up in the list two or three times—not an optimal situation.
Now, as a favor to you, Windows displays each person’s name only once. If you tap that name, you open the unified information screen for that person. It includes all the details from all the underlying accounts for that person.
You can, however, link or unlink a unified “card.” (Unlinking means splitting it back into its original component “cards.”) You might do that if, for example, People has linked two cards incorrectly. (It can happen. There is, after all, more than one person on earth named John Smith.)
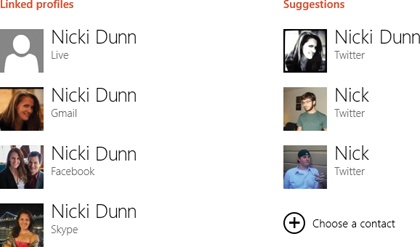
To unlink, open the unified card. Select “Link contacts.” (A tiny digit appears on this button, indicating how many cards have been consolidated.) The “Links for [this person’s name]” screen appears.
Here are two lists: “Linked profiles” and “Suggestions.”
You can make a card hop from one list to the other by clicking or tapping it. For example, to unlink a card, select it in the “Linked profiles” list. Presto: Its thumbnail pops over to the Suggestions column, no longer associated with this person.
You can use this same procedure to link to cards manually. Open a person’s card and then choose “Link contacts.” Now, if the Suggestions column correctly guesses the additional card you want to link, choose it. If not, use the “Choose a contact” option to go find the right one; hit Add.
You return to the screen shown in Figure 4-30, where you
can add, remove, and edit fields. Use the ![]() button when you’re finished.
button when you’re finished.
One nice thing about snagging info cards from Facebook, Twitter, or LinkedIn is that they come with headshots already.
In Windows 8.1, you can also add a photo manually. Select the generic silhouette; from the shortcut menu, choose “Add photo.” The File picker offers you the chance to root through your Photos collection to choose a headshot for this person; find it, select it, and then hit Open. It’s instantly installed as the new photo.
If you’re like most of us, you care more about some people than others. You might have 10,000 people in your master database of contacts, but you might not be interested in seeing what all of them had for lunch.
Fortunately, People lets you promote certain people to VIP status, where you can find them, or follow them, apart from the crowd.
Open the card of your special friend; select the Favorite
button (![]() ).
).
From now on, you’ll see this person’s picture at the top of the list on the People home page. That way you have quick access to the links for emailing, calling, or messaging.
(To un-favorite someone, open her card and tap Favorite again so that the button is no longer white.)
You can also turn a person in People into a Start screen tile, where his latest Facebook and Twitter updates will stare you in the face all day. You should reserve this treatment for the really important handful of people in your life.
Start by opening the lucky individual’s screen. Open the App bar. Choose Pin to Start. Edit the name, if you want—Windows proposes the actual name, but you can substitute “Mom” or “Honeybunch” or whatever—and then hit Pin to Start. (If you have a keyboard, Shift+Ctrl+1 does the trick.)
Next time you visit the Start screen, you’ll see that person’s photo, way off to the right side, where new tiles always appear. The tile alternates between showing the photo, this person’s latest Facebook post, and this person’s latest tweet.
Tap the tile to jump to the corresponding person’s page in People, for quick calling, emailing, or messaging.
(To un-pin someone, open the card, open the App bar, and tap Unpin from Start.)
There are two ways to find someone in your digital Rolodex:
Search. This search works just the way it does on the Start screen. When you’re on the main People screen, if you have a keyboard, just type. The search box receives your typing automatically. As you type, a list of matches sprouts right out of the search box.
Once you see the name you want, select it; that person’s card opens.
Use the alphabetical index. See the index in Figure 4-29? Select a letter to jump into that part of the alphabet. Scroll until you find the name you want.
Once you’ve found the tile for the person you seek, tap or click to open up the Details screen shown in Figure 4-31. Here’s an amazing dossier on this friend, relative, or associate. If you scroll the screen horizontally, you’ll find the following screens full of information.
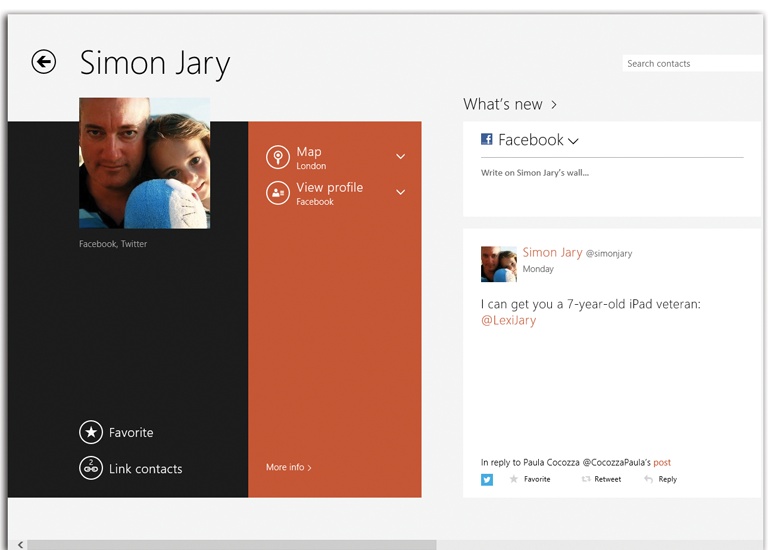
Figure 4-31. The Person screen offers contact information, followed immediately by this person’s latest Twitter and Facebook news. After that comes photos this person has posted to Facebook or Twitter, sorted by which camera or app took them.
Here are buttons for every conceivable way to reach this person. The exact buttons depend on what information you have for him, but these are some of the possibilities:
Send email. Use the pop-up menu to specify which email address you want to use. Choose the name of your Mail app. The screen splits, and in the right half, the Mail app opens a new, outgoing message, pre-addressed to the person you chose. Add a subject line and a message, and send away.
Call. Use the pop-up menu to choose a phone number or this person’s Skype number, if it exists. Of course, your computer is not a phone any more than your toaster is a VCR. But it can call phone numbers—using Skype, the texting/calling/videochatting app that Microsoft bought a few years ago.
It’s not free; you have to buy “Skype credit” to call an actual phone number. You’ll get the chance when you try to make the call.) Once you connect via Skype, your computer’s mike and speakers will simulate a phone. You can use the pop-up menu to choose a different phone number—Home or Work, for example.
Send message. The pop-up menu lets you specify either a text message or a Skype message.
Video call. You can place a computer-to-computer video call using Skype or another app, if you’ve installed it.
Map. The Maps app opens and pinpoints this person’s address on a map. (If you’ve specified more than one address, then use the pop-up menu to choose the one you mean.)
View profile. Choose the service (Facebook, Twitter, Google, whatever); the screen splits, and you get to see this person’s profile page from that service.
If you scroll rightward, past the Contact block, you may find a “What’s new” block of tiles. (“What’s new” is also a tile on your home screen.) It gives you a place to post on this person’s Facebook wall, and shows this person’s latest Facebook and Twitter posts, complete with the usual buttons at the bottom—Like, Retweet, Comment, Reply, and so on.
Select “What’s new” to expand that notion, filling the whole screen with a horizontally scrolling display of recent posts. You can tell by the little icon beneath each post which service it comes from (like Twitter, Facebook, or LinkedIn).
In other words, you can see all of each person’s online activities, from all their accounts, all in one place. It’s pretty great.
Tip
On this screen, you can also hide all the posts from one service or another. Open the App bar; the Filter button offers a list—Facebook, Twitter, All—that lets you control which posts you’re seeing.
To return to the main contact page, use the
![]() button at top left.
button at top left.
Finally, off to the right again, there may be a third block of tiles: photos this person has posted online. They’re rounded up from Facebook and Twitter.
Each tile represents an app (like Instagram or Hipstamatic), a program (like iPhoto or Picasa), or a source (like the Facebook Timeline) for a group of photos. Tap or click one of these tiles to see the photos within.
When you see an especially compelling photo, select it. It fills the screen—all except for a panel at the right side where you can type a comment about it (“Great pic!!!”) or express your approval with a click or a tap on the Like button.
You can work your way back to the person’s main card screen using the
![]() button, or you can back all the way out to
People’s “front door” using the Home button on the App bar.
button, or you can back all the way out to
People’s “front door” using the Home button on the App bar.
You can hide all the people from a certain account—Facebook or Twitter, for example—so that they’re not cluttering up your People app. That’s handy if you use People mainly for looking up email addresses or phone numbers and don’t really care about their social-network posts right now.
Just open the Charms bar, hit Settings, and then choose Options. Boom: There they are, checkboxes for Facebook, Gmail, Twitter, Skype, Outlook, and whatever other accounts you’ve set up. Turn off the checkboxes for the accounts whose contacts you want to hide. (You can always bring them back by turning their checkboxes on again.)
There’s a lot of work involved in entering someone’s contact information. It would be thoughtful, therefore, if you could spare the next guy all that effort—by sending a fully formed electronic business card to him. It can be yours or that of anyone in your People list.
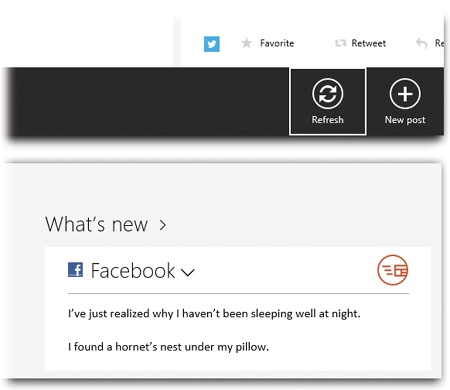
Figure 4-32. Top: To post to a service like Facebook or Twitter, start
from the What’s New screen. Open the App bar. At the right end,
select “New post.” Bottom: Now you get a box where you’re
free to share your brilliant musings with the world. If you’ve
signed up for more than one service, use the ![]() menu shown here. Use the cursor to specify
which one you’re posting to.
menu shown here. Use the cursor to specify
which one you’re posting to.
To do that, open the contact’s card. Open the Charms bar; choose Share; choose Mail, OneNote, or whatever sharing method you prefer. (In theory, as you install new programs, your list of options here may grow.)
If you chose Mail, you’re asked to address the outgoing email message; do so and then choose Send. You’ve just fired off an email containing the chosen contact info. The recipient, assuming he has a half-decent smartphone or address-book program on the receiving end, can install that person’s information with a single tap on the attachment.
You can also post to your social networks—Facebook, Twitter, whatever—right from the People app. See Figure 4-32 for the step-by-step.
Get Windows 8.1: The Missing Manual now with the O’Reilly learning platform.
O’Reilly members experience books, live events, courses curated by job role, and more from O’Reilly and nearly 200 top publishers.

