The old Photo Viewer of Windows 7 fame is gone. In its place: the TileWorld app called Photos. Its job is to grab photo albums from everywhere fine photos are stored—your own Pictures folder, other PCs on your network and your OneDrive, and so on—and display them all in one place (Figure 4-33). Especially if you have a touchscreen, you’ll find Photos a graceful, fluid, lovely way to browse your shots.
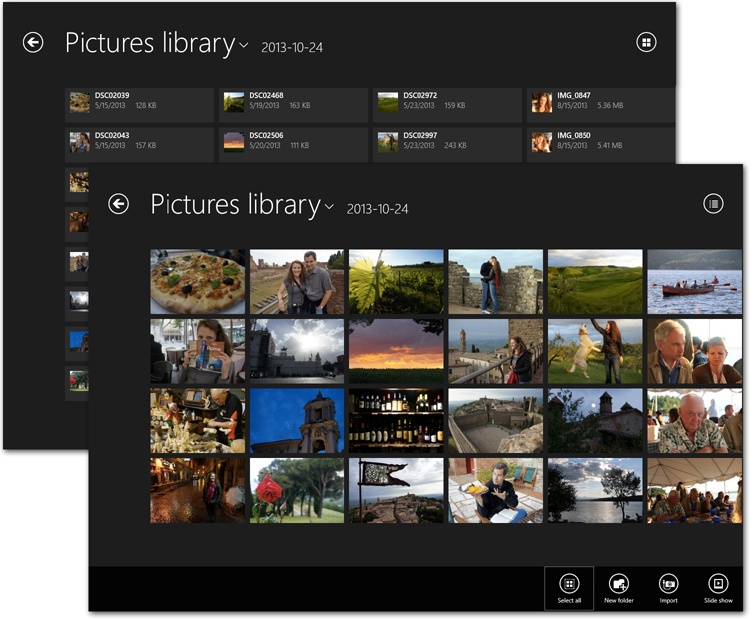
Figure 4-33. In the Photos app, the button at the top-right corner lets you switch between text-tiles view (top left) and thumbnails view (lower right). Shown here for added excitement: the App bar.
In Windows 8.1, you can even edit your pictures instead of just looking at them. (But you can no longer view your Facebook and Flickr photos in Photos.
It’s not hard to get around. The ![]() next to the title “Pictures library” lets you
choose the source of the photos you’re seeing: either your Pictures
library or your OneDrive. Once you’ve burrowed to your destination,
the
next to the title “Pictures library” lets you
choose the source of the photos you’re seeing: either your Pictures
library or your OneDrive. Once you’ve burrowed to your destination,
the ![]() button takes you back to the start.
button takes you back to the start.
Back at the desktop, behind the scenes of TileWorld, you have a Pictures folder. Any photos in this folder show up in the Photos app automatically.
Maybe there are pictures here already—perhaps because you upgraded a Windows 7 machine to Windows 8. If not, maybe now is the time to move your pictures into Pictures.
The Photos app can’t show you pictures that lie in any other folder on your PC. It’s the Pictures folder or nothing.
Tip
Well, actually, there’s one exception. If you keep pictures in another folder and don’t want to move them, you can add that folder to the Pictures library, as described on Working with Library Contents.
Photos can import photos from a camera or a memory card, too. If you open the App bar (The App Bar), you’ll find the Import button. It’s available at the Photos home screen or on any screen full of tiles or thumbnails—not when you’ve opened an individual photo.
The Import button brings in pictures from your camera, a USB flash drive, or some other drive. When you first select that button, you’re asked to choose the device you want to import from (Figure 4-34, inset). Once you select the name of your camera or memory card, you get to choose which shots to import (Figure 4-34, bottom).
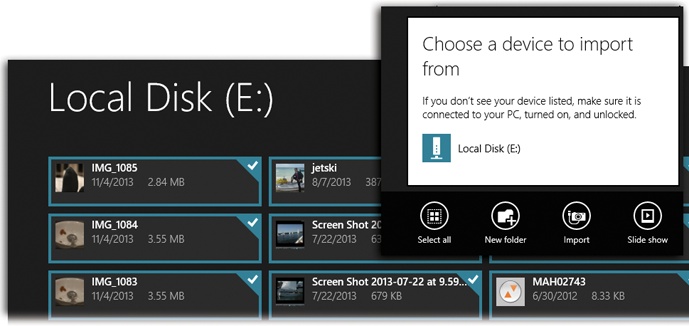
Figure 4-34. You see the photos and videos on your card. New ones are selected and ready to import, but you can select or deselect them as you see fit. (Swipe down from a thumbnail if you have a touchscreen; right-click if you don’t.) Name the folder for the new arrivals; then hit Import.
Tip
Point to a thumbnail without clicking to see a pop-up box of information about that photo: date, size, and so on.
When it’s all over, Windows offers you an “Open folder” button so you can see the newly imported goodies in the Photos app.
The rules of Photos are simple:
By tapping or clicking, select a source, then an album within it, and then a photo within it. When you’ve drilled down as far as you can go, the picture fills most of the screen.
To move through the photos, swipe horizontally (touchscreen), click the
 and
and  buttons at the edges of the screen
(mouse), or press the
buttons at the edges of the screen
(mouse), or press the  and
and  keys (keyboard).
The App bar offers a “Slide show” button that starts a slideshow of all photos in this batch.
Send a photo to somebody by email or text message, or send it into another app for editing. To do that, tap Share on the Charms bar; see The Charms Bar.
When you’ve opened an individual photo, you can enlarge or shrink it in the usual ways:
When zooming gets complicated is after you’ve restored a photo to its original fit-the-screen size. If you continue to zoom out, you backtrack into the album or other batch from which the photo came. If you zoom out more, you shrink the album’s thumbnails. You wind up with a mosaic view of your album that you can’t get to any other way, the better with which to survey your collection.
Once you’ve opened a photo to glorious full-screen size,
open the App bar (swipe up, right-click, or press
![]() +Z). Two frequently needed options are staring
you in the pixels:
+Z). Two frequently needed options are staring
you in the pixels:
Cropping means shaving off unnecessary portions of a photo. Usually, you crop a photo to improve its composition—adjusting where the subject appears within the frame of the picture. Often, a photo has more impact if it’s cropped tightly around the subject, especially in portraits. Or maybe you want to crop out wasted space, like big expanses of background sky. You can even chop a former romantic interest out of an otherwise perfect family portrait.
When you select the Crop button, a white rectangle appears on your photo. Drag inward on any corner. The part of the photo that Windows will eventually trim away is dimmed out. You can re-center the photo by dragging any part of the photo, inside or outside of the box.
If you tap the “Aspect ratio” button (also on the App bar), you get a choice of nine canned proportions: Square, 3 x 2, 3 x 5, 4 x 3, and so on. They make the app limit the cropping frame to preset proportions. (The “Lock screen” choice ensures that your cropped photo will exactly fit your computer’s Lock screen.)
The Constrain feature is especially important if you plan to order prints of your photos. Prints come only in standard photo sizes: 4 x 6, 5 x 7, 8 x 10, and so on. Limiting your cropping to one of these standard sizes guarantees that your cropped photos will fit perfectly into Kodak prints.
When everything looks good, select Apply. You have one final choice to make on the App bar: “Save a copy” (you wind up with both cropped and uncropped photos) and “Update original” (you wind up with only one copy—the cropped one). Or “Undo,” meaning “Never mind.”
Truth be told, Rotate and Crop were in the original Windows 8, too. The new stuff doesn’t appear until you hit Edit (also on the App bar).
The Photos app: It’s not just for looking at pictures anymore. Now it’s also for fixing them. In Windows 8.1, an impressively complete suite of photo-editing tools awaits. These tools can fix the brightness, contrast, and color of your pictures, and even add special effects like selective blur and vignetting (where the photo corners are misty white to draw the eye to the subject).
To begin, open the photo that needs help. Open the App bar; select Edit to open the editing wonderland shown in Figure 4-35.
Ready? Keep hands and feet inside the tram at all times.
Tip
As you work, keep in mind that you can zoom in for better
detail work. Touchscreen: Spread two fingers
on the glass. Mouse: Press Ctrl as you turn
the wheel, or click the ![]() and
and ![]() buttons on the screen.
Keyboard: Press Ctrl+plus and
Ctrl+minus.
buttons on the screen.
Keyboard: Press Ctrl+plus and
Ctrl+minus.
Also, as you work, keep in mind that the Undo button is always at your command, and it always reverses the last editing step—it’s a safety net, and it’s hiding in the App bar.
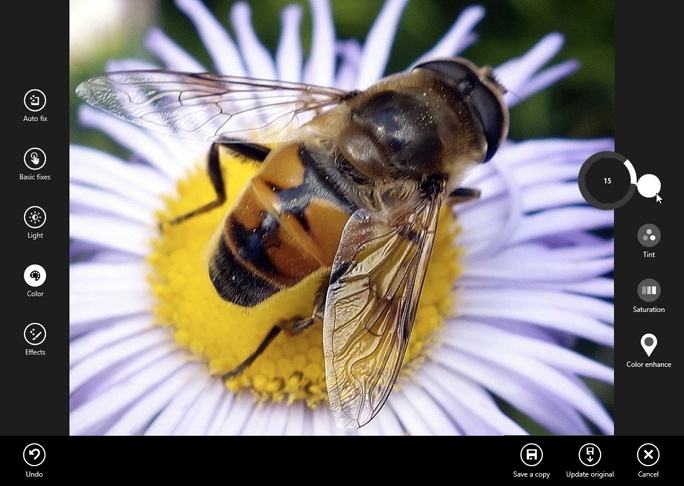
Figure 4-35. In the new Editing mode, you get five primary buttons at the left side; each one summons a different set of “button dials” on the right side. The App bar gives you everything you need to undo, cancel, or preserve the changes.
When you select this button (on the left), six thumbnail versions of your photo appear at right. Each offers Windows’ vision of what the picture might look like when it’s touched up in a different way: a little brighter, a little darker, a little contrastier, black-and-white, and so on. Select the one you want.
This left-side button produces four adjustments on the right:
Rotate, Crop. These work just as described on the previous pages.
Redeye. Red-eye is a common problem in flash photography. This creepy, possessed look—devilish, glowing-red pupils in your subjects’ eyes—has ruined many an otherwise great photo.
Red-eye is caused by light reflected back from eyes. The bright light of your flash illuminates the blood-red retinal tissue at the back of the eyes. That’s why red-eye problems are worse when you shoot pictures in a dim room: Your subjects’ pupils are dilated, allowing even more light from your flash to reach their retinas.
When you select this button, your cursor becomes loaded with a red dot. Apply it inside each eye that has the problem. (Zoom in if necessary.) The app turns the red in each eye to black.
Retouch. Sometimes an otherwise perfect portrait is spoiled by the tiniest of imperfections—a stray hair or a hideous blemish, for example. Professional photographers routinely remove such imperfections—a process known as retouching, for clients known as self-conscious or vain. (Kidding!)
Photos’s Retouch brush lets you do the same thing with your own photos: paint away scratches, spots, hairs, and other small flaws. It doesn’t cover the imperfections you’re trying to remove, but blurs them out by softly blending them into a small radius of surrounding pixels (in other words, you can’t use it to whiten teeth).
Once you’ve clicked Retouch, your cursor sprouts a round brush. Find the imperfection and “paint” over it, either by dabbing or dragging to blend it with the surrounding portion of the photo.
When this button is selected (left side), the buttons on the right side are the first appearance of Photos’s button dials. Figure 4-36 shows the idea.
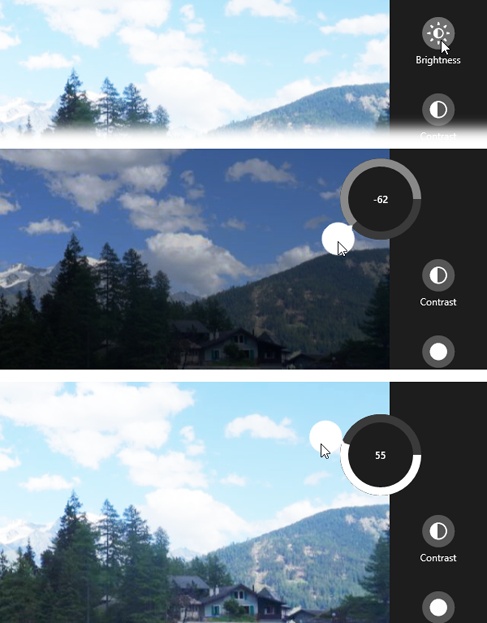
Figure 4-36. Many of the new photo-editing controls rely on these “button dials,” like the Brightness one shown here. When you tap or click it, the button itself becomes a handle—a white round handle. You can drag it either counterclockwise (in this case, making the photo darker, as shown at center) or clockwise (making the photo brighter, as shown at bottom). The unexpected part is that you can drag all the way around from the zero point, in either direction.
Brightness. Adjusts the overall exposure of the photo, making all of it lighter or darker.
Contrast. If your photo looks flat, then use this effect to bring out details. It makes the dark parts of your photo a little darker, and the light parts a little lighter.
Highlights, Shadows. The Highlights and Shadows dials are designed to recover lost detail in the brightest and darkest areas of your photos, turning what once might have been unsalvageably overexposed or underexposed photos into usable shots.
For example, suppose you’ve got a photo looking good, except that you don’t have any detail in murky, dark areas. Turn the Shadows handle clockwise, and presto! A world of detail emerges from what used to be nearly black.
Digital cameras (and scanners) don’t always capture color accurately. Digital photos sometimes have a slightly bluish or greenish tinge, producing dull colors, lower contrast, and sickly looking skin tones. In fact, the whole thing might have a faint green or magenta cast. Or perhaps you just want to take color adjustment into your own hands, not only to get the colors right, but also to create a specific mood.
Here are the tools at your disposal:
Temperature. This dial adjusts the photo along the blue-orange spectrum. Dial clockwise, for example, to warm up the tones, making them more orangeish—a handy technique for breathing life back into subjects who have been bleached white with a flash.
Tint. Like the tint control on a color TV, this slider adjusts the photo’s overall tint along the red-green spectrum. Adjusting this slider is helpful for correcting skin tones and for compensating for difficult lighting situations, like fluorescent lighting.
Saturation. When you increase the saturation of a photo’s colors, you make them more vivid; you make them “pop.” You can also improve photos that have harsh, garish colors by dialing down the saturation, so the colors look a little less intense. (Boosting the saturation is often a bad idea for pictures of people, though; skin can wind up looking really weird.)
Color enhance. Here’s a weirdie. This one lets you boost just one color in the photo—all the reds, for example, or all the blues. If you want, you can really goose just the sky, or bring out the yellows in a field of flowers.
Once you’ve selected this button, tap or click a spot in the photo that displays the color that needs boosting; a pin appears there, as though you’d marked a spot on a map. Now turn the button dial to make all patches of that color get brighter or dimmer.
Photos comes with two built-in special effects, each intended to draw the viewer’s eye to the subject of the photo. You won’t need them often, but now and then, they hit the bullseye:
Vignette. This effect whites out the corners of the photo, creating an oval-shaped, softly faded frame around the center. The more you turn the button dial, the more the whiteness encroaches toward the middle.
Selective focus. Tap or click the part of the photo that you want to be in focus. The rest of the image gets softly blurred, as though taken with an expensive camera by someone who knew what he was doing.
Also hiding on the App bar: the Set As button. Its shortcut menu lets you slap the current photo onto either of these billboards:
Lock screen. That’s a reference to the big photo that appears when you first wake up a Windows 8 machine, the one that bears the current time. Here’s one easy way to change it to a photo of your own.
App tile. Usually, the image that represents Photos on the Start screen changes every few seconds. It rotates through different pictures. But using this command, you can stamp the selected photo onto that tile for all time. (The tile no longer rotates through photos.)
Photos wouldn’t be much fun if your screen were the only place you could see them. Fortunately, the Photos app is happy to zap them away to your adoring fans electronically.
The first step is telling Photos which pictures you want to send. To do that, drill down until you’re looking at the thumbnails of some batch. Then, for each photo you want to include, do this:
In each case, the thumbnail sprouts a colored outline, and a checkmark appears in its top-right corner. You can repeat the procedure for another photo, and another, until all the ones you want are checkmarked.
Once you’ve chosen the photos you want to share, open the Charms bar (The Charms Bar). Hit Share.
The options here vary; if you’ve installed a program with beefier editing tools, like Microsoft’s own Fresh Paint, its name appears here, too.
But for sure you’ll find Mail, which means you can send
photos by email, directly from Photos. A new panel appears,
showing an outgoing message; the photos are attached. Address it,
type a subject line and maybe a message, and then hit the
![]() button to send it.
button to send it.
Your free online OneDrive disk is a handy intermediary for photos that shuttle between computers or phones (see the box on Photos from Other PCs). So it’s no surprise that Microsoft made it easy to send photos from Photos to your online OneDrive—if nothing else, it’s a great way to back them up.
In Photos, make sure you’re viewing your OneDrive pictures
(use the ![]() pop-up menu at top left). Open the App bar;
choose “Add files.” The File Picker appears (The File Picker). Navigate to your Pictures folder,
select the shots you want to copy to your OneDrive, and (again on
the App bar) hit Copy to OneDrive.
pop-up menu at top left). Open the App bar;
choose “Add files.” The File Picker appears (The File Picker). Navigate to your Pictures folder,
select the shots you want to copy to your OneDrive, and (again on
the App bar) hit Copy to OneDrive.
You can, of course, print out photos so that you can hang them handsomely on the wall or hand them proudly to admirers.
Start by opening the Pictures tile in Photos. (You can’t print pictures from online accounts or ones that live on other computers—only ones that are actually on your computer.)
Open the first photo you want to print so that it’s filling your screen. Open the Charms bar (The Charms Bar); choose Devices; choose your printer.
Photos shows you a preview of the printout-to-be. On this screen, you can specify how many copies you want and how you want the photo printed—upright (portrait orientation) or sideways (landscape). The “More settings” button reveals additional options specific to your printer, like paper type and print quality.
When everything looks good, hit the Print button.
Get Windows 8.1: The Missing Manual now with the O’Reilly learning platform.
O’Reilly members experience books, live events, courses curated by job role, and more from O’Reilly and nearly 200 top publishers.

