Chapter 1. General Administration
Hacks #1-16
We’ll begin with a catchall chapter of tips and tools that cover a wide range of general Windows system administration topics. Think of this chapter as the removable top drawer of your toolbox—usually cluttered, but containing your favorite, indispensable tools. The topics in this chapter include ways of hacking the Run As command, collecting event log information, running commands, extending your environment, shutting down processes, renaming mapped drives, and more. You’ll also learn how to disable file encryption if you don’t need or want it, collect configuration settings from remote machines, use automatic logon where it’s safe to do so, and make it easier for users to access Remote Assistance when they need it. We’ll also list some of our favorite third-party tools and a terrific online resource for Microsoft management technologies.
A number of the hacks in this chapter include scripts. To ensure these scripts run properly on your systems, make sure you download the latest scripting engines on the workstation from which you run the scripts. You can get these scripting engines from the Microsoft Scripting home page at http://msdn.microsoft.com/scripting/. Also, when working with the Active Directory Services Interface (ADSI), you must have the same applicable rights you need to use the built-in administrative tools, which basically means that you need administrator credentials to run the scripts.
Use Run As to Perform Administrative Tasks
Use Run As to protect your administrator workstation from Trojans and other nasties.
If you’re lazy, like I am, you probably use the default administrator account on your desktop workstation for browsing the Web, checking your email, and managing the servers on your company’s network.
Not a good idea.
What if you unknowingly visited a web page that executed a script that downloaded a Trojan to your machine? Your administrator account would be compromised, and the attacker would have total access to your workstation and possibly to your whole network! To avoid such dangers, administrators should always have two user accounts: a regular (user-level) account for ordinary activities, such as web browsing and messaging, and an administrator-level account, used only for performing administrative tasks. This way, when you are reading your email and suddenly remember you have to reschedule a backup, you can simply log off, log back on using your administrator account, perform the task, log off again, and log on again as a regular user.
Who am I kidding? That’s too much to expect of a lazy system administrator.
How Run As Works
The Run As service (called Secondary Logon service in Windows Server 2003 and Windows XP) is a hack designed to enable you to run programs by using alternate credentials while you’re logged on using another account. For example, if you are an administrator and are logged on to your desktop using your regular user account, you won’t be able to run administrative tools such as Computer Management, because they require administrator credentials to run properly. (Actually, you can open Computer Management as an ordinary user; you just can’t do much with it.) Using Run As, however, you can run Computer Management as an administrator while remaining logged on as an ordinary user.
There are two ways to use Run As: using the GUI or from the command line. To use the GUI method, first find the program you want to run in Windows Explorer or My Computer. Then, for executables (*.exe files), hold down the Shift key, right-click the program’s icon, and select Run to open the Run As Other User dialog box shown in Figure 1-1. For MMC consoles (*.msc files) and Control Panel utilities (*.cpl files), you do the same thing but don’t need to hold down the Shift key.
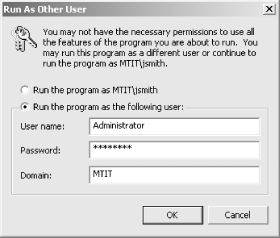
Once you specify the appropriate alternate credentials and click OK, the program you selected runs in the security context of those alternate credentials until you close or terminate the program. If you prefer, the alternative credentials can also be entered as domain\user or user@domain, which in Figure 1-1 would be MTIT\Administrator or Administrator@mtit.com for an example domain named mtit.com (replace these credentials with the name of your own domain). The advantage of doing it the way shown in Figure 1-1 is that, if your computer is a member server, you can specify a local user account by entering the name of the computer in the Domain field.
Using Run As from the
command line
is just as easy, but you need to know the path to the program (unless
the program file is located within the system path). For example, the
Computer Management console file compmgmt.msc is
located in the \system32 directory. To run it as
Administrator in the MTIT
domain, simply type the following at a command prompt:
runas /user:MTIT\Administrator "mmc %windir\system32\compmgnt.msc"
You’ll be prompted for a password for the account, after which Computer Management will open. Note that you can also type this command directly into the Run box (accessed by Start→Run).
Limitations of Run As
While Run As is useful, it has some limitations. First, the alternate credentials you specify must have the Log On Locally user right on the computer. Since Run As is usually used with administrator credentials (which have that right by default), this is usually an issue only in certain circumstances. For example, say you grant a few knowledgeable users a second user account that belongs to the Power Users group, to allow them to update device drivers and perform other minor maintenance on their desktop computers. If you try to reduce the attack surface of your network by removing the right to Log On Locally from the Power Users group using Group Policy, then these users won’t be able to perform such tasks.
Also, there are certain tasks you can’t perform directly using Run As, such as opening the Printers folder to administer a printer that is connected to your machine. The reason for this is that the special folders such as Printers and Network and Dial-up Connections are opened indirectly by the operating system, not by a command. You also can’t use Run As to open Windows Explorer and access the filesystem on your computer as administrator, because the Windows shell explorer.exe is already running as your current desktop environment and Windows allows only one GUI shell to run at a time.
Finally, Run As also might not work if the program you are trying to run is located on a network share, because the credentials used to access the share might be different than the credentials used to run the program.
Most limitations have workarounds of some sort, if you try hard enough to find them. So, let’s see if we can figure out ways to get around these limitations (except for the Log On Locally limitation, which is absolute).
Running programs without an executable
Say you want to change some settings for the Local Area Connection
in the Network and Dial-up Connections
folder. If you try doing this as an ordinary user,
you’ll get a message saying “The
controls on this properties sheet are disabled because you do not
have sufficient privileges to access them.”
Here’s how to access these settings as an
administrator without logging out of your regular account.
Right-click on the task bar and open Task Manager. Then, switch to
the Processes tab, select explorer.exe, and
click End Process to kill the desktop but leave Task Manager running.
Now, switch to the Applications tab, click New Task, type
runas /user:MTIT\Administrator explorer.exe to run
the Windows Explorer shell in an administrator context, and click OK.
Finally, move Task Manager out of the way and type your password into
the command-prompt window.
A new desktop will now appear, running in the security context of your administrator account. You can now change the settings of your Local Area Connection, modify the properties of a printer in the Printers folder, browse the filesystem, or do anything you want to do as administrator. But be sure to leave Task Manager running, because it is your only connection to your original desktop! You can minimize it so it won’t be in the way.
Once you’re finished performing your administrative tasks, you can return to your original desktop (the one running under the security context of your regular account) as follows. Maximize Task Manager so that you’ll have access to it when your desktop disappears again. Then, to log off of your administrator session, click Start→Shut Down and select Log Off.
Warning
Do not try to log off by pressing Ctrl-Alt-Del and clicking Log Off, because this will log off the session for your regular user account.
Your administrator
desktop
has now disappeared, but Task Manager is still running (in the
security context of your regular account), so switch to the
Applications tab, click New Task, type runas
/user:MTIT\Administrator
explorer.exe, and click OK. Your desktop has
returned.
At this point, you might ask, “Why should I go to all that trouble? It would be faster just to log off as a regular user and log on as an administrator.” True, but any applications you have running as a regular user would then have to be terminated. Doing it the way shown here, however, leaves all your desktop applications running in the background.
Running programs from network shares
Here’s how to get around the limitation of running
programs
from network shares with appropriate
credentials. To run a program named test.exe
found in the TOOLS share on server
SRV230, use Start→Run to open a
command-prompt window as administrator, type runas /user:MTIT\Administrator cmd to open a command shell in
administrator context, and then map a drive to the shared folder by
typing net use Z:\\SRV230\TOOLS. Now, switch to
the Z: drive and run the program as desired.
This lets you connect to the shared folder using domain administrator
credentials and run the program under the same credentials. This
approach is also useful for installing applications from a network
distribution point.
Run As Shortcuts
To make your life easier,
instead of having to type stuff at the
command line, you can use Run As to create a shortcut that will run a
program under alternate credentials. For example, to run the Computer
Management console from a Run As shortcut, right-click on your
desktop, select New→Shortcut, and type
%windir%\system32\compmgmt.msc as the command
string. Name your shortcut Computer Management and click OK. Then,
right-click on the shortcut, select Properties to open its properties
sheet, and on the Shortcut tab select the checkbox labeled
“Run program as other user” (on
Windows Server 2003, click the Advanced button on the Shortcut tab to
configure this). Now, whenever you double-click on the shortcut to
run Computer Management, the Run As Other User dialog box (see Figure 1-1) will appear. Just type in your administrator
password to run Computer Management in administrator context.
There’s another way to create Run As shortcuts that you might find even easier to use. Just right-click on your desktop, select New→Shortcut, and type the following command string:
%windir%\system32\runas.exe /user:MTIT\Administrator "mmc %windir%\system32\compmgmt.msc"
Save the shortcut with the name Computer Management. Now, when you double-click the shortcut, a command-prompt window opens, prompting you for the password for the MTIT\Administrator account. Type the password, press Enter, and Computer Management starts in administrator context.
What if you get tired of typing your administrator password each time you want to run a Run As shortcut? On Windows Server 2003, there’s a way to get around that. Just create a new shortcut with this command string:
%windir%\system32\runas.exe /user:MTIT\Administrator /savecred "mmc %windir%\
system32\compmgmt.msc"
Notice the /savecred switch in this string. This
option first appeared in Windows XP. The first time you double-click
on the shortcut, a command-prompt window opens to prompt you for the
password for the alternate credentials, just like before. The next
time you double-click on the shortcut, however, you are not prompted
for the password; it was stored on your machine the first time you
ran the shortcut. Now you no longer have to type a password each time
you use your Run As shortcut. Time-saver, right? Yes, but
it’s also a possible security hole: once the
credentials for your administrator account are stored locally on the
machine, they can be used to run any
command-line program using administrator credentials.
Here’s a scenario to illustrate what I mean.
Let’s say you need to run an administrative tool on
a user’s desktop machine without logging the user
off the machine. You ask the user to take a coffee break. Then, you
open a command-prompt window and use runas with
/savecred to start the tool (you use
/savecred because you might have to run several
administrative tools and you don’t want to have to
type your complex 24-character password repeatedly). When
you’re finished, you close all the tools you started
and walk away. When the user returns to her desktop, she opens a
command prompt and types runas /user:MTIT\Administrator /savecred cmd. A command-prompt window opens, displaying
administrator credentials in the title bar. The user now knows that
she can use this approach to run any program on her machine using
administrator credentials.
What did you do wrong as administrator in this scenario? Two things:
you used /savecred on a user’s
desktop machine, which saved your administrator password locally on
the machine, and you haven’t renamed the default
administrator account. If you had changed the name of this account to
something complex and unknown to ordinary users, the runas /user:MTIT\Administrator /savecred cmd command the user
typed wouldn’t work.
What do you do if you have used /savecred on an
unsecured machine without thinking about the consequences? Just
delete your stored credentials on the machine by opening Stored User
Names and Passwords in the Control Panel.
Drag and Drop to the Run Menu
If you’re tired of having to drop out to a command prompt and navigate through folders to run an executable that requires switches, try this.
The following easy-to-use steps can be used to run the program of your choice from the Run menu with any command-line switches you need to include. This is much handier than opening a command prompt and changing to the directory where the executable is located, especially if long filenames are involved, which requires you to enclose your path in double quotes.
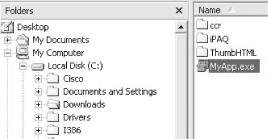
First, navigate in Windows Explorer to the executable you want to launch (Figure 1-2).
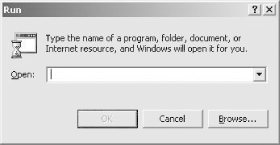
Next, use Start→Run to invoke the Run menu (Figure 1-3).
Then, drag and drop your executable to the Run menu (Figure 1-4). Make sure the Open box is empty before you perform this step, or unexpected results might occur.
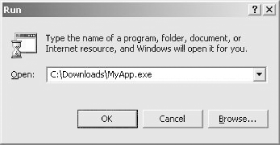
Now, simply add your switches and click OK to launch your application (Figure 1-5).
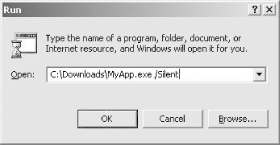
You’ll want to keep in mind that any filenames or paths that don’t follow the old 8.3 naming convention should be within quotation marks to run properly (Figure 1-6).

Note that your switches and arguments can reside outside of the quotation marks.
—Sean Ademy
Find and Replace Registry Keys from a Command Line
Using the Regfind utility, you can easily search the Registry for a value, regardless of the key, and replace it.
Regfind (from the Windows 2000 Server Resource Kit) can be an invaluable tool when you need change a Registry key that you know the value for but when do not necessarily know the full path. Recently tasked with changing the hardcoded DNS server IP on all the servers in our organization, I was pleasantly surprised when I located this gem. The problem with trying to change the DNS server entry in the Registry is that all the IP parameters are broken up by a hashed ID. The ID references several things, but most of them have to do with the network card. Regfind allows you to search a set of subkeys in the Registry for a specific value and, when found, replace it. Another real beauty of this program is that it will work remotely; all you need to do is supply it with a list of machines and let it go. Using a list of computer names (generated from SMS, Server Manager, or AD Users and Computers), combined with two batch files, you can make sweeping changes in a dynamic environment.
The Code
Here’s an example of how to change the DNS server entry on all servers in your organization. First, create a batch file called Regchange2.bat with the following syntax:
regfind -m \\%1 -p HKEY_LOCAL_MACHINE\SYSTEM\CurrentControlSet\Services\Tcpip\parameters "OLDIP" -r "NEWIP"
You will obviously want to replace OLDIP
with the old DNS server IP and replace
NEWIP with the new DNS server IP.
Now, create a second batch file called regchange1.bat with the following syntax:
for /F %%A in (servers.txt) do (call regchange2.bat %%A)
This searches the servers.txt file for computer names and passes them to the regchange2.bat file as a command-line argument.
Now you need to create a list file for your batch files to use. Create a listing of servers that need to have their DNS IP’s changed and save that list as servers.txt. An SMS report or a copy/paste from the server manager will suffice, or you can create the file manually if you like.
Running the Hack
Now, simply run the regchange1.bat batch file by calling it from a logon script and watch all your servers have their IP settings changed!
This is just one simple example of how to use Regfind. There are many command-line arguments, so please examine those to meet your needs.
—Donnie Taylor
Automatically Log On After Booting
It’s sometimes convenient to configure machines to log on automatically when booted. Here are three ways to do this.
In all versions of Windows that are based on Windows NT (including Windows 2000, Windows XP, and Windows Server 2003), a user is required to log on before he can use the system interactively. This is usually done by pressing Ctrl-Alt-Del and typing the user’s credentials. Automatic logon is an option you can set to enable Windows to log on automatically using credentials that are stored in the Registry. To invoke automatic logon, you set Registry entries that define the user ID, the password, and the domain to be used to log on. Why use this feature? There are a number of reasons. As an IT professional, I have several of my home systems set up to do this, and it makes life simpler. Test systems in a lab might be another place to use this feature. I also use it all the time on virtual machine images I have running on my laptop.
Automatic login makes things simpler, but it creates a security hole. First, the credentials are stored in clear text in the Registry. Thus, anyone with remote Registry privileges can see the clear text user ID and password. Also, if you have automatic logon set on a laptop, anyone who turns on the laptop is automatically logged in as you. So use this feature carefully!
Manual Configuration
You can configure
automatic logon manually by
adding the following four key Registry entries:
AutoAdminLogon,
DefaultDomainName,
DefaultUserName, and
DefaultPassword. These entries inform Windows
whether to attempt automatic logon and provide the credentials
(username, password, and domain).
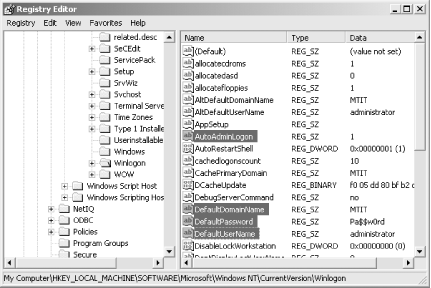
Start Registry Editor
(Start→Run→
regedit)
and find the Registry key HKLM\SOFTWARE\Microsoft\Windows NT\CurrentVersion\Winlogon, which is where the Registry
values you set to control automatic logon are located. Two of these
values, DefaultDomainName and
DefaultUserName, already exist.
DefaultDomainName is a string that holds the
domain (or workstation) name where the user ID exists, and
DefaultUserName is the user ID that Winlogon will
attempt to use to log on. This username is authenticated against the
domain (or workstation) name set in the
DefaultDomainName setting.
Now, create two new values by right-clicking on Winlogon and
selecting New→String Value, which will create new
values of type REG_SZ. Name the first value
AutoAdminLogon, and specify a value data of
1 to instruct Winlogon to attempt to use automatic
logon. Name the second value DefaultPassword; this
value specifies the password for the user set in the
DefaultUserName setting.
The result will looking like Figure 1-7.
Script Method
An easier way to configure automatic logon on your machines is to use two VBScript scripts, one to enable automatic logon and the other to disable it. Here’s the script for enabling it:
' Script to turn on automatic logon
' (c) Thomas Lee 2002
' Freely distributed!
Dim Prompt, oWSH,UserName, UserPass, UserDomain
set oWSH = WScript.CreateObject("WScript.Shell")

' get user name
Prompt = "Enter the autologon user name"
UserName = InputBox(Prompt, Title, "")

' get password
Prompt = "Enter the autologon user password for " & UserName
UserPass = InputBox(Prompt, Title, "")

' get domain
Prompt = "Enter the autologon user domain for " & UserName
Userdomain = InputBox(Prompt, Title, "")

' now set these in the Registry
oWSH.RegWrite "HKLM\SOFTWARE\Microsoft\Windows NT\CurrentVersion\Winlogon\AutoAdminLogon",
"1","REG_SZ"
oWSH.RegWrite "HKLM\SOFTWARE\Microsoft\Windows NT\CurrentVersion\Winlogon\
DefaultDomainName", UserDomain, "REG_SZ"
oWSH.RegWrite "HKLM\SOFTWARE\Microsoft\Windows NT\CurrentVersion\Winlogon\
DefaultUserName", UserName, "REG_SZ"
oWSH.RegWrite "HKLM\SOFTWARE\Microsoft\Windows NT\CurrentVersion\Winlogon\
DefaultPassword", UserPass, "REG_SZ"

' ensure the change is persistent!
oWSH.RegWrite "HKLM\SOFTWARE\Microsoft\WindowsNT\CurrentVersion\Winlogon\ForceAutoLogon",
"1", "REG_SZ"

' All done
And here’s the script for disabling automatic logon:
' Script to remove autoadmin logon
' (c) Thomas Lee 2002
' Freely distributed!
Option Explicit
On Error Resume Next

'Declare variables
Dim Prompt, oWSH

'Set the Windows Script Host Shell
set oWSH = WScript.CreateObject("WScript.Shell")

' delete the relevant keys
oWSH.RegDelete "HKLM\SOFTWARE\Microsoft\Windows NT\CurrentVersion\Winlogon\
AutoAdminLogon"
oWSH.RegDelete "HKLM\SOFTWARE\Microsoft\Windows NT\CurrentVersion\Winlogon\
DefaultDomainName"
oWSH.RegDelete "HKLM\SOFTWARE\Microsoft\Windows NT\CurrentVersion\Winlogon\
DefaultUserName"
oWSH.RegDelete "HKLM\SOFTWARE\Microsoft\Windows NT\CurrentVersion\Winlogon\
DefaultPassword"

' All done - say goodbye!
Legend = "Autoadmin removed - have a nice day!"
MyBox = MsgBox (legend, 4096, "We're Done")
You can use Notepad to type these scripts and save them with a .vbs file extension, or download autoadminlogon.vbs and noautoadminlogon.vbs from http://www.oreilly.com/catalog/winsvrhks/.
Sysinternals Tool
Finally, here’s one more way to configure automatic logon on machines. Mark Russinovich, of Sysinternals fame, also wrote a simple program to do this. You can download the program and the source from http://www.sysinternals.com/ntw2k/source/misc.shtml#AutoLogon, where you can find lots of other great tools.
—Thomas Lee
Wait for and Optionally Terminate a Process
If you’ve wondered how to write code that waits for a process to finish before terminating it, here’s the answer.
I have seen a number of discussions regarding the need for a VB script that waits for a process to finish. The script in this hack does this and more: it waits for a process to finish and optionally terminates the process if it has not finished within a specified amount of time.
This code is a modified form of what I use to control my software deployments, and it has two purposes. First, the code is designed to be certain that the deployment script waits until the initiated software setup executable is fully finished before proceeding. Even though the majority of recent software releases do not require this functionality when being deployed, it is still required for some legacy installations. Second, the code can perform a forceful termination of an application if this functionality is required.
This script accepts three arguments: the name of the executable to wait for or terminate, the amount of time to wait before terminating the specified executable, and (optionally) a switch specifying that the script should run silently. Note that the script uses Windows Management Instrumentation (WMI) for the process-management tasks, so make sure you’re running the latest WMI version on your machine.
The Code
The script consists of several sections, which are described inline in the following sections.
Main routine
First, command-line switches are read in the main body area:
Option Explicit
'''''''''''''''''''''''''''''''''''''''''''''''''''''''''''''''''''''''''''''
'
' File:     vbsWaitForProcess.vbs
' Updated:  Nov 2002
' Version:  1.0
' Author:   Dan Thomson, myITforum.com columnist
'           I can be contacted at dethomson@hotmail.com
'
' Usage:    The command processor version must be run using cscript
'           cscript vbsWaitForProcess.vbs notepad.exe 60 S
'           or
'           The IE and Popup versions can be run with cscript or wscript
'           wscript vbsWaitForProcess.vbs notepad.exe -1
'
' Input:    Name of executable  (ex: notepad.exe)
'           Time to wait in seconds before terminating the executable
'               -1 waits indefinitely for the process to finish
'               0 terminates the process imediately
'               Any value > 0 will cause the script to wait the specified
'               amount of time in seconds before terminating the process
'           Silent mode  (S)
'
' Notes:
'
''''''''''''''''''''''''''''''''''''''''''''''''''''''''''''''''''''''''''''

On Error Resume Next

'Define some variables
Dim strProcess
Dim intWaitTime
Dim strSilent

'Get the command line arguments
strProcess = Wscript.Arguments.Item(0)
intWaitTime = CInt(Wscript.Arguments.Item(1))
strSilent = Wscript.Arguments.Item(2)

Call WaitForProcess (strProcess, intWaitTime, strSilent)
Check if process is running
Next, the ProcessIsRunning function determines if
a process is running:
'''''''''''''''''''''''''''''''''''''''''''''''''''''''''''''''''''''''''''''
'
' Function: ProcessIsRunning
'
' Purpose:  Determine if a process is running
'
' Input:    Name of process
'
' Output:   True or False depending on if the process is running
'
''''''''''''''''''''''''''''''''''''''''''''''''''''''''''''''''''''''''''''
Private Function ProcessIsRunning( strProcess )
    Dim colProcessList

    Set colProcessList = Getobject("Winmgmts:").Execquery _
        ("Select * from Win32_Process Where Name ='" & strProcess & "'")
    If colProcessList.Count > 0 Then
        ProcessIsRunning = True
    Else
        ProcessIsRunning = False
    End If

    Set colProcessList = Nothing
End Function
Terminate the process
In the next section, the ProcessTerminate function
terminates a process:
'''''''''''''''''''''''''''''''''''''''''''''''''''''''''''''''''''''''''''''
'
' Function: TerminateProcess
'
' Purpose:  Terminates a process
'
' Input:      Name of process
'
''''''''''''''''''''''''''''''''''''''''''''''''''''''''''''''''''''''''''''
Private Function ProcessTerminate( strProcess )
    Dim colProcessList, objProcess

    Set colProcessList = GetObject("Winmgmts:").ExecQuery _
        ("Select * from Win32_Process Where Name ='" & strProcess & "'")
    For Each objProcess in colProcessList
        objProcess.Terminate( )
    Next

    Set colProcessList = Nothing
End Function
Wait for process to terminate
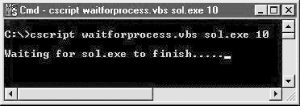
Finally, in the WaitForProcess subroutine, the
user interface is set up, the script waits while the process is
active, and the process termination is initiated. I created three
versions of the subroutine in an effort to demonstrate a few methods
for displaying status messages. For example, here’s
how to display these messages using the command console:
'''''''''''''''''''''''''''''''''''''''''''''''''''''''''''''''''''''''''''''
'
' Sub: WaitForProcess
'
' Purpose:  Waits for a process
'
' Input:    Name of process
'           Wait time in seconds before termination.
'             -1 will cause the script to wait indefinitely
'             0 terminates the process imediately
'             Any value > 0 will cause the script to wait the specified
'             amount of time in seconds before terminating the process
'           Display mode.
'             Passing S will run the script silent and not show any prompts
'
' Output:   On screen status
'
' Notes:    The version echos user messages in the command window via StdOut
'
''''''''''''''''''''''''''''''''''''''''''''''''''''''''''''''''''''''''''''
Private Sub WaitForProcess( strProcess, intWaitTime, strMode )

  If ProcessIsRunning(strProcess) Then
    Dim StdOut
    Dim w : w = 0
    Dim strPrompt
    Dim intPause : intPause = 1

    If UCase(strMode) <> "S" Then
      strPrompt = "Waiting for " & strProcess & " to finish."
      Set StdOut = WScript.StdOut
      StdOut.WriteLine ""
      StdOut.Write strPrompt
    End If
    'Loop while the process is running
    Do While ProcessIsRunning(strProcess)
      'Check to see if specified # of seconds have passed before terminating
      'the process. If yes, then terminate the process
      If w >= intWaitTime AND intWaitTime >= 0 Then
        Call ProcessTerminate(strProcess)
        Exit Do
      End If
      'If not running silent, post user messages
      If UCase(strMode) <> "S" Then _
        StdOut.Write "."
      'Increment the seconds counter
      w = w + intPause
      'Pause
      Wscript.Sleep(intPause * 1000)
    Loop
    If UCase(strMode) <> "S" Then
      StdOut.WriteLine ""
      Set StdOut = Nothing
    End If
  End If
End Sub
The result is shown in Figure 1-8.
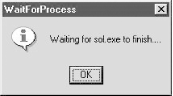
Alternatively, here’s some code for displaying status messages in Internet Explorer:
'''''''''''''''''''''''''''''''''''''''''''''''''''''''''''''''''''''''''''''
'
' Sub: WaitForProcess
'
' Purpose:  Waits for a process
'
' Input:    Name of process
'           Wait time in seconds before termination.
'             -1 will cause the script to wait indefinitely
'             0 terminates the process imediately
'             Any value > 0 will cause the script to wait the specified
'             amount of time in seconds before terminating the process
'             Display mode.
'             Passing S will run the script silent and not show any prompts
'
' Output:   On screen status
'
' Notes:    This version uses Internet Explorer for user messages
'
''''''''''''''''''''''''''''''''''''''''''''''''''''''''''''''''''''''''''''
Private Sub WaitForProcess( strProcess, intWaitTime, strMode )

  If ProcessIsRunning(strProcess) Then
    Dim objIntExplorer
    Dim c : c = 0
    Dim w : w = 0
    Dim strPrompt
    Dim intPause : intPause = 1

    strPrompt = "Waiting for " & strProcess & " to finish."

    'If not running silent, create reference to objIntExplorer
    'This will be used for the user messages. Also set IE display attributes
    If UCase(strMode) <> "S" Then
      Set objIntExplorer = Wscript._
      CreateObject("InternetExplorer.Application")
      With objIntExplorer
        .Navigate "about:blank"
        .ToolBar = 0
        .Menubar = 0         ' no menu
        .StatusBar = 0
        .Width=400
        .Height = 80
        .Left = 100
        .Top = 100
        .Document.Title = "WaitForProcess"
      End With
      'Wait for IE to finish
      Do While (objIntExplorer.Busy)
          Wscript.Sleep 200
      Loop
      'Show IE
      objIntExplorer.Visible = 1
    End If
    Do While ProcessIsRunning(strProcess)
      'Check to see if specified # of seconds have passed before terminating
      'the process. If yes, then terminate the process
      If w >= intWaitTime AND intWaitTime >= 0 Then
        Call ProcessTerminate(strProcess)
        Exit Do
      End If
      If UCase(strMode) <> "S" Then
        objIntExplorer.Document.Body.InnerHTML = strPrompt & String(c, ".")
        'Increment the counter.
        'Reset the counter indicator if it's > 25 because
        'we don't want it taking up a lot of screen space.
        If c > 25 Then c = 1 Else c = c + 1
        'Increment the seconds counter
        w = w + intPause
      End If
      'Pause
      Wscript.Sleep(intPause * 1000)
    Loop
    objIntExplorer.Quit( )             ' close Internet Explorer
    Set objIntExplorer = Nothing      ' release object reference

  End If
End Sub
The resulting status message is shown in Figure 1-9.

Finally, here’s code that uses the Popup method of Windows Scripting Host for displaying status messages:
''''''''''''''''''''''''''''''''''''''''''''''''''''''''''''''''''''''''''''
'
' Sub: WaitForProcess
'
' Purpose:  Waits for a process
'
' Input:    Name of process
'           Wait time in seconds before termination.
'             -1 will cause the script to wait indefinitely
'             0 terminates the process imediately
'             Any value > 0 will cause the script to wait the specified '
'             amount of time in seconds before terminating the process
'           Display mode.
'             Passing S will run the script silent and not show any prompts
'
' Output:   On screen status
'
' Notes:    This version uses WshShell.Popup for user messages
'
''''''''''''''''''''''''''''''''''''''''''''''''''''''''''''''''''''''''''''
Private Sub WaitForProcess( strProcess, intWaitTime, strMode )

  If ProcessIsRunning(strProcess) Then
    Dim objWshShell
    Dim c : c = 0
    Dim w : w = 0
    Dim strPrompt
    Dim intPopupTimer : intPopupTimer = 2
    Dim intPause : intPause = 1

    strPrompt = "Waiting for " & strProcess & " to finish."

    'If not running silent, create reference to objWshShell
    'This will be used for the user messages
    If UCase(strMode) <> "S" Then _
      Set objWshShell = CreateObject("WScript.Shell")
    'Loop while the process is running
    Do While ProcessIsRunning(strProcess)
      'Check to see if specified # of seconds have passed before terminating
      'the process. If yes, then terminate the process
      If w >= intWaitTime AND intWaitTime >= 0 Then
        Call ProcessTerminate(strProcess)
        Exit Do
      End If
      'If not running silent, post user prompt
      If UCase(strMode) <> "S" Then
        objWshShell.Popup strPrompt & String(c, "."), intPopupTimer, _
        "WaitForProcess", 64
        'Increment the counter.
        'Reset the counter indicator if it's > 25 because
        'we don't want it taking up a lot of screen space.
        If c > 25 Then c = 1 Else c = c + 1
      End If
      'Increment the seconds counter
      w = w + intPause + intPopupTimer
      'Pause
      Wscript.Sleep(intPause * 1000)
    Loop
    Set objWshShell = Nothing
  End If
End Sub
The resulting dialog box is shown in Figure 1-10.
Note that if you are assembling a standalone script, it should contain sections 1, 2, 3, and one option from section 4. If you would rather incorporate this code into your existing script, you need only sections 2, 3, and one option from section 4. You’ll also need to add the call statement that is at the end of the main routine section. All the code sections are self-contained, which makes them easy to import into existing scripts.
Running the Hack
To use this hack, type the code into Notepad (with Word Wrap disabled) and save it with a .vbs extension as WaitForProcess.vbs. Or, if you don’t want to tire your fingers out, download it from the O’Reilly web site instead.
Here are a few sample command-line examples. This will wait indefinitely until Notepad is closed:
cscript WaitForProcess.vbs notepad.exe -1
This will wait silently and indefinitely until Notepad is closed:
cscript WaitForProcess.vbs notepad.exe -1 S
And this will wait 10 seconds before Notepad is forcefully closed:
cscript WaitForProcess.vbs notepad.exe 10
—Dan Thomson
Shut Down a Remote Computer
Here’s a nifty way to use a script to shut down remote machines.
Sometimes, you need to be able to shut down a server remotely. This script pings the computer in question prior to sending the Win32Shutdown method. It operates on remote PCs and has been tested on systems running Windows 2000. It will probably work on NT4 systems with the proper WHS/WMI/VB scripting, though it has not been tested on such systems.
Using the Win32Shutdown method, the script provides you with the option of logging off the current user of the machine, powering the machine down, or rebooting it. In addition, each of these options can be forced so that the action occurs even if applications are running. Use this option carefully, though, because it might cause the logged-on user to lose his work if he has open files. Note that forced log off/power down/reboot will not work if the screen saver is password-protected and is currently active.
The Code
Make sure you have the latest scripting engines on the workstation you run this script from. You can download the latest scripting engines at the Microsoft Scripting home page (http://msdn.microsoft.com/library/default.asp?url=/nhp/default.asp?contentid=28001169). Note that, when working with the Active Directory Services Interface (ADSI), you must have the same applicable rights as you need to use the built-in administrative tools. Also, for VB scripts that interact with Windows Management Instrumentation (WMI), apply the most current version of the WMI agents.
Type the following code into a text editor such as Notepad (making sure to have Word Wrap disabled) and save it with a .vbs extension. Alternatively, you can download the RemoteShutdown.vbs script from the O’Reilly web site at http://www.oreilly.com/catalog/winsvrhks/.
'/'|| RemoteShutdown.vbs
'||
'|| Created by Harvey Hendricks, MCP, MCSE, A+
'|| March 2001
'|| email: Harvey.Hendricks@aramcoservices.com
'||
'||
'|| Based on techniques and ideas from:
'|| SMS admin, SMS Installer, & WMI forums ->
'|| http://www.myITforum.com/forums
'|| Win32 Scripting -> http://cwashington.netreach.net/
'|| Microsoft Windows Script Technologies ->
'|| http://msdn.microsoft.com/scripting
'|| Microsoft Online Library ->
'|| http://msdn.microsoft.com/library/default.asp
'|| Microsoft VBScript 5.5 documentation and Microsoft WMI SDK
'||
'||~~~~~~~~~~~~~~~~~~~~~~~~~~~~~~~~~~~~~~~~~~~~~~~~~~~~~~~~~~~~~~~~~~~~~~~~~
'|| SCRIPT LOGIC FLOW:
'|| Collects computername from user, calls function to ping the computername
'|| to determine if it is accessible, if not then display message and exit
'|| otherwise continue.
'|| Collects desired action to perform from the user, does error checking on
'|| the input to determine if it is acceptable, if not then display message
'|| and exit otherwise continue.
'|| Set variables and output messages based on the action chosen. Calls
'|| Win32Shutdown with the appropriate variable. Displays success message
'|| and exits
'||
'|| Uses WMI Win32Shutdown method from the Win32_OperatingSystem class
'|| to perform different logoff / powerdown / reboot functions
'||
'|| Testing found the following values to be effective on Win32Shutdown:
'|| Action decimal binary
'|| Logoff 0 0000
'|| Force Logoff 4 0100
'|| Reboot 2 0010
'|| Force Reboot 6 0110
'|| Powerdown 8 1000
'|| Force Powerdown 12 1100
'||
'|| Notice that the third bit from the right appears to be the "FORCE" bit.
'||
'|| A value of 1 will do a shutdown, ending at the "It is safe to turn
'|| off your computer" screen. I have no use for this and did not test it.
'||
'||
'||NOTES: - tested under Windows 2000 Pro. with ACPI compliant systems -
'|| SHOULD work under Windows NT4 without modification IF the
'|| system has compatible versions of WSH / WMI / VBscripting
'||
'||Logoff / Powerdown / Reboot:
'|| Does not work if a password protected screen saver is active or
'|| there is data to save. Either way the system waits for user input.
'||
'||Force Logoff / Force Powerdown / Force Reboot:
'|| Does not work if a password protected screen saver is active, will wait
'|| for user input. Otherwise will close open applications without saving
'|| data.
'||
'\/~~~~~~~~~~~~~~~~~~~~~~~~~~~~~~~~~~~~~~~~~~~~~~~~~~~~~~~~~~~~~~~~~~~~~~~~~~~

'/\/\/\/\/\/\/\/\/\/\/\/\/\/\ start function
function Ping(byval strName)
dim objFSO, objShell, objTempFile, objTS
dim sCommand, sReadLine
dim bReturn

set objShell = WScript.CreateObject("Wscript.Shell")
set objFSO = CreateObject("Scripting.FileSystemObject")

'Set default return value
bReturn = false

'Create command line to ping and save results to a temp file
sCommand = "cmd /c ping.exe -n 3 -w 1000 " & strName & " > C:\temp.txt"

'Execute the command
objShell.run sCommand, 0, true

'Get the temp file
set objTempFile = objFSO.GetFile("C:\temp.txt")
set objTS = objTempFile.OpenAsTextStream(1)

'Loop through the temp file to see if "reply from" is found,
'if it is then the ping was successful
do while objTs.AtEndOfStream <> true
sReadLine = objTs.ReadLine
if instr(lcase(sReadLine), "reply from") > 0 then
bReturn = true
exit do
end if
loop

'Close temp file and release objects
objTS.close
objTempFile.delete
set objTS = nothing
set objTempFile = nothing
set objShell = nothing
set objFSO = nothing

'Return value
Ping = bReturn
end function
'/\/\/\/\/\/\/\/\/\/\/\/\/\/\ end function

'/\/\/\/\/\/\/\/\/\/\/\ Start Main body of script
'Get computer name to operate on
ComputerName=InputBox("Enter the Machine name of the computer" & vbCRLF _
& "you wish to Shutdown / Reboot / Logoff", _
"Remote Shutdown / Reboot / Logoff", _
"ComputerName")

'if Cancel selected - exit
If (ComputerName = "") Then Wscript.Quit

'change the name to uppercase
ComputerName=UCase(ComputerName)

'ping the computername to see if it is accessible
bPingtest = ping(Computername)

If bPingtest = FALSE Then
y = msgbox ("'" & ComputerName & "' is not accessible!" & vbCRLF _
& "It may be offline or turned off." & vbCRLF _
& "Check the name for a typo." & vbCRLF, _
vbCritical, ComputerName & " NOT RESPONDING")
Wscript.Quit
end IF

'Get the action desired
Action=InputBox( _
"Select Action to perform on " & ComputerName & vbCRLF & vbCRLF _
& " 1 - Logoff" & vbCRLF _
& " 2 - Force Logoff ( NO SAVE )" & vbCRLF _
& " 3 - Powerdown" & vbCRLF _
& " 4 - Force Powerdown ( NO SAVE )" & vbCRLF _
& " 5 - Reboot" & vbCRLF _
& " 6 - Force Reboot ( NO SAVE )" & vbCRLF & vbCRLF _
& "NOTE:" & vbCRLF _
& " Using Force will close windows" & vbCRLF _
& " without saving changes!", _
"Select action to perform on " & ComputerName, "")

'if Cancel selected - exit
If (Action = "") Then Wscript.Quit

'error check input
If (INSTR("1234567",Action)=0) OR (Len(Action)>1) then
y = msgbox("Unacceptable input passed -- '" & Action & "'", _
vbOKOnly + vbCritical, "That was SOME bad input!")
Wscript.Quit
end if

'set flag to disallow action unless proper input achieved, 1 => go 0 => nogo
flag = 0

'set variables according to computername and action
Select Case Action
Case 1 'Logoff
x = 0
strAction = "Logoff sent to " & ComputerName
flag = 1
Case 2 'Force Logoff
x = 4
strAction = "Force Logoff sent to " & ComputerName
flag = 1
Case 3 'Powerdown
x = 8
strAction = "Powerdown sent to " & ComputerName
flag = 1
Case 4 'Force Powerdown
x = 12
strAction = "Force Powerdown sent to " & ComputerName
flag = 1
Case 5 'Reboot
x = 2
strAction = "Reboot sent to " & ComputerName
flag = 1
Case 6 'Force Reboot
x = 6
strAction = "Force Reboot sent to " & ComputerName
flag = 1
Case 7 'Test dialog boxes
y = msgbox("Test complete", vbOKOnly + vbInformation, "Dialog Box Test Complete")
flag = 0
Case Else 'Default -- should never happen
y = msgbox("Error occurred in passing parameters." _
& vbCRLF & " Passed '" & Action & "'", _
vbOKOnly + vbCritical, "PARAMETER ERROR")
flag = 0
End Select

'check flag
' if equal 1 (TRUE) then perform Win32Shutdown action on remote PC
' and display a confirmation message
' if not equal 1 (FALSE) then skip the action and script ends
if flag then
Set OpSysSet=GetObject("winmgmts:{(Debug,RemoteShutdown)}//" _
& ComputerName & "/root/cimv2").ExecQuery( _
"Select * from Win32_OperatingSystem where Primary=true")
for each OpSys in OpSysSet
OpSys.Win32Shutdown(x)
y = msgbox(strAction,vbOKOnly + vbInformation,"Mission Accomplished")
next
end If

'Release objects
set OpSys = nothing
set OpSysSet = nothing
Running the Hack
To run the hack, simply double-click on the RemoteShutdown.vbs file in Windows Explorer (or a shortcut to this file on your desktop) and type the name of the remote computer you want to log off from, power down, or reboot. This name can be the NetBIOS name, DNS name, or IP address of the remote machine. You will then be presented with an input box that displays a menu of options:
| 1 - Logoff |
| 2 - Force Logoff |
| 3 - Powerdown |
| 4 - Force Powerdown |
| 5 - Reboot |
| 6 - Force Reboot |
Simply type the number for the action you want to perform and press Enter.
—Harvey Hendricks
Rename Mapped Drives
Renaming drive mappings can be done in several ways, but automating the process is most efficient using a script.
Occasionally, an administrator
might need
to change drive-mapping names to hide share paths or to make the
drive name user-friendly. This is an easy operation when done
manually through a console, but when you try to automate this task,
it becomes a little more difficult. Because mapped drives are not
partitions on the local hard disk, common DOS commands, such as
label, can’t be used. Most
drive-mapping commands, such as net use,
don’t have a way to customize the name of the mapped
drive either.
One common way to perform this task is to hack the following Registry
key and add the _LabelFromReg string value:
HKCU\Software\Microsoft\Windows\CurrentVersion\Explorer\MountPoints2\%key%
Here, the %key% variable is the drive letter to be
changed.
There is a whole host of ways to make this method work, either by
editing the Registry directly, via script, or by importing a
.reg file using regedit /c.
All of these methods require many steps and some require external
files, so they might not fit into every administrative scheme. But
there’s an easier approach.
The Code
As it turns out, our old friend VBScript can be used to make this task a little more seamless. This simple script can be used on mapped drives as well as local partitions:
mDrive = "drive letter"Set oShell = CreateObject("Shell.Application") oShell.NameSpace(mDrive).Self.Name = "AnyName"
Running the Hack
To use this hack, simply edit the script to change the drive letter
and drive name as desired. For example, if E: is a
mapped drive that has the label Budgets on 172.16.33.14, and you want to change the label on the
mapped drive to simply Budgets, change this line:
mDrive = "drive letter"to this:
mDrive = "e:\"Then, change this line:
oShell.NameSpace(mDrive).Self.Name = "AnyName"to this:
oShell.NameSpace(mDrive).Self.Name = "Budgets"Finally, run the script by creating a shortcut to it and double-clicking on the shortcut, by calling it from a logon script, or by any other method suitable for your environment.
—Michael Brainard
Execute a Command on Each Computer in a Domain
This handy script lets you easily run any command on a specified subset of computers in your domain.
Running the same command on multiple computers in your domain can be tedious indeed, but such a scenario is common in an administrator’s life. I’ve written this hack to make this chore easier. The script traverses member systems of a domain, executing a command against each system that has a name that matches a particular specification you specify in the command line. Note that regular expressions are legal in this script, which makes it a powerful and flexible addition to the administrator’s toolkit.
The Code
To use this script, type it into a text editor such as Notepad (make sure Word Wrap is disabled) and save it with a .vbs extension as ExecuteAll.vbs. Alternatively, if you don’t want to wear your fingers out, you can download the script from the O’Reilly web site.
'Script Name: ExecuteAll.vbs

Option Explicit

Dim oDomain, oService, oItem, oShell
Dim strDomain, strSpec, strCommand, intButton
Dim oArgs, strFinalCommand, oRegEx, boolConfirm

' Prepare to execute commands & do popups
Set oShell = CreateObject("WScript.Shell")

GetArguments

' Access the domain so we can traverse objects
WScript.Echo "Accessing NT Domain " & strDomain
Set oDomain = GetObject("WinNT://" & strDomain)

' Initiate our regular expression support
Set oRegEx = New RegExp
oRegEx.Pattern = strSpec
oRegEx.IgnoreCase = True

' Traverse each computer (WinNT) object in the domain
WScript.Echo "Searching for " & strSpec
oDomain.Filter = Array("Computer") ' only look at computers
For Each oItem In oDomain
If oRegEx.Test(oItem.Name) Then
WScript.Echo " Matched " & oItem.Name
strFinalCommand = Replace(strCommand, "$n", oItem.Name)

intButton = vbNo
If boolConfirm Then
intButton = oShell.Popup("Execute " & strFinalCommand & "?",,_
"System " & oItem.Name, vbYesno + vbQuestion)
End If
If (boolConfirm = False) Or (intButton = vbYes) Then
WScript.Echo " Executing: " & strFinalCommand
execute strFinalCommand
End If
End If
Next

' All done; clean up
Set oItem = Nothing
Set oRegEx = Nothing
Set oDomain = Nothing
Set oShell = Nothing
Set oArgs = Nothing

'
' Glean the arguments for our run from the command line, if provided.
' If any are missing, prompt for input. A blank input signals an abort.
'
' /Y is an optional last argument
Sub GetArguments
Dim i, strConfirm, intButton
Set oArgs = WScript.Arguments

boolConfirm = True ' assume always confirm
strDomain = "" ' domain to be traversed
strSpec = "" ' name specification to be matched
strCommand = "" ' command to be executed on each match
strConfirm = "" ' track prompting for confirmation setting

' Look for our optional 4th argument
If oArgs.Length = 4 Then
If UCase(oArgs.Item(3)) = "/Y" Then
boolConfirm = False
strConfirm = "/Y" ' don't prompt below
End If
End If

' Look for any specified arguments, in order
If oArgs.Length >= 1 Then strDomain = oArgs(0)
If oArgs.Length >= 2 Then strSpec = oArgs(1)
If oArgs.Length >= 3 Then strCommand = oArgs(2)

' Prompt for any arguments not specified on the command line
If strDomain = "" Then
strDomain = InputBox _
("Enter the name of the NT Domain to be traversed", _
"NT Domain")
End If
If strDomain = "" Then WScript.Quit
strDomain = UCase(strDomain)

If strSpec = "" Then
strSpec = InputBox _
("Enter your name specification for the computer(s) " & _
"that will be matched within the " & strDomain & " Domain." & _
vbCrlf & "Regular Expressions are acceptable.", _
"Name Specification")
End If
If strSpec = "" Then WScript.Quit

If strCommand = "" Then
strCommand = InputBox _
("Enter the command to be executed on each computer matching " & _
strSpec & " within the " & strDomain & " Domain." & _
vbCrlf & "$n will be substituted for the computer name.", _
"Command to Execute")
End If
If strCommand = "" Then WScript.Quit

If strConfirm = "" Then
intButton = oShell.Popup("Confirm each command prior to execution?",,_
"Confirm?", vbYesNo + vbQuestion)
If intButton = vbNo Then
boolConfirm = False
End If
End If
End Sub

' Execute a command. Each is always run under a new instance of the command
' processor. This allows the use of built-in commands and I/O redirection.
'
' We won't wait for command completion.
Sub Execute(strCommand)
Dim RetVal

strCommand = "%COMSPEC% /c " & strCommand

RetVal = oShell.Run(strCommand, 1, False)
End Sub
Running the Hack
Here is the syntax for running the script:
ExexcuteAll.vbs <DomainToTraverse> <ComputerSpecification> <Command> [/Y]
When the script runs, the matched system’s name will
be substituted for the occurrence of $n in the
command to be performed. By default, each command instance is
confirmed before it is executed, but you can specify
/Y to always answer Yes
instead.
Here’s an example of how to run the script:
ExexcuteAll.vbs MYDOMAIN WKSATL* "del \\$n\admin$\activitylog.txt"
This example traverses the MYDOMAIN domain,
looking for computer names that start with WKSATL*
(note the wildcard) and
deletes the
activitylog.txt file from the C:\Winnt
folder.
—Hans Schefske
Add, Remove, or Retrieve Environment Variables
Environment variables can easily be added, removed, or retrieved using the script in this hack.
Using VBScript to work with the Windows system environment can be pretty simple. This hack shows how to use a script to read variables, add new variables, remove variables, and recurse through all of them. Just take a look through the script and read the comments to see how to perform each task. Note that there are four types of values in the Windows Script Host (WSH) environment—System, User, Volatile, and Process—and the script uses all of them.
By the way, this script is provided by Dudeworks (http://www.dudeworks.net). For additional resources on Windows scripting and working with the environment, see http://msdn.microsoft.com/library/default.asp?url=/library/en-us/script56/html/wsProEnvironment.asp.
The Code
Type the following script into Notepad (with Word Wrap disabled) and save it with a .vbs extension as GetEnvVars.vbs:
'~~~~~~~~~~~~~~~~~~~~~~~~~~~~~~~~~~~~~~~~~~~~~~~~~~~~~~~~~~~~~~~
'Created by: Rob Olson - Dudeworks
'Created on: 10/17/2001
'Purpose: Get Environment Variables.
'~~~~~~~~~~~~~~~~~~~~~~~~~~~~~~~~~~~~~~~~~~~~~~~~~~~~~~~~~~~~~~~~

wscript.echo "Working with the Environment: Provided by www.dudeworks.net"&vbcrlf&vbcrlf&strval

'// Create an instance of the wshShell object
set WshShell = CreateObject("WScript.Shell")
'Use the methods of the object
wscript.echo "Environment.item: "& WshShell.Environment.item("WINDIR")
wscript.echo "ExpandEnvironmentStrings: "& WshShell.ExpandEnvironmentStrings("%windir%")

'// add and remove environment variables
'// Specify the environment type ( System, User, Volatile, or Process )
set oEnv=WshShell.Environment("System")

wscript.echo "Adding ( TestVar=Windows Script Host ) to the System " _
& "type environment"
' add a var
oEnv("TestVar") = "Windows Script Host"

wscript.echo "removing ( TestVar=Windows Script Host ) from the System " _
& "type environment"
' remove a var
oEnv.Remove "TestVar"


'// List all vars in all environment types

'//System Type
set oEnv=WshShell.Environment("System")
for each sitem in oEnv
strval=strval & sItem &vbcrlf
next
wscript.echo "System Environment:"&vbcrlf&vbcrlf&strval
strval=""

'//Process Type
set oEnv=WshShell.Environment("Process")
for each sitem in oEnv
strval=strval & sItem &vbcrlf
next
wscript.echo "Process Environment:"&vbcrlf&vbcrlf&strval
strval=""

'//User Type
set oEnv=WshShell.Environment("User")
for each sitem in oEnv
strval=strval & sItem &vbcrlf
next
wscript.echo "User Environment:"&vbcrlf&vbcrlf&strval
strval=""

'//Volatile Type
set oEnv=WshShell.Environment("Volatile")
for each sitem in oEnv
strval=strval & sItem &vbcrlf
next

wscript.echo "Volatile Environment:"&vbcrlf&vbcrlf&strval
strval=""
Running the Hack
To run the script, open a command prompt, change to the directory
where the script is saved, and type cscript.exe GetEnvVars.vbs. Here is an example of typical output from
the script on a Windows 2000 machine:
Microsoft (R) Windows Script Host Version 5.6
Copyright (C) Microsoft Corporation 1996-2001. All rights reserved.

Working with the Environment: Provided by www.dudeworks.net

Environment.item: %SystemRoot%
ExpandEnvironmentStrings: C:\WINNT
Adding ( TestVar=Windows Script Host ) to the System type environment
removing ( TestVar=Windows Script Host ) from the System type environment
System Environment:

ComSpec=%SystemRoot%\system32\cmd.exe
Os2LibPath=%SystemRoot%\system32\os2\dll;
Path=%SystemRoot%\system32;%SystemRoot%;%SystemRoot%\System32\Wbem
windir=%SystemRoot%
OS=Windows_NT
PROCESSOR_ARCHITECTURE=x86
PROCESSOR_LEVEL=6
PROCESSOR_IDENTIFIER=x86 Family 6 Model 5 Stepping 2, GenuineIntel
PROCESSOR_REVISION=0502
NUMBER_OF_PROCESSORS=1
PATHEXT=.COM;.EXE;.BAT;.CMD;.VBS;.VBE;.JS;.JSE;.WSF;.WSH
TEMP=%SystemRoot%\TEMP
TMP=%SystemRoot%\TEMP

Process Environment:

=C:=C:\
=ExitCode=00000000
ALLUSERSPROFILE=C:\Documents and Settings\All Users
APPDATA=C:\Documents and Settings\Administrator\Application Data
CommonProgramFiles=C:\Program Files\Common Files
COMPUTERNAME=SNOOPY
ComSpec=C:\WINNT\system32\cmd.exe
HOMEDRIVE=C:
HOMEPATH=\Documents and Settings\Administrator
LOGONSERVER=\\SNOOPY
NUMBER_OF_PROCESSORS=1
OS=Windows_NT
Os2LibPath=C:\WINNT\system32\os2\dll;
Path=C:\WINNT\system32;C:\WINNT;C:\WINNT\System32\Wbem
PATHEXT=.COM;.EXE;.BAT;.CMD;.VBS;.VBE;.JS;.JSE;.WSF;.WSH
PROCESSOR_ARCHITECTURE=x86
PROCESSOR_IDENTIFIER=x86 Family 6 Model 5 Stepping 2, GenuineIntel
PROCESSOR_LEVEL=6
PROCESSOR_REVISION=0502
ProgramFiles=C:\Program Files
PROMPT=$P$G
SystemDrive=C:
SystemRoot=C:\WINNT
TEMP=C:\DOCUME~1\ADMINI~1\LOCALS~1\Temp
TMP=C:\DOCUME~1\ADMINI~1\LOCALS~1\Temp
USERDOMAIN=SNOOPY
USERNAME=Administrator
USERPROFILE=C:\Documents and Settings\Administrator
windir=C:\WINNT

User Environment:

TEMP=%USERPROFILE%\Local Settings\Temp
TMP=%USERPROFILE%\Local Settings\Temp

Volatile Environment:

LOGONSERVER=\\SNOOPY
APPDATA=C:\Documents and Settings\Administrator\Application Data
By the way, if you add a new variable via the command prompt, you
will not see it when you try to read it via the script. You can read
only the new values created via the same scripting type you used to
create them. Although I’ve tested this only to a
limited extent, it seems to be true. Try it for yourself; just open a
command prompt, type Set DUDE=Dudeworks, and press
Enter to set the new environment variable. Now, when you execute
GetEnvVars.vbs, and you’ll
notice that it does not list that new variable.
However, if you type SET at the command prompt,
you will see it.
—Rob Olson
Extend Group Policy
Group Policy is a powerful tool for managing Windows systems, but by configuring ADM files you can extend its capabilities even further.
One day, one of my customers gave me a phone call to say that “the Group Policy Plan we made was pretty nice, but there’s something missing, and if we had this we could really impress our boss.” From that day on, my life wasn’t the same, because this comment led to me discover the true power of Group Policy through customizing ADM files.
But first you need to understand the basics of ADM files.
ADM Files
An ADM file is an ASCII file that defines the Group Policy settings; every checkbox, drop-down menu, and folder in the Group Policy window is defined in this file. The ADM file can also be hacked with any text editor to extend the built-in settings of Group Policy, or you could even build a custom ADM to import to your own Group Policies files. This customization feature makes Group Policy a more powerful tool to manage computers.
The default Group Policy Object (GPO) created in Active Directory is composed of three ADM files: conf.adm, inetres.adm, and system.adm. The conf.adm file holds all the policy settings for Microsoft NetMeeting. The inetres.adm file holds some of the settings for the Windows Components section under both Computer and User Configuration portions of Group Policy. Finally, the system.adm file has additional settings for the Windows Components and System sections under Administrative Template in both the Computer and User Configuration portions of the Group Policy.
These ADM files are located in the %winnt%\inf folder, and every other ADM file that is installed on your machine will be put into that location as well. Also, many products that Microsoft has released for Windows 2000/XP have their own ADM files. For example, the Microsoft Office XP Resource Kit has a corresponding ADM file for each product of the Office suite. For instance, an ADM file called word10.adm adds policy settings that affect Word XP on clients computers.
Hacking ADM Files
How do you to find the policy you want to edit? And how do you change it? In the following example, I want to find and edit the “Save Word files as” policy in the word10.adm file. This policy defines the way a file is saved by default in Word XP. I usually add the option to save the Word file in a format that appears in a local version of Word but doesn’t appear in the ADM.
Figure 1-11 shows what the policy looks like.
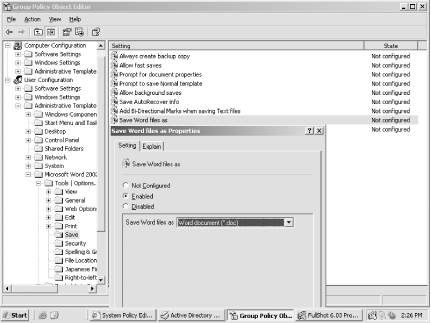
As you can see, the policy setting is found in the Save folder and its name is “Save Word files as.” Now, if I want to find this policy in the appropriate ADM file, I simply need to look for “Save Word files as.” To do this, just open the correct ADM file (which in this case is word10.adm) and do a text search for the string “Save Word files as”. You’ll find the following section of the ADM file:
POLICY "Save Word files as"
KEYNAME Software\Policies\Microsoft\Office\10.0\Word\Options
PART "Save Word files as" DROPDOWNLIST
VALUENAME DefaultFormat
ITEMLIST
NAME "Word document (*.doc)" VALUE "DEFAULT"
NAME "Web Page (*.htm; *.html)" VALUE "HTML"
NAME "Word 6.0/95 (*.doc)" VALUE "MSWord6Exp"
NAME "Word 6.0/95 - Japanese (*.doc)" VALUE"MSWord6JExp"
NAME "Word 6.0/95 - Korean (*.doc)" VALUE "MSWord95KExp"
NAME "Word 97-2002 & 6.0/95 - RTF" VALUE "MSWord6RTFExp"
NAME "Works 4.0 for Windows (*.wps)" VALUE "MSWorksWin4"
NAME "Works 3.0 for Windows (*.wps)" VALUE "MSWorksWin3"
END ITEMLIST
NOSORT
END PART
END POLICY
As you can see, the first line, Policy "Save Word files as“, defines the name of the policy as it appears in Figure
1-11, while everything under that line defines the policy settings
until the last line, END POLICY, closes the
policy. Looking at this further, KEYNAME defines
the path to the affected key in the Registry, PART
defines the way the policy box will appear in the GUI (in this case,
a drop-down menu list), VALUENAME defines the name
of the affected value in the Registry, NAME
defines the name of each option as it appears in the drop-down list,
and VALUE specifies the actual data that will be
inserted into the affected value that is defined by
VALUENAME.
So, if I want to add another option to be displayed in the drop-down
list of this policy, all I need to do is add the following line
wherever I want (within the section bounded by
ITEMLIST and END ITEMLIST):
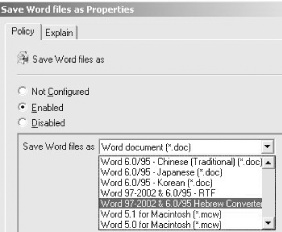
NAME "Word 97-2002 & 6.0/95 Hebrew Converter\doc" VALUE "MSWord6HBRExp"
Figure 1-12 shows the result of what will be added to the policy drop-down list in the GUI.
Easy, isn’t it? With this method, you can manipulate
virtually any Registry key that is in the
HKEY_LOCAL_MACHINE and
HKEY_CURRENT_USER hives to extend Group Policy.
If you’d like to learn more about hacking ADM files, see http://www.microsoft.com/windows2000/en/server/help/sag_spconcepts_34.htm from the Windows 2000 Server online documentation. Note that occasionally you might not see the results of your hack; see article 228723 in the Knowledge Base on TechNet for more information (http://support.microsoft.com/default.aspx?scid=kb;en-us;228723).
—Oren Zippori
Disable EFS
While the Encrypted File System of Windows 2000/XP can be useful for protecting data, your best approach might actually be to disable it.
The Encrypted File System (EFS) feature was first introduced in Windows 2000 and is also available in Windows XP Professional. EFS provides a much higher level of security than the one offered by NTFS alone, which can be circumvented without much effort as long as physical access to the computer is allowed. EFS is extremely easy to use and is available without any special configuration because it is enabled by default. Even though it seems that with all these advantages EFS should quickly find its place in everyone’s environment, implementating it properly is a fairly complex task.
The Problem
Your two primary concerns are the ability to recover encrypted files and the protection of private keys used for encryption, which are associated with each user’s account and the recovery agent’s account. Recovery of encrypted files might be a fairly common occurrence. Because the private keys necessary for decryption are stored in the user’s profile, if the profile gets deleted or corrupted, the user can no longer access their encrypted files. The process of recovery involves simply logging on as an account that is designated as a data recovery agent. By default, this account is a local administrator on a standalone computer and a domain administrator in a domain environment. Because the private keys for data recovery agents are also stored as part of their profiles, it is recommended that private keys for data recovery agents should be exported from the computer that contains them and stored in a secure place until a recovery needs to be performed.
Currently, without using any custom solution, backup and storage of a user’s private keys (without backing up the entire profile) tends to be a time-consuming process. In addition, using nondefault recovery agents (which is the recommended procedure) requires installation of the Certificate Authority feature, which also needs to be managed properly. If you are not ready to handle all these additional tasks, your best bet might simply be to temporarily disable EFS on users’ machines.
The Solution
In the Windows 2000 domain environment, launch the Group Policy MMC snap-in and select the Group Policy Object (GPO) linked to your domain. Then, drill down to Computer Configuration→Windows Settings→Security Settings→Public Key Policies→Encrypted Data Recovery Agents, right-click on the folder labeled Encrypted Data Recovery Agents, and select Delete Policy to delete the default recovery policy. Then, right-click on Encrypted Data Recovery Agents again and select Initialize Empty Policy. This will remove users’ ability to use EFS on any Windows 2000 system that belongs to the domain. In absence of EFS recovery agent, Windows 2000 clients will refuse to encrypt any files or folders.
However, you might be in for a surprise if you try to use the same approach in Windows XP, because Microsoft changed the default EFS behavior to allow a Windows XP client to use encryption even if no Data Recovery Agent is available (the same is true for Windows Server 2003). Fortunately, there are several new ways of preventing this, which we’ll look at now.
Disabling EFS for a file
Windows XP offers greater flexibility in configuring the scope of
reach of EFS. If your
intention is to disable EFS for a
single file, you can simply assign the system attribute to the file.
Although this is not the most elegant solution, it does provide a
quick workaround. In order to apply the system attribute to a file,
use the attrib command with +s
parameter. For example, to apply the system attribute to the
info1.txt file, type the following at the
command prompt:
attrib +s info1.txt
Disabling EFS for a folder
If you instead want to prevent EFS on the folder level, you can create a desktop.ini file in the folder. The desktop.ini file should contain the following two lines:
[Encryption]
Disable=1
This will affect the folder itself and all of its files. However, it does not have any impact on its subfolders and their content.
Disabling EFS for a system
Finally, if you prefer, you can disable EFS on the system level. This
can be accomplished by editing the Registry. Set the following entry
of DWORD type to the value 1:
HKLM\SOFTWARE\Microsoft\Windows NT\CurrentVersion\EFS\EfsConfiguration
It is easier, however, to use Group Policy for this purpose. Start by launching Local Security Policy from the Administrative Tools menu. Next, double-click on the Public Key Policies folder. You will see a subfolder named Encrypting File System. Right-click on it and select Properties from the context-sensitive menu. You will notice a checkbox labeled “Allow users to encrypt files using Encrypting File System (EFS),” as shown in Figure 1-13.

Unchecking this box will disable EFS altogether on the system. Note that this setting can be also used to together with Group Policy to disable EFS for all computers residing in any of Active Directory containers—sites, domains, or organizational units.
—Marcin Policht
Get Event Log Information
Need to check on the size and configuration settings of your event logs? Use this script instead of the GUI; it’s faster!
Monitoring event logs is an essential part of an administrator’s job. Unfortunately, viewing event log settings and log file sizes from the GUI is cumbersome, and it would be useful to have an easier way to obtain this information.
That’s exactly what this hack is all about. You can run the script on Windows NT/2000 and later to obtain the current file size, maximum file size, and number of records, and you can overwrite settings on the Application, System, and Security logs.
The Code
Type the following script into Notepad (make sure Word Wrap is disabled) and save it with a .vbs extension as loginfo.vbs. Or, if you like, you can download the script from the O’Reilly web site.
Option Explicit
On Error Resume Next
Dim strMoniker
Dim refWMI
Dim colEventLogs
Dim refEventLog
Dim strSource

'moniker string stub - security privilege needed to get
'numrecords for Security log
strMoniker = "winMgmts:{(Security)}!"

'append to moniker string if a machine name has been given
If WScript.Arguments.Count = 1 Then _
strMoniker = strMoniker & "\\" & WScript.Arguments(0) & ":"

'attempt to connect to WMI
Set refWMI = GetObject(strMoniker)
If Err <> 0 Then
WScript.Echo "Could not connect to the WMI service."
WScript.Quit
End If

'get a collection of Win32_NTEventLogFile objects
Set colEventLogs = refWMI.InstancesOf("Win32_NTEventLogFile")
If Err <> 0 Then
WScript.Echo "Could not retrieve Event Log objects"
WScript.Quit
End If

'iterate through each log and output information
For Each refEventLog In colEventLogs
WScript.Echo "Information for the " & _
refEventLog.LogfileName & _
" log:"
WScript.Echo " Current file size: " & refEventLog.FileSize
WScript.Echo " Maximum file size: " & refEventLog.MaxFileSize
WScript.Echo " The Log currently contains " & _
refEventLog.NumberOfRecords & " records"

'output policy info in a friendly format using OverwriteOutDated,
'as OverWritePolicy is utterly pointless.
'note "-1" is the signed interpretation of 4294967295
Select Case refEventLog.OverwriteOutDated
Case 0 WScript.Echo _
" Log entries may be overwritten as required"
Case -1 WScript.Echo _
" Log entries may NEVER be overwritten"
Case Else WScript.Echo _
" Log entries may be overwritten after " & _
refEventLog.OverwriteOutDated & " days"
WScript.Echo
End Select
Next

Set refEventLog = Nothing
Set colEventLogs = Nothing
Set refWMI = Nothing
Running the Hack
To run the script, use Cscript.exe, the
command-line version of the Windows Script Host (WSH). Simply type
cscript loginfo.vbs at a command prompt from the
directory in which the script resides. Here is a sample of typical
output when the script runs on a Windows 2000 machine:
C:\>cscript loginfo.vbs
Microsoft (R) Windows Script Host Version 5.6
Copyright (C) Microsoft Corporation 1996-2001. All rights reserved.

Information for the Security log:
 Current file size: 65536
 Maximum file size: 524288
 The Log currently contains 166 records
 Log entries may be overwritten after 7 days

Information for the Application log:
 Current file size: 524288
 Maximum file size: 524288
 The Log currently contains 2648 records
 Log entries may be overwritten as required

Information for the System log:
 Current file size: 524288
 Maximum file size: 524288
 The Log currently contains 2648 records
 Log entries may be overwritten after 7 days
Note that when you run this script on a domain controller it displays information concerning the Directory Service, File Replication Service, and DNS logs as well.
—Rod Trent
Shortcut to Remote Assistance
Remote Assistance is a helpful feature for troubleshooting Windows XP systems, but it’s a pain for ordinary users to use. This hack creates a helpful shortcut to this feature.
Windows XP provides a Remote Assistance feature, but you have to walk through several screens to get to it. This can be a problem for users who are not technically savvy, and you might find yourself spending a lot of time explaining to them how to use the feature. However, there’s a really cool workaround. Place a shortcut to this feature on users’ desktops. This will provide them with quicker access to the screen where they can type in the remote computer’s IP address to ask for remote assistance. This approach will make life easier for both you and your users.
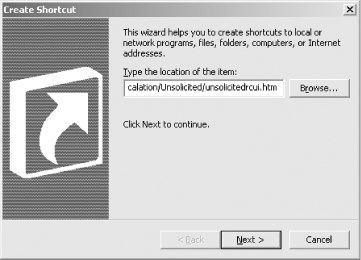
First, right-click on the desktop and choose New→Shortcut. Then, in the Create Shortcut box, type the following URL into the Location Box:
hcp://CN=Microsoft%20Corporation,L=Redmond,S=Washington,C=US/Remote%20Assistance/
Escalation/Unsolicited/unsolicitedrcui.htm
as shown in Figure 1-14.
Click Next and name the shortcut something descriptive, like “Remote Assistance” (Figure 1-15).

When the shortcut creation is finished, you’ll have an icon on your desktop for Remote Assistance (Figure 1-16).

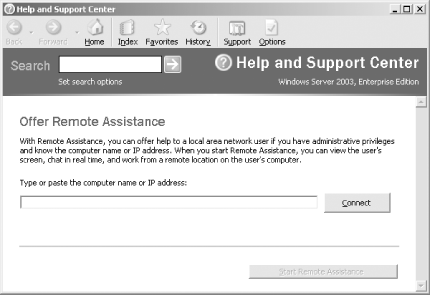
When you double-click on this icon, you’ll be whisked away to the Remote Assistance feature, as shown in Figure 1-17. Simply type the computer name or IP address of the computer you want to connect to for remote assistance.
Pretty handy, eh?
—Rod Trent
Desktop Checker
Here’s a useful script to quickly display the configuration of a remote system for troubleshooting or inventory purposes.
This handy script will attempt to gather various Windows NT/2000/XP/2003 operating-system attributes and display them in a coherent way to assist in troubleshooting. I highly suggest modifying the customization variables located within the script. To edit this text file, just open it with Notepad (leave Word Wrap turned off). Even if you have no experience with VBScript, you should find the changes quite easy to make. Please read the comments for different sections to make the tool viable for your organization.
This tool was intended to use only standard API calls and nothing from third-party COM objects. This keeps the tool lightweight and portable as only a text file. I suggest putting the tool into a local directory by itself so that the HTML pages it creates don’t get out of hand. If a machine does not have WMI 1.5, then a lot of info might be missing. You will get similar results if you don’t have administrator rights on the remote box. This script will not work on any Windows 9x operating systems.
The Code
You can download this script as DesktopChecker.vbs from the O’Reilly web site at http://www.oreilly.com/catalog/winsvrhks/:
'**************************************************************
'*                                                            *
'*  Desktop Checker - This script will ATTEMPT to gather      *
'*  various OS attributes and diplay them in a coherent       *
'*  way to assist in troubleshooting.  I highly suggest       *
'*  modifying the customization variables located 2 sections  *
'*  below.  Please read the comments for different sections   *
'*  to make the tool viable for your organization.  This      *
'*  tool was intended to use only standard API calls and      *
'*  nothing from 3rd party COM objects.  This keeps the       *
'*  tool lightwieght and portable as only a text file.        *
'*  I suggest putting the tool into a directory by itself     *
'*  so that the HTML pages it creates don't get out of hand.  *
'*  If a machine does not have WMI 1.5 then lots of info may  *
'*  be missing.                                               *
'*                                                            *
'*  Dennis Abbott                                             *
'*  speckled_trout@hotmail.com                                *
'*                                                            *
'**************************************************************
On Error Resume Next
Dim WshShell,WshFso,WshNet,WshSysEnv,IE,wmi,ADSIobj,OutPutFile,DumpFile
Dim PathToScript,ComSpec,Cnt,CompName,Company,Title,LogoLink,SelectServices, _
Domain,Progress,Instance,CurLine
Set WshShell = CreateObject("Wscript.Shell")
Set WshFso = CreateObject("Scripting.FileSystemObject")
Set WshNet = CreateObject("Wscript.Network")
Set WshSysEnv = WshShell.Environment("SYSTEM")
PathToScript = Left(WScript.ScriptFullName,(Len(WScript.ScriptFullName) - _
(Len(WScript.ScriptName) + 1)))
ComSpec = WshSysEnv("COMSPEC")
Cnt = 0

' grab contents of clipboard
' This allows you to work a LIST of boxes by cut-n-paste
Set IE = CreateObject("InternetExplorer.Application")
IE.Navigate("about:<script language=" & Chr(34)
& "vbscr" & "ipt" & Chr(34) & ">function go( ):document.all.it2.select"
 & "( ):document.execCommand " &
Chr(34) & "Paste" & Chr(34) & ":en" & "d function</script><body
onload=go( )>
<input type=t" & "ext value=" & Chr(34) & "start" & Chr(34) & "
id=it2></body>")
While IE.ReadyState <> 4:Wend
CompName = IE.document.all.it2.value
IE.quit( )
Set IE = Nothing

' SET CUSTOMIZATION VARIABLES
Company = "myITforum"
Title = Company & " - Helpdesk Diagnostic Tool"
LogoLink = "http://www.myitforum.com/img/logo_final.gif"
' The next line alows you to query a variety of NT services of your choosing
' Make sure you enter the service NAME not the DISPLAY NAME, they can be
  different names
SelectServices = Array("WinMgmt","Norton Antivirus Server","DefWatch","clisvc","Dhcp")
Domain = "amd"  'Your NT domain
Progress = True
'causes pop-up boxes when set to True it is silent when set to False

CompName = InputBox("Enter the name of the remote computer",Title,CompName)
If CompName = "" Then MsgBox "No machine name was entered.....goodbye" : _ Wscript.Quit(0)
Set wmi = GetObject("winmgmts:{impersonationLevel=impersonate}!//" & _ CompName)
Set ADSIobj = GetObject("WinNT://" & CompName & ",Computer")

Call PrepHTML(CompName)  'create an HTML file

If Progress Then
    WshShell.Popup "Getting OS information",2,Title, vbokonly + _
    vbsystemmodal
End If
Call GetOS(CompName)
If Progress Then
    WshShell.Popup "Getting NT administrators",2,Title, vbokonly + _
    vbsystemmodal
End If
Call GetAdmins(CompName)
If Progress Then
    WshShell.Popup "Checking Vital Services",2,Title, vbokonly + _
    vbsystemmodal
End If
Call Services(CompName,SelectServices)
If Progress Then
    WshShell.Popup "Checking Admin shares",2,Title, vbokonly + vbsystemmodal
End If
Call AdminShares(CompName)
If Progress Then
    WshShell.Popup "Getting date/time stamp",2,Title, vbokonly + _
    vbsystemmodal
End If
Call GetTime(CompName)
If Progress Then
    WshShell.Popup "Getting NetBIOS information",2,Title, vbokonly + _
    vbsystemmodal
End If
Call GetNBTstat(CompName)
If Progress Then
    WshShell.Popup "Pinging computer",2,Title, vbokonly + vbsystemmodal
End If
Call Ping(CompName)
If Progress Then
    WshShell.Popup "Getting Registry Quota",2,Title, vbokonly + _
    vbsystemmodal
End If
Call GetRegQuota(CompName)
If Progress Then
    WshShell.Popup "Getting Hardware information",2,Title, vbokonly + _
    vbsystemmodal
End If
Call GetHW(CompName)
If Progress Then
    WshShell.Popup "Getting Network Card information",2,Title, vbokonly + _
    vbsystemmodal
End If
Call GetNIC(CompName)
If Progress Then
    WshShell.Popup "Getting Software information",2,Title, vbokonly + _
    vbsystemmodal
End If
Call GetSW(CompName)
If Progress Then
    WshShell.Popup "Getting Critical NT Events",2,Title, vbokonly + _
    vbsystemmodal
End If
Call GetEvents(CompName)
Call ExitScript

Function PrepHTML(CompName)
    Set OutPutFile = WshFso.CreateTextFile(PathToScript & "\" & CompName _
    & ".html")
    OutPutFile.WriteLine "<body>"
    OutPutFile.WriteLine "<h1><center>" & Title & "</center></h1>"
    OutPutFile.WriteLine "<p><IMG SRC=" & Chr(34) & LogoLink & Chr(34) _
    & "</img></p>"
    OutPutFile.WriteLine "</p><p>" & "Account running this script is " _
    & WshNet.UserDomain & "\" & WshNet.UserName & " @ " _
    & Now & " from workstation " & WshNet.ComputerName & "</p>"
    OutPutFile.WriteLine "<p>Information on remote machine <b>\\" _
    & UCase(CompName) & "</b></p>"
    OutPutFile.WriteLine "<p><font color=red>To see information as it " _
    loads hit the REFRESH button on your web browser.</font></p>"
    OutPutFile.WriteLine "<hr>"
    WshShell.Run PathToScript & "\" & CompName & ".html"
End Function

Function GetOS(CompName)
    OutPutFile.WriteLine "<h3>1 - Operating System</h3>"
    OutPutFile.WriteLine "Operating System Version = " _
    & ADSIobj.OperatingSystem & " " & ADSIobj.OperatingSystemVersion & "<br>"
    For Each Instance in wmi.ExecQuery("Select * From Win32_OperatingSystem")
        OutPutFile.WriteLine "Operating System Caption = " _
        & Instance.Caption & "<br>"
        OutPutFile.WriteLine "Operating System Service Pack = " _
        & Instance.CSDVersion & "<br>"
        OutPutFile.WriteLine "Operating System LastBootUpTime = " _
        & StrDateTime(Instance.LastBootUpTime) & "<br>"
        OutPutFile.WriteLine "Operating System Directory = " _
        & Instance.WindowsDirectory & "<br>"
    Next
    OutPutFile.WriteLine "<hr>"
End Function

Function GetAdmins(CompName)
    Dim Admins,Admin
    Dim AdsInfo
    Set Admins = GetObject("WinNT://" & CompName & "/Administrators")
    OutPutFile.WriteLine "<h3>2 - Members of the local " _
    & "administrators group</h3>"
    OutPutFile.WriteLine "<table border=1><tr><td><b>Name</
b></td><td><b>Type</b></td><td><b>
Description</b></td></tr>"
    For Each Admin in Admins.Members
        Set AdsInfo = GetObject(Admin.adspath)
        OutPutFile.WriteLine "<tr><td>" & AdsInfo.Name & "</td><td>" _
        & AdsInfo.Class & "</td><td>" & AdsInfo.Description & "</td></tr>"
    Next
    OutPutFile.WriteLine "</table>"
    OutPutFile.WriteLine "<hr>"
End Function

Function Services(CompName,SelectServices)
    Dim Service,srvc,State,Strg
    OutPutFile.WriteLine "<h3>3 - Status of vital services</h3>"
    OutPutFile.WriteLine "<table border=1><tr><td><b>Service
Name</b></td><td><b>Display Name</b></td><td>
<b>Status</b></td></tr>"
    For Each Service in SelectServices
        Strg = "<tr><td>" & Service & "</td><td></
td><td><b><font color=FF0000>NOT PRESENT</font></b></
td></tr>"
        ADSIobj.Filter = Array("Service")
        For Each srvc in ADSIobj
            Select Case srvc.Status
            Case 1 State = "<font color=FF0000>STOPPED</font>"
            Case 2 State = "<font color=FF0000>START_PENDING</font>"
            Case 3 State = "<font color=FF0000>STOP_PENDING</font>"
            Case 4 State = "RUNNING"
            Case 5 State = "<font color=FF0000>CONTINUE_PENDING</font>"
            Case 6 State = "<font color=FF0000>PAUSE_PENDING</font>"
            Case 7 State = "<font color=FF0000>PAUSED</font>"
            Case Else State = "<font color=FF0000>ERROR</font>"
            End Select
                If LCase(srvc.Name) = LCase(Service) Then Strg = _
                "<tr><td>" & srvc.Name & "</td><td>" &
 srvc.DisplayName _
                & "</td><td>" & State & "</tr></td>"
        Next
    OutPutFile.WriteLine Strg
    Next
    OutPutFile.WriteLine "</table>"
    OutPutFile.WriteLine "<hr>"
End Function

Function AdminShares(CompName)
    Dim Shares
    OutPutFile.WriteLine "<h3>4 - Status of administrative shares</h3>"
    Shares = True
    If WshFso.FolderExists("\\" & CompName & "\c$") = True Then
        OutPutFile.WriteLine "C$ share exists<br>"
    Else
        Shares = False
        OutPutFile.WriteLine "<font color=red>C$ share is not " _
        & "accessible</font><br>"
    End If
    If WshFso.FolderExists("\\" & CompName & "\admin$") = True Then
        OutPutFile.WriteLine "admin$ share exists<br>"
    Else
        Shares = False
        OutPutFile.WriteLine "<font color=red>admin$ share is not " _
        & "accessible</font><br>"
    End If
    If Shares = False Then
        OutPutFile.WriteLine "<br>"
        OutPutFile.WriteLine "<font color=red>Shares made not be " _
        & "accessible due to the folowing reasons:</font><br>"
        OutPutFile.WriteLine "<font color=red>a - You do not have " _
        & "admin rights on this box</font><br>"
        OutPutFile.WriteLine "<font color=red>b - box is offline</font><br>"
        OutPutFile.WriteLine "<font color=red>c - Server service is not " _
        & "running</font><br>"
        OutPutFile.WriteLine "<font color=red>d - Shares have been " _
        & "disabled</font><br>"
        OutPutFile.WriteLine "<font color=red>e - remote machine's " _
        & "operating system is not NT-based</font><br>"
    End If
    OutPutFile.WriteLine "<hr>"
End Function

Function GetTime(CompName)
    OutPutFile.WriteLine "<h3>5 - Current date and time</h3>"
    OutPutFile.WriteLine "Current date and time of a domain controller<br>"
    WshShell.Run ComSpec & " /c net time /DOMAIN:" & Domain & " >" _
    & PathToScript & "\time.txt",6,True
    Set DumpFile = WshFso.OpenTextFile(PathToScript & "\time.txt", 1, True)
    Do While DumpFile.AtEndOfStream <> True
        CurLine = DumpFile.ReadLine
        If InStr(CurLine,"Current") <> 0 Then
            OutPutFile.WriteLine CurLine & "<br>"
        End If
    Loop
    DumpFile.Close
    OutPutFile.WriteLine "Current date and time of computer you are " _
    & "troubleshooting<br>"
    WshShell.Run ComSpec & " /c net time \\" & CompName " _
    & " >" & PathToScript & "\time.txt",6,True
    Set DumpFile = WshFso.OpenTextFile(PathToScript & "\time.txt", 1, True)
    Do While DumpFile.AtEndOfStream <> True
        CurLine = DumpFile.ReadLine
        If InStr(CurLine,"Current") <> 0 Then
            OutPutFile.WriteLine CurLine & "<br>"
        End If
    Loop
    DumpFile.Close
    OutPutFile.WriteLine "<hr>"
End Function

Function Ping(CompName)
    OutPutFile.WriteLine "<h3>7 - Ping test (DNS name resolution)</h3>"
    OutPutFile.WriteLine "<h4>If you get no reply on the ping yet other data is
retrieved on this page then there is most likely a problem with a static DNS entry.
This needs to be fixed before anything else.  You MUST VERIFY the machine is running
DHCP before
you modify the static DNS entry!!!!</h4>"
    WshShell.Run ComSpec & " /c ping " & CompName & " >" &
PathToScript & _
    "\ping.txt",6,True
    Set DumpFile = WshFso.OpenTextFile(PathToScript & "\ping.txt", 1, True)
    Do While DumpFile.AtEndOfStream <> True
         OutPutFile.WriteLine DumpFile.ReadLine & "<br>"
    Loop
    Set DumpFile = Nothing
    OutPutFile.WriteLine "<hr>"
End Function

Function GetNBTstat(CompName)
    Dim User
    User = "Nobody Logged On"
    WshShell.Run ComSpec & " /c nbtstat -a " & CompName & " >" &
PathToScript & "\nbt.txt",6,True
    Set DumpFile = WshFso.OpenTextFile(PathToScript & "\nbt.txt", 1, True)
    Do While DumpFile.AtEndOfStream <> True
        CurLine = DumpFile.ReadLine
        If InStr(CurLine,"---") <> 0 Then
            CurLine = DumpFile.ReadLine
            CompName = Trim(Left(CurLine,InStr(CurLine,"<")-1))
        End If
        If InStr(CurLine,"<03>") <> 0 Then
            If Trim(Left(CurLine,InStr(CurLine,"<03>")-1)) <> _
            UCase(CompName) and _
            Trim(Left(CurLine,InStr(CurLine,"<03>")-1)) <> _
            UCase(CompName) & "$" Then
                User = Trim(Left(CurLine,InStr(CurLine,"<03>")-1))
            End If
        End If
        If InStr(CurLine,"<1E>") <> 0 Then
            If Trim(Left(CurLine,InStr(CurLine,"<1E>")-1)) <> UCase(CompName)
and Trim(Left(CurLine,InStr(CurLine,"<1E>")-1)) <> UCase(CompName) & "$"
Then
                Domain = Trim(Left(CurLine,InStr(CurLine,"<1E>")-1))
            End If
        End If
    Loop
    OutPutFile.WriteLine "<h3>6 - NetBIOS Info</h3>"
    OutPutFile.WriteLine "Current User Logged on = " & User & " (this value may
not be accurate, it depends on the box's messenger service)<br>"
    OutPutFile.WriteLine "Domain machine is joined to = " & Domain & "<br>"
        DumpFile.Close
           OutPutFile.WriteLine "<hr>"
End Function

Function GetNIC(CompName)
    OutPutFile.WriteLine "<h3>9 - Network Card Configuration</h3>"
    For Each Instance in wmi.ExecQuery("Select * From Win32_" & _
    "NetworkAdapterConfiguration Where IPenabled = 'True'")
        OutPutFile.WriteLine "<table border=1><tr><td><b>" & _
        "Attribute</b></td><td><b>Value</b></td></tr>"
        OutPutFile.WriteLine "<tr><td>Name of card</td><td>" _
        & Instance.Caption & "</td></tr>"
        OutPutFile.WriteLine "<tr><td>DHCP Enabled</td><td>" _
        & Instance.DhcpEnabled & "</td></tr>"
        OutPutFile.WriteLine "<tr><td>IP address</td><td>" _
        & Instance.IPAddress(0) & "</td></tr>"
        OutPutFile.WriteLine "<tr><td>Subnet Mask</td><td>" _
        & Instance.IPSubnet(0) & "</td></tr>"
        OutPutFile.WriteLine "<tr><td>MAC Address</td><td>" _
        & Instance.MACAddress & "</td></tr>"
        OutPutFile.WriteLine "<tr><td>DNS HostName</td><td>" _
        & Instance.DNSHostname & "</td></tr>"
        OutPutFile.WriteLine "<tr><td>DNS Servers(in order)</td><td>" _
        & Instance.DNSServerSearchOrder(0) & " : " _
        & Instance.DNSServerSearchOrder(1) & "</td></tr>"
        OutPutFile.WriteLine "<tr><td>Primary WINS</td><td>" _
        & Instance.WINSPrimaryServer & "</td></tr>"
        OutPutFile.WriteLine "<tr><td>Secondary WINS</td><td>" _
        & Instance.WINSSecondaryServer & "</td></tr>"
        OutPutFile.WriteLine "</table>"
    Next
    OutPutFile.WriteLine "<hr>"
End Function

Function GetRegQuota(CompName)
    OutPutFile.WriteLine "<h3>8 - Registry size information</h3>"
    For each Instance in wmi.InstancesOf("Win32_Registry")
        OutPutFile.WriteLine "Current Registry size is " _
        & Instance.CurrentSize & " MB's.<br>"
        OutPutFile.WriteLine "Maximum Registry size is " _
        & Instance.MaximumSize & " MB's.<br>"
        If Instance.MaximumSize - Instance.CurrentSize < 8 Then
            OutPutFile.WriteLine "<font color=red><b>The Registry quota on " _
            & CompName & " may need to be increased!!!</font></b><br>"
        End If
    Next
    OutPutFile.WriteLine "<hr>"
End Function

Function GetHW(CompName)
    Dim stuff
    OutPutFile.WriteLine "<h3>10 - Hardware Information</h3>"
    For Each Instance in wmi.ExecQuery("Select * From Win32_" & _
    "LogicalDisk Where DeviceID = 'C:'")
        OutPutFile.WriteLine "Total Drive space available on C: is " &  Left(Instance.
FreeSpace/1000000,InStr(Instance.FreeSpace/1000000, ".")-1) & " Megabytes.<br>"
        stuff = ((Instance.Size - Instance.FreeSpace)/Instance.Size)*100
        OutPutFile.WriteLine "The C: drive is " _
        & Left(stuff,InStr(stuff, ".")-1) & "% full.<br>"
    Next
    For Each Instance in wmi.ExecQuery("Select * From Win32_ComputerSystem")
        OutPutFile.WriteLine "Computer Manufacturer = " _
        & Instance.Manufacturer & "<br>"
        OutPutFile.WriteLine "Computer Model = " & Instance.Model & "<br>"
        OutPutFile.WriteLine "Total Physical Memory = " & Left
(Instance.TotalPhysicalMemory/1000000,InStr(Instance.TotalPhysicalMemory/1000000,".")-1)
& " MB's" & "<br>"
    Next
    For Each Instance in wmi.ExecQuery("Select * From Win32_" & _
    "SystemEnclosure")
        OutPutFile.WriteLine "Asset Tag = " & Instance.SMBIOSassettag " _
        & "<br>"
        OutPutFile.WriteLine "Serial Number = " & Instance.serialnumber " _
        & "<br>"
    Next
    For Each Instance in wmi.ExecQuery("Select * From Win32_Processor")
        OutPutFile.WriteLine "Processor Name = " & Instance.Name & "<br>"
        OutPutFile.WriteLine "Processor Clock Speed = " _
        & Instance.CurrentClockSpeed & " MHz<br>"
        OutPutFile.WriteLine "Processor Voltage = " _
        & Instance.CurrentVoltage & " Volts<br>"
        OutPutFile.WriteLine "Current Processor Load = " _
        & Instance.LoadPercentage & "%<br>"
    Next
    OutPutFile.WriteLine "<hr>"
End Function

Function GetSW(CompName)
    Dim oReg
    Dim NavParent,PatternDate,NavDir,NavVer,IEVersion,program,installed,
    Version,ProgramName
    OutPutFile.WriteLine "<h3>11 - Software Information</h3>"
    Set oReg=GetObject("winmgmts:{impersonationLevel=impersonate}!//" _
    & CompName & "/root/default:StdRegProv")
    oReg.getstringvalue 2147483650,"SOFTWARE\INTEL\LANDesk\VirusProtect6\CurrentVersion\",
"Parent",NavParent
    oReg.getstringvalue 2147483650,"SOFTWARE\Symantec\SharedDefs\", _
    & "NAVCORP_70",PatternDate
    oReg.getstringvalue 2147483650,"SOFTWARE\Symantec\InstalledApps\" & _
    ","NAV",NavDir
    If UCase(Left(NavDir,1)) = "C" Then
        NavVer = WshFso.GetFileVersion("\\" & CompName & "\c$\" _
        & Right(NavDir,Len(NavDir)-3) & "\vpc32.exe")
        OutPutFile.WriteLine "Norton Antivirus Version = " &  NavVer  _
        & "<br>"
    End If
    PatternDate = Right(PatternDate,12)
    OutPutFile.WriteLine "Norton Antivirus Parent Server = " & NavParent _
    & "<br>"
    OutPutFile.WriteLine "Norton Antivirus Definition Date = " _
    & Mid(PatternDate,5,2) & "/" & Mid(PatternDate,7,2) & "/" &
Mid(PatternDate,1,4) & " Revision " & Right(PatternDate,3) & "<br>"
    oReg.getstringvalue 2147483650,"SOFTWARE\Microsoft\Internet Explorer\" & _
    ","Version",IEVersion
    OutPutFile.WriteLine "<p>Internet Explorer Version = " & IEVersion
    OutPutFile.WriteLine "<p>Installed Programs(from Add/Remove Programs applet)</
p>"
    OutPutFile.WriteLine "<table border=1><tr><td><b>Program
Name</b></td><td><b>Version(if available)</b></td></
 tr>"
    oReg.EnumKey 2147483650, "SOFTWARE\Microsoft\Windows\CurrentVersion\" & _
    "Uninstall", installed
    For each program in installed
        oReg.getstringvalue 2147483650,"SOFTWARE\Microsoft\Windows\" & _
        "CurrentVersion\Uninstall\" & program & "\","DisplayName",ProgramName
        oReg.getstringvalue 2147483650,"SOFTWARE\Microsoft\Windows\" & _
        "CurrentVersion\Uninstall\" & program & "\","DisplayVersion",Version
        If ProgramName <> "" Then
            OutPutFile.WriteLine "<tr><td>" & ProgramName & "</
td><td>" & Version & "</td></tr>"
        End If
    Next
    OutPutFile.WriteLine "</table>"
    OutPutFile.WriteLine "<hr>"
End Function

Function GetEvents(CompName)
    OutPutFile.WriteLine "<h3>12 - First 25 Errors from the system event log</h3>"
    OutPutFile.WriteLine "<table border=1><tr><td><b>DateTimeStamp
</b></td><td><b>EventSource</b></td><td><b>
Message</b></td></tr>"
    For Each Instance in wmi.ExecQuery("Select * From Win32_NTLogEvent Where Type =
'Error' and LogFile = 'System'")
        Cnt = Cnt + 1
        If Cnt = 25 Then Exit For
        OutPutFile.WriteLine "<tr><td>" & Mid(Instance.TimeGenerated,5,2) " _
        & "-" & Mid(Instance.TimeGenerated,7,2) & "-" _
        & Left(Instance.TimeGenerated,4) & "</td><td>" _
        & Instance.SourceName & "</td><td>" & Instance.Message & "</td></tr>"
    Next
    OutPutFile.WriteLine "</table>"
End Function
Function StrDateTime(d)
    Dim strVal,strDate,strTime
    strVal = CStr(d)
    strDate = DateSerial(Left(strVal, 4), _
    Mid(strVal, 5, 2), _
    Mid(strVal, 7, 2))
    strTime = TimeSerial(Mid(strVal, 9, 2), _
    Mid(strVal, 11, 2), _
    Mid(strVal, 13, 2))
    StrDateTime = strDate + strTime
End Function

Function ExitScript
    OutPutFile.WriteLine "</body>"
    OutPutFile.Close
    WshShell.Run PathToScript & "\" & CompName & ".html"
    If Progress Then
        MsgBox "The " & Title & " script is done.",vbokonly + _
        vbsystemmodal,Title
    End If
    Set WshShell = Nothing
    Set WshFso = Nothing
    Set WshNet = Nothing
    Set OutPutFile = Nothing
    Wscript.Quit(0)
End Function
Running the Hack
To run this hack, simply double-click on the DesktopChecker.vbs file in Windows Explorer (or on a shortcut to the file on your desktop). Then, type the name of the remote computer you want to query using either its NetBIOS name, DNS name, or IP address. At this point, Internet Explorer will open and display a page titled “myITforum Helpdesk Diagnostic Tool,” followed by a series of dialog boxes that show the progress of the script (you don’t need to click OK to close these dialog boxes, because they close automatically). Once the final dialog box appears—“The myITforum Helpdesk Diagnostic Tool script is done”—click OK and refresh the web page to view the information.
Here’s some sample output generated when the script was run on a workstation using Domain Admin credentials. The target machine is a Windows Server 2003 machine named SRV230. The output of the script is in the form of an HTML page named srv230.htm, which is created in the same directory where the script itself resides, but the output has been reformatted here as text to make it easier to include in this book.
myITforum - Helpdesk Diagnostic Tool
Account running this script is MTIT2\administrator @ 12/3/2003 11:40:37 AM from
workstation
SRV235
Information on remote machine \\SRV230
To see information as it loads hit the REFRESH button on your web browser.
----------------------------------------------------------------------------
1 - Operating System
Operating System Version = Windows NT 5.2
Operating System Caption = Microsoft(R) Windows(R) Server 2003, Enterprise Edition
Operating System Service Pack =
Operating System LastBootUpTime = 12/3/2003 11:26:42 AM
Operating System Directory = C:\WINDOWS
----------------------------------------------------------------------------
2 - Members of the local administrators group
Name               Type   Description
Administrator      User   Built-in account for administering the computer/domain
Enterprise Admins  Group  Designated administrators of the enterprise
Domain Admins      Group  Designated administrators of the domain
----------------------------------------------------------------------------
3 - Status of vital services
Service Name             Display Name                        Status
winmgmt                  Windows Management Instrumentation  RUNNING
Norton Antivirus Server                                      NOT PRESENT
DefWatch                                                     NOT PRESENT
clisvc                                                       NOT PRESENT
Dhcp                     DHCP Client                         RUNNING
----------------------------------------------------------------------------
4 - Status of administrative shares
C$ share exists
admin$ share exists
----------------------------------------------------------------------------
5 - Current date and time
Current date and time of a domain controller
Current date and time of computer you are troubleshooting
----------------------------------------------------------------------------
6 - NetBIOS Info
Current User Logged on = Nobody Logged On (this value may not be accurate, it depends on
the box's messenger service)
Domain machine is joined to = amd
----------------------------------------------------------------------------
7 - Ping test (DNS name resolution)
If you get no reply on the ping yet other data is retrieved on this page then there is
most likely a problem with a static DNS entry. This needs to be fixed before anything
else.
You MUST VERIFY the machine is running DHCP before you modify the static DNS entry!!!!
----------------------------------------------------------------------------
8 - Registry size information
Current Registry size is 1 MB's.
Maximum Registry size is 88 MB's.
----------------------------------------------------------------------------
10 - Hardware Information
Total Drive space available on C: is 1776 Megabytes.
The C: drive is 58% full.
Computer Manufacturer = System Manufacturer
Computer Model = System Name
Total Physical Memory = 536 MB's
Asset Tag = Asset-1234567890
Serial Number = Chassis Serial Number
Processor Name = Intel(R) Pentium(R) III processor
Processor Clock Speed = 501 MHz
Processor Voltage = 29 Volts
Current Processor Load = 2%
----------------------------------------------------------------------------
9 - Network Card Configuration
Attribute              Value
Name of card           [00000001] 3Com EtherLink XL 10/100 PCI For Complete PC Management
NIC (3C905C-TX)
DHCP Enabled           False
IP address             172.16.11.230
Subnet Mask            255.255.255.0
MAC Address            00:01:02:FC:92:FC
DNS HostName           srv230
DNS Servers(in order)  172.16.11.230 :
Primary WINS
Secondary WINS
----------------------------------------------------------------------------
11 - Software Information
Norton Antivirus Parent Server =
Norton Antivirus Definition Date = // Revision
Internet Explorer Version = 6.0.3790.0
Installed Programs(from Add/Remove Programs applet)

Program Name                                                     Version(if available)
FullShot V6
Windows Media Player Hotfix [See wm819639 for more information]
Remote Administration Tools                                      5.2.3790.0
----------------------------------------------------------------------------
12 - First 25 Errors from the system event log
DateTimeStamp  EventSource  Message
11-21-2003     W32Time      The time provider NtpClient is configured to acquire time
from one or more time sources, however none of the sources are currently accessible. No
attempt to contact a source will be made for 15 minutes. NtpClient has no source of
accurate time.
11-13-2003     DCOM         The server {A9E69610-B80D-11D0-B9B9-00A0C922E750} did not
register with DCOM within the required timeout.
etc...—Dennis Abbott
Top Five Tools
Here’s one IT professional’s take on five third-party tools for Windows 2000 every system administrator should have.
There can be no doubt that with every release of Microsoft’s operating system the need for third-party utilities becomes less and less. One major complaint about NT was its lack of disk quotas, something Unix has included since day one. A number of companies noticed this oversight and produced a product that did the trick. The release of Windows 2000 saw disk quotas become part of the OS, thus making the need to purchase this type of software an irrelevance for the majority of companies.
Whether you agree with Microsoft’s policy of continually adding features to its products that were once available only from other sources is one for debate. But in my role as a network administrator, I still find a need to seek out additional software to help make my job a lot easier. I’m sure everyone has their favorite must-have utilities, but these are my top five must-have add-on products for Windows 2000.
Server Monitor Lite
Server Monitor Lite is an invaluable monitoring product that allows you to monitor your servers centrally and get notified if a problem occurs. I use this utility to ping all my servers periodically, watch for low disk space, keep an eye on critical services, and make sure the company intranet is still accessible for my users. For more information, see http://www.purenetworking.net/Products/ServerMonitor/ServerMonitor.htm.
Lost Password Recovery
Have you inherited systems for which nobody knows the local administrator password, or do you have users that need access to Word, Excel, or Access documents that are password-protected and nobody knows the password? Well, this handy little product will save the day. It lets you reset the password on a huge array of systems. For more information, see http://www.lostpassword.com.
Data Replicator
Do you need to copy files from one system to another on a regular basis? Data Replicator makes this job much easier—it allows you to watch files or folders for changes, and then replicate them to another location. You can copy files across a LAN, WAN, or via FTP, which makes Data Replicator a great alternative to traditional backup software. For more information, see http://www.purenetworking.net/Products/DataReplicator/DataReplicator.htm.
Virtual Network Computing (VNC)
Take control of your remote servers from the comfort of your desk. VNC lets you control Windows, Unix, and Mac machines. For more information, see http://www.realvnc.com.
Network View
With this handy tool, you’ll never need to draw out your network. It automatically generates a network diagram for you within minutes. For more information, see http://www.networkview.com.
—Janet Ryding
myITforum.com
One of the best resources around for administrators who deploy and manage Windows-based networks, myITforum.com is best described by its CEO and founder, Rod Trent.
myITforum.com (http://www.myitforum.com) is the leading systems administration web site and community. It was created to be the Internet’s premiere knowledge and information forum for IT professionals. The web site provides IT administrators the opportunity to gain better insight about what they do by learning/sharing from other IT experts throughout the world. Through the web site, myITforum.com users give tips, share insight, and download utilities and tools to assist them in managing their IT enterprises. Whether you oversee 10 nodes or 100,000 nodes, myITforum.com can help you manage your environment.
myITforum.com is managed by Rod Trent (myself!), a Microsoft MVP and author of the best-selling books Microsoft SMS Installer, Admin911: SMS, and IIS 5.0: A Beginner’s Guide. Rod Trent is the leading authority on Microsoft SMS and an annual presenter and keynote presenter at the annual Microsoft Management Summit (http://www.microsoft.com/management/training/mms.mspx). He has over 18 years of IT experience, 8 of which have been dedicated to SMS. In addition to his best-selling books, Rod has written thousands of articles on technology topics in many publications, on the Web, and in the form of Microsoft white papers, case studies, and technical guides. Rod is also a principal in NetImpress, Inc. (http://www.netimpress.com), a technology publishing company.
History
myITforum.com’s roots lead back to the now defunct Swynk.com web site. Swynk.com was founded and operated by Stephen Wynkoop until 1999. Stephen had developed a web site that allowed administrators all over the world to gain support for their everyday IT tasks. myITforum.com was built on the success of the Systems Management Server (SMS) section of Swynk.com. The success of the SMS section led to an urgency to keep the ever-growing community alive when it was evident that the parent company of Swynk.com was not going to support it. Swynk.com had become much more than simply content and articles, and it became evident that the web site had outgrown its electronic boundaries. It had become a live community that was represented both on the Web and in the real IT world. So, the SMS community from Swynk.com migrated to its web site location: http://www.myitforum.com.
Since the move, myITforum.com has grown by leaps and bounds, primarily due to the opportunities it presents to administrators all over the world to interact with their fellow administrators and peers. The members of the myITforum.com community are the most caring folks found in any corner of the Internet. They give their time, experience, and knowledge selflessly to help create a brain trust of smarter administrators who become efficient and proficient IT professionals.
Scope
While myITforum.com was based on Microsoft Systems Management Server, it has grown far beyond this one topic. To be an SMS administrator, an IT professional must be proficient in far more than just SMS. SMS administrators are required to support many different applications, operating systems, and technologies. Because of this requirement and myITforum.com’s ability to grow quickly with the community needs, myITforum.com expanded its topic base to include many more areas in the IT world. myITforum.com supports Altiris products, Microsoft Operations Manager (MOM), VBScript, SMS 1.2/2.0/2003, Windows, SQL Server, Networking, Active Directory, security and patch management, antivirus technologies, Windows Mobile technologies, web technologies, and deployment technologies such as Windows Installer.
MyITforum.com supports these many topics through articles, email discussion lists, and web-based forums Figure 1-18 shows the myITforum.com home page. The articles posted to the web site are quite a bit different than the articles you find in other publications. Instead of information from individuals you can’t be sure have ever worked in IT, the myITforum.com articles are from real IT workers from real IT experiences. The premise is that if you are faced with a real-world situation, someone out there has probably already been through it and has the solution all wrapped up. By sharing their experiences through articles, the myITforum.com columnists provide a central location for IT administrators all of the world to get solutions to problems they might be facing, without having to spend days or weeks working through a tough situation. If it’s a problem, someone has already faced it and succeeded, and the solution is probably outlined on myITforum.com.
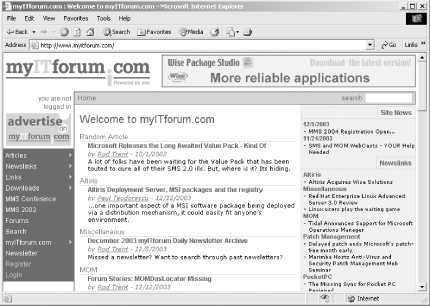
In addition to providing these web resources for the myITforum.com community, myITforum.com has transcended the confines of the Internet. Because real IT professionals make up the myITforum.com community, myITforum.com has reached beyond the Web to aid real people in setting up real-world local communities. myITforum.com has been instrumental in setting up over 17 user groups all over the world. From the U.S. to Canada to Israel to Australia, myITforum.com has provided valuable time and resources to set up and manage some of the most successful user group communities in the real world. myITforum.com provides many things to the user groups, including a free web site for the group’s web presence, contacts with vendors for speaking services, and an intermediary link between Microsoft and the user group for planning, support, and meeting facilities.
Over time, myITforum.com has also become a successful liaison between employers and prospective employees. Offered as a free service, myITforum.com has helped place hundreds of qualified employees into IT jobs. During the last few years, when the economy has caused layoffs and outsourcing, myITforum.com has stood as a central beacon for employers and employees to connect with each other. So, in addition to providing a central repository for connecting with peers, myITforum.com has become an informal meeting place, where workers find employment and employers locate the top candidates for open positions.
It has been noted that if you attend any IT event, anywhere in the world, you will find at least one myITforum.com community member. myITforum.com’s influence reaches into almost every nook of the IT world, primarily because it provides what IT professionals need to advance to a higher level in their profession, but also because it provides a level of sharing that can’t be experienced anywhere else. myITforum.com is a real community comprised of real people with real personalities. Participating in myITforum.com is like meeting with friends. myITforum.com is an ever-evolving, ever-growing community meeting place that extends experience and knowledge that is more valuable than sitting through a weeklong training class. At the end of the day, myITforum.com is the one location for everything IT.
—Rod Trent
Get Windows Server Hacks now with the O’Reilly learning platform.
O’Reilly members experience books, live events, courses curated by job role, and more from O’Reilly and nearly 200 top publishers.

