Chapter 4. Networking Services
Hacks #36-47
Under the hood of Windows 2000 Server and Windows Server 2003 are the core networking services and components that enable systems to communicate across a network. This includes services such as Dynamic Host Configuration Protocol (DHCP), Domain Name System (DNS), Windows Internet Name Service (WINS), and other services that run on top of TCP/IP. Configuring these services can be complex, and it can be hard to pinpoint the problem when things go wrong.
This chapter is about managing key services and other networking components. You’ll learn how to use a script to manage services on remote computers, how to ensure DHCP server availability so your clients can communicate, how DNS aging and scavenging work and can be configured, how to troubleshoot common DNS problems when Active Directory is deployed, how to perform complicated network configuration tasks using scripts and from the command line, and several other important tasks.
When running VB scripts for system administration, remember to ensure that you have the latest scripting engines on the workstation from which you run the scripts. Download the latest scripting engines from the Microsoft Scripting home page (http://msdn.microsoft.com/scripting/). Also, when working with the Active Directory Services Interface (ADSI), you must have the same applicable rights you need to use the built-in administrative tools. In other words, you should use an administrator account to run these scripts.
Manage Services on Remote Machines
Here are three handy scripts for managing network services that run on remote machines.
While the Services node in Computer Management can be used to manage services on remote machines, using a script is easier if you have many systems to manage. This hack offers three VB scripts you can use to display the services that run on a remote computer, change the start mode for a service, and change the password for the account used by a service. Enjoy!
Getting Remote Computer Service Information
If you want to check services on a remote computer, VBScript can help. Using the WMI repository and ADSI, you can easily retrieve information on stopped or started services.
The script prompts for the NetBIOS name of the remote computer.
Alternatively, you can get the service information for the local
computer by typing in the local name as localhost.
The script responds by displaying complete information for the
services that are registered on the specified computer.
The code
Type the following script into Notepad (with Word Wrap disabled) and save it with a .vbs extension:
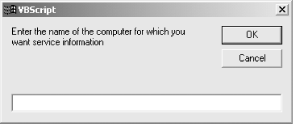
ComputerName = InputBox("Enter the name of the computer for which you " & _
"want service information")

winmgmt1 = "winmgmts:{impersonationLevel=impersonate}!//"& ComputerName &""

Set ServSet = GetObject( winmgmt1 ).InstancesOf ("Win32_service")

for each Serv in ServSet
GetObject("winmgmts:").InstancesOf ("win32_service")
WScript.Echo ""
WScript.Echo Serv.Description
WScript.Echo " Executable: ", Serv.PathName
WScript.Echo " Status: ", Serv.Status
WScript.Echo " State: ", Serv.State
WScript.Echo " Start Mode: ", Serv.StartMode
Wscript.Echo " Start Name: ", Serv.StartName
next
Running the hack
To run the script, open a command prompt, switch to the directory where the script is located, and type the following:
cscript.exe GetRemoteServices.vbs > services.txt
The reason for redirecting output to a text file is because the script generates a lot of output. A dialog box appears (see Figure 4-1), requesting the name of the remote machine. The machine name can be a FQDN, NetBIOS name, or IP address, as desired.
Here’s a sample of what the output of the script might look like if the target machine is running Windows Server 2003:
Microsoft (R) Windows Script Host Version 5.6
Copyright (C) Microsoft Corporation 1996-2001. All rights reserved.

Notifies selected users and computers of administrative alerts. If the service is stopped,
programs that use administrative alerts will not receive them. If this service is
disabled,
any services that explicitly depend on it will fail to start.
 Executable:  C:\WINDOWS\system32\svchost.exe -k LocalService
 Status:  OK
 State:  Stopped
 Start Mode:  Disabled
 Start Name:  NT AUTHORITY\LocalService

Provides support for application level protocol plug-ins and enables network/protocol
connectivity. If this service is disabled, any services that explicitly depend on it will
fail to start.
 Executable:  C:\WINDOWS\System32\alg.exe
 Status:  OK
 State:  Stopped
 Start Mode:  Manual
 Start Name:  NT AUTHORITY\LocalService

Processes installation, removal, and enumeration requests for Active Directory
IntelliMirror group policy programs. If the service is disabled, users will be unable to
install, remove, or enumerate any IntelliMirror programs. If this service is disabled,
any services that explicitly depend on it will fail to start.
 Executable:  C:\WINDOWS\system32\svchost.exe -k netsvcs
 Status:  OK
 State:  Stopped
 Start Mode:  Manual
 Start Name:  LocalSystem
Note that you can easily determine the start mode, service account, and state of each service from this output.
Changing the Start Mode for a Service
This VBScript changes the Server service start mode to Automatic and works remotely. This can be a big help to sites where the security folks have gone nuts and disabled the Server service or set it to Manual start mode.
In its current form, the script prompts for a remote computer name, connects, and changes the Server service’s start mode. The script could also be edited to run on the local computer and placed in a login script to hit a large number of computers at once.
The code
Type the following script into Notepad (with Word Wrap disabled) and save it with a .vbs extension:
strComputer = InputBox("Enter the name of the computer for which " & _
"you want to change the Start Mode for the Server service")
Set objWMIService = GetObject("winmgmts:" _
& "{impersonationLevel=impersonate}!\\" & strComputer & "\root\cimv2")
Set colService = objWMIService.ExecQuery _
("Select * from Win32_Service where DisplayName = 'Server'")
For Each objService in colService
errReturnCode = objService.Change( , , , , "Automatic")
Next
Running the hack
To run this script, simply create a shortcut to it and double-click on the shortcut.
To change the start mode of another service, simply change the
DisplayName to the service you want to modify. For
example, to change the start mode for the World Wide Web Publishing
Service, you’d alter the select statement to read:
("Select * from Win32_Service where DisplayName = 'w3svc'").And, of course, you can also use "Manual" or
"Disabled" instead of
"Automatic" in the second-to-last line.
Changing a Service Password
Services always run within the context of some user account. Usually,
this account is built in, such as LocalSystem or
NetworkService, but some services, such as IIS and
those for Exchange, use special accounts called service
accounts. To ensure these accounts are secure, you can
change the password used by these accounts, which this script will
allow you to do.
The code
Type the following script into Notepad (with Word Wrap disabled) and save it with a .vbs extension:
Dim Computer
Dim ComputerName
Dim ComputerDomain
Dim Service
Dim TargetService
Dim NewPassword
TargetService = "YourServicename"
ComputerDomain = "YourDomain"
ComputerName = "YourComputerName"
NewPassword = "YourPassword"
Set Computer = GetObject("WinNT://" & ComputerDomain & "/" & ComputerName & _ ",computer"
Set Service = Computer.GetObject("service", TargetService)
Service.SetPassword(NewPassword)
Service.SetInfo
Running the hack
Just replace the items in the following lines with your own information:
TargetService = "YourServicename"
ComputerDomain = "YourDomain"
ComputerName = "YourComputerName"
NewPassword = "YourPassword"
For example:
TargetService = "Network Agent"
ComputerDomain = "MTIT"
ComputerName = "SRV14"
NewPassword = "Pa$$w0rd"
—Rod Trent
Simplify DNS Aging and Scavenging
Understanding the mysteries of how DNS aging/scavenging works can save you time and effort troubleshooting DNS name-resolution problems.
Dynamic DNS (DDNS, introduced in Windows 2000) brought with it a process called DNS scavenging, the automatic removal of stale DNS information. In a perfect world, DNS scavenging would not be necessary, but who lives in a perfect world? So, before you spend time reading the rest of this hack, let’s see if it applies to you.
Have you pinged a machine before by name and gotten a reply, but when you attempt to connect to it, you connect to a different machine name or cannot connect at all? If you just shook your head in agreement, nodded, or mumbled something about this happening to you, then this hack might shed some light.
Still reading? Good. First, let me establish my bias: all of this information pertains to Active Directory Integrated Zones. That said, let’s establish some definitions before we continue:
- A
This record maps the name of the machine (host) to the IP address.
- PTR
This record maps the IP address to the hostname.
Why Scavenge?
There are two parts of DDNS that you need to understand before we answer the question of when scavenging is necessary: DNS and DHCP.
DHCP process
Wait a second. I thought we were talking about DNS? Before we go on about DNS, we first have to understand how DDNS works and why DHCP is important in this process.
Dynamic DNS registration happens at two places: either the DHCP client or the DHCP server. It all depends on configuration and client type. For the most part, Windows 2000 clients and above handle their own hostname registrations, while the DHCP server handles the PTR registration (except in the case of statically assigned IP addresses, in which case the client will handle both the hostname and PTR registrations). In other configurations, the DHCP server can be made to handle the host and PTR registrations. Other, down-level clients (NT4, 9x, etc.), do not interact with the DDNS registration process. However, the DHCP server can be set to handle registration for these clients as well.
Okay, now we have an idea of how these records are getting in DDNS. Unfortunately, how the records go in is much more efficient than how the records come out.
Tip
Read Larry Duncan’s excellent article, “DNS for Active Directory: A 10 Minute Primer” (http://www.myitforum.com/articles/16/view.asp?id=3907), to understand when clients like to refresh their DNS records.
DDS process
There’s nothing to stop two records from holding the
same IP address or the same host name. This scenario is problematic
for image-based workstation/laptop deployments. During a portion of
the image process, the client will register as
WIN2KIMAGE in DNS (for example), before having the
machine name changed later in the process. Another image is started
and WIN2KIMAGE is added again with a different IP
address. Sooner or later, you’ll end up with 50 PTR
records pointing to the same name, WIN2KIMAGE.
This same process happens under different situations, in which a
machine will establish a different dynamic IP address, but for some
reason, the old reverse-lookup record is not removed. Generally, the
DHCP client and server helps clean up these records. In some
configurations, the DHCP server does it all. However, real-world
experience might tell you that this is not getting done effectively.
When this clean-up process does not occur properly, stale records
reside in DNS.
This is where scavenging comes in. Scavenging deletes stale records if they’re beyond a set age. All records have an age. However, the age of a record is not considered until scavenging is turned on. Once scavenging is turned on, DNS does not calculate how old the record was prior to when scavenging was enabled.
Tip
For more information on various triggers of the StartScavenging time frame, refer to the Microsoft DNS white paper at http://www.microsoft.com/technet/treeview/default.asp?url=/TechNet/prodtechnol/windows2000serv/plan/w2kdns2.asp.
How to Use Scavenging
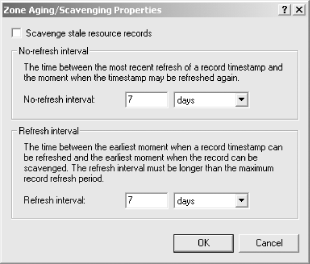
There are three intervals you need to understand before you set up scavenging: Scavenging Period, No-refresh Interval, and Refresh Interval. These intervals are described in the DNS GUI. Just right-click on an Active Directory Integrated zone, select Properties, choose the General tab, and click the Aging button to see the screen shown in Figure 4-2.
If you’re like me, your brain is twitching from the complex wording of the definitions. In order to understand this a little better (without needing the mental capacity to solve a Rubik’s Cube in two minutes), let’s break down what the definitions really mean:
- Scavenging Period
This is easy enough to understand. This interval simply tells your DNS server how often to check the zones for stale records. You can only get as granular as telling DNS to check every x number of hours or x number of days. By the way, this setting applies only to the DNS server, not the zones.
- No-refresh Interval
This is a mechanism by which DDNS suppresses reregistration attempts. This helps keep replication of record information to a minimum. For example, using the default of seven days, after the DNS client registers with DDNS, all attempts to reregister for a period of seven days will be ignored.
- Refresh Interval
This definition took awhile for me to grasp. It basically means the number of days after the No-refresh Interval expires that DDNS will wait for the client to refresh its record before the record becomes stale. Again, by default, this setting is also seven days.
Now, we’ll put this all together in an example that makes sense. In this scenario, the DNS client does not reregister during the Refresh Interval period. Keep in mind, we are using the default of seven days:
DNS client registers with DDNS.
No-refresh Interval starts (seven days).
DDNS server will not accept reregistration attempts from this client for seven days.
No-refresh Interval expires.
Refresh Interval starts (seven days).
DNS client has seven days to refresh its records before the record is considered stale.
Refresh Interval expires.
Scavenging process removes record.
If the client had registered its record again, the No-refresh Interval would have started all over again. In the previous scenario, with the default settings of seven days, a record would have to be greater than 14 days old before DDNS would scavenge it. This might work if your DHCP lease times are eight days (the default). Otherwise, you might need to set the intervals closer to your DHCP lease times. Also, keep in mind the Scavenging Period runs only on the interval specified, which is also seven days by default.
Scavenging jobs will use processor time. However, the scavenging process is a low-priority thread of the DNS service. This ensures that scavenging does not use all the processing capacity, but it’s horrible if your DNS servers are used heavily. As a low-priority thread on a highly used DNS server, there’s a probability that the scavenging thread might never run. Also, if the server attempts to run the scavenging process during a time when the DNS server is highly used, it will miss the scheduled interval. It will not attempt to start running over and over but instead will wait until the next scheduled interval (remember the default of seven days). At the time of this writing, I haven’t found a setting that can be adjusted to change which hour the scavenging process starts.
For the Advanced Pack Rat
As I mentioned earlier, the Scavenging Period setting applies only to an individual DNS server. Unlike the other settings, which are replicated by Active Directory, this setting is specific to the DNS server in question. With this in mind, not enabling this setting means that no servers are scavenging records. Aging of records is taking place (No-refresh, Refresh), but nothing else is going on. This is good for a variety of reasons. First, you don’t necessarily want all of your DNS servers to scavenge. You need only one server to scavenge. It’ll replicate the record deletes to the other DNS servers. This also allows for some other configuration options:
- Small environment
Turn Scavenging Period on. This should be ample for you.
- Larger environment
Leave the Scavenging Period setting off. In other words, you don’t want DNS servers scavenging records for you. Instead, use the
dnscmdcommand (found in the Support Tools folder on your product CD) with the/StartScavengingoption and schedule it on a recurring basis, at the time frame you’re looking for. It’s probably reasonable to suggest that nighttime hours have little DNS registrations or queries going on.- Enterprise environment
Designate a DNS server to handle all scavenging and nothing else. This can be established by placing the DNS server in its own site so that clients do not refer to it for lookups or any Active Directory functions. If that sounds like too much work, the SRV records for this DNS server can be stripped from DNS to achieve the same effect.
See Also
DNS Scavenging on Windows 2000 Server (http://www.microsoft.com/windows2000/en/server/help/default.asp?url=/WINDOWS2000/en/server/help/sag_DNS_imp_ManageAgingScavenging.htm)
Enable Aging and Scavenging for DNS (http://www.microsoft.com/technet/treeview/default.asp?url=/technet/prodtechnol/windowsserver2003/proddocs/deployguide/dssbm_drd_dvwv.asp)
Scavenging Stale DNS Records (http://www.winnetmag.com/Articles/Index.cfm?ArticleID=19897)
Set Aging/Scavenging Properties for the DNS Server (http://www.microsoft.com/technet/treeview/default.asp?url=/technet/prodtechnol/windowsserver2003/proddocs/standard/sag_DNS_pro_SetAgeScavengeServer.asp)
How to Optimize the Location of a Domain Controller or Global Catalog (http://support.microsoft.com/?id=306602)
—Marcus Oh
Troubleshoot DNS
Here are some tips, tools, and resources to help you troubleshoot DNS problems on Windows 2000/2003-based networks.
DNS troubleshooting is usually straightforward, because most errors tend to be simple configuration or setup errors. To troubleshoot DNS, you must have details of the configuration of any DNS resolvers and/or DNS servers and be able to use common DNS troubleshooting tools. This hack provides some details and links to tools you can use to troubleshoot DNS, as well as tips on how to overcome common DNS errors.
DNS Troubleshooting Tools
Here are a few useful web sites that offer tools for troubleshooting DNS:
- www.DNSreport.com (http://www.dnsreport.com)
This site will check the DNS settings for an Internet zone and provide prescriptive guidance on optimizing the settings.
- www.DNSstuff.com (http://www.dnsstuff.com)
This site has a number of DNS tools that you can use to diagnose DNS issues.
- SamSpade.org (http://www.samspade.org)
This site has some good tools for DNS troubleshooting. It promotes its tools and expertise as anti-spam utilities, as opposed to just DNS troubleshooting. The site’s tools page (http://www.samspade.org/t/) provides tools similar to those at www.DNSstuff.com. I have the Sam Spade For Windows tool (http://www.samspade.org/ssw/) on my desktop and use it a great deal.
- AnalogX DNSDig (http://www.analogx.com/contents/dnsdig.htm)
This page provides an online version of DIG—a useful tool from the Unix world that is used to troubleshoot DNS issues. (Why can’t Microsoft provide a port of DIG in Windows or the resource kit?)
- Squish.net DNS Checker (http://www.squish.net/dnscheck)
Given a record name and a record type, this page will return a report that details all possible answers.
- DNS Dump (http://www.reskit.net/DNS/dnsdump.cm_)
This is a truly awesome script by Dean Wells that exports/imports DNS server configurations. Read carefully before using it, and make sure you change the extension before you run it!
Troubleshooting Common DNS Issues
Here is a list of common problems and solutions that have been discussed in online newsgroups:
- Running
nslookupreturns nonexistent domain If you run
nslookup, you might see an error that looks like this:C:\>
nslookup*** Can't find server name for address 192.168.1.1: Non-existent domain *** Default servers are not available Default Server: UnKnown Address: 192.168.1.1When
nslookupstarts, it attempts do a reverse lookup of the IP address of the DNS server. If the reverse lookup fails,nslookupreturns the preceding error message, which is somewhat misleading. The solution is to either install a reverse lookup zone for your workstations or to ignore the message.- Netlogon Error 5774 - DNS Operation Refused
This error is typically caused by the use of a DNS server that does not allow dynamic update or is set to refuse operations from your computer. Sometimes, this is due to a workstation that points to the ISP’s DNS server instead of an internal DNS server. In general, all internal servers and workstations should point to one or more internal DNS servers that in turn point to a DNS server that forwards to the Internet.
- DNS Error 414 - The specified domain either does not exist or could not be contacted
This error usually occurs when the computer is configured without a DNS domain name. If the computer is a DNS server that has only a single label name (e.g., kona2 versus kona2.reskit.net), any zone created will have the default SOA and NS records created using just a single label. This in turn will lead to invalid or failed referrals for the zone used to provide lookups for this zone.
- DNS Error 5504 - The DNS Server encountered an invalid domain name in a packet from X.X.X.X
This error indicates that the DNS server has received a packet with an invalid domain name and the packet has been rejected. The most common cause of this is DNS cache pollution, as described in Knowledge Base (KB) article 241352 (http://support.microsoft.com/default.aspx?scid=kb;en-us;241352).
- Troubleshooting dynamic update problems
Dynamic update is a DNS feature that enables hosts to update their DNS details at the DNS server. Although easy to set up, there are some ways in which DNS dynamic update can fail. See the KB article 287156 for more details (http://support.microsoft.com/default.aspx?scid=kb;en-us;287156)
- Windows Server 2003 cannot resolve addresses that Windows 2000 can
In some cases, it appears that server is just not functioning and not resolving some names. The cause is that Extension Mechanisms for DNS (EDNS0) requests from the 2003 DNS server are not recognized by all other DNS servers. To resolve this, you should disable EDNS0 requests, using the DNScmd program from the Windows Server 2003 Support Tools folder and type
dnscmd /config /enableednsprobesat a command prompt.
DNS Newsgroups
If the previous tips and tools do not help and you are using any version of Microsoft Windows (or DOS, for that matter), consider posting a query to the microsoft.public.win2000.dns newsgroup. This newsgroup can be obtained from news://news.microsoft.com. If you do post, you will need to provide some details of your particular issue, including most of all of the following:
Is the problem a client problem or a DNS server problem?
What operating system are you running and with which service packs or other fixes?
What is the client configuration? (
ipconfig /allprovides this!)What specific error, if any, are you seeing?
What zones are configured on your DNS server, and what properties are set for those zones?
Are your DNS zones configured to be updated dynamically?
What sort of Internet connection do you have? Does your ISP allow you to run servers on your connection? Does your provided IP address vary, or is it fixed?
DNS Books
Finally, here are two books you can use to learn more about troubleshooting DNS issues:
- DNS and BIND
By Cricket Liu and Paul Ablitz (O’Reilly). This book is possibly the best introduction to DNS in existence. It’s Unix-based, but it’s still a good book.
- Windows 2000 DNS
By Herman Knief, Roger Abell, Jeffery Graham, and Andrew Daniels (O’Reilly). This is a pretty good Windows 2000 DNS book.
—Thomas Lee
Manually Recreate a Damaged WINS Database
A corrupt WINS database can spell a host of problems and must be repaired if your network is to function properly. This hack shows you how to recreate a damaged WINS database.
If you’re still using WINS on your network—typically in a mixed NT/2000 or NT/2003 environment while migration is underway—you might occasionally experience corruption of the Windows Internet Name Service (WINS) database. If your WINS database becomes corrupted, you can experience all manner of problems with your workstations and servers—most notably, name-resolution problems for legacy Windows clients. You’ll need to fix your WINS database if these clients are to communicate on the network. This hack recreates a damaged Windows NT 4.0 or Windows 2000 WINS database.
Windows NT 4.0
To recreate a damaged WINS database on Windows NT, first go to Control Panel→Services and stop the Windows Internet Name Service. Then, create a folder named WINS_OLD and move the contents of the %SystemRoot%\System32\WINS folder to WINS_OLD. Finally, restart the Windows Internet Name Service. When you are positive that the new WINS database is functioning properly, delete the WINS_OLD directory.
Windows Server 2000/2003
To recreate a damaged WINS database on Windows Sever 2000/2003, first go to Control Panel→ Administrative Tools→Services and stop the Windows Internet Name Service. Then, create a folder named WINS_OLD and move the contents of the %SystemRoot%\System32\WINS folder to WINS_OLD. Finally, restart the Windows Internet Name Service. When you are positive that the new WINS database is functioning properly, delete the WINS_OLD directory.
Tip
The only difference between Windows NT 4.0 and Windows 2000 for recreating a WINS database is the location for accessing the services.
Again, when you are positive that the new WINS database is functioning properly, delete the WINS_OLD directory.
—Rod Trent
Change WINS for All Enabled Adapters
Changing WINS settings on client machines can be a pain when you have to move your WINS servers. This hack makes it easier.
If you are using WINS as a name-resolution method (typically in a mixed NT/2000 environment) and have to change your WINS servers—for example, when you install a new WINS server—you have to reconfigure WINS settings on all your client computers. If you are using DHCP, you can configure the 044 WINS/NBNS Servers option on your DHCP servers to provide client computers with new WINS servers addresses, but this requires releasing and renewing DHCP leases on all your clients.
Here’s another approach you can use. The following script changes the WINS server settings on client machines and is useful when you install new WINS servers and need to change your WINS server settings on workstations across the board. Note that the script also works on multihomed machines (machines that have two or more network adapters).
The Code
Type the following code into Notepad (with Word Wrap disabled) and save it with a .vbs extension as ChangeWINS.vbs:
Option Explicit
On Error Resume Next

Dim objLocator, objService, NIC
Dim strComputer, strUsername, strPassword
Dim strWINS1, strWINS2
Dim intErr

strComputer = "."
strUsername = ""
strPassword = ""

strWINS1 = "172.16.1.122"
strWINS2 = "172.16.1.132"

Set objLocator = CreateObject("WbemScripting.SWbemLocator")
Set objService = objLocator.ConnectServer(strComputer, "root/cimv2", & strUsername,
strPassword)
objService.Security_.impersonationlevel = 3

For Each NIC In objService.ExecQuery("Select * from Win32_NetworkAdapterConfiguration
Where IPEnabled=True")
WScript.Echo "Nic Index: " & NIC.index
WScript.Echo "Current Settings"
WScript.Echo "Primary Wins Server: " & NIC.WINSPrimaryServer
WScript.Echo "Secondary Wins Server: " & NIC.WINSSecondaryServer
intErr = NIC.SetWinsServer(strWINS1, strWINS2)
If intErr <> 0 Then Wscript.Echo "Error changing WINS"
Next
Set objService = Nothing
Set objLocator = Nothing
Running the Hack
To run this hack, you first have to customize it. For example, if your primary WINS server is 10.0.0.15 and your secondary server is 10.0.0.16, change these lines:
strWINS1 = "172.16.1.122"
strWINS2 = "172.16.1.132"
to this:
strWINS1 = "10.0.0.15"
strWINS2 = "10.0.0.16"
Then, create a shortcut to the script and double-click on the shortcut to run the script. This will refresh your computer’s WINS settings.
—Rod Trent
Ensure DHCP Server Availability
Making sure a DHCP server is always available is critical if your network uses dynamic TCP/IP addressing.
Microsoft DHCP server became much more popular in Windows 2000 environments, where it became part of the overall strategy for managing IP addressing, host namespace, and name resolution (due to its close integration with Microsoft’s implementation of DNS). Because of its significance, it is imperative to have a solid plan that allows you to quickly recover from DHCP server failures.
Installing Redundant DHCP Servers
One approach to ensuring DHCP server availability is to install multiple DHCP servers and divide the list of available IP addresses on each subnet into multiple ranges, one per server. In the simplest case of two DHCP servers, configure each with the scopes that have matching start and end address. Next, for each one create mutually exclusive exclusion lists. For example, if your network is using class C nonsubnetted network 192.168.168.0/24, then, on both servers, you should create the scope with the start IP address 192.168.0.1 and the end IP address 192.168.168.254. Your choice of exclusion lists depends on whether you want both servers to share the load equally or whether one of them will be a primary choice for your DHCP clients. For example, to balance the load, you would configure the range 192.168.168.1-192.168.168.127 on the first server and 192.168.168.128-192.16.168.254 on the second.
In order for this configuration to work, you have to ensure that broadcasts from DHCP clients will reach both servers. Typically, this is done either by installing DHCP relay agents on the servers that reside on clients subnet or by configuring routers as BOOTP Relay Agents.
Backing Up the DHCP Database
In addition to providing redundancy, you should also ensure regular backups of the DHCP database. Fortunately, the backup takes place automatically by default. Its behavior is determined by Registry entries that reside in the following key:
HKEY_LOCAL_MACHINE\SYSTEM\CurrentControlSet\Services\DHCPServer\Parameters
The Registry entries contain the following values:
-
BackupDatabasePath Determines the location of the backup (set initially to %SystemRoot%\System32\DHCP\Backup).
-
BackupInterval Determines the frequency of the automatic backup, in minutes (the default is
60).-
RestoreFlag Can be used to force the restore by using the existing backup (by setting
RestoreFlagto1). Typically, the operating system does this automatically if it detects the DHCP database corruption.
Windows also automatically backs up the content of the Registry key
HKLM\SOFTWARE\Microsoft\DHCPServer\Configuration
to the DHCPCFG file, which resides in the
Backup folder.
Recovering the Database
Recovering the database
involves
restoring both the database files and the Registry settings. You
should first stop the DHCP server and then copy the files and load
the Registry hive (using REGEDT32.EXE) to their
target location by overwriting the existing
HKLM\SOFTWARE\Microsoft\DHCPServer\Configuration
Registry key. After you have restored the database file, you should
change the default of 0 conflict-detection
attempts (from the Advanced tab of Server properties in the DHCP MMC
console) to a nonzero value (5 is the maximum).
Another option is to use the NETSH command-line
utility to back up and restore configuration of the DHCP server
database. NETSH’s functionality
is provided through a number of helper DLLs, each dealing with a
particular type of Windows networking component.
NETSH allows you to dump the configuration of the
DHCP server (including all superscopes, scopes, exclusion ranges, and
reservations) into a text file that later can be used to restore.
Note, however, that NETSH does not back up
information about existing leases, which are stored in the DHCP
database.
To create the DHCP configuration dump file, execute the following
command, where IPAddressOrName is the IP
address or name of your DHCP server (note that this command can be
executed remotely):
NETSH DHCP SERVER IPAddressOrName DUMP > C:\DHCPCfg.txtTo restore the DHCP server configuration settings using the same file, run this command:
NETSH EXEC C:\DHCPCfg.txt
—Marcin Policht
Change a Network Adapter’s IP Info
Changing TCP/IP settings via the GUI is tedious at best. It’s accomplished more easily with a little VB scripting magic.
Changing a machine’s TCP/IP settings from the GUI usually involves a number of steps. This becomes tedious if you have to do it often—for example, if the machine is part of a testbed network where you test different deployment scenarios. Using the VBScript in this hack, you can quickly and frequently modify the network adapter information on a computer.
The Code
To use this script, type it into Notepad (with Word Wrap turned off) and save it with a .vbs extension as ChangeIP.vbs:
Option Explicit

Dim NetworkAdapter, AdapterConfiguration 'Objects
Dim IPAddress, SubnetMask, Gateway, DNS 'String Arrays
Dim RetVal 'Integers

For Each NetworkAdapter In
GetObject("winmgmts:").InstancesOf("Win32_NetworkAdapter")
If NetworkAdapter.AdapterType = "Ethernet 802.3" Then
For Each AdapterConfiguration In GetObject("winmgmts:").InstancesOf
("Win32_NetworkAdapterConfiguration")
If UCase(AdapterConfiguration.ServiceName) = UCase(NetworkAdapter.ServiceName) Then
IPAddress = Array("192.168.0.10")
SubnetMask = Array("255.255.255.0")
Gateway = Array("192.168.0.1")
DNS = Array("35.8.2.41")

RetVal = AdapterConfiguration.EnableStatic(IPAddress, SubnetMask)
If Not RetVal = 0 Then
WScript.Echo "Failure assigning IP/Subnetmask."
End If
RetVal = AdapterConfiguration.SetGateways(Gateway)
If Not RetVal = 0 Then
WScript.Echo "Failure assigning Gateway."
End If
RetVal = AdapterConfiguration.SetDnsServerSearchOrder(DNS)
If Not RetVal = 0 Then
WScript.Echo "Failure assinging DNS search order."
End If
End If
Next
End If
Next
Running the Hack
To run this hack, modify the IP information in the following lines, as required by your environment:
IPAddress = Array("192.168.0.10")
SubnetMask = Array("255.255.255.0")
Gateway = Array("192.168.0.1")
DNS = Array("35.8.2.41")
For example, to change the IP address of a machine to 172.16.44.3 with subnet mask 255.255.0.0 and default gateway 172.16.44.1, replace those lines with these:
IPAddress = Array("172.16.44.3")
SubnetMask = Array("255.255.0.0")
Gateway = Array("172.16.44.1")
Also, note this statement:
If NetworkAdapter.AdapterType = "Ethernet 802.3" Then
This is where the script checks the AdapterType,
which in this script is listed as "Ethernet 802.3“. You should modify this line if you have a different
networking environment.
Once these changes have been made to the script, create a shortcut to the script and double-click on the shortcut to run the script.
—Rod Trent
Change from Static IP to DHCP
Reconfiguring a network from static IP addressing to DHCP is a chore no system administrator wants to do, but now there’s help.
Companies grow over time, and their networks have to grow along with them. This means that the static IP addressing that was used when the network was small will no longer practical once the systems number more than a few dozen. Unfortunately, changing machines from static to dynamic addressing usually means visiting each machine, logging on as a local administrator, and clicking through numerous properties sheets to reconfigure TCP/IP settings for network adapters.
However, there’s an easier way. The VBScript in this hack uses Registry writes to change the TCP/IP settings on a machine from static IP to DHCP.
The Code
Type the script into Notepad (with Word Wrap disabled) and save it with a .vbs extension as Static2DHCP.vbs:
'All variables declared
Option Explicit

Dim oWSHShell
Dim sNIC, sMan
Dim iCount

Set oWSHShell = WScript.CreateObject("WScript.Shell")

' Set the DCHP service to autostart
oWSHShell.RegWrite "HKLM\SYSTEM\CurrentControlSet\Services\DHCP\Start", 2

' Get Network card
On Error Resume Next
iCount = 1
Do
sNIC = oWSHShell.RegRead("HKLM\SOFTWARE\Microsoft\Windows NT\ " & _
"CurrentVersion\NetworkCards\" & iCount & "\ServiceName")
sMan = oWSHShell.RegRead("HKLM\SOFTWARE\Microsoft\Windows NT\ " & _
"CurrentVersion\NetworkCards\" & iCount & "\Manufacturer")
' Skip the Async and NDIS services
If sMan <> "Microsoft" And Err.Number = 0 Then
Call SetNIC
End If
iCount = iCount + 1
Loop Until Err.Number <> 0

' Clear the error
Err.Clear

' End of Script


Sub SetNIC
Dim iTest
' Set the NIC service to use DHCP
sNIC = "HKLM\SYSTEM\CurrentControlSet\Services\" & sNIC &"\Parameters\TCPIP\"
iTest = oWSHShell.RegRead(sNIC & "EnableDHCP")
If iTest = 0 Then
oWSHShell.RegWrite sNIC & "EnableDHCP", 1, "REG_DWORD"
oWSHShell.RegWrite sNIC & "IPAddress", "0.0.0.0", "REG_MULTI_SZ"
oWSHShell.RegWrite sNIC & "SubnetMask", "0.0.0.0", "REG_MULTI_SZ"
End If
End Sub
Running the Hack
To run this hack, call the Static2DHCP.vbs
script from a logon script and use Group Policy to assign
this logon script to users’ machines. When a user
next logs on to his machine, the machine’s TCP/IP
settings will be changed from static to dynamic addressing. To lease
an address from the DHCP server, the user’s machine
needs to be rebooted, so you could also send out a message asking all
users to reboot their machines using the method in [Hack #35] or some other approach. If
you like, the logon script could also be combined with the
SU utility from the Windows 2000 Server Resource
Kit to perform a hands-off migration from static to dynamic
addressing.
—Rod Trent
Release and Renew IP Addresses
Using this handy script, you can release and renew a dynamically assigned IP address with a click of the mouse—well, two clicks, actually.
Troubleshooting DHCP lease problems is
frustrating when it involves
users’ desktop machines, because help desk personnel
have to explain to users how to open a command prompt, use the
ipconfig command, and interpret the output. It
would be nice if there were a way to release and renew a
machine’s IP address without having to go through
such techie steps.
Well, it turns out there is such a way; just use this handy VBScript to release and renew IP addresses assigned through DHCP.
The Code
Type the script into Notepad (with Word Wrap disabled) and save it with a .vbs extension as ReleaseRenew.vbs:
On Error Resume Next
Dim AdapterConfig
Dim RetVal
Set AdapterConfig = GetObject("winmgmts:Win32_NetworkAdapterConfiguration")

'WMI release IP Address for all installed network adapters
RetVal = AdapterConfig.ReleaseDHCPLeaseAll

'if retval = 1 then display success. If 0 then failure
If RetVal = 1 Then
MsgBox "IP Address Release was successful."
Else
MsgBox "DHCP Release failed!"
End If

'WMI renew ip for all network adapters
RetVal = AdapterConfig.RenewDHCPLeaseAll

'if retval = 1 then display success. If 0 then failure
If RetVal = 1 Then
MsgBox "IP Address Renew was successful."
Else
MsgBox "DHCP Renew failed!"
End If

Set AdapterConfig = Nothing
Running the Hack
Copy the script to users’ machines and create a shortcut to the script on their desktops. Then, when a user has IP address problems and can’t talk to the network, tell her to double-click on the shortcut to release and renew her address, and see if that fixes things. If not, escalate to the next level of troubleshooting!
—Rod Trent
Use netsh to Change Configuration Settings
You can use the Windows 2000 Netshell (netsh) command to do some amazing things, including switching your machine between two different network configurations.
If you move your machines around a lot, you know the pain of having to reconfigure their network settings so they can continue to talk on the network. This sort of thing is common in a testbed environment where you are building and testing different network-deployment scenarios prior to rolling out the real thing. You might also have to reconfigure network settings for your computers if you have a routed network with several subnets in one building and frequently move machines from one subnet to another—a common scenario in a physics lab or similar academic environment. Otherwise, if you have a laptop that you need to use at work, at home, and at the sites of several clients, being able to save and reload network configurations would be a real timesaver.
There are a few utilities on the market that allow you to quickly
switch between different network configurations. NetSwitcher
(http://www.netswitcher.com) is
one effective tool. But did you know you can do the same thing using
the Windows 2000 Netshell (netsh) command?
Using netsh
Here’s how it works. First, you dump your network settings to a text file through the command line, as follows:
netsh -c interface dump > NetworkSettings.txt
This command stores your current network settings in a text file named NetworkSettings.txt. Now, let’s say you have to reconfigure your machine’s network settings to repurpose the machine or move it to a different part of the network. Then, later, if you need to restore your machine’s original network settings, you can simply type the following command and load back in the previously dumped settings:
netsh -f NetworkSettings.txt
Note that the destination filename is not important, so you can effectively create multiple configuration files. You can create and name one for each network configuration you need. For example, you can use Work.txt for the office, Home.txt for your home configuration, and something like Client.txt to hold the values for a network you are temporarily visiting.
—Rod Trent
Remove Orphaned Network Cards
Moving a network adapter card to a new PCI slot in Windows 2000/XP can sometimes cause unexpected results.
If you swap out a network interface card (NIC) or move it into a different PCI slot but neglect to run the PnP Hardware Removal wizard or use Device Manager to do so, you might end up with an orphaned NIC. When you perform your hardware change with the card, power up the system, and log into Windows 2000/XP, the hardware wizard might display a message telling you that it detected a change. When you go to configure the network card’s TCP/IP settings and try to save them, it will say “Hey, those settings are associated with this network card. Are you sure you want to use them for this one?” Then you’ll realize the error you made. So, how do you remove the configuration settings for that orphaned NIC?
To remove your orphaned NIC, you first need to know the Registry keys associated with it. This is the first such key:
HKLM\Software\Microsoft\WindowsNT\CurrentVersion\NetworkCards
You might see one or more subkeys numerically incremented. Selecting the subkey shows you two values:
-
Description This contains the displayed description of the network card.
-
ServiceName This is the GUID of the network card that is referenced in the
Servicessection ofHKLMwhere the TCP/IP configuration information is maintained, and also under theEnum\PCIsection where the configuration parameters of the network card are maintained.
This is another important key:
HKLM\System\CurrentControlSet\Services\{GUID}Within this key, the Parameters\Tcpip subkey
contains the TCP/IP configuration settings for the network card,
including the DHCP server IP address, the lease information (if
you’re using DHCP), the subnet mask, and so on.
Here is the third key:
HKLM\System\CurrentControlSet\Services\{ServiceName of Network Card}This key represents certain driver parameters related to error
control, path to the driver file, and so on. The
Enum subkey also points to the PnP Instance ID of
the device, if you want a shortcut to where in the
HKLM\System\Enum section of the Registry the
device is maintained.
This is the fourth key:
HKLM\System\CurrentControlSet\Control\Network\{GUID}This key stores all information related to devices that serve as
communications media to transmit/receive data between devices, such
as network cards, infrared ports, and so on. It also contains
configuration information for the key Microsoft Network services,
such as File & Printer Sharing, QoS, and so on. Each
device/adapter has a GUID subkey under this section of the Registry,
where you can find the information related to that device. For the
network cards, find the appropriate GUID
and under this fourth key is the Connection subkey
that maintains information related to PnP and the name of the
connection (as you see when you go to
Start→Settings→Network & Dialup
Connections). The PnpInstanceID value is what we
are interested in, because it points to a section of the Registry
that maintains configuration information for Plug and Play devices.
Finally, this is the last key you need to know about:
HKLM\Enum\PCI\{PnPInstanceID}This key and its subkeys maintain information specific to the card, such as the PCI Bus it is installed in, driver information, and so forth.
Once you find all this information, you can delete those keys related to the card that was once there in the system. Then, you will no longer have to worry about issues of conflicting TCP/IP information between the old card and the new one or orphaned information that may or may not cause conflicts later on.
Warning
Use this hack at your own risk—making any changes in the Registry could have dire consequences. Make a backup first and get comfortable with what you are modifying/removing before proceeding with the recommended steps in this hack.
—Matt Goedtel
Implement Windows 2000 Network Load Balancing
If you need network load balancing software on your network, why not try the NLB component that comes with Windows 2000 Advanced Server?
Installing Windows Network Load Balancing (NLB) is often a terrific idea. Most network load balancing hardware devices today cost over $20,000. Thus, if your web application or content site is not necessarily going to support traffic as heavy as http://www.msn.com, NLB is a great choice.
However, this mighty piece of web-balancing code from Microsoft has a few implementation gotchas that can crop up at any minute. Let’s quickly review the basics, which most you probably already know. You can run NLB only on Windows 2000 Advanced Server, Windows 2000 Datacenter Server, or any edition of Windows Server 2003. NLB also has a role in Microsoft Application Center, but the concept is the same.
The following tips provide successful techniques to use with NLB.
Two NIC Environment
Plan on a two-NIC environment. For instance, identify a private network for Windows network activity, such as domain-level functions, file sharing, or name resolution. Identify the second NIC as the public- or client-facing connection. While NLB supports both unicast and multicast routing, using two NICS lets you avoid the complexities of using multicast mode. However, if you do want to use multicast mode with NLB, then either use a VLAN for all NLB NIC connections (which prevents saturating your Layer 2 network switches) or use a hub (that’s right, a nonswitched hub) for all NLB NICs and allow the hub to make one connection to the Layer 2 switch front-ending your web farm. For security reasons, ensure also that the NLB NIC is stripped of all services, such as File and Print Sharing and the Microsoft network client.
However, if you want to go home from work early, don’t even try to run NLB on one NIC using multicast mode. The underlying technical challenge for Layer 2 switches and NLB is that the NLB-based NICs create a dummy MAC address and provide it to the MAC address table of the switch to which they are connected. NLB has to receive all traffic addresses to the NLB cluster for the software algorithm in use to make a decision on which node to send the traffic to. Some Layer 2 switches get confused at the same MAC address coming through different ports, and this can create the dreaded broadcast storm.
Sample Environment
The scenario shown in Figure 4-3 illustrates Microsoft Network Load Balancing in use in a standard Microsoft n-tier highly available Internet configuration. The three front-end IIS web servers (the dark shaded area in Figure 4-3) all are running Windows 2000 Advanced Server and illustrate the redundancy and load balancing archived with an NLB solution. Each web server has its own internal or primary IP address of the form 10.0.0.x, which is a nonroutable address for security and management purposes, while the clustered or shared IP addresses are of the form 192.168.18.x. The firewall in front of the web farm is configured to perform a network translation of the actual hosted web site’s DNS name and IP address to the listening IP address 192.168.18.158 of NLB. In this case, equal load balancing is used, such that each web server will carry 33% of the load so that NLB will load-balance traffic based on an equal distribution of the incoming traffic. If one server goes down, the load will be distributed to the remaining two servers.
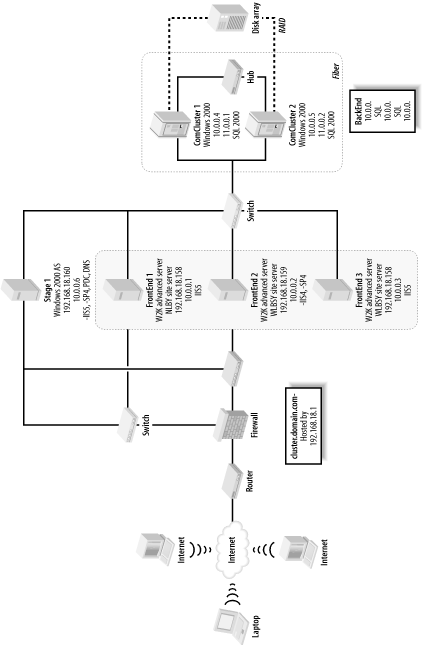
Other Microsoft high-availability technologies can also be seen in this example—for example, the use of a SQL Server cluster (the light-shaded area in Figure 4-3) providing backend database services for this solution. This illustrates the relationship between Microsoft Clustering Services (MSCS) and Microsoft Network Load Balancing (NLB): generally, they secure different tiers of highly available Microsoft solutions. In this case, NLB is used for the web tier, while clustering is used for the database tier.
These tips and the corresponding scenario should save you considerable time when implementing NLB web clusters using Windows 2000/2003. The main thing to remember, though, is to never fall for the one NIC multicast option when using Microsoft Network Load Balancing.
Get Windows Server Hacks now with the O’Reilly learning platform.
O’Reilly members experience books, live events, courses curated by job role, and more from O’Reilly and nearly 200 top publishers.

