This chapter provides a basic introduction to the
User Interface Language (UIL) and the Motif Resource Manager (Mrm). The
chapter describes UIL and Mrm, talks about how to use them, and
discusses the advantages and disadvantages of using them to create a
user interface. It also presents a "Hello, World" application that is
meant to provide you with a basic understanding of how to use both UIL
and Mrm to develop an application with Motif.
In this chapter, we introduce the OSF/Motif User
Interface Language (UIL) and the Motif Resource Manager (Mrm). We begin
by explaining the purpose and capabilities of UIL and Mrm. Then we
describe the structure of both a UIL module and a program that uses Mrm
by walking through the traditional "Hello World" application. The
example gives you an overview of how a user interface is described with
UIL and created with Mrm. For the most part we concentrate on the big
picture and leave the discussion of low-level details until Chapter 24,
Creating a User Interface With UIL.
In all of these chapters on UIL, we assume that you
are familiar with the basics of the X Toolkit (Xt) and the concepts of
Motif programming discussed earlier in this book. At the very least,
you must understand the process of widget creation and the concept of
widget resources. (Xt programming is covered in Volume Four, X
Toolkit Intrinsics Programming Manual, and you can find references
for Xt and Motif in Volume Five, X Toolkit Intrinsics Reference
Manual; and Volume Six B, Motif Reference Manual
respectively.)
UIL is a text-based language used to describe a user
interface that consists of Motif (and other) widgets. Like a C program,
a UIL description is a plain text file that you can edit with a
standard editor. However, unlike a structured programming language,
which supports dynamic constructs like loops and conditional
statements, UIL is strictly a static description language. It is
designed to work with the Motif widget set and data types, although you
can incorporate other Xt-based widgets as well. UIL files look vaguely
C-like, as curly braces are used extensively for grouping.
Mrm is a library of C routines that reads compiled
UIL files to create a user interface at run-time. Mrm consists of
functions for opening and closing compiled UIL files, creating widgets,
retrieving values (such as strings and icons), and declaring callbacks.
Loosely speaking, the UIL description is a "resource" that Mrm
"manages," hence the name.
An application that uses UIL consists of one or more
UIL source modules and the application source code. A UIL module
contains widget declarations that describe the application's user
interface. The application source code, which is usually written in C
or another high-level language, creates the user interface and
implements the application's behavior. Depending on its needs, an
application may also use other types of files.
The process of using UIL and Mrm consists of three
main steps:
Before you decide whether or not to use UIL in an
application, consider the advantages and disadvantages of the language.
The next two sections discuss the arguments for and against using UIL.
UIL provides a relatively simple syntax for specifying a user interface
in terms of a widget hierarchy. Both novice and experienced Motif
programmers can quickly learn the UIL syntax. In contrast, it is more
difficult and time consuming to learn all of the Motif and Xt function
calls needed to create an interface in code. In addition, since a UIL
module is only a static interface description, it is not subject to the
ordering constraints of widget creation that typically affect the
layout of programmatically-created widgets.
The extensive error checking provided by the UIL
compiler can also speed up development and help ensure a more robust
application. The compiler knows the resources and callbacks supported
by each widget, the type of value each resource can be set to, and the
children, if any, that are allowed for each widget. Any mistakes you
make are caught prior to run-time. Much of this error checking is not
available for interfaces created in C code. Although an ANSI C compiler
checks the syntax of each function call, you can set an unsupported
widget resource or create a child under a widget parent that doesn't
support that child (or any children). Some of these errors are caught
at run-time, but in most cases, it is up to you to notice when the
interface doesn't look or act correctly.
UIL is considerably less complex than a dynamic
language like C. As a result, you can compile an interface description
in UIL in a fraction of the time it would take to compile and link a
comparable interface created strictly in code. The time needed for the
design-compile-test cycle is greatly reduced. By using UIL as a
prototyping tool, you can try out several alternative interfaces
without wasting too much time on those you don't use.
Many of the graphical user interface builders (UIBs)
available today can read and write UIL files, which can be an advantage
if you're currently using such a builder or might use one in the
future. The syntax of UIL is simple enough that these products can read
any UIL file, including one written without the builder. However, there
are currently no tools that can read an interface created with
arbitrary C code. Most builders can generate application code, but
unlike UIL files, you cannot make changes to the generated C code and
have a UIB import it.
Internationalizing applications with UIL is often
easier than internationalizing applications written only in C because
nearly all the strings used in an interface are stored in the
application's associated UIL modules. Internationalizing the
application is simply a matter of isolating language-dependent strings
in a single module and writing separate versions of that module for
each language supported by the application. (An example of this
technique is presented in Section #suili18n in Chapter 26.) If you
decide to work with UIL, you must spend some time learning how to use
it. This is mainly a problem for experienced Motif and Xt programers
who already know how to create an interface in C. People entirely new
to Motif can usually get started faster with UIL, as there is less to
learn than with the corresponding C language interface. While UIL
attempts to be C-like, working with the UIL syntax can be difficult
because in some instances it is overly verbose and requires unnecessary
keywords and delimiters. For example, C programmers who begin using UIL
often forget the required semicolon after a closed curly brace. The
syntax is apparently designed to make UIL easy for the compiler to
parse, rather than easy for a person to use.
In exchange for its simplicity, UIL lacks many of
the advantages of a dynamic programming language. As a result, the more
dynamic an interface, the less useful UIL is for describing it. Dynamic
aspects of the interface, such as changing the sensitivity of widgets,
performing drag and drop operations, or creating and destroying parts
of the interface "on the fly" must be dealt with in application code.
In these situations, it may not be possible to completely externalize
an interface description. Therefore, you can expect more dependencies
between the code and the interface description. Changing either one may
require changing the other as well. These limitations can make dynamic
interfaces more complicated to work with when UIL is involved.
Until Motif 1.2, the biggest disadvantage of using
UIL was instability, which was caused by a number of bugs. While most
of these bugs have now been fixed, UIL still has a bad reputation. As
of Motif 1.2, UIL continues to have problems with some of the more
complicated features, but with each new Motif release more of these
outstanding bugs are resolved. To help you along, we point out many of
these bugs, and whenever possible, explain how to work around them. If
you are using an earlier version of UIL, you may encounter additional
bugs that are not mentioned here.
A good way to gain an understanding of the basic UIL
and Mrm programming model is to examine a simple application. The one
we present here is a version of the classic "Hello, World" program,
which illustrates the three steps we listed earlier. We'll concentrate
on the first and third steps: describing the interface in UIL and
creating it at run-time using Mrm. We'll also take a quick look at how
to compile the UIL module, but we'll leave the detailed discussion of
the UIL compiler for Chapter 23, Using the UIL Compiler.
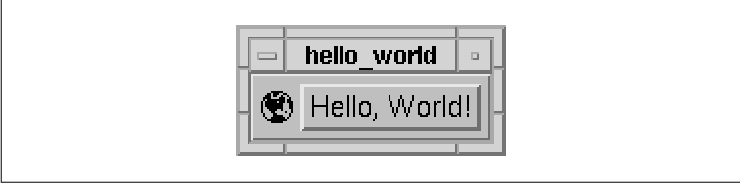
The "Hello, World" application requires only a few of the basic UIL constructs to describe the interface and a few Mrm function calls to create it. The application consists of a single UIL module that contains the interface description and a C program that initializes Xt, creates the interface with Mrm, and implements one callback. The output of the application is shown in the figure. It consists of an earth icon Label and a PushButton that contains the string Hello, World!.
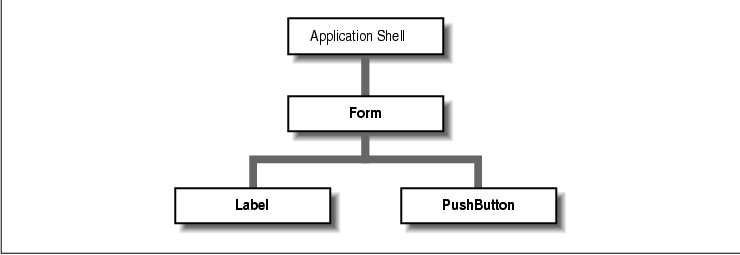
The icon Label and the PushButton are contained in a Form, which manages their positions. As in a typical Motif program, an ApplicationShell at the root of the hierarchy contains the Form. A diagram of the hierarchy appears in the figure.
An interface description in a UIL module consists of
three things:
   /* hello_world.uil -- Illustrate basic UIL programming concepts */

   module hello_world
     objects = { XmPushButton = gadget; }

   value
     form_margin : 3;     ! Value for all-around form margins.

   object hello_main : XmForm {
     controls {
       XmLabel       world;
       XmPushButton  hello;
     };
     arguments {
       XmNshadowThickness = 0;
       XmNresizePolicy = XmRESIZE_GROW;
       XmNmarginHeight = form_margin;
       XmNmarginWidth  = form_margin;
     };
   };

   value
     hello_string : "Hello, World!";
     hello_font   : font ('-adobe-helvetica-medium-r-*-*-*-140-*');
     world_icon   : icon (
       '     ******     ',
       '   ** ***  **   ',
       '  *** **  *  *  ',
       ' ****    ***  * ',
       ' * ********* ** ',
       '* ****** *** ***',
       '* *********   **',
       '* *********   **',
       '*  ********   **',
       '*   ****  *    *',
       '*    **     *  *',
       ' *    **      * ',
       ' *    *****   * ',
       '  *  ******* *  ',
       '   **********   ',
       '     ******     '  );

   procedure
     quit (string);

   object world : XmLabel {
     arguments {
       XmNlabelType        = XmPIXMAP;
       XmNlabelPixmap      = world_icon;

       ! Form constraint resources
       XmNleftAttachment   = XmATTACH_FORM;
       XmNtopAttachment    = XmATTACH_FORM;
       XmNbottomAttachment = XmATTACH_FORM;
     };
   };

   object hello : XmPushButton {
     arguments {
       XmNlabelString      = hello_string;
       XmNfontList         = hello_font;
       XmNmarginHeight     = 2;
       XmNmarginWidth      = 3;

       ! Form constraint resources
       XmNleftAttachment   = XmATTACH_WIDGET;
       XmNleftWidget       = world;
       XmNtopAttachment    = XmATTACH_FORM;
       XmNbottomAttachment = XmATTACH_FORM;
       XmNrightAttachment  = XmATTACH_FORM;
     };
     callbacks {
       XmNactivateCallback = procedure quit ("Goodbye!");
     };
   };

   end module;
The overall structure of a UIL module is fairly simple. A module begins
with a name, which is followed immediately by a number of optional
settings. The bulk of a module typically consists of one or more
sections that describe the user interface. This structure is depicted
in the figure.
Excluding blank lines and comments, every UIL module
must begin with a module statement that names the module.
Essentially, the statement is a syntactic formality required by the UIL
compiler. It consists of the string module followed by a name
of your choosing. The name has no special significance, but it must be
a UIL identifier. (The syntax of UIL identifiers is explained in
Section #suilsyntax.) Our example begins with the following module
statement:
module hello_worldThe name is usually the same as the module's filename without the .uil suffix. When choosing the name for a module, keep in mind that the name cannot be reused to name anything else in the module, such as a variable or a widget. If you should accidentally reuse the module name, the UIL compiler generates an error message.
Likewise, you must explicitly indicate the end of
every UIL module with the following statement:
end module;Like the module statement at the start of the module, this statement is required for the sake of the UIL compiler. In early versions of Motif 1.2 and previous releases, the compiler generates an error if you do not place a newline after the end module statement. Although this problem has been fixed, you should try to include the final newline to keep all versions of the compiler happy.
Options for the module, if present, immediately
follow the module name. The options allow you to tell the UIL compiler
how it should deal with certain information it encounters in the
module. The Motif 1.2 compiler supports the following three options:
names for setting case sensitivity, character_set for
setting the default character set, and object for indicating
whether the widget or gadget variants of certain objects are used by
default. You may see the version option in older UIL modules.
This option is supported in Motif 1.2 for backwards compatibility but
may be dropped from future versions. Unlike the other options, the
version setting does not affect the interpretation of the module.
It is used to associate a version string with the module. Instead of
using the version option, you should place version information
in a comment or in a variable in a value section. The
names option can be set to case_sensitive or
case_insensitive. As these settings imply, the option determines
how the UIL compiler interprets both programmer-defined names (like
widget names) and built-in keywords. If you don't set this option, it
defaults to case_sensitive. For example, with the
case_sensitive setting in effect, the names snowball,
SnowBall, and SNOWBALL are considered different by the
compiler. However, the same names are considered to be equal when
case_insensitive is specified. When names are case_sensitive
, built-in keywords must appear in lowercase, but when names are
case_insensitive they may appear in lowercase, uppercase, or mixed
case. Note, however, that the module, names,
case_sensitive, and case_insensitive keywords must always
appear in lowercase.
We suggest that you stick with the default
case_sensitive setting for a couple of reasons. First, case
insensitivity can easily lead to confusion for C programmers who are
accustomed to case sensitivity. Second, when case_insensitive
is set, all programmer-defined names are converted to and saved in
uppercase, which in turn requires the inconvenient use of uppercase
references in an application program. If you decide to use the
case_sensitive setting, it must be the first option set after the
module name, as this example illustrates:
   module bookmark_dialog
     names = case_insensitive
   ...
Keeping with our suggestion, the hello_world.uil module does not
set the names option, so it uses the default
case_sensitive setting. The character_set option allows
you to set the default character set of compound strings, fonts, and
font sets that appear in a UIL module. (We talk about defining these
values and how the default character set affects them in Section
#suiltext.) This option is normally used when you are developing an
interface for a language that uses a character set different from the
one used by your native language.
Our example application uses the English language.
Since this is the same language as our computing environment, it isn't
necessary to specify the character_set option in our module.
If we were building the application in a non-English environment, but
wanted it to run in an English environment, the module would begin:
   module hello_world
     character_set = iso_latin1
   ...
When the character_set option is not set, the character set
defaults to the codeset portion of the LANG environment variable if it
is set, or to the vendor-specific XmFALLBACK_CHARSET
otherwise. Because the default character set is dependent on the
environment and on vendor settings, you should ensure that the proper
character set is chosen for modules that may be compiled in a different
environment.
On the surface, it would appear that you can always
set the default character set using the character_set option
and not worry about the setting of LANG. Unfortunately, setting this
option has the side-effect of disabling locale-specific parsing of
compound strings, which is important for modules containing strings
with multi-byte characters. Currently, the only way to avoid this
problem is to specify the character set in the LANG environment
variable. In this example, we can safely set the character set in the
module because we haven't used any multi-byte strings. (For more
information about multi-byte string parsing see Sections #suilcomps and
#suiltext.) The objects option allows you to choose whether
the gadget or widget version of the Label, PushButton, ToggleButton,
CascadeButton, and Separator objects is used by default. The widget or
gadget variant is specified independently for each type of object. In
our example, we use the following setting to get the gadget version
PushButton:
   module paint
     objects = { XmPushButton = gadget; }
The default value for each object is widget, so you need to
specify the objects option only if you want to create gadgets
by default instead. Setting this option does not prevent you from
explicitly using the widget or gadget variant of a control in an
object definition. We recommend setting the objects option
when you know that you are going to be using gadgets for all or most of
a certain type of object.
As in C, it is possible to include other files in a
UIL module. However, the syntax of an include directive in UIL is
different. Our example application isn't large enough to make it worth
using include files, but to include a file named procedures.uih
we would use the following line in a module:
include file "procedures.uih";The .uih suffix is not required; it is a convention that we've chosen to distinguish a UIL module from a UIL include file. Nested include files are supported, so an include file may itself contain include directives. Unlike a module, an include file must not begin with the module name statement or end with the end module statement. In addition, an include file may contain only one or more complete UIL sections. You cannot start a section in one UIL file and continue it in an include file.
Since you've probably used C include files before,
you should already have a good idea of how to use UIL include files.
You can avoid repetitive and time-consuming declarations of variables,
procedures, and widgets that are referenced in multiple modules by
placing them in a single include file. Then you simply include the
appropriate file if you need to reference any of its declarations.
Include files can also be used to obtain definitions of commonly used
user interface components. (Chapter 26, Advanced UIL Programming
, discusses using include files in more detail and contains several
examples of their use.)
There are two different types of comments that you
can add to a UIL module. The first type of comment can span one or more
lines; it begins with the character sequence /* and ends with
*/. This style is the same as a C comment. The second type of
comment begins with an exclamation mark and ends at the end of the
line. Both comment styles appear in the source code
You can place comments anywhere in a UIL module
except, of course, within a quoted string. Comments are the only text
that can occur before the module name statement or after the end module
statement. For example, the first line of the hello_world.uil
module is a C-style comment.
UIL, like C, is a free-form language, which means
that the compiler doesn't care about the spacing and positioning of
symbols within a UIL module. The only requirements are that one or more
whitespace characters (space, newline, etc.) must appear between
successive symbols, and lines cannot exceed 132 characters in length.
A symbol is a string of characters, like module
or age. Single character operators and separators, such as
+, =, and :, are not considered symbols. Most UIL
modules contain both predefined and programmer-defined symbols.
Predefined symbols, or keywords, are built into the
UIL compiler. The built-in symbols are categorized as either reserved
or unreserved keywords. The difference between the two is that you can
redefine unreserved keywords, while the meaning of reserved keywords is
fixed. The complete list of UIL reserved keywords appears in and the
complete list of unreserved keywords is shown in We suggest you avoid
redefining unreserved keywords, as this practice can easily lead to
confusion and programming errors. lp9w(1.4i) | lp9w(3.25i) lp9w(1.4i) |
lp9w(3.25i). Type Reserved Keywords
_
General T{ module, end, widget,
gadget T}
Section and list names T{
arguments, callbacks, controls,
identifier,
include, list, object, procedure
,
procedures, value
T}
Storage classes T{
exported, private
T}
Boolean constants T{
on, off, true, false
T}
_
lp9w(1.4i) | lp9w(3.25i)
lp9w(1.4i) | lp9w(3.25i).
Type Unreserved Keywords
_
Resource names T{
XmNaccelerators, XmNactivateCallback, et al.
T}
Character set names T{
iso_latin1, iso_greek, et al.
T}
Enumerated values T{
XmATTACH_FORM, XmSHADOW_ETCHED_IN, et al.
T}
Widget class names T{
XmPushButton, XmSeparator, et al.
T}
Option names and values T{
background, case_insensitive, case_sensitive
,
file, foreground, imported, managed
,
names, objects, right_to_left,
unmanaged,
user_defined
T}
Type names T{
any, argument, asciz_table,
asciz_string_table,
boolean, character_set, color,
color_table,
compound_string, compound_string_table, float
,
font, font_table, fontset, icon
,
integer, integer_table, keysym,
reason,
rgb, single_float, string,
string_table,
translation_table, wide_character,
xbitmapfile
T}
_ Programmer-defined symbols, also called identifiers, are
used to name the variables, procedures, lists, and widgets that you
define in a UIL module. For the most part, you can choose any name that
you like for these items, although the UIL compiler imposes three
rules:
The main body of a UIL module is divided into
several sections that group the different types of definitions and
declarations. Each section begins with the section name and ends at the
start of the next section. The list below gives a brief overview of the
five sections supported by UIL: object, value,
identifier, procedure, and list.
   value
     form_margin : 3;
This section defines form_margin, whose value is the integer
3. You can place more than one definition in a value section.
As you can see in the module, the second value section defines
three more constants: the string hello_string, the font
hello_font, and the pixmap world_icon. Although we've only
defined integer, string, font, and pixmap values, UIL supports a number
of additional data types. The complete set is described in Section
#suiltypes.
You gain a couple of benefits by defining symbolic
constants instead of always using literal values. First, the name of a
value helps document your UIL module by making its purpose more clear.
Second, you can easily change values that are used in more than one
place, which is useful for changing strings or adjusting the layout of
your interface. In UIL, a callback procedure is just a specialized type
of value used to set a widget's callback resource. Like other constant
values, you need to declare callbacks in a UIL module, but these
declarations go in a procedure section instead. We say that
callbacks are declared instead of defined (like values) because the
callback definitions really occur in the application's source code. The
following procedure section appears in our example:
   procedure
     quit (string);
This section declares a callback named quit that takes a
string argument. The actual callback is defined in the
hello_world.c program. The argument in a procedure declaration
specifies the type of the expected argument, similar to a function
prototype in C. In some cases, the UIL compiler can convert a
compatible value to the expected type. This capability is explained in
Section #suilarg. As with value sections, single procedure
sections may contain multiple declarations. Section #suilproc describes
the syntax of a procedure section in further detail. Although
constants and procedures are important, widget definitions usually
constitute the majority of a UIL module. In UIL, you can define almost
the entire widget hierarchy of your application, including top-level
windows, dialog boxes, and menu systems. As we mentioned earlier, only
the ApplicationShell widget of an application must be created with
application code.
A widget definition occurs in an object
section of a UIL module. While an object section can contain
more than one widget definition, we have adopted the style of putting
each widget definition in its own object section. This
practice causes widget definitions to stand out, making UIL modules
easier to read and modify. The widget hierarchy of our example
application starts with the following definition:
   object hello_main : XmForm
   {
     controls {
       XmLabel       world;
       XmPushButton  hello;
     };
     arguments {
       XmNshadowThickness = 0;
       XmNresizePolicy = XmRESIZE_GROW;
       XmNmarginHeight = form_margin;
       XmNmarginWidth  = form_margin;
     };
   };
This object section defines the Form widget hello_main
, which is the parent of the other widgets in the module. A definition
consists of a name, which is just a UIL identifier, and a widget type.
You can use the name of any Motif widget or widget variant as a type
name. For example, both XmRowColumn and XmPulldownMenu
are legal widget types. (For a complete list of UIL widget types see
Volume Six B, Motif Reference Manual.)
Widget definitions can contain three optional
subsections that specify different widget attributes: controls
, which specify a widget's children; arguments, which set the
widget's initial resource settings; and callbacks, which
specify the widget's callback procedures. Each subsection can occur
only once per widget definition.
Our definition of the hello_main Form
contains two of these subsections. The controls subsection
indicates that the Form has two children: a Label and a PushButton.
These two widgets are defined later in the module. The UIL compiler
knows if a widget allows children, and for those that do, which widget
types can be created as their children. If you try to include a child
widget where it isn't allowed or supported, the UIL compiler generates
an error message and the compilation fails, which is one of the
advantages of describing a user interface in UIL rather than with a
programming language like C.
You set widget resources, with the exception of
callbacks, in a widget's argument subsection. This subsection
in the hello_main widget illustrates several typical resource
settings. We used a symbolic constant to set the last two resources so
that it is easy to adjust the Form margins by changing the constant
definition.
Callback resource settings are specified separately
from other resources in the callbacks subsection of a widget
definition. The hello_main widget does not have any callbacks,
but the PushButton does. Here's the relevant part of its definition:
   object hello : XmPushButton
   {
     ! ... arguments ...
     callbacks {
       XmNactivateCallback = procedure quit ("Goodbye!");
     };
   };
This subsection sets the PushButton's activate callback to the
quit() procedure declared earlier in the module. The string
argument "Goodbye!" is passed as client_data to the
procedure when the callback is invoked. You'll see how this value is
used later when we explain registering callback procedures with Mrm.
The widget definitions, along with the value
definitions and procedure declaration, are all there is to the "Hello,
World" module. As a whole, they form the interface description, which
is the first step in developing an application with UIL. Our interface
is quite simple; the interface for a real application would obviously
be much more complex. The UIL modules for a real application are
presented in Chapter 25, Building an Application With UIL.
The UIL module must be compiled to produce a user
interface description (UID) file. This compiled file is read at
run-time by Mrm to obtain the interface description and create the
widgets. The UID file is generated only if the source module is free of
errors. On a UNIX system, we use the following command to compile our
module:
uil -o hello_world.uid hello_world.uilThe -o option specifies the name of the output file. (This option, along with the rest of the compiler options, is explained in Chapter 23, Using the UIL Compiler). The name of the module to compile, in this case hello_world.uil, always follows the options. If the compilation is successful, the compiler generates a UID file. But if the compilation fails, the compiler prints one or more error messages and does not generate a UID file. Warning and informational messages can also be printed in either situation. The hello_world.uil module is free of errors and warnings, so this compilation does not print anything.
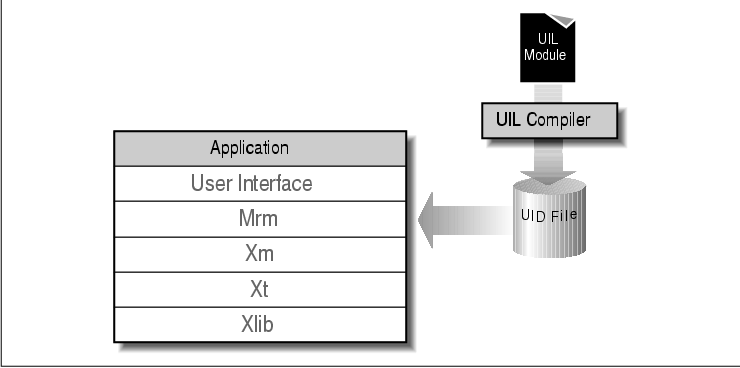
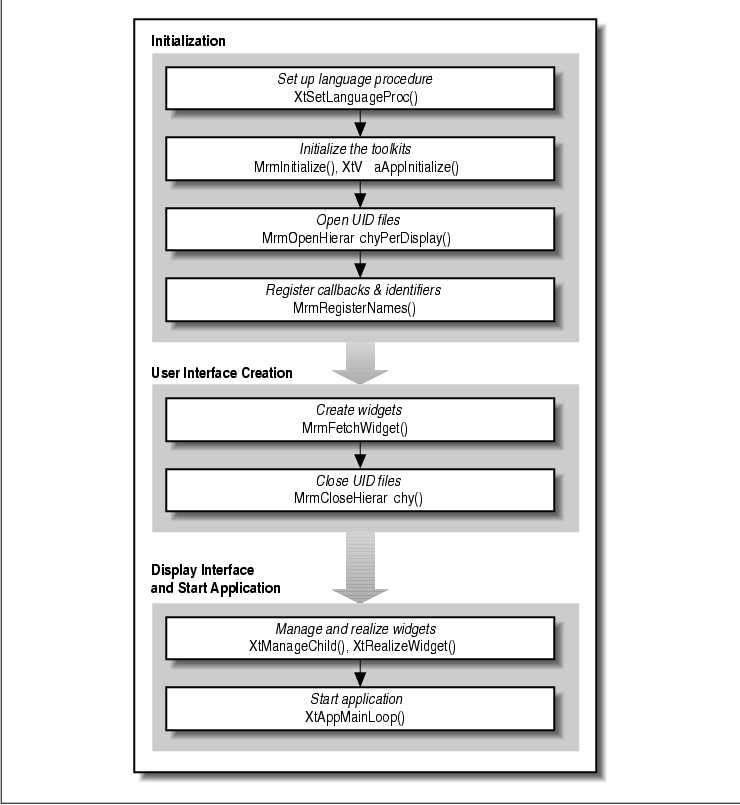
The structure of an application that uses Mrm and UIL is similar in most respects to that of an application that uses only Xt. The main difference is that you create the user interface with calls to Mrm procedures that encapsulate the Xt widget creation routines. Mrm also takes care of setting up any callbacks for your widgets. Other aspects of an Xt application, including toolkit initialization and event processing, are the same for both types of applications. the figure illustrates the structure of an Mrm application.
In the remainder of this section, we take a closer
look at each of these steps by examining the hello_world.c
program shown in the source code In our explanation of this program, we
concentrate only on how it differs from a standard Motif application.
If you are unfamiliar with the details of a particular function call,
see Chapter 2, The Motif Programming Model, in this book or see
Volume Four, X Toolkit Intrinsics Programming Manual, and
Volume Five, X Toolkit Intrinsics Reference Manual.
   /* hello_world.c --
    * Initialize X Toolkit creating ApplicationShell widget, then create
    * the user interface described in the hello_world.uid file.
    */

   #include <Xm/Xm.h>
   #include <Mrm/MrmPublic.h>
   #include <stdio.h>

   /* Global declarations. */
   static void quit();

   /* Global definitions. */
   /* Callback list looks like an action list: */
   static MrmRegisterArg callback_list[] = {
       { "quit", (XtPointer) quit },
   };

   /* error - Print an error message and exit. */
   static void
   error (message)
   char *message;
   {
       fprintf (stderr, "hello_world: %s0, message);
       exit (1);
   }

   /* quit - The quit callback procedure.  Exits the program. */
   static void
   quit (w, client_data, call_data)
   Widget w;
   XtPointer client_data;
   XtPointer call_data;
   {
       puts ((char *) client_data);
       exit (0);
   }

   main (argc, argv)
   int argc;
   char *argv[];
   {
       XtAppContext app_context;
       Widget toplevel, hello_main;
       Cardinal status;
       static String uid_file_list[] = { "hello_world" };
       MrmHierarchy hierarchy;
       MrmType class_code;

       XtSetLanguageProc (NULL, NULL, NULL);

       MrmInitialize();

       toplevel =
           XtVaAppInitialize (&app_context,    /* application context    */
                              "Demos",         /* application class name */
                              NULL, 0,         /* command line options   */
                              &argc, argv,     /* argc and argv          */
                              NULL,            /* fallback resources     */
                              NULL);           /* arg list               */

       status =
           MrmOpenHierarchyPerDisplay (XtDisplay (toplevel),     /* display   */
                                       XtNumber (uid_file_list), /* num files */
                                       uid_file_list,            /* file list */
                                       NULL,                     /* OS data   */
                                       &hierarchy);              /* hierarchy */

       if (status != MrmSUCCESS)
           error ("Unable to open hello_world.uid file.");

       status = MrmRegisterNames (callback_list, XtNumber (callback_list));

       if (status != MrmSUCCESS)
           error ("Unable to register callback functions with Mrm.");

       status = MrmFetchWidget (hierarchy,          /* hierarchy to search */
                                "hello_main",       /* object name         */
                                toplevel,           /* parent              */
                                &hello_main,        /* widget created      */
                                &class_code);       /* widget's class code */

       if (status != MrmSUCCESS)
           error ("Unable to create interface from UID file");

       MrmCloseHierarchy (hierarchy);

       XtManageChild (hello_main);
       XtRealizeWidget (toplevel);

       XtAppMainLoop (app_context);
   }
Compiling this program is similar to any other Motif application--we
just need to add the Mrm library to the link line. Because the program
consists of a single file, we can use the following command to compile
it on most UNIX systems:
cc -o hello_world hello_world.c -lMrm -lXm -lXt -lX11You should note that this program, like any program that uses Mrm, includes the file <Mrm/MrmAppl.h>. This file contains the function prototypes and constant definitions necessary to use Mrm. It also includes the <Xm/Xm.h> file, which contains the necessary declarations and definitions for the Motif library. When you use Mrm, there's no need to include a header file for each type of widget in the interface because the interface is not created directly in C. However, if your application uses any widget convenience functions, you do need to include the appropriate widget header file(s).
The first step for any Motif application is the
initialization of the library components. The addition of Mrm doesn't
change this--the initialization process is just a little more involved.
As you can see in the figure, initialization is the most involved step
in an Mrm application. Before initializing any of the libraries, the
hello_world.c program calls XtSetLanguageProc(). This
function sets the default procedure used to establish the run-time
language environment. In X11R5 you should be sure to include this call
before any other X-related initialization since other libraries depend
on the language setting.
Next, we initialize the Mrm library by calling
MrmInitialize(). This routine sets up internal data structures that
Mrm needs to create widgets and should be called prior to initializing
Xt. You should call this function only once, preferably when your
application is starting up. Unlike the other Mrm functions,
MrmInitialize() does not return a status value.
You may run across some code that initializes Mrm
after Xt. While the order doesn't matter currently, the OSF
documentation specifically states that you should initialize Mrm before
Xt, so you should probably follow their advice. After initializing Mrm,
we're ready to initialize Xt with the following call:
   toplevel =
     XtVaAppInitialize (&app_context,      /* application context    */
                        "Hello",           /* application class name */
                         NULL, 0,          /* command line options   */
                         &argc, argv,      /* argc and argv          */
                         NULL,             /* fallback resources     */
                         NULL);            /* arg list               */
This convenience function initializes the toolkit, creates an
application context, opens the display, and creates the top-level
ApplicationShell. This call is used by most Xt and Motif applications.
Once both Mrm and Xt are initialized, we must open the UID files. We
use the MrmOpenHierarchyPerDisplay() function to do this. The
form of this function is: The Motif 1.2
MrmOpenHierarchyPerDisplay() function supersedes the Motif 1.1
MrmOpenHierarchy() function that you may encounter in older
applications. Motif 1.2 still supports the older version to remain
backwards compatible, but you shouldn't use it.
   Cardinal
   MrmOpenHierarchyPerDisplay(display, num_files, file_list, os_data,
                              hierarchy)
       Display          *display;
       MrmCount          num_files;
       String            file_list[];
       MrmOsOpenParmPtr  os_data[];
       MrmHierarchy      hierarchy;
The first argument is the Display; the second and third are
the number of UID files and an array of filenames to open; the fourth
is an operating system-dependent structure that should always be
NULL (it is used internally by the UIL compiler); and the fifth is
the address of an MrmHierarchy value that is filled in by the
routine. Here's the call used by the "Hello, World" application to open
its UID file:
   String uid_file_list[] = { "hello_world" };
   ...
   status =
     MrmOpenHierarchyPerDisplay (XtDisplay (toplevel),      /* display   */
                                 XtNumber (uid_file_list),  /* num files */
                                 uid_file_list,             /* file list */
                                 NULL,                      /* OS data   */
                                 &hierarchy);               /* hierarchy */
Although we need to open only one UID file in this situation, we use
the XtNumber() macro so that we can easily add filenames to
the uid_file_list array. While the "Hello World" interface is
described in a single UID file, the interface of a more complex
application is often broken into multiple UID files for organizational
and internationalization purposes. (See Section #suilorg for a
discussion on UIL module organization.)
Note that the hello_world filename is missing
the .uid extension. We don't need to add it because Mrm supplies
the extension by default. The filenames you pass to this function may
be either full pathnames that begins with a slash or partial pathnames.
Full pathnames are opened directly, while partial names like
hello_world are located using a search path. Mrm gets the path from
the UIDPATH environment variable if it is set. Otherwise, the following
default path is used: /usr/lib/X11 and /usr/include/X11
are vendor specific and may therefore differ in some implementations.
%U%S
$XAPPLRESDIR/%L/uid/%N/%U%S
$XAPPLRESDIR/%l/uid/%N/%U%S
$XAPPLRESDIR/uid/%N/%U%S
$XAPPLRESDIR/%L/uid/%U%S
$XAPPLRESDIR/%l/uid/%U%S
$XAPPLRESDIR/uid/%U%S
$HOME/uid/%U%S
$HOME/%U%S
/usr/lib/X11/%L/uid/%N/%U%S
/usr/lib/X11/%l/uid/%N/%U%S
/usr/lib/X11/uid/%N/%U%S
/usr/lib/X11/%L/uid/%U%S
/usr/lib/X11/%l/uid/%U%S
/usr/lib/X11/uid/%U%S
/usr/include/X11/uid/%U%S
If XAPPLRESDIR is not set, Mrm uses HOME instead in
the default search path. You might recognize some of the substitution
characters in the default path, as they are also used in Xt resource
file paths like XFILESEARCHPATH. In the path above, %L
represents the LANG environment variable, %N represents the
application class name, %U represents the UID filename in
question, %S represents the filename suffix .uid, and
%l represents the language part LANG. You can find a complete
listing of substitutions in the XtResolvePathname() reference
in Volume Five, X Toolkit Intrinsics Reference Manual.
Mrm may actually search the UID path twice for each
partial pathname that you specify in the file_list. If
Mrm cannot find the file with the suffix (%S) set to .uid
, it tries again with no suffix, which is why we did not need to use the
.uid suffix in our file list.
If MrmOpenHierarchyPerDisplay()
successfully opens the specified files, it returns an MrmHierarchy
value in the hierarchy argument and returns the status
MrmSUCCESS. The hierarchy value, which is analogous
to a FILE pointer, is used as an argument to other Mrm
routines that read information from UID files. If Mrm fails to open a
UID file, it prints an error message with XtAppWarning() and
returns one of the following:
We suggest that you always check the status value
returned by MrmOpenHierarchyPerDisplay() and the other Mrm
functions against MrmSUCCESS, as opposed to checking against
one or more error values. By using this approach, you avoid the
possibility of accidentally forgetting to check for one or more errors.
If necessary, you can check for a specific error status value after
checking against MrmSUCCESS. Recall that we set the
XmNactivateCallback of the PushButton to quit() in the UIL
module. The UIL compiler stores the name quit in the compiled
UID file, but Mrm needs the address of the quit() procedure to
add the callback to the widget at run-time. This raises the question,
"Why not store the procedure's address in the UID file, instead of its
name?" While this sounds like a reasonable solution, it would impose
two undesirable restrictions. First, the UIL module would need to be
recompiled any time we relink the application, and second, the compiled
UID file would be usable only with that specific application on that
particular host architecture.
By calling MrmRegisterNames(), the
application provides Mrm with the information it needs to map the
procedure names stored in the UID files to procedure addresses. Here is
the call and associated data from the source code
   static MrmRegisterArg callback_list[] = {
     { "quit", (XtPointer) quit },
   };
   ...
   MrmRegisterNames (callback_list, XtNumber (callback_list));
MrmRegisterNames() has two arguments: an array of callbacks
and the number of elements in that array. The callback_list is
an array of mappings from procedure names to procedure addresses. The
list is of type MrmRegisterArg, which takes the following
form:
   typedef struct {
     String name;
     XtPointer value;
   } MrmRegisterArg, *MrmRegisterArglist;
When the button is created and Mrm encounters the quit
procedure, Mrm can find the address associated with the name and add
the callback in the usual Xt fashion as long as MrmRegisterNames()
has been called. If the mappings are successfully registered, the
routine returns MrmSUCCESS A value of MrmFAILURE is
returned otherwise. This function only fails if it cannot allocate
memory.
You can also register callbacks using
MrmRegisterNamesInHierarchy(). This function is similar to
MrmRegisterNames() and takes the following form:
   Cardinal
   MrmRegisterNamesInHierarchy(hierarchy, callback_list, num_callbacks)
       MrmHierarchy        hierarchy;
       MrmRegisterArglist  callback_list;
       MrmCount            num_callbacks;
The difference between the two routines is that this function takes an
MrmHierarchy as an additional argument. An application may open
more than one set of UID files; MrmRegisterNamesInHierarchy()
allows you to limit the availability of callbacks to a particular set
of UID files. In contrast, callbacks registered with
MrmRegisterNames() can be referenced from any open hierarchy. As
most applications open only a single hierarchy,
MrmRegisterNamesInHierarchy() is rarely used. Even if you are
working with an application that opens multiple hierarchies, you only
need to use this function if two different callbacks are referenced by
the same name in two separate hierarchies.
After the initialization is complete, it is time to
create the user interface. Unlike a plain Motif application in which we
need to create each widget individually, with Mrm we only need to make
a single call to MrmFetchWidget(). The form of this function
is:
   Cardinal
   MrmFetchWidget(hierarchy, widget_name, parent, widget_return,
                  class_return)
       MrmHierarchy   hierarchy;
       String         widget_name;
       Widget         parent;
       Widget        *widget_return;
       MrmType       *class_return;
Mrm looks in the UID files specified by hierarchy for a
widget named widget_name and creates it as a child of
parent. The parent argument required in this
call is the reason that we had to create the top-level ApplicationShell
in our program before fetching any widgets. Mrm also recursively
creates and manages all of the descendents of the specified widget,
which is why only a single call is needed to create the entire widget
hierarchy.
If all goes well, the routine puts the ID of the
newly created widget in widget_return and returns a
status of MrmSUCCESS. The other return parameter,
class_return, holds the internal UIL class code of the widget.
Note that the class_return value is not a pointer to
the widget's class record. As of Motif 1.2, the class_return
value is useless because the possible return values are not publicly
defined in the Mrm header files. If you need to determine the type of
the returned widget, you can use the appropriate XtIs*() or
XmIs*() macro. For example, to verify that hello_main is
really a Form, you would use XmIsForm (hello_main). If
MrmFetchWidget() fails, it returns the following:
MrmBAD_HIERARCHY, if the hierarchy argument is
invalid; MrmNOT_FOUND, if the widget description cannot be
found in the UID files; or Mrm_FAILURE for any other type of
failure. To avoid crashing your application, you should always check
the return status against MrmSUCCESS after fetching a widget
hierarchy, as illustrated in the source code Although our example
simply exits when an error occurs, a more robust application should
attempt to recover from the problem.
The MrmFetchWidget() routine takes the
place of all the widget calls needed in an application that doesn't use
UIL and Mrm. As it creates widgets, Mrm automatically sets the
resources and callbacks that are specified in the UIL module. Without
Mrm, the interface would require many more function calls to create the
individual widgets and resource values, set the resources, and add the
callbacks. We fetch a Form named hello_main and create it as a
child of the ApplicationShell with the following call:
   status =
     MrmFetchWidget (hierarchy,          /* hierarchy to search */
                     "hello_main",       /* object name         */
                     toplevel,           /* parent              */
                     &hello_main,        /* widget created      */
                     &class_code);       /* widget's class      */
To keep this introduction easy to understand, we've only touched on the
basics of the Mrm widget creation process. If you plan on doing any
serious application development with UIL and Mrm, you need to
understand the details of the entire process, which are discussed in
Section #suilcreate.
Once an application has finished creating its
interface, it should close the UID files by calling
MrmCloseHierarchy(). This routine frees memory and closes the files
that are associated with the Mrm hierarchy. Once you close a hierarchy,
it cannot be used again. The function takes the MrmHierarchy
to close as its only argument. The call from hello_world.c is
simply:
MrmCloseHierarchy (hierarchy);Although the function returns a status code like most of the other Mrm routines, failure to close the hierarchy usually doesn't have a negative impact on an application, so you can generally ignore the return status. Interestingly, MrmCloseHierarchy() unconditionally returns MrmSUCCESS in Motif 1.2. Technically, closing the hierarchy doesn't have much to do with creating the user interface, but it makes sense to free up some resources before entering the event loop. Larger applications that do not create the entire user interface at the start of the program should not close the hierarchy until the program exits. By using this technique, your program can avoid the extra time it would take to reopen the hierarchy when creating additional user interface components on demand.
Now that the interface has been created, the
remaining steps are the same as any other Motif application. When Mrm
is creating the hierarchy with MrmFetchWidget(), it manages
all of the widgets except the widget at the top of the hierarchy. To
make the hierarchy visible, you must manage the widget that you fetch.
The following line from the source code takes care of managing the
widget:
XtManageChild (hello_main);The widget management process in an Mrm application is different from the one used in a C code interface, where you must use the widget creation convenience routines that create and manage the widgets, or explicitly call XtManageChild() on each widget. However, Mrm makes one exception--it does not manage shell widgets in order to prevent menus and dialogs from popping up unexpectedly.
After managing the top-level widget, all that's left
to do is realize the widgets and hand off control to Xt's event
processing loop. The following two calls make these steps happen:
   XtRealizeWidget (toplevel);
   XtAppMainLoop (app_context);
Again, these calls are part of any Xt application, whether or not you use UIL and Mrm to create the interface. The call to XtRealizeWidget() creates windows for the widgets, initiates geometry management, and maps the windows. The call to XtAppMainLoop() causes the application to begin processing events from the X server.
The basic purpose of UIL and Mrm is to provide a way
to describe and create a Motif user interface. UIL is a static user
interface description language that allows you to define widget
hierarchies and specify the resource and callback settings of those
widgets. Mrm is a run-time library that provides the application
interface for creating the widgets described in a UIL module. We
considered some of the advantages and disadvantages of programming with
UIL and Mrm. Understanding these tradeoffs can help you decide when UIL
and Mrm are worth using.
Using UIL and Mrm involves writing the interface
description, compiling the UIL module, and creating the interface with
Mrm. Using a simple "Hello World" application, we looked at the process
of writing an interface description in UIL to help you understand the
structure and content of a UIL module. Likewise, we looked at the C
code of the application to illustrate how a program that uses Mrm
differs from a typical Motif application.