This chapter describes the different types of menus
provided by the Motif toolkit. It also presents a number of ways to
create menus in an application and talks about the issues involved in
designing menu systems.
Menus provide the user with a set of choices in an
application without complicating its normal visual appearance. These
convenient mini-toolboxes are essential for the user who, like an auto
mechanic that is busy working under the car, needs quick and convenient
access to her tools without having to look or move away from her work.
The Motif Style Guide provides for three different types of
menus: PulldownMenus, PopupMenus, and OptionMenus. Despite the
differences between the three types of menus, they all provide simple
and convenient access to application functionality.
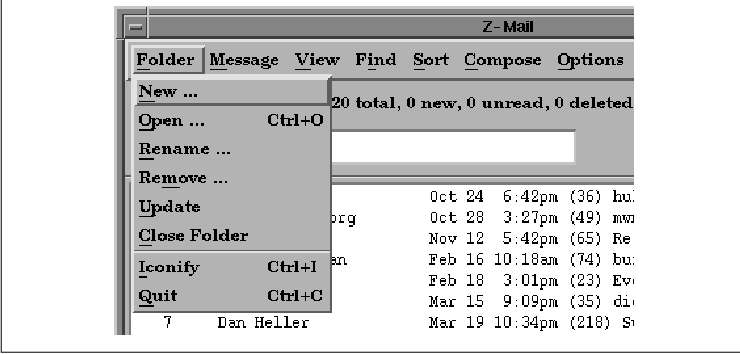
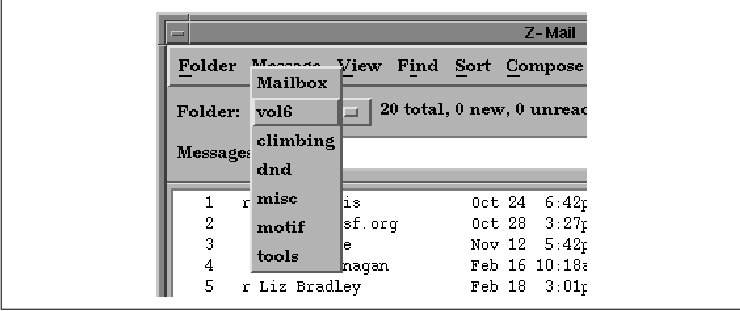
PulldownMenus that are posted from the MenuBar are the most common menus in an application. the figure shows an example of a PulldownMenu. The menu pops up when the user presses the first mouse button on a CascadeButton. The button that posts the menu is typically user-settable, since left-handed users may want to reverse the default button bindings. As described in Chapter 4, The Main Window, CascadeButtons may be displayed as titles in a MenuBar or as menu items in a PulldownMenu. When the CascadeButton is a child of a MenuBar, the menu drops down below the button when the user clicks on it. When the CascadeButton is an item in an existing menu, the new menu pops up to the right of the item; it is sometimes referred to as a cascading menu or a pullright menu.
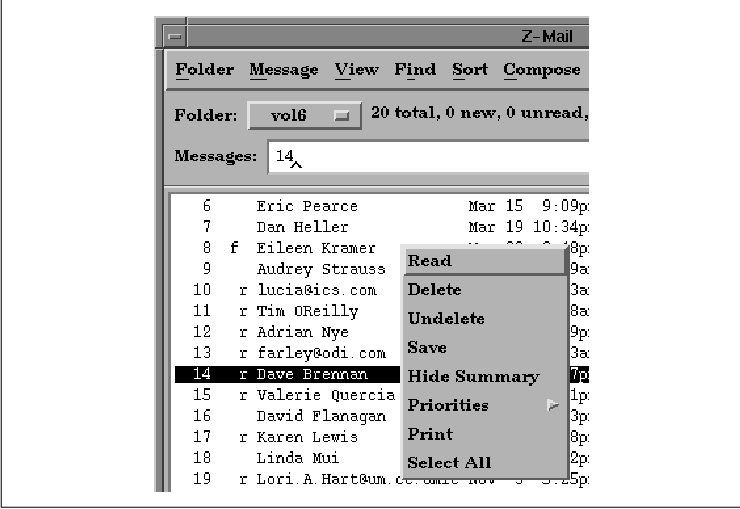
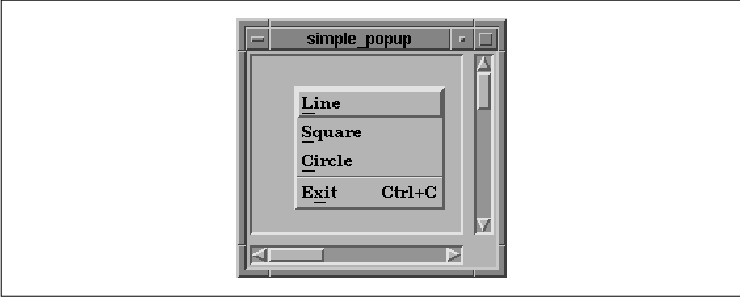
Under certain conditions, it may be inconvenient for the user to stop what she is doing, move the mouse to the MenuBar to pull down a menu, and then move the mouse back to where she was working. Having to move the mouse away, even to another part of the same window, can reduce productivity. A PopupMenu is one solution to this problem as it can provide immediate access to application functionality. PopupMenus are posted using the third mouse button and can be displayed anywhere in an application. Rather than having to move the mouse, the user can simply press the third mouse button to cause a PopupMenu to appear on the spot. This type of menu does not need to be associated with a visible user-interface element. In fact, PopupMenus are usually popped up from a work area or another region that is not affiliated with a user-interface component like a PushButton or CascadeButton. The only drawback to this design is that there is no indication to the novice user that the menu exists. the figure shows a PopupMenu.
The OptionMenu combines the strengths of a PulldownMenu and a PopupMenu. Like a PulldownMenu, it is posted from a CascadeButton, but like a PopupMenu, it can be placed where it is needed. The CascadeButton is used to display the default choice for the menu. When the user presses the button, the alternate choices are displayed in a menu, as shown in the figure. Like a PulldownMenu, an OptionMenu is invoked using the first mouse button, but it is displayed on top of its associated CascadeButton rather than below it.
The use of the third mouse button to activate
PopupMenus is in sharp contrast to PulldownMenus and OptionMenus, which
are always invoked by the first mouse button. It may seem confusing to
the user that some menus are invoked by the first button while others
are invoked by the third. However, there is some consistency in the
fact that PulldownMenus and OptionMenus are always attached to
CascadeButtons, and buttons are always activated by the first mouse
button. By specifying that PopupMenus use the third mouse button, the
first mouse button is free to be used for other activities in an
application work area, which is important since PopupMenus can be
popped up anywhere in an application.
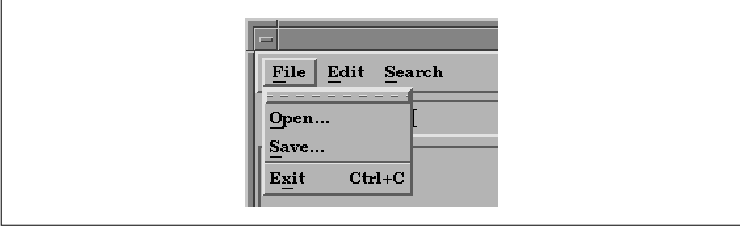
When the user posts a menu, it is only displayed until the user makes a selection, and then it is removed. In Motif 1.2, a menu can have an additional feature that allows it to be torn off, so that it remains posted in its own window. The tear-off functionality is activated by a special tear-off button in the menu. The button displays a dashed line to indicate that you can tear off the menu, like you would tear a coupon out of a newspaper. When the user presses the tear-off button, the menu is placed in a separate window, and the user can make as many selections as she would like. the figure shows a PulldownMenu that provides the tear-off capability.
To make menus even more convenient to use, menu
items can have mnemonics and accelerators associated with
them. These devices are keyboard equivalents that allow the user to
activate menu items using the keyboard rather than the mouse. For
example, in the figure, the underlined letter in each menu item is its
mnemonic. While the menu is posted, the user can type the specified
character to activate that menu item. Accelerators are keystroke
combinations that invoke a menu item even when the menu is not
displayed. Accelerators typically use the CTRL or ALT key to
distinguish them from ordinary keystrokes that are sent to the
application. For example, again in the figure, the Ctrl+C
accelerator allows the user to exit the application without accessing
the menu.
Before we plunge into the details of menu creation,
a word of warning to experienced X Toolkit programmers is in order.
Motif does not use Xt's normal methods for creating and managing menus.
In fact, you cannot use the standard Xt methods for menu
creation or management without virtually reimplementing the Motif menu
design. If you need to port an Athena or OPEN LOOK-based application to
Motif, you will probably have to reimplement your menu design. In Xt,
you would typically create an OverrideShell that contains a generic
manager widget, followed by a set of PushButtons. To display the menu,
you would pop up the shell using XtPopup(). The Motif toolkit
abstracts the menu creation and management process using routines that
make the shell opaque to the programmer.
In Chapter 4, The Main Window, we used the
simple menu creation routines to build the MenuBar and its associated
PulldownMenus. These routines are designed to be plug-and-play
convenience routines; their only requirements are compound strings for
the menu labels and a single callback function that is invoked when the
user activates any of the menu items.
XmVaCreateSimpleMenuBar() creates a
MenuBar, while XmVaCreateSimplePulldownMenu() generates a
PulldownMenu and its associated items. These functions take a
variable-length argument list of parameters that specify either the
CascadeButtons for the MenuBar or the menu items for the PulldownMenu.
You can also pass RowColumn-specific resource/value pairs to configure
the RowColumn widget that manages the items in the menu. The functions
are front ends for more primitive routines that actually create the
underlying widgets, so they are convenient for many simple menu
creation needs. You should review Chapter 4, The Main Window,
for more information on how to use these functions.
Motif also provides simple creation routines for
creating PopupMenus and OptionMenus. Both
XmVaCreateSimplePopupMenu() and XmVaCreateSimpleOptionMenu()
are very similar to the routines for creating PulldownMenus, so much of
the information in Chapter 4 also applies to these functions.
The only difference between
XmVaCreateSimplePulldownMenu() and XmVaCreateSimplePopupMenu()
is that the latter routine does not have a button
parameter for specifying the CascadeButton used to display the menu.
Since PopupMenus are not associated with CascadeButtons, this parameter
isn't necessary. the source code demonstrates the creation of a simple
PopupMenu. XtSetLanguageProc() is only available in X11R5;
there is no corresponding function in X11R4.
XmStringCreateLocalized() is only available in Motif 1.2;
XmStringCreateSimple() is the corresponding function in Motif 1.1.
   /* simple_popup.c -- demonstrate how to use a simple popup menu.
    * Create a main window that contains a DrawingArea widget, which
    * displays a popup menu when the user presses the third mouse button.
    */
   #include <Xm/RowColumn.h>
   #include <Xm/MainW.h>
   #include <Xm/DrawingA.h>

   main(argc, argv)
   int argc;
   char *argv[];
   {
       XmString line, square, circle, exit, exit_acc;
       Widget toplevel, main_w, drawing_a, popup_menu;
       void popup_cb(), input();
       XtAppContext app;

       XtSetLanguageProc (NULL, NULL, NULL);

       toplevel = XtVaAppInitialize (&app, "Demos", NULL, 0,
           &argc, argv, NULL, NULL);

       /* Create a MainWindow widget that contains a DrawingArea in
        * its work window.
        */
       main_w = XtVaCreateManagedWidget ("main_w",
           xmMainWindowWidgetClass, toplevel,
           XmNscrollingPolicy,      XmAUTOMATIC,
           NULL);
       /* Create a DrawingArea -- no actual drawing will be done. */
       drawing_a = XtVaCreateManagedWidget ("drawing_a",
           xmDrawingAreaWidgetClass, main_w,
           XmNwidth,  500,
           XmNheight, 500,
           NULL);

       line = XmStringCreateLocalized ("Line");
       square = XmStringCreateLocalized ("Square");
       circle = XmStringCreateLocalized ("Circle");
       exit = XmStringCreateLocalized ("Exit");
       exit_acc = XmStringCreateLocalized ("Ctrl+C");
       popup_menu = XmVaCreateSimplePopupMenu (drawing_a, "popup", popup_cb,
           XmVaPUSHBUTTON, line, 'L', NULL, NULL,
           XmVaPUSHBUTTON, square, 'S', NULL, NULL,
           XmVaPUSHBUTTON, circle, 'C', NULL, NULL,
           XmVaSEPARATOR,
           XmVaPUSHBUTTON, exit, 'x', "Ctrl<Key>c", exit_acc,
           NULL);
       XmStringFree (line);
       XmStringFree (square);
       XmStringFree (circle);
       XmStringFree (exit);
       XmStringFree (exit_acc);

       /* after popup menu is created, add callback for all input events */
       XtAddCallback (drawing_a, XmNinputCallback, input, popup_menu);

       XtRealizeWidget (toplevel);
       XtAppMainLoop (app);
   }

   /* input() -- called in responses to events in the DrawingArea;
    * button-3 pops up menu.
    */
   void
   input(widget, client_data, call_data)
   Widget widget;
   XtPointer client_data;
   XtPointer call_data;
   {
       Widget popup = (Widget) client_data;
       XmDrawingAreaCallbackStruct *cbs =
           (XmDrawingAreaCallbackStruct *) call_data;

       if (cbs->event->xany.type != ButtonPress ||
               cbs->event->xbutton.button != 3)
           return;

       /* Position the menu where the event occurred */
       XmMenuPosition (popup, (XButtonPressedEvent *) (cbs->event));
       XtManageChild (popup);
   }

   /* popup_cb() -- invoked when the user selects an item in the popup menu */
   void
   popup_cb(menu_item, client_data, call_data)
   Widget menu_item;
   XtPointer client_data;
   XtPointer call_data;
   {
       int item_no = (int) client_data;

       if (item_no == 3) /* Exit was selected -- exit */
           exit (0);
       puts (XtName (menu_item)); /* Otherwise, just print the selection */
   }
This program creates a standard MainWindow widget that contains a
DrawingArea widget. The program does not do any drawing; it is just a
skeleton that demonstrates how to attach a PopupMenu. The PopupMenu is
created using XmVaCreateSimplePopupMenu() with the DrawingArea
widget as its parent. The menu is popped up when the user presses the
third mouse button in the DrawingArea, as shown in the figure.
The Motif toolkit does not handle posting a
PopupMenu automatically, as it does with PulldownMenus and OptionMenus,
so we must watch for the appropriate events ourselves. We use the
XmNinputCallback resource of the DrawingArea widget to monitor
events, as the routine is called whenever a keyboard or mouse action
happens in the widget. In a real application, we would use this routine
to handle drawing as well. However, in this case, the input()
routine only looks for ButtonPress events for the third mouse
button. The menu is passed as the client data to input().
If input() sees an appropriate event, it
uses the XmMenuPosition() routine to position the menu at the
coordinates specified in the event data structure. The menu is
then popped up using XtManageChild(). As far as Xt is
concerned, this method for popping up a menu is technically incorrect.
It is supported by the Motif toolkit to simplify the PopupMenu
interface. For more information, see the discussion on popping up
dialog boxes in Chapter 5, Introduction to Dialogs. The menu
contains four items, the last of which has the accelerator
Ctrl<Key>C. Any time the user presses CTRL-C in the application,
the callback routine associated with the menu is called as if the menu
had been popped up and the Exit item had been selected. The
popup_cb() routine either prints the name of the menu item or
exits, depending on which item the user selected. Note that the name of
the menu item does not correspond to its label. As described in
Chapter 4, The Main Window, menu items are automatically given
names of the form button_n, where n
is assigned in order of menu item creation, starting at 0 (zero).
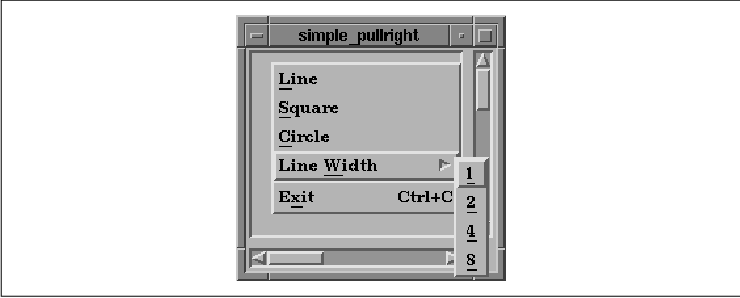
A cascading menu, or a pullright menu, is
implemented as a PulldownMenu displayed from a menu item in another
PulldownMenu or PopupMenu that is already displayed. The menu item that
posts the cascading menu must be a CascadeButton. the source code
demonstrates how to add a cascading menu using the simple menu
routines. The program adds a Line Width menu item to the
PopupMenu from the source code This menu item is a CascadeButton that
posts a PulldownMenu created with XmVaCreateSimplePulldownMenu()
. XtSetLanguageProc() is only available in X11R5; there is no
corresponding function in X11R4. XmStringCreateLocalized() is
only available in Motif 1.2; XmStringCreateSimple() is the
corresponding function in Motif 1.1.
   /* simple_pullright.c -- demonstrate how to make a pullright menu
    * using simple menu creation routines.  Create a main window that
    * contains a DrawingArea widget that displays a popup menu when the
    * user presses the third mouse button.
    */
   #include <Xm/RowColumn.h>
   #include <Xm/MainW.h>
   #include <Xm/DrawingA.h>

   main(argc, argv)
   int argc;
   char *argv[];
   {
       XmString line, square, circle, weight, exit, exit_acc;
       XmString w_one, w_two, w_four, w_eight;
       Widget toplevel, main_w, drawing_a, cascade, popup_menu, pullright;
       void popup_cb(), set_width(), input();
       XtAppContext app;

       XtSetLanguageProc (NULL, NULL, NULL);

       toplevel = XtVaAppInitialize (&app, "Demos", NULL, 0,
           &argc, argv, NULL, NULL);

       /* Create a MainWindow widget that contains a DrawingArea in
        * its work window.
        */
       main_w = XtVaCreateManagedWidget ("main_w",
           xmMainWindowWidgetClass, toplevel,
           XmNscrollingPolicy,      XmAUTOMATIC,
           NULL);
       /* Create a DrawingArea -- no actual drawing will be done. */
       drawing_a = XtVaCreateManagedWidget ("drawing_a",
           xmDrawingAreaWidgetClass, main_w,
           XmNwidth,  500,
           XmNheight, 500,
           NULL);

       line = XmStringCreateLocalized ("Line");
       square = XmStringCreateLocalized ("Square");
       circle = XmStringCreateLocalized ("Circle");
       weight = XmStringCreateLocalized ("Line Width");
       exit = XmStringCreateLocalized ("Exit");
       exit_acc = XmStringCreateLocalized ("Ctrl+C");
       popup_menu = XmVaCreateSimplePopupMenu (drawing_a, "popup", popup_cb,
           XmVaPUSHBUTTON, line, 'L', NULL, NULL,
           XmVaPUSHBUTTON, square, 'S', NULL, NULL,
           XmVaPUSHBUTTON, circle, 'C', NULL, NULL,
           XmVaCASCADEBUTTON, weight, 'W',
           XmVaSEPARATOR,
           XmVaPUSHBUTTON, exit, 'x', "Ctrl<Key>c", exit_acc,
           NULL);
       XmStringFree (line);
       XmStringFree (square);
       XmStringFree (circle);
       XmStringFree (weight);
       XmStringFree (exit);

       /* create pullright for "Line Width" button -- this is the 4th item! */
       w_one = XmStringCreateLocalized (" 1 ");
       w_two = XmStringCreateLocalized (" 2 ");
       w_four = XmStringCreateLocalized (" 4 ");
       w_eight = XmStringCreateLocalized (" 8 ");
       pullright = XmVaCreateSimplePulldownMenu (popup_menu,
           "pullright", 3 /* menu item offset */, set_width,
           XmVaPUSHBUTTON, w_one, '1', NULL, NULL,
           XmVaPUSHBUTTON, w_two, '2', NULL, NULL,
           XmVaPUSHBUTTON, w_four, '4', NULL, NULL,
           XmVaPUSHBUTTON, w_eight, '8', NULL, NULL,
           NULL);
       XmStringFree (w_one);
       XmStringFree (w_two);
       XmStringFree (w_four);
       XmStringFree (w_eight);

       /* after popup menu is created, add callback for all input events */
       XtAddCallback (drawing_a, XmNinputCallback, input, popup_menu);

       XtRealizeWidget (toplevel);
       XtAppMainLoop (app);
   }

   /* input() -- called in responses to events in the DrawingArea;
    * button-3 pops up menu.
    */
   void
   input(widget, client_data, call_data)
   Widget widget;
   XtPointer client_data;
   XtPointer call_data;
   {
       Widget popup = (Widget) client_data;
       XmDrawingAreaCallbackStruct *cbs =
           (XmDrawingAreaCallbackStruct *) call_data;

       if (cbs->event->xany.type != ButtonPress ||
               cbs->event->xbutton.button != 3)
           return;

       /* Position the menu where the event occurred */
       XmMenuPosition (popup, (XButtonPressedEvent *) (cbs->event));
       XtManageChild (popup);
   }

   /* popup_cb() -- invoked when the user selects an item in the popup menu */
   void
   popup_cb(menu_item, client_data, call_data)
   Widget menu_item;
   XtPointer client_data;
   XtPointer call_data;
   {
       int item_no = (int) client_data;

       if (item_no == 4) /* Exit was selected -- exit */
           exit (0);
       puts (XtName (menu_item)); /* Otherwise, just print the selection */
   }

   /* set_width() -- called when items in the Line Width pullright menu
    * are selected.
    */
   void
   set_width(menu_item, client_data, call_data)
   Widget menu_item;
   XtPointer client_data;
   XtPointer call_data;
   {
       int item_no = (int) client_data;

       printf ("Line weight = %d0, 1 << item_no);
   }
In the call to XmVaCreateSimplePulldownMenu(), the PopupMenu
is specified as the parent of the cascading menu. The button
parameter is set to 3 to indicate that the fourth item in the
PopupMenu posts the cascading menu. the figure shows the output of the
program.
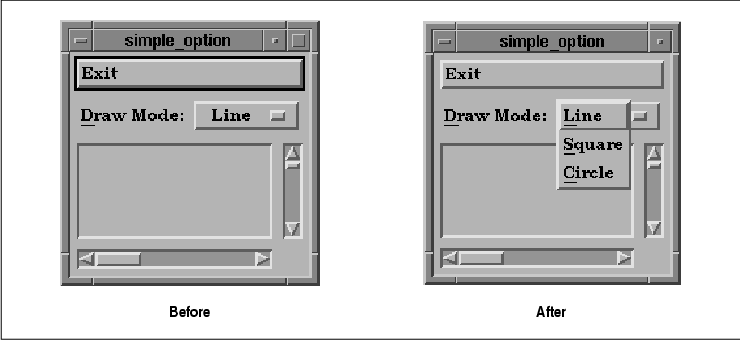
An OptionMenu is similar to a PulldownMenu in that
they are both associated with CascadeButtons. However, there are also
several major differences between the two types of menus. In an
OptionMenu, the CascadeButton is not part of a MenuBar. Instead, it is
created as the child of a RowColumn widget that also contains a Label.
Another difference is that the menu pops up on top
of the CascadeButton, instead of dropping down from it. The label on
the CascadeButton is one of the elements in the menu; the CascadeButton
displays the current menu selection. The Motif toolkit handles the
management of the PulldownMenu for the OptionMenu, so its handle is not
available to you, nor does it need to be. Because of the design of the
OptionMenu, it cannot have cascading menus.
the source code demonstrates the use of
XmVaCreateSimpleOptionMenu(). The program uses a DrawingArea again,
but now the user selects the drawing style from an OptionMenu that is
displayed above the DrawingArea.
   /* simple_option.c -- demonstrate how to use a simple option menu.
    * Display a drawing area.  The user selects the drawing style from
    * the option menu.
    */
   #include <Xm/RowColumn.h>
   #include <Xm/MainW.h>
   #include <Xm/ScrolledW.h>
   #include <Xm/DrawingA.h>
   #include <Xm/PushB.h>

   main(argc, argv)
   int argc;
   char *argv[];
   {
       XmString draw_shape, line, square, circle;
       Widget toplevel, main_w, rc, sw, drawing_a, option_menu, pb;
       void option_cb(), exit();
       XtAppContext app;

       XtSetLanguageProc (NULL, NULL, NULL);

       toplevel = XtVaAppInitialize (&app, "Demos", NULL, 0,
           &argc, argv, NULL, NULL);

       /* Create a MainWindow widget that contains a RowColumn
        * widget as its work window.
        */
       main_w = XtVaCreateManagedWidget ("main_w",
           xmMainWindowWidgetClass, toplevel, NULL);
       rc = XtVaCreateWidget ("rowcol", xmRowColumnWidgetClass, main_w, NULL);

       /* Inside RowColumn is the Exit pushbutton, the option menu and the
        * scrolled window that contains the drawing area.
        */
       pb = XtVaCreateManagedWidget ("Exit", xmPushButtonWidgetClass, rc, NULL);
       XtAddCallback (pb, XmNactivateCallback, exit, NULL);

       draw_shape = XmStringCreateLocalized ("Draw Mode:");
       line = XmStringCreateLocalized ("Line");
       square = XmStringCreateLocalized ("Square");
       circle = XmStringCreateLocalized ("Circle");
       option_menu = XmVaCreateSimpleOptionMenu (rc, "option_menu",
           draw_shape, 'D', 0 /*initial menu selection*/, option_cb,
           XmVaPUSHBUTTON, line, 'L', NULL, NULL,
           XmVaPUSHBUTTON, square, 'S', NULL, NULL,
           XmVaPUSHBUTTON, circle, 'C', NULL, NULL,
           NULL);
       XmStringFree (line);
       XmStringFree (square);
       XmStringFree (circle);
       XmStringFree (draw_shape);

       XtManageChild (option_menu);

       /* Create a DrawingArea inside a ScrolledWindow */
       sw = XtVaCreateManagedWidget ("sw",
           xmScrolledWindowWidgetClass, rc,
           XmNscrollingPolicy, XmAUTOMATIC,
           NULL);
       drawing_a = XtVaCreateManagedWidget ("drawing_area",
           xmDrawingAreaWidgetClass, sw,
           XmNwidth,  500,
           XmNheight, 500,
           NULL);

       XtManageChild (rc);

       XtRealizeWidget (toplevel);
       XtAppMainLoop (app);
   }

   /* option_cb() -- invoked when the user selects an item in the
    * option menu
    */
   void
   option_cb(menu_item, client_data, call_data)
   Widget menu_item;
   XtPointer client_data;
   XtPointer call_data;
   {
       int item_no = (int) client_data;

       puts (XtName (menu_item));
   }
The layout of the application is different from that in the previous
examples because we use a separate ScrolledWindow for the DrawingArea.
The RowColumn widget that contains the Exit button, the
OptionMenu, and the ScrolledWindow is the work area for the MainWindow.
the figure shows the output of the program both before and after the
OptionMenu is displayed. Notice how the label of the CascadeButton
changes as you select alternate values from the menu.
The advantages of the simple menu creation routines
are clear. It is easy to create menus with them, the code is extremely
readable, and the job gets done without much room for error. Once the
code is written, it is easy to modify the callback function, labels,
mnemonics, and accelerators used by a menu.
There are also some disadvantages to using the
simple menu creation functions. One problem is that they require a
great deal of bulk to create a single menu. If an application needs to
create a large number of menus, it has to use a lot of redundant code
because the simple creation routines make it difficult to build a
looping construct or a function to automate the process. Since the
creation routines name the widgets using non-unique names, it is
difficult to specify labels, mnemonics, and accelerators in a resource
file. If these values are set using a creation routine, this point is
irrelevant because the routines hard-code the values. The simple
creation routines also make it impossible to specify different callback
functions for menu items.
To get around the shortcomings of the simple
creation routines, we are going to build a new system that is just as
simple to use, but more dynamic and easy to modify. Before we can build
our new system, we need to examine the advanced Motif menu creation
routines and discuss the overall design of a menu system. We are going
to start with the MenuBar and PulldownMenus because almost every
application uses these components. Furthermore, everything there is to
know about menus can be adapted from the design of a menu system that
uses these menus.
Let's begin by examining the steps that you need to
take to create a MenuBar and its associated PulldownMenus:
   /* file_menu.c -- demonstrate how to create a menu bar and pulldown
    * menu using the Motif creation routines.
    */
   #include <Xm/RowColumn.h>
   #include <Xm/MainW.h>
   #include <Xm/CascadeB.h>
   #include <Xm/SeparatoG.h>
   #include <Xm/PushBG.h>

   main(argc, argv)
   int argc;
   char *argv[];
   {
       Widget toplevel, MainWindow, MenuBar, FilePullDown;
       XmString    label_str;
       XtAppContext app;

       XtSetLanguageProc (NULL, NULL, NULL);

       toplevel = XtVaAppInitialize (&app, "Demos", NULL, 0,
           &argc, argv, NULL, NULL);

       MainWindow = XtVaCreateManagedWidget ("main_w",
           xmMainWindowWidgetClass, toplevel,
           XmNscrollingPolicy,  XmAUTOMATIC,
           NULL);

       MenuBar = XmCreateMenuBar (MainWindow, "MenuBar", NULL, 0);

       /* create the "File" Menu */
       FilePullDown = XmCreatePulldownMenu (MenuBar, "FilePullDown", NULL, 0);

       /* create the "File" button (attach Menu via XmNsubMenuId) */
       label_str = XmStringCreateLocalized ("File");
       XtVaCreateManagedWidget ("File",
           xmCascadeButtonWidgetClass, MenuBar,
           XmNlabelString,  label_str,
           XmNmnemonic,    'F',
           XmNsubMenuId,    FilePullDown,
           NULL);
       XmStringFree (label_str);

       /* Now add the menu items */
       XtVaCreateManagedWidget ("Open",
           xmPushButtonGadgetClass, FilePullDown, NULL);

       XtVaCreateManagedWidget ("Save",
           xmPushButtonGadgetClass, FilePullDown, NULL);

       XtVaCreateManagedWidget ("separator",
           xmSeparatorGadgetClass, FilePullDown, NULL);

       XtVaCreateManagedWidget ("Exit",
           xmPushButtonGadgetClass, FilePullDown, NULL);

       XtManageChild (MenuBar);

       XtRealizeWidget (toplevel);
       XtAppMainLoop (app);
   }
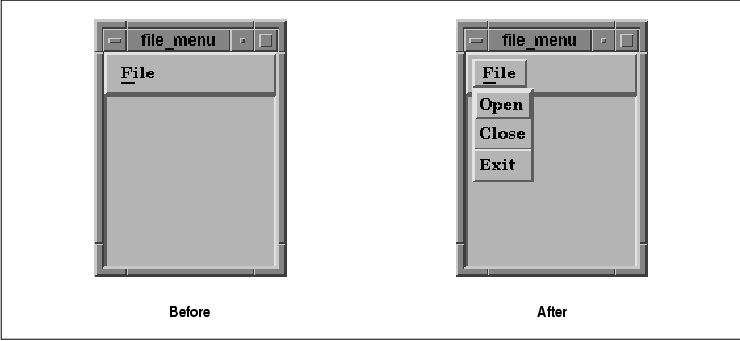
The code follows the steps that we just outlined. The MenuBar is
created as a child of the MainWindow, and the PulldownMenu is created
as a child of the MenuBar. The CascadeButton acts as the File
title item in the MenuBar, so it is also created as the child of the
MenuBar. Both the menu title and the PulldownMenu are children of the
MenuBar. The CascadeButton sets its XmNsubMenuId resource to
the PulldownMenu so that when the button is selected, it knows which
PulldownMenu to display. When you create a PulldownMenu using the
simple menu creation routine, it sets this resource behind the scenes.
We also set the label of the CascadeButton using the XmNlabelString resource. This value is a compound string, just as in the simple creation function. If we had not set the label directly, the name of the widget itself would appear as the label, and we could override it with a specification in a resource file. Since we are not using the simple creation routine, we can choose whether or not we hard-code the label for the CascadeButton. After we create the items in the menu, we manage the MenuBar using XtManageChild(). The output of the source code both before and after the PulldownMenu is posted, is shown in the figure.
The titles in a MenuBar are actually the labels of
the CascadeButtons. The labels can be specified using the
XmNlabelString resource, either in the application code or in a
resource file. Every CascadeButton must have a submenu associated with
it via the XmNsubMenuId resource. When the user selects the
CascadeButton, the associated PulldownMenu is displayed. You should
never attach a callback function directly to a CascadeButton in the
MenuBar as it would confuse the user. Callback functions should only be
attached to menu items in PulldownMenus that are posted from the
MenuBar.
The PulldownMenu that is associated with a
CascadeButton is created using XmCreatePulldownMenu(). This
routine returns the RowColumn widget that manages the menu items. The
routine creates the RowColumn as a child of a MenuShell widget. Since
the routine returns the RowColumn widget, the resource list provided to
the function only sets resources for the RowColumn widget, not for the
MenuShell that contains it.
Menu titles should not be dynamically created or
destroyed. An application should not make the MenuBar disappear or add
new titles to the MenuBar while the application is running. All of the
titles in the MenuBar must be available to the user when the MainWindow
is visible. You can, however, deactivate an entire menu by changing the
XmNsensitive resource on the CascadeButton widget that acts as
its title, as discussed in Section #smenusens.
The items in a menu are actually the labels of the
PushButtons that make up the menu. Unlike the File title item in
the MenuBar, we chose not to use hard-coded values for the menu item
strings, so the strings can be set in a resource file. While our menu
only contains PushButton gadgets, a PulldownMenu can also contain
ToggleButtons, Separators, and CascadeButtons.
You can install a callback routine for each of the
items in a menu, or you can install an XmNentryCallback for
the RowColumn widget to act on behalf of all the menu items. This
resource specifies a callback function that overrides the
XmNactivateCallback used by Pushbuttons and the
XmNvalueChangedCallback used by ToggleButtons. Using this resource
generates a design that is similar to the simple menu routines
described earlier. See Chapter 8, Manager Widgets, for details
on this generic RowColumn resource.
As with the title items, menu items should not be
dynamically created or destroyed since it may confuse the user.
However, there is one exception to this guideline. If a menu contains
items that keep track of a dynamic list of objects, such as the open
files in a text editor, the menu items should change to reflect the
current state of the application.
Mnemonics help users traverse the menu system and
select actual menu items without having to use the mouse. In the source
code we used the XmNmnemonic resource to attach the mnemonic
"F" to the File menu, which allows the user to use the key
sequence ALT-F to open or close the menu without using the mouse. The
XmNmnemonic resource is defined by the Label class, but it is only
used by PushButtons, ToggleButtons, and CascadeButtons when these
objects are used in a menu system.
A mnemonic is represented visually by the
underlining of the mnemonic character in the label string. In this
case, the "F" in the word "File" is underlined. If the label does not
contain the mnemonic character, there is no visual feedback for the
mnemonic, but it still functions. When a mnemonic is specified, the
character can be either uppercase or lowercase, but the distinction
only affects which letter is underlined. For operational purposes,
mnemonics are case insensitive.
Our example only provided a mnemonic for the entire
menu, but mnemonics can be set on menu items as well. When a
PulldownMenu is displayed, the user can activate a menu item simply by
typing the letter represented by its mnemonic. (The ALT key is not used
once the menu is displayed.) If the user activates a menu item using a
mnemonic, the callback function for the menu is called just as if the
user had selected it with the mouse.
Mnemonics are set on MenuBar titles and menu items
in the same way. To illustrate, let's add a mnemonic to the Exit
item in our File menu. We can set the mnemonic directly in the
declaration of the item, as follows:
   XtVaCreateManagedWidget ("Exit",
       xmPushButtonGadgetClass, FilePullDown,
       XmNmnemonic, 'x',
       NULL);
While this method accomplishes the task, one problem with it is that
the mnemonic is hard-coded in the widget, while the label is not.
Consider the following resource specification in a resource file:
*Exit.labelString: QuitThis resource sets the label for the item button to "Quit", but since the mnemonic for the button is hard-coded to "x", there is visual feedback, and the mnemonic itself is counterintuitive.
The best way to handle this situation is to specify
both the label string and the mnemonic in the same place: a resource
file or application code. For example:
   *Exit.labelString: Exit
   *Exit.mnemonic:    x
Setting both of these resources in the same way helps ensure that an application has a consistent interface.
The purpose of menu accelerators is to provide the
user with the ability to activate menu items in a PulldownMenu without
having to display the menu at all. In Figure 15-1, the Quit menu
item displayed the accelerator Ctrl+C to indicate that the
user could press the CTRL-C keyboard sequence to activate that menu
item and quit the application.
To install a accelerator on a menu item, use the
XmNaccelerator resource to specify the accelerator translation and
XmNacceleratorText to provide visual feedback to the user. A side
effect of the implementation of Motif accelerators is that you cannot
install your own accelerators using the standard methods provided by
the X Toolkit Intrinsics (such as XtInstallAccelerators() or
XtInstallAllAccelerators()). These functions will not work, and you
may interfere with the Motif accelerator mechanism by attempting to use
them. These resources are defined by the Label class, but they only
work for PushButtons and ToggleButtons in menus. The syntax for the
accelerator is exactly the same as for a translation table, except that
you do not specify an action function with the event sequence. The
accelerator for the Quit button in Figure 15-1 is specified as
"Ctrl<Key>C". (For information on how to specify translation
tables, see Volume Four, X Toolkit Intrinsics Programming Manual
.
However, the string that is displayed for the
accelerator is not the same as the accelerator translation because it
would be confusing for most users. Instead, you should display
something like "^C", "Ctrl-C", or "Ctrl+C",
as these make it reasonably clear what the user is expected to type.
(The latter is the convention recommended by the Motif Style Guide
, though all three forms are frequently used.) Since this resource
specifies displayable text, you cannot use a common C string; the text
must be given as a compound string.
For example, the following code demonstrates how to
install an accelerator for the Exit button in the source code
   char     *accel = "Ctrl<Key>C";
   XmString  accel_text = XmStringCreateLocalized ("Ctrl+C");

   XtVaCreateManagedWidget ("Exit",
       xmPushButtonGadgetClass, FilePullDown,
       XmNaccelerator,      accel,
       XmNacceleratorText,  accel_text,
       NULL);

   XmStringFree (accel_text);
As with mnemonics, the resources for the accelerator itself and the
text used to display the accelerator can either be set directly in
application code or specified in a resource file. Both of the resources
should be specified in the same way, so that they are always
consistent.
Motif specifies various ways for the user to get help. She can use the HELP or F1 keys on the keyboard, the Help button in a dialog box, or the Help title on the MenuBar. This title provides the highest level of help for your application, so it should not provide too much detail about lower-level functions in the program. When you create a PulldownMenu for this title, it should provide items that give the user access to the help system. the figure shows a common Help menu.
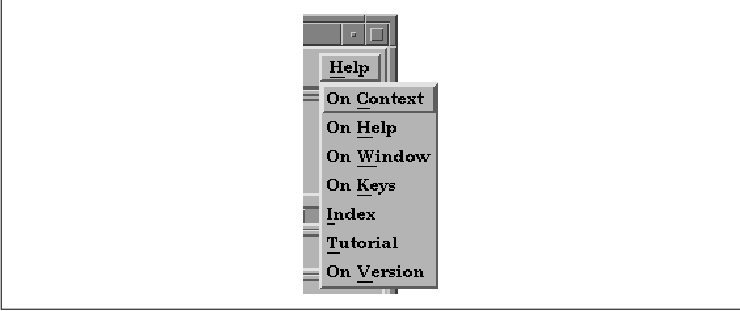
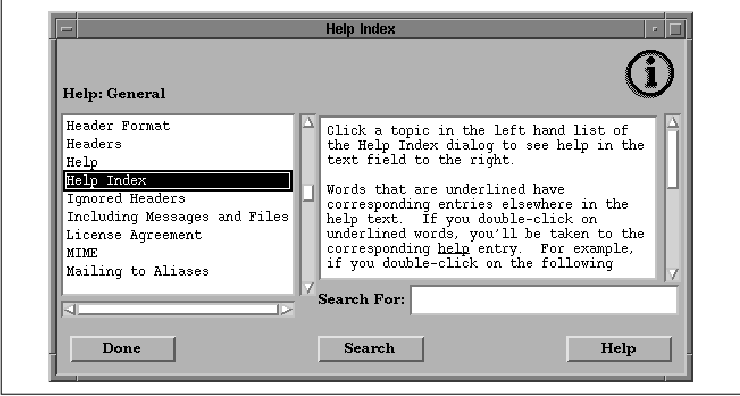
The choices shown in the figure are recommended by the Motif Style Guide; if they apply to your application, you should use them. There is usually an item on the Help menu that gives the user a brief overview of how to use the help system. You should consult the Motif Style Guide for details on what kind of help each of the above selections should provide. It is usually a good idea to have an item that displays an index of the type of help that is available in an application. An example of help index dialog is shown in the figure. See Chapter 21, Advanced Dialog Programming, for a discussion of help dialogs.
Creating a Help menu is just like creating
any other menu, except that once you have created the CascadeButton,
you should set the XmNmenuHelpWidget resource for the MenuBar.
This resource specifies which CascadeButton is placed to the far right
in the MenuBar, which is where the Style Guide states that the
Help menu must be positioned. the source code contains a routine
that demonstrates how to build a Help menu and attach it to the
MenuBar. In this example, we present an alternate approach to creating
MenuBar titles and their associated PulldownMenus.
   void
   BuildHelpMenu(MenuBar)
   Widget MenuBar;
   {
       Widget HelpPullDown, widget;
       int i;
       static char *h_items[] = {
           "On Context", NULL, "On Help", "On Window", "On Keys",
           "Index", "Tutorial", "On Version"
       };

       /* Help menu */
       HelpPullDown = XmCreatePulldownMenu (MenuBar, "HelpPullDown", NULL, 0);
       widget = XtVaCreateManagedWidget ("Help",
           xmCascadeButtonWidgetClass, MenuBar,
           XmNsubMenuId, HelpPullDown,
           NULL);
       /* tell the MenuBar that this is the help widget */
       XtVaSetValues (MenuBar, XmNmenuHelpWidget, widget, NULL);

       /* Now add the menu items to the pulldown menu */
       for (i = 0; i < XtNumber (h_items); i++) {
           if (h_items[i] != NULL) {
               widget = XtVaCreateManagedWidget (h_items[i],
                   xmPushButtonGadgetClass, HelpPullDown, NULL);
               XtAddCallback (widget, XmNactivateCallback,
                   do_help, h_items[i]);
           }
           else
               widget = XtVaCreateManagedWidget ("sep",
                   xmSeparatorGadgetClass, HelpPullDown, NULL);
       }
   }
Much of the work required to create a PulldownMenu is involved in
creating the menu items. We can optimize the code by using a loop that
creates individual items based on the names provided in a static array.
If you want to add a new help item to the list, you just need to add
its name to the h_items list. A NULL entry causes a
Separator gadget to be added to the menu. In the source code we specify
the same callback function for each item in the menu; the
client_data is the same as the name of the menu item. In Section
#smenucreate, we expand on this approach to build arbitrary menus for
the MenuBar.
As we mentioned earlier, MenuBar titles and menu
items should not be dynamically created or destroyed. They may,
however, be activated or deactivated using XtSetSensitive().
When a CascadeButton or a menu item is insensitive, it is grayed
out, and the user is unable to display the associated menu or activate
the menu item.
For CascadeButtons, insensitivity has the additional
effect of preventing the user from accessing any of the items on the
associated menu, including access through mnemonics and accelerators,
since the menu cannot be displayed. The menu and all its items are
completely unavailable until the sensitivity of the CascadeButton is
reset. An alternate way to disable an entire menu is to set the
PulldownMenu pane insensitive. This approach has the advantage of still
allowing the user to display the menu and see all the items, while
making the items unavailable.
For example, take an editor program. If the user is
not editing a file, it doesn't make sense to have the Save item
in the File menu be selectable. Once the user starts editing a
file, the Save button is sensitized so that the user can select
it. Since the user cannot select the item until its sensitivity is
reset, it is important that the application do so at the appropriate
time. Another less realistic example, but one that we can demonstrate,
involves a menu item that pops up a dialog. As long as that dialog is
up, the user cannot reselect the menu item again. For purposes of this
demonstration, let's say that the Open item pops up a
FileSelectionDialog and desensitizes itself. When the dialog is
dismissed, the menu item is resensitized. This behavior is not a great
design. The dialog really should be cached, and the menu item should
remain sensitive. If the item is reselected, the dialog should be
remapped or raised to the top of the window stack, if necessary.
To implement this behavior, we specify a callback
routine for the Open menu item that creates a
FileSelectionDialog and sets the item insensitive. We also specify a
callback routine for the dialog box that resets the menu item's
sensitivity. The code fragment in the source code shows these callback
routines.
   /* reset_sensitive() -- generalized routine that resets the
    * sensitivity on the widget passed as the client_data parameter
    * in a call to XtAddCallback().
    */
   void
   reset_sensitive(w, client_data, call_data)
   Widget w;
   XtPointer client_data;
   XtPointer call_data;
   {
       Widget reset_widget = (Widget) client_data;

       XtSetSensitive (reset_widget, True);
   }

   /* open_callback() -- the callback routine for when the "Open"
    * menu item is selected from the "File" title in the MenuBar.
    */
   void
   open_callback(menu_item, client_data, call_data)
   Widget menu_item;
   XtPointer client_data;
   XtPointer call_data;
   {
       Widget dialog, parent = menu_item;

       /* Get the window manager shell widget associated with item */
       while (!XtIsWMShell (parent))
           parent = XtParent (parent);

       /* turn off the sensitivity for the Open button ... */
       XtSetSensitive (menu_item, False);
       dialog = XmCreateFileSelectionDialog (parent, "files", NULL, 0);

       /* Add callback routines to respond to OK button selection here. */

       /* Make sure that if the dialog is popped down or destroyed, the
        * menu_item's sensitivity is reset.
        */
       XtAddCallback (XtParent(dialog),  /* dialog's _parent_ */
           XmNpopdownCallback, reset_sensitive, menu_item);
       XtAddCallback (dialog, XmNdestroyCallback, reset_sensitive, menu_item);

       XtManageChild (dialog);
       XtPopup (XtParent (dialog), XtGrabNone);
   }
The open_callback() function is called whenever the user
activates the Open menu item on the File menu. The first
thing open_callback() does is find the nearest WMShell widget
associated with the menu item. We do not want the MenuShell here, as we
need a non-transient widget to act as the parent for the
FileSelectionDialog. If the menu item is used as the parent for the
dialog, when the menu is popped down, the dialog is also popped down
because it is a secondary window.
We set the menu item's sensitivity to False
, which prevents the user from selecting the item again. In order to be
notified when the FileSelectionDialog is dismissed, we add callback
routines for XmNpopdownCallback and XmNdestroyCallback
. In both cases, the Open menu item needs to be reset so that the
user can select it again. The only thing in open_callback() is
a callback function that opens the selected file when the user selects
the OK button. This functionality is beyond the scope of this
chapter; see Chapter 6, Selection Dialogs, for details.
Motif 1.2 provides a new feature that allows menus
to be torn off and placed in separate windows. From the user's
perspective, tear-off menus make it easy to make repeated menu
selections. Normally, when the user posts a menu, it is only displayed
until she makes a selection, and then it is removed. If the menu has
been torn off, however, it is displayed in a separate window, and the
user can make as many selections as she wants without having to repost
it each time.
Tear-off behavior is provided for all of the Motif
menu types, but the behavior is disabled by default. When tear-off
functionality is enabled in a menu, the first item in the menu is a
tear-off button. The button displays a dashed line to indicate that the
user can tear off the menu, much as she would tear a coupon out of a
newspaper. If the user selects the tear-off button, the menu is placed
in a separate window with limited window manager decorations. The
window can be moved, so the user can position it in a convenient
location. The menu remains torn off until the user cancels the menu by
pressing the ESCAPE key within the window.
Tear-off functionality is controlled by the XmNtearOffModel resource of the RowColumn widget. This resource is only valid when the RowColumn is being used as a PulldownMenu or a PopupMenu. The resource can have one of the following values: XmTEAR_OFF_ENABLED or XmTEAR_OFF_DISABLED. By default, the resource is set to XmTEAR_OFF_DISABLED, so if you want to provide tear-off functionality in the menus in your application, you must set the resource for all of your menu panes. the figure shows a PulldownMenu both before and after being torn off.

Motif does not install a resource converter for the
XmNtearOffModel resource, but it does provide one that you can
install if you want to specify the resource in a resource file. The
XmRepTypeInstallTearOffModelConverter() routine installs the
resource converter for XmNtearOffModel. This routine does not
take any arguments, but it does win the award for the longest function
name in the Motif toolkit. Once the converter is installed, you can use
the following resource specification to enable tear-off functionality
for all menus:
*tearOffModel: TEAR_OFF_ENABLEDThe converter is not installed by default for backwards compatibility reasons.
Some applications use menus in such a way that they
need to keep track of when the menu is popped up and popped down. For
example, an application might use some ToggleButtons in a PulldownMenu
to allow the user to set state variables for the program. If the
application also provides another interface for changing the variables,
such as a command-line, the application needs to know when the menu is
popped up so that it can make sure the ToggleButtons are set
appropriately.
Now let's say that this application is recompiled
with Motif 1.2. If the resource converter for XmNtearOffModel
were installed, the user could enable tear-off functionality, and that
might cause the application to malfunction. If an application needs to
keep track of the comings and goings of menus, it has to do extra work
for tear-off menus. Since the converter is not installed by default,
the programmer can decide whether or not to support tear-off
functionality in this case. If the application is modified to support
tear-off menus, then it can install the converter and allow the user to
set the resource in a resource file. If your application does not
require any special handling of menus, there is no reason not to enable
tear-off functionality for all menus, as it really is a convenience to
the user.
The RowColumn widget provides two new callback
resources that allow an application to keep track of tear-off menus.
The XmNtearOffMenuActivateCallback routine is called when a
menu is torn off; XmNtearOffMenuDeactivateCallback is called
when the torn-off menu is dismissed. These callbacks provide a way for
you to perform any special processing that is necessary for handling
tear-off menus.
Motif also provides access to the tear-off button
with the XmGetTearOffControl() routine. This routine takes a
menu pane and returns the widget ID of the tear-off button in the menu,
if there is one. Otherwise the routine returns NULL. The
tear-off button has a Separator-like appearance; you can specify its
background, foreground, and top and bottom shadow colors using the
standard resources, as well as the XmNseparatorType resource.
You can also set these resources in a resource file using the name of
the button, which is TearOffControl.
Now we have addressed each of the fundamental
elements of the MenuBar and the resources used to provide the user with
the appropriate feedback. Using this information, we can generalize the
way we build MenuBars, enabling us to create arbitrarily large MenuBars
and PulldownMenus using a substantially smaller amount of code.
In the examples that follow, we use many of the
recommended elements for a standard Motif MenuBar. You can adjust the
algorithms and data structures to fit the needs of your own
application. Although we use hard-coded values for widget resources,
this technique is by no means a requirement, nor should it be construed
as recommended usage. If you choose to specify resources in a resource
file, you should write an application defaults file that contains the
appropriate resource values.
Let's begin by identifying each of the attributes of
a menu item:
   typedef struct _menu_item {
       char        *label;         /* the label for the item */
       WidgetClass *class;         /* pushbutton, label, separator, ... */
       char         mnemonic;      /* mnemonic; NULL if none */
       char        *accelerator;   /* accelerator; NULL if none */
       char        *accel_text;    /* to be converted to compound string */
       void       (*callback)();   /* routine to call; NULL if none */
       XtPointer    callback_data; /* client_data for callback() */
   } MenuItem;
To create a PulldownMenu, all we need to do is initialize an array of
MenuItem structures and pass it to a routine that iterates through
the array and creates the items using the appropriate information. For
example, the following declaration describes the elements for a File
menu:
   MenuItem file_items[] = {
       { "New", &xmPushButtonGadgetClass, 'N',
           NULL, NULL, do_open, NEW },
       { "Open...", &xmPushButtonGadgetClass, 'O',
           NULL, NULL, do_open, OPEN },
       { "Save", &xmPushButtonGadgetClass, 'S',
           NULL, NULL, do_save, SAVE },
       { "Save As...", &xmPushButtonGadgetClass, 'A',
           NULL, NULL, do_save, SAVE_AS },
       { "Print...", &xmPushButtonGadgetClass, 'P',
           NULL, NULL, do_print, NULL },
       { "", &xmSeparatorGadgetClass, NULL,
           NULL, NULL, NULL, NULL },
       { "Exit", &xmPushButtonGadgetClass, 'x',
           "Ctrl<Key>C", "Ctrl+C", do_quit, NULL },
       NULL,
   };
Each element in the MenuItem data structure
is filled with default values for each menu item. If a resource value
is not meaningful, or is not going to be hard-coded, we initialize the
field to NULL. If you don't need a callback function or client
data for an item, the field may be set to NULL. The only field
that cannot be NULL is the widget class. The final terminating
NULL in the label field indicates the end of the
list.
We have not specified any accelerators except for
the Exit item. The Separator gadget is completely unspecified,
since none of the resources even apply to Separators. This design makes
modification and maintenance very simple. If you want to add an
accelerator for the Save item, all you need to do is change the
appropriate fields in the data structure, instead of having to search
through the source code looking for where that item is created.
One particular point of interest is the way the
WidgetClass field is initialized. It is declared as a pointer to a
widget class rather than just a widget class, so we initialize the
field with the address of the widget class variable that is declared in
the widget's header file. The use of &xmPushButtonGadgetClass
is one such example. The structure must be initialized this way because
the compiler requires a specific value in order to initialize a static
data structure. The xmPushButtonWidgetClass pointer does not
have a value until the program is actually running, but the address of
the variable does have a value. Once the program is running, the
pointer can be dereferenced to access the real PushButton widget class.
Now we can write a routine that uses the
MenuItem data structure to create a PulldownMenu. The
BuildPulldownMenu() function is shown in the source code The
routine loops through each element in an array of pre-initialized
MenuItem structures and creates menu items based on the
information. XmStringCreateLocalized() is only available in
Motif 1.2; XmStringCreateSimple() is the corresponding
function in Motif 1.1. The XmNtearOffModel resource is only
available in Motif 1.2; it should not be specified in Motif 1.1.
   Widget
   BuildPulldownMenu(parent, menu_title, menu_mnemonic, tear_off, items)
   Widget parent;
   char *menu_title, menu_mnemonic;
   Boolean tear_off;
   MenuItem *items;
   {
       Widget PullDown, cascade, widget;
       int i;
       XmString str;

       PullDown = XmCreatePulldownMenu (parent, "_pulldown", NULL, 0);
       if (tear_off)
           XtVaSetValues (PullDown, XmNtearOffModel, XmTEAR_OFF_ENABLED, NULL);
       str = XmStringCreateLocalized (menu_title);
       cascade = XtVaCreateManagedWidget (menu_title,
           xmCascadeButtonWidgetClass, parent,
           XmNsubMenuId,   PullDown,
           XmNlabelString, str,
           XmNmnemonic,    menu_mnemonic,
           NULL);
       XmStringFree (str);

       /* Now add the menu items */
       for (i = 0; items[i].label != NULL; i++) {
           widget = XtVaCreateManagedWidget (items[i].label,
               *items[i].class, PullDown,
               NULL);
           if (items[i].mnemonic)
               XtVaSetValues (widget, XmNmnemonic, items[i].mnemonic, NULL);
           if (items[i].accelerator) {
               str = XmStringCreateLocalized (items[i].accel_text);
               XtVaSetValues (widget,
                   XmNaccelerator, items[i].accelerator,
                   XmNacceleratorText, str,
                   NULL);
               XmStringFree (str);
           }
           if (items[i].callback)
               XtAddCallback (widget, XmNactivateCallback,
                   items[i].callback, items[i].callback_data);
       }
       return cascade;
   }
The function takes five parameters. parent is a handle to a
MenuBar widget that must have already been created, menu_title
indicates the title of the menu, menu_mnemonic specifies the
mnemonic, tear_off indicates whether or not the menu can be
torn off, and items is an array of MenuItem
structures.
The first thing the routine does is create a
PulldownMenu. Since the name of this widget is not terribly important,
we use a predefined name, prefixed with an underscore, to indicate that
the name is not intended to be referenced in a resource file. This use
of the underscore is our own convention, by the way, not one adopted by
the X Toolkit Intrinsics. We came up with this "unwritten rule" because
Xt has no such naming conventions for widgets that do not wish to have
their resources specified externally.
After creating the PulldownMenu, the routine creates
the CascadeButton that acts as the title for the menu on the MenuBar.
The name of the widget is taken from the second parameter,
menu_title. The routine also sets the mnemonic and the
XmNtearOffModel resource at this point. All MenuBar titles should
have mnemonics associated with them.
Now the function loops through the array of
MenuItem structures creating menu items until it finds an entry
with a NULL label name. We use this value as an end-of-menu
indicator in our initialization. When each widget is created, the
mnemonic, accelerator, and callback function are added only if they are
specified in the MenuItem structure.
BuildPulldownMenu() must be called from
another function that passes the appropriate data structures and other
parameters. In our design, this would be the routine that creates the
MenuBar itself. the source code shows the code for the
CreateMenuBar() routine. This simple function creates a MenuBar
widget, calls BuildPulldownMenu() for each menu, manages the
MenuBar, and returns it to the calling function.
   Widget
   CreateMenuBar(MainWindow)
   Widget MainWindow;
   {
       Widget MenuBar, widget, BuildPulldownMenu();

       MenuBar = XmCreateMenuBar (MainWindow, "MenuBar", NULL, 0);

       (void) BuildPulldownMenu (MenuBar, "File", 'F', True, file_items);
       (void) BuildPulldownMenu (MenuBar, "Edit", 'E', True, edit_items);
       (void) BuildPulldownMenu (MenuBar, "View", 'V', True, view_items);
       (void) BuildPulldownMenu (MenuBar, "Options", 'O', True, options_items);
       widget = BuildPulldownMenu (MenuBar, "Help", 'H', True, help_items);

       XtVaSetValues (MenuBar, XmNmenuHelpWidget, widget, NULL);

       XtManageChild (MenuBar);
       return MenuBar;
   }
Each call to BuildPulldownMenu() passes an array of
pre-initialized MenuItem structures. The Help menu is a
special case, so we set the XmNmenuHelpWidget resource to let
the MenuBar know which item it is. By setting the resource to the
CascadeButton returned by the function, the MenuBar knows that this
button should be placed to the far right. The only parameter to the
CreateMenuBar() function is the MainWindow widget that is the
parent of the MenuBar that is returned.
We can add pullright menus to our menu creation
methodology quite easily by adding to the MenuItem data
structure and making a slight modification to the
CreatePulldownMenu() function. As we learned from the simple menu
creation routines, a cascading menu is really a PulldownMenu that is
associated with a CascadeButton. We also know that we can attach a menu
to a CascadeButton by setting the XmNsubMenuId resource to the
handle of the PulldownMenu. We begin by modifying the MenuItem
structure as follows:
   typedef struct _menu_item {
       char        *label;         /* the label for the item */
       WidgetClass *class;         /* pushbutton, label, separator... */
       char         mnemonic;      /* mnemonic; NULL if none */
       char        *accelerator;   /* accelerator; NULL if none */
       char        *accel_text;    /* to be converted to compound string */
       void       (*callback)();   /* routine to call; NULL if none */
       XtPointer    callback_data; /* client_data for callback() */
       struct _menu_item *subitems; /* pullright menu items, if not NULL */
   } MenuItem;
The new field at the end of the structure is a pointer to another array
of MenuItem structures. If this pointer is not NULL,
the menu item has a cascading submenu that is described by subitems
. the source code shows an example of creating a cascading menu. This
program uses a modified version of BuildPulldownMenu() that
calls itself to create cascading menus. XtSetLanguageProc() is
only available in X11R5; there is no corresponding function in X11R4.
XmStringCreateLocalized() is only available in Motif 1.2;
XmStringCreateSimple() is the corresponding function in Motif 1.1.
The XmNtearOffModel resource is only available in Motif 1.2;
it should not be specified in Motif 1.1.
   /* build_menu.c -- Demonstrate the BuildPulldownMenu() routine and
    * how it can be used to build pulldown -and- pullright menus.
    * Menus are defined by declaring an array of MenuItem structures.
    */
   #include <Xm/RowColumn.h>
   #include <Xm/MainW.h>
   #include <Xm/DrawingA.h>
   #include <Xm/CascadeBG.h>
   #include <Xm/PushB.h>
   #include <Xm/PushBG.h>
   #include <Xm/ToggleB.h>
   #include <Xm/ToggleBG.h>

   typedef struct _menu_item {
       char        *label;         /* the label for the item */
       WidgetClass *class;         /* pushbutton, label, separator... */
       char         mnemonic;      /* mnemonic; NULL if none */
       char        *accelerator;   /* accelerator; NULL if none */
       char        *accel_text;    /* to be converted to compound string */
       void       (*callback)();   /* routine to call; NULL if none */
       XtPointer    callback_data; /* client_data for callback() */
       struct _menu_item *subitems; /* pullright menu items, if not NULL */
   } MenuItem;

   /* Pulldown menus are built from cascade buttons, so this function
    * also includes pullright menus.  Create the menu, the cascade button
    * that owns the menu, and then the submenu items.
    */
   Widget
   BuildPulldownMenu(parent, menu_title, menu_mnemonic, tear_off, items)
   Widget parent;
   char *menu_title, menu_mnemonic;
   Boolean tear_off;
   MenuItem *items;
   {
       Widget PullDown, cascade, widget;
       int i;
       XmString str;

       PullDown = XmCreatePulldownMenu (parent, "_pulldown", NULL, 0);
       if (tear_off)
           XtVaSetValues (PullDown, XmNtearOffModel, XmTEAR_OFF_ENABLED, NULL);
       str = XmStringCreateLocalized (menu_title);
       cascade = XtVaCreateManagedWidget (menu_title,
           xmCascadeButtonGadgetClass, parent,
           XmNsubMenuId,   PullDown,
           XmNlabelString, str,
           XmNmnemonic,    menu_mnemonic,
           NULL);
       XmStringFree (str);

       /* Now add the menu items */
       for (i = 0; items[i].label != NULL; i++) {
           /* If subitems exist, create the pull-right menu by calling this
            * function recursively.  Since the function returns a cascade
            * button, the widget returned is used..
            */
           if (items[i].subitems)
               widget = BuildPulldownMenu (PullDown, items[i].label,
                   items[i].mnemonic, tear_off, items[i].subitems);
           else
               widget = XtVaCreateManagedWidget (items[i].label,
                   *items[i].class, PullDown,
                   NULL);
           /* Whether the item is a real item or a cascade button with a
            * menu, it can still have a mnemonic.
            */
           if (items[i].mnemonic)
               XtVaSetValues (widget, XmNmnemonic, items[i].mnemonic, NULL);
           /* any item can have an accelerator, except cascade menus. But,
            * we don't worry about that; we know better in our declarations.
            */
           if (items[i].accelerator) {
               str = XmStringCreateLocalized (items[i].accel_text);
               XtVaSetValues (widget,
                   XmNaccelerator, items[i].accelerator,
                   XmNacceleratorText, str,
                   NULL);
               XmStringFree (str);
           }
           if (items[i].callback)
               XtAddCallback(widget,
                   (items[i].class == &xmToggleButtonWidgetClass ||
                   items[i].class == &xmToggleButtonGadgetClass) ?
                       XmNvalueChangedCallback : /* ToggleButton class */
                       XmNactivateCallback,      /* PushButton class */
                   items[i].callback, items[i].callback_data);
       }
       return cascade;
   }

   /* callback functions for menu items declared later... */
   void
   set_weight(widget, client_data, call_data)
   Widget widget;
   XtPointer client_data;
   XtPointer call_data;
   {
       int weight = (int) client_data;

       printf ("Setting line weight to %d0, weight);
   }

   set_color(widget, client_data, call_data)
   Widget widget;
   XtPointer client_data;
   XtPointer call_data;
   {
       char *color = (char *) client_data;

       printf ("Setting color to %s0, color);
   }

   void
   set_dot_dash(widget, client_data, call_data)
   Widget widget;
   XtPointer client_data;
   XtPointer call_data;
   {
       int dot_or_dash = (int) client_data;

       printf ("Setting line style to %s0, dot_or_dash? "dot" : "dash");
   }

   MenuItem weight_menu[] = {
       { " 1 ", &xmPushButtonGadgetClass, '1', NULL, NULL,
           set_weight, (XtPointer) 1, (MenuItem *) NULL },
       { " 2 ", &xmPushButtonGadgetClass, '2', NULL, NULL,
           set_weight, (XtPointer) 2, (MenuItem *) NULL },
       { " 3 ", &xmPushButtonGadgetClass, '3', NULL, NULL,
           set_weight, (XtPointer) 3, (MenuItem *) NULL },
       { " 4 ", &xmPushButtonGadgetClass, '4', NULL, NULL,
           set_weight, (XtPointer) 4, (MenuItem *) NULL },
       NULL,
   };

   MenuItem color_menu[] = {
       { "Cyan", &xmPushButtonGadgetClass, 'C', "Alt<Key>C", "Alt+C",
           set_color, (XtPointer) "cyan", (MenuItem *) NULL },
       { "Yellow", &xmPushButtonGadgetClass, 'Y', "Alt<Key>Y", "Alt+Y",
           set_color, (XtPointer) "yellow", (MenuItem *) NULL },
       { "Magenta", &xmPushButtonGadgetClass, 'M', "Alt<Key>M", "Alt+M",
           set_color, (XtPointer) "magenta", (MenuItem *) NULL },
       { "Black", &xmPushButtonGadgetClass, 'B', "Alt<Key>B", "Alt+B",
           set_color, (XtPointer) "black", (MenuItem *) NULL },
       NULL,
   };

   MenuItem style_menu[] = {
       { "Dash", &xmPushButtonGadgetClass, 'D', NULL, NULL,
           set_dot_dash, (XtPointer) 0, (MenuItem *) NULL },
       { "Dot",  &xmPushButtonGadgetClass, 'o', NULL, NULL,
           set_dot_dash, (XtPointer) 1, (MenuItem *) NULL },
       NULL,
   };

   MenuItem drawing_menus[] = {
       { "Line Weight", &xmCascadeButtonGadgetClass, 'W', NULL, NULL,
           0, 0, weight_menu },
       { "Line Color", &xmCascadeButtonGadgetClass, 'C', NULL, NULL,
           0, 0, color_menu },
       { "Line Style", &xmCascadeButtonGadgetClass, 'S', NULL, NULL,
           0, 0, style_menu },
       NULL,
   };

   main(argc, argv)
   int argc;
   char *argv[];
   {
       Widget toplevel, main_w, menubar, drawing_a;
       XtAppContext app;

       XtSetLanguageProc (NULL, NULL, NULL);

       toplevel = XtVaAppInitialize (&app, "Demos", NULL, 0,
           &argc, argv, NULL, NULL);

       /* Create a MainWindow widget that contains a DrawingArea in
        * its work window.
        */
       main_w = XtVaCreateManagedWidget ("main_w",
           xmMainWindowWidgetClass, toplevel,
           XmNscrollingPolicy,  XmAUTOMATIC,
           NULL);

       menubar = XmCreateMenuBar (main_w, "menubar", NULL, 0);
       BuildPulldownMenu (menubar, "Lines", 'L', True, drawing_menus);
       XtManageChild (menubar);

       /* Create a DrawingArea -- no actual drawing will be done. */
       drawing_a = XtVaCreateManagedWidget ("drawing_a",
           xmDrawingAreaWidgetClass, main_w,
           XmNwidth, 500,
           XmNheight, 500,
           NULL);

       XtRealizeWidget (toplevel);
       XtAppMainLoop (app);
   }
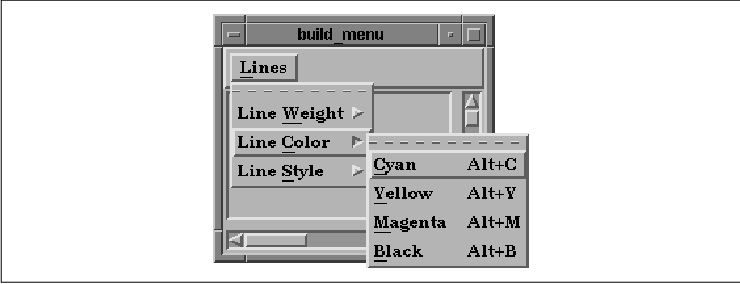
The majority of this program is composed of the new version of
BuildPulldownMenu() and the menu and submenu declarations. All the
menus and menu items are declared in reverse order because the
cascading menu declaration must exist before the menu is actually
referenced. The output of the program is shown in the figure.
All we have to do to get BuildPulldownMenu()
to create a cascading menu is add code that checks whether or not the
current menu has a submenu. If it does, the routine calls itself to
create the submenu. Because the function creates and returns a
CascadeButton, the return value can be used as the menu item in the
menu that is currently being built. We have to create the cascading
menu first because it has to exist before it can be attached to a
CascadeButton. Recursion handles this problem for us by creating the
deepest submenus first, which ensures that all the necessary submenus
are built before their CascadeButtons require them.
We also added support for ToggleButtons to this
version of BuildPulldownMenu(), even though our menus do not
contain any ToggleButtons. The only change that we have to make here
involves the callback function. Since ToggleButtons have an
XmNvalueChangedCallback, while PushButtons have an
XmNactivateCallback, we check the class of the item being added and
specify the appropriate callback resource in our call to
XtAddCallback().
To further demonstrate the flexibility of our design
and to exploit the similarities between PulldownMenus, PopupMenus, and
cascading menus, we can easily modify the BuildPulldownMenu()
routine to support any of these menu types. We only need to specify a
new parameter indicating which of the two menu types to use. Since
Motif already defines the values XmMENU_PULLDOWN and
XmMENU_POPUP in <Xm/Xm.h>, we use those values. We have also
given the function a more generic name, BuildMenu(), as shown
in the source code XmStringCreateLocalized() is only available
in Motif 1.2; XmStringCreateSimple() is the corresponding
function in Motif 1.1. The XmNtearOffModel resource is only
available in Motif 1.2; it should not be specified in Motif 1.1.
   Widget
   BuildMenu(parent, menu_type, menu_title, menu_mnemonic, tear_off, items)
   Widget parent;
   int menu_type;
   char *menu_title, menu_mnemonic;
   Boolean tear_off;
   MenuItem *items;
   {
       Widget menu, cascade, widget;
       int i;
       XmString str;

       if (menu_type == XmMENU_PULLDOWN)
           menu = XmCreatePulldownMenu (parent, "_pulldown", NULL, 0);
       else
           menu = XmCreatePopupMenu (parent, "_popup", NULL, 0);
       if (tear_off)
           XtVaSetValues (menu, XmNtearOffModel, XmTEAR_OFF_ENABLED, NULL);

       if (menu_type == XmMENU_PULLDOWN) {
           str = XmStringCreateLocalized (menu_title);
           cascade = XtVaCreateManagedWidget (menu_title,
               xmCascadeButtonGadgetClass, parent,
               XmNsubMenuId,   menu,
               XmNlabelString, str,
               XmNmnemonic,    menu_mnemonic,
               NULL);
           XmStringFree (str);
       }

       /* Now add the menu items */
       for (i = 0; items[i].label != NULL; i++) {
           /* If subitems exist, create the pull-right menu by calling this
            * function recursively.  Since the function returns a cascade
            * button, the widget returned is used..
            */
           if (items[i].subitems)
               widget = BuildMenu (menu, XmMENU_PULLDOWN, items[i].label,
                   items[i].mnemonic, tear_off, items[i].subitems);
           else
               widget = XtVaCreateManagedWidget (items[i].label,
                   *items[i].class, menu,
                   NULL);
           /* Whether the item is a real item or a cascade button with a
            * menu, it can still have a mnemonic.
            */
           if (items[i].mnemonic)
               XtVaSetValues (widget, XmNmnemonic, items[i].mnemonic, NULL);
           /* any item can have an accelerator, except cascade menus. But,
            * we don't worry about that; we know better in our declarations.
            */
           if (items[i].accelerator) {
               str = XmStringCreateLocalized (items[i].accel_text);
               XtVaSetValues(widget,
                   XmNaccelerator, items[i].accelerator,
                   XmNacceleratorText, str,
                   NULL);
               XmStringFree (str);
           }
           /* again, anyone can have a callback -- however, this is an
            * activate-callback.  This may not be appropriate for all items.
            */
           if (items[i].callback)
         XtAddCallback(widget,
             (items[i].class == &xmToggleButtonWidgetClass ||
                   items[i].class == &xmToggleButtonGadgetClass) ?
                       XmNvalueChangedCallback : /* ToggleButton class */
                       XmNactivateCallback,      /* PushButton class */
                   items[i].callback, items[i].callback_data);
       }
       return menu_type == XmMENU_POPUP ? menu : cascade;
   }
All of the original functionality is maintained; we only added a couple
of lines to support popup menus. Namely, when XmMENU_POPUP is
passed as the menu_type parameter, the function
XmCreatePopupMenu() is called, and the menu itself is returned.
Otherwise the routine returns a CascadeButton. If any of the menu items
have cascading menus, we continue what we were doing before for
submenus.
In order to use this routine in an application, we
would have to create the PopupMenu as the child of another widget and
set up a callback routine to post the menu, just as we did with the
simple menu creation routine. Since mnemonics are not typically used
for PopupMenus, the mnemonic fields in the data structure should be
specified as NULL.
Now we can build PopupMenus, but what we really need
to talk about is when you should use PopupMenus in an application. The
Motif Style Guide has very little to say about when and how popup
menus should be used. One guideline is that PopupMenus should only be
used as a redundant means of activating application functionality,
since they do not make themselves apparent to the user. The single
requirement is that PopupMenus use the third mouse button, which leads
to the question: how do you get the necessary events on an arbitrary
widget so that you can pop up a menu?
In our previous PopupMenu examples, we have used the
DrawingArea widget because of its ability to track such input events
through a callback routine. However, for all other widgets, the
solution is not so simple. Unfortunately, the design of PopupMenus in
the Motif toolkit requires you to dig into lower-level Xt
event-handling mechanisms in order to post a PopupMenu. We can continue
to build menus in the same way; it's just that we have to do a bit of
work to pop them up.
the source code demonstrates how to display a
PopupMenu for an arbitrary widget. Here, we use events in a PushButton
widget to display a PopupMenu, but the menu could be triggered from any
type of widget. This program uses the BuildMenu() routine from
the source code so we do not show it in this example.
XtSetLanguageProc() is only available in X11R5; there is no
corresponding function in X11R4.
   /* popups.c -- demonstrate the use of a popup menus in an arbitrary
    * widget.  Display two PushButtons.  The second one has a popup
    * menu attached to it that is activated with the third
    * mouse button.
    */
   #include <Xm/LabelG.h>
   #include <Xm/PushBG.h>
   #include <Xm/PushB.h>
   #include <Xm/ToggleBG.h>
   #include <Xm/ToggleB.h>
   #include <Xm/SeparatoG.h>
   #include <Xm/RowColumn.h>
   #include <Xm/FileSB.h>
   #include <Xm/CascadeBG.h>

   Widget toplevel;
   extern void exit();
   void open_dialog_box();

   /* callback for pushbutton activation */
   void
   put_string(w, client_data, call_data)
   Widget w;
   XtPointer client_data;
   XtPointer call_data;
   {
       String str = (String) client_data;

       puts (str);
   }

   typedef struct _menu_item {
       char        *label;
       WidgetClass *class;
       char         mnemonic;
       char        *accelerator;
       char        *accel_text;
       void       (*callback)();
       XtPointer    callback_data;
       struct _menu_item *subitems;
   } MenuItem;

   MenuItem file_items[] = {
       { "File Items", &xmLabelGadgetClass, NULL, NULL, NULL, NULL, NULL, NULL },
       { "_sep1", &xmSeparatorGadgetClass, NULL, NULL, NULL, NULL, NULL, NULL },
       { "New", &xmPushButtonGadgetClass, 'N', NULL, NULL,
           put_string, "New", NULL },
       { "Open...", &xmPushButtonGadgetClass, 'O', NULL, NULL,
           open_dialog_box, (XtPointer) XmCreateFileSelectionDialog, NULL },
       { "Save", &xmPushButtonGadgetClass, 'S', NULL, NULL,
           put_string, "Save", NULL },
       { "Save As...", &xmPushButtonGadgetClass, 'A', NULL, NULL,
           open_dialog_box, (XtPointer) XmCreateFileSelectionDialog, NULL },
       { "Exit", &xmPushButtonGadgetClass, 'x', "Ctrl<Key>C", "Ctrl+C",
          exit, NULL, NULL },
       NULL,
   };

   main(argc, argv)
   int argc;
   char *argv[];
   {
       Widget BuildMenu(), button, rowcol, popup;
       XtAppContext app;
       extern void PostIt();

       XtSetLanguageProc (NULL, NULL, NULL);

       toplevel = XtVaAppInitialize (&app, "Demos", NULL, 0,
           &argc, argv, NULL, NULL);

       /* Build a RowColumn to contain two PushButtons */
       rowcol = XtVaCreateManagedWidget ("rowcol",
           xmRowColumnWidgetClass, toplevel,
           NULL);

       /* The first PushButton is a -gadget-, so we cannot popup a menu
        * from here!
        */
       button = XtVaCreateManagedWidget ("Button 1",
           xmPushButtonGadgetClass, rowcol, NULL);
       XtAddCallback (button, XmNactivateCallback, put_string, "Button 1");

       /* This PushButton is a widget, so it has its own window, so
        * we can pop up a menu from here by adding an event handler
        * specifically for the 3rd mouse button (motif compliance).
        */
       button = XtVaCreateManagedWidget ("Button 2",
           xmPushButtonWidgetClass, rowcol,
           NULL);
       /* it can still have its callback! */
       XtAddCallback (button, XmNactivateCallback, put_string, "Button 2");

       /* build the menu... */
       popup = BuildMenu(button, XmMENU_POPUP, "Stuff", NULL,
           True, file_items);
       /* Add the event handler (PostIt()) and pass the newly created menu
        * as the client_data.  This is done to avoid using unnecessary globals.
        */
       XtAddEventHandler (button, ButtonPressMask, False, PostIt, popup);

       XtRealizeWidget (toplevel);
       XtAppMainLoop (app);
   }

   /* PostIt() -- event handler for the 3rd mouse button on the
    * PushButton widget's window.
    */
   void
   PostIt(pb, client_data, event)
   Widget pb;
   XtPointer client_data;
   XEvent *event;
   {
       Widget popup = (Widget) client_data;
       XButtonPressedEvent *bevent = (XButtonPressedEvent *) event;

       if (bevent->button != 3)
           return;
       /* position the menu at the location of the button press.  If we wanted
        * to position it elsewhere, we could change the x,y fields of the
        * event structure.
        */
       XmMenuPosition (popup, bevent);
       XtManageChild (popup);
   }

   /* open_dialog_box() -- callback for some of the menu items declared
    * in the MenuItem struct.   The client data is the creation function
    * for the dialog.  Associate the dialog with the menu
    * item via XmNuserData so we don't have to keep a global and
    * don't have to repeatedly create one.
    */
   void
   open_dialog_box(w, client_data, call_data)
   Widget w;
   XtPointer client_data;
   XtPointer call_data;
   {
       Widget (*func)(); = client_data;
       Widget dialog = NULL;

       /* first see if this menu item's dialog has been created yet */
       XtVaGetValues(w, XmNuserData, &dialog, NULL);

       if (!dialog) {
           /* menu item hasn't been chosen yet -- create the dialog.
            * Use the toplevel as the parent because we don't want the
            * parent of a dialog to be a menu item.
      */
           dialog = (*func)(toplevel, "dialog", NULL, 0);

           XtVaSetValues (XtParent (dialog), XmNtitle, XtName (w), NULL);
     XtVaSetValues (dialog, XmNautoUnmanage, True, NULL);

           /* store the newly created dialog in the XmNuserData for the menu
            * item for easy retrieval next time. (see get-values above.)
            */
           XtVaSetValues (w, XmNuserData, dialog, NULL);
       }

       XtManageChild (dialog);
       XtPopup (XtParent (dialog), XtGrabNone);
       /* If the dialog was already open, XtPopup does nothing.  In
        * this case, at least make sure the window is raised to the top
        * of the window tree (or as high as it can get).
        */
       XRaiseWindow (XtDisplay (dialog), XtWindow (XtParent (dialog)));
   }
The output of the program is shown in the figure.
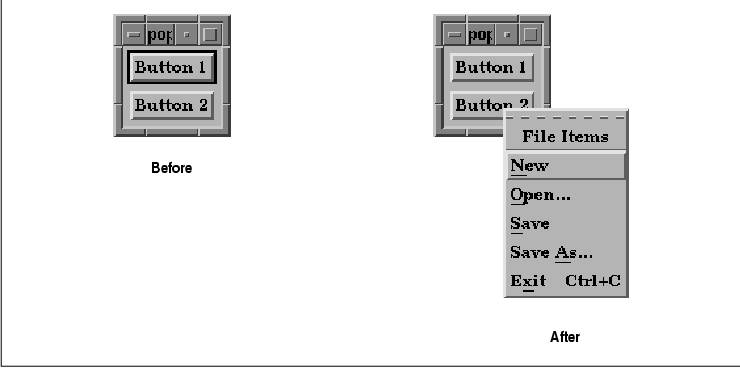
The program displays two PushButtons, one of which
is a gadget and the other a widget. We get the ButtonPress
event by specifically asking for it using XtAddEventHandler().
This routine requires a widget because it needs a window. To add an
event handler for a gadget, you would have to install it on the
gadget's parent, which is a manager widget. Anytime a ButtonPress
event occurs in the manager, the event handler would be called, so the
event handler would have to check the coordinates of the event and see
if it happened within the boundaries of the gadget. This technique
would work, but it is beyond the scope of this simple demonstration.
XtAddEventHandler() takes the following
form:
   void XtAddEventHandler(w, event_mask, nonmaskable,
           proc, client_data)
       Widget w;
       EventMask event_mask;
       Boolean nonmaskable;
       XtEventHandler proc;
       XtPointer client_data;
The widget parameter specifies the widget on which the
event handler is to be installed, while event_mask
identifies the events that are being handled. We specify
ButtonPressMask to indicate that we are interested in
ButtonPress events. The nonmaskable argument
indicates whether or not the event handler should be called on
non-maskable events. We specify False since we are not
interested in the events. The final arguments specify the event handler
routine and the client data that is passed to it. In our case, we
specify the PostIt() routine and pass it the PopupMenu as
client data. See Volume Four, X Toolkit Intrinsics Programming
Manual, for a complete list of event masks and more detailed
information about XtAddEventHandler().
An event handler routine takes the following form:
   void
   event_handler(widget, client_data, event)
       Widget      widget;
       XtPointer   client_data;
       XEvent     *event;
In the PostIt() event handler, we check which button produced
the ButtonPress event. If it wasn't the third button, we
simply return. To pop up the menu, we need to position the menu and
then manage the menu pane. To position it, we use XmMenuPosition()
, which takes the following form:
   void
   XmMenuPosition(widget, event)
       Widget widget;
       XButtonPressedEvent *event;
Since the event parameter for this function is defined
to be of type XButtonPressedEvent, you may run into problems
if you try to use another type of event. The x_root and
y_root fields in the event structure are used to position the menu
appropriately, since these fields indicate the position where the mouse
button was pressed. You could modify these fields to position the menu
elsewhere, but we recommend restraint.
In order to actually pop up the menu, we call
XtManageChild() on the PopupMenu. Motif treats PopupMenus just like
dialog widgets with respect to their shell parents. Although the
visible PopupMenu is a RowColumn widget, it has an invisible MenuShell
parent. As with dialogs, when you call XtManageChild(), the
RowColumn checks its XmNrowColumnType resource to see if it is
a PopupMenu. If it is, the widget checks to see if its parent is a
MenuShell and if so, it automatically calls XtPopup() on the
MenuShell.
The RowColumn widget has a resource that you can set
on PopupMenus called XmNmenuPost, which allows you to specify
an alternate button to post the menu. As of Motif 1.2, if you specify
this resource and then simply position and manage the menu in an event
handler, the toolkit takes care of checking the event to make sure it
matches the event description for the XmNmenuPost resource. In
earlier releases of Motif, setting this resource could cause the server
to hang, so we don't recommend using it unless you are using Motif 1.2.
You may have noticed that the PopupMenu shown in the
figure has accelerators associated with it. These accelerators only
take effect if the input focus is in the widget that contains the menu.
The only time you should ever add an event handler
to pop up a menu is when you are using a PopupMenu. You should not
attach PulldownMenus or OptionMenus to arbitrary Motif widgets. It is
also inappropriate to use a PopupMenu on a CascadeButton, since it
already has a menu associated with it.
In this final section on generalized menu creation methods, we
examine how to create OptionMenus using the BuildMenu()
function. In this case, the underlying function is
XmCreateOptionMenu(), which is another convenience routine provided
by the Motif toolkit. The routine creates a RowColumn widget that
manages the Label and CascadeButton widgets that define the OptionMenu,
but we must create the actual PulldownMenu ourselves. The final version
of the BuildMenu() function is shown in the source code
   /* build_option.c -- The final version of BuildMenu() is used to
    * build popup, option, pulldown -and- pullright menus.  Menus are
    * defined by declaring an array of MenuItem structures as usual.
    */
   #include <Xm/MainW.h>
   #include <Xm/ScrolledW.h>
   #include <Xm/PanedW.h>
   #include <Xm/RowColumn.h>
   #include <Xm/DrawingA.h>
   #include <Xm/CascadeBG.h>
   #include <Xm/ToggleB.h>
   #include <Xm/ToggleBG.h>
   #include <Xm/PushB.h>
   #include <Xm/PushBG.h>

   typedef struct _menu_item {
       char        *label;         /* the label for the item */
       WidgetClass *class;         /* pushbutton, label, separator... */
       char         mnemonic;      /* mnemonic; NULL if none */
       char        *accelerator;   /* accelerator; NULL if none */
       char        *accel_text;    /* to be converted to compound string */
       void       (*callback)();   /* routine to call; NULL if none */
       XtPointer    callback_data; /* client_data for callback() */
       struct _menu_item *subitems; /* pullright menu items, if not NULL */
   } MenuItem;

   /* Build popup, option and pulldown menus, depending on the menu_type.
    * It may be XmMENU_PULLDOWN, XmMENU_OPTION or  XmMENU_POPUP.  Pulldowns
    * return the CascadeButton that pops up the menu.  Popups return the menu.
    * Option menus are created, but the RowColumn that acts as the option
    * "area" is returned unmanaged. (The user must manage it.)
    * Pulldown menus are built from cascade buttons, so this function
    * also builds pullright menus.  The function also adds the right
    * callback for PushButton or ToggleButton menu items.
    */
   Widget
   BuildMenu(parent, menu_type, menu_title, menu_mnemonic, tear_off, items)
   Widget parent;
   int menu_type;
   char *menu_title, menu_mnemonic;
   Boolean tear_off;
   MenuItem *items;
   {
       Widget menu, cascade, widget;
       int i;
       XmString str;

       if (menu_type == XmMENU_PULLDOWN || menu_type == XmMENU_OPTION)
           menu = XmCreatePulldownMenu (parent, "_pulldown", NULL, 0);
       else if (menu_type == XmMENU_POPUP)
           menu = XmCreatePopupMenu (parent, "_popup", NULL, 0);
       else {
           XtWarning ("Invalid menu type passed to BuildMenu()");
           return NULL;
       }
       if (tear_off)
           XtVaSetValues (menu, XmNtearOffModel, XmTEAR_OFF_ENABLED, NULL);

       /* Pulldown menus require a cascade button to be made */
       if (menu_type == XmMENU_PULLDOWN) {
           str = XmStringCreateLocalized (menu_title);
           cascade = XtVaCreateManagedWidget (menu_title,
               xmCascadeButtonGadgetClass, parent,
               XmNsubMenuId,   menu,
               XmNlabelString, str,
               XmNmnemonic,    menu_mnemonic,
               NULL);
           XmStringFree (str);
       }
       else if (menu_type == XmMENU_OPTION) {
           /* Option menus are a special case, but not hard to handle */
           Arg args[5];
           int n = 0;
           str = XmStringCreateLocalized (menu_title);
           XtSetArg (args[n], XmNsubMenuId, menu); n++;
           XtSetArg (args[n], XmNlabelString, str); n++;
           /* This really isn't a cascade, but this is the widget handle
            * we're going to return at the end of the function.
            */
           cascade = XmCreateOptionMenu (parent, menu_title, args, n);
           XmStringFree (str);
       }

       /* Now add the menu items */
       for (i = 0; items[i].label != NULL; i++) {
           /* If subitems exist, create the pull-right menu by calling this
            * function recursively.  Since the function returns a cascade
            * button, the widget returned is used..
            */
           if (items[i].subitems)
               if (menu_type == XmMENU_OPTION) {
                   XtWarning ("You can't have submenus from option menu items.");
                   continue;
               }
               else
                   widget = BuildMenu (menu, XmMENU_PULLDOWN, items[i].label,
                       items[i].mnemonic, tear_off, items[i].subitems);
           else
               widget = XtVaCreateManagedWidget (items[i].label,
                   *items[i].class, menu,
                   NULL);

           /* Whether the item is a real item or a cascade button with a
            * menu, it can still have a mnemonic.
            */
           if (items[i].mnemonic)
               XtVaSetValues (widget, XmNmnemonic, items[i].mnemonic, NULL);

           /* any item can have an accelerator, except cascade menus. But,
            * we don't worry about that; we know better in our declarations.
            */
           if (items[i].accelerator) {
               str = XmStringCreateLocalized (items[i].accel_text);
               XtVaSetValues (widget,
                   XmNaccelerator, items[i].accelerator,
                   XmNacceleratorText, str,
                   NULL);
               XmStringFree (str);
           }

           if (items[i].callback)
               XtAddCallback (widget,
                   (items[i].class == &xmToggleButtonWidgetClass ||
                    items[i].class == &xmToggleButtonGadgetClass) ?
                       XmNvalueChangedCallback : /* ToggleButton class */
                       XmNactivateCallback,      /* PushButton class */
                   items[i].callback, items[i].callback_data);
       }

       /* for popup menus, just return the menu; pulldown menus, return
        * the cascade button; option menus, return the thing returned
        * from XmCreateOptionMenu().  This isn't a menu, or a cascade button!
        */
       return menu_type == XmMENU_POPUP ? menu : cascade;
   }

   MenuItem drawing_shapes[] = {
       { "Lines", &xmPushButtonGadgetClass, 'L', NULL, NULL, 0, 0, NULL },
       { "Circles", &xmPushButtonGadgetClass, 'C', NULL, NULL, 0, 0, NULL },
       { "Squares", &xmPushButtonGadgetClass, 'S', NULL, NULL, 0, 0, NULL },
       NULL,
   };

   main(argc, argv)
   int argc;
   char *argv[];
   {
       Widget toplevel, main_w, pane, sw, drawing_a, menu, option_menu;
       void input();
       XtAppContext app;
       XtWidgetGeometry geom;

       XtSetLanguageProc (NULL, NULL, NULL);

       toplevel = XtVaAppInitialize (&app, "Demos", NULL, 0,
           &argc, argv, NULL, NULL);

       main_w = XtVaCreateManagedWidget ("main_w",
           xmMainWindowWidgetClass, toplevel, NULL);

       /* Use a PanedWindow widget as the work area of the main window */
       pane = XtVaCreateWidget ("pane", xmPanedWindowWidgetClass, main_w, NULL);

       /* create the option menu -- don't forget to manage it. */
       option_menu = BuildMenu (pane, XmMENU_OPTION, "Shapes",
           'S', True, drawing_shapes);
       XtManageChild (option_menu);

       /* Set the OptionMenu so that it can't be resized */
       geom.request_mode = CWHeight;
       XtQueryGeometry (option_menu, NULL, &geom);
       XtVaSetValues (option_menu,
           XmNpaneMinimum, geom.height,
           XmNpaneMaximum, geom.height,
           NULL);

       /* The scrolled window (which contains the drawing area) is a child
        * of the PanedWindow; its sibling, the option menu, cannot be resized,
        * so if the user resizes the toplevel shell, *this* window will resize.
        */
       sw = XtVaCreateManagedWidget ("sw",
           xmScrolledWindowWidgetClass, pane,
           XmNscrollingPolicy,  XmAUTOMATIC,
           NULL);
       /* Create a DrawingArea -- no actual drawing will be done. */
       drawing_a = XtVaCreateManagedWidget ("drawing_a",
           xmDrawingAreaWidgetClass, sw,
           XmNwidth, 500,
           XmNheight, 500,
           NULL);

       XtManageChild (pane);
       XtRealizeWidget (toplevel);
       XtAppMainLoop (app);
   }
There are two particularly interesting features of this program. First,
of course, is the modification of the BuildMenu() function. As
the comments in the code indicate, the function now fully supports all
of the Motif menu types. We use XmCreatePulldownMenu() to
create the menu pane that is posted from the CascadeButton of the
OptionMenu. This menu pane is attached to the OptionMenu by setting the
XmNsubMenuId as usual. As we loop through the menu items that
are to be placed in the menu, we prevent the creation of a pullright
menu in an OptionMenu, as cascading menus are not allowed in
OptionMenus.
When BuildMenu() is used to create an
OptionMenu, the function returns the RowColumn widget that is returned
by XmCreateOptionMenu(), even though it is not really a
CascadeButton as the variable name might indicate. The calling function
needs the RowColumn widget so that it can manage the OptionMenu by
calling XtManageChild(). (The call to XtManageChild()
might be another automated part of BuildMenu() if you want to
modify it.)
The other interesting feature of the program is the
layout of the MainWindow. The MainWindow widget has a single
PanedWindow widget as its child because we wish to retain the vertical
stacking relationship between the OptionMenu and the DrawingArea.
Another advantage of using the PanedWindow is that we can set the
maximum and minimum height of each pane. The user can resize the entire
window using the window manager, but we don't want the OptionMenu to
change size, so we allow the ScrolledWindow to absorb the size
fluctuations.
Menus are basically simple objects that provide the
user with access to application functionality. While the simple menu
creation routines are handy for basic prototyping and other simple
application constructs, their usefulness is limited once you begin to
develop larger-scale applications.
We have described the design of a general menu
creation routine, so it should be clear that you only need two things
to create an arbitrary number of menus: predefined arrays of
MenuItem structures and the BuildMenu() function. Since
initializing an array of MenuItem objects is very simple, our
method is convenient and also more powerful than the simple menu
creation routines. We have defined our own data type and generalized
the routine to build menus so that you can use and modify these
functions however you like, to conform to the needs of your
application.
This chapter could go on forever discussing more and
more things you can do with menus. However, the goal was to present you
with the fundamental concepts and design considerations behind menus.
From this information, you should be able to teach yourself new
techniques that we haven't touched upon. In that spirit, you should be
able to do the following exercises based on the material covered in
this chapter.