This chapter expands upon the overview of UIL and
Mrm presented earlier. The syntax and usage of UIL are described in
detail, along with the Mrm functions associated with the various UIL
constructs.
Now that you have a basic understanding of how UIL
and Mrm are used to define and create a user interface, we can turn to
the details of using UIL and Mrm. Recall that a UIL module can contain
five different types of sections: the object section for
defining widgets; the value section for defining resource
values and callback arguments; the identifier section for
declaring application variables exported to UIL; the procedure
section for declaring callbacks; and the list section for
defining lists of widgets, resource settings, callback settings, and
callback routines.
An application accesses UIL definitions using the
Mrm library. Mrm functions serve three basic purposes: file handling,
importing information from UIL, and exporting information to UIL.
Examples of each of these types of functionality appear in the
hello_world.c program in Chapter 22, Introduction to UIL.
The functions that import information create widgets that are defined
in object sections and retrieve data that is defined in
value sections. The functions that export information register
callbacks that are declared in procedure sections and
application data that is declared in identifier sections.
There are no Mrm functions that work with UIL lists, because unlike
other UIL entities, lists are strictly internal to a module.
In this chapter, we describe the role of UIL in each
major step of creating an application:
The showuid.c program is designed to display
a portion of a user interface that is defined in a UID file. The idea
is to allow you to examine the output of different UIL modules without
needing a separate program for every module. The complete source code
of this program appears in the source code
   /* showuid.c --
    * Program to show the interface defined in a UID file.
    */

   #include <stdio.h>
   #include <Mrm/MrmAppl.h>

   void quit();
   void print();

   static MrmRegisterArg callback_list[] = {
       { "quit",     (XtPointer) quit },
       { "print",    (XtPointer) print },
     /* Add additional callback procedures here... */
   };

   typedef struct {
       String root_widget_name;
   } app_data_t;

   static app_data_t app_data;

   static XtResource resources[] = {
       { "root", "Root", XmRString, sizeof(String),
           XtOffsetOf (app_data_t,root_widget_name), XmRString,
           (XtPointer) "root" },
   };

   static XrmOptionDescRec options[] = {
       { "-root", "root", XrmoptionSepArg, NULL },
   };

   void
   quit (w, client_data, call_data)
   Widget    w;
   XtPointer client_data;
   XtPointer call_data;
   {
       exit (0);
   }

   void
   print (w, client_data, call_data)
   Widget    w;
   XtPointer client_data;
   XtPointer call_data;
   {
       char *message = (char *) client_data;
       puts (message);
   }

   main (argc, argv)
   int   argc;
   char *argv[];
   {
       XtAppContext  app_context;
       Widget        toplevel;
       Widget        root_widget;
       Cardinal      status;
       MrmHierarchy  hierarchy;
       MrmType       class_code;

       XtSetLanguageProc (NULL, NULL, NULL);

       MrmInitialize();

       toplevel = XtVaAppInitialize (&app_context, "Demos", options,
           XtNumber(options), &argc, argv, NULL, NULL);

       XtGetApplicationResources (toplevel, &app_data, resources,
           XtNumber(resources), NULL, 0);

       /* Check number of args after Xt and App have removed their options. */
       if (argc < 2) {
           fprintf (stderr,
               "usage: showuid [Xt options] [-root name] uidfiles ...0);
           exit (1);
       }

       /* Use argc and arv to obtain UID file names from the command line.
          (Most applications use an internal static array of names.) */
       status = MrmOpenHierarchyPerDisplay (XtDisplay (toplevel), argc - 1,
           argv + 1, NULL, &hierarchy);

       if (status != MrmSUCCESS) {
           XtAppError (app_context, "MrmOpenHierarchyPerDisplay failed");
           exit (1);
       }

       MrmRegisterNames (callback_list, XtNumber (callback_list));

       status = MrmFetchWidget (hierarchy, app_data.root_widget_name,
           toplevel, &root_widget, &class_code);

       if (status != MrmSUCCESS) {
           XtAppError (app_context, "MrmFetchWidget failed");
           exit (1);
       }

       MrmCloseHierarchy (hierarchy);

       XtManageChild (root_widget);
       XtRealizeWidget (toplevel);

       XtAppMainLoop (app_context);
   }
This program is similar to the hello_world.c program in
Chapter 22, Introduction to UIL. However, we've made a few small
changes to make the program flexible enough to accommodate our needs in
this chapter. The main() procedure follows the steps required
of any Mrm program except that the UID files containing the interface
description and the name of the widget to be created are not hard-coded
in the program. This information is now specified on the command line,
so the program can be used to display different UID files and widget
trees.
The list of UID files passed to
MrmOpenHierarchyPerDisplay() is taken directly from the command
line. Since argv is in the format expected by the routine, we
pass it directly to the routine, after adding 1 to skip the
name of program in argv[0]; We then subtract 1 from
argc to account for the difference.
MrmOpenHierarchyPerDisplay() is called after the other command-line
arguments have been removed by XtVaAppInitialize() and
XtGetApplicationResources().
You can specify the name of the widget hierarchy
created by the program with the -root option. Xt takes care of
parsing the command-line switch and putting the value into the
app_data structure. (See Volume Four, X Toolkit Intrinsics
Programming Manual, for detailed information on this process.) If
you do not specify the -root option, the application uses
root as the default name. In most of the modules in this chapter,
we use the default name root for the top-level widget.
The following command compiles the showuid
program:
cc -o showuid showuid.c -lMrm -lXm -lXt -lX11To display a UID file, use the following command:
showuid -root form hello_world.uidThe command-line options tell the command to open a description file named hello_ world.uid and create the widget hierarchy rooted at the widget named form. Mrm searches for the UID files specified on the command line using the UIDPATH environment variable if it is set, or the default path described in Chapter 22. It is easy to run the command on a file in the current directory, since the current directory is included in the default search path. Remember that you can also specify an absolute path to a UID file.
We recommend that you use the showuid program
for trying out our examples as well as experimenting on your own. In
addition, the program is an excellent starting point for your own Mrm
programs. The basic Mrm framework is already in place. You only need to
add the callbacks that implement your application's functionality and
provide an array of UID files, instead of taking them from the command
line.
As you know, the main purpose of a UIL module is to define the widgets of a user interface. We mentioned earlier that widget definitions always occur in an object section of a UIL module, which begins with the keyword object followed by one or more widget definitions. The complete form of a widget definition is shown in the figure.
The figure may seem a little imposing at first, but
if we ignore all the optional parts of the definition, it is really
quite simple. the source code defines a PushButton widget named
root using only the required parts of a definition. This module,
along with the showuid.c program, comprise all the source
necessary for a complete application.
   /* trivial.uil -- Illustrate a minimal widget declaration. */

   module trivial

   object root : XmPushButton { };

   end module;
The widget definition in the source code consists of three parts, not
including the object keyword. The definition begins with the
widget name, which is a programmer-defined identifier. The name of the
widget in this example is root. The type of widget follows the
name; a colon separates the name and the type. Legal widget types
include all of the standard Motif widgets as well as the names of
specific instances of Motif widgets, such as XmMenuBar (a
RowColumn) or XmQuestionDialog (a MessageBox). You can find a
complete list of widget type names in Appendix D, Table of UIL
Objects, of Volume Six B, Motif Reference Manual. UIL also
supports non-Motif widgets with the user_defined type, which
we explain later in Chapter 26, Advanced UIL Programming. The
last, and usually largest, part of a widget definition is made up of
the widget attributes. In our simple definition, we do not specify any
attributes, but even so, we must include the curly braces that would
surround them. Widget definitions always end with a semicolon.
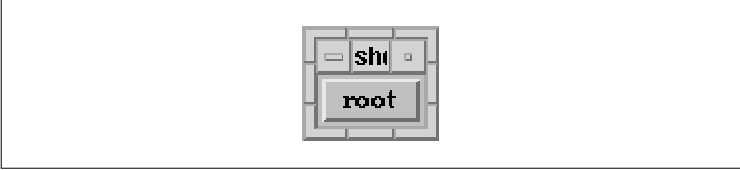
After compiling the module, we can display its
output with the showuid program. The following two commands
accomplish these steps:
   uil -o trivial.uid trivial.uil
   showuid trivial
You don't need to use the -root option because the PushButton uses the default widget name root. The output of the program appears in the figure.
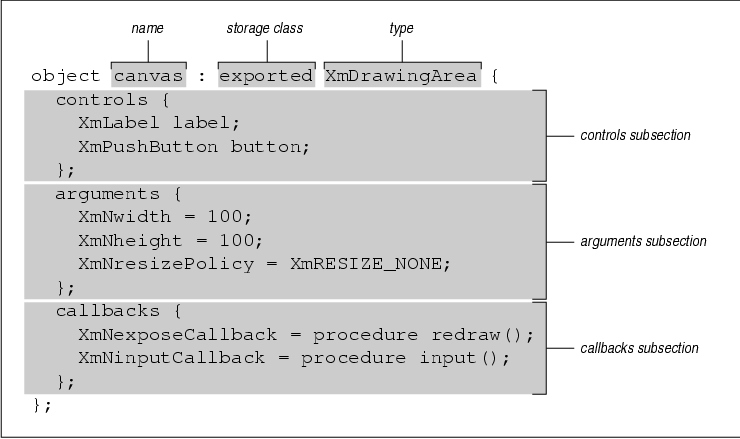
A bare-bones widget definition like the one in the
previous example is rare in even the simplest Motif applications. To
create a useful interface, you need a hierarchy of customized widgets,
which is where widget attributes enter the picture. When you define a
widget in UIL, you can specify children and resources in subsections of
its attribute section. The controls subsection contains a list
of a manager widget's children, and the arguments and
callbacks subsections contain lists of the widget's resource and
callback settings. Each subsection begins with the subsection name
followed by a list of children, resources, or callback settings. Each
subsection can occur only once in a single widget definition, but they
can occur in any order. The controls subsection of a widget
definition is where you specify the children of the widget. The name of
this subsection was chosen because the parent widget manages, or
controls, the child widgets. The module in the source code shows a
typical usage of the controls subsection.
   /* kids.uil -- Simple demonstration of the controls subsection. */

   module kids

   object top : XmTextField { };

   object bottom : XmPushButton { };

   object root : XmPanedWindow {
     controls {
       XmTextField top;
       XmPushButton bottom;
     };
   };

   end module;
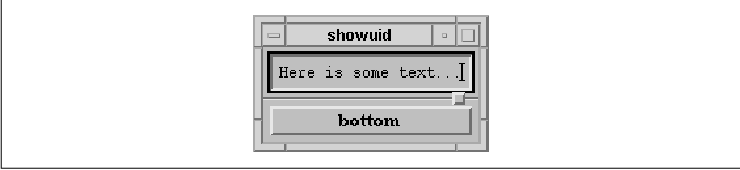
In this example, we define three widgets: a TextField, a PushButton,
and a PanedWindow. The controls subsection of the PanedWindow
specifies that the TextField and the PushButton are its children. The
example illustrates the form of an entry in a controls
subsection, where the widget type is followed by the name of a widget
and a semicolon. Even though the type of the widget has already been
specified in a separate widget definition, you must specify it again
here. In this example, we define the children before their parent, but
widgets referenced in a controls subsection can be defined
anywhere in the UIL module because UIL allows forward references. The
output of the module is shown in the figure, where we typed some text
in the TextField.
Each of the three widget definitions begins with
object, which means that each of them is in a separate object
section. Technically, you only need the object keyword before
the first widget in consecutive definitions. Although the convention of
placing an object keyword before each definition requires a
bit more typing, it makes definitions easier to recognize and move
around in a module.
One advantage of defining your interface with UIL is
that the compiler always makes sure that the children listed in a
controls subsection are allowed for that parent. If you try to use
an unsupported widget, the UIL compiler issues an error message, and
the compilation fails. Appendix D, Table of UIL Objects, in
Volume Six B, Motif Reference Manual, contains a complete
listing of the Motif widgets and the children that they support. In
contrast, when you create widgets directly with Xt, there is no
compile-time checking that makes sure the widget hierarchy is valid.
Many of the Motif manager widgets provide some form of run-time
checking, but we don't recommend relying on this behavior.
The presence of a widget definition in a UIL module
does not necessarily mean that the widget is created at run-time. A
widget is not created until you fetch it directly with
MrmFetchWidget() or MrmFetchWidgetOverride(), or it
appears in a widget hierarchy fetched with one of these routines. By
referencing a widget in a controls subsection, you make it
part of a widget hierarchy. When the hierarchy is fetched, all of the
widgets in the hierarchy are created. (The widget creation process is
described in Section #suilcreate.) If a widget is defined, but never
referenced or fetched from an application, it is never created.
When a widget is created based on a UIL definition,
you are not limited to creating a single instance of it. Every call to
MrmFetchWidget() or MrmFetchWidgetOverride() results in
the creation of a new widget, assuming a definition is found. In
addition, each widget reference in a controls subsection
results in the creation of an instance of that widget when the
enclosing hierarchy is fetched. This behavior lets you reuse a widget
as often as necessary. You can reuse widgets at any level, from a
single widget to an entire hierarchy. You can place a complete widget
definition inside a controls subsection, instead of
referencing a widget defined elsewhere. For example, we can move the
child widget definitions from the source code into the body of the
PanedWindow definition, as shown in the following fragment:
   object root : XmPanedWindow {
     controls {
       top : XmText { };
       bottom : XmPushButton { };
     };
   };
The form of an in-line widget definition is the same as a widget
definition in an object section. In-line definitions are most
useful for specifying widget children that have few or no attributes.
While larger definitions are allowed, they tend to clutter up the
parent definition, which makes both reading and editing the module more
difficult.
Unlike widgets defined in an object section, the
name of an in-line widget is optional. This feature is most frequently
used in menu definitions, as the following fragment illustrates:
   object file_menu : XmPulldownMenu {
     controls {
       XmPushButton open;
       XmPushButton print;
       XmSeparator { };
       XmPushButton quit;
     };
   };
This definition contains an unnamed Separator, along with references to
three PushButtons that are defined elsewhere. In this situation, it is
worthwhile to create a stand-alone definition for the Separator because
it doesn't have any attributes. The UIL compiler automatically
generates a name when you don't provide one. The format of these names
is not documented and can vary from one compilation to the next. If a
widget does not have a well-defined name, neither you nor the users of
your application can customize it using X resource files. If you want
to allow such customizations, you must explicitly name the widget. When
you define an object of a class that has both a widget and a gadget
variant, you can specify in the definition which type is created. Motif
supports widget and gadget variants of the Label, PushButton,
ToggleButton, ArrowButton, CascadeButton, and Separator objects. As we
explained in Section #suiloptions, you can specify the default type for
each class in the objects option setting at the top of a
module. If you do not set this option, widgets are used by default. The
following code fragment demonstrates how to define a PushButtonGadget,
regardless of the default PushButton type setting:
object push_me : XmPushButton gadget { };
UIL also supports the type names with Gadget appended, so the
following definition is also legal:
object toggle_me : XmToggleButtonGadget { };
You can use the widget keyword to ensure that the widget
version of an object is created, as shown in the following fragment:
object this_way : XmArrowButton widget { };
This syntax is the only way to specify a widget variant; the UIL
compiler does not recognize type names such as XmArrowButtonWidget
. Several Motif widgets are compound objects, which means that they are
composed of one or more simpler widgets. For example, the
FileSelectionBox is a complete dialog box packaged as a widget; it
contains Lists, TextFields, Labels and PushButtons. As of Motif 1.2,
UIL lets you access and customize the automatically-created children of
a compound object. Like other child widgets, you reference
automatically-created children in the controls subsection of
their parent, although the syntax is slightly different. The following
code fragment illustrates this syntax:
   object yes_or_no : XmQuestionDialog {
     controls {
       Xm_OK {
         arguments {
           XmNlabelType = XmPIXMAP;
           XmNlabelPixmap = xbitmapfile ('thumb_up.xbm');
         };
       };
     };
   };
This fragment shows how to make the OK PushButtons in a
QuestionDialog display an icon instead of the usual text string. The
name of this button is Xm_OK. The name is followed by
attribute settings, just like any other widget definition. lists the
names of all the automatically-created children of each of the Motif
composite widgets. tab(@), linesize(2); lp9 | lp9 lp9 | lp9.
   object panel : XmRowColumn {
     controls {
       XmPushButton visible;
       unmanaged XmPushButton invisible;
     };
   };

   object error : XmErrorDialog {
     controls {
       Xm_Help unmanaged { };
     };
   };
When the panel RowColumn widget is created, both PushButtons
are created, but only the first one is managed. When you want to manage
the other button, your application code must handle it, just like it
must manage dialogs and popup menus. You can also unmanage
automatically-created children as shown in the second object definition
above. In this case, the unmanaged keyword follows the name of
the automatically-created widget instead of preceding it. In UIL, you
specify resources (with the exception of callbacks) in the
arguments subsection of a widget definition. The UIL module in the
source code shows several examples of resource settings.
   /* resource.uil - Basic example of setting widget resources. */

   module resource

   object root : XmPushButton {
     arguments {
       XmNlabelString = "Candy-Gram!";
       XmNmarginWidth = 350;
       XmNmarginHeight = 350;
       XmNunitType = Xm100TH_MILLIMETERS;
       XmNforeground = color ('SlateGrey');
       XmNbackground = color ('LemonChiffon');
       XmNfontList = font ('*times-bold-r-normal*180-100-100*');
     };
   };

   end module;
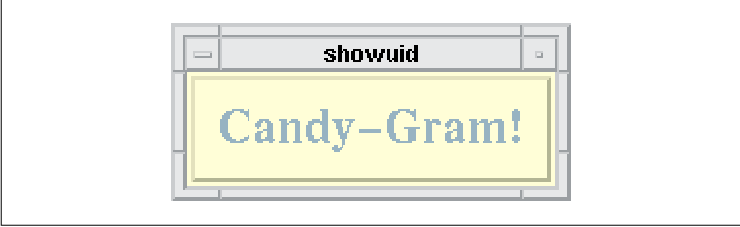
In this example, we set several PushButton resources. These settings
demonstrate the use of a number of UIL data types. However, we're not
going to discuss the data types right now, as they are covered later in
Section #suiltypes. The basic format of each setting is the same. Each
consists of a resource name, an equal sign (=), a value, and a
semicolon. the figure shows the output of this example, which is quite
different from the simple PushButtons in our earlier examples.
Creating a PushButton with the same resource
settings in application code requires a lot more work. You need to
declare variables for the XmString, Color, and
XmFontList values and then you must create or allocate each of
these values by calling various Xm, Xt, and X routines. After the
values are created, you can create the widget. Any values copied by the
widget should be freed. When you use UIL and Mrm, all of this work
boils down to the much simpler widget definition shown above and a
single call to MrmFetchWidget().
The UIL compiler checks resource names, so if you
specify a resource that is not supported by a widget, the compiler
generates an error message. In contrast, if you try to set an
unsupported resource with XtSetValues(), Xt ignores the
resource and does not generate an error. By using UIL, you can also
avoid setting a resource to the wrong type of value because the UIL
compiler ensures that the type of resource matches the type of the
value you assign to it. (Appendix C, Table of Motif Resources,
in Volume Six B, Motif Reference Manual, contains a complete
list of Motif widget resources and their associated types.) Once again,
this type of error is not caught in C code when you use
XtSetValues() or XtVaSetValues(). Unrecognized resource
names are also ignored in X resource files.
The disadvantages of specifying resource values in
code and in resource files may give you the impression that you should
always set resources from a UIL module. However, there are also
disadvantages to setting resources in UIL. The main disadvantage is
that users of your application cannot override UIL settings with their
own resource settings. In Section #suilres we take a closer look at the
issues involved in deciding whether to set a resource in UIL,
application code, or an X resource file. The type of a value you assign
to a resource must match the type of the resource. However, there are a
few cases in which the UIL compiler automatically converts a value to
the appropriate type. The supported conversions are shown in lp9 | lp9
lp9 | lp9. Value Type Automatically Converted To
_
string compound_string asciz_string_table
compound_string_table font font_list
fontset font_list icon pixmap
xbitmapfile pixmap rgb color _ This
feature is most useful when you are working with string and font
values. the source code relies on the string to
compound_string (XmString) conversion for setting the
XmNlabelString resource. Several of the Motif widgets have array
resources for which there is an associated count resource that
indicates the size of the table. These resource pairs are given special
treatment by the UIL compiler. Whenever you set one of the resources
listed in UIL automatically sets the corresponding count resource for
you. lp9 | lp9 | lp9 lp9 | lp9 | lp9. Widget Table Resource Coupled
Count Resource
_
XmList XmNitems XmNitemCount XmList
XmNselectedItems XmNselectedItemCount XmSelectionBox
XmNlistItems XmNlistItemCount XmCommand
XmNhistoryItems XmNhistoryItemCount XmFileSelectionBox
XmNdirListItems XmNdirListItemCount XmFileSelectionBox
XmNfileListItems XmNfileListItemCount XmText
XmNselectionArray XmNselectionArrayCount XmTextField
XmNselectionArray XmNselectionArrayCount _ The following
code fragment illustrates this feature:
   object toppings : XmScrolledList {
     arguments {
       XmNitems = string_table ("Anchovies", "Extra Cheese", "Ham",
         "Mushroom", "Pepperoni", "Peppers", "Pineapple", "Sausage");
       XmNselectedItems = string_table ("Ham", "Pineapple");
       XmNvisibleItemCount = 6;
     };
   };
This fragment sets two XmStringTable resources in a List
widget. We do not have to set the XmNitemCount or
XmNselectedItemCount resources because the UIL compiler sets them
automatically. Although callbacks are really just another type of
resource, you specify them separately in the callbacks
subsection of a widget definition. Since callback functions are
implemented in application code, the process of setting up callbacks
involves a few more steps than the specification of other attributes.
We explained the basics of this process in Chapter 22, Introduction
to UIL. In this section, we describe how to add a callback
procedure to a widget. In Section #suilproc, we discuss declaring
callbacks, specifying callback arguments, and registering callbacks
with Mrm.
Setting a callback in a UIL module requires two
steps. First, you declare the callback in a procedure section,
and then you specify the callback in a widget definition. The module in
the source code illustrates this process.
   /* cb.uil - Plain and simple callback setting example. */

   module cb

   procedure
     print (string);
     quit();

   object Hello : XmPushButton {
     callbacks {
       XmNactivateCallback = procedure print ("hello!");
     };
   };

   object Goodbye : XmPushButton {
     callbacks {
       XmNactivateCallback = procedures {
         print ("goodbye!");
         quit();
       };
     };
   };

   object root : XmRowColumn {
     controls {
       XmPushButton Hello;
       XmPushButton Goodbye;
     };
   };

   end module;
The callback declarations in the procedure section tell the
UIL compiler that the procedures are defined externally in the
application program. A callback setting looks similar to a resource
setting; it always begins with the name of a callback, such as
XmNactivateCallback, and is followed by an equal sign. The
right-hand side of the setting varies depending on the number of
callback procedures you are specifying. A single callback is specified
with the keyword procedure followed by the callback
invocation. Multiple callbacks are specified with the keyword
procedures followed by a list of callback invocations.
In the source code the XmNactivateCallback
of the Hello PushButton is set to the single callback procedure
print(), while the XmNactivateCallback of the Goodbye
PushButton is set to the two callbacks print() and quit()
. You cannot specify multiple callbacks by setting the same callback
more than once because when you set the same resource or callback
multiple times, only the last setting is used. The Xt specification
doesn't guarantee the order in which callbacks are called, as widgets
can reorder callback lists internally. In nearly all cases, however,
callbacks are called in the order that they are listed.
As with resource settings in an arguments
section, the UIL compiler makes sure that the callbacks you set in a
callbacks subsection exist and are supported by the widget. When
you add callbacks in application code, there is nothing to prevent you
from setting a callback on a widget that does not support it. This
problem is not caught at compile-time or run-time by Xt.
When the source code for an application grows beyond
a certain size, you normally split it into multiple source files. You
can use the same technique to divide an interface description among
multiple UIL modules. When you use this technique, one module must
often reference a widget that is defined in another module. UIL
supports this technique by allowing you to export a widget definition
from one module and import, or reference, the definition in another
module. A widget definition is exported by using the optional
exported storage specifier before the widget type name in the
definition, as shown in the source code
   /* first.uil - First half of a two-module interface description. */

   module first

   object top : exported XmText { };

   end module;
An exported definition looks and acts just like a regular
definition. The difference is that you can access an exported widget in
another module by declaring it with the imported storage class
specifier. This technique is illustrated in the source code which
imports the top widget from the source code
   /* second.uil - Second half of a two-module interface description. */

   module second

   object top : imported XmText;

   object bottom : XmPushButton { };

   object root : XmPanedWindow {
     controls {
       XmText top;
       XmPushButton bottom;
     };
   };

   end module;
Since the imported declaration refers to a widget defined
elsewhere, you cannot specify attributes for the widget and must end
the declaration immediately after the type name, as shown in this
example. You can think of an imported widget declaration as
having the same meaning as an extern variable declaration in
C. Collectively, the two modules describe the same interface as the
source code After compiling these two modules, you can view the
interface with the following command:
showuid first secondPlacing a single widget in a separate file, as we've done in this example, is clearly a trivial example of sharing widgets. This technique makes more sense when you are creating a larger interface for a real application. You can see a more realistic example of sharing widgets in Chapter 25, Building an Application With UIL.
Widget definitions, like top-level variable
definitions in C, are global by default, which means that you really
don't need to use the exported storage specifier. However, we
recommend using it when you plan to reference a widget in another
module because it clearly indicates which widget definitions you expect
to use elsewhere. When you import a widget, UIL assumes that the widget
class in the imported declaration matches the class of the
widget definition. If you make a mistake and import a widget that is
different from its declared class, you defeat the compiler's
type-checking of the imported widget and may run into problems at
run-time. Although some of the Motif managers can detect an attempt to
create an unsupported child, you should ensure that your widget
definitions and declarations match rather than relying on possible
run-time detection.
UIL also supports the private storage
specifier. This specifier allows you to restrict the use of a widget
definition to the module in which it occurs. The static
storage class specifier in C has the same effect on C functions and
variables. As of Motif 1.2, however, widgets defined as private
can still be accessed from other modules. Although the private
storage specifier is rarely used, you can specify it if you want to
protect access to private widgets (assuming the problem will be fixed),
or if you want to explicitly indicate that a widget should not be
referenced elsewhere.
Now that you know how to define widgets in a UIL
module, we can take a closer look at how to create widgets at run-time
using MrmFetchWidget(). In Chapter 22, Introduction to UIL
, we showed you the basics of using MrmFetchWidget() to create
a widget or a widget hierarchy. As a reminder, this function takes the
following form:
   Cardinal
   MrmFetchWidget(hierarchy, widget_name, parent, widget_return,
                  class_return)
       MrmHierarchy   hierarchy;
       String         widget_name;
       Widget         parent;
       Widget        *widget_return;
       MrmType       *class_return;
The hierarchy argument is an MrmHierarchy that
has been opened with MrmOpenHierarchyPerDisplay(). The
widget_name parameter is the name of the widget to fetch. The
parent argument is the parent of the widget that is to be
created. On success, widget_return contains the widget
ID of the widget and class_return contains the internal
UIL class code for the widget.
You can also fetch a widget by calling
MrmFetchWidgetOverride(), which lets you override resource settings
in the application. This routine takes the following form:
   Cardinal
   MrmFetchWidgetOverride(hierarchy, widget_name, parent, override_name,
                          arg_list, num_args, widget_return, class_return)
       MrmHierarchy   hierarchy;
       String         widget_name;
       Widget         parent;
       String         override_name;
       ArgList        arg_list;
       Cardinal       num_args;
       Widget        *widget_return;
       MrmType       *class_return;
The override_name argument lets you specify a name for
the widget that differs from widget_name.
widget_name is used only to look up the widget definition. If
override_name is NULL, widget_name
is used for the name. The arg_list and num_arg
parameters specify a standard array of Xt resource name-value
pairs. Any resources specified in this list override those specified in
the widget definition from the UIL module. The rest of the parameters
are the same as for MrmFetchWidget().
For each of these functions, Mrm first makes sure that the hierarchy specified is valid and open. If you supply an invalid hierarchy to a function, it immediately fails and returns MrmBAD_HIERARCHY. Assuming the hierarchy is valid, the two routines use the widget creation algorithm illustrated in the figure and described in the following sections.
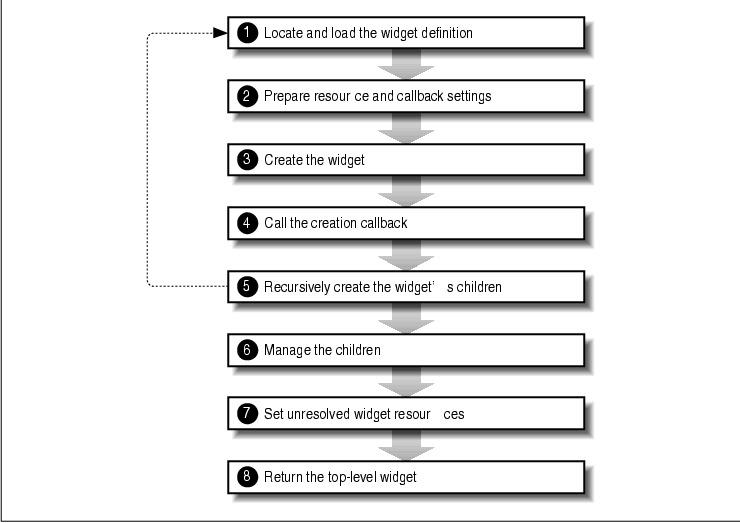
Mrm begins the widget creation process by searching
for the widget definition in the UID files associated with the
hierarchy. The files are searched in the same order as they appear in
the array passed to MrmOpenHierarchyPerDisplay(). The search
order matters when two widgets with the same name are defined in
different files, as Mrm uses the first definition that it finds. Once
Mrm locates the widget definition, it reads it from the UID file and
moves on to the next step. If Mrm cannot find the widget after looking
in each file, it prints a warning message by calling XtAppWarning()
.
If the missing widget is at the root of the
hierarchy that the application is fetching, MrmFetchWidget()
returns a status of MrmNOT_FOUND. But if the missing widget is
one of its descendents, the widget hierarchy creation process
continues, minus one widget. While a failure to create a child widget
is bound to cause problems for your application, MrmFetchWidget()
unfortunately returns MrmSUCCESS as long as the top-level
widget is created. Before Mrm creates a widget, any resource or
callback settings are put into an ArgList. Many resource
settings, such as colors and fonts, are created and maintained by the X
server, which means that they cannot be stored in a UID file. Instead,
descriptions of these values are stored in the UID file. Mrm creates
the actual values at run-time based on these descriptions. Other
values, such as integers, strings, and XmStrings, are read
from the UID file and placed directly into the ArgList. Mrm
also converts callback names stored in the UID file to function
pointers that the application registered by calling
MrmRegisterNames() or MrmRegisterNamesInHierarchy().
If for any reason Mrm cannot create a resource value
or cannot find a the specific resource or callback and prints a warning
message using XtAppWarning(). This type of failure does not
prevent Mrm from creating the widget, and the status returned by
MrmFetchWidget() or MrmFetchWidgetOverride() does not
indicate that a problem occurred.
If you are fetching a widget with
MrmFetchWidgetOverride(), callback function pointer to match a
callback name, it does not set the ArgList you pass to this
function is appended to the internally generated ArgList of
the top-level widget. Override arguments do not affect any widgets
further down in the hierarchy. Since Xt uses the last occurrence of a
resource or callback setting in an ArgList to set the value,
the settings from the application program override any settings
specified in the widget definition. You can also override widget
resource settings after a widget is created by using
MrmFetchSetValues(), which is described in Section #suilfetch. Now
Mrm calls the widget creation function corresponding to the class of
the widget. For the built-in Motif widgets, Mrm uses the Motif
convenience functions, such as XmCreatePushButton(). Some
widgets, like the FileSelectionBox, create their own children at the
time they themselves are created. Mrm is aware of these children, but
is not responsible for their creation. For user_defined
widgets, Mrm calls the creation procedure that you specified when
registering the widget. (User-defined widgets are described in Section
#suiluserdef.) Mrm does not manage the widget at this point in the
procoess. In addition to the callbacks that are part of each widget,
Mrm and UIL support a special creation callback, MrmNcreateCallback
, which is invoked by Mrm immediately after the widget is created. In
the case of an automatically-created child, the callback is invoked
after its resources are set. The widgets are not aware of the callback,
since it is handled directly by Mrm. The MrmNcreateCallback
takes the same form as any other callback and is specified in the
callbacks subsection of a widget definition. The client_data
argument is an XmAnyCallbackStruct, which is defined in <
Xm/Xm.h> as follows:
   typedef struct {
       int     reason;
       XEvent *event;
   } XmAnyCallbackStruct;
The reason field is always set to MrmCR_CREATE, and
the event pointer is always NULL. You can use this
callback to handle almost anything you would normally do in a standard
Xt program after creating a widget. At this point, the widget creation
process becomes recursive. If the newly-created widget has any children
specified in its controls subsection, Mrm creates them now.
Mrm uses the process just described to create each of the children.
Automatically-created children are also processed recursively so that
Mrm can handle any resources or callbacks specified in the UIL file.
Instead of creating an automatically-created child in the widget
creation step, Mrm just sets the resources and callbacks using the
XtArgList for the child.
The recursive nature of the widget creation process
allows you to create, with a single function call, a user interface
that consists of an arbitrarily large widget hierarchy. This behavior
is what makes MrmFetchWidget() and
MrmFetchWidgetOverride() so powerful. As we mentioned earlier, if
Mrm cannot create a child widget, it prints a warning message using
XtAppWarning() and continues with the next child. In general, both
fetch functions continue working through just about any type of
failure, short of not finding the definition of the top-level widget in
the hierarchy. If any children have been created, Mrm now manages them.
Mrm manages all non-Shell children that are part of the controls
subsection of the parent widget, unless they are declared as
unmanaged. Since the creation process is recursive, any children of
the widgets that are being managed have been managed previously. The
top-level widget that is being fetched is not managed by Mrm because
the management step only applies to the children of a widget. After all
of the widgets in the hierarchy have been created, there may still be
some resources that Mrm needs to set because UIL allows you to make
forward references to widgets. As a result, you can specify widgets in
resource settings and as callback arguments without worrying about the
creation order of the widgets involved. If you reference a widget
before it is defined, Mrm cannot resolve the reference when it is
encountered. To handle this situation, Mrm remembers the reference and
resolves it once all of the widgets in the hierarchy have been created.
The ability to use forward references makes UIL
quite flexible. One situation where this feature is useful is when you
create an interface that uses the Form widget. With UIL, you can
specify complex Form attachments without having to worry about the
creation order of the widgets. The one limitation to this feature is
that it only works within a single call to MrmFetchWidget().
During a call to MrmFetchWidget(), Mrm maintains a list of the
widgets that have been created, which means that you can only reference
a widget that is part of the hierarchy created by the current call. If
you need to set a resource to a widget in another hierarchy, you can
set it using the MrmNcreateCallback or set it after the
hierarchy has been created. After the entire hierarchy has been
created, Mrm returns the widget ID of the top-level widget to the
application. The top-level widget is the one that you name in the
MrmFetchWidget() or MrmFetchWidgetOverride() function
call. Remember that Mrm does not manage this widget, so an application
must explicitly call XtManageChild() on the widget. Although
the widget creation process is rather involved, all you really need is
a general understanding of the process. If you encounter problems with
Mrm widget creation, you can return to this section to brush up on the
details.
UIL supports over 20 different data types, which
gives you the ability to specify values for nearly every Motif
resource. In addition, most types of values can be passed as the
client_data argument to your callbacks or retrieved on demand from
a UID file by Mrm. Each of the types has its own syntax so that the UIL
compiler can distinguish between them. But before we describe the
syntax of each value, we need to look at defining symbolic variables
and retrieving variables at run-time using Mrm.
Variables provide a convenient and descriptive way
to refer to values. Variables are defined in a value section
of a UIL module. This section begins with the keyword value
and consists of one or more variable definitions. Most value
sections define variables for familiar values like integers and
strings, as shown in the following fragment:
   value
     spacing : 10;
     warning : "Aviso";
A value definition consists of an identifier followed by a colon, the
value assigned to the identifier, and a semicolon.
UIL supports forward references to variables, so you
don't need to declare or define a variable before you reference it.
However, we recommend that you avoid forward references for a couple of
reasons. The first reason is purely stylistic. Programmers expect to
see a definition or declaration before a reference, since it is
required by many programming languages. A module is also easier to read
if variables are defined or declared before they are used. Another
reason has to do with the UIL compiler. While forward references tend
to work most of the time, problems with the compiler may cause
unexpected errors depending on the context in which you use a
forward-referenced variable.
Like widgets, you can share most values between
modules by defining an exported value in one module and
declaring it imported in another module. This feature is
commonly used to maintain strings in a separate module from the
interface definition for internationalization purposes. (This style of
internationalization is illustrated in Section #suili18n.) You can
specify a storage class of private (the default) or
exported just before the value in a declaration, as shown in the
following fragment:
   value
     ducks : private 7;
     swans : 3;
     geese : exported 5;
The variables ducks and swans are accessible only in
the module in which they are defined, while the variable geese
is accessible from any module. Unlike private widget
definitions, private variables really are private, so you
cannot access them from another module. You can also retrieve
exported values from an application, as you'll see shortly. You can
use a variable from another module by declaring it as an imported
variable. The syntax is similar to an imported widget
declaration, as shown below:
   value
     geese : imported integer;
Like imported widgets, you need to make sure that the type of
an imported variable matches the type in its definition. If
they do not match, there's a good chance you'll run into problems when
you create a widget that references the imported value.
As we mentioned earlier, an application can read all
types of exported variables from a UIL module, with the
exception of character_set and color_table values.
You retrieve most exported variables using
MrmFetchLiteral(). However, pixmap and color are
retrieved with special routines that we'll describe later. Fetching
values from a UIL module is useful for obtaining internationalized
strings or widget resource values that change dynamically based on the
state of the program. MrmFetchLiteral() takes the following
form:
   Cardinal
   MrmFetchLiteral(hierarchy, name, display, value_return, type_return)
       MrmHierarchy   hierarchy;
       String         name;
       Display       *display;
       XtPointer     *value_return;
       MrmCode       *type_return)
Mrm looks for the variable specified by name in the UID
files associated with the hierarchy parameter. The
files are searched in the same order as they appeared in the array of
files passed to MrmOpenHierarchyPerDisplay(), so if two
variables with the same name occur in separate files, you'll get the
value from the first file in the list. When a value is fetched
successfully, the function returns MrmSUCCESS, fills in
value_return with a pointer to the value, and fills in
type_return with a constant from <Mrm/MrmPublic.h>
indicating the type of value. If MrmFetchLiteral() cannot find
the variable in any of the UID files, it returns MrmNOT_FOUND.
The value_return parameter usually
contains a pointer to the value that you fetched, even for types such
as integer and boolean. You can check the type by
examining type_return. lists each UIL data type, the
type of the value placed in value_return, and the
associated type identifier placed in type_return.
tab(@), linesize(2); lp9 | lp9 | lp9 | lp9 lp8w(1i)
| lp8 | lp8 | lp8.
Type@Mrm Return Type@C Return Type@Free Routine
_
asciz_table@MrmRtypeChar8Vector@String*@
XtFree() boolean@MrmRtypeBoolean@int*@
XtFree() class_rec_name@MrmRtypeClassRecName@
WidgetClass@N/A color@N/A@Pixel@XFreeColors()
compound_string@MrmRtypeCString@XmString@
XmStringFree() T{ compound_
string_table T}@MrmRtypeCStringVector@
XmStringTable@XtFree() float@MrmRtypeFloat
@double*@XtFree() font@MrmRtypeFont@
XFontStruct*@N/A fontset@MrmRtypeFontSet@
XFontSet@N/A font_table@MrmRtypeFontList@
XmFontList@XmFonyListFree() icon@N/A@Pixmap
@XFreePixmap() integer@MrmRtypeInteger@
int*@XtFree() integer_table@
MrmRtypeIntegerVector@int*@XtFree() keysym
@MrmRtypeKeysym@char@N/A rgb@N/A@Pixel
@XFreeColors() single_float@MrmRtypeSingleFloat
@float*@XtFree() string@MrmRtypeChar8
@String@XtFree() translation_table@
MrmRtypeTransTable@XtTranslations@N/A wide_character
@MrmRtypeWideCharacter@wchar_t*@XtFree()
xbitmapfile@N/A@Pixmap@XFreePixmap() _ Mrm
allocates an int for boolean values, so you cannot
use the Xt Boolean type because on some machines it is defined
as a char. However, you can still assign the int that
is returned to a Boolean. The specialized routines
MrmFetchBitmapLiteral(), MrmFetchColorLiteral(), and
MrmFetchIconLiteral() do not have an MrmType argument. If
the named value is not the right type, a status of MrmWRONG_TYPE
is returned. Mrm allocates storage for most of the values returned by
MrmFetchLiteral(). The application is responsible for freeing the
storage; it uses the routine indicated in However, note that you should
not free font or fontset values because they are
cached by Mrm and are reused as needed. There is no need to free
class_rec_name or keysym values because they are returned
by value, and you cannot free translation_table values
because Xt does not provide a way to free them. In addition, Mrm
allocates asciz_string_table, compound_string_table,
and integer_table values in a single chunk of memory, which
means you should free them with a single call, rather than freeing the
individual elements.
The following code fragment illustrates using
MrmFetchLiteral() to fetch a string and an integer
:
   extern MrmHierarchy hierarchy;
   extern Widget toplevel;
   Cardinal status;
   MrmCode type;
   String animal;
   int *count;

   status = MrmFetchLiteral (hierarchy, "animal", XtDisplay(toplevel),
       (XtPointer) &animal, &type);
   if (status != MrmSUCCESS || type != MrmRtypeChar8)
       error ();

   status = MrmFetchLiteral (hierarchy, "count", XtDisplay(toplevel),
       (XtPointer) &count, &type);
   if (status != MrmSUCCESS || type != MrmRtypeInteger)
       error ();

   printf ("There are %d %s0, *count, animal);

   XtFree (count);
   XtFree (animal);
Mrm fills in the string pointer and the integer pointer with the values
from the UID file. The integer value is returned as a pointer
to an integer. We check the types of the values returned just in case
the values are not a string and an integer as
expected. The two values can be defined in a UIL module as follows:
   value
     animal : exported "frogs";
     count  : 7;
With MrmFetchLiteral(), you can retrieve values from a UIL
module that are not necessarily part of the user interface, such as
printed error messages and program configuration values.
Since values fetched from a UIL module are often
used to set resources of existing widgets, Mrm provides a function that
handles this situation. If you use MrmFetchLiteral(), you
still have to call XtVaSetValues() to set the values.
MrmFetchSetValues() handles both fetching the values and setting
the resources. This routine takes the following form:
   Cardinal
   MrmFetchSetValues(hierarchy, widget, args, num_args)
       MrmHierarchy  hierarchy;
       Widget        widget;
       ArgList       args;
       Cardinal      num_args;
The hierarchy argument specifies the Mrm hierarchy, and
widget specifies the widget on which to set the values.
The args parameter is an array of resource settings,
and num_args specifies the size of the array. Each
array element is an Arg structure, which is defined as
follows:
   typedef struct {
       String    name;
       XtArgVal  value;
   } Arg, *ArgList;
This structure is the same one used with XtSetValues(), but it
is used in a slightly different way. When you call
MrmFetchSetValues(), the name field still specifies the
name of a resource, but the value field names a UIL variable
that contains the value instead of specifying the value directly. The
function and its structure are demonstrated in the Message()
routine shown in the source code
   extern Widget message_dialog;
   ...
   void
   Message(hierarchy, name)
   MrmHierarchy hierarchy;
   String name;
   {
       char msg_buf[33], type_buf[3];
       Arg args[2];

       sprintf (type_buf, "%s_type", name);
       sprintf (msg_buf, "%s_msg", name);

       args[0].name = XmNdialogType;
       args[0].value = (XtArgVal) type_buf;

       args[1].name = XmNmessageString;
       args[1].value = (XtArgVal) msg_buf;

       MrmFetchSetValues (hierarchy, message_dialog, args, XtNumber (args));
       XtManageChild (message_dialog);
   }
This function uses its name argument to form two UIL variable
names and calls MrmFetchSetValues() to fetch the values and
set the resources of a MessageDialog. The string buffers are only 33
characters long because a UIL variable name can be at most 32
characters long. The corresponding variable definitions in a UIL module
might look like the following:
   value
     fnf_msg  : exported compound_string ("File not found!");
     fnf_type : exported XmDIALOG_ERROR;
     dsl_msg  : exported compound_string ("Almost out of disk space.");
     dsl_type : exported XmDIALOG_WARNING;
An application could use the following function calls to display the
MessageDialog with these messages:
     Message (hierarchy, "fnf");
     Message (hierarchy, "dsl");
Each message string is explicitly defined as a
compound_string in the UIL module. The UIL compiler only converts a
NULL-terminated string to a compound_string
when it is assigned to an XmString resource.
UIL supports several numeric value types,
specifically integers, booleans, floating point values, and integer
arrays. In addition, UIL understands C-like numeric expressions and
lets you explicitly convert numeric values from one type to another.
Let's begin by looking at UIL integer values. The following fragment
illustrates how you can define integer variables and set widget
resources to integer values:
   value
     spacing : 5;
     font_size : exported -2;

   object rc : XmRowColumn {
     arguments {
       XmNmarginWidth = 3;
       XmNspacing = spacing;
     };
   };
Unlike in C, the boolean type is built into
UIL. You represent boolean values with the the reserved
keywords true, false, on and off,
as shown in the following code fragment:
   value
     alive : true;
     debug : exported true;

   object button : XmPushButton {
     arguments {
       XmNwidth = 100;
       XmNrecomputeSize = false;
       XmNsensitive = alive;
       XmNtraversalOn = off;
     };
   };
The keywords true and on both represent true values,
while false and off are both false values.
Although none of the Motif widgets use floating
point resources, UIL provides support for floating point values.
Floating point values must contain a decimal point so that the UIL
compiler can distinguish them from integers. The following code
fragment shows a value section that defines several floating
point variables:
   value
     pi : 3.14159;
     Avogadro: exported 6.023e23;
     slope : -3.3337;
     millisecond: 1e-3;
Floating point values can be defined both with and
without exponents. A floating point value defined in UIL is stored as a
C double. Although you probably won't use floats very often,
some potential uses include setting resources of user-defined widgets,
exporting them back to the application, and passing them as callback
arguments. Even though UIL is a static description language, you can
use numeric expressions that are very similar to C expressions.
Expressions in UIL are evaluated at compile-time, not at run-time. UIL
supports the standard operators for use with integer, floating point,
and boolean values. summarizes these operators and their precedence
order. As with C, you can add parentheses to change the order of
evaluation.
lp9 | lp9 | lp9 | lp9 | lp9 lp9 | lp9 | lp9 | lp9 |
lp9. Operator Type Operand Types Operation Precedence
_
~ unary boolean NOT 1 (highest) integer One's complement 1
- unary integer Negation 1 float Negation 1 + unary
integer None 1 float None 1 * binary integer Multiplication 2
float Multiplication 2 / binary integer Division 2 float
Division 2 + binary integer Addition 3 float Addition 3 -
binary integer Subtraction 3 float Subtraction 3 >> binary
integer Shift right 4 << binary integer Shift left 4 &
binary boolean AND 5 integer Bitwise AND 5 | binary boolean OR
6 integer Bitwise OR 6 ^ binary boolean XOR 6 integer Bitwise
XOR 6 (lowest)
_
You can use a numeric expression just about anywhere
that a numeric value is expected. In early releases of Motif 1.2, if
you use an expression in an rgb definition, the result is
always zero. However, the UIL compiler does place some restrictions on
expressions. An expression must evaluate to a known value when you
compile a module, which means that you cannot use imported numeric
values in an expression since the unknown value prevents the compiler
from evaluating the expression.
Like C, UIL lets you mix values of different types
in an expression. In this situation, the result of the expression is
the type of the most complex type in the expression. The order of
complexity, from lowest to highest, is boolean, integer
, and float. For example, the result of the expression 2 *
2.71828 is the float value 5.43656, and the
result of the expression 15 & true is the
integer value 1.
You can explicitly cast any numeric value or numeric
expression to a specific type. UIL allows casts to integer,
float, and single_float values, but not to boolean
values. The UIL float type is a C double, while the
UIL single_float type is a C float. Here are several
examples of casting:
   value
     one     : integer (true);
     zero    : integer (false);
     result  : integer (2 * 2.71828);
     five_oh : float (5);
     g       : single_float (9.8);
     round   : float (integer (2.71828 + 0.5));
When you cast a float value to an integer, the
fractional part is always truncated, so the value of result is
5. A cast to float simply converts an integer
or a boolean into a C double. A cast to a
single_float is the only way you can define a C float
value, since a floating point literal is always stored as a C
double. You must use a single_float to set a user-defined
resource that is a C float. In addition to individual integer
values, UIL supports integer arrays. The compiler does not currently
support boolean or floating point arrays, however. The following code
fragment illustrates an array definition:
   value
     primes : exported integer_table (2, 3, 5, 7, 11, 13);
An integer array consists of the keyword integer_table
followed by a list of integer values. Like most other UIL values, you
can export integer arrays from a UIL module or pass them as callback
arguments. UIL does not provide a way to indicate the end of an integer
array, so an application must know the length or obtain it somehow. You
can define integer arrays as exported values and fetch them
from your application or use them to set the Text and TextField
XmNselectionArray resource. Unfortunately, setting this resource
does not work in early releases of Motif 1.2 because the possible
values for the array elements are not defined. Even if you define the
values yourself, based on the definitions in <Xm/Xm.h>, an
incompatibility between the two widgets and Mrm prevents an
XmNselectionArray setting from working properly. This problem has
been fixed as of Motif Release 1.2.3.
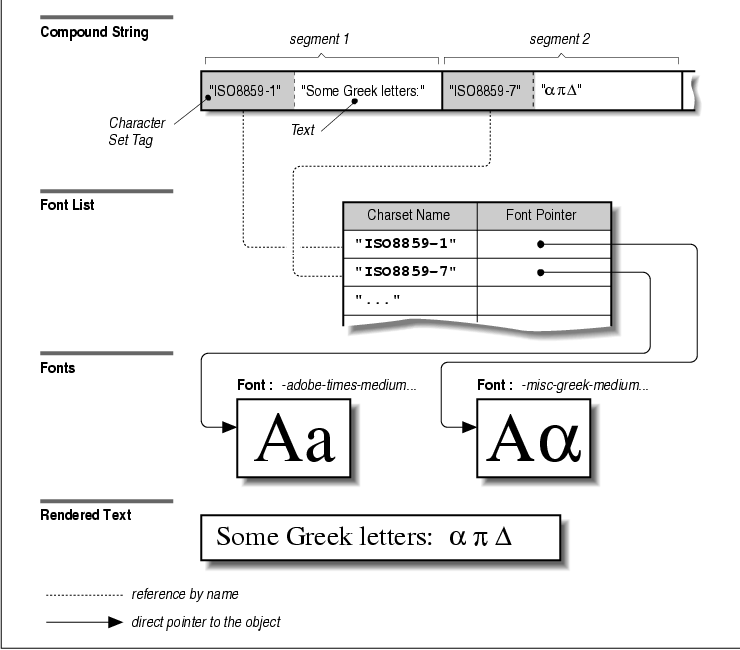
Text is almost always an important part of a graphical user interface. UIL supports string, character set, and font values, all of which are related to the display of text in your interface. A string consists of displayable text. A string only makes sense in the context of a character set, which defines the supported characters in a string and the encoding (or mapping from values to glyphs) of the string. A font contains the actual glyphs that visually represent a character on the screen or on paper. These three elements are closely related as all are necessary to display text. the figure illustrates the relationships among these types under UIL.
This figure may look complicated, but UIL and Motif
provide default values for character sets and fonts. You don't have to
worry about these values unless you are customizing or
internationalizing an application. Of course, you must always provide
the strings, but that's the easy part. Before we can explain strings or
fonts, you need to understand character sets, because both strings and
fonts depend on them. The character set of a string determines the
string's parsing direction, writing direction, and the number of bytes
per character. For example, character sets for Latin-based languages
like English are read from left to right, are written from left to
right, and are typically encoded using one byte per character.
When a string is displayed, it must be drawn with a
font that uses the same character set as the string because a character
set defines a mapping from character codes to character glyphs. For
example, in the ISO 8859-1 character set (ISO Latin-1), the value 65
represent an A, the value 66 represents a B, etc. In
a font for ISO 8859-1, the symbol A occupies position 65,
B occupies position 66, and so on. If the character set of a string
doesn't match the character set of the font with which it is drawn,
there's a good chance that the rendered text will be gibberish.
UIL provides a number of built-in character sets
that should meet the needs of most applications. lists the built-in UIL
character sets and specifies the UIL name, the official name, and the
attributes of each. lp9 | lp9 | lp9 | lp9 | lp9 lp9 | lp9 | lp9 | lp9 |
lp9. UIL Name Character Set Parse Direction Writing Direction 16 Bit
_
iso_latin1 ISO8859-1 L to R L to R No iso_latin2
ISO8859-2 L to R L to R No iso_latin3 ISO8859-3 L to R L to R
No iso_latin4 ISO8859-4 L to R L to R No iso_latin5
ISO8859-5 L to R L to R No iso_cyrillic ISO8859-5 L to R L to
R No iso_arabic ISO8859-6 L to R L to R No iso_greek
ISO8859-7 L to R L to R No iso_latin8 ISO8859-8 R to L R to L
No iso_latin8_lr ISO8859-8 L to R R to L No iso_hebrew
ISO8859-8 R to L R to L No iso_hebrew_lr ISO8859-8 L to R R to
L No gb_hanzi GB2313.1980-0 L to R L to R Yes gb_hanzi_gr
GB2313.1980-1 L to R L to R Yes jis_kanji JISX0208.1983-0 L to
R L to R Yes jis_kanji_gr JISX0208.1983-1 L to R L to R Yes
jis_katakana JISX0201.1976-0 L to R L to R No ksc_hangul
KSC5601.1987-0 L to R L to R Yes ksc_hangul_gr KSC5601.1987-1
L to R L to R Yes _ If you need to use a character set that is not
built into UIL, you can define your own character set. UIL allows
user-defined character sets anywhere a built-in is expected, except in
the character_set option at the beginning of a module. The
specification of a user-defined character set takes the following form:
   character_set ('string_expression'
                  [, right_to_left = boolean_expression]
                  [, sixteen_bit = boolean_expression] )
The string_expression that is used to name a user-defined
character set is the key that links a string to a font, as you'll see
shortly. The name is followed by two optional character set properties
that only affect string values. When the right_to_left
property is set to false, strings that use the character set
are parsed and written from left to right. When the property is set to
true, strings are parsed and written from right to left. When the
sixteen_bit property is set to false, each character in a
string that uses the character set is one byte long, but when it is set
to true, each character is two bytes long. Since both
properties default to false, you do not need to specify them
in most cases. Here are a few specifications of user-defined character
sets:
   character_set ('bold');
   character_set ('italic');
   character_set ('hieroglyphic', sixteen_bit = true);
   character_set ('xnaye, right_to_left = true);
UIL does not allow the definition of character set variables. You can
only specify a character set by using the character_set option
in the module header or by explicitly specifying the character set of a
string. We describe how to specify the character set for a string in
the next section. While a character set traditionally represents the
characters of a language, you can also represent different font styles
with user-defined character sets. UIL supports several different types
of strings so that it can represent the various string values used for
Motif widget resources. The asciz_string_table type is the
only type that is not associated with a widget resource. lists all of
the UIL string types and their corresponding C types. lp9 | lp9 lp9 |
lp9. UIL Type Name C/Xt/Motif Type Name
Both single and double-quoted strings can contain
any of the printable single-byte characters. These are the characters
with decimal values in the ranges 32 to 126 and 160 to 255. Characters
with values outside of the ranges can only be entered using the \
value\ escape sequence, where value represents the
character code desired. In addition, you must escape a single quote (
') in a single-quoted string and a double quote (") in a
double-quoted string. To allow the easy specification of commonly used
nonprinting characters, UIL recognizes the escape sequences shown in l
| l c | l.
Escape Sequence Meaning
_
\b Backspace \f Formfeed \n Newline
\r Carriage return \t Horizontal tab \v Vertical
tab \\ Backslash \' Single quote \" Double
quote
_ The following code fragment shows some examples of quoted string
variable definitions that include escape sequences:
   value
     bell : 'Beep\7\';
     quote : "\"You don't believe me?\" asked the lawyer.";
The first string includes some normal text and an escaped control
character, decimal 7, which is the bell character on most terminals.
The second string contains a couple of double quotes that must be
escaped because the string itself is double-quoted. Alternatively, we
could have made it a single-quoted string, thereby eliminating the need
for escaping the double quotes within it. In general, non-printable
escape characters only make sense in the context of NULL
-terminated strings and may produce strange results if you use them
within compound strings (which we'll discuss shortly).
You can continue a single-quoted string over
multiple lines by adding the backslash character as the last character
on a continued line. The string continues with the first character on
the following line and does not include a newline. If you want a
newline in a string, you must use the \n escape sequence.
Double-quoted strings cannot span multiple lines. The following
definition shows an example of a multi-line single-quoted string:
   value
     sentence : 'TRUE! -- NERVOUS -- VERY, very dreadfully nervous \
   I had been and am; but why will you say that I am mad?';
UIL NULL-terminated strings are the same as C strings. While
most Motif text resources are XmString values, there are a few
strings that are NULL-terminated. The most common is the
XmNvalue resource of the Text and TextField widgets. You also use
NULL-terminated strings in the literal syntax of many UIL variable
definitions, and you can use a NULL-terminated string as the
argument to a callback. The following fragment demonstrates the use of
NULL-terminated strings:
   procedure
     verify (string);

   object phone : XmTextField {
     arguments {
       XmNvalue = '(512) 555-1212';
       XmNbackground = color ('wheat');
     };
     callbacks {
       XmNmodifyVerifyCallback = procedure verify ('(###) ###-####');
     };
   };
In this widget definition, we assign a NULL-terminated string
to the XmNvalue resource, we use one in the definition of a
UIL color value, and we pass one as a callback argument. The
callback is declared as taking a string value, which is the
UIL type for NULL-terminated strings. We recommend using the
convention of writing NULL-terminated strings as single-quoted
strings. This distinguishes them from compound strings, which we
recommend writing as double-quoted strings.
You can concatenate two or more NULL
-terminated strings with the ampersand (&), which is the UIL
string concatenation operator. It is a binary operator that creates a
new string consisting of the left operand followed by the right
operand. You can use this operand with NULL-terminated strings
that are used for resource settings, callback arguments, and variable
definitions. However, using string concatenation in the literal syntax
of a UIL value definition may crash the UIL compiler or result in an
incorrect definition. The following fragment shows an example of string
concatenation:
   value
     first : 'Bilbo';
     last  : 'Baggins';
     full  : first & ' ' & last;
The full variable is defined as the concatenation of the
variables first and last, separated by a space. The
resulting string is 'Bilbo Baggins'. You can use both
variables and NULL-terminated string literals as the operands
for string concatenation. Most text values in the Motif widget set are
handled as XmString values, or compound strings. Compound
strings differ from NULL-terminated strings in that they
contain information about the character set and writing direction of
the string along with the textual information. This additional
information is necessary for displaying text in different languages and
fonts. Essentially, a compound string is a string that comes with all
of the information that is needed to render it. In most situations, you
can simply specify the text, and the UIL compiler provides the
character set, as in the following familiar example:
   object hello : XmLabel
   {
     arguments {
       XmNlabelString = "Hello, World!";
     };
   };
XmNlabelString is an XmString resource, but in this
definition we only specify the text portion of the compound string.
This specification works because there is a default character set
associated with every UIL module. As we explained in Chapter 22,
Introduction to UIL, you can specify the default character set by
setting the LANG environment variable or by setting the
character_set option at the beginning of the module. If you do not
specify the default character set, the UIL compiler uses a built-in
default which is vendor specific. In any event, you can use a single or
double-quoted string wherever a compound string is expected, and the
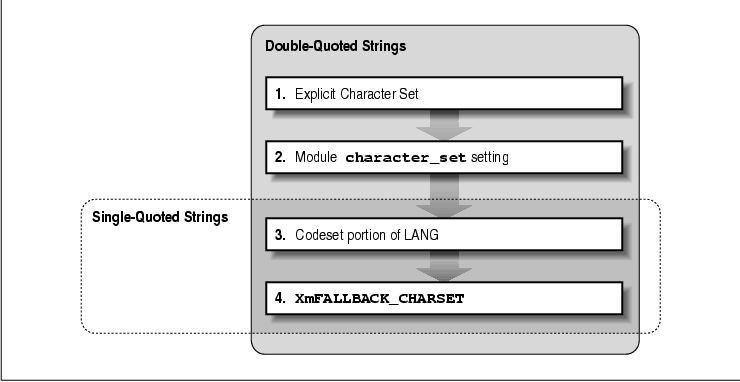
UIL compiler will automatically convert it to a compound string. the
figure illustrates how the UIL compiler determines the character set
for compound strings.
The character set of an individual string can also
be specified explicitly. You do so by preceding a string with the pound
sign (#) and specifying the name of a built-in or user-defined
character set. This syntax only works with double-quoted strings,
however, which is why we recommend using double-quoted strings to
represent compound strings. In early releases of Motif 1.2, the UIL
compiler does not generate an error if you specify a character set for
a single-quoted string. The compiler silently ignores the
specification, so you should be careful to always use double-quoted
strings when specifying a character set. The following code fragment
demonstrates how to set the character set of a string explicitly:
   object hello : XmLabel {
     arguments {
       XmNlabelString = #iso_greek"[[chi]][[alpha]][[iota]][[rho]][[epsilon]]";
     };
   };
In this example, we explicitly set the character set to iso_greek
, which is one of the built-in UIL character sets. At run-time, the
string is displayed in Greek as long as the font list of the Label is
set correctly. (We explain font lists later in this section.) It is
rare for an application to specify a character set explicitly, as most
applications only display text using one language for a given
invocation, although the language may vary between invocations.
You can also specify different font styles using
character sets, although that is not their primary purpose. You can
define your own character set to represent a different style, as shown
in the following fragment:
   object title : XmLabel {
     arguments {
       XmNlabelString = #character_set('italic')"Elsinore";
     };
   };
The XmNlabelString resource is set to a compound string that
contains the text "Elsinore" and uses the character set named
italic. Displaying the string in italics requires that the font
list of the Label contain an italic character set.
Unlike other UIL values, you cannot define a
character set variable, which means that you must always specify a
user-defined character set explicitly, as shown in this example.
Specifying font styles with character sets is most useful when you want
to display a compound string that contains text in several different
styles, as we'll show you in an example later in this section.
Although automatic string conversion can handle the
creation of most compound strings, there are still a few situations
when you need to define compound strings explicitly. If you want to
declare an exported compound string variable or override one of the
properties of a compound string, you need to use the compound string
literal syntax. An explicit compound string definition takes the
following form:
   compound_string (string_expression,
                    [, right_to_left = boolean_expression ]
                    [, separate = boolean_expression ] )
A compound_string literal begins with the compound_string
keyword and is followed by a single or double-quoted string and the
optional properties. You can set the writing direction of the compound
string with the right_to_left property; the default value of
this property is taken from the writing direction string's character
set. The separate property specifies whether or not a
separator component is added to the end of the compound string. The
default value is false, which means that a separator is not
added.
Unlike with NULL-terminated strings,
placing a newline character in a compound string does not produce a
multi-line string. A line break in a compound string is indicated by a
separator component, which you add by setting the separate
property to true in an explicit compound string definition.
You can create a multi-line compound string by concatenating compound
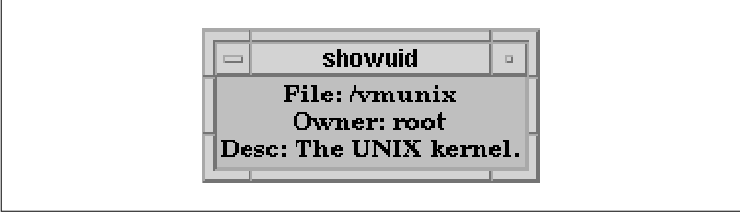
strings with the & operator, as shown in the source code
   module multiline

   value
     file  : compound_string ("/vmunix", separate=true);
     owner : compound_string ("root", separate=true);
     desc  : compound_string ("The UNIX kernel.");
     all   : "File: " & file & "Owner: " & owner & "Desc: " & desc;

   object root : XmLabel {
     arguments {
       XmNlabelString = all;
     };
   };

   end module;
Both file and owner are defined as compound string
values that contain a compound string separator. The concatenation of
the strings in this example produces a three-line compound string,
which is shown in the figure.
As the source code shows, you can mix NULL
-terminated strings and compound strings with the &
concatenation operator. When you concatenate two strings, the result is
a compound string if either one of the strings is a compound string, or
if the character sets of the two strings are different. The
wide_character string type was added in Motif 1.2 to support the
definition of user interfaces that contain Asian language text.
Unfortunately, the UIL compiler flags a wide-character definition as an
error in early releases of Motif 1.2. The form of a wide-character
definition is:
wide_character (string_expression)The string_expression contains a multibyte string. Asian language text must be represented with multibyte or wide-character strings because the number of different characters in these languages cannot be encoded in single bytes. In a multibyte character string, the length in bytes of each individual character varies, but in a wide-character string, the length of each character is the same. Most programs, including the Motif widgets, work with wide-character strings internally because the fixed character size makes them easier to use than multibyte characters.
The wide_character type converts a
multibyte character string into an equivalent wide-character string.
The conversion is based on the locale that is set when you run the UIL
compiler. When compiling a module that contains wide-character strings,
you must use the -s compiler option or multibyte string
conversions may be incorrect. See Section #suilcomps for more
information about this option.
The only wide-character resource in the Motif widget
set is the XmNvalueWcs resource of the Text and TextField
widgets. In addition to setting this resource, you can also fetch
exported wide-character strings from an application program and use
them as callback arguments. In addition to single, NULL
-terminated strings and compound strings, UIL supports arrays of both
types. The XmNitems and XmNselectedItems resources of
the List widget are both XmStringTable values, or compound
string arrays. Even though there are no NULL-terminated string
array resources in the Motif widget set, you can still pass these
arrays as callback arguments and fetch exported arrays with
MrmFetchLiteral(), just as you can with compound string arrays. The
form of each type of array is similar, as shown in the following
fragment:
   value
     seasons : asciz_string_table ('winter', 'spring', 'summer', 'autumn');
     fruits : compound_string_table ("apple", "banana", "grape", "cherry");
You can also use the keywords asciz_table and string_table
when defining NULL-terminated and compound string tables,
respectively. The UIL compiler terminates both types of arrays with a
NULL pointer. Quoted strings in the compound_string_table
are converted automatically to compound strings by the UIL compiler.
However, unlike with individual string values, the UIL compiler does
not convert an asciz_string_table to a
compound_string_table. Remember that when you set a Motif
XmStringTable resource, the UIL compiler sets the associated count
resource automatically. Fonts are the last piece of the textual
information picture that we need to examine. As we explained earlier,
you cannot display a compound string without an associated font; a
character set links a string to a particular font. You specify the
fonts used by Motif widgets with font list resources. The simplest case
involves setting the XmNfontList resource of a widget to a
single font. A font list can also specify a list of fonts or font sets
and their associated character sets. For more information on Motif font
lists, see Chapter 19, Compound Strings.
UIL provides support for font, font set, and font
list values. These types correspond to the XFontStruct,
XFontSet, and XmFontList types in C. The UIL font set type
was added in Motif 1.2 to support the XFontSet type that was
added in X11R5. A font list can contain both fonts and font sets, so
we'll look at these two types first. The following code fragment shows
a value of each type:
   value
     menu_font : font
       ('-adobe-times-bold-r-normal--12-120-75-75-p-67-iso8859-1');
     label_font : fontset ('-*-fixed-medium-r-normal-*-*-130-*');
As these definitions illustrate, fonts and font sets are defined using
X Logical Font Description (XLFD) names and patterns. Xlib may load one
or more fonts in a font set, which is why you must always specify a
pattern instead of a single font name. Xlib determines the exact fonts
that are needed based on the locale setting. For example, drawing
Japanese text typically requires a Kanji font, a Kana font, and a Latin
font. For additional information about fonts and font sets, see
Volume One, Xlib Programming Manual, and Volume Two, Xlib
Reference Manual.
Fonts and font sets are loaded at run-time because
they are resources maintained by the X server. UIL simply stores the
font names or patterns that you specify in the UID output file without
checking to see if the fonts exist. The font and fontset
types are typically used to set a Motif font list resource. Mrm also
creates a XFontStruct or XFontSet value for you when
you pass a font or fontset value as a callback
argument or when you fetch one of the values from an application
program.
Each Motif widget that displays text has a
XmFontList resource associated with it. UIL provides the
font_table type so you can define font lists directly in UIL. A
font list is simply an array of font and/or font set values, each of
which has an associated character set. The following fragment
illustrates the definition of a font list:
   value
     latin1 : font ('*-iso8859-1', character_set = iso_latin1);
     hebrew : font ('*-iso8859-8')
     fonts : font_table (latin1, iso_hebrew = font ('*-iso8859-8'));
You define a font list using the font_table keyword followed
by a list of fonts. This example demonstrates the two ways of
associating a character set with a font or font set. You can specify
the character set in the font or font set definition by adding a
character_set property setting, or you can specify the character
set directly in the font_table definition. The character set
specified in a font table definition takes precedence over a character
set specified in a font or font set definition.
If you do not specify a character set for a font or
a font set, it defaults to the codeset portion of the LANG environment
variable if it is set, or to XmFALLBACK_CHARSET otherwise.
Unlike with string definitions, the default character set of the module
has no effect on the character set used for font and font set
definitions. If a font list contains only a single font or font set,
you can set the XmNfontList resource to the font or font set
directly, and the UIL compiler creates a font list that contains the
entry automatically. Motif obtains the font or font set needed to
render a compound string by matching the character set of the string
with a font or font set in a font list that has the same character set.
Now we can take a look at an example that uses strings, character sets,
fonts, and font lists. The module in the source code shows how these
values work together. In early releases of Motif 1.2, the user-defined
character set in this module may cause a compilation error or it may
crash the UIL compiler.
   /* joel.uil - Example of strings, character sets, and fonts, and font sets. */

   module joel

   value
     artist : #iso_latin1 "Billy Joel";
     title  : #iso_cyrillic "186\222\221\230\213\224\226
     album  : #character_set('latin1-bold') "Album";

   value
     normal  : font ('*fixed-medium-r-normal-*-*-140-*-iso8859-1');
     bold    : font ('*fixed-medium-r-bold-*-*-140-*-iso8859-1');
     russian : font ('*fixed-medium-r-normal-*-*-140-*-iso8859-5');

   value
     styles : font_table (iso_latin1 = normal,
                          iso_cyrillic = russian,
                          character_set('latin1-bold') = bold);

   object root : XmLabel {
     arguments {
       XmNlabelString =  album & " : " & artist & " - " & title;
       XmNfontList = styles;
     };
   };

   end module;
The module begins with the definition of three strings, each with a
different character set. Two of the character sets are built-in and one
is user-defined. The built-in ones represent two different languages,
while the user-defined character set represents both a language and a
font style. The characters in the second string are shown in their
decimal form, as we are unable to print the corresponding characters in
this book. You could enter the actual characters directly with a
Cyrillic editor, as they are not control characters. We've specified
the character sets explicitly because we are using more than one
language and don't want to worry about the setting of the LANG
environment variable.
The font definitions for the text come next. We define three fonts, one for each string. Each font is defined using an XLFD font name. We combine the fonts in the styles font list definition, which is where we establish the connection between the character sets used by the strings and the fonts. The character set names in the compound string definitions must match the character set names used in the font_table. Finally, we define a Label that displays the concatenated string. The output of this module is shown in the figure.
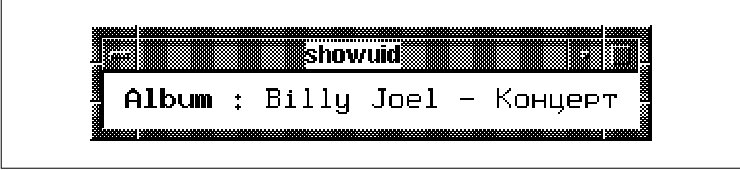
In early releases of Motif 1.2, the user-defined
character set in the font list definition may cause a compilation
error, or it may cause the UIL compiler to crash. You can work around
this problem by specifying the font list in an X resource file. In this
case, you must specify the character set names of the built-in
character sets using the names shown in the second column of The proper
resource specification for this module is:
Demos*XmLabel.fontList: *fixed-medium-r-normal-*-*-140-*-iso8859-1=ISO8859-1, *fixed-medium-r-normal-*-*-140-*-iso8859-5=ISO8859-5, *fixed-bold-r-normal-*-*-140-*-iso8859-1=latin1-boldThe name of the user-defined character set is the same as the name we used in the module. In general, placing font list definitions in an app-defaults file is a good idea anyway, since it lets the users of an application customize the font settings.
The UIL compiler supports color values, which means
that you can set all of the different Motif color resources in a UIL
module. In addition, UIL color values play an important role in the
specification of color pixmaps in UIL. Color values in UIL can be
specified by the name of the color or by the amount of red, green, and
blue (RGB) that compose the color. Both types of color values are easy
to define, as shown in the following fragment:
   object button : XmPushButton {
     arguments {
       XmNbackground = color ('wheat');
XmNforeground = rgb (500, 0, 65535); }; }; A named
color value is specified with the keyword color followed by a
color name. Mrm converts the color name to the corresponding RGB value
at run-time using Xlib. On most UNIX systems, Xlib converts colors from
names to values using the mappings defined in the file
/usr/lib/X11/rgb.txt. You can find more details on this process in
Volume Two, Xlib Reference Manual. You specify RGB values with
the keyword rgb and the amount of red, green, and blue present
in the color. Each amount can range from 0 to 65535, which represents 0
to 100 percent of a color.
Like other values, you can assign both color
and rgb values to UIL variables, pass them as arguments to
callback functions, and use them to specify resources. If Mrm cannot
allocate a color at run-time for setting a resource, the resource is
simply not set, and Mrm prints a warning message by calling
XtAppWarning(). If Mrm cannot allocate a color that you use as a
callback argument, your application may crash when the callback is
invoked. As a result, you should avoid passing color arguments from UIL
and allocate or fetch colors directly in application code instead.
For the most part, we recommend that you avoid
setting color resources in a UIL module because users cannot override
UIL resource settings using a resource file. Color is one of the most
frequently customized aspects of an application, so you should not
hard-code color values. However, colors do have their place in UIL.
They are still useful for defining color pixmaps, where you don't have
to worry about allowing users to change the colors. Color values are
one of the types that cannot be fetched with MrmFetchLiteral()
because Mrm requires a colormap in which to allocate the color. The
MrmFetchColorLiteral() function exists to allow the retrieval of
color values. This function takes the following form:
   Cardinal
   MrmFetchColorLiteral(hierarchy, name, display, colormap, pixel_return)
       MrmHierarchy   hierarchy;
       String         name;
       Display       *display;
       Colormap       colormap;
       Pixel         *pixel_return;
As with MrmFetchLiteral(), the hierarchy and
name arguments specify the Mrm hierarchy to search and the
exported color variable to fetch. Mrm allocates the color in the
colormap specified by the colormap parameter. If this
argument is NULL, Mrm allocates the color in the colormap
returned by the DefaultColormap() macro.
When Mrm successfully fetches the color, the
pixel_return argument contains the allocated color, and the
function returns MrmSUCCESS. If Mrm cannot find a variable by
the specified name, the routine returns MrmNOT_FOUND. If Mrm
finds a variable with the specified name, but it isn't a color value,
the function returns MrmWRONG_TYPE. The routine can also
return MrmBAD_HIERARCHY if the hierarchy
argument is invalid or MrmFAILURE if anything else goes wrong.
As usual, you should check the return value against MrmSUCCESS
before testing for a specific failure. If MrmFetchColorLiteral()
fails to allocate a color, Mrm should substitute black or white and
print a warning message by calling XtAppWarning(). However, in
early releases of Motif 1.2 this fallback mechanism does not take
place, and the function returns MrmNOT_FOUND instead. When you
are finished using a color retrieved with this function, you must free
it with a call to XFreeColors().
The UIL compiler supports pixmap values so that the
various pixmap resources can be set in a UIL module. These resources
include icon-type resources such as XmNsymbolPixmap and
shading-type resources such as XmNbackgroundPixmap. There are
two different forms of pixmap values that you can use in a UIL module.
The first type is an xbitmapfile, which is a reference to a
bitmap defined in a separate file. For details on the X bitmap file
format, see Volume One, Xlib Programming Manual. The second type
is an icon, which is defined entirely within a UIL module. The
xbitmapfile type is used to specify a bitmap file. The
contents of the file are used to create the actual bitmap. The module
in the source code shows the use of this type.
   /* bomb.uil -- Example using xbitmapfile type */

   module bomb

   procedure quit;

   object root : XmMessageDialog {
     arguments {
       XmNmessageString = compound_string ("Segmentation Fault", separate=true) &
                          compound_string ("(Dumping Core)");
       XmNsymbolPixmap = xbitmapfile ('bomb.xbm');
       XmNdialogTitle = "Fatal Error";
     };
   };

   end module;
This example creates a MessageDialog that uses a customized icon
instead of one of the standard Motif symbols. The output of the module
is shown in the figure.
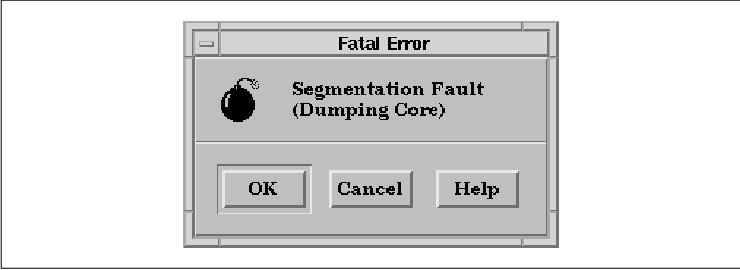
The xbitmapfile value is a bitmap whose
contents are defined in the file bomb.xbm. X bitmaps are a
convenient format since they can be edited and created with the
standard bitmap client. Bitmaps are monochrome images, which
means that each pixel is either on or off. When you use a bitmap in a
Motif widget, the "on" pixels are set to the foreground color of the
widget, and the "off" pixels are set to the background color. You can
only adjust the colors of a bitmap by changing the foreground and
background color of a widget.
When you compile a module that contains an
xbitmapfile value, the UIL compiler does not verify the contents or
existence of the file. The file name is saved in the UID file, and Mrm
handles loading the bitmap at run-time by calling XmGetPixmap()
. (For details on this routine, see Section #spixmaps in Chapter 3,
Overview of the Motif Toolkit.) If Mrm cannot find or load a bitmap
file, it prints a warning message by calling XtAppWarning().
If the bitmap file is used as a resource setting, the resource is not
set. When an xbitmapfile is used as a callback argument in
early releases of Motif 1.2, the application crashes when the callback
is invoked. We recommend that you only use xbitmapfile values
for resource settings. You can also represent pixmaps with the UIL
icon type, which supports full color images. You define icon
values entirely within a UIL module, instead of referencing an external
file. The UIL icon type is a useful feature, as neither Motif,
Xt, or Xlib provides any support for defining color pixmaps. The only
drawback is that you may have to edit the icon manually using
a text editor. Several third-party vendors sell color pixmap editors
that can save images using the UIL icon format; many of these editors
are part of a user interface builder (UIB) tool. The Hello, World
example in Chapter 22, Introduction to UIL, used an icon
value to create the earth image. We've taken the image from that
example and colorized it to illustrate the complete syntax of an
icon, as shown in the source code
   /* globe.uil --  colorize the world icon */

   module globe

   value
     world_colors : color_table (background color = ' ',
                    color ('black') = '*',
                    color ('blue') = '.',
                    color ('green') = 'x',
                    color ('white') = '=');

     world_icon : icon (color_table = world_colors,
       '     ******     ',
       '   **.===..**   ',
       '  *xx.==..x..*  ',
       ' *xxx....xxx..* ',
       ' *.xxxxxxxxx.x* ',
       '*.xxxxxx.xxx.xx*',
       '*.xxxxxxxxx...x*',
       '*.xxxxxxxxx...x*',
       '*..xxxxxxxx...x*',
       '*...xxxx..x....*',
       '*....xx.....x..*',
       ' *....xx......* ',
       ' *....xxxxx...* ',
       '  *..xxxxxxx.*  ',
       '   **xxxxxx**   ',
       '     ******     '  );

   object root : XmLabel {
     arguments {
       XmNlabelType = XmPIXMAP;
       XmNlabelPixmap = world_icon;
       XmNmarginWidth = 10;
       XmNmarginHeight = 10;
     };
   };

   end module;
An icon definition specifies a UIL color_table, which
maps characters to color values, and a number of strings, where each
character represents an individual pixel in the resulting pixmap. The
output of this module is shown in the figure. Obviously, the output is
not in color, but you can tell from the different degrees of shading
that the pixels are different colors.
Although color_table is a distinct UIL
type, a color_table value is only useful in the context of an
icon definition. A color_table value consists of the
keyword color_table followed by a parenthesized list of color
mappings. The form of each mapping is a color or rgb
value followed by an equal sign and a single character, which is used
to represent that color in an icon definition. You can also use the
special colors foreground color and background color.
These colors are taken from the widget in which an icon
appears. We use the background color around the earth so that
it blends in smoothly with the Label.
When you use a color value in a
color_table, you can specify how the color appears on a monochrome
display, or when Mrm cannot allocate color, you can specify either
foreground or background after the color name. For
example, we can ensure that our earth icon looks reasonable on a
monochrome display by using the following color_table
definition:
   world_colors : color_table (background color = ' ',
                  color ('black', foreground) = '*',
                  color ('blue', background) = '.',
                  color ('green', foreground) = 'x',
                  color ('white', foreground) = '=');
Without these attributes, each color is mapped to white on a monochrome
display. We recommend specifying the foreground and
background attributes in a color_table, as they ensure
that an icon looks reasonable. These attributes only affect colors that
are allocated as part of a color_table; if you specify the
attribute in a color that is used as a resource or a callback argument,
the UIL compiler quietly ignores the attribute.
The UIL compiler does not support the foreground
and background attributes with rgb values. However,
unlike a color value, an rgb value maps predictably
to black or white based on its intensity. The mapping of a monochrome
color value depends on the X server's color database, which varies
from server to server. If you must use rgb values in a
color_table, you should use rgb values for all of the
mappings and be sure to view the resulting icon on a monochrome screen.
Avoid mixing color and rgb values in the same
color_table, since the mapping of a color value depends on
the foreground and background colors of a widget, while the mapping of
an rgb value is always the same.
An icon definition consists of the keyword
icon followed by an optional color_table setting and a
list of equal-length strings that define the rows of the pixmap. If you
leave out the color_table setting, as we did in the original
world_icon definition, the following default color_table
is used:
   color_table (background color = ' ',
                foreground color = '*');
If you specify a color_table, it must be the first entry in
the icon definition, as in the source code The pixmap
definition consists of an arbitrary number of comma-separated strings
that correspond to the rows of the pixmap. Each pixel in the pixmap is
defined using one of the characters from the color_table. Any
other characters are illegal and are flagged as such by the UIL
compiler. The compiler also verifies that all of the strings in an
icon definition are the same length. Pixmap values are another one
of the types that cannot be fetched with MrmFetchLiteral()
because Mrm needs a Screen pointer, as well as background and
foreground colors, in order to create a pixmap. Mrm provides two
specialized functions for fetching pixmap values:
MrmFetchBitmapLiteral() and MrmFetchIconLiteral().
MrmFetchBitmapLiteral() is new in Motif 1.2; it takes the following
form:
   Cardinal
   MrmFetchBitmapLiteral(hierarchy, name, screen, display, pixmap_return,
                         width_return, height_return)
       MrmHierarchy   hierarchy;
       String         name;
       Screen        *screen;
       Display       *display;
       Pixmap        *pixmap_return;
       Dimension     *width_return;
       Dimension     *height_return;
This routine fetches an icon value in the form of a Bitmap
, which is a Pixmap with a depth of 1. The hierarchy
argument specifies the Mrm hierarchy that contains the exported
icon value specified by the name argument. If Mrm
finds the icon, it creates the bitmap on the screen
of the display and returns it in pixmap_return
. The width and height of the pixmap are returned in
width_return and height_return. A return value
of MrmSUCCESS indicates that the pixmap has been fetched and
created successfully. In this case, the application is responsible for
freeing the pixmap with XFreePixmap().
The icon that is specified can only use the
colors foreground color and background
color. These colors represent the values of 1 and 0
, respectively, in the resulting bitmap. If you use any other colors,
the function fails and returns MrmNOT_VALID. The function can
also return MrmBAD_HIERARCHY if the hierarchy
argument is not a valid Mrm hierarchy, MrmNOT_FOUND if Mrm
cannot find the icon in the hierarchy, MrmWRONG_TYPE
if Mrm finds a value but it is not an icon, or MrmFAILURE
if anything else goes wrong.
You can use the bitmap returned by
MrmFetchBitmapLiteral() anywhere that a bitmap or a bit mask is
needed. Common uses include setting the window manager icon of an
application or defining a cursor by calling XCreatePixmapCursor()
.
You can also fetch pixmaps with
MrmFetchIconLiteral(). This function can retrieve both icon
and xbitmapfile values. The routine returns a Pixmap
whose depth is the default depth of the screen as returned by the
DefaultDepthOfScreen() macro. It takes the following form:
   Cardinal
   MrmFetchIconLiteral(hierarchy, name, screen, display, foreground,
                       background, pixmap_return);
       MrmHierarchy   hierarchy;
       String         name;
       Screen        *screen;
       Display       *display;
       Pixel          foreground;
       Pixel          background;
       Pixmap        *pixmap_return;
The first four arguments are the same as for
MrmFetchBitmapLiteral(). The foreground and
background arguments specify the colors of the pixmap. When you
fetch an xbitmapfile, "on" pixels are set to the foreground
color and "off" pixels are set to the background color. When you fetch
a UIL icon, it specifies the colors for foreground
color and background color pixels. Mrm allocates
the other colors that are used in the default colormap of the
display. For this reason, you should not use this function to
fetch icons for a visual class other than the default.
On success, MrmFetchIconLiteral() fills in
pixmap_return with the pixmap and returns MrmSUCCESS
. An application is responsible for freeing the pixmap using
XFreePixmap(). The routine can also return MrmBAD_HIERARCHY
if the specified hierarchy is not valid,
MrmNOT_FOUND if Mrm cannot find the icon or
xbitmapfile in the hierarchy, MrmWRONG_TYPE if Mrm finds a
value but it is not an icon or xbitmapfile, or
MrmFAILURE if anything else goes wrong.
When MrmFetchIconLiteral() cannot allocate
a color for an icon, it should substitute either black or
white. However, in early releases of Motif 1.2 this substitution does
not take place, and the function returns MrmNOT_FOUND when a
color allocation fails. To avoid this problem, you should set
pixmap-type widget resources, such as XmNlabelPixmap, in a UIL
module widget definition or by calling MrmFetchSetValues().
The widget class type, or class_rec_name as
it is called in UIL, is new in Motif 1.2. (This feature may have been
present in earlier versions, but was not documented until Motif 1.2)
The type mainly supports the XmNentryClass resource, which
restricts the allowable children of a RowColumn widget. You can also
use a widget class value as a callback argument or with a user-defined
widget. The XmNentryClass resource is usually set
automatically by RowColumn when you create a MenuBar or RadioBox. You
can also set the resource manually, as the following fragment
illustrates:
   object root_widget : XmRowColumn {
     arguments {
       ! Must set isHomogeneous for entryClass to take effect.
       XmNisHomogeneous = true;
       XmNentryClass = class_rec_name ('XmLabel');
     };
   };
You specify a widget class value with the keyword class_rec_name
followed by the name of the widget class. You can use the name of an
actual widget class, such as XmPushButtonGadget, or the name of a
compound object, such as XmPulldownMenu. When you use a name that is
not really a widget class, the class_rec_name value represents
the name of the actual class. For example, the real class of an
XmPulldownMenu object is XmRowColumn.
In UIL, you define key mnemonics with the keysym
type. The XmNmnemonic resource is the only keysym
resource in the Motif widget set. The following widget definition
illustrates the use of this type:
   object open : XmPushButton {
     arguments {
       XmNlabelString = "Open...";
       XmNmnemonic = keysym ('O');
     };
   };
A keysym definition is specified with the keysym
keyword followed by a single character. In early releases of Motif 1.2,
the UIL compiler does not report an error if you specify more than one
character, but Mrm does catch the mistake at run-time.
The UIL translation_table type corresponds
to the XtTranslations type. A translation table maps events to
action procedures. The format of a UIL translation table looks like an
asciz_table in that it contains a list of strings, but the
individual entries in the table must contain valid translations. (See
Volume Four, X Toolkit Intrinsics Programming Manual, for a
description of the Xt translation table syntax.) The following fragment
shows the definition of a translation_table value:
   value
     actions : translation_table ('#override',
                                  'Ctrl<Key>A: beginning-of-line()',
                                  'Ctrl<Key>E: end-of-line()',
                                  'Ctrl<Key>space: set-anchor()');
The first entry of a translation_table can be used to control
how the table affects the existing translations of a widget. If the
first entry is not a translation, the string must be one of
#augment, #override, or #replace. Each of the
remaining entries in the table must be a NULL-terminated
string containing a single translation. If you specify a translation in
a UIL module, a user cannot override it from a resource file. You
should consider placing translations in an app-defaults file so
that users can customize them if they wish.
Setting up a callback with UIL and Mrm involves four
steps: writing the callback in application code, registering the
callback with Mrm, declaring the callback in the UIL module, and
setting the callback in a UIL widget definition. A callback that you
write for use in an Mrm application is no different from a callback in
a plain Xt application. However, as we explained in Chapter 22,
Introduction to UIL, you need to register the routine with Mrm
before creating any widgets that call it. The following code fragment
from showuid.c shows how to register callbacks:
   static MrmRegisterArg callback_list[] = {
     { "quit",     (XtPointer) quit },
     { "print",    (XtPointer) print },
     /* Add additional callback procedures here... */
   };
   ...
   MrmRegisterNames (callback_list, XtNumber (callback_list));
   ...
You're already familiar with the basics of declaring a callback
procedure in a UIL module and using it in the callbacks
subsection of a widget definition. Now we are going to look at how you
can pass a UIL value as a callback argument. As you know, callbacks are
declared in a procedure section of a UIL module. The purpose
of the declaration is to let the compiler know that the callback exists
and to give it enough information to verify that the callback is being
used correctly. A callback declaration consists of the name of the
callback followed by an optional argument type enclosed in parentheses.
The parentheses are optional as well, but because the compiler does not
perform argument type-checking when this style of declaration is used,
we recommend against using it. Here are the procedure declarations that
correspond to the callback functions from showuid.c:
   procedure
     quit();
     print (string);
When no argument type is specified, as with the quit()
declaration, the callback is declared as taking no arguments. When a
UIL type name is present, as with the print() declaration, you
must specify a value that matches the type when you use the callback.
You can use any of the built-in UIL types. In addition, you can also
specify the name of a Motif widget class such as XmPushButton
or XmForm in a callback declaration. Finally, you can indicate
that an argument is expected, but not restrict its type, by specifying
the special type-name any. If you use the any
specifier, you should take extra care to ensure that references to the
procedure elsewhere in the UIL module do not pass values to the
callback that might crash your application. This problem has been fixed
as of Motif Release 1.2.3.
The UIL compiler makes sure that the use of a
callback is consistent with its declaration. If you declare a callback
as taking no arguments, you cannot pass an argument to the callback
when you use it. Likewise, when a callback does take an argument, you
must provide one when you use the routine, and the argument must match
the type in the declaration. You can pass an argument whose type does
not match the declaration if the UIL automatic type conversions
described earlier provide for it. For example, you can pass a
string to a callback that is declared as taking a
compound_string. If the use of a callback does not agree with its
declaration, the UIL compiler generates an error, and the module is not
compiled successfully. The following code fragment shows how you might
use the print and quit callbacks:
   object close : XmPushButton {
     callbacks {
       XmNarmCallback = procedure print ("Armed!");
       XmNactivateCallback = procedure quit();
     };
   };
When a callback specified in a UIL module is invoked
at run-time, the argument, if any, is passed to the callback as the
client_data parameter. In this example, the string "Armed!" is
passed to the print() callback when the PushButton is armed.
The callback simply prints the argument that is passed to it. This
routine is shown in the following code fragment:
   void
   print (w, client_data, call_data)
   Widget    w;
   XtPointer client_data;
   XtPointer call_data;
   {
       char *message = (char *) client_data;
       puts (message);
   }
You should always cast the client_data argument to the
appropriate type before using it, as this fragment illustrates. The
argument type depends on the UIL value passed to a callback. contains a
complete listing of the UIL data types and the corresponding C types.
In particular, you should note that the integer, float
, and boolean numeric types are passed as pointers to the
values, not the values themselves.
A UIL list is a group of widget children, resource
settings, callback settings, or callback procedures. Although we didn't
mention it earlier, the controls, arguments, and
callbacks subsections of a widget definition are all in-line lists.
The procedures syntax for specifying multiple callbacks is
also an in-line list. You can also define a list outside of a widget
definition and name it, so that you can use the list later in a widget
definition or in another list.
You define named lists in a list section of
a UIL module, which begins with the list keyword. A list
definition consists of the name of the list, followed by a colon, the
type of the list, and its contents. Unlike variable and widget
definitions, list definitions are always private to a module, so you
cannot export them. If you want to use a list in more than one module,
you should place its definition in a UIL include file. The list name is
a programmer-specified identifier; the list type is one of controls
, arguments, callbacks, or procedures. The
content of a list depends on its type.
Lists of controls, arguments, and
callbacks, like the widget subsections by the same name, contain
widget children, resource settings, and callback settings,
respectively. The format of each of these lists is the same as the
format of the corresponding subsection of a widget definition. A
procedures list is used to specify multiple callback routines for a
particular callback reason, as we explained earlier. Once you define a
named list, you can use it in a widget definition. the source code
shows a UIL module that uses all four types of lists.
   /* simple_lst.uil -- simple example of lists */

   module simple_lst

   procedure
     quit();
     print (string);

   list buttons : controls {
     XmPushButton OK;
     XmPushButton Help;
   };

   list size : arguments {
     XmNwidth = 50;
     XmNheight = 50;
   };

   list funcs : callbacks {
     XmNactivateCallback = procedure print ("Help!");
     XmNhelpCallback = procedure print ("Help!");
   };

   list ok_cbs : procedures {
     print ("Okee-dokee");
     quit();
   };

   object OK : XmPushButton {
     arguments size;
     callbacks {
       XmNactivateCallback = procedures ok_cbs;
     };
   };

   object Help : XmPushButton {
     arguments size;
     callbacks funcs;
   };

   object root : XmRowColumn {
     controls buttons;
   };

   end module;
As with the object definition, we use the convention of placing each
list definition in its own list section, even though it is not
necessary for consecutive definitions. This example defines the
buttons, size, funcs, and ok_cbs lists,
and then uses the lists in defining the widget hierarchy. To use a list
in a widget definition, you specify the subsection followed by the name
of a list. The named list replaces the in-line list definition that you
have seen previously. The UIL compiler makes sure that the type of each
named list matches the name of the subsection, which means that you
cannot specify a named controls list for an arguments
subsection, for example.
A named list definition lets you separate
the contents of each list type from a widget definition. One advantage
of this approach is that you can abstract commonly-used settings and
define them in one place. However, the ability to factor out duplicate
widget subsections and procedure lists is not that big of an advantage.
The feature of lists that makes them more useful is the ability to
reference other lists of the same type. You include one list in another
by including an entry that consists of the type of the included list,
followed by the name of the list to include.
Each reference to a list includes a copy of that
list, which has different results depending on the type of the list.
When you include a controls or procedures list in
another list, the widgets or callbacks in the included list are added
to the existing list, even if the same widget or callback is already
there. Therefore, you can create multiple instances of the same widget
or call the same callback multiple times. When you include an
arguments or callbacks list in another list, the resources
or callback settings in the included list are added to the existing
list, but any duplicate setting supersedes the earlier setting. The
advantage of this behavior is that you can selectively override
resource or callback settings that have already been specified. When
you override a resource or callback setting, the UIL compiler generates
an informational message. You can turn off these messages with the
-w compiler option, but you should be careful to do so only if you
know that a module does not generate any other warnings. the source
code illustrates the use of nested lists.
   /* station.uil -- Example of using lists in lists */

   module dialog

   list basic_buttons : controls {
     OK     : XmPushButton { };
     Cancel : XmPushButton { };
   };

   list extended_buttons : controls {
     controls basic_buttons;
     Help : XmPushButton { };
   };

   list attach_all : arguments {
     XmNtopAttachment    = XmATTACH_FORM;
     XmNbottomAttachment = XmATTACH_FORM;
     XmNleftAttachment   = XmATTACH_FORM;
     XmNrightAttachment  = XmATTACH_FORM;
   };


   object stations : XmRadioBox {
     controls {
       WAQY : XmToggleButton { };  KLBJ : XmToggleButton { };
       WPLR : XmToggleButton { };  KRCK : XmToggleButton { };
       WHCN : XmToggleButton { };  KPEZ : XmToggleButton { };
     };
     arguments {
       XmNorientation = XmHORIZONTAL;
       XmNnumColumns = 3;
       XmNmarginWidth = 20;
       arguments attach_all;
       XmNbottomAttachment = XmATTACH_NONE;
     };
   };


   object panel : XmRowColumn {
     controls extended_buttons;
     arguments {
       XmNorientation = XmHORIZONTAL;
       XmNentryAlignment = XmALIGNMENT_CENTER;
       XmNpacking = XmPACK_COLUMN;
       arguments attach_all;
       XmNtopAttachment = XmATTACH_WIDGET;
       XmNtopWidget = stations;
     };
   };

   object root : XmFormDialog {
     controls {
       XmRadioBox stations;
       XmRowColumn panel;
     };
     arguments {
       XmNdialogTitle = "Station Chooser";
     };
   };

   end module;
This module describes a simple user interface that uses two different
types of lists. The output of the module is shown in the figure.
The basic_buttons list is a controls list that consists of two PushButtons: OK and Cancel. The extended_buttons list builds on the first list by adding a Help PushButton. This list is used as part of the dialog later in the module. The attach_all list is an arguments list that contains several Form attachment resource settings. We reference this list in the definition of both the RadioBox and the RowColumn, instead of reproducing the same settings in both widget definitions. In both cases, we override one of the resource settings from the list in the widget definition. This section only covers the basic use of lists in a UIL module. For more information on using lists, see Section #suiladvlist in Chapter 26, Advanced UIL Programming.
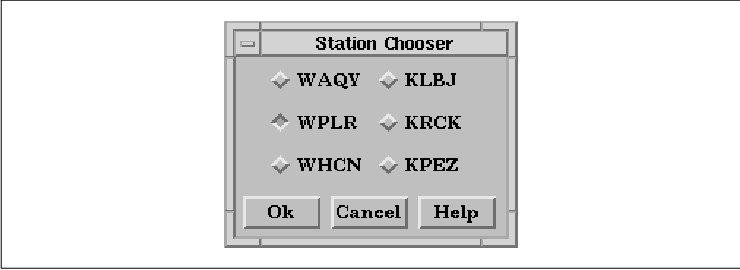
A value that is created or defined in an application
can be used in a UIL module by declaring the value as a UIL
identifier and registering it with Mrm. In this context, the term
identifier means a value that is imported from the application, not a
programmer-defined symbol. You can use an identifier as the value of a
resource or as a callback argument. Unlike other values in a UIL
module, identifiers are not typed, which means that the UIL compiler
cannot perform type checking on identifiers. You should be careful to
avoid type-mismatch problems in your use of identifiers.
You can use a registered application-defined value
in a UIL module by declaring it an identifier section. This
section begins with the keyword identifier and is followed by
a list of declarations. Identifiers can be used like any other values,
as illustrated in the following code fragment:
   identifier
     home_directory;
     complex_data;

   procedure
     open (any);

   object fsb : XmFileSelectionBox {
     controls {
       Xm_OK {
         callbacks {
           XmNactivateCallback = procedure open (complex_data);
         };
       };
     };
     arguments {
       XmNdirectory = home_directory;
       XmNpattern = '*.uil';
     };
   };
In this fragment, we use the identifier complex_data as the
argument to the open() callback. The identifier represents a
value of type ComplexStructure that is declared in the
application program, as you will see shortly. We declare the callback
as taking an argument of type any because there is no UIL type
that correspondes to the ComplexStructure type. The any
type indicates that the callback function takes an argument, but that
the argument can be of any type. We recommend that you only use the
any type for identifier arguments, since the UIL compiler cannot
perform type-checking when you use a callback that takes an any
argument. We also use the identifier home_directory as the
value of a resource setting. This setting is not type-checked either,
so it is up to the application to make sure that home_directory
is a string.
When Mrm creates a widget that uses an identifier,
it must convert the identifier name to the corresponding
application-defined value. Similar to callback procedures, you must
register the names of identifiers and their associated values with Mrm
by calling MrmRegisterNames() or
MrmRegisterNamesInHierarchy() before fetching widgets that
reference the exported values. These routines are the same ones that
are used to register callback procedures, as described in Chapter 22,
Introduction to UIL. These functions take the following form:
   Cardinal
   MrmRegisterNames(identifier_list, num_identifiers)
       MrmRegisterArglist  identifier_list;
       MrmCount            num_identifiers;
   Cardinal
   MrmRegisterNamesInHierarchy(hierarchy, identifier_list,
                               num_identifiers)
       MrmHierarchy        hierarchy;
       MrmRegisterArglist  identifier_list;
       MrmCount            num_identifiers;
A call to MrmRegisterNames() makes the identifiers accessible
from any open Mrm hierarchy, while a call to
MrmRegisterNamesInHierarchy() makes the identifiers accessible from
the Mrm hierarchy passed to the function. Identifiers that are
registered in a specific Mrm hierarchy take precedence over those that
are registered globally. The identifier_list argument
specifies an array of MrmRegisterArg structures, and
num_identifiers indicates the size of the array. The
MrmRegisterArg structure indicates the mapping from an identifier
name to an application value and is defined as follows:
   typedef struct {
       String     name;
       XtPointer  value;
   } MrmRegisterArg, *MrmRegisterArglist;
The name field is the name of the identifier as used in the
UIL module. The name is case-sensitive, unless it is being referenced
from a module that has the names option set to
case_insensitive, in which case the name must be upper case. The
value field is a pointer to an application variable. Since
value is an XtPointer, you should only register values
that are pointers. If you use a value whose size is not the same as an
XtPointer, part of the value may be lost or corrupted. The size of
certain C values, such as int and float, are not
necessarily the same size as an XtPointer on all
architectures. You can ensure the portability of an application by
using the address of non-pointer types as the value of an identifier.
The following code fragment shows how
MrmRegisterNames() can be used to register the identifier values
used in the UIL fragment of the previous section:
   char *home_directory;
   ComplexStructure complex_data;
   static MrmRegisterArg identifiers[] = {
       { "home_directory", (XtPointer) directory },
       { "complex_data", (XtPointer) &complex_data },
   };
   ...
   MrmRegisterNames (identifiers, XtNumber (identifiers));
   ...
This code registers the home_directory and complex_data
identifiers globally, so that they are accessible from any Mrm
hierarchy. The home_directory identifier is a string, while
complex_data is a value of type ComplexStructure.
Identifiers provide a mechanism for exporting arbitrarily complex data
to a UIL module.
A UIL module may contain five types of sections,
whose usage and syntax we have explained and demonstrated in detail.
An object section contains definitions of
the widgets in an interface. An application creates these widgets at
run-time by using the MrmFetchWidget() routine in the Mrm
library.
A value section consists of declarations
and definitions of UIL values that are used as resource settings and
callback arguments in the widget definitions. Values can be fetched
from a UIL module using a number of different Mrm routines.
A procedure section contains the
declarations of callback procedures that are defined in the application
program. Any callbacks that are specified in a UIL module must be
declared in this section. Callback procedures are registered with the
application program using MrmRegisterNames().
A list section is used to define
controls, arguments, or callbacks lists that are
used in the corresponding subsections of widget definitions, and to
define procedures lists that specify the functions that are
called when a single callback is invoked. The use of lists is private
to a UIL module.
An identifier section contains declarations
of application variables that are exported to UIL. The names and values
of identifiers are registered with the application program using
MrmRegisterNames().