This chapter teaches the fundamentals of Motif by
example. It dissects a simple "Hello, World" program, showing the
program structure and style common to all Motif programs. Because much
of this material is already covered in detail in Volume Four, X Toolkit
Intrinsics Programming Manual, Motif Edition, this chapter can be used
as a refresher or a light introduction for those who haven't read the
earlier book. It makes reference to Volume One, Xlib Programming
Manual, and Volume Four to point out areas that the programmer needs to
understand (windows, widgets, events, callbacks, resources,
translations) before progressing with Motif.
Though we expect most readers of this book to be
familiar with the X Toolkit Intrinsics (Xt), this chapter briefly
reviews the foundations of Motif in Xt. This review serves a variety of
purposes. First, for completeness, we define our terms, so if you are
unfamiliar with Xt, you will not be completely at sea if you forge
ahead. Second, there are many important aspects of the X Toolkit
Intrinsics that we aren't going to cover in this book; this review
gives us a chance to direct you to other sources of information about
these areas. Third, Motif diverges from Xt in some important ways, and
we point out these differences up front. Finally, we point out some of
the particular choices you can make when Xt or Motif provides more than
one way to accomplish the same task.
If you are unfamiliar with any of the concepts
introduced in this chapter, please read the first few chapters of
Volume Four, X Toolkit Intrinsics Programming Manual. Portions
of Volume One, Xlib Programming Manual, and Volume Three, X
Window System User's Guide, Motif Edition, may also be appropriate.
As discussed in Chapter 1, Introduction to Motif
, the Motif user-interface specification is completely independent of
how it is implemented. In other words, you do not have to use the X
Window System to implement a Motif-style graphical user interface
(GUI). However, to enhance portability and robustness, the Open
Software Foundation (OSF) chose to implement the Motif GUI using X as
the window system and the X Toolkit Intrinsics as the platform for the
Application Programmer's Interface (API).
Xt provides an object-oriented framework for
creating reusable, configurable user-interface components called
widgets. Motif provides widgets for such common user-interface
elements as labels, buttons, menus, dialog boxes, scrollbars, and
text-entry or display areas. In addition, there are widgets called
managers, whose only job is to control the layout of other widgets, so
the application doesn't have to worry about details of widget placement
when the application is moved or resized.
A widget operates independently of the application,
except through prearranged interactions. For example, a button widget
knows how to draw itself, how to highlight itself when it is clicked on
with the mouse, and how to respond to that mouse click.
The general behavior of a widget, such as a
PushButton, is defined as part of the Motif library. Xt defines certain
base classes of widgets, whose behavior can be inherited and augmented
or modified by other widget classes (subclasses). The base widget
classes provide a common foundation for all Xt-based widget sets. A
widget set, such as Motif's Xm library, defines a complete set of
widget classes, sufficient for most user-interface needs. Xt also
supports mechanisms for creating new widgets or for modifying existing
ones.
Xt also supports lighter-weight objects called
gadgets, which for the most part look and act just like widgets,
but their behavior is actually provided by the manager widget that
contains them. For example, a pulldown menu pane can be made up of
button gadgets rather than button widgets, with the menu pane doing
much of the work that would normally be done by the button widgets.
Most widgets and gadgets inherit characteristics
from objects above them in the class hierarchy. For example, the Motif
PushButton class inherits the ability to display a label from the Label
widget class, which in turn inherits even more basic widget behavior
from its own superclasses. See Volume Four, X Toolkit Intrinsics
Programming Manual, for a complete discussion of Xt's classing
mechanisms; see Chapter 3, Overview of the Motif Toolkit, for
details about the Motif widget class hierarchy.
The object-oriented approach of Xt completely
insulates the application programmer from the code inside of widgets.
As a programmer, you only have access to functions that create, manage,
and destroy widgets, plus certain public widget variables known as
resources. As a result, the internal implementation of a widget can
change without requiring changes to the API. A further benefit of the
object-oriented approach is that it forces you to think about an
application in a more abstract and generalized fashion, which leads to
fewer bugs in the short run and to a better design in the long run.
Creating a widget is referred to as instantiating
it. You ask the toolkit for an instance of a particular widget
class, which can be customized by setting its resources. All Motif
PushButton widgets have the ability to display a label; an instance of
the PushButton widget class actually has a label that can be set with a
resource.
Creating widgets is a lot like buying a car: first
you choose the model (class) of car you want, then you choose the
options you want, and then you drive an actual car off the lot. There
may exist many cars exactly like yours, others that are similar, and
still others that are completely different. You can create widgets,
destroy them, and even change their attributes just as you can buy,
sell, or modify a car by painting it, adding a new stereo, and so on.
Widgets are designed so that many of their resources
can be modified by the user at run-time. When an application is run, Xt
automatically loads data from a number of system and user-specific
files. The data from these files is used to build the resource
database, which is used to configure the widgets in the
application. If you want to keep the user from modifying resources, you
can set their values when you create the widget. This practice is
commonly referred to as hard-coding resources.
It is considered good practice to hard-code only
those resource values that are essential to program operation and to
leave the rest of the resources configurable. Default values for
configurable resources are typically specified in an application
defaults file, which is more colloquially referred to as the
app-defaults file. By convention, this file is stored in the directory
/usr/lib/X11/app-defaults and it has the same name as the
application with the first letter capitalized. The app-defaults file is
loaded into the resource database along with other files that may
contain different values set by the system administrator or the user.
In the event of a conflict between different settings, a complex set of
precedence rules determines the value actually assigned to a resource.
See Volume Four, X Toolkit Intrinsics Programming Manual, for
more information on how to set resources using the various resource
files.
Motif widgets are prolific in their use of
resources. For each widget class, there are many resources that neither
the application nor the user should ever need to change. Some of these
resources provide fine control over the three-dimensional appearance of
Motif widgets; these resources should not be modified, since that would
interfere with the visual consistency of Motif applications. Other
resources are used internally by Motif to make one large, complex
widget appear to the user in a variety of guises.
The callback resources for a widget are a
particularly important class of resources that must be set in the
application code. A widget that expects to interact with an application
provides a callback resource for each type of interaction it supports.
An application associates a function with the callback resources in
which it is interested; the function is invoked when the user performs
certain actions in the widget. For example, a PushButton provides a
callback for when the user activates the button.
Note, however, that not every event that occurs in a
widget results in a callback to an application function. Widgets are
designed to handle many events themselves, with no interaction from the
application. All widgets know how to draw themselves, for example. A
widget may even provide application-like functionality. For example, a
Text widget typically provides a complete set of editing commands via
internal widget functions called actions. Actions are mapped to
events in a translation table. This table can be augmented,
selectively overridden, or completely replaced by settings contained in
the implementation of a widget class, in application code, or in a
user's resource files.
In the basic Xt design, translations are intended to
be configurable by the user. However, the purpose of Xt is to provide
mechanism, not impose user-interface policy. In Motif, translations are
typically not modified by either the user or the application
programmer. While it is possible for an application to install event
handlers or new translations and actions for a widget, most Motif
widgets expect application interaction to occur only through callbacks.
Since the Motif widgets are designed to allow
application interaction through callbacks, we don't discuss
translations very often in this book. Some of the Motif widgets,
particularly buttons when they are used in menus, have undefined
behavior when their translations are augmented or overiddden. An
experienced Xt programmer may feel that Motif's limitations on the
configurability of translations violates Xt. But consider that Xt is a
library for building toolkits, not a toolkit itself. Motif has the
further job of ensuring consistent user-interface behavior across
applications.
Whether the goal of consistency is sufficient
justification for OSF's implementation is a matter of judgement, but it
should at least be taken into account. At any rate, you should be aware
of the limitations when configuring Motif widgets. Motif widgets
provide callback resources to support their expected behavior. If a
widget does not have a callback associated with an event to which you
want your application to respond, you should be cautious about adding
actions to the widget or modifying its translations.
A Motif user interface is created using both the
Motif Xm library and the Intrinsics' Xt library. Xt provides functions
for creating and setting resources on widgets. Xm provides the widgets
themselves, plus an array of utility routines and convenience functions
for creating groups of widgets that are used collectively as single
user-interface components. For example, the Motif MenuBar is not
implemented as one particular widget, but as a collection of smaller
widgets put together by a convenience function.
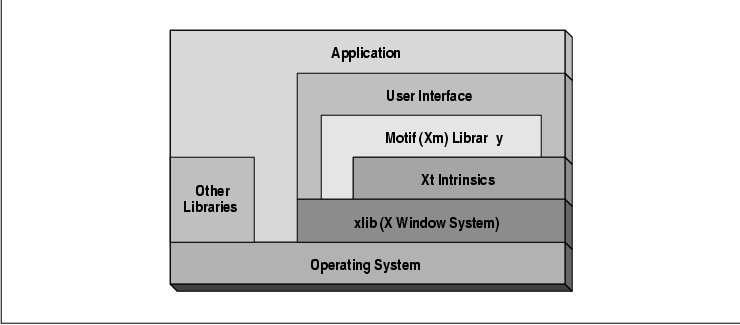
An application may also need to make calls to the Xlib layer to render graphics or get events from the window system. In the application itself, rather than in the user interface, you may also be expected to make lower-level system calls into the operating system, filesystem, or hardware-specific drivers. Thus, the whole application may have calls to various libraries within the system. the figure represents the model for interfacing to these libraries.
As illustrated above, the application itself may
interact with all layers of the windowing system, the operating system,
and other libraries (math libraries, rpc, database) as needed. On the
other hand, the user-interface portion of the application should
restrict itself to the Motif, Xt, and Xlib libraries whenever possible.
This restriction aids in the portability of the user-interface across
multiple computers and operating systems. Since X is a distributed
windowing system, once the application runs on a particular computer,
it can be displayed on any computer running X--even across a local or
wide-area network.
In addition to restricting yourself to using the
Motif, Xt, and Xlib libraries, you should try to use the higher-level
libraries whenever possible. Focus on using Motif-specific widgets and
functions, rather than trying to implement equivalent functionality
using Xt or Xlib. An exception to this guideline is the use of Xt
creation routines rather than Motif convenience functions for creating
simple widgets, as discussed later in the chapter. Higher-level
libraries hide a great number of details that you would otherwise have
to handle yourself. By following these guidelines, you can reduce code
complexity and size, creating applications that are easier to maintain.
In situations where the Motif library does not
provide the functionality you need, you may attempt to borrow widgets
from other toolkits or write your own. This technique is possible and
made relatively simple because Motif is based on Xt. While this book
discusses certain methods for extending the Motif library, you should
refer to Volume Four, X Toolkit Intrinsics Programming Manual,
for a general discussion of how to build your own widgets. For example,
an application might make good use of a general-purpose graphing
widget.
Whatever libraries you use, be sure to keep your
application modular. The first and most important step in the
development of an application is its design. You should always identify
the parts of the application that are functional and the parts that
make up the user interface. Well-designed applications keep the
user-interface code separate from the functional code. You should be
able to unplug the Motif code and replace it with another
user-interface widget set based on Xt merely by writing corresponding
code that mirrors the Motif implementation.
The quickest way to understand the basic Motif
programming model is to examine a simple application. the source code
is a version of the classic "hello world" program that uses the Motif
toolkit. XtSetLanguageProc() is only available in X11R5; there
is no corresponding function in X11R4. XmStringCreateLocalized()
is only available in Motif 1.2; XmStringCreateSimple() is the
corresponding function in Motif 1.1.
   /* hello.c -- initialize the toolkit using an application context and a
    * toplevel shell widget, then create a pushbutton that says Hello using
    * the varargs interface.
    */
   #include <Xm/PushB.h>

   main(argc, argv)
   int argc;
   char *argv[];
   {
       Widget        toplevel, button;
       XtAppContext  app;
       void          button_pushed();
       XmString      label;

       XtSetLanguageProc (NULL, NULL, NULL);

       toplevel = XtVaAppInitialize (&app, "Hello", NULL, 0,
           &argc, argv, NULL, NULL);

       label = XmStringCreateLocalized ("Push here to say hello");
       button = XtVaCreateManagedWidget ("pushme",
           xmPushButtonWidgetClass, toplevel,
           XmNlabelString, label,
           NULL);
       XmStringFree (label);
       XtAddCallback (button, XmNactivateCallback, button_pushed, NULL);

       XtRealizeWidget (toplevel);
       XtAppMainLoop (app);
   }

   void
   button_pushed(widget, client_data, call_data)
   Widget widget;
   XtPointer client_data;
   XtPointer call_data;
   {
       printf ("Hello Yourself!0);
   }
The output of the program is shown in the figure.

You can get the source code for hello.c and
the rest of the examples in this book via anonymous ftp or other
methods that are described in the Preface. It is a good idea to compile
and run each example as it is presented.
The example programs come with Imakefiles that
should make building them easy if you have the imake program.
This program should already be in /usr/bin/X11 on UNIX-based
systems that have X11 Release 4 or Release 5 installed. You also need
the configuration files for imake; they are in
/usr/lib/X11/config on most UNIX-based systems. An Imakefile is a
system-independent makefile that is used by imake to generate a
Makefile. This process is necessary because it is impossible to write a
Makefile that works on all systems. You invoke imake using the
xmkmf program. Complete instructions for compiling the examples
using imake are provided in the README file included with
the source code.
As explained in the Preface, there are versions of
the example programs for both Motif 1.2 and Motif 1.1 available
electronically. However, all of the example code in this book is
designed to work with Motif 1.2 (and X11R5); the programs use functions
that are not available in Motif 1.1 (and X11R4). Where we use Motif 1.2
functions, we try to mention how to perform the same tasks using Motif
1.1, usually in a footnote. To use the example programs with Motif 1.1,
make the changes we describe. When the necessary changes are
significant, we may explain both versions of the program. For a
description of the changes that we made to convert the example programs
to Motif 1.2, see Section #smotif12.
To compile any of the examples on a UNIX system
without using imake, use the following command line:
cc -O -o filename filename.c -lXm -lXt -lX11If you want to do debugging, replace -O with -g in this command line. The order of the libraries is important. Xm relies on Xt, and both Xm and Xt rely on Xlib (the -lX11 link flag specifies Xlib).
Now let's take a look at this program step by step,
noting elements of the underlying Xt model and where Motif differs from
it.
An application that uses the Motif toolkit must
include a header file for each widget that it uses. For example,
hello.c uses a PushButton widget, so we include <Xm/PushB.h
>. The appropriate header file for each Motif widget class is included
on the reference page for the widget in Volume Six B, Motif
Reference Manual.
If you simply browse through /usr/include/Xm
(or wherever you have installed your Motif distribution) trying to find
the appropriate header file, you will find that each widget class
actually has two header files. The one with the name ending in a "P"
(e.g. PushBP.h) is the widget's private header file and should
never be included directly by an application. Private header files are
used only by the code that implements a widget class and its
subclasses.
Xt uses public and private header files to hide the
details of widget implementation from applications. This technique
provides object-oriented encapsulation and data hiding in the C
language, which is not designed to support object-oriented programming.
(See Volume Four, X Toolkit Intrinsics Programming Manual, for
additional information on the object-oriented design of widgets.)
For some types of objects, you may see another pair
of header files, each containing a capital "G" at the end of their
names (for example, PushBG.h and PushBGP.h). These files
are for the gadget version of the object. For the most part, when we
talk about widgets, we include gadgets. Later chapters make it clear
when to use gadgets and when to use widgets.
A quick examination of the #include
directives in each of the Motif widget or gadget header files reveals
that each of them includes <Xm/Xm.h>, the general header file
for the Motif library. <Xm/Xm.h> in turn includes the following
files:
   #include <X11/Intrinsic.h>
   #include <X11/Shell.h>
   #include <X11/Xatom.h>
   #include <Xm/XmStrDefs.h>
   #include <Xm/VirtKeys.h>
Therefore, none of these files ever need to be included by your application, as long as you include <Xm/Xm.h>. Since <Xm/Xm.h > is included by each widget header file, you do not need to include it directly either. If you look closely at the code, you'll see that just about every necessary header file is included the moment you include your widget header file. This method of using header files contrasts with the way other Xt-based toolkits, like the Athena toolkit or the OPEN LOOK Intrinsics Toolkit (OLIT), use header files.
Release 1.2 of the Motif toolkit provides a new
header file, <Xm/XmAll.h>, that simply includes all of the
public header files. The <Xm/ExtObject.h>, <Xm/Traversal.h
>, <Xm/VaSimple.h>, and <Xm/VendorE.h> header files are
present in Motif 1.1, but they are obsolete in Motif 1.2.
We recommend that you not duplicate the inclusion of
header files. One reason is that if you include only the header files
that you need, whoever has to maintain your code can see which widgets
you are dealing with in your source files. Another reason is that
duplicating header files is generally bad practice, as you run the risk
of redeclaring macros, functions, and variables.
However, it isn't always easy to prevent multiple
inclusions. For example, <Xm/Xm.h> is included by each widget
header file that you include. All of the Motif, Xt and X header files
are protected from multiple inclusion using a technique called
ifdef-wrapping. We recommend that you use this method in your own
header files as well. The ifdef-wrapper for <X11/Intrinsic.h> is
written as follows:
   #ifndef _XtIntrinsic_h
   #define _XtIntrinsic_h

   /* Include whatever is necessary for the file... */
   #endif /* _XtIntrinsic_h */
The wrapper defines _XtIntrinsic_h when a file is first included. If the file is ever included again during the course of compiling the same source (.c) file, the #ifdef prevents anything from being redeclared or redefined.
Of course, the wrapper prevents multiple inclusion
only within a single source file; the next source file that gets
compiled goes through the same test. If the same files are included,
the same macros, data types, and functions are declared again for the
benefit of the new file. For this reason, you should never write
functions in a header file, since it would be equivalent to having the
same function exist in every source file. Function declarations,
however, are acceptable and expected.
In addition to the widget header files, you will
most likely need other include files specific to your application, such
as <stdio.h> or <ctype.h>.
The order of inclusion is generally not important
unless certain types or declarations required by one file are declared
in another. In this case, you should include the files in the necessary
order. Otherwise, application-specific header files are usually
included first, followed by UI-specific header files (with Xt header
files, if any, preceding Motif header files), followed by
system-specific header files.
For Release 5 of the X Window System, the X Toolkit
was modified to better support internationalization. An
internationalized application retrieves the user's language (called a
locale) from the environment or a resource file and operates in
that language without changes to the binary. An internationalized
application must display all of its text in the user's language and
accept textual input in that same language. It must also display dates,
times, and numbers in the appropriate format for the language
environment.
X internationalization is based on the ANSI-C
internationalization model. This approach is based on the concept of
localization, whereby an application uses a library that reads a
customizing database at startup time. This database contains
information about the characteristics of every locale that is supported
by the system. When an application establishes its locale by calling
setlocale(), the library customizes the behavior of various
routines based on the locale. See the Third Edition of Volume One,
Xlib Programming Manual, for a complete description of the concepts
and implementation of X internationalization.
Xt support of internationalization is trivial in
most applications; the only additional code needed is a call to
XtSetLanguageProc() before the toolkit is initialized.
XtSetLanguageProc() sets the language procedure that is used
to set the locale of an application. The first argument to the routine
specifies an application context, the second argument specifies the
language procedure, and the third parameter specifies additional data
that is passed to the language procedure when it is called. Since the
language procedure is responsible for setting the locale, an Xt
application does not call setlocale() directly. The language
procedure is called by XtDisplayInitialize().
If the second argument to XtSetLanguageProc()
is NULL, the routine registers a default language procedure.
Here's the call that we used in the source code to set the default
language procedure:
XtSetLanguageProc (NULL, NULL, NULL);The default language procedure sets the locale according to the LANG environment variable, verifies that the current locale is supported, and returns the value of the current locale. For more information about establishing the locale in an Xt application, see Volume Four, X Toolkit Intrinsics Programming Manual.
Most of the support for internationalization in
Motif 1.2 is provided by Xlib and Xt. Xlib provides support for
internationalized text output, interclient communication, and
localization of the resource database, while Xt handles establishing
the locale. The Motif Text and TextField widgets have been modified to
support internationalized text input and output; see Section #stexti18n
for more information. The Motif routines that work with compound
strings and font lists have also been updated in Motif 1.2. See
Chapter 19, Compound Strings, for details on the new API for
XmString and XmFontList values.
Before an application creates any widgets, it must
initialize the toolkit. There are many ways to perform this task, most
of which also perform a number of related tasks, such as opening a
connection to the X server and loading the resource database. Here's a
list of some of the things that are almost always done:
   Widget        toplevel;
   XtAppContext  app;

   toplevel = XtVaAppInitialize (&app, "Hello", NULL, 0,
       &argc, argv, NULL, NULL);
The widget returned by XtVaAppInitialize() is a shell widget.
The shell widget acts as the top-level window of the application and
handles the application's interaction with the window manager. All of
the other widgets created by the application are created as descendents
of the shell, which we'll talk about more later in this chapter. The
first argument to XtVaAppInitialize() is the address of an
application context, which is a structure that Xt uses to manage some
internal data associated with an application. Most applications do not
manipulate the application context directly. Most often, an application
receives an opaque pointer to an application context in the toolkit
initialization call and merely passes that pointer to a few other
toolkit functions that require it as an argument. The fact that the
application context is a public variable, rather than hidden in the
toolkit internals, is a forward-looking feature of Xt, designed to
support multiple threads of control.
The simpler X11R3 initialization call,
XtInitialize(), is still supported by later versions of the
toolkit. Its use is discouraged because the new initialization calls
provide a greater degree of upward compatibility with future Xt-based
applications. The simpler function creates an application context that
is stored internally by Xt. The second argument to
XtVaAppInitialize() is a string that defines the class name
of the application. A class name is used in resource files to specify
resource values that apply to all instances of an application, a
widget, or a resource. (See Volume Three, X Window System User's
Guide, Motif Edition, and Volume Four, X Toolkit Intrinsics
Programming Manual, for details.) For many applications, the
application class is rarely used and the class name is important only
because it is also used as the name of the application's app-defaults
file.
Whenever a widget is created in Xt, its resources
must have certain initial (or default) values. You can either hard-code
the values, allow them to default to widget-defined values, or specify
the default values in the app-defaults file. These default values are
used unless the user has provided his own default settings in another
resource file.
By convention, the class name is the same as the
name of the application itself, except that the first letter is
capitalized. For example, a program named draw would have Some
applications follow the convention that if the application's name
begins with an "X", the X is silent and so the second letter is
capitalized as well. For example, the class name of xterm is
XTerm. a class name of Draw and an app-defaults filename of
/usr/lib/X11/app-defaults/Draw. Note, however, that there is no
requirement that an app-defaults file with this name actually be
installed.
Exceptions can be made to this convention, as long
as you document it. For example, all the example programs in this book
have the class name of Demos, which allows us to set certain
common defaults in a single file. This technique can be useful whenever
you have a large collection of independent programs that are part of
the same suite of applications. The third and fourth arguments specify
an array of objects that describe the command-line arguments for your
program, if any, and the number of arguments in the array. These
arguments are unused in most of the examples in this book and are
specified as NULL and 0, respectively. The program
xshowbitmap.c in the Appendix, Additional Example Programs,
provides an example of using command-line arguments. See Volume Four,
X Toolkit Intrinsics Programming Manual, for a more complete
discussion of application-specific command-line arguments.
The fifth and sixth arguments contain the value (
argv) and count (argc) of any actual command-line
arguments. The initialization call actually removes and acts on any
arguments it recognizes, such as the standard X Toolkit command-line
options and any options that you have defined in the third argument.
After this call, argv should contain only the application name
and any expected arguments such as filenames. You may want to check the
argument count at this point and issue an error message if any spurious
arguments are found. The seventh argument is the start of a NULL
-terminated list of fallback resources for the top-level shell
widget created by the initialization call. Fallback resources provide a
kind of "belt and suspenders" protection against the possibility that
an app-defaults file is not installed. They are ignored if the
app-defaults file or any other explicit resource settings are found.
When no fallback resources are specified, the seventh argument should
be NULL.
It is generally a good idea to provide fallbacks for
resources that are essential to the operation of your application. An
example of how fallback resources can be used by an application is
shown in the following code fragment:
   String fallbacks[] = {
       "Demos*background: grey",
       "Demos*XmList.fontList: -*-courier-medium-r-*--12-*",
       "Demos*XmText.fontList: -*-courier-medium-r-*--12-*",
       /* list the rest of the app-defaults resources here ... */
       NULL
   };
   ...
   toplevel = XtVaAppInitialize (&app, "Demos", NULL, 0,
       &argc, argv, fallbacks, NULL);
   ...
Fallback resources protect your application against
a missing app-defaults file, but they do not guard against one that is
modified incorrectly or otherwise corrupted, since they are not used if
the app-defaults file is present in any form. A better fallback
mechanism would provide protection against these types of problems.
Fortunately, X11 Release 5 introduces a new function,
XrmCombineDatabases(), that allows you to provide real fallbacks in
case the user or the system administrator misconfigures the
app-defaults file. The eighth parameter is the start of a NULL
-terminated list of resource/value pairs that are applied to the
top-level widget returned by XtVaAppInitialize(). If there are
no resource settings, which is often the case for this function, you
can pass NULL as the eighth parameter. If you do pass any
parameters, it should be done just as we describe for
XtVaCreateWidget() later in this chapter. All of the functions
whose names begin with XtVa support the same type of
varargs-style (variadic) argument lists.
The X11 Release 4 implementation of
XtVaAppInitialize() and other varargs functions may not work
entirely as expected for some non-ANSI-C compilers due to a bug in the
way that Xt declares variadic functions. This problem only arises for
some compilers that do not understand function prototypes. The problem
is rare since it is compiler-dependent and it only happens on older
compilers. It is not a compiler error but an Xt error, since functions
are not supposed to mix fixed parameter declarations with variadic
declarations. XtVaAppInitialize() mixes these declarations;
the first seven parameters are fixed while the eighth through n
th arguments are variadic. ANSI-C allows, and even requires, this type
of specification.
If you experience problems such as segmentation
faults or bus errors as a result of using XtVaAppInitialize(),
you can try passing an extra NULL parameter after the final
NULL. Another option is to use XtAppInitialize(), which is
identical to XtVaAppInitialize(), but does not contain a
variable argument list of resource/values pairs. Instead, it uses the
old-style args and num_args method of specifying
resource values, which we describe later in this chapter.
There is a convenience function for creating every
class of widget and gadget supported by the Motif toolkit. For example,
to create a PushButton widget, you can use the function
XmCreatePushButton(). To create the corresponding gadget, you can
use XmCreatePushButtonGadget(). In addition, there are
convenience functions for creating compound objects. A compound
object is a collection of widgets that is treated like a single object.
For example, a ScrolledList object is really a List widget inside a
ScrolledWindow widget. XmCreateScrolledList() creates the
compound object consisting of both widgets.
The convenience functions for creating all of the
different types of widgets are described in Volume Six B, Motif
Reference Manual. In the examples in this book, however, we
typically use the Xt functions XtVaCreateWidget() and
XtVaCreateManagedWidget() for creating simple widgets. These
functions allow you to decide whether to create a widget as managed or
unmanaged, while the Motif convenience functions always create
unmanaged widgets. The Xt routines also allow you to set resources for
a widget using the varargs interface, which is more convenient than the
args and num_args method used by the Motif creation
routines.
X nests windows using a parent-child model. A
display screen is defined as the root window; every application has a
top-level window that is a child of the root window. A top-level window
in turn has subwindows, which overlay it but cannot extend beyond its
boundaries. If a window extends beyond the boundaries of its parent, it
is clipped.
Because every widget has its own X window, widgets
follow a similar parent-child model. Whenever a widget is created, it
is created as the child of another widget. The shell widget returned by
the call to XtVaAppInitialize() is the top-level widget of an
application. It is usually overlaid with a special class of widget
called a manager widget, which implements rules for controlling
the size and placement of widget children. For example, the Motif
RowColumn widget is a manager that allows widgets to be laid out in
regular rows and columns, while the Form widget is a manager that
allows widgets to be placed at precise positions relative to one
another. A manager widget can contain other manager widgets as well as
primitive widgets, which are used to implement actual
user-interface controls. Managers also support gadgets. A gadget is a
lighter-weight object that is identical to its corresponding widget in
appearance, but does not have its own window.
In the source code the button was created as a child
of the top-level shell window. This simple application contains only
one visible widget, so it does not use a manager. Actually, shells are
extremely simple managers. A shell can only have one child; the shell
makes itself exactly the same size as the child so the shell remains
invisible behind the child. Here's the call we used to create the
button:
   button = XtVaCreateManagedWidget ("pushme",
       xmPushButtonWidgetClass, toplevel,
       XmNlabelString, label,
       NULL);
The first argument is a string that is used as the name of the widget
in the resource database. If a user wants to specify the color of the
button label for the application, he can use the following
specification in a resource file:
hello.pushme.foreground: blueThe name is different from the variable name that is used to refer to the widget in application code. The following resource specification is not correct:
hello.button.foreground: blueThe resource name does not need to be identical to the variable name given to the widget inside the program, though to minimize confusion, many programmers make the two names the same. If you want users to be able to configure widget resources, be sure to include the names of the widgets in your documentation.
The second argument is the class of the widget to be
created. This name is defined in the public header file for the widget.
The widget reference pages in Volume Six B list the widget class name
for each Motif and Xt widget class.
The third argument is the parent of the widget,
which must be a manager widget that has already been created. In this
example, the parent of the PushButton widget is toplevel, the
shell widget returned by the call to XtVaAppInitialize(). The
remainder of the argument list is a variable-length list of resource
settings. We'll talk about the format of these resource settings in the
next section.
A widget class defines resources of its own and it
inherits resources from its superclasses. The names of the resources
provided by each widget class (new and inherited) are documented in the
widget reference pages in Volume Six B, Motif Reference Manual.
The most useful resources are described in detail in the individual
chapters on each of the Motif widget classes.
When resources are set in a program, each resource
name begins with the prefix XmN. These names are mnemonic
constants that correspond to actual C strings that have the same name
without the XmN prefix. For example, the actual resource name
associated with XmNlabelString is labelString. The
XmN identifies the resource as being Motif-related. Motif also uses
the XmC prefix to identify resource class symbols. Xt uses the
prefix XtN for any resources defined by its base widget
classes. Motif also provides corresponding XmN names for most
of these resources. Some toolkits use the XtN prefix, even
though its resource are not common to all Xt toolkits. The resource
naming convention has not been used long enough for all vendors to
conform to it. If you need access to an Xt-based resource that does not
have a corresponding XmN constant, you need to include the
file <X11/StringDefs.h>. When you are specifying resources in a
resource file or when you are using the -xrm option to specify
resources on the command line, omit the XmN prefix.
The main purpose of the constant definitions for
resource names is to allow the C preprocessor to catch spelling errors.
If you use the string width rather than the constant
XmNwidth, the program still works. However, if you type widdth
, the compiler happily compiles the application, but your program won't
work and you'll have a difficult time trying to figure out why. Because
resource names are strings, there is no way for Xt or Motif to report
an error when an unknown resource name is encountered. On the other
hand, if you use XmNwiddth, then the compiler complains that
the token is an undefined variable. The Motif convenience functions, as
well as the Xt functions XtCreateWidget() and
XtCreateManagedWidget(), require you to declare resource settings
in a static array. You pass this array to the function, along with the
number of items in the array. By contrast, the varargs-style functions
introduced in X11R4 allow you to specify resources directly in a
creation call, as a NULL-terminated list of resource/value
pairs.
In the call to XtVaCreateManagedWidget() in
hello.c, the only resource set was the string displayed as the
PushButton's label. Other resources could have been set in the same
call, as shown in the following code:
   button = XtVaCreateManagedWidget ("pushme",
       xmPushButtonWidgetClass, toplevel,
       XmNlabelString, label,
       XmNwidth, 200,
       XmNheight, 50,
       NULL);
These settings specify that the widget is 200 pixels wide by 50 pixels
high, rather than its default size, which would be just big enough to
display its label.
When you set resources in the creation call for the
widget, those resources can no longer be configured by the user. Such
resources are said to be hard-coded. For example, since we've set the
width and height of the PushButton in the call to
XtVaCreateManagedWidget(), a user resource specification of the
following form is ignored:
   *pushme.width:  250
   *pushme.height: 100
It is recommended that you hard-code only those resource values that are absolutely required by your program. Most widgets have reasonable default values for their resources. If you need to modify the default values, specify the necessary resource values in an app-defaults file, instead of in the application code.
Every resource has a data type that is specified by
the widget class defining the resource. When a resource is specified in
a resource file, Xt automatically converts the resource value from a
string to the appropriate type. However, when you set a resource in
your program, you must specify the value as the appropriate type. For
example, the Motif PushButton widget expects its label to be a compound
string (see Chapter 19, Compound Strings), so we create a
compound string, use it to specify the resource value, and free it when
we were done.
Rather than specifying a value of the appropriate
type, you can invoke Xt's resource converters in a varargs list using
the keyword XtVaTypedArg, followed by four additional
parameters: the resource name, the type of value you are providing, the
value itself, and the size of the value in bytes. Xt figures out the
type of value that is needed and performs the necessary conversion. For
example, to specify the background color of the button directly in our
program without calling an Xlib routine to allocate a colormap entry,
we can use the following code:
   button = XtVaCreateManagedWidget ("pushme",
       xmPushButtonWidgetClass, toplevel,
       XmNlabelString, label,
XtVaTypedArg, XmNbackground, XmRString, "red", strlen ("red") + 1, NULL);
The data type in this construct is specified using a
special symbol called a representation type, rather than the C
type. An XmR prefix identifies the symbol as a representation
type. See Volume Four, X Toolkit Intrinsics Programming Manual,
for more information on resource type conversion and the possible
values for representation types. These symbols are defined in the same
way as the XmN symbols that are used for resource names. After
a widget has been created, you can set resources for it using
XtVaSetValues(). The values set by this function override any
values that are set either in the widget creation call or in a resource
file. The syntax for using XtVaSetValues() is:
   XtVaSetValues (widget_id,
       resource-value-list,
       NULL);
The widget_id is the value returned from a widget creation
call, and resource-value-list is a NULL
-terminated list of resource/value pairs.
Some Motif widget classes also provide convenience
routines for setting certain resources. For example,
XmToggleButtonSetState() sets the XmNset resource of a
ToggleButton to either True or False. The available
convenience functions are described in Volume Six B, Motif Reference
Manual, and in the chapters on each widget class in this book. A
convenience function has direct access to the internal fields in a
widget's data structures, so it might have slightly better performance
than XtVaSetValues(). Functionally, however, the two methods
are interchangeable. The routine used to get widget resource values is
XtVaGetValues(). The syntax of this routine is exactly the same as
XtVaSetValues(), except that the value part of the resource/value
pair is the address of a variable that stores the resource value. For
example, the following code gets the label string and the width for a
Label widget:
   extern Widget    label;
   XmString         str;
   Dimension        width;
   ...
   XtVaGetValues (label,
       XmNlabelString, &str,
       XmNwidth,       &width,
       NULL);
Notice that the value for XmNlabelString is an XmString
, which is a Motif compound string. Almost all of the Motif widget
resources that specify textual information use compound strings rather
than regular character strings. The XmNvalue and
XmNvalueWcs resources for Text and TextField widgets are the only
exceptions to this policy. When you are retrieving a string resource
from a widget, make sure that you pass the address of a compound
string, not a character string, as in the following incorrect example:
   extern Widget    label;
   char             *buf;
   Dimension        width;
   ...
   XtVaGetValues (label,
       XmNlabelString, &buf, /* do not do this */
       XmNwidth,       &width,
       NULL);
If you try to get a compound string resource value with a character
string variable, the program still works, but the value of the
character string is meaningless. The correct way to handle a compound
string resource is to retrieve it with an XmString variable
and then get the character string from the compound string using
XmStringGetLtoR(). See Chapter 19, Compound Strings, for
more information.
There are some things to be careful about when you
are getting resource values from a widget. First, always pass the
address of the variable that is being used to store the retrieved
value. A value represented by a pointer is not copied into the address
space. Instead, the routine sets the value for the address of the
pointer to the position of the internal variable that contains the
desired value. If you pass an array, rather than a pointer to the
array, the routine cannot move its address. If you pass the address of
a pointer, XtVaGetValues() is able to reset the pointer to the
correct internal value. The Motif toolkit sometimes sets the given
address to allocated data, which must be freed when it is no longer
needed. This situation occurs when a compound string resource is
retrieved from a widget and when the text value of a Text widget is
retrieved. These cases are discussed in Chapter 14, Text Widgets
, and Chapter 19, Compound Strings. For values that are not
represented by pointers, such as integers, the value is simply copied.
For example, the width value is an int, so the
resource value is copied into the variable.
You should also be careful about changing the value
of a variable returned by XtVaGetValues(). In the case of a
variable that is not a pointer, the value can be changed because the
variable contains a copy of the value and does not point to internal
data for the widget. However, if the variable is a pointer to a string
or a data structure, it does point to internal data for the widget. If
you dereference the pointer and change the resulting value, you are
changing the internal contents of the widget. This technique should not
be used to change the value of a resource. To modify a resource value,
you should use XtVaSetValues() with a defined resource name,
as this routine ensures that the widget redraws and manages itself
appropriately.
Motif also provides convenience routines for getting
certain resource values from particular widget classes. Most of these
functions correspond to the convenience routines for setting resource
values. Many of the functions allocate memory for the value that is
returned. For example, XmTextGetString() allocates space for
and returns a pointer to the text in a Text widget. When a convenience
function for retrieving a resource value is available, we generally
recommend using it. While we use the variadic functions almost
exclusively in this book, you should know how to use the old-style
argument lists needed by the Motif widget creation functions. The Motif
convenience functions, and some Xt functions like XtCreateWidget()
and XtCreateManagedWidget(), require you to set resources
using a separately-declared array of objects of type Arg. You
pass this array to the appropriate function along with the number of
items in the array.
For example, the following code fragment creates a
PushButton widget like the one in hello.c, but it uses a Motif
convenience routine:
   Arg args[5];
   int n = 0;

   XtSetArg (args[n], XmNlabelString, label); n++;
   button = XmCreatePushButton (toplevel, "pushme", args, n);
   XtManageChild (button);
For all of the Motif convenience routines, the first argument is the parent of the widget being created, the second argument is the widget's name, and the third and fourth arguments are the array of resource specifications and the number of resources in the array. Since the class of the widget being created is reflected in the name of the convenience function, it does not need to be specified as an argument to the routine. For example, XmCreateLabel() creates a Label widget, while XmCreatePushButton() creates a PushButton widget.
Xt also provides some generic widget creation
functions that use the old-style argument lists for specifying widget
resources. The following code fragment shows the use of
XtCreateWidget():
   Arg args[5];
   int n = 0;

   XtSetArg (args[n], XmNlabelString, label); n++;
   button = XtCreateWidget ("pushme",
       xmPushButtonWidgetClass, toplevel, args, n);
   XtManageChild (button);
With this routine, the name of the widget is the first parameter, the
widget class is the second parameter, and the parent is the third
parameter. The fourth and fifth parameters specify the resources, as in
the Motif convenience routines.
The argument-list style of setting resources is
quite clumsy and error-prone, since it requires you to declare an array
(either locally or statically) and to make sure that it has enough
elements. It is a common programming mistake to forget to increase the
size of the array when new resource/value pairs are added; this error
usually results in a segmentation fault.
In spite of the disadvantages of this method of
setting resources, there are still cases where the convenience routines
may be useful. One such case is when the routine creates several
widgets and arranges them in a predefined way consistent with the
Motif Style Guide. The argument-list style functions also can be
useful when you have different resources that should be set depending
on run-time constraints. For example, the following code fragment
creates a widget whose foreground color is set only if the application
knows it is using a color display:
   extern Widget parent;
   Arg args[5];
   Pixel red;
   int n = 0;

   XtSetArg (args[n], XmNlabelString, label); n++;
   if (using_color) {
       XtSetArg (args[n], XmNforeground, red); n++;
   }
   ...
   widget = XtCreateManagedWidget ("name", xmLabelWidgetClass, parent,
       args, n);
The old-style routines also allow you to pass the exact same set of
resources to more than one widget. Since the contents are unchanged,
you can reuse the array for as long as it is still available. Be
careful of scoping problems, such as using a local variable outside of
the function where it is declared. The following code fragment creates
a number of widgets that all have the same hard-coded resources:
   static char *labels[] = { "A Label", "Another Label", "Yet a third" };
   XmString label;
   Widget widget, rc;
   Arg args[3];
   int i, n = 0;

   /* Create an unmanaged RowColumn widget parent */
   rc = XtCreateWidget ("rc", xmRowColumnWidgetClass, parent, NULL, 0);

   /* Create RowColumn's children -- all 50x50 with different labels */
   XtSetArg (args[n], XmNwidth, 50); n++;
   XtSetArg (args[n], XmNheight, 50); n++;
   for (i = 0; i < XtNumber (labels); i++) {
       xm_label = XmStringCreateLocalized (labels[i]);
       XtSetArg (args[n], XmNlabelString, xm_label);
       widget = XtCreateManagedWidget ("label", xmLabelWidgetClass, rc,
           args, n + 1);
       XmStringFree (xm_label);
   }

   /* Now that all the children are created, manage RowColumn */
   XtManageChild (rc);
Each Label widget is created with the same width and height resource
settings, while each XmNlabelString resource is distinct. All
other resource settings for the widgets can be set in a resource file.
To set resources in a resource file, you need to
specify the names of the widgets, which in this case are all set to
label. It is perfectly legal to give the same name to more than one
widget. As a result, a resource specification in a resource file that
uses a particular name affects all of the widgets with that name,
provided that the widget tree matches the resource specification. For
example, you could set the foreground color of all of the Labels using
the following resource specification:
*rc.label.foreground: red
Other widgets in the application that have the
widget name label, but are not children of the widget named
rc, are not affected by this specification. Obviously, whether you
really want to use the same name for a number of widgets is dependent
on your application. This technique makes it easier to maintain a
consistent interface, but it also limits the extent to which the
application can be customized.
We could have used the elements of the labels
array as widget names, but in this example, these strings contain
spaces, which are "illegal" widget names. If you want to allow the user
to specify resources on a per-widget basis, you cannot use spaces or
other non-alphanumeric characters, except the hyphen (-) and
the underscore (_), in widget names. If per-widget resource
specification is not a concern, you can use any widget name you like,
including NULL or the null string ("").
Even if a widget has an illegal name, the user can
still specify resources for it using the widget class, as in the
following example:
*rc.XmLabel.foreground: redThis resource setting causes each Label widget to have a foreground color of red, regardless of the name of the widget (and provided that the resource value is not hard-coded for the widget). See Volume Four, X Toolkit Intrinsics Programming Manual, for a discussion of appropriate widget names and further details on resource specification syntax.
Once we have created and configured the widgets for
an application, they must be hooked up to application functions via
callback resources. Before we can talk about callback resources and
callback functions, we need to discuss events and event handling. In
one sense, the essence of X programming is the handling of asynchronous
events. Events can occur in any order, in any window, as the user moves
the pointer, switches between the mouse and the keyboard, moves and
resizes windows, and invokes functions available through user interface
components. X handles events by dispatching them to the appropriate
application and to the separate windows that make up each application.
Xlib provides many low-level functions for handling
events. In special cases, which are described later in this book, you
may need to dip down to this level to handle events. However, Xt
simplifies event handling by having widgets handle many events for you,
without any application interaction. For example, widgets know how to
redraw themselves, so they respond automatically to WExpose
events, which are generated when one window is covered up by another
and then uncovered. These "widget survival skills" are handled by
functions called methods deep in the widget internals. Some
typical methods redraw the widget, respond to changes in resource
settings that result from calls to XtVaSetValues(), and free
any allocated storage when the widget is destroyed.
The functionality of a widget also encompasses its
behavior in response to user events. This type of functionality is
typically handled by action routines. Each widget defines a table of
events, called a translation table, to which it responds. The
translation table maps each event, or sequence of events, to one or
more actions.
Consider the PushButton in hello.c. Run the
program and note how the widget highlights its border as the pointer
moves into it, displays in reverse-video when you click on it, and
switches back when you release the button. Watch how the highlighting
disappears when you move the pointer out of the widget. Also, notice
how pressing the SPACEBAR while the pointer is in the widget has the
same effect as clicking on it. These behaviors are the kinds of things
that are captured in the widget's translation table:
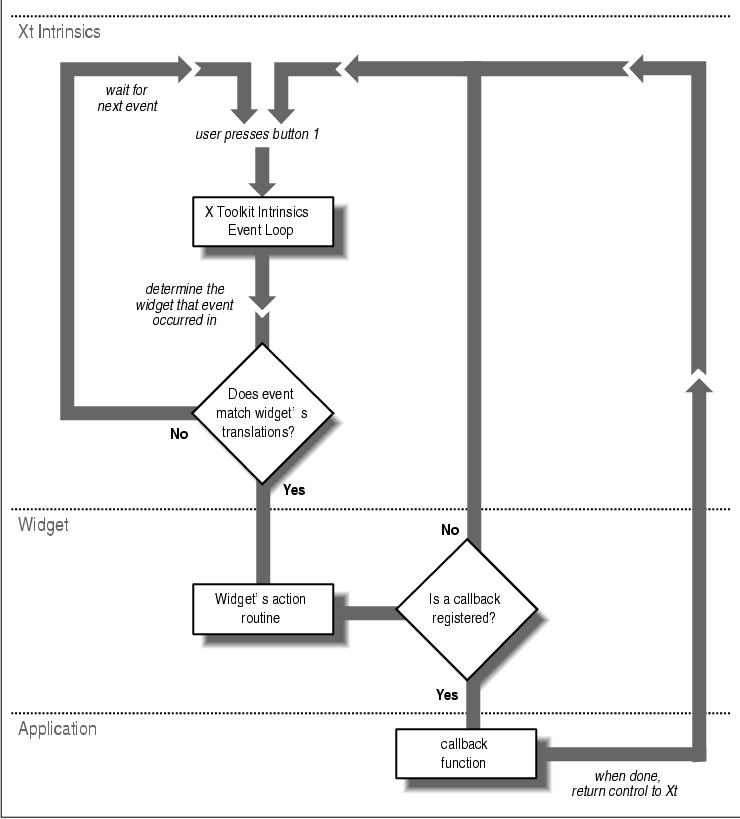
   <Btn1Down>:                     Arm()
   <Btn1Down>,<Btn1Up>:            Activate() Disarm()
   <Btn1Down>(2+):                 MultiArm()
   <Btn1Up>(2+):                   MultiActivate()
   <Btn1Up>:                       Activate() Disarm()
   <Btn2Down>:                     ProcessDrag()
   <Key>osfSelect:                 ArmAndActivate()
   <Key>osfActivate:               PrimitiveParentActivate()
   <Key>osfCancel:                 PrimitiveParentCancel()
   <Key>osfHelp:                   Help()
   ~Shift ~Meta ~Alt <Key>Return:  PrimitiveParentActivate()
   ~Shift ~Meta ~Alt <Key>space:   ArmAndActivate()
   <EnterWindow>:                  Enter()
   <LeaveWindow>:                  Leave()
The translation table contains a list of event translations on the left side, with a set of action functions on the right side. When an event specified on the left occurs, the action routine on the right is invoked. As we just described, moving the pointer in and out of the PushButton causes some visual feedback. The EnterWindow and LeaveWindow events generated by the pointer motion cause the Enter() and Leave() actions to be invoked.
As another example, when the first mouse button is
pressed down inside the PushButton, the Arm() action routine
is called. This routine contains the code that displays the button as
if it were "pushed in," as opposed to "pushed out." When the mouse
button is released, both the Activate() and Disarm()
routines are invoked in that order. Here is where your application
actually steps in. If you have provided an appropriate callback
function, the Activate() action calls it. The Disarm()
routine causes the button to be redrawn so that it appears "pushed out"
again. In the Xt syntax, events are specified using symbols that are
tied fairly closely to pure X hardware events, such as ButtonPress
or EnterWindow. For example, <Btn1Down> specifies a
button press for the first mouse button. KeyPress events are
indicated by symbols called keysyms, which are
hardware-independent symbols that represent individual keystrokes.
Different keyboards may produce different hardware keycodes for
the same key; the X server uses keysyms as a portable representation,
based on the common labels found on the tops of keys.
Motif provides a further level of indirection in the
form of virtual keysyms, which describe key events in a
completely device-independent manner. For example, osfActivate
indicates that the user invoked an action that Motif considers to be an
activating action. An activating action typically corresponds to the
RETURN key being pressed or the left mouse button being clicked.
Similarly, osfHelp corresponds to a user request for help,
such as the HELP or F1 key being pressed.
Virtual keysyms are supposed to be provided by the
vendor of the user's hardware, based on the keys on the keyboard, but
some X vendors also provide keysym databases to support multiple
keyboards. As of X11 Releaase 5, the X Consortium provides a virtual
keysym database in the file /usr/lib/X11/XKeysymDB. This file
contains a number of predefined key bindings that OSF has registered
with the X Consortium to support actions in the Motif toolkit.
Virtual keysyms can be invoked by physical events,
but the Motif toolkit goes one step further and defines them in the
form of virtual bindings. Here's the translation table for the
PushButton widget expressed using virtual bindings:
   BSelect Press:          Arm()
   BSelect Click:          Activate() Disarm()
   BSelect Release:        Activate() Disarm()
   BSelect Press 2+:       MultiArm()
   BSelect Release 2+:     MultiActivate() Disarm()
   BTranserPress:          ProcessDrag()
   KSelect:                ArmAndActivate()
   KHelp:                  Help()
Examples of virtual bindings are BSelect, which corresponds to the first mouse button, and KHelp, which is usually the HELP key on the keyboard. The rule of thumb is that any virtual binding beginning with a "B" corresponds to a mouse button event, while any binding beginning with a "K" corresponds to a keyboard event. More than one event can be bound to a single virtual keysym. For example, the Motif Style Guide permits F1 to be a help key, so that key is also virtually bound to KHelp.
Virtual bindings can be specified by a system
administrator, a user, or an application. One common use of virtual
bindings is to reconfigure the operation of the BACKSPACE and DELETE
keys. On some keyboards, the BACKSPACE key is in a particularly
difficult location for frequent access. Users of this type of keyboard
may prefer to use the DELETE key for backspacing. These people may find
the default operation of the Motif Text widget annoying, since it does
not allow them to backspace using their "normal" backspace key.
Since Xt allows applications and users to override,
augment, or replace translation tables, many people familiar with Xt
try to specify a new translation for the DELETE key to make it act like
a backspace. The translation invokes the action routine that backspaces
in a Text widget. However, this approach is limited, in that it only
works for a single Text widget. The Text widget has the following
translation:
<Key>osfBackSpace: delete-previous-char()The virtual keysym osfBackSpace is bound to delete-previous-char(), which is the backspace action. Rather than changing the translation table to specify that <Key>Delete should invoke this action, a user can redefine the virtual binding of the osfBackSpace keysym. A user can configure his own bindings by specifying the new virtual keysym bindings in a .motifbind file in his home directory. The following virtual binding specifies that the DELETE key is mapped to osfBackSpace:
osfBackSpace : <Key>DeleteAs a result of this specification, the DELETE key performs the backspace action in the Text widget, as well as any other widgets in the Motif toolkit that use the osfBackSpace keysym. The advantage of using virtual bindings is that the interface remains consistent and nothing in the toolkit or the application needs to change.
Virtual keysym bindings can also be set in a
resource file, using the XmNdefaultVirtualBindings resource.
The resource can be specified for all applications or on a
per-application basis. To map the DELETE key to osfBackSpace,
use the following specification:
*defaultVirtualBindings: osfBackSpace : <Key>Delete 0 other bindingsThe only difference between the syntax for the resource specification and for the .motifbind file is that the resource specification must have a newline character (\n) between each entry. The complete syntax of Motif virtual bindings is explained in Volume Six B, Motif Reference Manual.
Motif 1.2 includes a new client, xmbind, that
configures the virtual key bindings for Motif applications. This action
is performed by the Motif Window Manager (mwm) or any
application that uses the Motif toolkit at startup, so you really only
need to use xmbind if you want to reconfigure the bindings
without restarting mwm or a Motif application. Motif 1.2 also
provides a new function, XmTranslateKey(), to translate a
keycode into a virtual keysym. This function allows applications that
override the default XtKeyProc to handle Motif's virtual key
bindings. Translations and actions allow a widget class to define
associations between events and widget functions. A complex widget,
such as the Motif Text widget, is almost an application in itself,
since its actions provide a complete set of editing functions. But
beyond a certain point, a widget is helpless unless control is passed
from the widget to the application. A widget that expects to call
application functions defines one or more callback resources, which are
the hooks on which an application can hang its functions. For example,
the PushButton widget defines the XmNactivateCallback,
XmNarmCallback, and XmNdisarmCallback callback resources.
It is no accident that the callback resource names
bear a resemblance to the names of widget action routines. In addition
to highlighting the widget, the action routines call any application
functions associated with the callbacks of the same name. There is no
reason why a callback has to be called by an action; a widget could
install a low-level event handler to perform the same task. However,
this convention is followed by most widgets.
the figure illustrates the event-handling path that results in an application callback being invoked. The widget's translation table registers the widget's interest in a particular type of event. When Xt receives an event that happened in the widget's window, it tests the event against the translation table. If there is no match, the event is thrown away. If there is a match, the event is passed to the widget and an action routine is invoked. The action routine may perform a function internal to the widget, such as changing the widget's appearance by highlighting it. Depending on the design of the widget, the action routine may then pass control to an application callback function. If the action is associated with a callback resource, it checks to see if a callback function has been registered for that resource, and if so, it dispatches the callback.
There are several ways to connect an application
function to a callback resource. The most common is to call
XtAddCallback(), as demonstrated in hello.c:
   void button_pushed();
   ...
   XtAddCallback(button, XmNactivateCallback, button_pushed, NULL);
The first argument specifies the widget for which the callback is installed. The second parameter is the name of the callback resource, while the third is a pointer to the callback function. The fourth argument is referred to as client data. If this parameter is specified, its value is passed to the callback function when it is called. Here, the client data is NULL.
The client data can be a value of any type that has
the same size as an XtPointer. An XtPointer is
usually the same as a char pointer; it is typically
represented by a 32-bit value. You can pass pointers to variables, data
structures, and arrays as client data. You cannot pass actual data
structures; the result of passing a data structure is undefined. You
can pass variables of type int or char, but
understand that you are passing the data by value, not by reference. If
you want to pass a variable so that the callback routine can change its
value, you must pass the address of the variable. In this case, you
need to make sure that the variable is global, rather than local, since
a local variable loses its scope outside of the routine that calls
XtAddCallback().
The callback function itself is passed the widget,
the client data, if any, and a third argument that is referred to as
call data. The signature of a callback function can be expressed in
one of two ways: using an ANSI-compliant function prototype or using
the older style conventions of K&R C. The ANSI-style function
declaration is as follows:
button_pushed (Widget widget, XtPointer client_data, XtPointer call_data)In the strictest sense, declaring the types of the parameters to the function is the proper way to handle function declarations and signatures. While this convention is good style and recommended for upwards compatibility, most compilers today still understand the older style conventions:
   button_pushed (widget, client_data, call_data)
       Widget widget;
       XtPointer client_data;
       XtPointer call_data;
Since this style is the least common denominator, your best bet is to
use the second, more portable method. In the course of the book, we
make a habit of declaring client_data and call_data
as XtPointers, even though we usually know the actual types of
the parameters being passed to the function. Before referencing these
parameters, we cast the values to the appropriate types.
The third parameter in a Motif-based callback
function is always a structure that contains information specific to
the widget class that invoked the callback function, as well as
information about the event that triggered the callback. There is a
generic callback structure, XmAnyCallbackStruct, as well as
variations for specific widget classes and callback resources. The
XmAnyCallbackStruct is defined as follows:
   typedef struct {
       int     reason;
       XEvent *event;
   } XmAnyCallbackStruct;
The callback structure for the PushButton widget class,
XmPushButtonCallbackStruct, is defined as follows:
   typedef struct {
       int     reason;
       XEvent *event;
       int     click_count;
   } XmPushButtonCallbackStruct;
We discuss the callback structures for a widget
class in this book (see the chapter corresponding to the specific
widget type). The callback structures are also documented in the widget
reference pages in Volume Six B, Motif Reference Manual.
All of the callback structures contain at least the
two fields found in XmAnyCallbackStruct. The reason
field always contains a symbolic value that indicates why the callback
was called. These values are defined in /usr/include/Xm/Xm.h and
are usually self-explanatory. For example, when a callback function
associated with a PushButton's XmNactivateCallback resource
is called, the reason is XmCR_ACTIVATE. The different
values for reason make it easier to write callback routines
that are called by more than one type of widget. By testing the
reason field, you can determine the appropriate action to take in
the callback. Because the widget is always passed to the callback
function, you can also find out what widget caused the function to be
invoked.
The event field contains the actual event
that triggered the callback, which can provide a great deal of useful
information. See Volume Four, X Toolkit Intrinsics Programming
Manual, for information on how to interpret the contents of an
event. That subject is not discussed at length in this book, although
our examples frequently use the events in callback structures to
control processing.
Once all of the widgets for an application have been
created and managed and all of the callbacks have been registered, it's
time to start the application running. The final two function calls in
hello.c perform this task:
   XtRealizeWidget (toplevel);
   XtAppMainLoop (app);
Realizing a widget creates the actual window for the widget. When you call XtRealizeWidget() on the top-level widget of an application (the one returned by the call to XtVaAppInitialize() ), Xt recursively traverses the hierarchy of widgets in the application and creates a window for each widget. Before this point, the widgets existed only as data structures on the client side of the X connection. After the call, the widgets are fully instantiated, with windows, fonts, and other X server data in place. The first Expose event is also generated, which causes the application to be displayed.
The call to XtAppMainLoop() turns control
of the application over to the X Toolkit Intrinsics. Xt handles the
dispatching of events to the appropriate widgets, which in turn pass
them to the application via callbacks. The application code is idle
until summoned to life by user-generated events.
We've looked at the skeleton of a simple Motif
program. Every application follows more or less the same plan: