9 critical tools for designing a product
Product design is not a linear process. It’s a set of tools.
 Tools (source: Publicdomainpictures.net)
Designing for Validation
-
Learn why you should design a test before you design a
product.
Learn faster. Dig deeper. See farther.
-
Get nine tools that are critical for designing your
product. -
Understand which of those tools you can safely skip depending
on what you’re building and for whom.
I should warn you, if you’re already a professional designer of
any sort, you may find some of the following tedious or infuriating.
That’s OK. This isn’t meant to teach professional designers to be even
better at their jobs. This is meant to teach other people how to do
enough design to validate or invalidate their initial hypotheses. It’s
also meant to teach designers how to design in Lean environments and
validate their work.
Design is a rich and complicated field that people study for their
whole lives with varying degrees of success. Even worse, there are
dozens of different disciplines within design—for example, figuring out
how a complicated product should work is different from designing a
beautiful brochure, which is different from designing a physical object.
These are all called design. Probably because we are designers and not
linguists.
But, at its heart, design is about solving problems. Once you’ve
defined your problem well and determined what you want your outcome to
be, Lean UX encourages you to do as little work as possible to get to
your desired outcome, just in case your desired outcome isn’t exactly
perfect. That means doing only the amount of design you need to validate
your hypothesis.
Sometimes doing very little design is even harder than doing a lot
of design. Because the trick is knowing what sort of design is the most
important right this second and what is just a waste of time.
If you’ve done your research, you should understand your problem,
your market, and your product concept pretty thoroughly. You hopefully
have a problem you want to solve and an idea of a feature or product
that might solve it. Now you need to build something.
Maybe this should be obvious, but there are all sorts of different
kinds of things that you need to build over the course of a product’s
life span. A lot of advice just focuses on the very first time you build
something—the initial product.
But the vast majority of design decisions happen after you’ve
built a product. You are constantly iterating and changing your initial
product. Or, at least, you should be.
Here are some of the things you will have to do in the
course of building and rebuilding your product. All of these require
some amount of design:
-
Fix a bug.
-
Deal with an error state.
-
Make a small change in a user flow.
-
Create an entirely new feature.
-
Do a complete visual redesign.
-
Tweak an existing visual design.
-
Reorganize the product.
-
Build a whole new product.
-
Redesign for another platform.
Just to make things even more confusing, there is a whole lot of
gray area between some of these. For example, some bug fixes are typos,
others fundamentally change the process a user goes through, and some
may not have any obvious user impact at all.
But all these different types of changes have one very important
thing in common: In Lean UX, you should be designing just enough to
validate your hypothesis. And no more.
There is a process for doing this in a Lean way, and I’m going to
describe it here. As I describe it, you’re going to be thinking to
yourself, “This seems like a huge amount of work!”
And the thing is, it is a lot of work. Lean
design is not lazy design. It’s not about skipping steps or doing a
shoddy job or not thinking through the user experience. In fact, Lean UX
has a huge amount in common with traditional User-Centered Design and
also with Agile Design, neither of which are particularly easy.
I started this section by writing a step-by-step guide for
designing a product, but I kept wanting to write, “The next step is X
except for when it isn’t.” That’s when I realized that this sort of
design is not a linear process. It’s a set of tools.
Sometimes, in the course of building a product or a feature,
you’ll use all these tools. Sometimes you’ll skip one or two steps.
That’s OK. The key is to understand the tools well enough to know when
it’s safe to skip one.
Tool 1: Truly Understand the Problem
The first tool in any sort of design is truly
understanding the problem you want to solve. In this way, Lean UX is
no different from any other sort of design theory. Sadly, it’s pretty
different from the way a lot of people practice design.
The vast majority of time I talk to entrepreneurs, they present
me with solutions rather than problems. They say things like, “I want
to add comments to my product,” not “My users don’t have any way to
communicate with one another, and that’s affecting their engagement
with my product.”
By rephrasing the problem from your user’s point of view, you
help yourself understand exactly what you are trying to do before you
figure out how to do it.
I’m not going to rehash how you might understand the problem
you’re trying to solve. If you’re confused by this, go back and read
not available through
Designing for Validation. I’ll give you a hint: It
involves listening, observation, and other sorts of research.
One note to make here is that often research won’t be confined
to just users. We’ve been talking a lot about listening to your users,
and that is clearly the most important thing you can be doing. But
this is the point where you also need to listen to stakeholders within
your company.
If you’re part of a small startup, luckily this will be quick.
Make sure that you have involved the people in your organization most
likely to understand the problem you’re trying to solve. These people
could be practically anybody in the organization—customer service
folks, engineers, and salespeople are obvious choices if they
exist.
Just remember that there are people within your organization who
may understand the problem better than you do, and make sure that
you’re incorporating their knowledge into the design process. They’re
not creating the final designs or telling you exactly what people
need. They’re weighing in with their thoughts about business needs,
and their input should be weighed against the input from the
customers.
Let’s imagine that you already have a product with some people
who are using it. However, as with many startups, you are getting
signals that your product is confusing. For example, many people visit
your product or download your app and then never use it again. That’s
a good sign that you’re not solving the problem people thought you’d
be solving for them. Your first step is to start by understanding the
problem better.
For example, you need to figure out your user
base:
-
What sort of people are using your product?
-
How familiar with technology are they?
-
Are you mainly trying to help new users or existing
users? -
Are they paying you or using your product for free?
You need to understand the context in which they’ll be using
your product:
-
Are they looking for quick help on the go or are they at a
desk and ready to commit time to learning about your
product? -
Do they need help from an expert, or will help from other
users work? -
Are they likely to have problems in the middle of something
critical and time sensitive?
You need to learn more about your user needs:
-
Are they using your product for fun? For work? To make
themselves more productive?
You may already know the answer to a lot of these questions, but
don’t assume the same is true of any problem you’re trying to solve
for your users. Figure out the types of users, context, and needs for
any specific problem you’re trying to solve. You’ll use all of this
information in all of the following steps.
When Is It Safe to Skip This?
It is never, ever safe to skip this. If you don’t understand
the problem, you can’t solve it.
Tool 2: Design the Test First
If I had to pick one thing that really sets Lean UX design apart
from all other sorts of design, it would be this. Lean UX always has a
measurable goal, and you should always figure out how to measure that
goal before you start designing. If you don’t, how will you know that
your design worked? Here’s a real-life example. Once upon a time, I
worked at IMVU. For those of you who don’t know, IMVU allows its users
to create 3D avatars and chat with other people from around the world.
Users customize their avatars with all sorts of virtual goods, like
clothes, pets, and virtual environments.
As with all companies, we occasionally had to decide what to
work on next. We decided that our first priority was to increase a
specific metric—activation. We wanted more folks who tried the product
once to come back again.
So our goal for the project was to increase the
activation number.
We needed to figure out how we would know if the project was a
success. We decided that our project would be a success when we saw a
statistically significant increase in the percentage of new users
coming back within a certain amount of time.
To fully understand whether the problem was fixed by our new
design, we’d release any changes we made in an A/B test that would
show the old version to half the new users and the new version to the
other half. We’d measure the percentage of folks coming back from both
cohorts over a period of several weeks and see what happened.
Now we knew our problem, and we had a verifiable way to know
that we’d either solved the problem or made progress toward solving
the problem.
I’m not going to go into all the different ways that we tried to
make progress on that specific metric. I’ll have more on those sorts
of changes later. Suffice it to say that some things moved the needle
and others didn’t. More importantly, it wasn’t always the biggest
changes that had the biggest impact. The point was, whatever changes
we made, we had an objective way of determining whether or not the
design was a success.
There are other sorts of tests you might do rather than a strict
A/B test, and I’ll cover those later in the book.
Interestingly, desired outcomes aren’t always obvious and A/B
tests aren’t always possible. In our example of helping people who are
having problems, looking at the number of problems people are solving
isn’t really a good metric. I mean, you could easily increase the
number of problems people are solving by increasing the number of
problems they’re having, and that is not a metric you want any
higher.
A better metric in this case might be something like the number
of support calls you get from users who see the new feature or the
number of questions you get about specific problems users were
having.
The trick is that all success metrics must be measurable and
directly related to your business goals. Again, I’ll talk more about
how to pick a good test goal later in the book. Think of it as an
annoying little trick to force you to keep reading.
When Is It Safe to Skip This?
You really shouldn’t skip this either, although I’ve found
that this particular exercise can take as little as a few minutes.
Before you start to design or build anything, you should know very
clearly what it is intended to do and how to know whether it is
working.
Tool 3: Write Some Stories
A lot of times when we think of stories, we think of the
very specific Agile engineering stories that we write and track. These
are not the sort of stories you’re going to write.
You need to write down design stories. Think of these as a way
to break down your problem into manageable steps. Also, think of these
as a way to evaluate the design once it’s finished.
A good story for our user help experiment might be something
like, “Users who are having trouble making changes to their accounts
can quickly figure out how to solve that problem.”
Don’t forget to write admin stories, too! You might include
something like, “Customer service reps can more quickly add new
content to help users when new problems arise.”
You’ll notice I didn’t suggest things like, “Customers can ask
questions of other users and get immediate responses.” That may be a
solution that you explore, but being too explicit about how you’re
going to solve your problem can lock you into a specific idea too soon
and prevent you from discovering better ones.
When Is It Safe to Skip This?
Writing down stories is always a good idea. With that said,
you’re welcome to skip writing stories for very trivial things like
quick bug fixes; small changes to messaging; or visual design
changes, like testing a new button color, that are better
represented by showing the actual design.
On the other hand, the very simplest stories should take no
more than a few minutes to write, so consider doing it anyway, just
as practice. Sometimes, in the process of writing design stories,
you’ll find that you’re missing a crucial part of the design.
For example, I was talking with a startup that was changing
its home page rather dramatically. The team thought it was a very
simple visual design change. However, once they started writing
their stories, they realized that one part of the design involved
testing different images on the home page. They also realized that
they wanted to allow their marketing team to continue to test
different images going forward, which meant that they needed an
admin interface to allow that to happen. By writing the design
stories, they thought through things like how changes would be made
going forward—things they would otherwise have missed.
Tool 4: Talk About Possible Solutions with the Team
Depending on the type of person you are, this is either
the most fun or the most tortuous part of the design process. I’m not
going to go into detail about the best way to discuss things with your
team, but make sure that it’s a very small, targeted group of people
who have a strong grasp of the problem you’re trying to solve.
If you’ve properly used Tool 1 in this chapter, you’re already
ahead of the game. You’ve talked to these stakeholders already when
you were in the process of truly understanding the problem.
The important thing here is that, just because you know the
exact problem you’re trying to solve, doesn’t mean there’s a single,
obvious way to fix it. For example, a pretty typical problem for
products is that new users have no idea how to get started.
There are dozens of ways to fix this. You could do a tutorial, a
video, a webinar, a walk-through, inline callouts, tooltips, or
contextual help messages, for example. Hell, if you have very few
users who are each paying a huge amount of money, you could go to each
customer’s house personally and teach him how to use it.
This is the time to get all those different options on the table
for further evaluation.
As I’m sure you’ve been told, this is not the time to shoot down
people’s ideas. In our help example, you don’t want to ignore the
person in the corner saying things like, “What if Ryan Gosling were to
answer all of our support questions?” even if you feel it’s not the
most cost-efficient method of helping users.
Perhaps the most important thing to consider about brainstorming
is that it should be a very, very, very short process. People who love
this part of the job will try to suck you into four-hour “strategy”
meetings that are really thinly veiled brainstorming meetings.
Don’t do it. If you’re just brainstorming, and not starting
arguments over every stupid idea (and let’s face it, some ideas are
really stupid, no matter what they tell you in brainstorming school),
you will run out of ideas very quickly.
Start the session by clearly stating the user problem and the
reason you are choosing to solve it. Explain how you will measure the
success of the experiment. Then have everybody write down their ideas
in a sentence or two. Go around the room, have people read their
ideas, write them on the whiteboard, and don’t let people discuss
beyond clarifying certain specifics about the idea.
Depending on the types of ideas that people are presenting, you
may want to start grouping ideas in a way that makes sense to you.
Feel free to group by things like which metric will be affected, ease
of implementation, or customer problem that you’re solving. Those can
all be helpful in deciding what’s most important to do next.
Try to do this in under 15 minutes. Seriously. If it takes much
longer than that, you’re including too many people or talking about
too many things.
Feel free to ask people at the end whether they feel strongly
about a particular solution they’d like to try, but whatever you do,
don’t take a vote. This is an opportunity to get some new ideas, not
some stupid experiment in democratic government.
When Is It Safe to Skip This?
I just said you can do this in 15 minutes. Why would you skip
it? The truth is, by continually checking in with your team and the
stakeholders, you’re going to save yourself time in the long run,
because they will catch mistakes and problems that you might
miss.
Tool 5: Make a Decision
Welcome to the hardest part of the design process. You
need to pick something to try. If you can’t make hard decisions and
then stick to them for at least as long as it takes to prove whether
you were right or wrong, you are going to need to change careers,
because this is a necessary skill.
But don’t fret. I’m not going to send you into the wilderness
empty-handed. I’m going to remind you of a very important calculation
called ROI—return on investment.
Every possible solution has an expected cost and an expected
return. Of course, your expectations of both things are probably
completely wrong, but you have to do this anyway, because you will get
better and better at making expected ROI calculations as you do more
of them. Don’t get me wrong. You’ll still probably suck at them, but
you’ll suck less, and it’s a useful exercise.
A good way to do this is to create a simple graph with
x- and y-axes. Label one
“Expected Return” and one “Expected Cost.” Then put all your different
features on the graph. While you won’t be able to truly estimate the
exact cost of every different feature, it’s pretty easy to estimate
which ones are going to take far more time or engineering
effort.
Oh, in case you’re thinking to yourself that you don’t really
know how to estimate engineering effort, this might be a good time to
mention that you should have someone from engineering involved in this
effort. Same goes for any of the other people in your company who
might be affected by your changes. That can be marketing, customer
service, sales, or anyone else who needs to weigh in on unexpected
costs or benefits of particular features.
Again, none of those people are going to vote on the right
decision to be made. What they will do is provide enough information
about the real expected costs and benefits of each feature so you can
make the decision.
An important thing to keep in mind during this process is that,
depending on the size and complexity of your company, this process may
have to be quite iterative. Engineering may not have enough
information at this point to commit to a solid estimate. Marketing may
be able to give only a rough estimate of what sort of support they’ll
need for the new feature. Sales may have things they need added to
make the feature really effective for them.
That’s OK. You don’t need to know absolutely everything about
the feature at this point. You just need to get everybody thinking
about the decision as early as possible so that, as problems do arise,
you’ll have more people on your team to catch them and fix
them.
When Is It Safe to Skip This?
Never. Never ever ever ever ever. You must make a
decision. There is nothing I see more often at failing startups than
a fundamental inability to make a damn decision. If you have done
your research and involved your team, you are ready to make a
decision, even if you don’t know it’s the right one.
Don’t worry. You’re going to validate whether this is the
right idea or not. But first you have to pick a direction to go
in.
Tool 6: (In)Validate the Approach
OK, this section should have been titled “(In)Validate the
Approach When Possible and Financially Worthwhile,” but it looked
weird.
The reason this is here is because the next few tools can take
some time. While understanding the problem and getting your team on
board are not really negotiable parts of the design process,
everything that follows this can be avoided with one easy trick:
Invalidate your idea.
“What’s that?” you say. “Why would I want to invalidate my
idea?” The simple answer is because if you can prove that you’re about
to make a huge mistake, it’s very possible for you to avoid making it.
And, yes, even if you’ve used all the tools provided to you so far in
the chapter, you could still be making a huge mistake.
Here’s an example. Imagine you’re working on an e-commerce
company that sells gadgets. Now imagine you’ve spent a lot of time
talking to your users, and you realize that one of the biggest reasons
people don’t buy gadgets is they feel like they already have too many
they don’t use. Furthermore, imagine that another common reason people
don’t buy new gadgets is price.
You and your team might reasonably come to the conclusion that a
good solution to both of these problems would be to allow people to
resell their own gadgets in order to get new ones. This would be a
perfectly reasonable hypothesis about a way to fix a known
problem.
What you want to do next is figure out if the hypothesis is
wrong. Too often, the solution to a problem seems so obvious to us,
but it simply fails to catch on with users. Think of how much time you
would waste implementing an entire system allowing users to sell their
own gadgets on your site if none of them actually wanted to sell
any.
I talk in the next chapter about Feature Stubs, and that’s what
you might want to do here. Design the smallest possible thing that you
can that might invalidate your hypothesis. In this example, that might
be a Sell Your Gadget button in an obvious place in your product that
counts the number of times people click it and gives a nice message saying
the feature isn’t fully implemented yet. If nobody ever clicks the
button, it’s a great signal that you don’t want to build the full
version of the feature, at least until you understand the problem or
the market better.
The reason this is so important is that every failed feature you
don’t build saves you money and time so that you can build more
features that are more likely to succeed.
When Is It Safe to Skip This?
There are some features or changes that simply take more time
to validate than they do to build. Before you implement a fake
feature or come up with some other ingenious test to see if you’re
going in the right direction, ask yourself how long the feature will
take to build and how long it will take to test in this manner. If
it’s almost as fast to just build it and test it in production, then
feel free to do that.
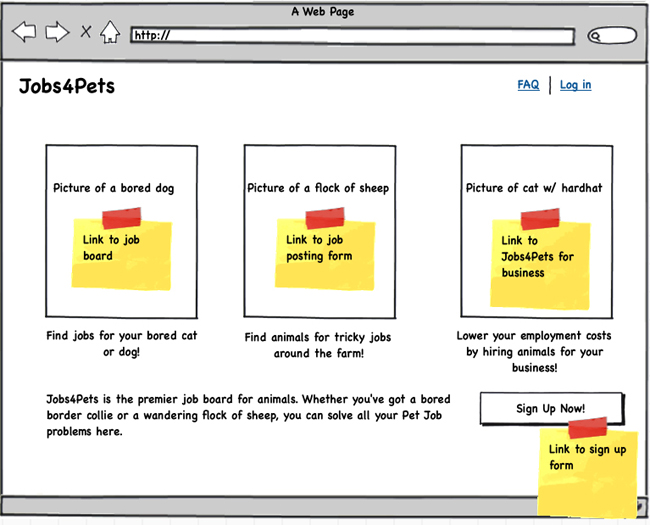
Tool 7: Sketch a Few Approaches
I’m a big fan of starting to sketch at this point in the design
process. You’ll note we’re on Tool 7 here.
Unfortunately, this is where a lot of folks start the design
process. The thing is, once you start sketching, you can have a
tendency to focus on the details—where a button goes, what pieces of
the interface belong together, how much text will be necessary.
That’s OK to do on Tool 7. You’re ready for it now. You probably
already have a picture of what you want to design in your head.
Every designer I’ve talked to has a different preferred way of
“sketching.” I’m going to give you mine, but you may end up liking a
different method. That’s fine. The most important things about
sketching are that it’s quick and that it’s disposable. This is your
chance to try out a few different versions of your new feature or
product.
Because you’re going to want to create several different
versions of your idea quickly, and because you’re going to want to
iterate quickly on your ideas, I suggest you use a sketching tool like
Balsamiq or OmniGraffle. There are about a dozen others. Those are the
two I use. They are easy to learn, and they produce things at a high
enough fidelity to get your point across.
Your goal with sketching is to start to work out things like
what elements belong on a screen and what pieces belong together. For
example, if you’re creating a product page to sell something, you’re
almost certainly going to want a picture of the thing you’re selling,
a buy button, and a price. Those things should probably be pretty
close together. Other than that, though, you have a lot of directions
you could go.
Because sketching is so quick, it’s a great time to do things
like work out the flows of basic tasks. Often people forget that what
they are sketching is almost certainly not a static thing. It has
actions and states. Buttons can be pressed. Forms can be filled in,
sometimes incorrectly. When you’re sketching, it’s a good time to get
through as many of the different states as possible to make sure that
they can all be handled.
Whenever you sketch an interactive element, make sure you’re
adding a screen or a note about what happens when somebody interacts
with that element. If you add a drop-down list, think through what
might be in that drop-down list.
Too often I see “sketches” that are so vague as to be completely
useless. While these are technically sketches, they are not
particularly useful in helping you to work out how a user will
interact with your product. And that’s really the point of
sketching.
Once you have several versions of your sketches produced, it’s
time to make a few more decisions. The most important decision is
which ones to move forward with, since it’s very rarely a good idea to
move forward with three or four completely different designs, unless
you have a lot of bored engineers and an entire testing system already
set up to A/B test all the versions against one another.
For most of us with limited resources, it’s generally best to
pick one or two sketches that we think are most likely to fix the
problems we observed in the initial research. The best way to do this
is to get your sketches in front of actual users again.
useful
Your goal for testing your sketches with users isn’t to try to
understand the usability of the design, it’s to understand, overall,
whether potential users get what the product is and can find the
starting point for all of their most important tasks.
Let’s look at an example. Imagine that you’ve created a few
sketches of a new e-commerce product page. You know that the most
important things for people to do on this page are to buy the product
or to share the product with friends. Show the sketches to some
strangers, preferably on a computer. Ask the following
questions:
-
What do you think this screen is for?
-
How would you buy something?
-
Imagine that you think it would be perfect for a friend. How
would you share it with that friend?
Don’t forget to mix up the order in which you show people the
sketches, so everybody doesn’t see the same sketch first.
If, after you’ve done this four or five times, nobody is
having any trouble understanding any of the sketches, then feel free
to pick your favorite and move on. If, on the other hand, everybody is
having trouble with all the sketches, pay close attention to where
people are looking and try a few new sketches. Repeat.
When Is It Safe to Skip This?
When you’re making a change that is easier to communicate or
test in another way, you don’t need to create a sketch. For example,
if you’re making a simple visual design change, it might be faster
or more efficient to show the change in Photoshop or even in HTML
and CSS.
In other cases, you may be making major changes to your
product that you know will require fully interactive prototypes, and
you may want to begin your design process with one of those.
Don’t sketch for the sake of sketching. Sketch because it
helps you to develop and communicate your design ideas quickly. And
if it’s not going to do that, then you’re welcome to skip it.
Tool 8: Create Interactive Prototypes
I’m a huge fan of interactive prototypes, but there’s often some
confusion about what those are. Let’s be clear: When I say interactive
prototypes, I don’t mean something created in PowerPoint that somebody
could kind of click through. I mean a full-scale, working prototype
that allows users to explore and feel like they’re accomplishing
tasks.
Unsurprisingly, it’s a little hard to illustrate what I mean in
a book, but interactive wireframes have things like widgets that
respond to users and animations that work and forms that users can
fill in. They are interactive enough for users to make mistakes and
recover from them. They are realistic enough that users often think
they’re just an ugly, boring, nonvisually designed version of the real
product.
Here’s the problem with interactive prototypes: They take a long
time to build. I mean, they don’t take as long to build as a real
product, because often they have a rudimentary visual design and no
backend to speak of. For example, you might have an interactive
prototype that lets a user feel like he was purchasing a product but
didn’t actually process a payment or ship him anything.
In general, they are wonderful for figuring out what’s confusing
or hard to use about your product before you write a lot of code. They
also serve as a fantastic tool for communicating to engineers exactly
what you want them to build.
For example, imagine that you are building that checkout
flow. Maybe you want parts of the interface to be shown only after a
user performs a specific task. Instead of writing a document that
explains in detail everything that you want to have happen, you simply
include it in the prototype. Or maybe you want a particular animation
to happen when a user presses a button. You can show exactly the
style, speed, and behavior of the animation in your prototype.
So, now that you know all the wonderful reasons you’d want to
build an interactive prototype, you have to decide whether it’s worth
spending the time to do so. There are a few criteria you should use to
make this decision.
First, is it a complex interaction? Any time you have a sequence
of steps where a user needs to make a number of choices, it’s probably
worth it to do a prototype. Multiple steps mean multiple chances for
users to get lost or to get something wrong, and the more complex or
potentially confusing an interaction, the more important it is to
prototype it.
Second, will it take awhile to build and, more importantly, will
it take awhile to fix if you get it wrong? One of the biggest reasons
people give for not making prototypes is that they simply don’t have
the time, but if it’s a big, complicated interaction that can take a
few days to build, it can also take days to fix if there’s something
particularly confusing about it. On the other hand, if an engineer can
build the entire working feature in about the same time it would take
me to build an entire prototype, I’ll generally err on the side of
just building and testing it in production.
Third, how often do you make changes to your product? If you’re
serious about being Lean, hopefully you practice continuous
deployment, so you can ship a fix immediately rather than waiting for
weeks for a new version of the product, but not everybody’s work
environment is like that. If you’re building something that simply
can’t be changed on the fly, like a physical product or a heavily
regulated piece of software, then interactive prototypes are crucial
for finding as many problems as possible before you ship.
The last question to ask yourself before you build the
interactive prototype is whether it will help you, as the designer or
product owner, figure out important things about the design. More
often than you’d think, the answer to this question will be a
resounding yes.
You see, if you’re designing something interactive, you need to
design it to be…well…interactive. Too often, designers design
screens in something like Photoshop or Illustrator, as if screens were
the end product. But screens aren’t the end product. Screens are
snapshots of particular states that a user might encounter in your
product.
For example, a single screen in a checkout flow could
have all sorts of states. It could have multiple types of errors, or a
user could back out of the checkout flow and come back to it, or she
could abandon the checkout flow altogether, or she could click through
to read more about the terms of service. By creating an interactive
prototype, the designer is forced to think through every single
interaction on the screen and the different states that could be
caused by different types of input.
Which brings us to a very important question: How should you
create your interactive prototypes? Well, here again I tend to differ
from other designers. I make my interactive prototypes in HTML,
JavaScript, and CSS. Knowing enough programming to create prototypes
means that I have a lot of flexibility in what I can design. I’m not
limited by the capabilities of prototyping tools.
But, by all means, if you’re an absolute whiz with some other
type of tool, like Axure or Flash, that really allows you to create a
fully interactive experience, use that.
When Is It Safe to Skip This?
If you’re designing something very simple, quick, and not
highly interactive, by all means, skip the interactive prototype. I
will always skip the prototypes on things like landing pages with a
single call-to-action; messaging changes; and small, new features
with very little interactivity.
Deciding whether or not to make an interactive prototype is
essentially an ROI question. If an engineer can build and release a
feature for testing in less time than it would take to build a
prototype, often it makes no sense to bother with one. However, if
you stand to lose significant time, revenue, or customers by
releasing a major change without truly understanding the usability
of the feature, building and testing an interactive prototype can be
a lifesaver.
Tool 9: Test and Iterate
OK, now we’re on the last tool. Pretty exciting! You’re almost
done! Oh, except for the part where you have to test and go back and
do everything all over again.
If you truly think that the very first thing you design will be
completely perfect and not require any changes, you are either
delusional or you are a better designer than anybody I’ve ever met.
No, I take that back. You’re totally delusional.
One of the major differences between Lean and other
methodologies is the extreme importance of iteration. You see, if you
really do crank out an absolutely perfect design the first time around, you are
spending way too much time up front.
Build things, prototype things, and get things in front of users
as quickly as possible to find out what they like and what they hate
and what they find horribly confusing. Then fix the problems and add
things you think they’ll like and keep doing that until you’ve got a
feature that people are excited about.
I know that nine tools seems like a lot to use over and over,
but you’ll find that they go very quickly once you realize that you
don’t have to get everything absolutely perfect the first time.
When Is It Safe to Skip This?
I can’t believe you even asked this question. I’m ashamed of
you.
Promise me that you will never skip testing or iteration. I
mean it.
Go Do This Now!
-
Write some stories: Try breaking down a current feature into
a complete set of user stories. -
Do some sketching: Try taking the user stories and creating
three rough sketches of how one of the screens might look. If that
goes well, THEN sketch all the screens for the feature. -
Learn what your users really want: Try looking at a feature
that’s commonly requested by users and figuring out what problem
they’re trying to solve.