
 Pastoral scene
 Preface
When you start building your applications with Docker, you’re excited about the capabilities and opportunities you encounter: it runs the same in dev and in prod, it’s straightforward to put together a Docker image, and the distribution is taken care of by tools like the Docker hub. So, you’re satisfied with how quickly you were able to port an existing, say, Python app, to Docker and you want to connect it to another container that has a database, such as PostgreSQL. Also, you don’t want to manually launch the Docker containers and implement your own system that takes care of checking if the containers are still running, and if not, relaunch them.
At this juncture, you realize there are two related challenges you’ve been running into: networking and service discovery. Unfortunately, these two areas are emerging topics, which is a fancy way of saying there are still a lot of moving parts, and there are currently few best practice resources available in a central place. Fortunately, there are tons of recipes available, even if they are scattered over a gazillion blog posts and many articles.
The Book
So, I thought to myself: what if someone wrote a book providing some basic guidance for these topics, pointing readers in the right direction for each of the technologies?
That someone turned out to be me, and with this book I want to provide
you—in the context of Docker containers—with an overview of the
challenges and available solutions for networking as well as service
discovery. I will try to drive home three points throughout this book:
Service discovery and container orchestration are two sides of the same coin.
Without a proper understanding of the networking aspect of Docker and a sound strategy in place, you will have more than one bad day.
The space of networking and service discovery is young: you will find yourself starting out with one set of technologies and likely change gears and try something else; do not worry, you’re in good company and in my opinion it will take another two odd years until standards emerge and the market is consolidated.
You
My hope is that the book is useful for:
Developers who drank the Docker Kool-Aid
Network ops who want to brace themselves for the upcoming onslaught of their enthusiastic developers
(Enterprise) software architects who are in the process of migrating existing workloads to Docker or starting a new project with Docker
Last but not least, I suppose that distributed application developers, SREs, and backend engineers can also extract some value out of it.
Note that this is not a hands-on book—besides the basic Docker networking stuff in Docker Networking 101—but more like a guide.
You will want to use it to make an informed decision when planning Docker-based deployments. Another way to view the book is as a heavily annotated bookmark collection.
Me
I work for a cool startup called Mesosphere, Inc. (the commercial entity behind Apache Mesos), where I help devops to get the
most out of the software. While I’m certainly biased concerning Mesos being the best current option to do cluster scheduling at scale,
I will do my best to make sure throughout the book that this preference does not negatively influence the technologies discussed in each section.
Acknowledgments
Kudos to my Mesosphere colleagues from the Kubernetes team: James
DeFelice and Stefan Schimanski have been very patient answering my
questions around Kubernetes networking. Another round of kudos
go out to my Mesosphere colleagues (and former Docker folks)
Sebastien Pahl and Tim Fall—I appreciate all of your advice around Docker
networking very much! And thank you as well to Mohit Soni, yet
another Mesosphere colleague who took time out of his busy schedule to
provide feedback!
I further would like to thank Medallia’s Thorvald Natvig, whose
Velocity
NYC 2015 talk triggered me to think deeper about certain
networking aspects; he was also kind enough to allow me to follow up
with him and discuss motivations of and lessons learned from Medallia’s
Docker/Mesos/Aurora prod setup.
Thank you very much, Adrian Mouat (Container Solutions) and Diogo Mónica
(Docker, Inc.), for answering questions via Twitter, and especially for the
speedy replies during hours where normal people sleep, geez!
I’m grateful for the feedback I received from Chris Swan, who provided clear and
actionable comments throughout, and by addressing his concerns, I believe the
book became more objective as well.
Throughout the book writing process, Mandy Waite (Google) provided incredibly useful feedback, particularly concerning Kubernetes; I’m so thankful for this and it certainly helped to make things clearer. I’m also grateful for the support I got from Tim Hockin (Google),
who helped me clarify the confusion around the new Docker networking features and Kubernetes.
Thanks to Matthias Bauer, who read an early draft of this manuscript and provided
great comments I was able to build on.
A big thank you to my O’Reilly editor Brian Anderson. From the first moment
we discussed the idea to the drafts and reviews, you’ve been very
supportive, extremely efficient (and fun!), and it’s been a great pleasure to work with you.
Last but certainly not least, my deepest gratitude to my awesome
family: our “sunshine” Saphira, our “sporty girl” Ranya, our son and
“Minecraft master” Iannis, and my ever-supportive wife Anneliese.
Couldn’t have done this without you and the cottage is my second-favorite
place when I’m at home. 😉
Motivation
In February 2012, Randy Bias gave an impactful talk on
architectures for open and scalable clouds.
In his presentation, he established the
pets versus cattle meme:1
With the pets approach to infrastructure, you treat the machines as
individuals. You give each (virtual) machine a name and applications
are statically allocated to machines. For example,db-prod-2
is one of the production servers for a database. The apps are manually
deployed and when a machine gets ill you nurse it back to health
and again manually redeploy the app it ran onto another machine.
This approach is generally considered to be the dominant paradigm of a
previous (non-cloud-native) era.With the cattle approach to infrastructure, your machines are anonymous,
they are all identical (modulo hardware upgrades), have numbers rather than
names, and apps are automatically deployed onto any and each of the machines.
When one of the machines gets ill, you don’t worry about it immediately,
and replace it (or parts of it, such as a faulty HDD) when you want and not
when things break.
While the original meme was focused on virtual machines, we apply the
cattle approach to infrastructure to containers.
Go Cattle!
The beautiful thing about applying the cattle approach to infrastructure
is that it allows you to scale out on commodity hardware.2
It gives you elasticity with the implication of hybrid cloud
capabilities. This is a fancy way of saying that you can have a part
of your deployments on premises and burst into the public cloud
(as well as between IaaS offerings of different providers) if and
when you need it.
Most importantly, from an operator’s point of view, the cattle approach allows
you to get a decent night’s sleep, as you’re no longer paged at 3 a.m. just to replace a broken HDD or to relaunch a hanging app on a
different server, as you would have done with your pets.
However, the cattle approach poses some challenges that generally fall into
one of the following two categories:
- Social challenges
I dare say most of the challenges are of a social nature:
How do I convince my manager? How do I get buy-in from my CTO?
Will my colleagues oppose this new way of doing things?
Does this mean we will need less people to manage our infrastructure?
Now, I will not pretend to offer ready-made solutions for
this part; instead, go buy a copy of
The Phoenix Project,
which should help you find answers.- Technical challenges
In this category, you will find things like selection of base
provisioning mechanism of the machines (e.g., using Ansible to
deploy Mesos Agents), how to set up the communication links between the
containers and to the outside world, and most importantly, how to ensure the
containers are automatically deployed and are consequently findable.
Docker Networking and Service Discovery Stack
The overall stack we’re dealing with here is depicted in
Figure 1-1 and is comprised of the following:
- The low-level networking layer
This includes networking
gear,iptables, routing, IPVLAN, and Linux namespaces. You usually
don’t need to know the details here, unless you’re on the networking
team, but you should be aware of it. See Docker Networking 101
for more information on this topic.- A Docker networking layer
This encapsulates the low-level networking layer and
provides some abstractions such as the single-host bridge networking
mode or a multihost, IP-per-container solution. I cover
this layer in Chapters 2 and 3.- A service discovery/container orchestration layer
Here, we’re
marrying the container scheduler decisions on where to place a container
with the primitives provided by lower layers. Containers and Service Discovery provides you with all the
necessary background on service discovery, and in Containers and Orchestration, we look at networking and service discovery
from the point of view of the container orchestration systems.
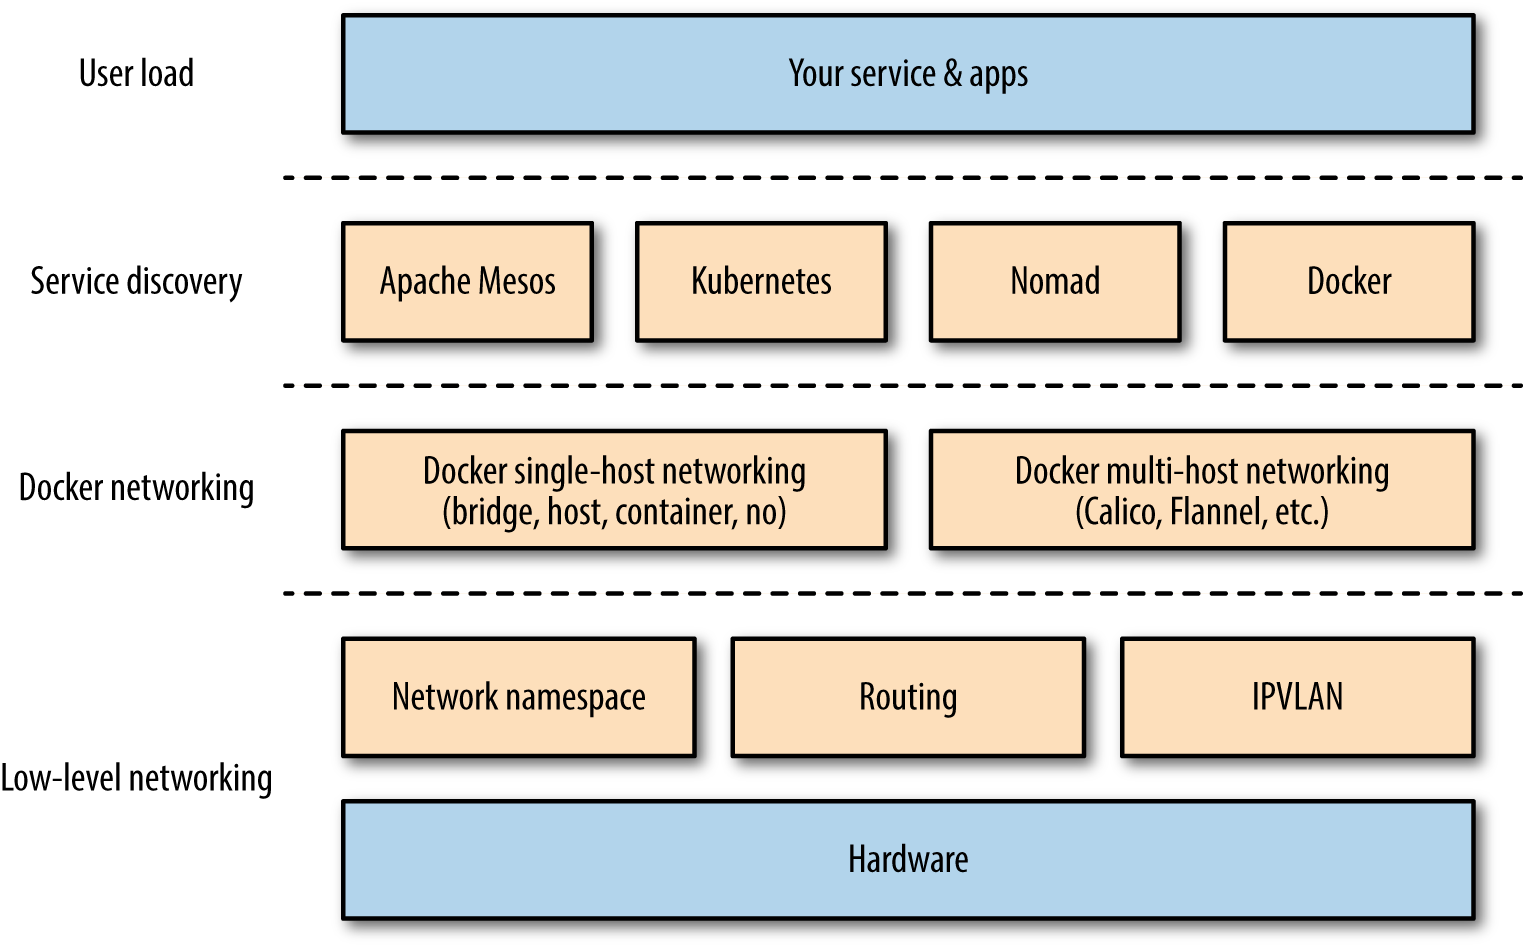
If you are on the network operations team, you’re probably good to go
for the next chapter. However, if you’re an architect or developer and
your networking knowledge might be a bit rusty, I suggest brushing up
your knowledge by studying the Linux Network Administrators Guide
before advancing.
Do I Need to Go “All In”?
Oftentimes when I’m at conferences or user groups, I meet people who are very excited about
the opportunities in the container space but at the same time they (rightfully) worry about how
deep they need to commit in order to benefit from it. The following table provides an informal overview of deployments I have seen in the wild, grouped by level of commitment (stages):
| Stage | Typical Setup | Examples |
|---|---|---|
Traditional | Bare-metal or VM, no containers | Majority of today’s prod deployments |
Simple | Manually launched containers used for app-level dependency management | Development and test environments |
Ad hoc | A custom, homegrown scheduler to launch and potentially restart containers | RelateIQ, Uber |
Full-blown | An established scheduler from Containers and Orchestration to manage containers; fault tolerant, self-healing | Google, Zulily, Gutefrage.de |
Note that not all of these examples use Docker containers (notably, Google does not) and that some start out, for instance, in the ad-hoc stage and are transitioning
to a full-blown stage as we speak (Uber is such a case; see this presentation from ContainerSched 2015 in London). Last but not least,
the stage doesn’t necessarily correspond with the size of the deployment. For example, Gutefrage.de only has six bare-metal servers under management, yet uses Apache Mesos to manage them.
One last remark before we move on: by now, you might have already realized that we are dealing with distributed systems in general here.
Given that we will usually want to deploy containers into a network of computers (i.e., a cluster), I strongly suggest reading up on the fallacies of distributed computing, in case you are not already familiar with this topic.
And now, without further ado, let’s jump into the deep end with Docker networking.
1In all fairness, Randy did attribute the origins to Bill Baker of Microsoft.
2Typically even very homogenous hardware—see, for example, slide 7 of the PDF slide deck for Thorvald Natvig’s Velocity NYC 2015 talk “Challenging Fundamental Assumptions of Datacenters: Decoupling Infrastructure from Hardware”.
Docker Networking 101
Before we get into the networking side of things, let’s have a look
at what is going on in the case of a single host. A Docker container needs a host to run on.
This can either be a physical machine (e.g., a bare-metal server in your on-premise datacenter) or a VM either on-prem or in the cloud. The host has the Docker daemon and client running,
as depicted in Figure 2-1, which enables you to interact with a
Docker registry
on the one hand (to pull/push Docker images), and on the other hand, allows you to start, stop, and
inspect containers.
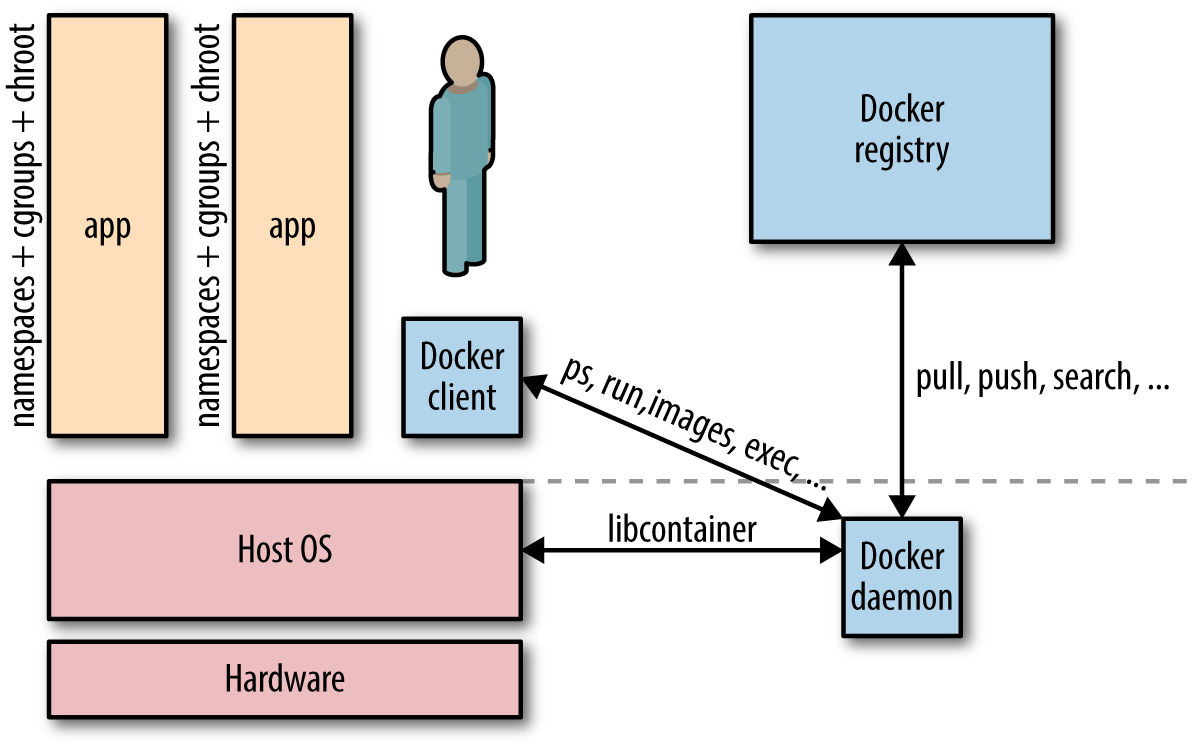
The relationship between a host and containers is 1:N. This means that one host
typically has several containers running on it. For example, Facebook
reports that—depending on how beefy the machine is—it sees on average some 10 to 40 containers per host running.
And here’s another data point: at Mesosphere, we found in various load tests on bare metal that not more
than around 250 containers per host would be possible.3
No matter if you have a single-host deployment or use a cluster of machines,
you will almost always have to deal with networking:
For most single-host deployments, the question boils down to data exchange via a
shared volume
versus data exchange through networking (HTTP-based or otherwise). Although a Docker data volume is
simple to use, it also introduces tight coupling, meaning that it will be harder to turn a
single-host deployment into a multihost deployment. Naturally, the upside of shared volumes is speed.In multihost deployments, you need to consider two aspects: how are containers communicating within a host
and how does the communication paths look between different hosts. Both performance considerations and
security aspects will likely influence your design decisions. Multihost deployments usually become
necessary either when the capacity of a single host is insufficient (see the earlier discussion on average and maximal number of
containers on a host) or when one wants to employ distributed systems such as Apache Spark, HDFS, or Cassandra.
This chapter focuses on networking topics for the single-host case, and
in Docker Multihost Networking, we will discuss the multihost scenarios.
Simply put, Docker networking is the native container SDN solution you have at your disposal
when working with Docker. In a nutshell, there are four modes available for
Docker networking: bridge mode, host mode, container mode,
or no networking.4 We will have a closer look at each of those modes relevant for a single-host setup and conclude at the end of this chapter with some general topics such as security.
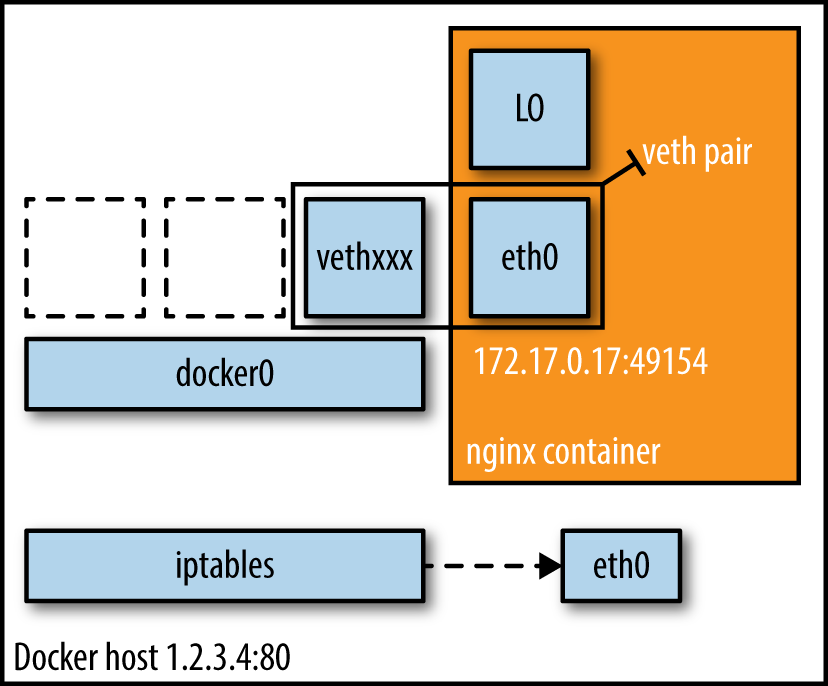
Bridge Mode Networking
In this mode (see Figure 2-2), the Docker daemon creates docker0, a virtual Ethernet
bridge that automatically forwards packets between any other network
interfaces that are attached to it. By default, the daemon then connects
all containers on a host to this internal network through creating a
pair of peer interfaces, assigning one of the peers to become the
container’s eth0 interface and other peer in the namespace of the host,
as well as assigning an IP address/subnet from the
private IP range to the bridge (Example 2-1).
Example 2-1. Docker bridge mode networking in action
$ docker run -d -P --net=bridge nginx:1.9.1
$ docker ps
CONTAINER ID   IMAGE                  COMMAND    CREATED
STATUS         PORTS                  NAMES
17d447b7425d   nginx:1.9.1            nginx -g   19 seconds ago
Up 18 seconds  0.0.0.0:49153->443/tcp,
               0.0.0.0:49154->80/tcp  trusting_feynman
Note
Because bridge mode is the Docker default, you could have equally used
docker run -d -P nginx:1.9.1 in Example 2-1.
If you do not use -P (which publishes all exposed ports of the container) or -p host_port:container_port (which publishes a specific port), the IP
packets will not be routable to the container outside of the host.
Tip
In production, I suggest using the Docker host mode (discussed in Host Mode Networking)
along with one of the SDN solutions from Docker Multihost Networking. Further, to influence
the network communication between containers, you can use the
flags --iptables and -icc.
Host Mode Networking
This mode effectively disables network isolation of a Docker container.
Because the container shares the networking namespace of the host, it is
directly exposed to the public network; consequently, you
need to carry out the coordination via port mapping.
Example 2-2. Docker host mode networking in action
$ docker run -d --net=host ubuntu:14.04 tail -f /dev/null
$ ip addr | grep -A 2 eth0:
2: eth0: <BROADCAST,MULTICAST,UP,LOWER_UP> mtu 9001 qdisc mq state UP group default qlen 1000
    link/ether 06:58:2b:07:d5:f3 brd ff:ff:ff:ff:ff:ff
    inet **10.0.7.197**/22 brd 10.0.7.255 scope global dynamic eth0

$ docker ps
CONTAINER ID  IMAGE         COMMAND  CREATED
STATUS        PORTS         NAMES
b44d7d5d3903  ubuntu:14.04  tail -f  2 seconds ago
Up 2 seconds                jovial_blackwell
$ docker exec -it b44d7d5d3903 ip addr
2: eth0: <BROADCAST,MULTICAST,UP,LOWER_UP> mtu 9001 qdisc mq state UP group default qlen 1000
    link/ether 06:58:2b:07:d5:f3 brd ff:ff:ff:ff:ff:ff
    inet **10.0.7.197**/22 brd 10.0.7.255 scope global dynamic eth0
And there we have it: as shown in Example 2-2, the container has the same IP address as the host,
namely 10.0.7.197.
In Figure 2-3, we see that when using host mode networking,
the container effectively inherits the IP address from its host.
This mode is faster than the bridge mode (because there is no routing overhead),
but it exposes the container directly to the public network, with all its
security implications.

Container Mode Networking
In this mode, you tell Docker to reuse the networking namespace of
another container. In general, this mode is useful when you want to
provide custom network stacks. Indeed, this mode is also what
Kubernetes
networking leverages and you can read more on this topic in Kubernetes.
Example 2-3. Docker container mode networking in action
$ docker run -d -P --net=bridge nginx:1.9.1
$ docker ps
CONTAINER ID  IMAGE        COMMAND   CREATED         STATUS
PORTS                      NAMES
eb19088be8a0  nginx:1.9.1  nginx -g  3 minutes ago   Up 3 minutes
0.0.0.0:32769->80/tcp,
0.0.0.0:32768->443/tcp     admiring_engelbart
$ docker exec -it admiring_engelbart ip addr
8: eth0@if9: <BROADCAST,MULTICAST,UP,LOWER_UP> mtu 9001 qdisc noqueue state UP group default
    link/ether 02:42:ac:11:00:03 brd ff:ff:ff:ff:ff:ff
    inet **172.17.0.3**/16 scope global eth0

$ docker run -it --net=container:admiring_engelbart ubuntu:14.04 ip addr
...
8: eth0@if9: <BROADCAST,MULTICAST,UP,LOWER_UP> mtu 9001 qdisc noqueue state UP group default
    link/ether 02:42:ac:11:00:03 brd ff:ff:ff:ff:ff:ff
    inet **172.17.0.3**/16 scope global eth0
The result (as shown in Example 2-3) is what we would have expected: the second container, started
with --net=container, has the same IP address as the first container
with the glorious auto-assigned name admiring_engelbart, namely
172.17.0.3.
No Networking
This mode puts the container inside of its own network stack but doesn’t
configure it. Effectively, this turns off networking and is useful for
two cases: either for containers that don’t need a network (such as
batch jobs writing to a disk volume) or if you want to set up your
custom networking—see Docker Multihost Networking for a number
of options that leverage this.
Example 2-4. Docker no-networking in action
$ docker run -d -P --net=none nginx:1.9.1
$ docker ps
CONTAINER ID  IMAGE          COMMAND   CREATED
STATUS        PORTS          NAMES
d8c26d68037c  nginx:1.9.1    nginx -g  2 minutes ago
Up 2 minutes                 grave_perlman
$  docker inspect d8c26d68037c | grep IPAddress
    "IPAddress": "",
    "SecondaryIPAddresses": null,
And as you can see in Example 2-4, there is no network configured—precisely as we would
have hoped for.
You can read more about networking and learn about
configuration options on the excellent
Docker docs pages.
Note
All Docker commands in this book have been executed in a CoreOS environment
with both Docker client and server on version 1.7.1.
Wrapping It Up
In this chapter, we had a look at the four basic Docker single-host
networking modes. We will now briefly discuss other aspects you
should be aware of (and which are equally relevant for multihost deployments):
- Allocating IP addresses
Manually allocating IP addresses when
containers come and go frequently and in
large numbers is not sustainable.5 The bridge mode takes care of this
issue to a certain extent. To prevent ARP collisions on a local network,
the Docker daemon generates a random MAC address from the allocated IP
address. We will re-visit this allocation challenge in the next chapter.- Allocating ports
You will find yourself either in the
fixed-port-allocation or in the dynamically-port-allocation camp. This
can be per service/application or as a global strategy, but you
must make up your mind. Remember that, for bridge mode, Docker can
automatically assign (UDP or TCP) ports and consequently make them
routable.- Network security
Out of the box, Docker has
inter-container
communication enabled (meaning the default is--icc=true); this means containers on a host can communicate with each
other without any restrictions, which can potentially lead to denial-of-service attacks. Further, Docker controls the communication
between
containers and the wider world through the--ip_forwardand
--iptablesflags. You should study the defaults of these flags and
loop in your security team concerning company policies and how to
reflect them in the Docker daemon setup. Also, check out the Docker security analysis Boyd Hemphill of StackEngine carried out.Another network security aspect is that of on-the-wire encryption, which
usually means TLS/SSL as per RFC
5246. Note, however, that at the time of this writing this aspect is rarely
addressed; indeed, only two systems, which we will discuss in greater detail
in the next chapter, provide this out of the box: Weave uses
NaCl and OpenVPN has a TLS-based setup. As I’ve
learned from Docker’s security lead, Diogo Mónica, on-the-wire encryption will likely be
available after
v1.9.
Last but not least, check out Adrian Mouat’s Using Docker, which covers the network security aspect in great detail.
Tip
Automated Docker Security Checks
In order to automatically check against common security best practices
around deploying Docker containers in production, I strongly recommend running The Docker Bench for Security.
Now that we have a basic understanding of the solution space for a
simple setup, let’s have a look at a likely more interesting case:
multihost networking with Docker.
3This might have been a potential limitation of the Docker daemon at that time.
4Note that with Docker 1.9, the networking documentation doesn’t mention the container mode anymore, while it’s still supported and listed in the run reference.
5New Relic, for example, found the majority of the overall uptime of the containers, in one particular setup, in the low minutes; see also update here.
Docker Multihost Networking
As long as you’re using Docker on a single host, the techniques introduced in the previous chapter are
really all you need. However, if the capacity of a host is not sufficient to sustain the workload, you will either
need to buy a bigger box (scale up) or add more machines of the same type (scale out).
In the latter case, you end up with a network of machines (i.e., a cluster). Now, a number of questions arise:
How do containers talk to each other on different hosts? How do you control communication between containers and between the outside world?
How do you keep state, such as IP address assignments, consistent in a cluster? What are the integration points with the existing networking infrastructure?
What about security policies?
In order to address these questions, we will review technologies for Docker multihost networking
in this chapter.6
Tip
For the options discussed in this chapter, please do remember that Docker subscribes to a “batteries included but replaceable” paradigm. By that I mean that there will always be a default functionality (like networking or service discovery)
that you can exchange with alternatives.
Overlay
In March 2015, Docker, Inc.,
acquired
the software-defined networking (SDN) startup SocketPlane and rebranded
it as
Docker
Overlay Driver; this is the upcoming default for multihost networking (in Docker 1.9 and above).
The Overlay Driver extends the normal bridge mode by a peer-to-peer communication
and uses a pluggable key-value store backend to distribute cluster state, supporting Consul, etcd, and ZooKeeper.
Flannel
CoreOS flannel is a virtual
network that gives a subnet to each host for use with container
runtimes. Each container (or pod, in the case of Kubernetes) has a unique,
routable IP inside the cluster and it supports a range of backends such
as VXLAN, AWS VPC, and the default layer 2 UDP overlay network. The
advantage of flannel is that it reduces the complexity of doing port
mapping. For example, Red Hat’s Project
Atomic uses
flannel.
Weave
Weaveworks Weave creates a virtual network that
connects Docker containers deployed across multiple hosts. Applications
use the network just as if the containers were all plugged into the same
network switch, with no need to configure port mappings and links.
Services provided by application containers on the Weave network can be
made accessible to the outside world, regardless of where those
containers are running. Similarly, existing internal systems can be
exposed to application containers irrespective of their location. Weave
can traverse firewalls and operate in partially connected networks.
Traffic can be encrypted, allowing hosts to be connected across an
untrusted network. You can learn more about Weave’s discovery features
in Alvaro Saurin’s “Automating Weave Deployment on Docker Hosts with Weave Discovery”.
Project Calico
Metaswitch’s Project Calico uses standard
IP routing—to be precise, the venerable Border Gateway Protocol (BGP), as
defined in RFC 1105—and networking
tools to provide a layer 3 solution. In contrast, most other networking
solutions, including Weave, build an overlay network by encapsulating layer 2
traffic into a higher layer. The primary operating mode requires no
encapsulation and is designed for datacenters where the organization has
control over the physical network fabric.
Open vSwitch
Open vSwitch is a multilayer virtual switch
designed to enable network automation through programmatic extension
while supporting standard management interfaces and protocols, such as
NetFlow, IPFIX, LACP, and 802.1ag. In addition, it is designed to support
distribution across multiple physical servers, quite similar to VMware’s
vNetwork distributed vSwitch or Cisco’s Nexus 1000V.
Pipework
Pipework was created by Jérôme Petazzoni, a rather well-known Docker engineer, and promises to be
“software-defined networking for Linux containers.” It lets you connect
containers in arbitrarily complex scenarios using cgroups and namespace
and works with LXC containers as well as with Docker. Given the Docker, Inc., acquisition of SocketPlane and the introduction of the Overlay Driver, cf.
Overlay, we will have to see how, if at all, these activities will consolidate.
OpenVPN
OpenVPN, another OSS project that has a commercial offering,
allows you to create virtual private networks (VPNs) using TLS. These VPNs can also
be used to securely connect containers to each other over the public
Internet. If you want to try out a Docker-based setup, I suggest taking a look at DigitalOcean’s great walk-through tutorial
“How
To Run OpenVPN in a Docker Container on Ubuntu 14.04”.
Future Docker Networking
In the recently released Docker version 1.9, a
new docker network command has been introduced. With this, containers can then also dynamically
connect to other networks, with each network potentially backed by a different network driver.
The default multihost network driver is Overlay (discussed earlier in Overlay).
In order to gather more hands-on experience, I suggest checking out the following blog posts:
Aleksandr Tarasov’s “Splendors and Miseries of Docker Network”
Project Calico’s “Docker libnetwork Is Almost Here, and Calico Is Ready!”
Weave Works’ “Life and Docker Networking – One Year On”
Wrapping It Up
In this chapter, we reviewed multihost networking options, and we close out
with a brief discussion on other aspects you should be aware of in this context:
- IPVLAN
The Linux kernel version
3.19 introduced an IP-per-container feature. This assigns each container on a host
a unique and (world-wide) routable IP address. Effectively, IPVLAN takes a single network interface and
creates multiple virtual network interfaces with different MAC addresses assigned to them.
This relatively recent feature,
which was contributed by Mahesh Bandewar of Google, is conceptually similar to the
macvlan driver, but
is more flexible because it’s operating both on L2 and L3. If your Linux distro
already has a kernel > 3.19, you’re in luck; otherwise, you cannot yet benefit from this feature.- IP address management (IPAM)
One of the bigger challenges
concerning multihost networking is the allocation of IP addresses to
containers in a cluster.7- Orchestration tool compatibility
Most if not all of the multihost networking solutions discussed in
this chapter are effectively co-processes wrapping the Docker API and configuring the networking for you.
This means that before you select one, you should make sure to check compatibility issues with the container orchestration
tool you’re using. More on this topic in Containers and Orchestration.- IPv4 versus IPv6
To date, most Docker deployments use the standard
IPv4, but IPv6 is witnessing some uptake. Docker supports IPv6
since
v1.5 (released in February 2015). The ever-growing address shortage in
IPv4 land might encourage more IPv6 deployments down the line, also
getting rid of NATs, however it is unclear when exactly the tipping
point will be reached here.
At this point in time, you should have a good understanding of the low-level and Docker networking options and challenges.
We now move on to the next layer in the stack: service discovery.
6For some background on this topic, read DOCKER-8951, which contains a detailed discussion of the problem statement; also, the Docker docs now has a dedicated section on multihost networking.
7As for some background on IPAM, check out the “Mesos Networking” talk from MesosCon 2015 in Seattle; it contains an excellent discussion of the problem statement and potential approaches to solving it.
Containers and Service Discovery
The primary challenge arising from adopting the cattle approach to managing
infrastructure (introduced in Motivation) is service discovery.
Service discovery and container scheduling are really two sides of the same coin.
If you subscribe to the cattle approach to managing infrastructure,
you treat all of your machines equally and you do not manually allocate
certain machines for certain applications; instead, you leave it up to a piece of software (the scheduler) to manage the
life cycle of the containers.
Then the question is: How do you determine on which host your container ended up being scheduled?
Exactly! This is called service discovery, and we will discuss the other
side of the coin, container orchestration, in Containers and Orchestration in greater detail.
The Challenge
Service discovery has been around for a while, considered to be
part of zeroconf (see the sidebar that follows).
In the context of Docker containers, the challenge boils down to reliably
maintaining a mapping between a running container and its location. By
location, I mean its IP address (or the address of the host from which it has been launched) and
potentially on which port it is reachable. This mapping has to be done
in a timely manner and accurately across relaunches of the container throughout the
cluster. Two distinct operations must be supported by a container
service discovery solution:
- Register
Establishes the
container -> locationmapping. Because
only the container scheduler knows where containers “live,” we can
consider it to be the absolute source of truth concerning a container’s
location.- Lookup
Enables other services or applications to look up the mapping we stored during registration. Interesting properties include the freshness of the information and the latency of a query (average, p50, p90, etc.).
Let’s take a look at a few slightly orthogonal considerations for the selection process:
Rather than simply sending a requestor in a certain direction, how
about excluding unhealthy hosts or hanging containers from the lookup
path? You’ve guessed it, it’s the strongly related topic of load
balancing, and because it is of such importance we’ll discuss options in
the last section of this chapter.Some argue it’s an implementation detail, others say the position in
the CAP triangle (see undefined ‘4-2’) matters: the choice of
strong consistency versus high availability in the context of the service
discovery tool might influence your decision. Be at least aware of it.Your choice might
also be impacted by scalability considerations. Sure, if you only have a handful
of nodes under management then all of the thereafter discussed solutions are a fit.
If your cluster, however, is in the high 100s or even 1,000s of nodes, then you will
want to make sure you did some proper load testing before you commit to one particular technology.
If you want to learn more about requirements and fundamental challenges
in this space, read Jeff Lindsay’s “Understanding Modern Service Discovery with Docker” and check out
what Simon
Eskildsen of Shopify shared on this topic at a recent DockerCon.
Technologies
This section briefly introduces each technology, listing pros and cons and pointing to further discussions on the Web (if you want to gain hands-on knowledge with these technologies, you should check out Adrian Mouat’s excellent book
Using Docker).
ZooKeeper
Apache ZooKeeper is an ASF top-level project and a JVM-based, centralized tool for configuration management,8
providing comparable functionality to what Google’s
Chubby brings to the
table. ZooKeeper (ZK) organizes its payload data somewhat like a
filesystem, in a hierarchy of so-called znodes. In a cluster, a leader is elected and clients can connect to any of the servers to retrieve data. You want 2n+1 nodes in a ZK cluster. The most often found configurations in the wild are three, five, or seven nodes. Beyond that, you’ll experience diminishing returns concerning the fault tolerance–throughput tradeoff.
ZooKeeper is a battle-proven, mature, and scalable solution, but has
some operational downsides. Some people consider the installation and
the management of a ZK cluster as a not-so-enjoyable experience. Most ZK
issues I’ve seen come from the fact that certain services (Apache Storm
comes to mind) misuse it. They either put too much data into the znodes, or even worse, they have an unhealthy
read-write ratio, essentially writing too fast. If you plan to use ZK,
at least consider using higher-level interfaces, such as
Apache Curator, which is a wrapper library around ZK, implementing a number of recipes, as well as
Netflix’s Exhibitor for managing
and monitoring a ZK cluster.
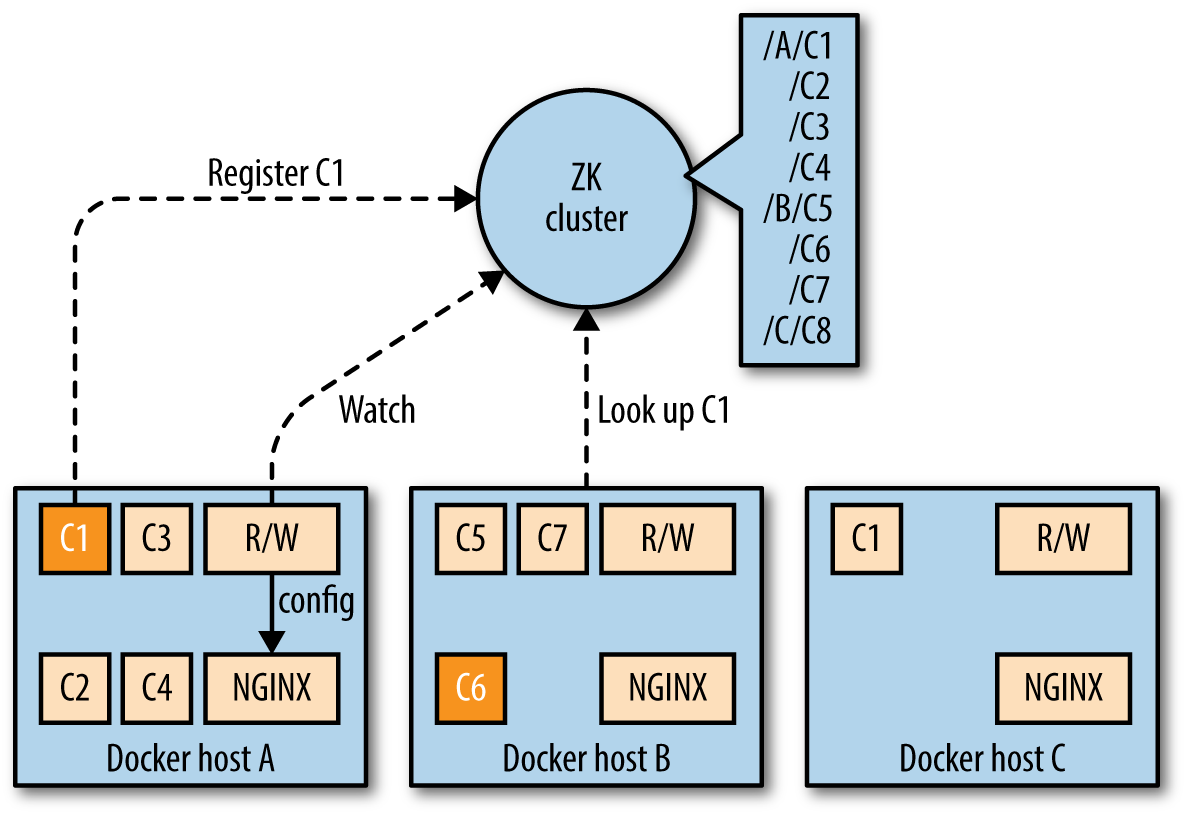
Looking at Figure 4-1, you see two components: the R/W (which stands for registration watcher, a piece of software you need to provide yourself), and NGINX, controlled by R/W. Whenever a container is scheduled on a node, it registers with ZK, using a znode with a path like /$nodeID/$containerID and the IP address as it’s payload. The R/W watches changes on those znodes and configures NGINX accordingly. This setup also works for HAProxy and other load balancers.
etcd
Written in the Go language, etcd is a product of the CoreOS team.9 It
is a lightweight, distributed key-value store that uses the
Raft algorithm for consensus
(leader–follower model, with leader election) and employing a replicated
log across the cluster to distribute the writes a leader receives to its
followers. In a sense, etcd is conceptually quite similar to ZK. While
the payload can be arbitrary, etcd’s HTTP API is JSON-based10 and as with ZK, you can watch for changes in the values etcd
makes available to the cluster. A very useful feature of etcd is that of
TTLs on keys, which is a great building block for service discovery. In the same manner as ZK, you want 2n+1 nodes in an etcd cluster, for the same reasons.
The security model etcd provides allows on-the-wire encryption through
TLS/SSL as well as client cert authentication, both for between clients
and the cluster as well as between the etcd nodes.
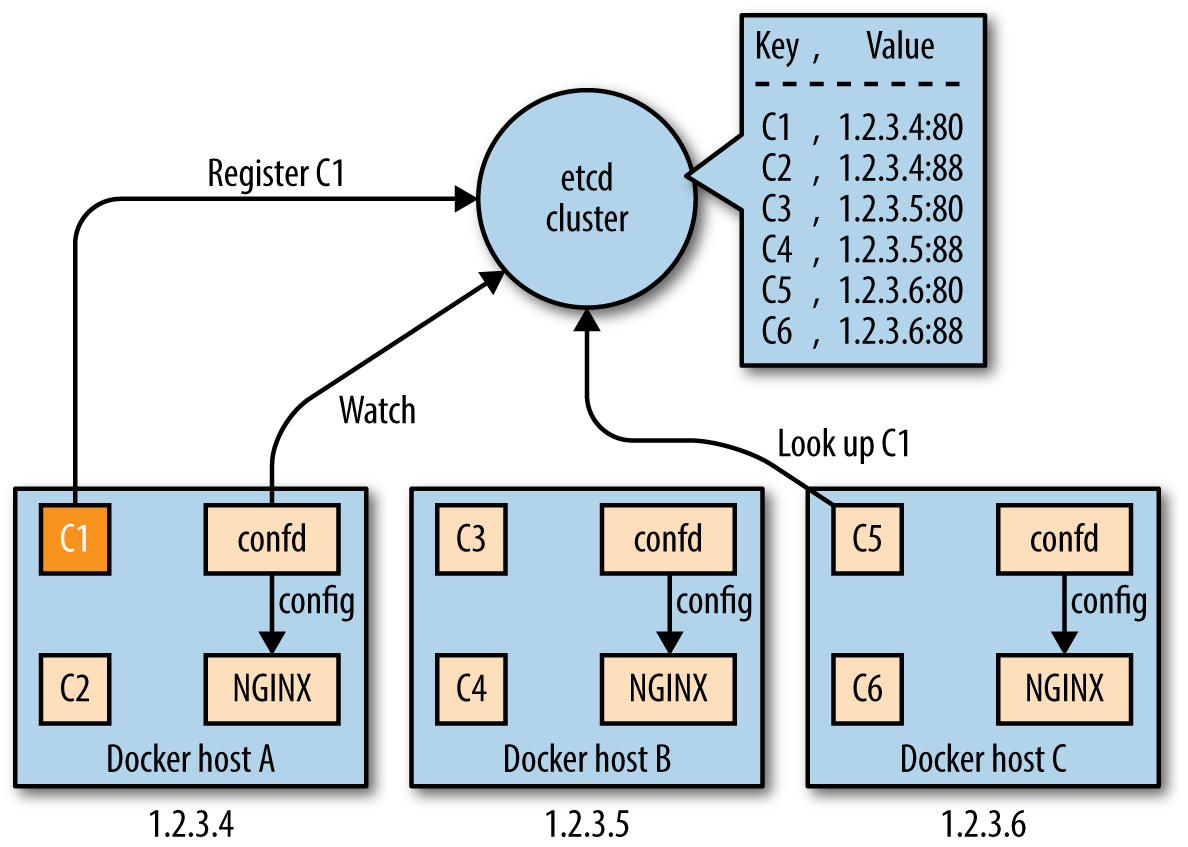
In Figure 4-2, you can see that the etcd service discovery setup is quite similar to the ZK setup. The main difference is the usage of confd, which configures NGINX, rather than having you write your own script. As with ZK, this setup also works for HAProxy and other load balancers.
Consul
Consul, a HashiCorp product also written in the Go language,
exposes functionality for service registration, discovery, and health checking in
an opinionated way. Services can be queried using either the HTTP API or
through DNS. Consul supports multi-datacenter deployments.
One of Consul’s features is a distributed key-value store, akin to etcd.
It also uses the Raft consensus algorithm (and again the same
observations concerning 2n+1 nodes as with ZK and etcd apply), but the deployment is different. Consul has the concept of agents, which
can be run in either of the two available modes: as a server (provides
key-value store and DNS), or as a client (registers services and runs
health checks) and with the membership and node discovery implemented by
serf.
With Consul, you have essentially four options to implement service discovery (from most desirable to least desirable):
Use a service definition config file, interpreted by the Consul agent.
Use tools like traefik, which have a Consul backend.
Write your own side-kick process that registers the service through the HTTP API.
Bake the registration into the service itself through leveraging the HTTP API.
Want to learn more about Consul for service discovery? Check out these
two great blog posts:
“Consul
Service Discovery with Docker” and
“Docker DNS &
Service Discovery with Consul and Registrator”.
Pure-Play DNS-Based Solutions
DNS has been a robust and battle-proven workhorse on the Internet for many decades. The eventual consistency of the DNS system, the fact that certain clients aggressively cache DNS lookups,11 and also the reliance on SRV records make this option something you will want to use when you know exactly that it is the right one.
I’ve titled this section “Pure-Play DNS-Based Solutions” because
Consul technically also has a DNS server, but this is only one option for how you can use it to do service discovery. Here are some popular and widely used pure-play DNS-based service discovery solutions:
- Mesos-DNS
This solution is specific for service discovery in Apache
Mesos. Written in Go, Mesos-DNS
polls the active Mesos Master process for any running tasks and exposes
the IP:PORT info via DNS as well as through an HTTP API. For DNS requests
for other hostnames or services, Mesos-DNS can either use an external
nameserver or leverage your existing DNS server to forward only the
requests for Mesos tasks to Mesos-DNS.- SkyDNS
Using etcd, you can announce your services to SkyDNS, which
stores service definitions into etcd and updates its DNS records. Your
client application issues DNS queries to discover the services. Thus,
functionality-wise it is quite similar to Consul, without the health
checks.- WeaveDNS
WeaveDNS was
introduced in Weave 0.9 as a simple solution to service discovery on the
Weave network, allowing containers to find other containers’ IP
addresses by their hostnames. In Weave 1.1, a so-called
Gossip DNS was
introduced, making lookups faster through a cache as well as timeout
functionality. In the new implementation, registrations are broadcast
to all participating instances, which subsequently hold all entries in
memory and handle lookups locally.
Airbnb’s SmartStack and Netflix’s Eureka
In this section, we’ll take a look at two bespoke systems that were
developed to address specific requirements. This doesn’t mean you
can’t or shouldn’t use them, just that you should be aware of this
heritage.
Airbnb’s SmartStack is an
automated service discovery and registration framework, transparently
handling creation, deletion, failure, and maintenance work. SmartStack
uses two separate service that run on the same host as your container:
Nerve (writing into ZK) for service registration, and
Synapse (dynamically configuring HAProxy) for lookup. It is a
well-established solution for non-containerized environments and time
will tell if it will also be as useful with Docker.
Netflix’s Eureka is different. This
comes mainly from the fact that it was born in the AWS environment
(where all of Netflix runs). Eureka is a REST-based service used for
locating services for the purpose of load balancing and failover of
middle-tier servers and also comes with a Java-based client component,
which makes interactions with the service straightforward. This client
also has a built-in load balancer that does basic round-robin load
balancing. At Netflix, Eureka is used for red/black deployments, for Cassandra and memcached deployments, and for carrying application-specific metadata about services.
Participating nodes in a Eureka cluster replicate their service
registries between each other asynchronously; in contrast to ZK, etcd, or
Consul, Eureka favors service availability over strong consistency,
leaving it up to the client to deal with the stale reads, but with the
upside of being more resilient in case of networking partitions. And you
know: The network is reliable. Not.
Load Balancing
One aspect of service discovery—sometimes considered orthogonal, but
really an integral part of it—is load balancing:
it allows you to spread the load (service inbound requests) across a number of containers.
In the context of containers and microservices, load balancing achieves a couple of things
at the same time:
Allows throughput to be maximized and response time to be minimized
Can avoid hotspotting (i.e., overloading a single container)
Can help with overly aggressive DNS caching such as found with Java
The following list outlines some popular load balancing options with Docker:
- NGINX
A popular open source load balancer and web server. NGINX is known for its high performance, stability, simple configuration, and low resource consumption. NGINX integrates well with the service discovery platforms presented in this chapter, as well as with many other open source projects.
- HAProxy
While not very feature-rich, it is
a very stable, mature, and battle-proven workhorse. Often used in
conjunction with NGINX, HAProxy is reliable and integrations with pretty
much everything under the sun exist. Use, for example, the tutumcloud/haproxy Docker
images; because Docker, Inc., acquired Tutum recently, you can expect this image will soon be part of the native Docker tooling.- Bamboo
A daemon that
automatically configures HAProxy instances, deployed on Apache Mesos and
Marathon; see also this
p24e.io
guide for a concrete recipe.- Kube-Proxy
Runs
on each node of a Kubernetes cluster and reflects services as defined in
the Kubernetes API. It supports simple TCP/UDP forwarding and round-robin and Docker-links-based serviceIP:PORTmapping.- vulcand
A HTTP reverse proxy for HTTP API
management and microservices, inspired by Hystrix.- Magnetic.io’s vamp-router
Inspired by
Bamboo and Consul-HAProxy, it supports updates of the config through REST or Zookeeper, routes and filters
for canary releasing and A/B-testing, as well as provides for stats and ACLs.- moxy
A HTTP reverse proxy and load
balancer that automatically configures itself for microservices deployed on Apache Mesos and Marathon.- HAProxy-SRV
A templating solution that can flexibly reconfigure
HAProxy based on the regular polling of the service data from DNS (e.g., SkyDNS or Mesos-DNS) using SRV records.- Marathon’s servicerouter.py
The servicerouter is a simple script that gets app
configurations from Marathon and updates HAProxy; see also this p24e.io recipe.- traefik
The new kid on the block.
Only very recently released but already sporting 1,000+ stars on GitHub, Emile Vauge (traefik’s lead developer)
must be doing something right. I like it because it’s like HAProxy, but comes with a bunch of
backends such as Marathon and Consul out of the box.
If you want to learn more about load balancing, check out this Mesos meetup video
as well as this talk from nginx.conf 2014 on load balancing with NGINX+Consul.
Wrapping It Up
To close out this chapter, I’ve put together a table that provides you
with an overview of the service discovery solutions we’ve discussed.
I explicitly do not aim at declaring a winner, because I believe it very much depends on your use case and
requirements. So, take the following table as a quick orientation and summary but not as a shootout:
| Name | Consistency | Language | Registration | Lookup |
|---|---|---|---|---|
ZooKeeper | Strong | Java | Client | Bespoke clients |
etcd | Strong | Go | Sidekick+client | HTTP API |
Consul | Strong | Go | Automatic and through traefik (Consul backend) | DNS |
Mesos-DNS | Strong | Go | Automatic and through traefik (Marathon backend) | DNS + HTTP/JSON API |
SkyDNS | Strong | Go | Client registration | DNS |
WeaveDNS | Strong | Go | Auto | DNS |
SmartStack | Strong | Java | Client registration | Automatic through |
Eureka | Eventual | Java | Client registration | Bespoke clients |
As a final note: the area of service discovery is constantly in flux and new tooling is
available almost on a weekly basis. For example, Uber only recently open sourced its internal solution,
Hyperbahn, an overlay network of routers designed to support the
TChannel RPC protocol. Because container service discovery is overall a
moving target, you are well advised to reevaluate the initial choices on an ongoing basis,
at least until some consolidation has taken place.
Containers and Orchestration
As mentioned in the previous chapter, with the cattle approach to managing infrastructure,
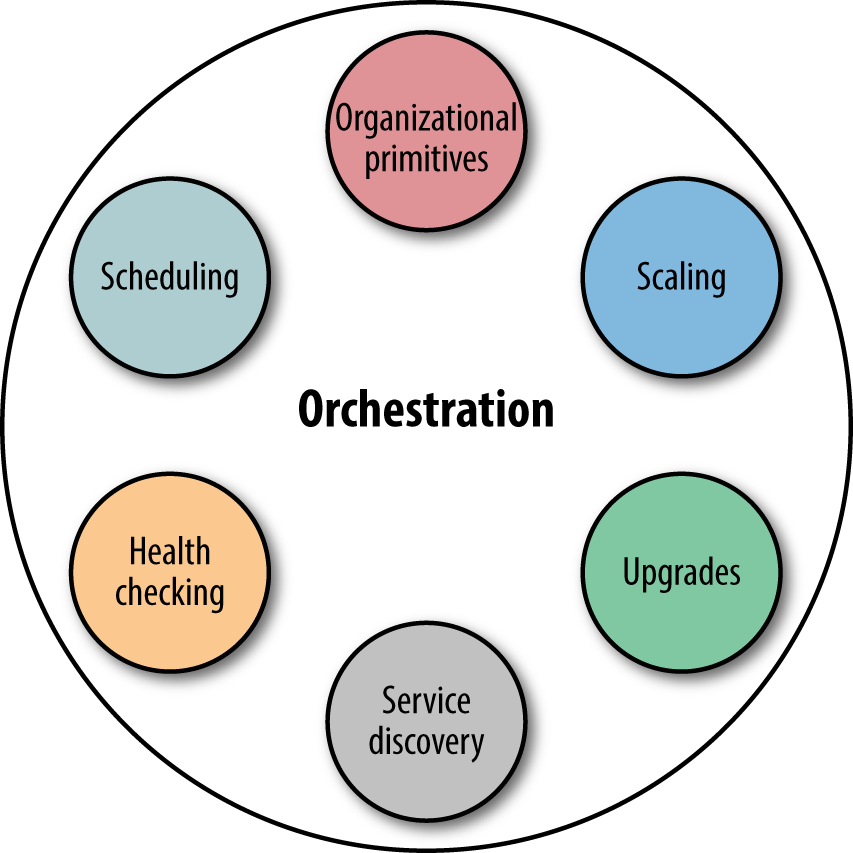
you don’t manually allocate certain machines for certain applications—instead, you leave it up to a scheduler to manage the life cycle of the containers. While scheduling is an important activity, it is actually just one part of a broader concept: orchestration.
In Figure 5-1, you can see that orchestration includes things such as
health checks, organizational primitives (e.g., labels in Kubernetes or groups in Marathon),
autoscaling, upgrade/rollback strategies, as well as service discovery. Sometimes considered part
of orchestration but outside of the scope of this book is the topic
of base provisioning, such as setting up a Mesos Agent or Kubernetes Kubelet.
Service discovery and scheduling are really two sides of the same coin. The entity that
decides where in a cluster a certain container is placed is called a scheduler. It
supplies other systems with an up-to-date mapping containers -> locations,
which then can be used to expose this information in various ways, be it in
distributed key-value stores such as etcd or through DNS as the case with,
for example, Mesos-DNS.
In this chapter, we will discuss service discovery and networking from
the point of view of the container orchestration solution. The motivation
behind this is simple: assume that you’ve decided to go with a certain platform,
say, Kubernetes. Then, your primary concern is how service discovery and networking
is handled in the context of this platform.
Note
In the following, I’ve made the choice to discuss container orchestration
systems that fulfill two requirements: they are open source and they have
a considerable community up-take (or in Nomad’s case, this is expected to
happen, relatively soon).
There are several other solutions out there you could have a look at,
including Facebook’s Bistro or
hosted solutions such as Amazon EC2 Container Service ECS.
And, should you want to more fully explore the topic of distributed system
scheduling, I suggest reading Google’s research papers on Borg
and Omega.
Before we dive into container orchestration systems, let’s step
back and review what the scheduler—which is the core component of orchestration—actually does in the context of Docker.
What Does a Scheduler Actually Do?
A distributed systems scheduler takes an application by request of a user
and places it on one or more of the available machines. For example, a user
might request to have 100 instances (or replicas, in the case of Kubernetes)
of the app running.
In the case of Docker, this means that (a) the respective Docker image must
exist on a host, and (b) the scheduler tells the local Docker daemon to launch a container
based on it.
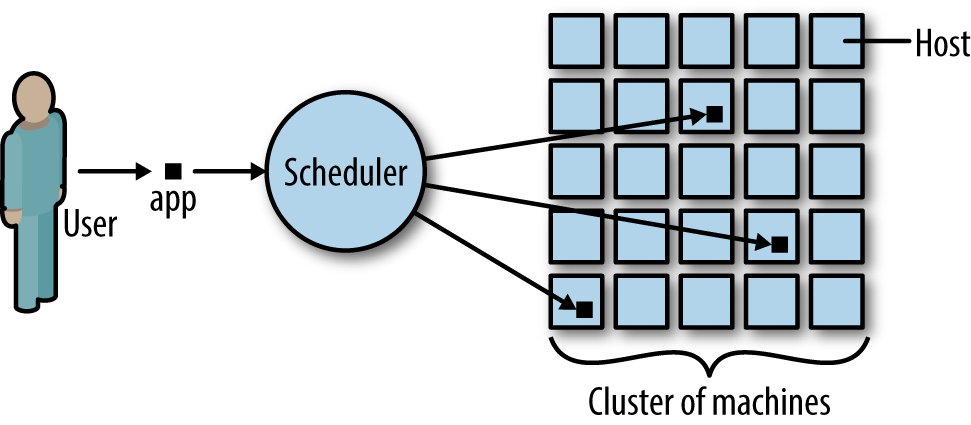
In Figure 5-2, you can see that the user requested three instances
of the app running in the cluster. The scheduler decides the actual placement
based on its knowledge of the state of the cluster, primarily the utilization
of the machines, resources necessary to successfully launch the app, and
constraints such as launch this app only on a machine that is SSD-backed.
Further, quality of service might be taken into account for the placement decision.
Learn more about this topic via Cluster Management at Google
by John Wilkes.
Warning
Beware of the semantics of constraints that you can place on scheduling containers.
For example, I once gave a Marathon demo that wouldn’t work as planned because I
screwed up concerning the placement constraints:
I used a combination of unique hostname and a certain role and it wouldn’t scale,
because there was only one node with the specified role in the cluster.
The same thing can happen with Kubernetes labels.
Vanilla Docker and Docker Swarm
Out of the box, Docker provides a basic service discovery mechanism:
Docker links. By default, all containers can communicate directly with
each other if they know each other’s IP addresses. Linking allows a user
to let any container discover both the IP address and exposed ports of
other Docker containers on the same host. In order to accomplish this,
Docker provides the --link flag, a convenient command-line option that
does this automatically.
But hard-wiring of links between containers is neither fun nor scalable.
In fact, it’s so bad that, going forward, this feature will be deprecated.12
Let’s have a look at a better solution (if you nevertheless want to or need to use links): the ambassador pattern.
Ambassadors
The idea behind this pattern, shown in Figure 5-3, is to use a proxy container that stands in for the real container and forwards traffic to the real thing.13 What it buys you is the following: the ambassador pattern allows you to have a different network architecture in the development phase and in production. The network ops can rewire the application at runtime, without changing the application’s code.
In a nutshell, the downside
of ambassadors is that they don’t scale well. The ambassador pattern can be used in small-scale, manual deployments but should be avoided when employing an
actual container orchestration tool such as Kubernetes or Apache Mesos.
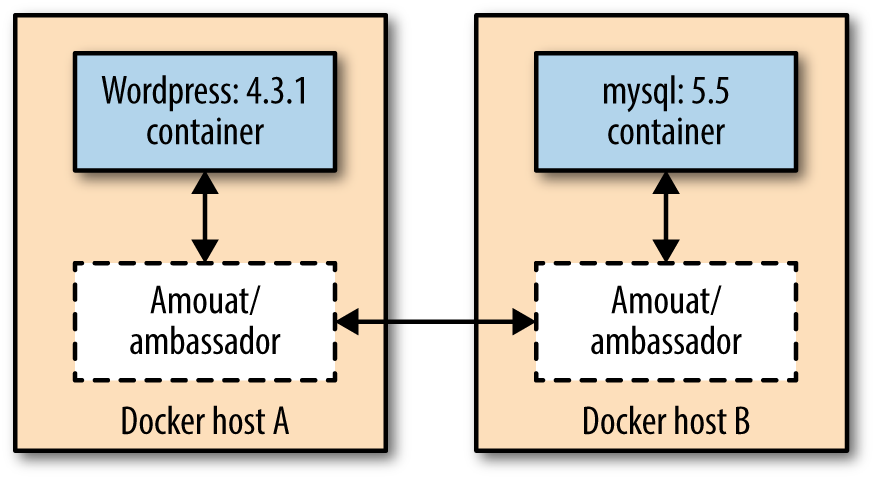
Note
If you want to know how to actually implement the ambassador pattern in Docker, I’ll again refer you to Adrian Mouat’s awesome book Using Docker. In fact, in Figure 5-3, I’m using his amouat/ambassador Docker image.
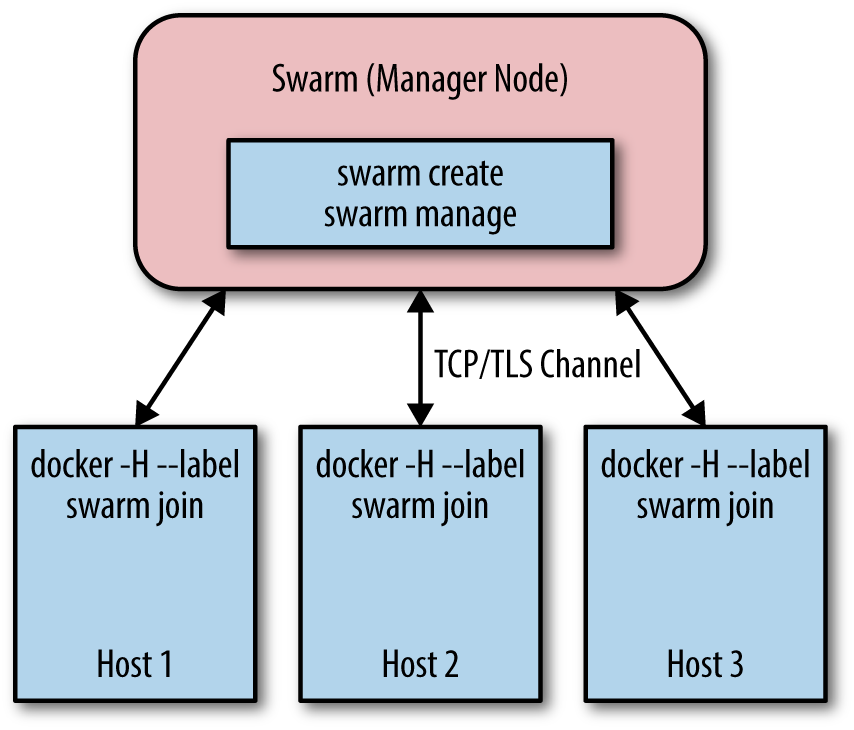
Docker Swarm
Beyond the static linking of containers, Docker has a native clustering
tool called Docker Swarm. Docker Swarm builds upon the Docker API14 and works as follows: there’s one Swarm manager, responsible for the scheduling and one each host an agent runs, which takes care of the local resource management (Figure 5-4).
The interesting thing about Swarm is that the scheduler is plug-able, so you
can, for example, use Apache Mesos rather than one of the included schedulers.
At the time of writing this book, Swarm turned 1.0 and subsequently it was awarded General Availability status; new features such as high availability
are being worked on an ongoing basis.
Networking
We discussed Docker single-host and multihost networking earlier in this book, so I’ll simply point you
to Chapters 2 and 3 to read up on it.
Service Discovery
Docker Swarm supports different backends: etcd, Consul, and Zookeeper. You can also use a
static file to capture your cluster state with Swarm
and only recently a DNS-based service discovery tool for Swarm, called wagl, has been introduced.
If you want to dive deeper into Docker Swarm, check out Rajdeep Dua’s “Docker Swarm” slide deck.
Kubernetes
Kubernetes (see Figure 5-5) is an opinionated open source framework for elastically managing containerized applications. In a nutshell, it captures Google’s lessons learned from running containerized workloads for more than 10 years, which we will briefly discuss here. Further, you almost always have the option to swap out the default implementations with some open source or closed source alternative, be it DNS or monitoring.
This discussion assumes you’re somewhat familiar with Kubernetes and its terminology. Should you not be familiar with Kubernetes, I suggest checking out Kelsey Hightower’s wonderful book Kubernetes Up and Running.
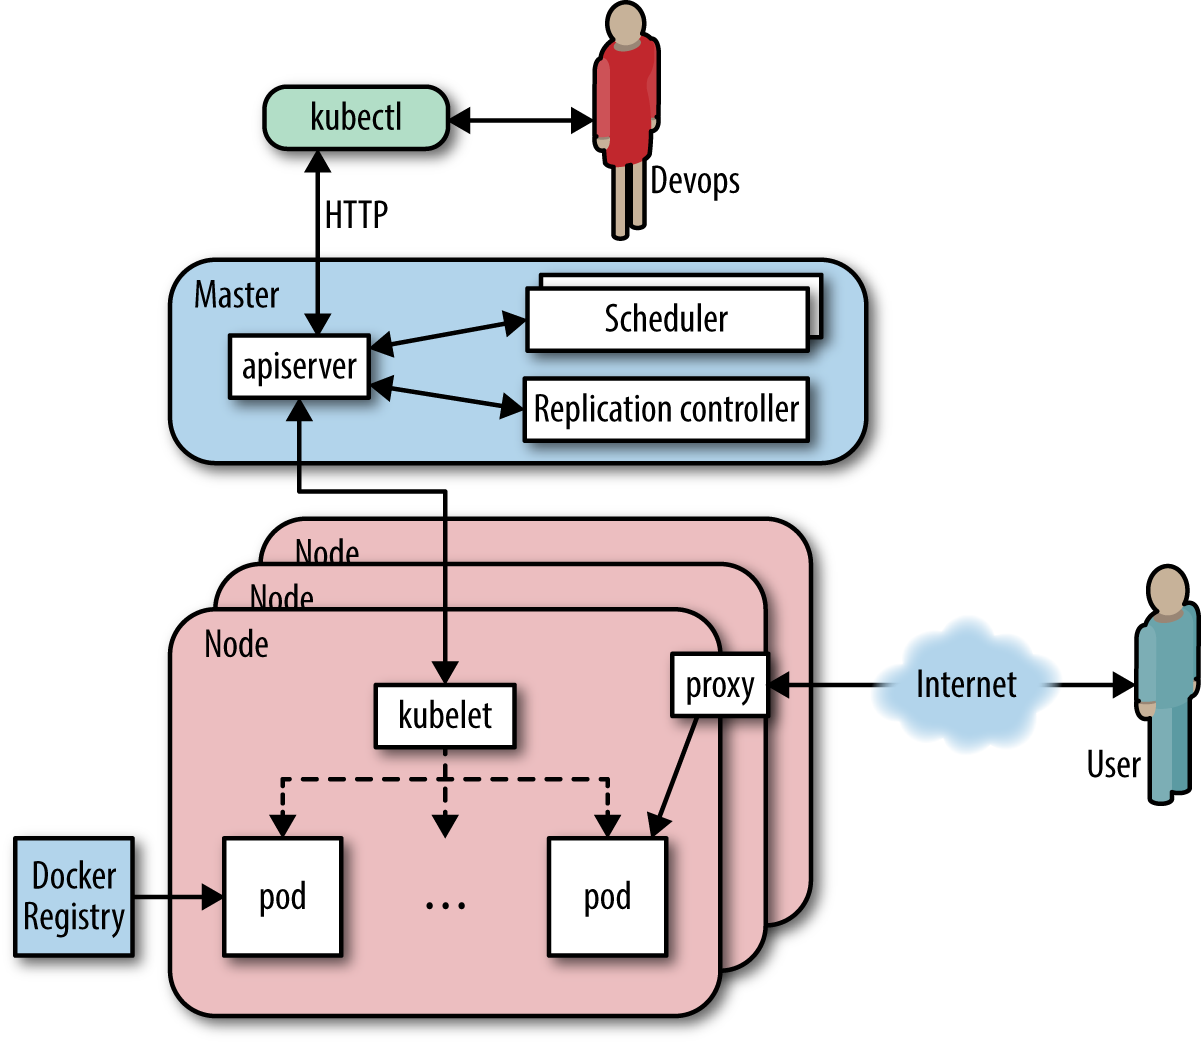
The unit of scheduling in Kubernetes is a pod. Essentially, this is a tightly coupled set of containers that is always collocated. The number of running instances of a pod (called replicas) can be declaratively stated and enforced through Replication Controllers. The logical organization of pods and services happens through labels.
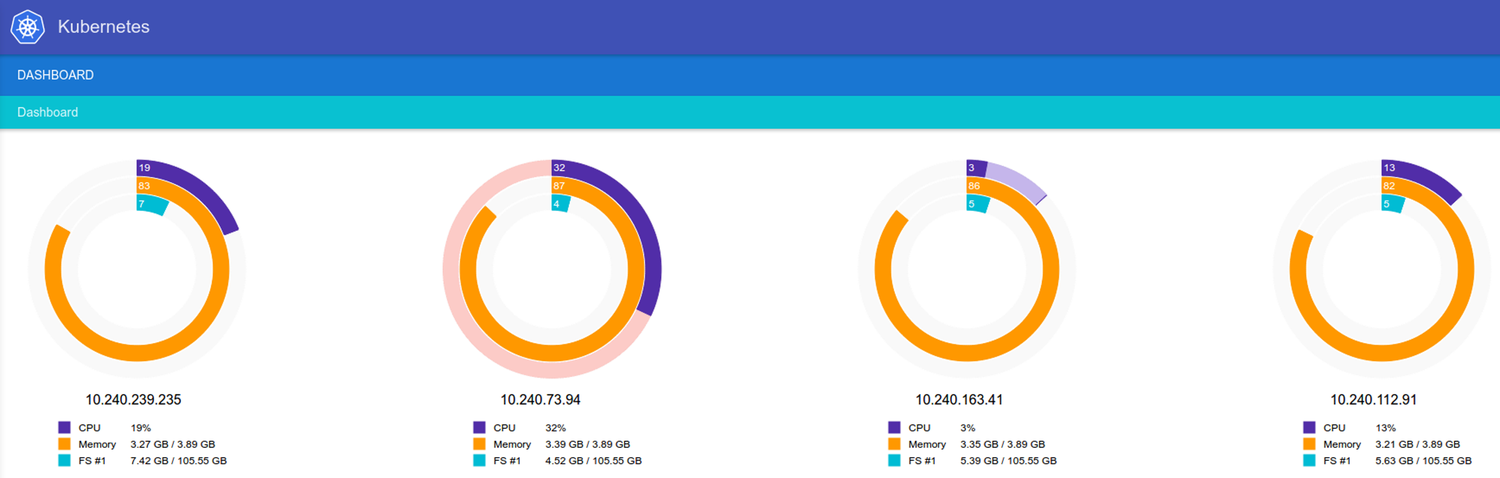
Per Kubernetes node, an agent called Kubelet runs, which is responsible for controlling the Docker daemon, informing the Master about the node status and setting up node resources. The Master exposes an API (for an example web UI, see Figure 5-6), collects and stores the current state of the cluster in etcd, and schedules pods onto nodes.
Networking
In Kubernetes, each pod has a routable IP, allowing pods to communicate across cluster nodes without NAT. Containers in a pod share a port namespace and have the same notion of localhost, so there’s no need for port brokering. These are fundamental requirements of Kubernetes, which are satisfied by using a network overlay.
Within a pod there exists a so-called infrastructure container, which is the first container that the Kubelet instantiates and it acquires the pod’s IP and sets up the network namespace. All the other containers in the pod then join the infra container’s network and IPC namespace. The infra container has network bridge mode enabled (see Bridge Mode Networking) and all the other containers in the pod share its namespace via container mode (covered in Container Mode Networking). The initial process that runs in the infra container does effectively
nothing,15 as its sole purpose is to act as the home for the namespaces. Recent work around port forwarding can result in additional processes being launched in the infra container. If the infrastructure container dies, the Kubelet kills all the containers in the pod and then starts the process over.
Further, Kubernetes Namespaces enable all sorts of control points; one example in the networking space is Project Calico’s usage of namespaces to enforce a coarse-grained network policy.
Service Discovery
In the Kubernetes world, there’s a canonical abstraction for service discovery and this is (unsurprisingly) the
service primitive. While pods may come and go as they fail (or the host they’re
running on fails), services are long-lived things: they deliver cluster-wide service discovery as well as some level of load balancing.
They provide a stable IP address and a persistent name, compensating for the short-livedness of all equally labelled pods. Effectively, Kubernetes
supports two discovery mechanisms: through environment variables (limited to a certain node) and DNS (cluster-wide).
Apache Mesos
Apache Mesos (Figure 5-7) is a general-purpose cluster
resource manager that abstracts the resources of a cluster (CPU, RAM,
etc.) in a way that the cluster appears like one giant computer to you,
as a developer.
In a sense, Mesos acts like the kernel of a distributed operating system.
It is hence never used standalone, but always together with so-called frameworks, such as
Marathon (for long-running stuff like a web server), Chronos (for
batch jobs) or Big Data frameworks like Apache Spark or Apache Cassandra.
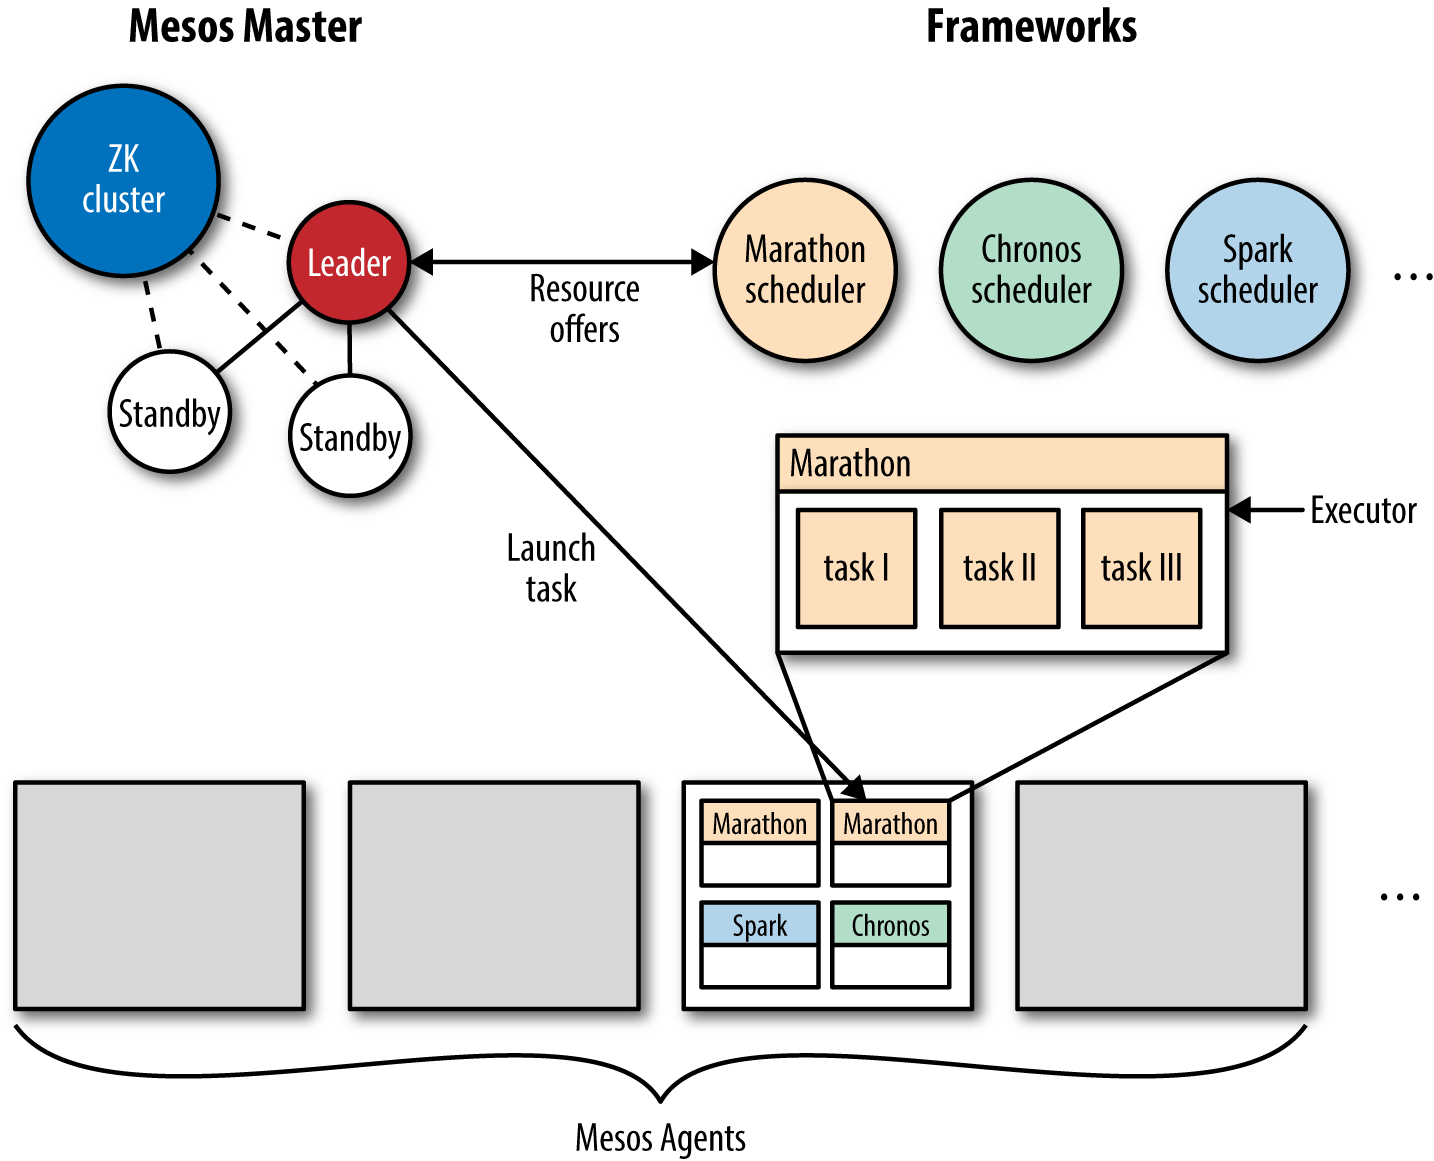
Mesos supports both containerized workloads, that is, running Docker containers as well as
plain executables (including bash scripts, Python scripts, JVM-based apps, or simply a good old Linux binary format)
for both stateless and stateful services.16
In the following, I’m assuming you’re familiar with Mesos and its
terminology. If you’re new to Mesos, I suggest checking out David Greenberg’s wonderful book Building Applications on Mesos, a gentle introduction into this topic, particularly useful for distributed application developers.
In Figure 5-8, you can see the Marathon UI in action, allowing you to launch and manage long-running services and applications on top of Apache Mesos.
Networking
The networking characteristics and capabilities mainly
depend on the Mesos containerizer used:
For the Mesos containerizer, there are a few
prerequisites
such as a Linux Kernel version > 3.16, andlibnlinstalled. You can then
build a Mesos Agent with the network isolator support enabled. At launch,
you would use something like the following:mesos-slave --containerizer=mesos --isolation=network/port_mapping --resources=ports:[31000-32000];ephemeral_ports:[33000-35000]
This would configure the Mesos Agent to use non-ephemeral ports in the
range from 31,000 to 32,000 and ephemeral ports in the range from 33,000
to 35,000. All containers share the host’s IP and the port ranges are
then spread over the containers (with a 1:1 mapping between destination
port and container ID). With the network isolator, you also can define
performance limitations such as bandwidth and it enables you to perform
per-container monitoring of the network traffic. See the MesosCon 2015
Seattle talk “Per Container
Network Monitoring and Isolation in Mesos” for more details on this
topic.For the Docker containerizer, see Docker Networking 101.
Note that Mesos supports IP-per-container
since version 0.23 and if you want to learn more about the current state of networking as well as upcoming
developments, check out this MesosCon 2015 Seattle talk on
Mesos
Networking.
Service Discovery
While Mesos is not opinionated about service
discovery, there is a Mesos-specific solution, which in praxis is often
used: Mesos-DNS (see Pure-Play DNS-Based Solutions). There are, however, a multitude of emerging solutions such as traefik (see Wrapping It Up) that are integrated with Mesos and gaining traction. If you’re interested in more details about service discovery with Mesos, our open docs site has a dedicated section on
this topic.
Note
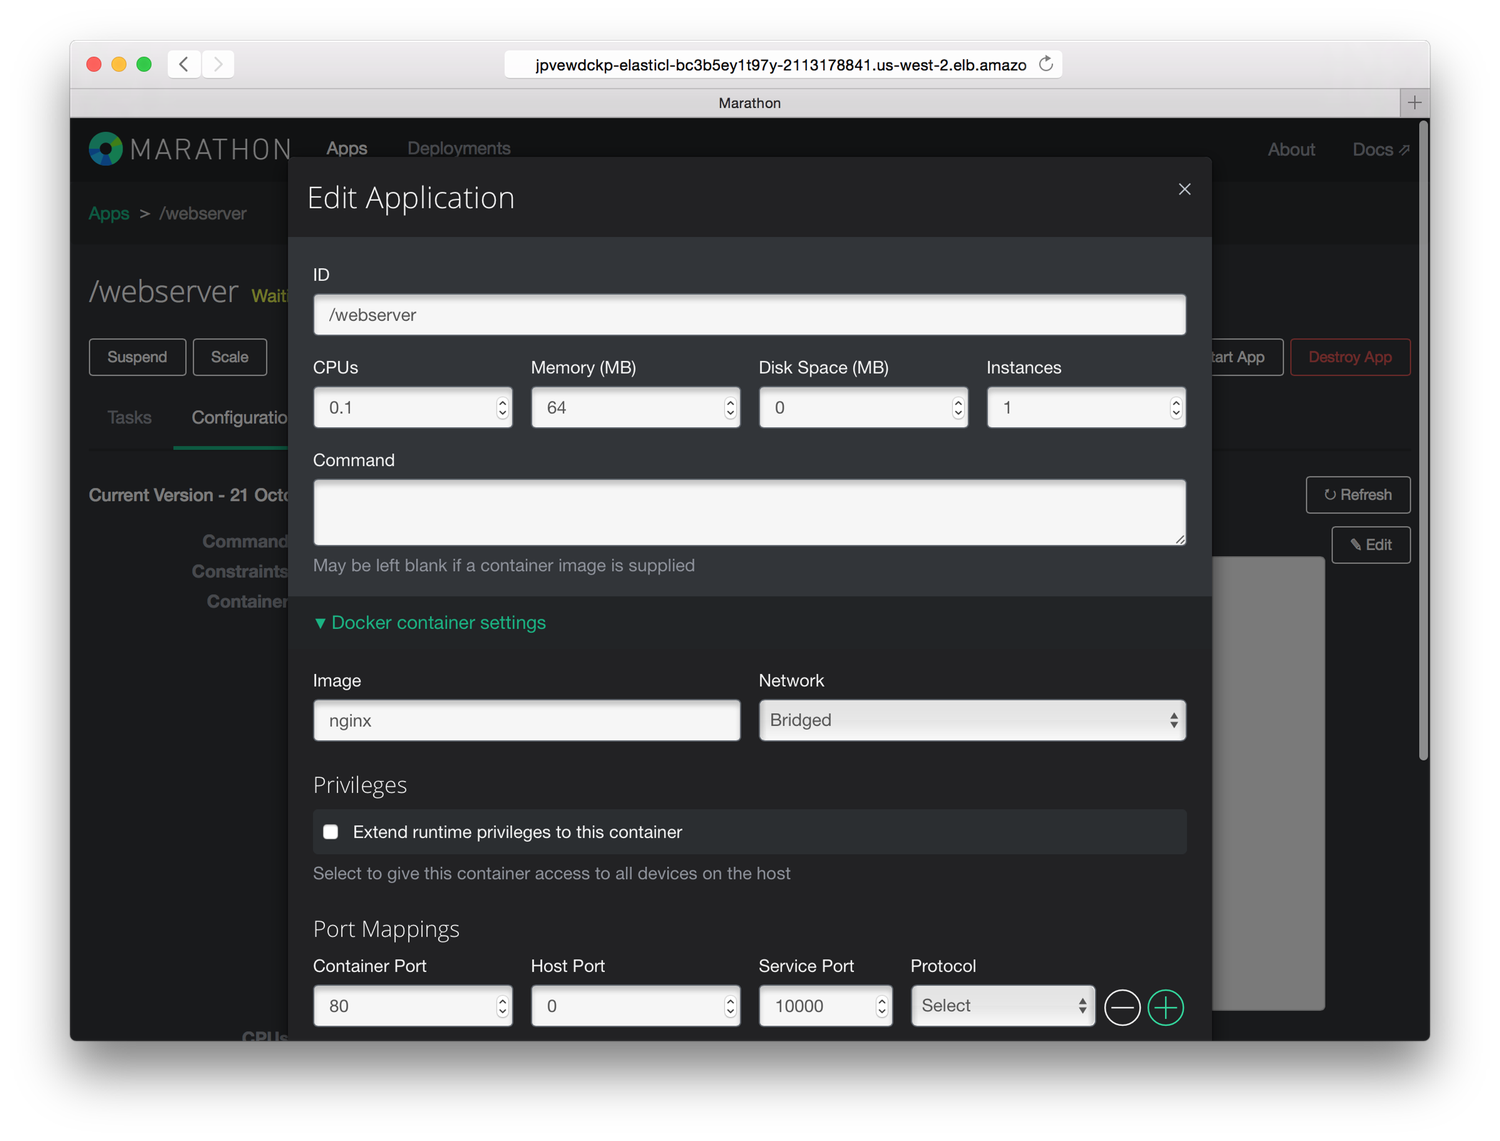
Because Mesos-DNS is currently the recommended default service discovery mechanism with Mesos, it’s important to pay attention to how Mesos-DNS represents the tasks. For example, the running task you see in Figure 5-8 would have the (logical) service name webserver.marathon.mesos.
Hashicorp Nomad
Nomad is a cluster scheduler by HashiCorp,
the makers of Vagrant. It was introduced in September 2015
and primarily aims at simplicity. The main idea is that Nomad is
easy to install and use. Its
scheduler
design is reportedly inspired by Google’s Omega,
borrowing concepts such as having a global state of the cluster as well as employing an optimistic,
concurrent scheduler.
Nomad has an agent-based architecture
with a single binary that can take on different roles, supporting
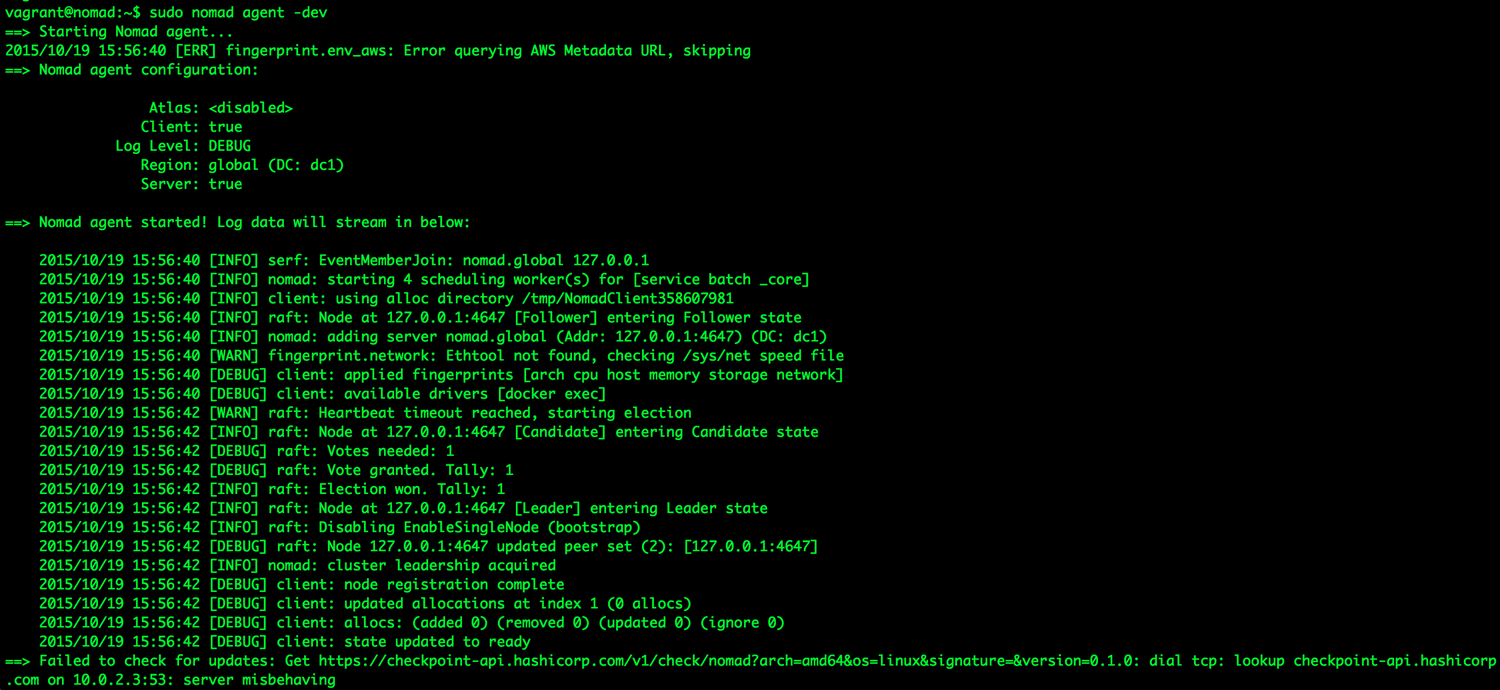
rolling upgrade as well as draining nodes (for re-balancing). Nomad makes use of both a consensus protocol (strongly consistent) for all state replication and scheduling and a gossip protocol used to manage the addresses of servers for automatic clustering and multiregion federation. In Figure 5-9, you can see a Nomad agent starting up.
Jobs in Nomad are
defined in a HashiCorp-proprietary format called
HCL or in JSON, and Nomad offers both
a command-line interface as well as an HTTP API to interact with the
server process.
In the following, I’m assuming you’re familiar with Nomad and its terminology (otherwise I suppose you wouldn’t be reading this section).
Should you not be familiar with Nomad, I suggest you watch “Nomad: A Distributed, Optimistically Concurrent Schedule: Armon Dadgar, HashiCorp” (a very nice introduction to Nomad by HashiCorp’s CTO, Armon Dadgar) and also read the docs.
Networking
Nomad comes with a couple of so-called task drivers,
from general-purpose exec to Java to qemu and
Docker. We will
focus on the latter one in the following discussion.
Nomad requires, at the time of this writing, Docker in the version 1.8.2. and
uses port binding to expose services running in containers using the
port space on the host’s interface. It provides automatic and manual
mapping schemes for Docker, binding both TCP and UDP protocols to ports
used for Docker containers.
For more details on networking options, such as mapping ports and using labels,
I’ll point out the excellent docs page.
Service Discovery
With v0.2, Nomad introduced a Consul-based (see Consul) service discovery mechanism; see the respective docs section. It includes health checks
and assumes that tasks running inside Nomad also need to be able to connect to the Consul agent, which can,
in the context of containers using bridge mode networking, pose a challenge.
Which One Should I Use?
The following is of course only a suggestion from where I stand. It is based on my experience and naturally I’m biased toward stuff I’ve been using. Your mileage may vary, and there may be other (sometimes political?) reasons why you opt for a certain technology.
From a pure scale perspective, your options look like this:
| Tool | Up to 10 nodes | 10 to 100 nodes | Up to 1,000 nodes | 1,000s of nodes |
|---|---|---|---|---|
Docker Swarm | ++ | + | ? | ? |
Kubernetes | ++ | ++ | + | ? |
Apache Mesos | + | ++ | ++ | ++ |
Nomad | ++ | ? | ? | ? |
For a handful of nodes, it essentially doesn’t matter: choose any of the four solutions, depending on your preferences or previous experience. Do remember, however, that managing containers at scale is hard:
Docker Swarm reportedly scales to 1,000 nodes, see this HackerNews thread and this Docker blog post.
Kubernetes 1.0 is known to be scale-tested to 100s of nodes and work is ongoing to achieve the same scalability as Apache Mesos.
Apache Mesos has been simulated to be able to manage up to 50,000 nodes.
No scale-out information concerning Nomad exists at the time of this writing.
From a workload perspective, your options look like this:
| Tool | Non-containerized | Containerized | Batch | Long-running | Stateless | Stateful |
|---|---|---|---|---|---|---|
Docker Swarm | – | ++ | + | ++ | ++ | + |
Kubernetes | – | ++ | + | ++ | ++ | + |
Apache Mesos | ++ | ++ | ++ | ++ | ++ | + |
Nomad | ++ | ++ | ? | ++ | ++ | ? |
Non-containerized means you can run anything that you can also launch
from a Linux shell (e.g., bash or Python scripts, Java apps, etc.), whereas containerized implies you need
to generate Docker images. Concerning stateful services, pretty much all of the solutions
require some handholding, nowadays. If you want to learn more about choosing an orchestration tool:
See the blog post “Docker Clustering Tools Compared: Kubernetes vs Docker Swarm”.
Read an excellent article on O’Reilly Radar: “Swarm v. Fleet v. Kubernetes v. Mesos”.
For the sake of completeness and because it’s an awesome project, I will point out the spanking new kid on the block, Firmament.
Developed by folks who also contributed to Google’s Omega and Borg, this new scheduler construct a flow network of tasks and machines and runs a minimum-cost optimization over it. What is particularly intriguing about Firmament is the fact that you can use it not only standalone but also integrated with Kubernetes and (upcoming) with Mesos.
A Day in the Life of a Container
When choosing a container orchestration solution, you should consider the entire life cycle of a container (Figure 5-10).
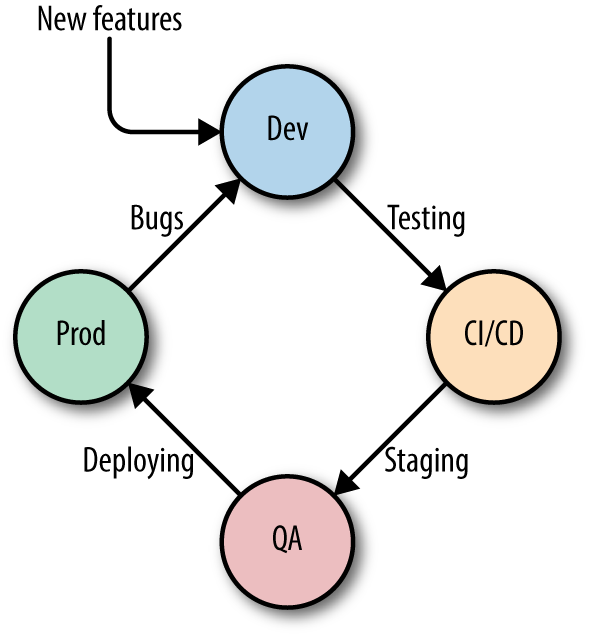
The Docker container life cycle typically spans the following phases:
- Phase I: dev
The container image (capturing the essence of your service or app) starts its
life in a development environment, usually on a developer’s laptop.
You use feature requests and insights from running the service or application in production as inputs.- Phase II: CI/CD
Then, the container goes through a pipeline of continuous integration
and continuous delivery, including unit testing, integration testing, and
smoke tests.- Phase III: QA/staging
Next, you might use a QA environment (a cluster either on premises or in the cloud) and/or a staging phase.
- Phase IV: prod
Finally, the container image is deployed into the production environment.
When dealing with Docker, you also need to have a strategy in place for how to distribute the images.
Don’t forget to build in canaries
as well as plan for rolling upgrades of the core system (such as Apache Mesos), potential higher-level
components (like Marathon, in Mesos’ case) and your services and apps.In production, you discover bugs and may collect metrics that can be used to improve the next iteration (back to Phase I).
Most of the systems discussed here (Swarm, Kubernetes, Mesos, Nomad) offer instructions, protocols,
and integration points to cover all phases. This, however, shouldn’t be an excuse for not trying out
the system end to end yourself before you commit to any one of these systems.
Community Matters
Another important aspect you will want to consider when selecting an orchestration system is that of the community behind and around it.17 Here a few indicators and metrics you can use:
Is the governance backed by a formal entity or process, such as the Apache Software Foundation or the Linux Foundation?
How active is the mailing list, the IRC channel, the bug/issue tracker, Git repo (number of patches or pull requests), and other community initiatives? Take a holistic view, but make sure that you actually pay attention to the activities there. Healthy (and hopefully growing) communities have high participation in at least one if not more of these areas.
Is the orchestration tool (implicitly or not) de facto controlled by a single entity? For example, in the case of Nomad, it is clear and accepted that HashiCorp alone is in full control. How about Kubernetes? Mesos?
Have you got several (independent) providers and support channels? For example, you can run Kubernetes or Mesos in many different environments, getting help from many (commercial or not) organizations and individuals.
With this, we’ve reached the end of the book. You’ve learned about the networking aspects of containers, as well as about service discovery options. With the content of this chapter, you’re now in a position to select and implement your containerized application.
If you want to dive deeper into
the topics discussed in this book, check out References, which provides an organized list of resources.
12See the last section of the “Understand Docker Container Networks” page.
13Why it’s called ambassador when it clearly is a proxy at work here is beyond me.
14Essentially, this means that you can simply keep using docker run commands and the deployment of your containers in a cluster happens automagically.
15See pause.go for details; basically blocks until it receives a SIGTERM.
16It should be noted that concerning stateful services such as databases (MySQL, Cassandra, etc.) or distributed filesystems (HDFS, Quobyte, etc.), we’re still in the early days in terms of support, as most of the persistence primitives landed only very recently in Mesos; see Felix Hupfeld and Jörg Schad’s presentation “Apache Mesos Storage Now and Future” for the current (end 2015) status.
17Now, you may argue that this is not specific to the container orchestration domain but a general OSS issue and you’d be right. Still, I believe it is important enough to mention it, as many people are new to this area and can benefit from these insights.
References
What follows is a collection of links that either contain background info on topics covered in this book or contain advanced material, such
as deep-dives or tear-downs.
Networking References
Service Discovery References
Service Discovery on p24e.io
Service Discovery, Mesosphere