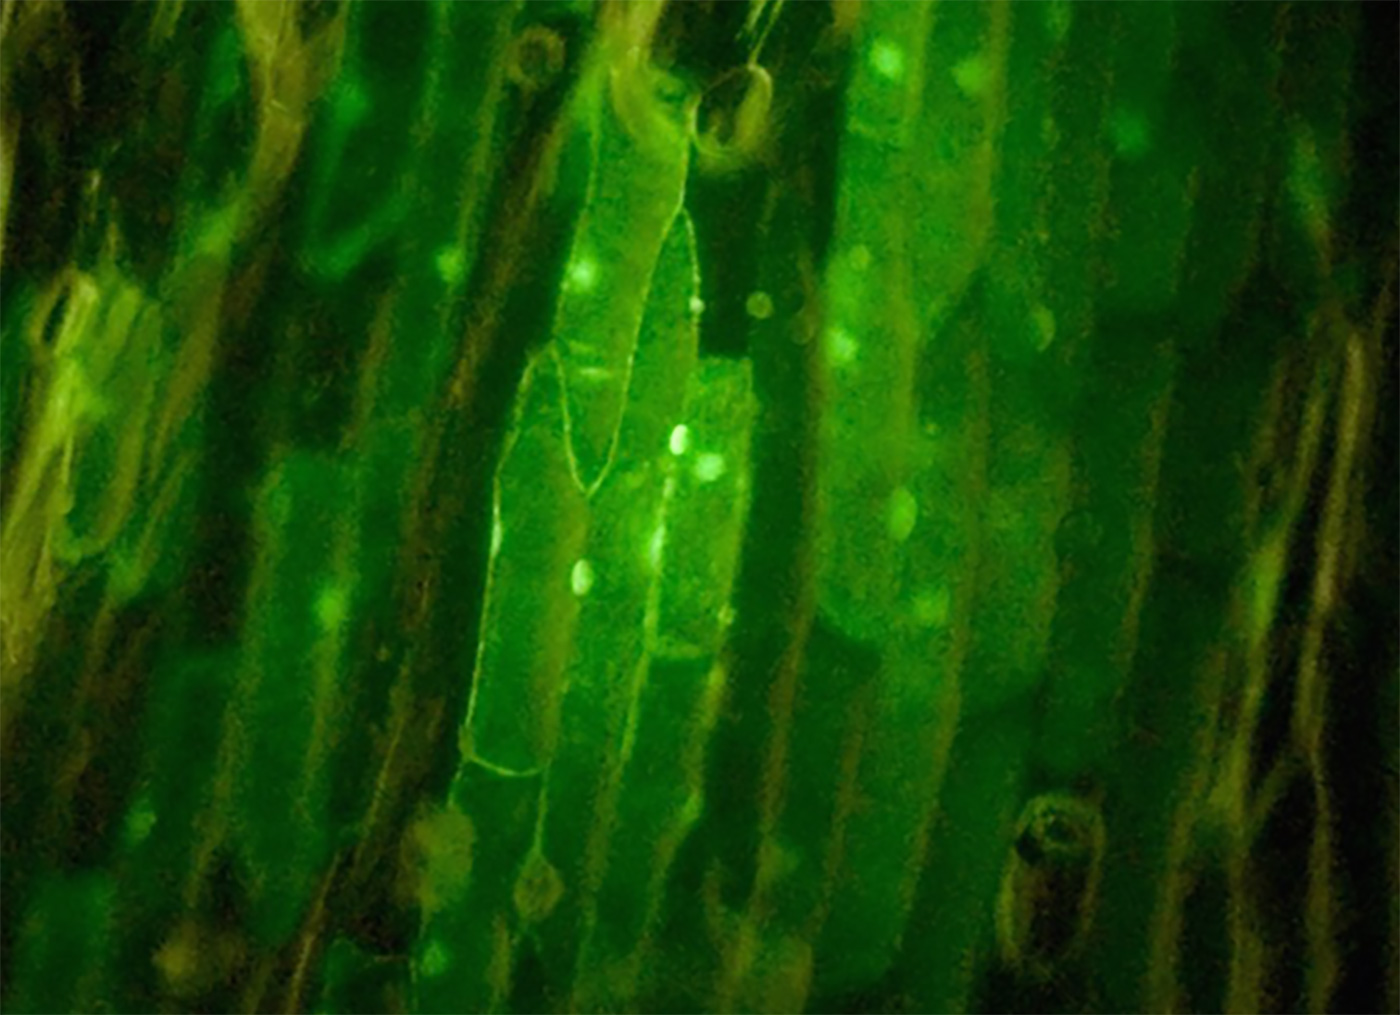
 Cropped image showing GFP expression in onion cells.
 What Is a Gene Gun?
The gene gun is a device used to transfect cells with foreign DNA by bombarding the target cells with DNA-coated microparticles. It was originally developed using plant tissue as the target but can also be used with yeast, bacteria, mammalian cell lines, and insects. In plants, it is one of the few ways to get foreign DNA into chloroplasts as well as genomic DNA. It is called a gene gun because it fires small DNA-coated particles (typically gold or tungsten particles because they are dense) into target cells. This method is called biolistic, a combination of the words “biology” and “ballistics” from the Greek ballein, “to throw.” By adjusting the velocity of the particles, any type of cell wall can be penetrated. It is an effective method for inserting foreign DNA into cells and thus transforming the target cells.
Another popular method of doing plant transformations is to use Agrobacterium tumefaciens, a plant pathogen, to introduce a gene of interest into plant cells. Using this method, Agrobacterium injects the foreign DNA into the plant, where it is incorporated into the plant genome at random locations. However, since it involves using a plant pathogen, the USDA regulates it and has disallowed making available any transgenic plants created using this method. However, transgenic plants created using a gene gun are allowed by the USDA. So that is another advantage the gene gun has over using Agrobacterium as a transfection method if the goal is to make a commercially available transgenic plant. Another advantage over Agrobacterium is that a gene gun can be used on any plant, and Agrobacterium is limited to plants that are its hosts. Monsanto and other companies have used the gene gun to bioengineer crops with pesticide resistance and other characteristics to improve crop yields. The gene gun has also been used to administer gene-based therapies for cancer and other diseases. There are references to some gene gun applications at the end of this article.
A Brief History
The gene gun was developed by Dr. John Sanford and his graduate student, Ted Klein, at Cornell in 1987. In the first successful prototype, they used a .22 caliber rifle barrel equipped with a firing pin that detonated a gunpowder-filled blank cartridge. The blast forced a nylon projectile down the gun barrel, pushing thousands of DNA-coated tungsten particles ahead of it. A steel plate with a 1 millimeter hole in the center stopped the nylon projectile but allowed the tungsten particles to travel through the hole and bombard the target at velocities of more than 1,000 miles per hour (~1,500 ft/sec). The first target was a collection of onion bulb cells.
Today, modern gene guns use a pulse of compressed helium in the range of 200–1,500 psi to create the energy needed to accelerate the DNA-coated particles. There are two commercial gene guns available from Bio-Rad. The PDS-1000 system sells for $25,000 and the Helios system for $30,000.
DIY Gene Guns
Because commercial gene guns are very expensive, there have been a number of DIY gene guns developed. If you Google “DIY gene gun,” you will see a number of hits. The one described in this article uses some ideas from other DIY gene guns and has some unique features that make it easy to adjust the gas pressure, gas pulse time, and target distance while keeping the cost low.
Building the Gene Gun
List of components: (total cost: $200–$230):
- High-pressure solenoid ($75)
- Adjustable relay that provides pulses in the 10–500 millisecond range ($30–$60 on eBay)
- A bicycle CO2 inflator to attach the CO2 cartridge to the gene gun ($22)
- A valve to adjust the pressure ($21)
- A pressure gauge that reads from 0–1,000 psi ($15 on eBay)
- A fitting to suspend the tungsten particles above the target in front of the target
- A compressed gas discharge (macrocarrier) ($5)
- Pipe fittings to hook up the Solenoid, CO2, and nozzle ($30)
The four key parts that are needed are the relay, the solenoid, the valve, and a CO2 tire inflator.
Other than that, the rest of the parts are 1/8″–1/2″ pipes and fittings available from any hardware store.
See Figure 1-1.
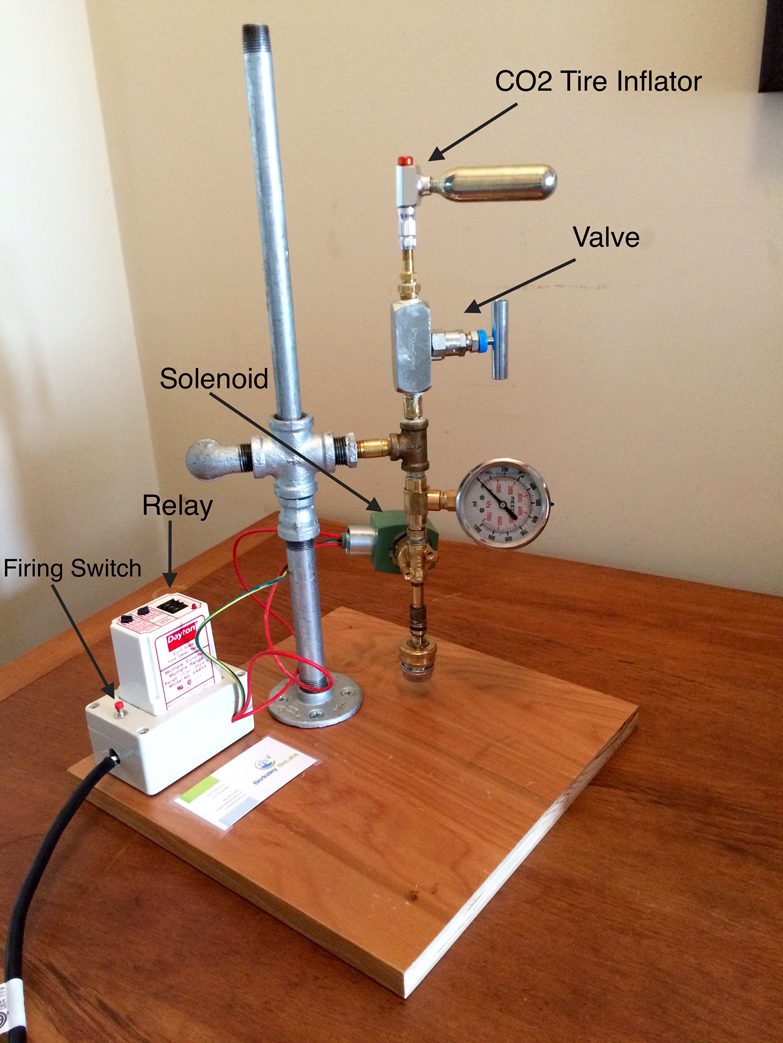
Building the stand
I used a vertical 1/2″ pipe mounted to a wooden base to support the gun and allow easy adjustment up and down. An improvement on this stand might be a geared vertical post with a ruler attached to assist in determining the distance to the target cells.
As you can see from the photo, the CO2 bicycle inflator is attached to the valve and then to a 1/4″ tee. The purpose of the tee is to attach the gun to the stand. The short horizontal pipe connecting the gun to the stand is blocked off to prevent CO2 from leaking out. This was done by heating up the pipe and melting solder into it to form a gas tight plug.
The CO2 tire inflator
The purpose of the tire inflator is to connect the CO2 cartridge to the system. There are many CO2 tire inflators on the market. So far, I have used two, the Cabrill02-Elite and the Lezyne.
The Cabrill02-Elite seems to be sturdier and so far has held up better. The Lezyne started to leak after about 50 uses.
Another option is to use a CO2 paintball canister. They hold a lot more CO2 but are larger and cost a bit more. However, if you are using the gene gun a lot, the larger canister will be more economical in the long run.
Valve
The valve controls the pressure in the chamber. By opening the valve, CO2 flows into the chamber until the desired pressure is reached.
DuraChoice has a 1/4″ carbon steel needle valve rated at 10,000 psi (SKU VNC01-025).
Pressure Gauge
The gauge displays the pressure in the chamber.
This gauge is 0–1,000 psi. I got it on eBay. Nothing special about it. Any good gauge will work.
The Solenoid
The solenoid is an electronically controlled valve that opens and closes (quickly) and is controlled by the relay. When the solenoid is open, it lets compressed CO2 flow from the chamber to hit the macrocarrier and accelerate the DNA-coated tungsten particles toward the target cells. Try this Asco model 8262H200, which is rated at 700 psi and costs $74.
The Relay
The relay is a switch used to time how long the solenoid is open that can be adjusted to open for a specified period and then closed.
This relay is Dayton Model #6A855. It is adjustable in 10 millisecond increments, and the minimum open time is 10 milliseconds.
These are often available on eBay, where I got mine.
You can also buy one new from Grainger.
Firing Switch
The switch triggers the relay to open. This is a momentary push button switch. When pushed, it only closes momentarily then opens again automatically. Switches are available at Fry’s Electronics.
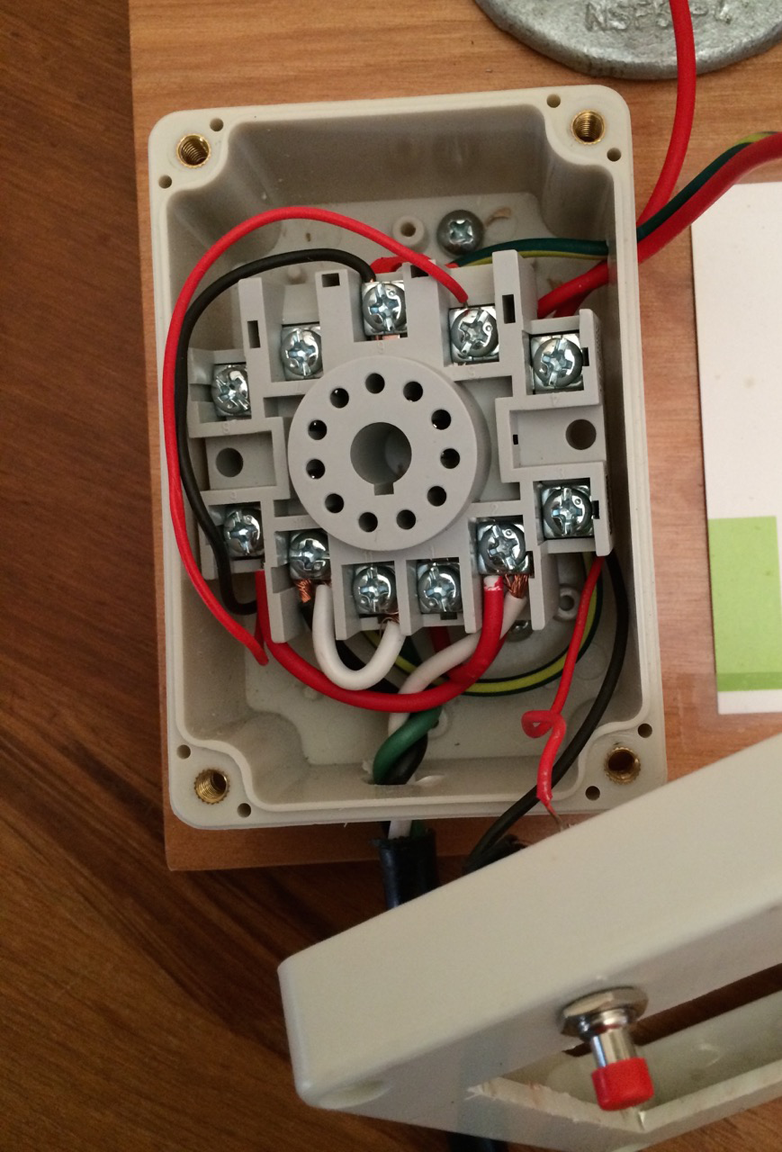
Wiring
For an illustration of the wiring setup, see Figure 1-2.
| Pin | Description |
|---|---|
| 1 | Black to 110v + a jumper to pin 2 |
| 2 | White jumper to pin 1 |
| 3 | Red to solenoid |
| 4 | – |
| 5 | – |
| 6 | Black to push switch |
| 7 | Red to push switch |
| 8 | – |
| 9 | – |
| 10 | White to 110v + second red to solenoid |
| 11 | – |
Socket for relay to plug into
All the wires are attached to the socket and the relay plugs into the socket. I got my 11-pin socket on eBay, but Grainger also has them.
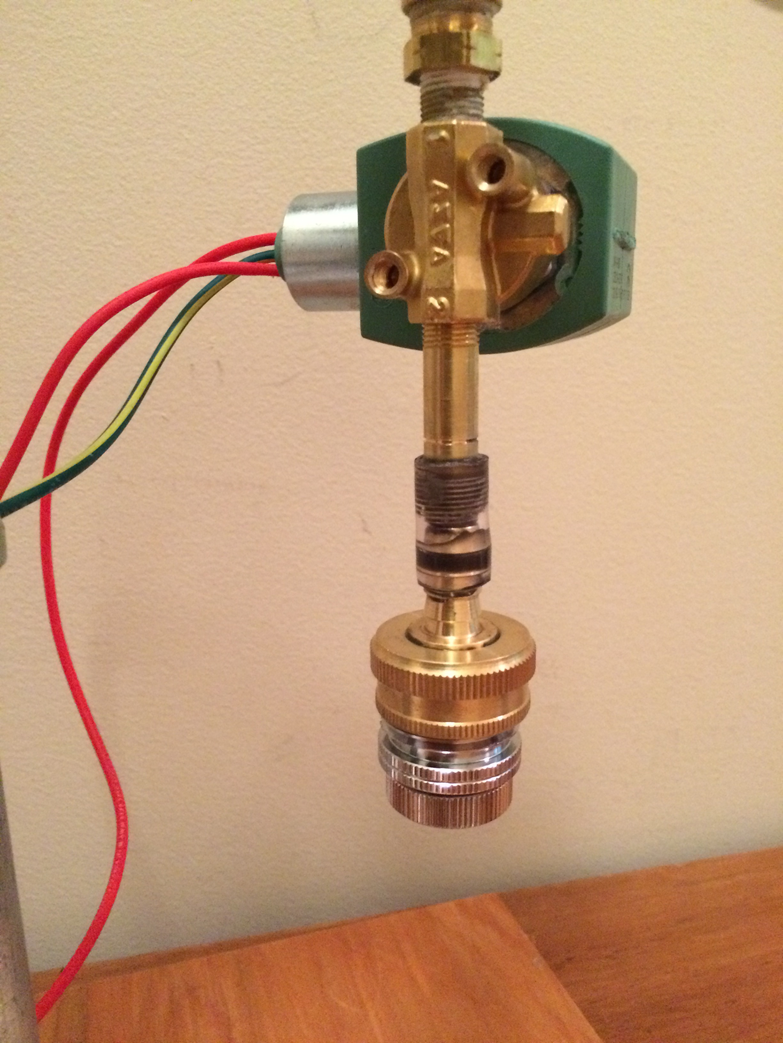
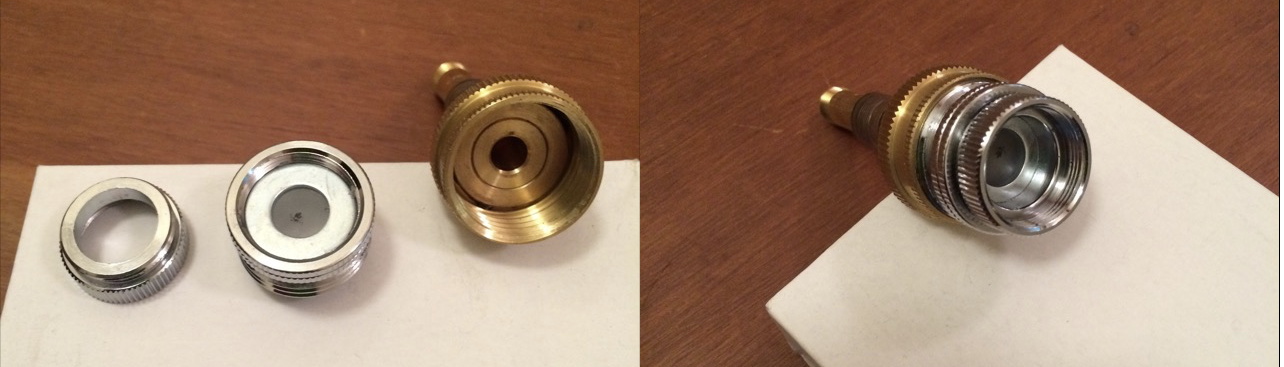
Macrocarriers
The macrocarrier is the support structure that holds the DNA-coated microparticles. After trying out various fittings at the hardware store, I ended up adapting some garden hose fittings to hold a 3/4″ washer. The washer can be used to support various types of paper or films that hold the microparticles. See Figures Figure 1-3, Figure 1-4, and Figure 1-5.
Using the Gene Gun
A few members of the Plant Bio Group at BioCurious have been using the gene gun over the past few months on onion cells with the goal of improving transformation efficiency. Arnie Wernick and Kyle Taylor have been leading this effort. We have tried several different pressures, distances, and macrocarriers. If you are in the San Francisco Bay Area and are interested in seeing the gene gun, the Plant Bio Group meets each Tuesday at 7 p.m. and is open to anyone interested in pursuing plant biology projects.
The basic steps to use the gene gun are:
- Prepare the tungsten particles and coat them with DNA.
- Load the particles onto macrocarriers.
- Prepare the target cells.
- Decide on your parameters and set the gene gun accordingly for distance from target, pulse duration, and CO2 pressure.
- Place the target under the gene gun barrel and fire it.
Tungsten Particles (Microcarriers)
Bio-Rad sells four sizes of tungsten particle microcarriers: M-10 (~0.7 μm diameter), M17 (~1.1 μm diameter), M-20 (~1.3 μm diameter), and M-25 (~1.7 μm diameter). The current cost is $110 for 6 grams. This is enough for about 4,000 bombardments (~$0.03 cents per shot). Bio-Rad also sells gold microcarriers at $625 for 250 mg (23 times more expensive than tungsten).
Tungsten M-10 Microcarriers
We have been using M-10 tungsten (from a different source but the same size as the Bio-Rad M-10).
There are a number of published protocols for preparing the microcarriers. We have been using the protocol from Iowa State University.
There are a couple of steps where sonication is required. This can be done with an ultrasonic jewelry sonicator, available on Amazon for $20–$30.
The DNA coating protocol calls for spermidine. At first we omitted adding spermidine because we didn’t have any. The one successful transformation we got was achieved without using spermidine. Eventually we got some from Sigma-Aldrich and now include it when preparing the DNA-coated tungsten. Sigma-Aldrich sells 99% spermidine for $35/gm.
The Iowa State paper describes the preparation of gold particles, but the same protocol applies to tungsten.
There are two parts to the method. The first part describes how to wash and prepare 15 mg of tungsten and divide into 10 2.0 ml Eppi tubes (1X tubes, 1.5 mg each). These 1X tubes of tungsten particles are stored at -20° C until use. Each 1X tube will be used to prepare enough coated particles for 8–10 bombardments.
The second protocol describes how to coat the tungsten particles with DNA. This is done on the day you will use them. The following list is a summary of the protocol to coat the tungsten particles with DNA:
- Thaw 1X tube.
- Sonicate for 15 seconds.
- Add 5 μl construct (selection construct and gene of interest construct).
- Agitate very well by tapping the tube.
- Tap tube on bench top to gather all drops at bottom.
- Add 50 μl CaCl2 (2.5 M) using a pipette.
- Re-suspend gently with pipette once.
- Place on low speed vortex and add 20 μl spermidine (0.1 M) while shaking.
- Wait 30 seconds, then close the tube and agitate vortex well.
- Return to low speed vortex for 10 minutes
- Remove from vortex and let tungsten particles settle for at least five minutes.
- Centrifuge for 15 seconds at 5,000 rpm to pellet the tungsten.
- Pipette off supernatant.
- Add 250 μl of cold 100% EtOH (fresh out of -20° C freezer)
- Agitate by tapping with your finger to dislodge pellet.
- Rock back and forth to make tungsten a silky smooth consistency.
- Let sit 3–5 minutes for tungsten to settle out.
- Centrifuge for 15 seconds at 5,000 rpm.
- Remove supernatant and add 120–140 μl ice cold 100% EtOH.
- Agitate by tapping with your finger then place on vortexer on low to distribute tungsten particles uniformly for loading onto macrocarrier.
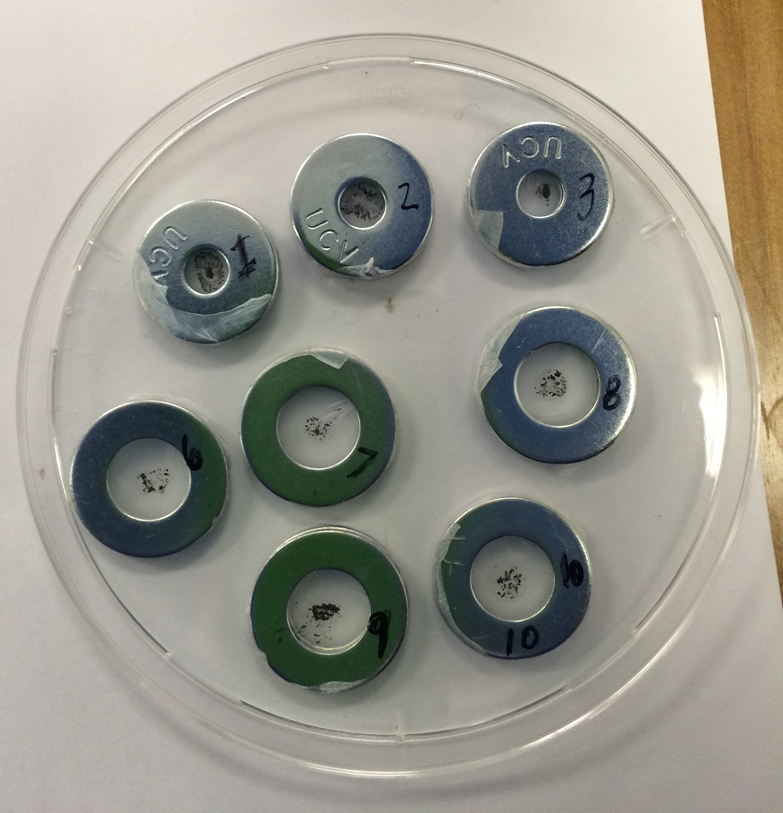
Keep the tungsten particles in a uniform suspension by vortexing on low setting while aliquoting ~10–15 μl to the center of the parafilm held by the washers in the macrocarriers (see Figure 1-5). Starting at the center of the macrocarrier, distribute the suspension evenly across the target area.
After loading the macrocarriers, let them sit for 5–10 minutes to be sure they are dry before bombardment.
Testing the System
Over the past few months in the Plant Bio Group at BioCurious, we have been using the gene gun to bombard onion bulb cells with a plasmid containing a GFP reporter, TuGFP. We have tried a variety of macrocarriers and pressures and are still working to improve the yield.
After bombardment and overnight incubation at room temperature in the dark, the onion cells are inspected with a fluoresence microscope to find transformants that are expressing GFP.
So far we have had one successful transformation out of about 40+ bombardments (Figure 1-5). We have primarily used pressures in the 600–700 psi range and occasionally up to 850 psi and as low as 550 psi. The pulse duration has been 80 ms and the distance to the target between 1–2 cm. As a negative control, we fire a blank macrocarrier (no tungsten particles) or a macrocarrier with tungsten particles without DNA. This exposes the target cells to the same biolistic exposure but without the reporter gene. We have focused on testing and improving the macrocarriers. Arnie Wernick has come up with several promising macrocarrier designs, and he is continuing to innovate in this area. The goal is to design a macrocarrier that will hold the particles and then disperse them to the target cells in a uniform and consistent pattern. We have been using two 3/4″ washers to hold various films, like plastic wrap, paper, cellophane, and parafilm. Arnie determined that parafilm worked the best, and a majority of our bombardments have been using parafilm macrocarriers. However, parafilm does not rupture uniformly. Sometimes the gas pulse blows a nice hole through the center and disperses the tungsten particles well. Other times, it rips off from one side and forms a flap such that most of the particles are not dispersed to the target. The bottom line is we are still working to design a better macrocarrier that will release the particles in a uniform pattern and consistently bombard the target with good cell wall penetration.
Figure 1-6 shows GFP expression in onion cells from one of our targets.

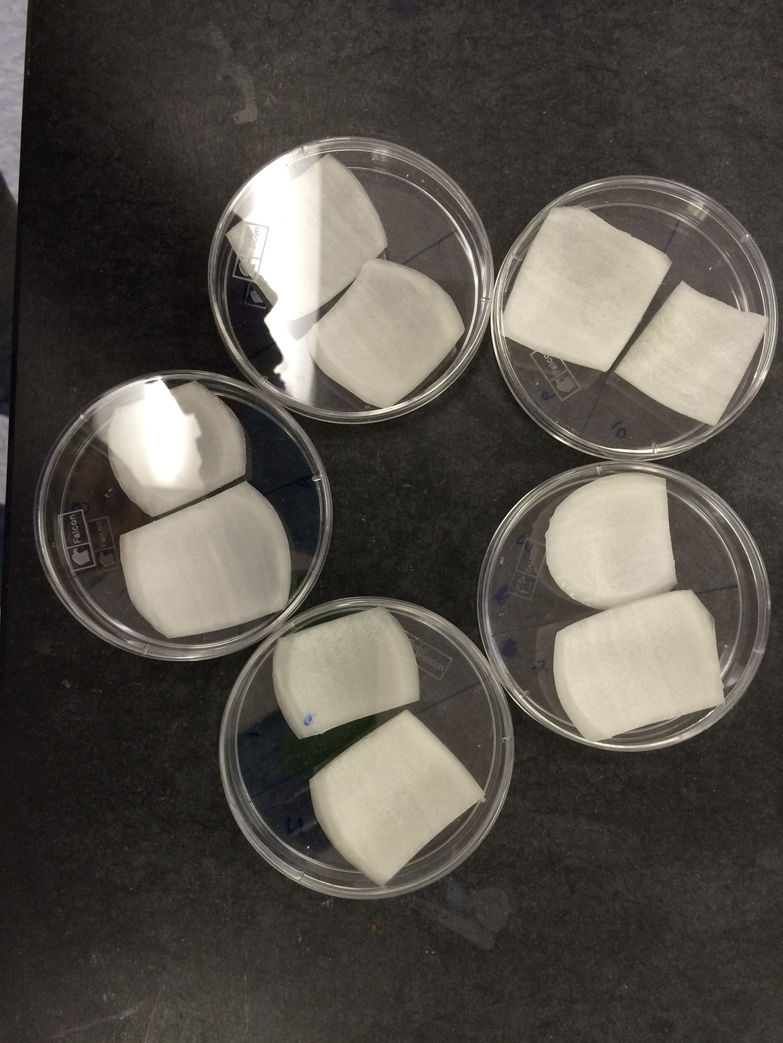
Onion cell targets
To prepare the onion targets, buy a fresh white onion at your local grocer or farmer’s market. Cut off about one-third of one side, and then lift out a segment that is larger than an inch in diameter and cut it down to about an inch. Place the targets in a sterile petri dish and cover until they are taken out briefly to bombard (see Figure 1-7). After firing the tungsten particles, you can inspect the onion target using a 10–40x stereo microscope to see the pattern of tungsen particles and estimate penetration. After you have completed a batch of targets, add about 500 μl of water to each dish and seal with parafilm. Place them in the dark for 18–24 hours to incubate. After incubation, assay for the reporter to see if you have any transformants.
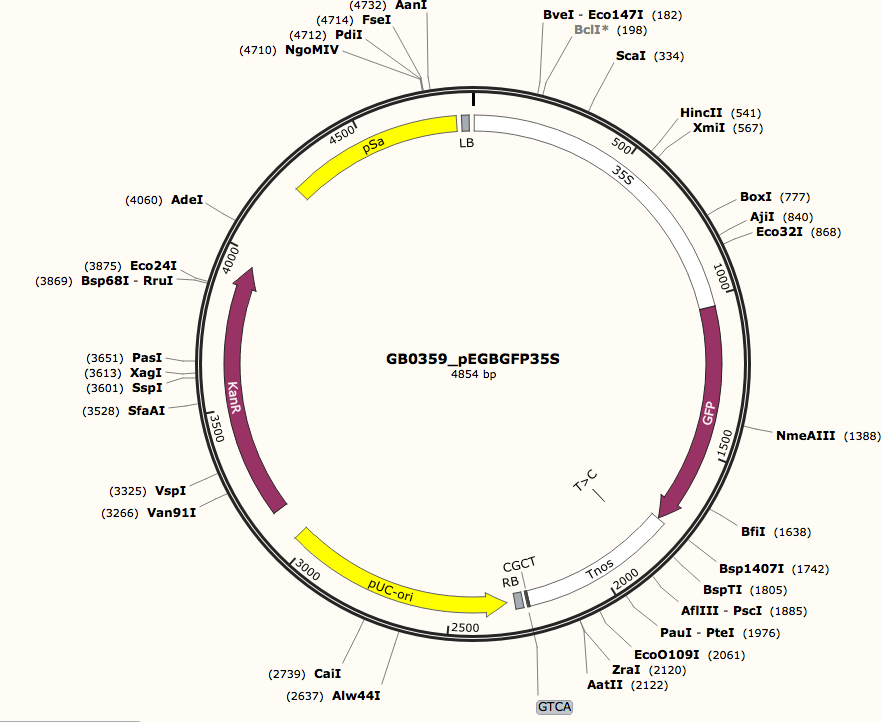
GFP Reporter Protein
We have been using pEGB35S:GFP:Tnos (pDGB1_alpha1), Genbank file: GB0359. This is a plasmid containing a GFP gene and uses the 35s promoter that works well in plants (see Figure 1-8). GFP expression by the onion cells can be seen using a fluorescence microscope. There are other artifacts that also cause fluorescence, so it is important to differentiate between these auto-fluorescent artifacts and GFP fluorescence; however, it is not difficult.
However, you don’t have to use GFP; you can use any reporter system you choose to generate an expression signal that can be assayed. Jay Hanson has posted a short video showing how to set up and use the gene gun.
Next Steps
We are actively working to improve the gene gun, focusing on the macrocarrier and how to achieve a more consistent distribution of the tungsten particles with higher transformation yields. Once we get the system working well, we will do a follow-up article in BioCoder describing the improvements. If you have any questions or comments, send them to diygenegun@gmail.com.
References
Articles on Gene Guns:
- Bio-Rad Laboratories, Inc. “Biolistic Particle Delivery Systems.” Bulletin 5443. http://www.bio-rad.com/webroot/web/pdf/lsr/literature/Bulletin_5443.pdf.
- Glowing Plant. “How a Gene Gun Works.” YouTube, published September 27, 2013. https://www.youtube.com/watch?v=VqklR_8YRfA.
- Helenius, Elina, Maria Boije, Viola Niklander-Teeri, E. Tapio Palva, and Teemu Teeri. “Optimization of Gene Delivery into Arabidopsis, Tobacco and Birch Using the Helios™ Gene Gun System.” Bio-Rad Laboratories, Inc. Bulletin, no. 2453. http://www.bio-rad.com/LifeScience/pdf/Bulletin_2453.pdf.
- Williams, R. S., S. A. Johnston, M. Riedy, M. J. Devit, S. G. Mcelligott, and J. C. Sanford. “Introduction of Foreign Genes into Tissues of Living Mice by DNA-coated Microprojectiles.” Proc. Nati. Acad. Sci. USA 88, no. 7 (April 1991): 2726–730. http://www.pnas.org/content/88/7/2726.full.pdf.
Articles on Gene Gun Applications:
- Bonetta, Laura. “The Inside Scoop—Evaluating Gene Delivery Methods.” Nature Methods 2, no. 11 (2005): 875–83. http://www.nature.com/nmeth/journal/v2/n11/full/nmeth1105-875.html.
- Chen, C-H, H. Ji, K. W. Suh, M. A. Choti, D. M. Pardoll, and T-C Wu. “Gene Gun-mediated DNA Vaccination Induces Antitumor Immunity against Human Papillomavirus Type 16 E7-expressing Murine Tumor Metastases in the Liver and Lungs.” Gene Therapy 6, no. 12 (1999): 1972–981. http://www.nature.com/gt/journal/v6/n12/full/3301067a.html.
- Mahvi, David M., Michael J. Sheehy, and Ning-Sun Yang. “DNA Cancer Vaccines: A Gene Gun Approach.” Immunology and Cell Biology 75, no. 5 (1997): 456–60. http://www.nature.com/icb/journal/v75/n5/pdf/icb199770a.pdf.
- Osman, Gamal H., Shireen K. Assem, Rasha M. Alreedy, Doaa K. El-Ghareeb, Mahmoud A. Basry, Anshu Rastogi, and Hazem M. Kalaji. “Development of Insect Resistant Maize Plants Expressing a Chitinase Gene from the Cotton Leaf Worm, Spodoptera Littoralis.” Scientific Reports 5 (December 14, 2015). http://www.nature.com/articles/srep18067.
- Ueki, Shoko, Benoît Lacroix, Alexander Krichevsky, Sondra G. Lazarowitz, and Vitaly Citovsky. “Functional Transient Genetic Transformation of Arabidopsis Leaves by Biolistic Bombardment.” Nature Protocols 4, no. 1 (December 18, 2008): 71–77. http://www.nature.com/nprot/journal/v4/n1/full/nprot.2008.217.html.
- Yang, Ning-Sun, and Wenn H. Sun. “Gene Gun and Other Non-viral Approaches for Cancer Gene Therapy.” Nature Medicine 1, no. 5 (1995): 481–83. http://www.nature.com/nm/journal/v1/n5/full/nm0595-481.html.