Let’s use Keystone!
Use this instructional tutorial to interact with Keystone and invoke its core operational capabilities.
 Lion keystone (source: Heissenstein via Pixabay)
In this chapter we will explain how to use Keystone in a development environment. This involves a few steps. First, we deploy OpenStack with DevStack, then try basic Keystone operations with OpenStackClient (a command line interface), then we perform the same Keystone operations with Horizon (a Web interface). We will also be providing cURL alternatives to the OpenStackClient commands to illustrate the fact that the CLI is simply just a wrapper for a REST call.
2.1 Getting DevStack
The examples shown below were performed on a new Ubuntu 64-bit virtual machine (VM). There are several options available for quickly getting an Ubuntu VM up and running, such as VMWare Fusion or Oracle’s VirtualBox.

Learn faster. Dig deeper. See farther.
To begin, we need to install git and curl, then clone the DevStack repository. It is best to perform these steps from your user’s home directory.
$ sudo apt-get install git curl
$ git clone https://github.com/openstack-dev/devstack/
$ cd devstack
Within the devstack folder, we create a file called local.conf. The settings in this file tell DevStack which components of OpenStack to install and provide a few minor configuration details. We’ll be installing Keystone, Nova, Glance, Cinder, and Horizon. We’ll also be using the latest development branch of OpenStack.
Example 1-1. The local.conf file contents
[[local|localrc]]
RECLONE=yes

# Credentials
DATABASE_PASSWORD=openstack
ADMIN_PASSWORD=openstack
SERVICE_PASSWORD=openstack
SERVICE_TOKEN=openstack
RABBIT_PASSWORD=openstack

# Services
ENABLED_SERVICES=rabbit,mysql,key
ENABLED_SERVICES+=,horizon
ENABLED_SERVICES+=,n-api,n-crt,n-obj,n-cpu,n-cond,n-sch,n-novnc,n-cauth
ENABLED_SERVICES+=,n-net
ENABLED_SERVICES+=,g-api,g-reg
ENABLED_SERVICES+=,cinder,c-api,c-vol,c-sch,c-bak

# Enable Logging
LOGFILE=/opt/stack/logs/stack.sh.log
VERBOSE=True
LOG_COLOR=True
SCREEN_LOGDIR=/opt/stack/logs
The last step in the process is to kick off the stack.sh script and grab a coffee—the whole process will take around 25 minutes for the initial setup.
$ ./stack.sh
Once completed, the output looks like:
This is your host IP address: 10.0.2.15
This is your host IPv6 address: ::1
Horizon is now available at http://10.0.2.15/
Keystone is serving at http://10.0.2.15:5000/
The default users are: admin and demo
The password: openstack
Congratulations, you’ve installed OpenStack!
2.2 Basic Keystone Operations Using OpenStackClient
In this section we will use OpenStackClient to perform basic Keystone operations such as authenticating, listing, and creating users, projects, domains, groups, and roles. For illustrative purposes we also include the cURL alternative to the specific command to show the reader that OpenStackClient performs the equivalent REST call.
Before we start executing commands, we should create a few environment variables to make authenticating with our Keystone service easier. Note that most of these values should be the same for your deployment, but the hostname or IP address of your VM may be different.
$ export OS_IDENTITY_API_VERSION=3
$ export OS_AUTH_URL=http://10.0.2.15:5000/v3
$ export OS_USERNAME=admin
$ export OS_PROJECT_NAME=admin
$ export OS_USER_DOMAIN_NAME=Default
$ export OS_PASSWORD=openstack
$ export OS_PROJECT_DOMAIN_NAME=Default
To check that the environment variables are set, perform the following and analyze the output:
$ env | grep OS
OS_IDENTITY_API_VERSION=3
OS_AUTH_URL=http://10.0.2.15:5000/v3
OS_USERNAME=admin
OS_PROJECT_NAME=admin
OS_USER_DOMAIN_NAME=Default
OS_PASSWORD=openstack
OS_PROJECT_DOMAIN_NAME=Default
2.2.1 Getting a Token
Using OpenStackClient
Since we already set authentication and authorization data as environment variables we simply perform the following to issue a token:
$ openstack token issue
+------------+----------------------------------+
| Field      | Value                            |
+------------+----------------------------------+
| expires    | 2015-08-27T21:45:41.712853Z      |
| id         | d219ca63fd2548f685fea48623b22a10 |
| project_id | 92841d1c386643a08c697c833ed840af |
| user_id    | 82d7e61f128b4e398bb165f278f45569 |
+------------+----------------------------------+
Using cURL
When using cURL to obtain a token, the payload for the authentication request must include information about the user and the project.
$ curl -i -H "Content-Type: application/json" -d '
{ "auth": {
    "identity": {
      "methods": ["password"],
      "password": {
        "user": {
          "name": "admin",
          "domain": { "name": "Default" },
          "password": "openstack"
        }
      }
    },
    "scope": {
      "project": {
        "name": "admin",
        "domain": { "name": "Default" }
      }
    }
  }
}' http://localhost:5000/v3/auth/tokens

HTTP/1.1 201 Created
Date: Thu, 27 Aug 2015 21:57:56 GMT
Server: Apache/2.4.7 (Ubuntu)
X-Subject-Token: 2511aaa898ff42158addea8c90ba2622
Vary: X-Auth-Token
x-openstack-request-id: req-ab469b0e-6990-4cca-9b1a-98780ae4108a
Content-Length: 5276
Content-Type: application/json

{"token": {"methods": ["password"], "roles": [{"id": "2d357899bd5c430988772eb861f
b7a68", "name": "admin"}], "expires_at": "2015-08-27T22:57:58.249918Z",
"project": {"domain": {"id": "default", "name": "Default"}, "id": "ed50269971bc41
ef9f25ce2c7e9b9d11", "name": "admin"}, "catalog": [{"endpoints": [{"region_id":
"RegionOne", "url": "http://10.0.2.15:35357/v2.0", "region": "RegionOne",
"interface": "admin", "id": "19dfab5f51b24dbe8cfc0e7d5f4677a7"}, {"region_id":
"RegionOne", "url": "http://10.0.2.15:5000/v2.0", "region": "RegionOne",
"interface": "internal", "id": "763fef84e9bd43b58733813d5b1f29bb"}, {"region_id":
"RegionOne", "url": "http://10.0.2.15:5000/v2.0", "region": "RegionOne",
"interface": "public", "id": "d210b05177b24733b40146f7dcafdb90"}], "type":
"identity", "id": "8ae94fc3bb534ef2ae5bc16979e28eaf", "name": "keystone"}],
"extras": {}, "user": {"domain": {"id": "default", "name": "Default"}, "id":
"9644330bc62542c491179895c6a6d228", "name": "admin"}, "audit_ids": ["2h1Ass48TvKn
Oa4u3LR3HA"], "issued_at": "2015-08-27T21:57:58.249944Z"}}
Note
The actual response was trimmed down, since it included the full catalog with all endpoints. For readability, we opted to remove most endpoints in the catalog.
The Token value is set in the X-Subject-Token response header. For the next few examples we will show both CLI and cURL examples. To make the cURL examples easier, set OS_TOKEN to the value seen in X-Subject-Token.
$ OS_TOKEN=2511aaa898ff42158addea8c90ba2622
2.2.2 Listing Users
Using OpenStackClient
After running DevStack, several users will be created automatically. Generally, these are service accounts for other OpenStack services (Cinder, Glance, and Nova), an administrator account (admin), and a non-administrator account (demo).
$ openstack user list
+----------------------------------+--------+
| ID                               | Name   |
+----------------------------------+--------+
| 05a77e13219949c59368b99047b6be4b | cinder |
| 4da7bd7e25f34ea4aca792055f715fb8 | admin  |
| 8e30d2d495eb467b8b673fbdfb8be6c7 | glance |
| ae760d23927b467e910146e4e9f400c0 | nova   |
| f6ddb1f6568942cbb85fdbf441c45c05 | demo   |
+----------------------------------+--------+
Using cURL
The alternative would be to use a token and reach the correct API.
$ curl -s -H "X-Auth-Token: $OS_TOKEN" \
   http://localhost:5000/v3/users | python -mjson.tool
{
    "links": {
        "next": null,
        "previous": null,
        "self": "http://localhost:5000/v3/users"
    },
    "users": [
        {
            "domain_id": "default",
            "enabled": true,
            "id": "0aa473010af04acb86018125ef71a65e",
            "links": {
                "self": "http://localhost:5000/v3/users/0aa473010a...125ef71a65e"
            },
            "name": "glance"
        },
        {
            "domain_id": "default",
            "enabled": true,
            "id": "9644330bc62542c491179895c6a6d228",
            "links": {
                "self": "http://localhost:5000/v3/users/96443...91179895c6a6d228"
            },
            "name": "admin"
        },
        {
            "domain_id": "default",
            "enabled": true,
            "id": "ab7ab1f3fe2745fd91b3d62fd3b7309b",
            "links": {
                "self": "http://localhost:5000/v3/users/ab7a...d91b3d62fd3b7309b"
            },
            "name": "cinder"
        },
        {
            "domain_id": "default",
            "email": "demo@example.com",
            "enabled": true,
            "id": "c88b8fa1414e44be918e9e129f04147d",
            "links": {
                "self": "http://localhost:5000/v3/users/c88b8fa...8e9e129f04147d"
            },
            "name": "demo"
        },
        {
            "domain_id": "default",
            "enabled": true,
            "id": "cf15631f360c4db18fc95fe95da827f2",
            "links": {
                "self": "http://localhost:5000/v3/users/cf1563...fc95fe95da827f2"
            },
            "name": "nova"
        }
    ]
}
2.2.3 Listing Projects
Using OpenStackClient
Similar to users, DevStack also creates several projects by default. They can be seen by issuing the following command:
$ openstack project list
+----------------------------------+--------------------+
| ID                               | Name               |
+----------------------------------+--------------------+
| 10bc96bf62c14d44b02bb5ad8aef57d3 | admin              |
| 241d8b116a164bcb9c63d75117ed3894 | demo               |
| 81dc6de893924fbbbf16f272bdfba38d | invisible_to_admin |
| ebad3ef327c143bb8e79a52b9b0324e8 | service            |
+----------------------------------+--------------------+
Using cURL
Again, similar to the users API, a token is required and we need to reach the proper endpoint.
$ curl -s -H "X-Auth-Token: $OS_TOKEN" \
    http://localhost:5000/v3/projects | python -mjson.tool
{
    "links": {
        "next": null,
        "previous": null,
        "self": "http://localhost:5000/v3/projects"
    },
    "projects": [
        {
            "description": "",
            "domain_id": "default",
            "enabled": true,
            "id": "5f198c74b0984566b0a6da26440c5f85",
            "is_domain": false,
            "links": {
                "self": "http://localhost:5000/v3/projects/5f1...0a6da26440c5f85"
            },
            "name": "demo",
            "parent_id": null
        },
        {
            "description": "",
            "domain_id": "default",
            "enabled": true,
            "id": "9457bf6cb940453ab92a88219a40a3f7",
            "is_domain": false,
            "links": {
                "self": "http://localhost:5000/v3/projects/9457bf6cb9...9a40a3f7"
            },
            "name": "service",
            "parent_id": null
        },
        {
            "description": "",
            "domain_id": "default",
            "enabled": true,
            "id": "dcd882c878bd43188f9758831676559a",
            "is_domain": false,
            "links": {
                "self": "http://localhost:5000/v3/projects/dcd882c878...1676559a"
            },
            "name": "invisible_to_admin",
            "parent_id": null
        },
        {
            "description": "",
            "domain_id": "default",
            "enabled": true,
            "id": "ed50269971bc41ef9f25ce2c7e9b9d11",
            "is_domain": false,
            "links": {
                "self": "http://localhost:5000/v3/projects/ed5026997...c7e9b9d11"
            },
            "name": "admin",
            "parent_id": null
        }
    ]
}
2.2.4 Listing Groups
Using OpenStackClient
Similar to users, DevStack also creates two groups by default. Note that the users are not part of either group yet.
$ openstack group list
+----------------------------------+-----------+
| ID                               | Name      |
+----------------------------------+-----------+
| a95873d6a7f54dae90e53de3044b0964 | nonadmins |
| e27d8f1c492441888ea4b0a7e836a835 | admins    |
+----------------------------------+-----------+
Using cURL
As with the other commands, simply reuse the token and reach the proper endpoint.
$ curl -s -H "X-Auth-Token: $OS_TOKEN" \
   http://localhost:5000/v3/groups | python -mjson.tool
{
    "groups": [
        {
            "description": "openstack admin group",
            "domain_id": "default",
            "id": "5553cf58254746c8ba615b671dcdc5b2",
            "links": {
                "self": "http://localhost:5000/v3/groups/5553cf582...1dcdc5b2"
            },
            "name": "admins"
        },
        {
            "description": "non-admin group",
            "domain_id": "default",
            "id": "8a2e550b2edc4f76bae608e578becf5c",
            "links": {
                "self": "http://localhost:5000/v3/groups/8a2e550b2...8e578becf5c"
            },
            "name": "nonadmins"
        }
    ],
    "links": {
        "next": null,
        "previous": null,
        "self": "http://localhost:5000/v3/groups"
    }
}
2.2.5 Listing Roles
Using OpenStackClient
In a fashion similar to the previous commands, DevStack also creates a number of roles by default and assigns these roles to various users across the projects.
$ openstack role list
+----------------------------------+---------------+
| ID                               | Name          |
+----------------------------------+---------------+
| 03bdd6d46c2c4f99818bc855872a909e | service       |
| 4684cf02622f49dd82458852c62f4135 | Member        |
| 8a5dbcef99274f688effa338db6bf928 | anotherrole   |
| a22b737940ed4e7588639f1bcb3e3afa | admin         |
| b5e5224549574edf9ff2caebbda9431d | ResellerAdmin |
+----------------------------------+---------------+
Using cURL
Again, use a token and hit the correct endpoint.
$ curl -s -H "X-Auth-Token: $OS_TOKEN" \
   http://localhost:5000/v3/roles | python -mjson.tool
{
    "links": {
        "next": null,
        "previous": null,
        "self": "http://localhost:5000/v3/roles"
    },
    "roles": [
        {
            "id": "20cd9e77e2d44d3490d8c044f508c8f3",
            "links": {
                "self": "http://localhost:5000/v3/roles/20cd9e77e...044f508c8f3"
            },
            "name": "service"
        },
        {
            "id": "2d357899bd5c430988772eb861fb7a68",
            "links": {
                "self": "http://localhost:5000/v3/roles/2d357899b...eb861fb7a68"
            },
            "name": "admin"
        },
        {
            "id": "40df936c87824fd98b7e39da44f2dbde",
            "links": {
                "self": "http://localhost:5000/v3/roles/40df936c8...9da44f2dbde"
            },
            "name": "Member"
        },
        {
            "id": "d1e7fed5471941b9aeebf15a341edef9",
            "links": {
                "self": "http://localhost:5000/v3/roles/d1e7fed54...15a341edef9"
            },
            "name": "ResellerAdmin"
        },
        {
            "id": "face2e488b1c4562bc9f43f8a5e143db",
            "links": {
                "self": "http://localhost:5000/v3/roles/face2e488...3f8a5e143db"
            },
            "name": "anotherrole"
        }
    ]
}
2.2.6 Listing Domains
Using OpenStackClient
Keystone automatically has a single domain when it is brought up; this is to handle backwards compatibility between Identity API versions.
$ openstack domain list
+---------+---------+---------+----------------------------------------------+
| ID      | Name    | Enabled | Description                                  |
+---------+---------+---------+----------------------------------------------+
| default | Default | True    | Owns users and projects for Identity API v2. |
+---------+---------+---------+----------------------------------------------+
Using cURL
To list domains, use a valid token and hit the correct endpoint.
$ curl -s -H "X-Auth-Token: $OS_TOKEN" \
   http://localhost:5000/v3/domains | python -mjson.tool
{
    "domains": [
        {
            "description": "Owns users and projects for Identity API v2.",
            "enabled": true,
            "id": "default",
            "links": {
                "self": "http://localhost:5000/v3/domains/default"
            },
            "name": "Default"
        }
    ],
    "links": {
        "next": null,
        "previous": null,
        "self": "http://localhost:5000/v3/domains"
    }
}
2.2.7 Creating Another Domain
Using OpenStackClient
To get a better sense of v3 of the Identity API, let’s create a domain, and a project and user to be owned by that domain.
$ openstack domain create acme
+---------+----------------------------------+
| Field   | Value                            |
+---------+----------------------------------+
| enabled | True                             |
| id      | adf547d21ae148aa81c77b36b611d1c3 |
| name    | acme                             |
+---------+----------------------------------+
Using cURL
Here, we use a POST request with the minimal amount of information in the payload, just the domain name, and by default it’ll be enabled.
$ curl -s -H "X-Auth-Token: $OS_TOKEN" \
   -H "Content-Type: application/json" -d '{ "domain": { "name": "acme"}}'
   http://localhost:5000/v3/domains | python -mjson.tool
{
    "domain": {
        "enabled": true,
        "id": "05a0fcbf796142bfbeb30d0fd3dfa67a",
        "links": {
            "self": "http://localhost:5000/v3/domains/05a0fcbf796142b...d3dfa67a"
        },
        "name": "acme"
    }
}
2.2.8 Create a Project within the Domain
Using OpenStackClient
To create a project within the domain, we need to specify the domain we created in the previous step, and preferably, give it a fun description.
$ openstack project create tims_project \
  --domain acme \
  --description "tims dev project"
+-------------+----------------------------------+
| Field       | Value                            |
+-------------+----------------------------------+
| description | tims dev project                 |
| domain_id   | adf547d21ae148aa81c77b36b611d1c3 |
| enabled     | True                             |
| id          | 77941c6a73ed452eb65d36d7c962201c |
| is_domain   | False                            |
| name        | tims_project                     |
| parent_id   | None                             |
+-------------+----------------------------------+
Using cURL
Along with the name of the project, the payload of the POST request must also specify the domain ID, which can be found in the previous step. The description of the project is optional.
$ curl -s  -H "X-Auth-Token: $OS_TOKEN" \
    -H "Content-Type: application/json" \
    -d '{ "project": { "name": "tims_project", \
    "domain_id": "05a0fcbf796142bfbeb30d0fd3dfa67a", \
    "description": "tims dev project"}}' \
    http://localhost:5000/v3/projects | python -mjson.tool
{
    "project": {
        "description": "tims dev project",
        "domain_id": "05a0fcbf796142bfbeb30d0fd3dfa67a",
        "enabled": true,
        "id": "26436cea94ac4a40b890f05434f15aa4",
        "is_domain": false,
        "links": {
            "self": "http://localhost:5000/v3/projects/26436cea94ac4...434f15aa4"
        },
        "name": "tims_project",
        "parent_id": null
    }
}
2.2.9 Create a User within the Domain
Using OpenStackClient
To create a user within the domain, we need to specify the domain we created in the previous step. Setting a password and email for the user is optional, but encouraged.
$ openstack user create tim --email tim@tim.ca \
    --domain acme --description "tims openstack user account" \
    --password s3cr3t
+-------------+----------------------------------+
| Field       | Value                            |
+-------------+----------------------------------+
| description | tims openstack user account      |
| domain_id   | adf547d21ae148aa81c77b36b611d1c3 |
| email       | tim@tim.ca                       |
| enabled     | True                             |
| id          | a5db8e8e6a994e05afe94aa21c8c4ec8 |
| name        | tim                              |
+-------------+----------------------------------+
Using cURL
Similar to the previous cURL commands, the payload has to be structured correctly.
$ curl -s  -H "X-Auth-Token: $OS_TOKEN"  \
    -H "Content-Type: application/json"  \
    -d '{ "user": { "name": "tim", "password": "s3cr3t", \
    "email": "tim@tim.ca", "domain_id": \
    "05a0fcbf796142bfbeb30d0fd3dfa67a", "description": \
    "tims openstack user account"}}' http://localhost:5000/v3/users \
    | python -mjson.tool
{
    "user": {
        "description": "tims openstack user account",
        "domain_id": "05a0fcbf796142bfbeb30d0fd3dfa67a",
        "email": "tim@tim.ca",
        "enabled": true,
        "id": "6eced805da4649198dd1dd3bdddadd68",
        "links": {
            "self": "http://localhost:5000/v3/users/6eced805da4649198dd...dadd68"
        },
        "name": "tim"
    }
}
2.2.10 Assigning a Role to a User for a Project
Using OpenStackClient
To assign a role to the new user on the new project, we can use the CLI, but both the user and the project must be qualified with the right domain, or OpenStackClient will use the default domain.
$ openstack role add member --project tims_project --project-domain acme \
    --user tim --user-domain acme
Using cURL
The API for assigning a role is different than the previous commands; it uses PUT instead of POST, and only accepts IDs for the user, project and role.
$ curl -s -X PUT -H "X-Auth-Token: $OS_TOKEN" \
    http://localhost:5000/v3/projects/26436cea94ac4a40b890f05434f15aa4/users/6ece
d805da4649198dd1dd3bdddadd68/roles/40df936c87824fd98b7e39da44f2dbde
2.2.11 Authenticating as the New User
Using OpenStackClient
To authenticate as the new user, it’s best to start a new terminal session and create new environment variables. In this case, the user name, password, project, and domain information must all be set accordingly.
$ export OS_PASSWORD=s3cr3t
$ export OS_IDENTITY_API_VERSION=3
$ export OS_AUTH_URL=http://10.0.2.15:5000/v3
$ export OS_USERNAME=tim
$ export OS_PROJECT_NAME=tims_project
$ export OS_USER_DOMAIN_NAME=acme
$ export OS_PROJECT_DOMAIN_NAME=acme
Once that is set, we can try to retrieve a token to ensure our user is able to authenticate.
$ openstack token issue
+------------+----------------------------------+
| Field      | Value                            |
+------------+----------------------------------+
| expires    | 2015-08-22T05:26:02.385430Z      |
| id         | 59c60758f9f947a58289900c1f87b700 |
| project_id | 77941c6a73ed452eb65d36d7c962201c |
| user_id    | 26898b5d27114f90a1f57c5333e3e9b4 |
+------------+----------------------------------+
Using cURL
Similar to the authentication request of 2.2.1 Getting a Token, the structure of the payload remains the same, but the values must be updated. Again, for readability, we remove several of the endpoints from the service catalog.
$ curl -i -H "Content-Type: application/json" -d '                                                                                                                 { "auth": {
    "identity": {
      "methods": ["password"],
      "password": {
        "user": {
          "name": "tim",
          "domain": { "name": "acme" },
          "password": "s3cr3t"
        }
      }
    },
    "scope": {
      "project": {
        "name": "tims_project",
        "domain": { "name": "acme" }
      }
    }
  }
}' http://localhost:5000/v3/auth/tokens
HTTP/1.1 201 Created
Date: Thu, 27 Aug 2015 22:47:01 GMT
Server: Apache/2.4.7 (Ubuntu)
X-Subject-Token: 1bce8850bc6c4b9e8e90b6822885d93c
Vary: X-Auth-Token
x-openstack-request-id: req-a71ec134-60d8-4f86-8546-00877a48151f
Content-Length: 5326
Content-Type: application/json

{"token": {"methods": ["password"], "roles": [{"id": "4
0df936c87824fd98b7e39da44f2dbde", "name": "Member"}], "expires_at": "2015-08-27T2
3:47:01.322257Z", "project": {"domain": {"id": "05a0fcbf796142bfbeb30d0fd3dfa67a"
, "name": "acme"}, "id": "26436cea94ac4a40b890f05434f15aa4", "name": "tims_projec
t"}, "catalog": [{"endpoints": [{"region_id": "RegionOne", "url": "http://10.0.2.
15:35357/v2.0", "region": "RegionOne", "interface": "admin", "id": "19dfab5f51b24
dbe8cfc0e7d5f4677a7"}, {"region_id": "RegionOne", "url": "http://10.0.2.15:5000/v
2.0", "region": "RegionOne", "interface": "internal", "id": "763fef84e9bd43b58733
813d5b1f29bb"}, {"region_id": "RegionOne", "url": "http://10.0.2.15:5000/v2.0", "
region": "RegionOne", "interface": "public", "id": "d210b05177b24733b40146f7dcafd
b90"}], "type": "identity", "id": "8ae94fc3bb534ef2ae5bc16979e28eaf", "name": "ke
ystone"}], "extras": {}, "user": {"domain": {"id": "05a0fcbf796142bfbeb30d0fd3dfa
67a", "name": "acme"}, "id": "6eced805da4649198dd1dd3bdddadd68", "name": "tim"},
"audit_ids": ["rWvgwqBWSjq3sZgGWFNmVg"], "issued_at": "2015-08-27T22:47:01.322285
Z"}}
There are many, many more commands a user or administrator can perform; we suggest using openstack --help to find additional commands, or looking at OpenStackClient’s documentation.
2.3 Basic Keystone Operations Using Horizon
2.3.1 What Keystone Operations Are Available through Horizon?
There are various Keystone operations that are supported through Horizon, OpenStack’s Dashboard. However, depending on the version enabled in Horizon’s configuration file, there will be some differences. If v2 of the Identity API is enabled, then only User and Project CRUD support will be available, and users will only be able to authenticate against a single domain. If v3 of the Identity API is enabled, then User, Group, Project, Domain, and Role CRUD support will be made available, and users will be able to authenticate against multiple domains.
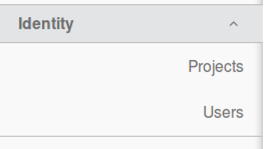
2.3.2 Accessing the Identity Operations
The Identity operations will appear in their own menu on the left-hand accordion.
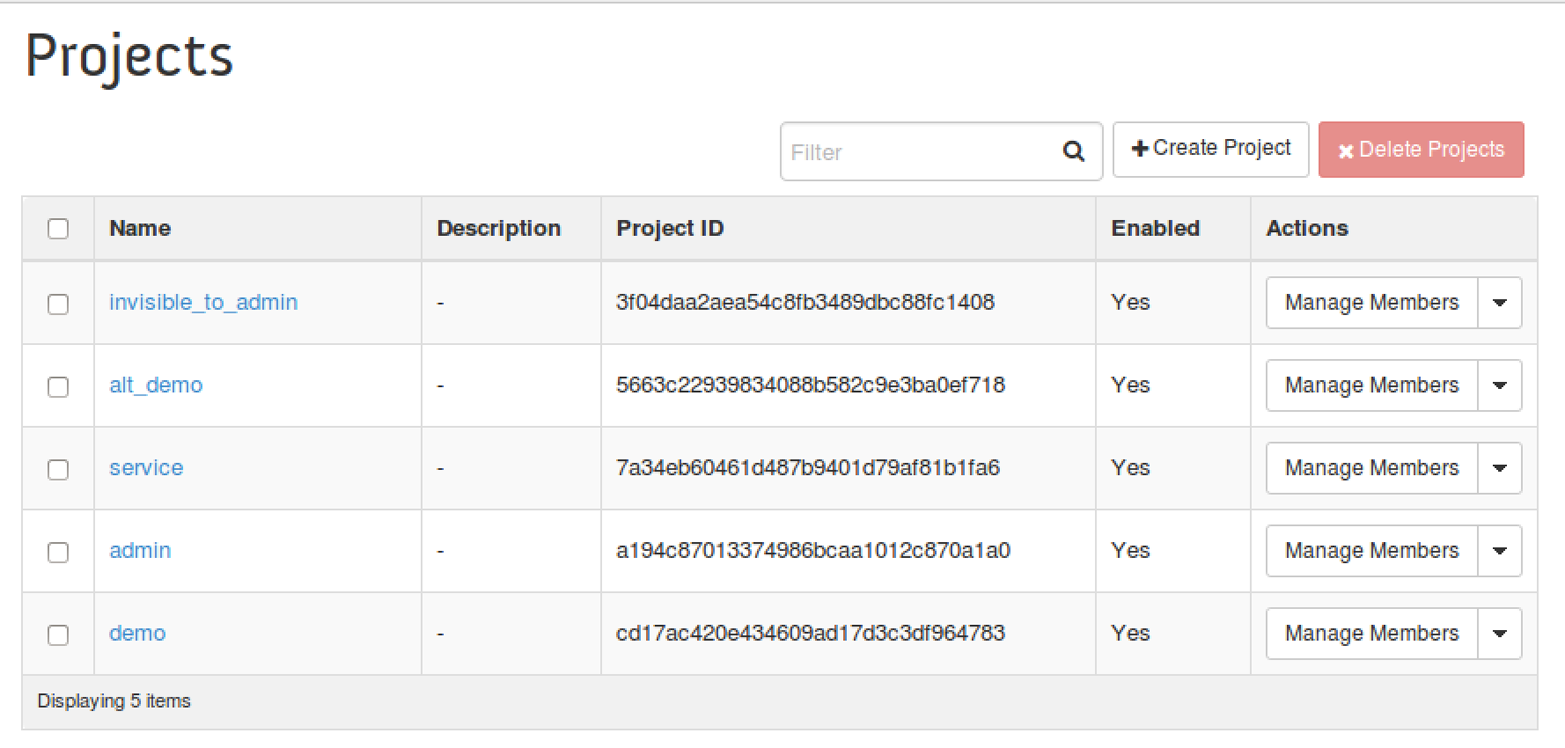
2.3.3 List, Set, Delete, Create, and View a Project
From Horizon, a user will be able to perform the same project-based command line operations.
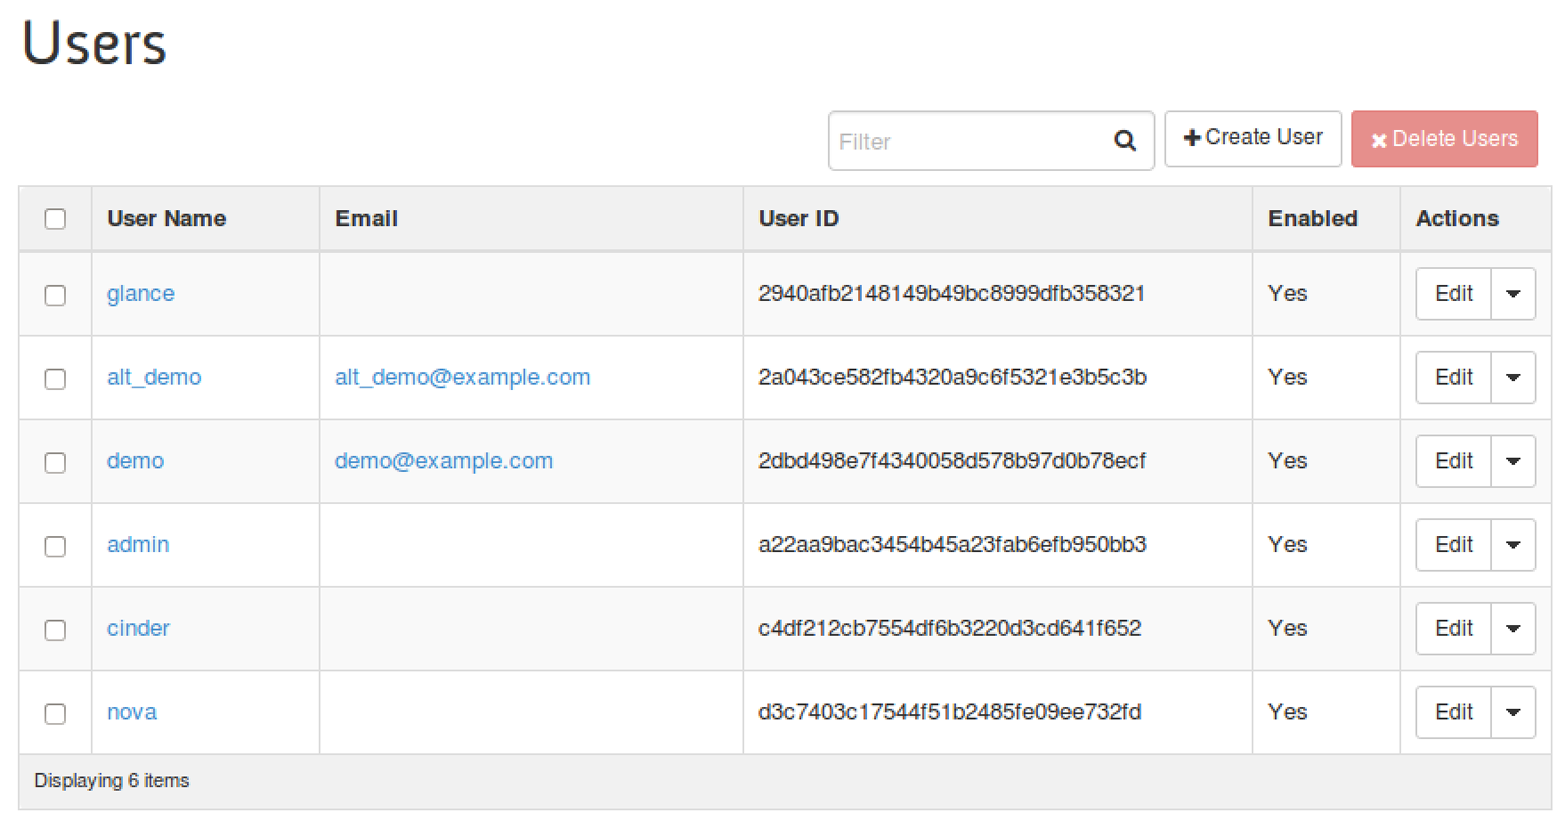
2.3.4 List, Set, Delete, Create, and View a User
From Horizon, a user will be able to perform the same user-based command line operations.
2.4 Tips, Common Pitfalls, and Troubleshooting
Check Your Scope: A Common Authentication Problem
Continuing from our previous example, with the non-admin account, suppose we incorrectly set the project’s domain. Let’s try to authenticate with that information and see what happens:
$ export OS_PROJECT_DOMAIN_NAME=Default
$ openstack token issue
ERROR: openstack Could not find project: tims_project (Disable debug mode to supp
ress these details.) (HTTP 401) (Request-ID: req-3aa6c248-325f-4f10-bc27-b4d85a2c
338b)
This error indicates that Keystone could not find the project in the specified domain. That’s because we created the project in the “acme” domain, and no project named “acme” exists in the default domain, yet. Using our admin account, let’s create a project with the same name in the default domain.
$ openstack project create tims_project
+-------------+----------------------------------+
| Field       | Value                            |
+-------------+----------------------------------+
| description |                                  |
| domain_id   | default                          |
| enabled     | True                             |
| id          | 07dd8005d0d94be7ac6cb1ccb181f436 |
| is_domain   | False                            |
| name        | tims_project                     |
| parent_id   | None                             |
+-------------+----------------------------------+
Now, going back to the non-admin account, let’s try to authenticate again.
$ openstack token issue
ERROR: openstack User 26898b5d27114f90a1f57c5333e3e9b4 has no access to project
07dd8005d0d94be7ac6cb1ccb181f436 (Disable debug mode to suppress these details.)
(HTTP 401) (Request-ID: req-b4b3048a-cf7a-453e-a5af-8ae8120e8fbf)
As you can see, the message is very different. The output indicates the project was found, but the user does not have a role on the project. That’s because we never added a role for the user on that project.
Getting Additional Information
The --debug option for OpenStackClient is very handy; it allows the user to see a lot of information about the request and response. Simply add --debug to any OpenStackClient command to enable this option.