 Nature Montage. (source: By Mary-Lynn on Flickr)
 Introduction
Computer Vision (CV) allows your Raspberry Pi to see things. In practical terms, this means that your Raspberry Pi can analyse an image, looking for items of interest and even recognizing faces and text.
If you link this with a camera to supply the images, then all sorts of possibilities open up.
Installing SimpleCV
Problem
You want to install SimpleCV Computer Vision software on your Raspberry Pi.
Solution
To install SimpleCV, run the commands below that first install the prerequisite packages using these commands:
$ sudo apt-get update
$ sudo apt-get install ipython python-opencv python-scipy
$ sudo apt-get install python-numpy python-setuptools python-pip
$ sudo pip install svgwrite
Then install SimpleCV itself using the command:
$ sudo pip install https://github.com/sightmachine/SimpleCV/zipball/master
Once installation is complete, you can check that everything worked by running the command below:
$ simplecv
+-----------------------------------------------------------+
 SimpleCV 1.3.0 [interactive shell] - http://simplecv.org
+-----------------------------------------------------------+
Commands:
    "exit()" or press "Ctrl+ D" to exit the shell
    "clear()" to clear the shell screen
    "tutorial()" to begin the SimpleCV interactive tutorial
    "example()" gives a list of examples you can run
    "forums()" will launch a web browser for the help forums
    "walkthrough()" will launch a web browser with a walkthrough
This will open the SimpleCV console. This is a Python console, with extra features for SimpleCV.
Discussion
SimpleCV is a Python wrapper around the OpenCV Computer Vision software. SimpleCV, as the name suggests, simplifies the use of OpenCV. If you want to unleash the full power of OpenCV then take a look at: http://opencv.org/
Computer Vision is both processor and memory intensive, so, although SimpleCV and OpenCV will work on an older Raspberry Pi, it can be frustratingly slow on anything less than a Raspberry Pi 3 or 2.
See Also
For information on OpenCV see http://opencv.org/.
The home page for the SimpleCV project is here: http://simplecv.org
The first recipe in this chapter to use SimpleCV is Counting Coins and you will find useful details for getting started with SimpleCV there.
Setting up a USB Camera for Computer Vision
Problem
You want to set-up a USB webcam for use in computer vision projects.
Solution
Use a USB webcam that is compatible with the Raspberry Pi (see http://elinux.org/RPi_USB_Webcams). Chose a good quality camera and if its a project where you need the camera close to the subject, select one that has a manual focus option. For getting really close to the subject, a low-cost USB endoscope can be useful.
Depending on your CV project, you may wish to set-up a well illuminated area for your CV project. Figure 1-1 shows a simple light box made from a translucent plastic storage box illuminated from the sides and top to give even illumination. The webcam is attached to a hole in the top of the box. This arrangement is used in Counting Coins.
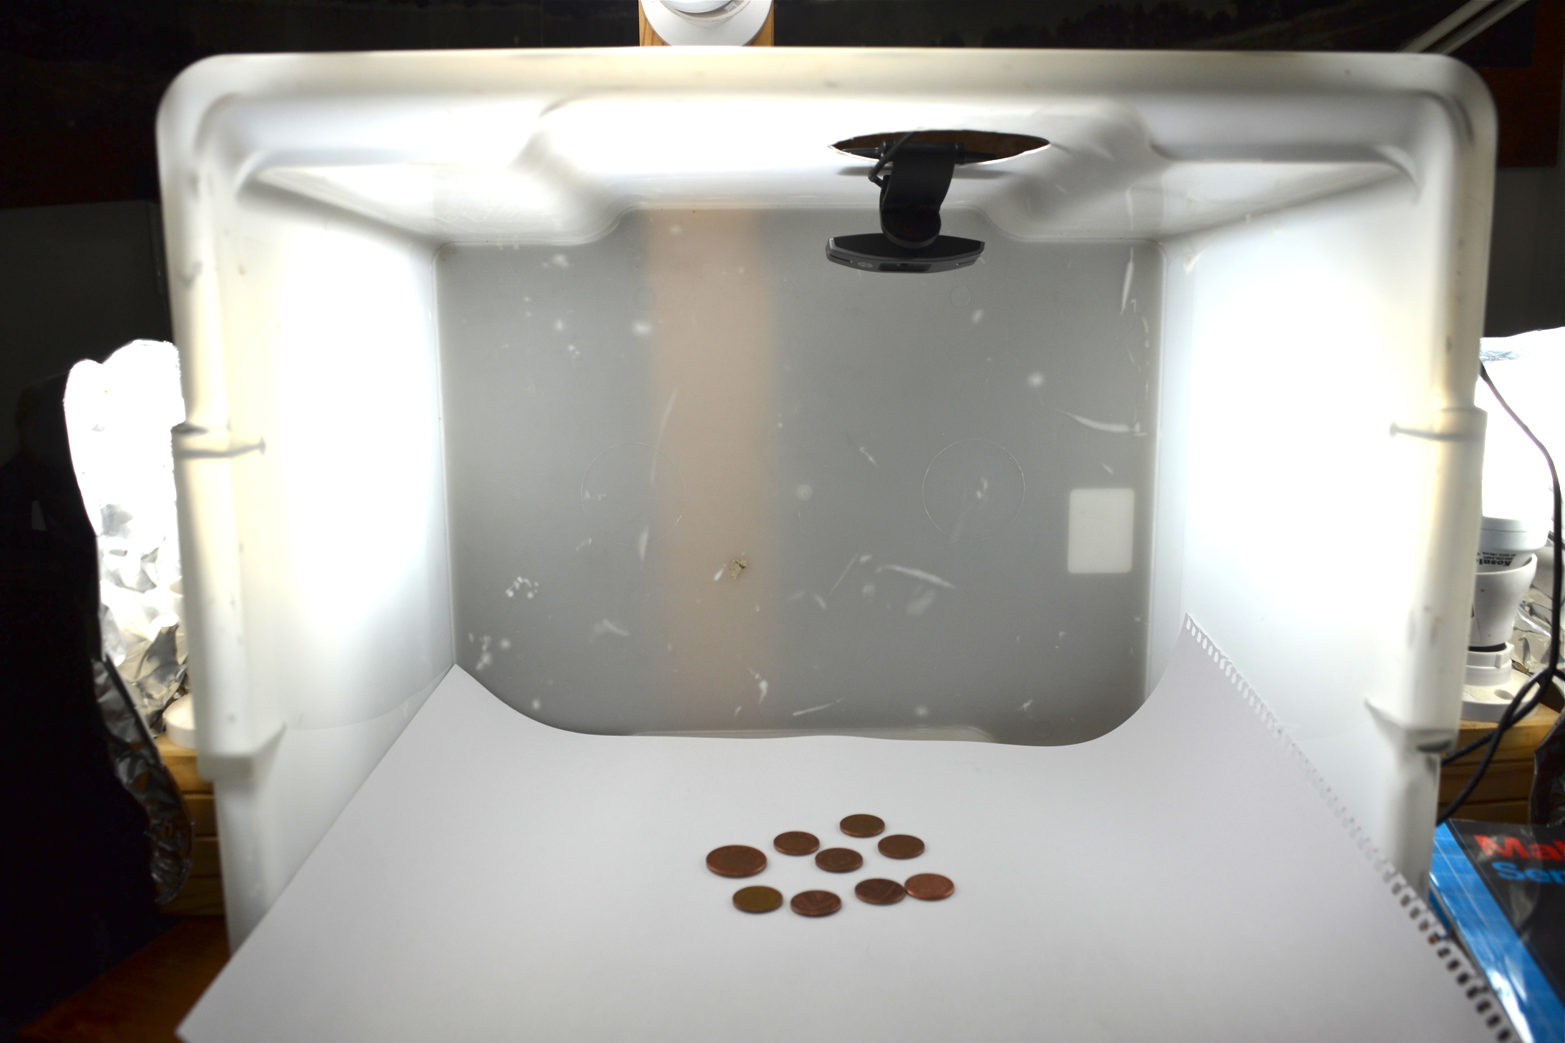
You can also buy commercial ‘light tents’ designed for photography, that work well.
You may need a little trial and error to get your system brightly and evenly illuminated. Shadows can be particularly problematic.
Discussion
You can test out your USB camera from the SimpleCV console. Start up SimpleCV and then enter the commands shown below in bold:
SimpleCV:1> c = Camera()
VIDIOC_QUERYMENU: Invalid argument
VIDIOC_QUERYMENU: Invalid argument
VIDIOC_QUERYMENU: Invalid argument
VIDIOC_QUERYMENU: Invalid argument
VIDIOC_QUERYMENU: Invalid argument
VIDIOC_QUERYMENU: Invalid argument
VIDIOC_QUERYMENU: Invalid argument

SimpleCV:2> i = c.getImage()
SimpleCV:3> i
SimpleCV:3: <SimpleCV.Image Object size:(640, 480), filename: (None), at memory location: (0x2381af8)>
SimpleCV:4> i.show()
Don’t worry about the ‘Invalid argument’ messages.
When you issue the command i.show() a second window will open up showing the image just captured from the camera.
Although you can use the Raspberry Pi Camera module (Using a Raspberry Pi Camera Module for Computer Vision) with SimpleCV it has a very short lead to the Raspberry Pi and you will probably find working with a high quality webcam better.
See Also
To use a Raspberry Pi Camera Module with SimpleCV see Using a Raspberry Pi Camera Module for Computer Vision.
Using a Raspberry Pi Camera Module for Computer Vision
Problem
You want to use a Raspberry Pi Camera Module that connects directly to your Raspberry Pi with Simple CV.
Solution
The Raspberry Pi Camera Module does not automatically show up as a camera device. The easiest way to make the module work with SimpleCV is to use the picamera Python module to capture an image with the camera.
The following code fragment will use picamera to capture an image save it to a temporary file and then load it as an Image suitable for use with SimpleCV.
import picamera
from SimpleCV import *

def get_camera_image():
    with picamera.PiCamera() as camera:
        camera.capture('tmp.jpg')
    return Image('tmp.jpg')
In Counting Coins the program assumes a USB webcam. A second version of the program using the function above for the Raspberry Pi camera module is also provided in the file coin_count_pi_cam.py.
Discussion
It may seem inefficient to write a file each time an image is captured, and indeed it is, but any processing that you apply to the image with SimpleCV on a Raspberry Pi is likely to take a lot longer than the time taken to load and save the image.
The picamera module allows you to set various features of the camera. Most usefully, you can control the resolution, automatic exposure and white-balance adjustments, that can make it easier to get consistent results with CV.
The native resolution of the camera is 2592×1944 which will make for pretty slow image processing, so you may want to set the resolution to say 1024×768 and turning auto-white balance off. The get_camera_image function can be modified to include those settings as below:
import picamera
from SimpleCV import *

def get_camera_image():
    with picamera.PiCamera() as camera:
        camera.resolution = (1024, 768)
        camera.awb_mode = 'off'
        camera.capture('tmp.jpg')
    return Image('tmp.jpg')
See Also
See not available for information on installing the Raspberry Pi camera module.
For information on the picamera Python module, see http://picamera.readthedocs.org/
To use a USB camera with SimpleCV see: Setting up a USB Camera for Computer Vision
Counting Coins
Problem
You want to use computer vision to count the number of coins under your webcam.
Solution
Use SimpleCV and its findCircle function to provide a real-time count of the number of coins placed under the webcam.
This is one use of CV where you really need good lighting and a camera fixed in position. I used the setup shown in Figure 1-1.
Before writing a Python program that will simply tell you the number of coins your Raspberry Pi can see, you need to experiment with the SimpleCV console to get the parameters for circle recognition right.
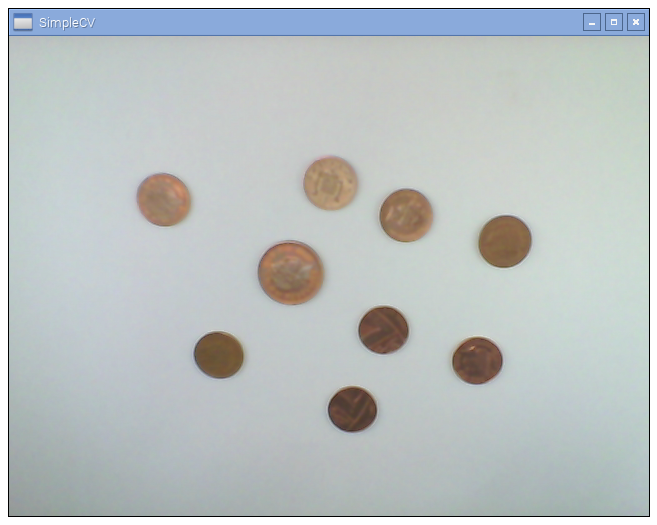
Start SimpleCV using the command simplecv and then enter the commands below to start the camera, capture an image and then display it in a separate window.
SimpleCV:1> c = Camera()
SimpleCV:2> i = c.getImage()
SimpleCV:3> i.show()
This should open up an image of your coins that looks something like Figure 1-2.
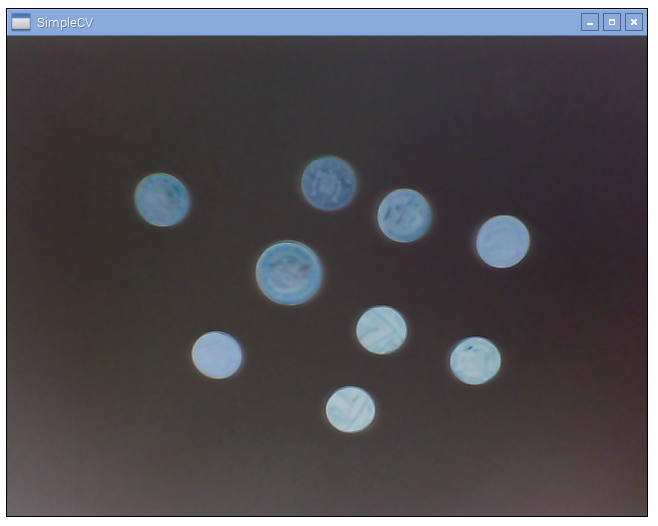
Circle detection needs the image to be inverted, or use a black background. To invert the image and then display it, run the commands below:
SimpleCV:4> i2 = i.invert()
SimpleCV:5> i2.show()
This command makes an inverted copy of i that looks like Figure 1-3.
Your image is now prepared, so the next step is to have SimpleCV search for circles using the findCircle command. This command takes three parameters that you will need to tune to prevent mis-identification. The parameters are:
- canny – this is the threshold for edge detection. In CV terms, an edge is the line between significant changes in the image pixel colors. The default for this parameter is 100 and if you decrease this value you will find more edges. This may not result in more circles being found because those extra edges may corrupt the good circle shapes. In the case of a coin , the edges may be writing or graphics on the coin.
- thresh – having found edges the circle detection then needs to decide which are strong enough to represent the circles. Decreasing this value will find you more circles.
- distance – this parameter sets the gap that there must be (in pixels) between adjacent circles.
Run the following command to find some circles:
SimpleCV:6> coins = i2.findCircle(canny=100, thresh=70, distance=15)
SimpleCV:7> coins
 SimpleCV.Features.Detection.Circle at (237,297),
 SimpleCV.Features.Detection.Circle at (307,323),
 SimpleCV.Features.Detection.Circle at (373,305),
 SimpleCV.Features.Detection.Circle at (305,261),
 SimpleCV.Features.Detection.Circle at (385,253),
 SimpleCV.Features.Detection.Circle at (243,231),
 SimpleCV.Features.Detection.Circle at (307,383),
 SimpleCV.Features.Detection.Circle at (407,371),
 SimpleCV.Features.Detection.Circle at (235,373)]
If you don’t get any coins back, try decreasing the canny and thresh parameters. If you get too many then increase thresh. We can check that SimpleCV is actually finding coins by superimposing the coin circles onto the original image using the following command.
SimpleCV:8> coins.draw(width=4)
SimpleCV:9> coins.show()
This will show the circles superimposed on the actual coins (Figure 1-4).
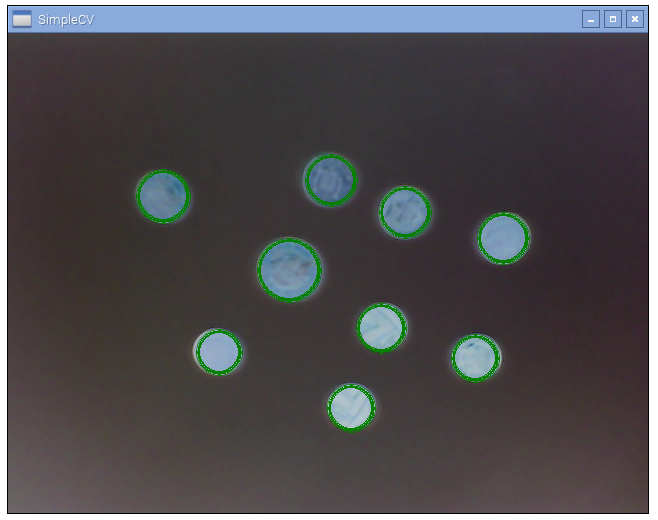
Try moving the coins around and adding and removing coins capturing another photo and repeating the steps above, to make sure things are reliable, tweaking the parameters until you get good results.
We can bundle up the commands that we used in the SimpleCV console into a Python program that will (as fast as the Raspberry Pi can) print out the number of coins detected. The program can be found with the other downloads for the book in the file named coin_count.py.
from SimpleCV import *

c = Camera()

while True:
    i = c.getImage().invert()
    coins = i.findCircle(canny=100, thresh=70, distance=1)
    print(len(coins))
After importing the SimpleCV library the commands are the same as you typed into the console. The only difference is that rather than displaying the coins, the len function is used to display the count.
$ sudo python count_coins.py
9
9
9
10
10
Try adding a coin and moving the coins around to see how well the project works.
Discussion
After the initial delay while the library loads and the camera is set up, I found I could get about two ‘countings’ per second using a Raspberry Pi B+. Using a Rspberry Pi 2 this increased to about 5 readings per second.
Although not something that you would want to put into a vending machine, it would be an interesting project to use the diameter of the coins to identify their monetary value and add up the value of the coins on the table.
You can access the diameter by using the diameter method on one of the coins like this:
SimpleCV:10> coins[0].diameter()
SimpleCV:11> 60
See Also
For information on installing SimpleCV see Installing SimpleCV and on setting up a camera, see Setting up a USB Camera for Computer Vision.
Face Detection
Problem
You want to find the coordinates of faces in a photograph or webcam image.
Solution
Use the Haar-like feature detection in SimpleCV to analyze an image and pick out the faces.
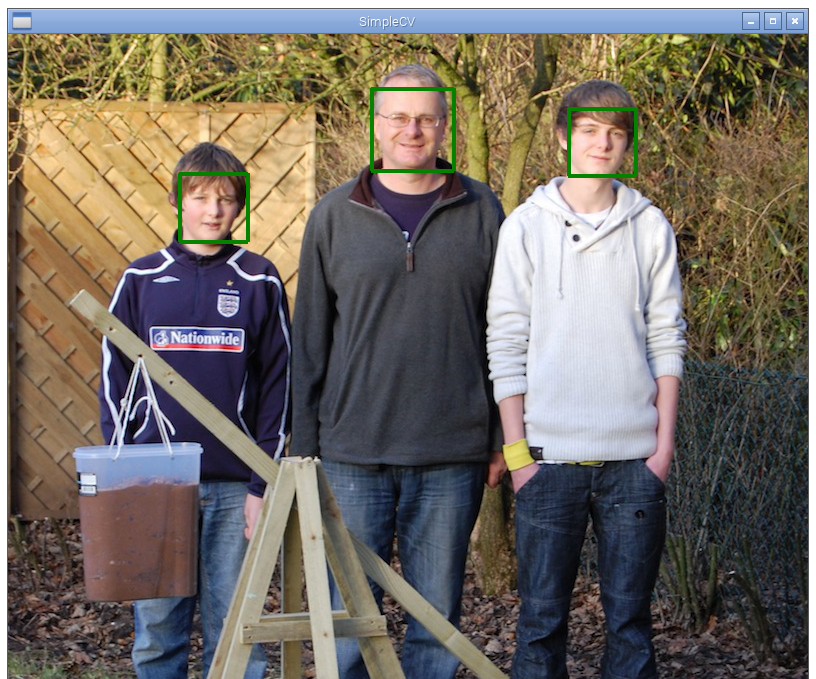
If you have not already done so, then install SimpleCV see Installing SimpleCV. Open the SimpleCV console and load up an image containing faces. You will find a suitable file with the downloads for the book called ‘faces.jpg’. Then run the commands below:
SimpleCV:1> i=Image("faces.jpg")
SimpleCV:2> faces = i.findHaarFeatures('face.xml', min_neighbors=5)
SimpleCV:3> faces.draw(width=4)
SimpleCV:4> i.show()
This will open up the image viewing window with the faces marked with rectangles as shown in Figure 1-5.
Discussion
As well as interfacing with a camera, you can also load existing files into SimpleCV. In the example above, the image i is loaded from the file ‘faces.jpg’. The method findHaarFeatures has one mandatory file, which is the type of feature that is being searched for. These features are called ‘haar’ features and are described by an XML file. SimpleCV comes preloaded with some of these files, but you can also find more specific haar files on the Internet.
The second parameter used in this example (min_neighbors) will tune the harr function. Decreasing min_neighbors will increase the number of false positives. When you see the false positives, they often have a faceish element to them (mouth nose and eyes).
There are many built-in haar features. You can list them all using the command:
SimpleCV:5> i.listHaarFeature()
SimpleCV:4> fullbody.xml', 'face4.xml', 'face.xml',
'upper_body.xml', 'right_ear.xml', 'eye.xml', 'lower_body.xml',
'two_eyes_small.xml', 'nose.xml', 'face2.xml', 'lefteye.xml',
'right_eye.xml', 'two_eyes_big.xml', 'face3.xml', 'mouth.xml',
'glasses.xml', 'profile.xml', 'left_ear.xml', 'left_eye2.xml',
'upper_body2.xml', 'right_eye2.xml', 'face_cv2.xml'
As you can see, they are all associated with parts for the body.
Finding harr features takes a few seconds even on a Raspberry Pi 3.
See Also
For information on installing SimpleCV see Installing SimpleCV and on setting up a camera, see Setting up a USB Camera for Computer Vision.
For a whole load of interesting Haar files, take a look at https://github.com/Itseez/opencv/tree/master/data/haarcascades.
Motion Detection
Problem
You want to use a camera connected to your Raspberry Pi to detect something moving in its field of view.
Solution
Use SimpleCV to detect changes between successive frames from the camera.
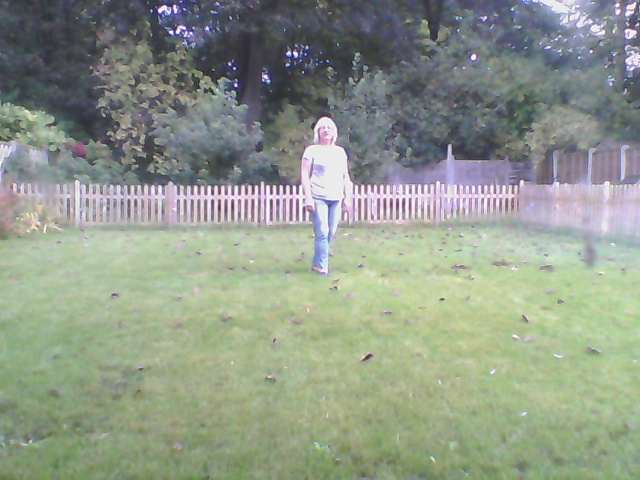
The program below compares each image captured to the previous image. It then detects any blobs (areas of similar color) in the difference image and if there are any larger than MIN_BLOG_SIZE then it prints out a message saying that movement was detected.
from SimpleCV import *

MIN_BLOG_SIZE = 1000

c = Camera()

old_image = c.getImage()

while True:
    new_image = c.getImage()
    diff = new_image - old_image
    blobs = diff.findBlobs(minsize=MIN_BLOG_SIZE)
    if blobs :
        print("Movement detected")
    old_image = new_image
Discussion
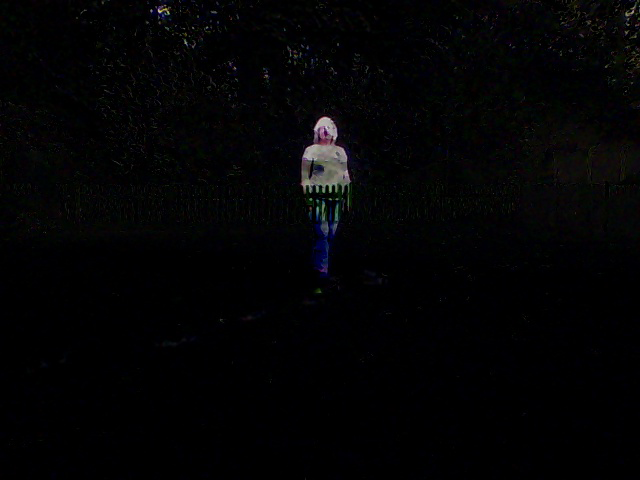
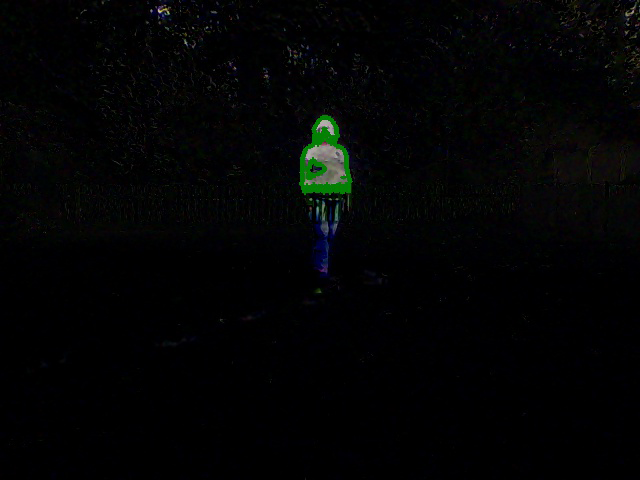
Successive frames of the image might look like Figure 1-6 and Figure 1-7. When the first image is subtracted from the first, the resulting image will look like Figure 1-8. Running blob detection on it will result in the outlined blobs shown in Figure 1-9.

Using a Raspberry Pi 2 the motion detection program above will process about 5 frames per second.
See Also
For information on installing SimpleCV see Installing SimpleCV and on setting up a camera, see Setting up a USB Camera for Computer Vision.
An alternative way to detect movement is to use a PIR (Passive Infrared) sensor: not available
Optical Character Recognition
Problem
You want to be able to convert an image containing text to actual text.
Solution
Use the tesseract OCR (Optical Character Recognition) software to extract text from the image.
To install tesseract, run the following commands:
$ sudo apt-get install python-distutils-extra tesseract-ocr tesseract-ocr-eng libopencv-dev libtesseract-dev libleptonica-dev python-all-dev swig libcv-dev python-opencv python-numpy python-setuptools build-essential subversion
$ sudo apt-get install tesseract-ocr-eng tesseract-ocr-dev libleptonica-dev python-all-dev swig libcv-dev
$ sudo svn checkout http://python-tesseract.googlecode.com/svn/python-tesseract-0.7.4/
$ cd python-tesseract-0.7.4
$ sudo python setup.py build
$ sudo python setup.py install
To try out tesseract, you will need an image file that contains some text. You will find one called ‘ocr_example.png’ with the downloads for the book.
To convert the image to text, run the command:
$ tesseract ocr_example.png found
Tesseract Open Source OCR Engine v3.02 with Leptonica
$ more found.txt
The quick brown fox jumped over
the lazy dogs back.
$
Discussion
The tesseract library will work with most image types, including PDF, PNG and JPG files.
See Also
For more information on the tessaract library see https://github.com/tesseract-ocr/tesseract/wiki/TrainingTesseract