
 Photo montage. (source: Pixabay)
 Recently, I set out to install a doorbell in my new house and thought: why doesn’t my doorbell tell me who is at the door?
Most of my DIY projects end up costing more than the equivalent product, even if I value my time at $0 per hour. Something about supply chains and economies of scale, I guess. (But I have way more fun making things myself.) In the course of this project, I built a door camera that is not only way cheaper than my Dropcam, but it has some genuinely useful features that, for some reason, aren’t available on the market yet.
Here’s what we’re going to build: a $60 Raspberry Pi-powered security camera setup that takes pictures, posts them to the cloud, and then does face recognition. You could also stream the data to Amazon S3, making it a full-fledged Dropcam replacement. While Nest charges $100 a year for keeping the last 10 days of video footage, you could keep a year of camera footage in S3 for around $20. If you used Amazon Glacier, that cost would go down to around $4.
Machine learning with Amazon Rekognition
This tutorial will focus on the machine learning part—using Amazon’s new Rekognition service to do face recognition on your guests, and send that to your Amazon Echo so you will always know who’s at your door. In order to build a reliable service, we’ll also make use of one of Amazon’s coolest and most useful products: Lambda.
Ingredients:
Amazon Echo Dot ($50)
Raspberry PI V3 ($38) (This project would also work with a Pi v2 and USB Wifi)
Raspberry PI-Compatible Camera ($16)
Raspberry Pi Case ($6)
16GB SD Card ($8)
Total: $118
We will use Amazon’s S3, Lambda, and Rekognition services for the face matching. These services are free to get started, and you can recognize thousands of people at your door every month for pennies.
Setting up the Raspberry Pi
If you’ve done any of my other Raspberry Pi tutorials, much of this will be familiar.
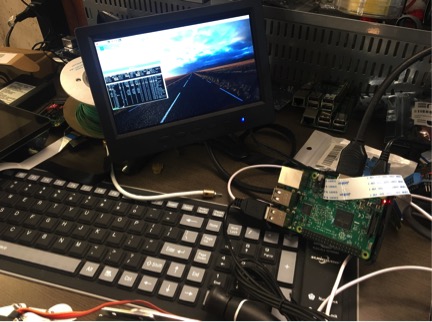
First, download Noobs from the Raspberry Pi Foundation and follow their setup instructions. This mainly involves copying Noobs onto an SD card and then plugging the SD card into your Pi. Then plug a mouse, keyboard, and monitor into your Pi and follow the setup instructions, which have gotten much more accessible since the launch of Pixel, the new desktop environment.
Next, change the name of your Pi to something you can remember, so you can SSH into it. There’s good instructions for this on howtogeek—you need to modify the /etc/hosts and /etc/hostname files and give your Pi a name. I like to name all of my security camera Raspberry Pi after characters on my favorite TV show, “It’s Always Sunny in Philadelphia,” so I named my front door camera “Dennis.” That means I don’t need to remember an IP address, and I can SSH to dennis.local at all times, even if my router gets reset.
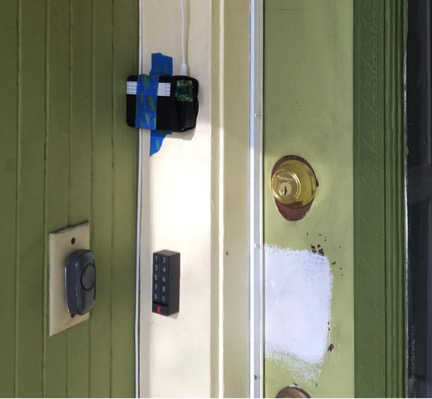
Next, you should attach your Raspberry Pi Camera to your PI. Remember, the tape should face the Ethernet jack—I’ve probably Googled that a hundred times by now. Note: you might want to buy a wide-angle camera for a bigger field of view; you also might want to buy an infrared camera to add night vision.
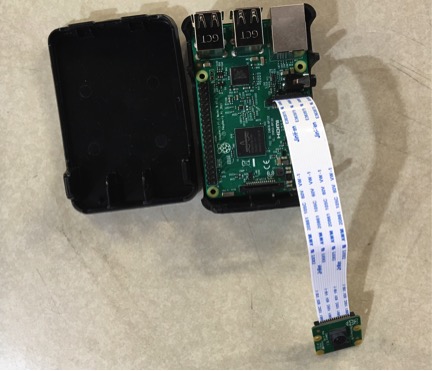
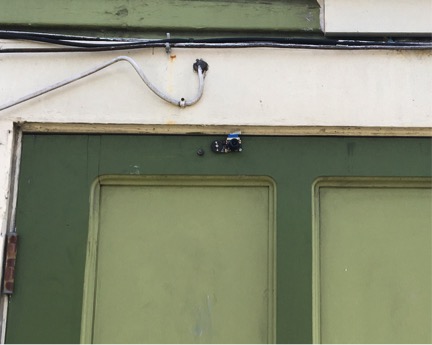
You also probably want to put this whole contraption in a case to protect it from the weather. You’re also going to need to connect the Pi to power, through a micro USB cable. (I had already drilled a small hole to connect my Dropcam to an indoor power outlet, so I had a USB cable sitting in the right spot.)
I’ve actually installed a couple of these around the house at this point. The camera ribbon cable is so thin, you can potentially mount the Pi inside and slide the cable over the door like I did from my laboratory (garage).
Next, you need to install RPi-Cam-Web-Interface. This is a really useful piece of software that serves up a continuous stream from the Pi camera over http. Follow the installation instructions and choose NGINX for your webserver. There is a really useful configuration file at /etc/raspimjpeg where you can change a ton of stuff.
Setting up Amazon S3 and Amazon Rekognition
If you haven’t created an AWS account, you need to do that now. You should create an IAM user and give that user access to S3, Rekognition, and Lambda (we’ll use Lambda later).
Install the AWS command line interface with:
sudo apt install awscli
Set your region to US-East (as of the time of writing this article, Rekognition is only available there).
Create a face recognition group:
aws create-collection –collection-id friends
You can add your friends’ faces with a quick unix shell script I wrote:
aws s3 cp $1 s3://doorcamera > output
aws rekognition index-faces \
  --image "{\"S3Object\":{\"Bucket\":\"doorcamera\",\"Name\":\"$1\"}}" \
--collection-id "friends" --detection-attributes "ALL" \
--external-image-id "$2"
Either copy that into a file and use as a shell script, or type it into a command line and replace $1 with the local filename of a picture of your friend, and $2 with the name of your friend.
Amazon’s Rekognition service uses machine learning to find distances between points on a face, and then uses those points to match people in its index, so you can train the system with just one picture of a friend and it’s likely to work well.
Now you can test out that face recognition with a similar script:
aws s3 cp $1 s3://doorcamera > output
aws rekognition search-faces-by-image --collection-id "friends" \
--image "{\"S3Object\":{\"Bucket\":\"doorcamera\",\"Name\":\"$2\"}}"
You will get back a big JSON, with not just the match, but other aspects of the picture, including gender, emotion, facial hair, and a bunch of other interesting stuff:
{
     "FaceRecords": [
    {
          "FaceDetail": {
               "Confidence": 99.99991607666016,
               "Eyeglasses": {
                     "Confidence": 99.99878692626953,
                     "Value": false
               },
               "Sunglasses": {
                     ...
Next, we can write a python script to pull down an image from our Raspberry Pi camera and check for faces. I actually used a second Raspberry Pi to do this, but running on a single machine is even easier. Just look at /dev/shm/mjpeg/cam.jpg and you will find an image file that corresponds to what the camera is seeing.
Either way, we need to expose this functionality in a webserver for later. I used Flask as my webserver:
from flask import Flask, request
import cameras as c
app = Flask(__name__)

@app.route('/faces/<path:camera>')
def face_camera(camera):
     data = c.face_camera(camera)
     return ",".join(data)

if __name__ == '__main__':
     app.run(host='0.0.0.0', port=5000)
I put the parsing code (and all the other code mentioned here) at github.com/lukas/facerec.
If you’ve gotten this far, you have something that’s really fun to play with. I found that Amazon’s service was excellent at recognizing my friends. The only place it seemed to have a lot of trouble was recognizing my emotions (although that might say more about me than Amazon).
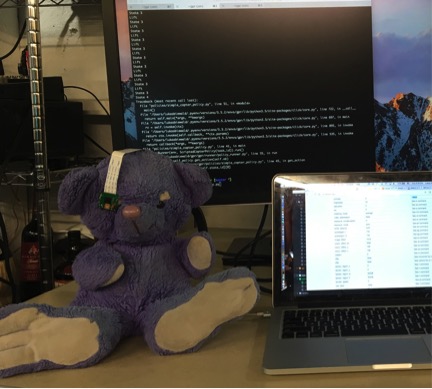
I actually sewed one of these into a stuffed animal and made a very creepy face-recognizing Teddy Bear sentry that lives on my desk.
Making the face recognition camera work with Amazon Echo
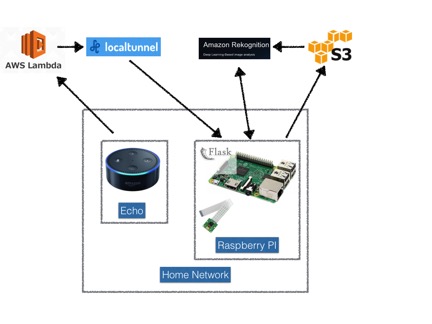
Amazon’s Echo makes high-quality voice commands really easy and is the perfect interface for this kind of project. Unfortunately, the best way to use the Echo is to have it talk directly to a stable webservice, but we want to keep our Pi camera on the local network behind our router’s firewall—this makes the setup a little tricky.
We’re going to have the Echo connect to an AWS Lambda service, which then talks to our Raspberry Pi through an SSH Tunnel. This might feel a little convoluted, but it’s the easiest way to do it.
Exposing our HTTP face-recognizing API through an SSH Tunnel
At this point, we’ve built a little webapp that does face recognition, and we need to make it accessible to the outside world. If we had a webserver somewhere, we could setup an SSH tunnel, but there’s a sweet little app called localtunnel that does everything for us. You can install it easily with:
npm install -g localtunnel
I like to wrap it with a little script that keeps it alive in case it goes down. Change MYDOMAIN to something meaningful to you:
until lt --port 5000 -s MYDOMAIN; do
            echo 'lt crashed... respawning...'
            sleep 1
done
Now you can ping your server with a call to http://MYDOMAIN.localtunnel.me.
Creating an Alexa skill
To hack our Echo, we need to create a new Alexa skill. Amazon has a good guide on getting started, or you can go directly to the Alexa Developer Portal.
First, we need to setup an intent:
{
  "intents": [
          {
     "intent": "PersonCameraIntent",
     "slots": [
    {
          "name": "camera",
          "type": "LIST_OF_CAMERAS"
    }
     ]
     }]}
And then we give Alexa some sample utterances:
PersonCameraIntent tell me who {camera} is seeing
PersonCameraIntent who is {camera} seeing
PersonCameraIntent who is {camera} looking at
PersonCameraIntent who does {camera} see
Next, we need to give Alexa an endpoint, and for that we are going to use a Lambda function.
Setting up a Lambda function
If you’ve never used a Lambda function, you’re in for a treat! Lambda functions are a simple way to define a consistent API for a simple function on Amazon’s servers, and you only pay when it’s invoked.
Alexa skills are a perfect use case for Lambda functions, so Amazon has already set up a template for Alexa skills that you should use. When Alexa matches one of the PersonCameraIntents that we listed, it will call our Lambda function. Change MYDOMAIN to the domain you used with your localtunnel script, and everything should work great.
You can also use other fun bits of the metadata that Amazon Rekognition sends you—for example, it makes a guess at the face’s emotion, so I pass that along to tell if I have a happy guest or an angry guest at my door. You could also have the Echo tell you if your guest has a mustache, sunglasses, and a bunch of other features:
def face_camera(intent, session):
     card_title = "Face Camera"
     if 'camera' in intent['slots']:
    robot = intent['slots']['camera']['value']
    try:
          response = urlopen('http://MYDOMAIN.localtunnel.me/faces/%s' % robot)
          data = response.read()
          if (data== "Not Found"):
               speech_output = "%s didn't see a face" % robot
          else:
               person, gender, emotion = data.split(",")
               if person == "" or person is None:
                     speech_output = "%s didn't recognize the person, but " % robot
               else:
                     speech_output = "%s recognized %s and " % (robot, person)
               if gender == "Male":
                     speech_output += "he "
               else:
                     speech_output += "she "

               speech_output += "seems %s" % emotion.lower()

    except URLError as e:
          speech_output = "Strange, I couldn't wake up %s" % robot
    except socket.timeout, e:
          speech_output = "The Optics Lab Timed out"

     else:
speech_output = “I don’t know what robot you’re talking about”
     should_end_session = False
     return build_response({}, build_speechlet_response(
    card_title, speech_output, None, should_end_session))
When you talk to Alexa, it actually parses your speech to find an intent, and runs a Lambda function, which calls an external server, which tunnels into your raspberry pi, which gets an image from its camera, which it uploads to S3, and then runs a deep learning inference algorithm on it to match it against your friend’s face, and then sends the results back to your Pi, which then parses the results and sends them to your Echo, which then talks to you…but the whole thing happens amazingly fast! To witness this yourself, check out my video:
You can take this same technology and apply it/extend it in a lot of cool ways. For example, I put the same code on my robots from my robot Pi/Tensorflow project, and now they can all talk to me and tell me what they’re seeing. I was also thinking of connecting the Pi to my August lock using this GitHub project, so that my door would automatically open for my friends or automatically lock if an angry looking person is at the door.