Chapter 4. Automated Dependency Injection
You may well have heard of Dependency Injection—there’s a certain buzz around the term that has been moving through the ActionScript community for the last couple of years. It’s one of those terms that sounds like it must be really sophisticated and complex, but actually turns out to be a fancy name for a simple concept that you already understand how to use.
This doesn’t mean that it’s not powerful and interesting, but, as with most design patterns, it’s the neat capturing of an idea that many programmers encounter on their own into a single specific term—‘Dependency Injection’—that is most useful. You were probably already doing it; now you’ll have a more pithy way of referring to it.
So, what exactly is Automated Dependency Injection?
First of all, it’s worth knowing that Dependency Injection—also known as DI—is a complicated name for something you’ve been doing since the first time you passed a parameter to a function.
A dependency is just a requirement to use another object
If the UserXMLLoader class needs to be passed a
loadScriptPath:String of the url from
which to load its data, this is a dependency:
public function UserXMLLoader( loadScriptPath:String )
You can fulfil a dependency in three different ways
When an instance of one class needs to use an instance of another class, you can support this relationship (fulfil the dependency) in various ways:
You can create a new instance of a class within the object that is dependent on it
You can use the locator pattern to pull a pre-existing instance of the dependency into the class that is dependent on it. This decouples your dependent class from knowing how to construct the class it’s dependent on. But of course your class is now dependent on the locator too
You can ‘manually inject’ it. Inject in this situation really just means ‘create it somewhere else and give it directly to the dependent object’
You already use Dependency Injection
Any time you do any of these, you’re using DI:
Constructor injection
public class UserXMLLoader
{
    // declares the dependency in the constructor
    public function UserXMLLoader( loadScriptPath:String )
    {
    }
}

// the dependency is fulfilled at instantiation:
var userXMLLoader:UserXMLLoader = new UserXMLLoader(remoteScriptPath);
Public property injection
public class UserXMLLoader
{
    // declares the dependency as a public property
    public var loadScriptPath:String;
}

var userXMLLoader:UserXMLLoader = new UserXMLLoader();

// dependency is fulfilled by setting a public property after instantiation:
userXMLLoader.loadScriptPath = remoteScriptPath;
Setter method injection
public class UserXMLLoader
{
    protected var _loadScriptPath:String;

    public function UserXMLLoader( )
    {
    }

    // declares the dependency through a property setter
    public function setLoadScriptPath(value:String):void
    {
        _loadScriptPath = loadScriptPath;
    }
}

// dependency is fulfilled by setting a protected property after instantiation
// via a setter method:
var userXMLLoader:UserXMLLoader = new UserXMLLoader();
userXMLLoader.setLoadScriptPath(remoteScriptPath);
There are different ways to inject dependencies
So, if we’re all doing DI already, why the buzz about it? The truth is that injecting dependencies is trivial in a small example, but quickly becomes tiresome in a large application—tending to result in a lot of ‘pass the parcel’ code where objects are holding on to properties they’re not really interested in, simply so that they can ‘inject’ them into other objects they create or interact with.
Configuration, cooperation and communication related dependencies are key to the responsibilities of the class—you could say that these are ‘real’ dependencies. Pass the parcel dependencies could be said to be ‘artificial’ dependencies. If objectA needs to use objectB, and objectB requires objectC for configuration, this imposes an artificial dependency (on C) on objectA.
This particular problem is the one we’re usually seeking to avoid when we resort to using statics and globals as property holders in our code, or use an object locator pattern. Solving dependency-chain problems in this way is really just a case of shuffling the problem from place to place, sacrificing something in return for each solution.
Statics and globals make code rigid, brittle, hard to test, and prone to memory leaks
Static properties and methods have their place—nobody would argue
that a function that finds prime factors isn’t a good use of static—but
when we use statics to hold state we make big sacrifices in other areas.
We can easily use a static value to configure the UserXMLLoader, but now
it’s hard to test how the class responds to connection failures or bad
responses from the script. We also couple the UserXMLLoader to the AppConfig—when really it
only wants to know about the script path.
public class UserXMLLoader
{
    protected var _loadScriptPath:String;

    public function UserXMLLoader()
    {
        // pulls the dependency through a static reference
        _loadScriptPath = AppConfig.loadScriptPath;
    }
}

public class AppConfig
{
    public static const loadScriptPath:String = 'http://sample.com/userXML.php';
}
Locator patterns push extra responsibilities on your classes
Even if you avoid using a static instance for the object that can supply your classes with what they need, it’s still a big imposition on a class to require it to do not just its job but also know how to get all the things it needs to do its job.
It’s tempting to imagine that we can ‘just’ use a common base class to quickly roll this functionality into many classes across our codebase and keep it maintained in one place, but this is a really bad place to make inheritance decisions from! And what about inevitable common super/subclasses that don’t need this functionality but are part of the inheritance chain?
Surely there has to be a better way?
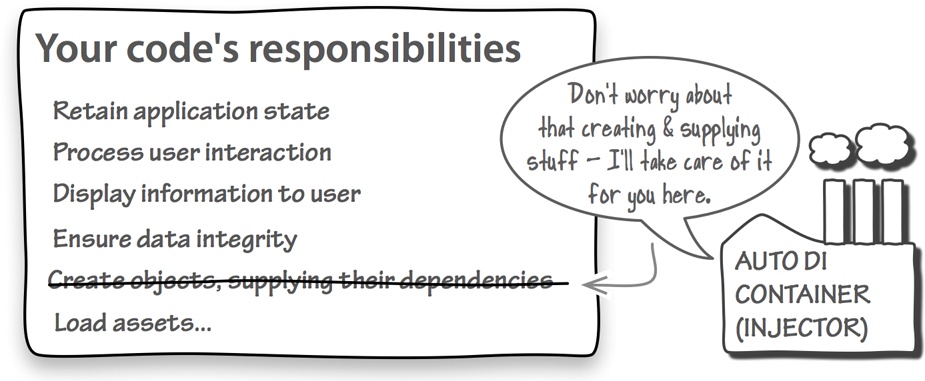
Automated DI gets around the need to ‘pass the parcel’, but keeps code flexible
The intention behind automated DI containers is to abstract the fulfilment of dependencies from the application itself. Essentially, we split this job out completely, so that the application code no longer has to do it, and instead we ask a third party—the DI container—to get it done.
This reduction of responsibilities for your own code is a plus, but there’s another advantage: being able to type your dependencies against interfaces instead of concrete types.
A getInstance() singleton always requires you
to be dependent on a concrete class. For example, even if UserXMLLoader implements an
IUserLoader
interface, the XMLUserLoadingService has to use the actual
class, and not the interface, in order to access the static getInstance method:
public class XMLUserLoadingService implements IUserLoadingService
{
   //We are stuck with the UserXMLLoader 'forever'
   private var userXMLLoader:IUserLoader = UserXMLLoader.getInstance();

   public function loadAllUsers():void
   {
       userXMLLoader.loadAll();
   }
}
With Robotlegs Automated DI, we can declare a particular dependency
in a class, and configure our application (through our context) to know
how to fulfil that dependency: which concrete class to inject against an
interface for example. In this example, IUserLoader might be fulfilled by XmlUserLoader, JsonUserLoader or even
DummyUserLoader:
public class LoadUserCommand
{
   //We can swap out our IUserLoader implementations easily.
   [Inject]
   public var userLoader:IUserLoader;

   public function execute():void
   {
       userLoader.loadAll();
   }
}
How does Robotlegs Injection work?
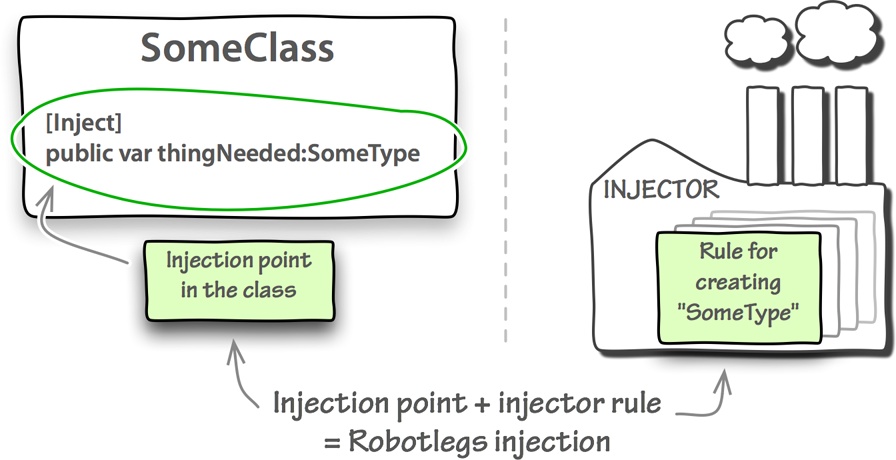
Automated DI is a handshake
Like any handshake, the Automated DI handshake has two sides:
The injection point in the class (asking for something to be provided)
The rule in the injector (defining how it should be provided)
From the developer’s point of view, that’s almost all there is to it. Injection point + injector rule = happy classes.
You can specify an injection point in three ways
Injection points (dependencies that you would like to be provided) can be specified as public properties, properties with a setter function, or through your class constructor.
// as a public property
[Inject]
public var someProperty:IPropertyType;

... or using a setter function
[Inject]
public function setSomeProperty(value:IPropertyType):void
{
    ...
}
... or in your constructor
[Inject]
public function SomeClass(someProperty:IPropertyType):void
{
    ...
}
Warning
The Automated DI container (the injector) has to be able to find out which dependencies your class would like to be injected. This means that injection points always have to be public—whether you’re defining them as properties, setter functions or through the constructor. The injector will silently ignore any private or protected injection point.
And you also have to tell the injector what you would like it to do
Any injection point in your application has to be paired with a rule that you’ve created about how to fulfil that dependency. You do that in your context using the Robotlegs Injector. For example, to declare a rule that anytime a class declares a dependency on IPropertyType you want to use a specific instance of UserURLParams, you’d use this:
injector.mapValue(IPropertyType, new UserURLParams("robotlegs.org"));Robotlegs has different types of injection
An injection mapping is really just a rule about how to satisfy the dependency. It’s really no more complex than that. You’re saying “When a class asks for this, give it this.”
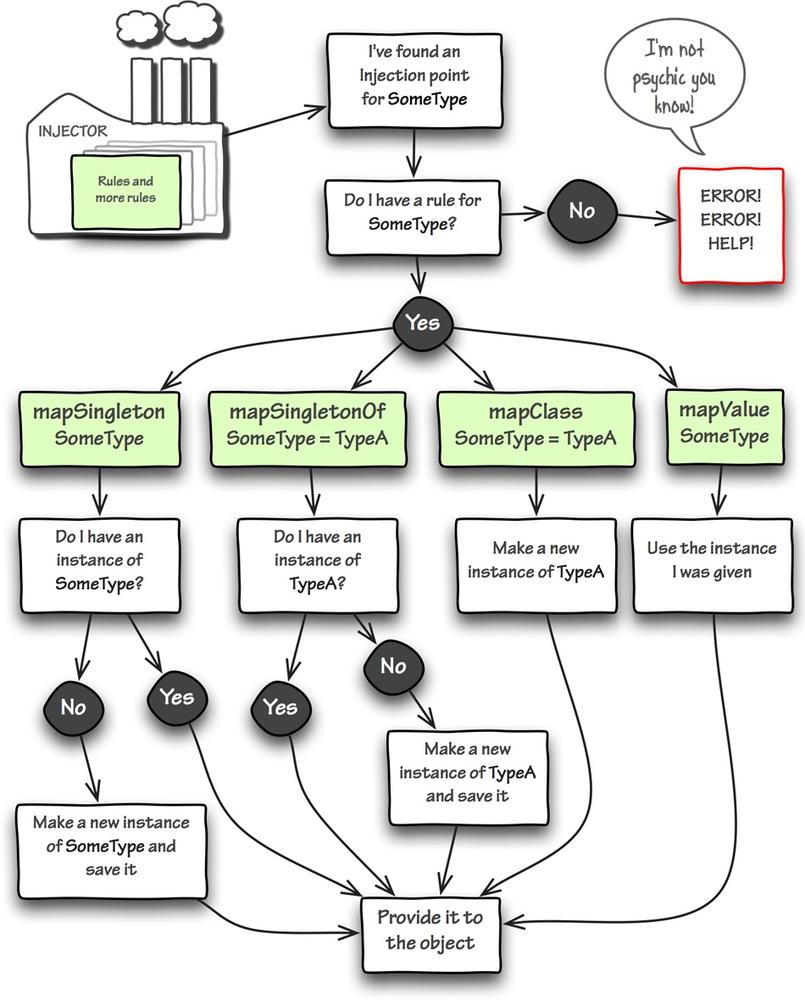
Robotlegs offers a choice of four rules about how the injector should respond to the request:
mapClass(SomeType, TypeA)Meets
SomeTyperequests with an instance ofTypeA—using a fresh instance each time (note that it injects an instance of the class, not the class itself)mapSingleton(SomeType)Meets
SomeTyperequests with the same instance ofSomeTypeevery timemapSingletonOf(SomeType, TypeA)Meets
SomeTyperequests with an instance ofTypeA—using the same instance each timemapValue(SomeType, new TypeA())Meets
SomeTyperequests with the instance ofTypeAprovided—using the same instance each time
If you only want one instance, use mapSingleton
// in the context startup();
injector.mapSingleton(UserLoadingService);
// in the class that has the dependency:
[Inject]
public var userLoadingService:UserLoadingService;
Unlike the getInstance() Singleton pattern, the
class itself—UserLoadingService—doesn’t need to know
that it’s going to be used as a ‘singleton’—meaning that the injector
will use the same instance every single time this dependency is
requested. As well as freeing the UserLoadingService from the
responsibility of maintaining its ‘singleness’, you are also now free
to create additional instances if, for some reason, you needed
to.
Neat!... but our code is now coupled to the actual
implementation class. Our injection points declare UserLoadingService as
their dependency. We can do better!
mapSingletonOf keeps your code coupled only to interfaces
// in the context startup();
injector.mapSingletonOf(IUserLoadingService, UserLoadingService);
// in the class that has the dependency:
[Inject]
public var userLoadingService:IUserLoadingService;
Now we’re free to switch the concrete UserLoadingService for a DummyUserLoadingService
or LocalUserLoadingService in the context
and we know that every single class that is dependent on the injected
IUserLoadingService will get this kind
of concrete instance instead.
What if my class has to be created elsewhere? (e.g. a factory)
mapValue
lets you control the creation of the singleton instance:
// in the context startup();
injector.mapValue(IUserURLParams, new UserURLParams("Robotlegs.org");
// in the class that has the dependency:
[Inject]
public var userURLParams:IUserURLParams;
mapValue() works much like mapSingletonOf(),
except that it’s your code, instead of the injector, that controls the
creation of the instance that is provided to each object that has this
dependency. How you create this instance is up to you, with all the
usual options—new
Thing(), factories, fluent builders[2]—available to you.
You can only create one rule per class
Automated Injection is limited to one rule per dependency class, in each context. (See, context is making more sense now, isn’t it?)
So, this would explode, because the injector has no way of telling which value to use for which injection:
// in the class that has the dependencies:
[Inject]
public var url:String;

[Inject]
public var username:String;
// in the context startup();
mapValue(String, 'Robotlegs.org');
mapValue(String, 'Joel Hooks');
Named rules let you create multiple rules for each class (but they’re icky)
The injector actually lets you map multiple injections against the same class, if you provide an additional parameter—a ‘name’ to tell the like injections apart.
// in the class that has the dependencies:
[Inject(name='weburl')]
public var url:String;

[Inject(name='username')]
public var username:String;
// in the context startup();
mapValue(String, 'Robotlegs.org', 'weburl');
mapValue(String, 'Joel Hooks', 'username');
We understand that this looks attractive initially. It means you
can inject against base types without having to create custom classes.
Which sounds like a plus, but the reliance on a String for
identification is weak—with the possibility of runtime problems that
are hard to test and debug if you accidentally use the wrong
name.
// in the class that has the dependencies:
[Inject(name='usrname')]
public var username:String;
You need to tell the compiler to include the injection metadata
The Flash/Flex compiler will strip out non-native metadata unless
you tell it not to – this includes the [Inject] and [PostConstruct] metadata that Robotlegs
needs to function correctly. Sometimes, when building an AIR application
for example, the metadata will stay intact while debugging but will be
stripped out when you publish your release build.
You need to tell the compiler that you want it to keep the
[Inject] and
[PostConstruct]
metadata tags.
The Robotlegs swc includes the required compiler arguments for you, but when linking against the source you will need to add the arguments yourself, and how you need to do that depends on what you’re using to compile your code:
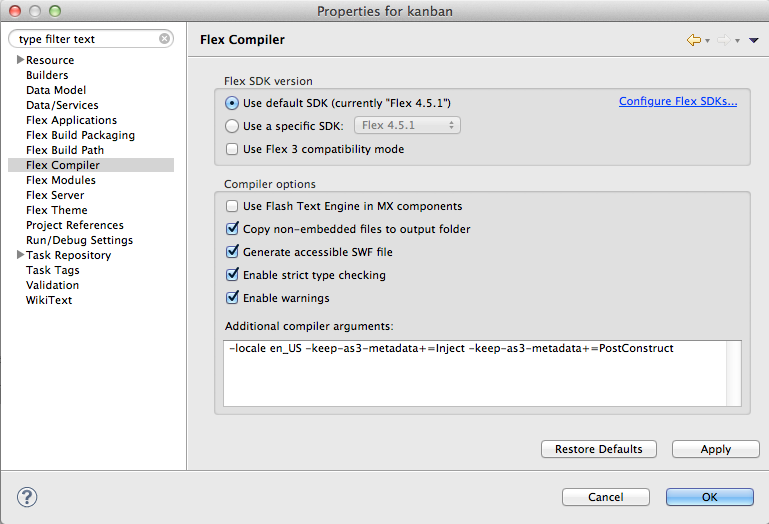
FlashBuilder/FlexBuilder solution
In your project properties, under ‘Flex Compiler’, add the following to the ‘Additional compiler arguments’:
-keep-as3-metadata+=Inject -keep-as3-metadata+=PostConstruct
Flash CS4/CS5 IDE Solution
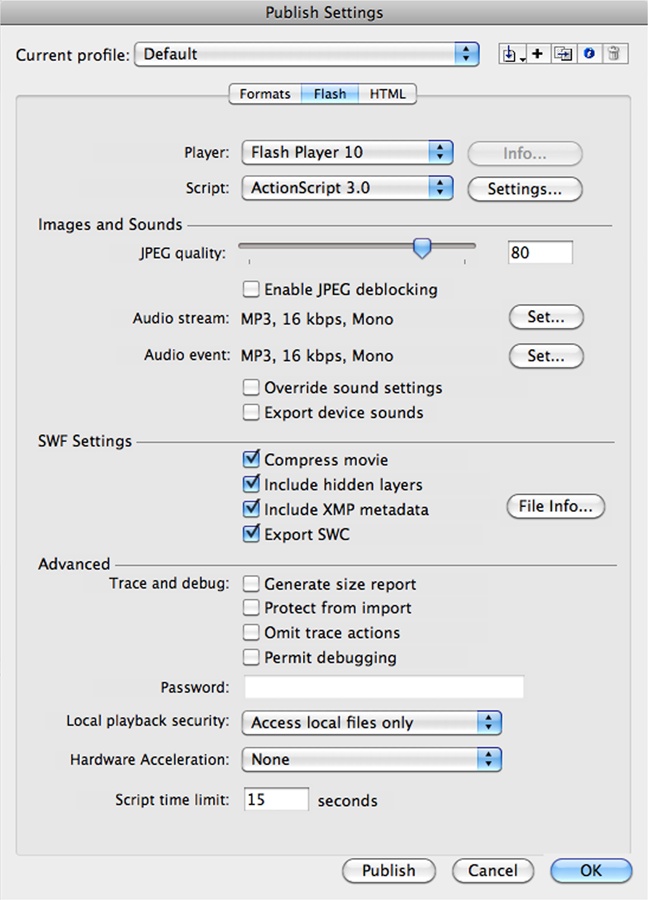
Flash CS4 and CS5 don’t offer the option to specify the metadata arguments to the compiler directly. For a while it was thought that they couldn’t be used with custom metadata at all—but it turns out that if you build against the Robotlegs swc, and you specify that you also want to build a swc of your project, the metadata stays in place. Nice!
IntelliJ Solution
In IntelliJ, specific compiler arguments are provided on a per-module rather than per-project basis. In the Flex Compiler Settings for your module, in the ‘Additional compiler options’ add:
-keep-as3-metadata+=Inject -keep-as3-metadata+=PostConstruct
Automated Injection ‘Gotchas’
Automated DI is fairly simple once you get to grips with it, but there are a few common tripping points that can make your first experience with it frustrating if you’re not aware of them.
If an object has an [Inject]ed dependency you have to create it using the Injector.
Injection isn’t magic, it’s just a very neat way of abstracting some factory logic when your objects are instantiated.
If you do new
ThingWithInjection() you’ll find that none of the Injections
have been fulfilled. It doesn’t matter where you put this code, the
injector has no idea you’ve created a new instance and so it can’t get
busy injecting it. There are some tricks for manually instantiating
objects with [Inject]ed dependencies in the power-ups section. In a
typical implementation this won’t be necessary as all your classes
with Injections will be created by the Injector.
You can map injection rules at runtime, but beware of race conditions.
If your rule isn’t mapped before the first time it needs to be used, you’ll get an injector error.
The injection point and rule have to be of exactly the same type
The Injector allows you to specify an injection point using an interface and then fulfil it with a concrete class, but you have to make sure the first parameter in your rule matches the injection point.
This won’t work:
// in the class file of the concrete type
public class SpecialThing implements IThing ...

// in the context
injector.mapSingletonOf(IThing, SpecialThing);

// in the class file where you declare the dependency to be injected
[Inject]
public var thing:SpecialThing    // this needed to be mapped to IThing
You also can’t substitute superclasses/subclasses, so this won’t work either:
// in the class file of the concrete type
public class ExtraSpecialThing extends SpecialThing ...

// in the context
injector.mapSingleton(ExtraSpecialThing);

// in the class file where you declare the dependency to be injected
[Inject]
public var thing:SpecialThing  // this needed to be mapped to ExtraSpecialThing
                               // but much better to use an interface here!
If you override a method that has an [Inject] tag, you need to add it in the subclass
If you extend a class with an [Inject] method and you override that
method, the compiler will use the describe-type data from the subclass
and not the superclass, so it won’t know about the original [Inject] tag. You need
to tag the subclass method with [Inject] too. If you’re working on a
class which includes methods with [Inject] tags that others are likely to
override, give some thought to whether there’s a more fool-proof way
to achieve the same result.
An advantage of methods over properties is that they can be
declared in an interface, so if you do decide to keep your injected
method for this reason, make sure you shout out the need for the
[Inject]
tag!
[2] A fluent builder uses a natural-language approach to
building an instance with the properties you want. For example, var quiz:Quiz = new
QuizBuilder().multipleChoice.withTitle('Robotlegs
jeopardy') .withQuestionSet('robotlegs.xml').build();
Get ActionScript Developer's Guide to Robotlegs now with the O’Reilly learning platform.
O’Reilly members experience books, live events, courses curated by job role, and more from O’Reilly and nearly 200 top publishers.
