
ADOBE PREMIERE ELEMENTS 7 CLASSROOM IN A BOOK 277
the beginning. If you are recording with an analog device, you must manually
press the Record button on your device when Adobe Premiere Elements starts
playing the Timeline.
7 Once the end of the project has been reached, the recording will stop
automatically if you are using a DV device. If you’re recording to an analog
device, you must manually press its Stop button to stop recording.
8 Click the Cancel button to close the Export to Tape dialog.
Exporting a frame of video as a still image
Occasionally, you may wish to grab frames from your video footage to email to
friends and family, include in a slide show, or for other purposes. In this exercise,
you will learn to export a frame from the project and to create a preset to use when
exporting frames in the future.
1 In the Timeline, drag the current-time indicator to timecode 00;00;52;20, or
click the current timecode box on the lower left of the Monitor panel and type
in 5220 and press Enter.
2 Click the Freeze Frame button (
) in the lower-right corner of the Monitor
panel, and then click Export in the Freeze Frame dialog. You might have to
enlarge the Monitor panel in order to see the Freeze Frame button.
278 LESSON 12 Sharing Movies
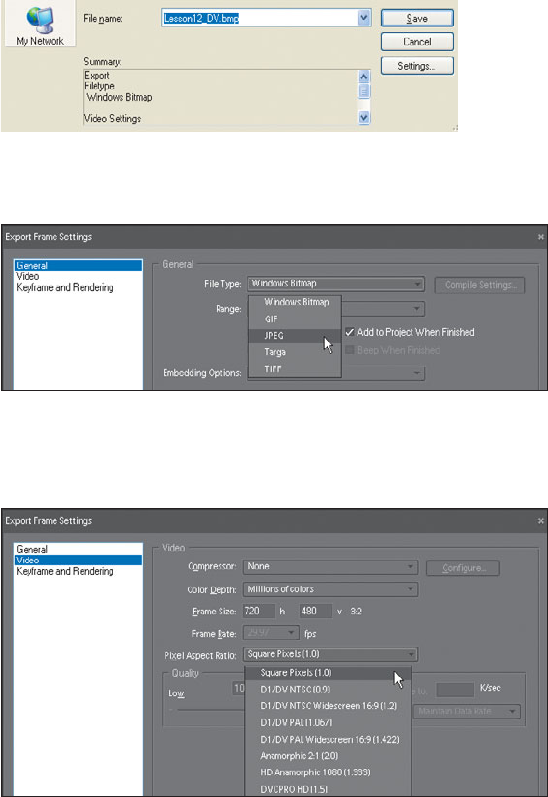
3 In the Export Frame dialog, click the Settings button to open the Export Frame
Settings dialog. Don’t worry about naming the fi le; you’ll do that in a moment
4 In the General section of the Export Frame Settings dialog, choose JPEG from
the File Type menu and select the Add to Project When Finished checkbox.
5 Click Video in the left column to access the Video control settings. Choose
Square Pixels (1.0) from the Pixel Aspect Ratio menu, which optimizes the
image for viewing on a computer monitor.
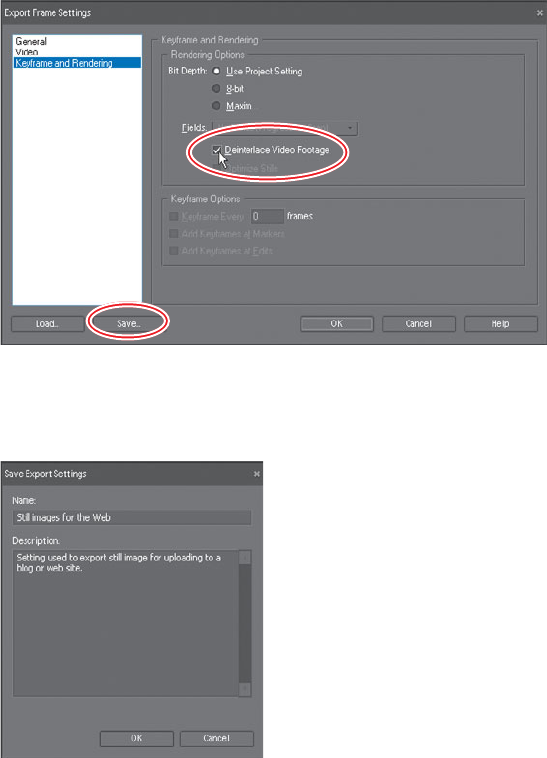
6 Click “Keyframe and Rendering” to access these controls. When working with
interlaced source footage, as you are here, select the Deinterlace Video Footage
checkbox to deinterlace the frame before storing the image. If working with
progressive source footage, do not select Deinterlace Video Footage.
ADOBE PREMIERE ELEMENTS 7 CLASSROOM IN A BOOK 279
7 Click the Save button to open the Save Export Settings dialog.
8 In the Name fi eld of the Save Export Settings dialog, type Still images for
the Web. In the Description fi eld, type Setting used to export still image for
uploading to a blog or web site.
9 Click OK to save your setting and to close the Save Export Settings dialog, and
then click OK to close the Export Frame Settings dialog. Back in the Export
Frame dialog, locate the Lesson12 folder and name your fi le killerwhale.jpg.
Click Save to save the still image onto your hard disk.
10 Click Cancel to close the Freeze Frame panel.
Because in step 4 you selected the Add to Project When Finished option, Adobe
Premiere Elements has placed the still image you just saved in your Project view.
11 Double-click the killerwhale.jpg image to view it in the Preview window, and
then close the Preview window and save your project.
Get Adobe Premiere Elements 7 Classroom in a Book now with the O’Reilly learning platform.
O’Reilly members experience books, live events, courses curated by job role, and more from O’Reilly and nearly 200 top publishers.

