Chapter 4. Working with a Database
There are many options when it comes to working with a database. You can choose anything from SQL Server, Oracle, MySQL, or even a Microsoft Access database! My personal preference is SQL Server. I don’t claim it to be the best; however, I do think it is the best choice when working with MVC. ASP.NET and the MVC framework are built and maintained by Microsoft. Microsoft is also the owner of SQL Server. Because of this, I think it provides the best support.
Just like databases, there are a variety of ways to integrate a database into your MVC application. You can write your own SQL statements and access the database by using the classes under the SqlClient namespace. Or you can use an ORM (Object-Relational-Mapper) that wraps your database access.
What Is an ORM?
An ORM converts a database table into a model, which allows you to use it like any other class in a project. For example, in Chapter 3, a Person class was created. With an ORM, this class could be mapped to a Person table.
When you fetch the object from your database, the ORM would return the Person class populated with the data. Likewise, saving data to the database would involve creating a new Person object populated with the data to save.
My preference is the latter. A framework like Entity Framework (EF) makes it easy to create, access, and maintain your database with an MVC project.
There are several other frameworks like EF, such as NHibernate; however, like SQL Server, Entity Framework is built and maintained by Microsoft, which will provide better support within your application for compatibility.
Chapter 5 will demonstrate this with Visual Studio’s built-in support for Entity Framework when creating controllers and views.
Introduction to Entity Framework
Entity Framework is an ORM that provides easy access to your database using LINQ that is written similarly to SQL. EF converts the LINQ to SQL and executes against your database. When the SQL is executed, EF takes the response of your query and converts the results into your models for easy access within your code.
Entity Framework provides three different workflows that you can set up and use within your project:
- Database First
- This flow is for when you have an existing database or want complete control over how your database is created and maintained. When you use this flow, you create an EDMX file that stores your data schema, data models, and the relationship between your schema and models in XML. Visual Studio provides a very nice designer that visually displays your model and relationships within it.
- Model First
- This flow is quite similar to Database First in that your models and relationships are maintained within an EDMX file. Instead of the EDMX being generated automatically from a database design, you manually create models and define inter-model relationships using the Visual Studio designer. Once finished, you tell EF to create the necessary database tables, columns, and primary and foreign keys. Just like in Database First, the EDMX stores the information in XML.
- Code First
- With Code First, you can have Entity Framework automatically create your database. Or if you have an existing database, you can use the Entity Framework tools to create your initial Code First classes. When using Code First, Entity Framework provides a nice toolset that allows you to perform Code First Migrations to automatically update your database when your models change.
The power of the Code First Migrations makes this option extremely convenient for any developer who doesn’t require complete control over how the database tables are created and maintained.
Database First makes it very convenient for the opposite scenario—when you want complete control over all database changes, but still want to leverage the power of an ORM.
The next two sections will explore both of these workflows, which will allow you to make your own decision for your projects.
Installing Entity Framework is quite similar to how Knockout was installed using the NuGet Package Manager. To install EF, right-click your project in Visual Studio and select Manage NuGet Packages. Once selected, the NuGet Package Manager will be opened. If it is not already selected, choose the Online option from the left-hand side. Because Entity Framework is so popular, it is often the first result returned. If it is not, type “Entity Framework” in the search box on the right. Once you find it, click the Install button. You will need to accept the licenses agreement before it will be installed in your application.
To demonstrate the differences between Code First and Database First, the next two sections will build a data model that contains a Book model and a related Author model. In this relationship, a Book can have one Author, while an Author can have many Books.
It’s time to put the M in MVC! Whether you choose Code First or Database First, interacting with your models will be the same. This will be demonstrated in the next chapter. The remainder of this chapter will focus on creating your models.
Code First
When you use Code First and you don’t have an existing database, you need to manually create your Model classes. As mentioned, the example model consists of books and authors. To begin, create a new file called Book.cs inside of the Models directory. A model is simply a new class with one property per column in your table. Example 4-1 contains the Book model.
Example 4-1. The Book model
usingSystem;usingSystem.Collections.Generic;usingSystem.Linq;usingSystem.Web;namespaceBootstrapIntroduction.Models{publicclassBook{publicintId{get;set;}publicintAuthorId{get;set;}publicstringTitle{get;set;}publicstringIsbn{get;set;}publicstringSynopsis{get;set;}publicstringDescription{get;set;}publicstringImageUrl{get;set;}publicvirtualAuthorAuthor{get;set;}}}
If you try to build your project, it will error out because the Book model contains a reference to the Author model (shown in Example 4-2). Before this code will compile, you must create the Author model, so create a new file called Author.cs and add it to the Models directory.
In our data model, a Book can contain one Author. You define this in the Book model by creating the property AuthorId. You also create a virtual property to the Author model, which provides the ability to access the Author model directly from the Book model. Unlike the Book model, the Author model can contain one or more books. Thus, it is defined as a collection of the Book model. When an Author model is accessed, the virtual collection of books provides the ability to display the list of books for a specific author.
Virtual Properties and Lazy Loading
It’s quite common to define navigational properties in a model to be virtual. When a navigation property is defined as virtual, it can take advantage of certain Entity Framework functionality. The most common one is lazy loading.
Lazy loading is a nice feature of many ORMs because it allows you to dynamically access related data from a model. It will not unnecessarily fetch the related data until it is actually accessed, thus reducing the up-front querying of data from the database.
Once the models are created, it’s time to create a class that maintains your Entity Framework Database Context. The EF context is a lot like a controller in the MVC pattern because it coordinates your data models to the database. It is quite common for a controller to create the DbContext. The controller would use your DbContext class to fetch the model and pass it to the view.
It’s quite common for large projects to have more than one EF context class because you can logically group your models together in one or more contexts. To aid with code organization, it’s a good idea to create a new folder in which to store your EF contexts. A common folder name is DAL, which stands for Data Access Layer.
With the DAL folder created, you can create a new file called BookContext.cs inside of it. The BookContext (as shown in Example 4-3) contains one DbSet property per model in the context. Quite commonly, a DbSet is related to a table in the database, and the model represents one row in the table.
Example 4-3. The BookContext
usingBootstrapIntroduction.Models;usingSystem;usingSystem.Collections.Generic;usingSystem.Data.Entity;usingSystem.Data.Entity.ModelConfiguration.Conventions;usingSystem.Linq;usingSystem.Web;namespaceBootstrapIntroduction.DAL{publicclassBookContext:DbContext{publicBookContext():base("BookContext"){}publicDbSet<Book>Books{get;set;}publicDbSet<Author>Authors{get;set;}protectedoverridevoidOnModelCreating(DbModelBuildermodelBuilder){modelBuilder.Conventions.Remove<PluralizingTableNameConvention>();base.OnModelCreating(modelBuilder);}}}
The BookContext is a class that extends the DbContext class from Entity Framework. The DbContext class is what allows querying the database. The BookContext class contains an empty constructor that calls the base constructor with the string "BookContext". The DbContext class will use this string to get the connection string from the Web.config file so that it can connect to your database.
In this class, I’ve also added a function that overrides the default OnModelCreating function. By overriding this function, I can specify different options for how I want my tables and columns created inside my database. In Example 4-3, I’ve told EF to remove the convention to pluralize my table names.
Conventions
Entity Framework has a lot of built-in conventions to make database creation easy when using Code First. For example, fields named Id are automatically recognized as primary keys. Likewise, fields with a related class and Id are created as foreign keys. Example 4-1 contains an example of this with the AuthorId property. When EF creates the Book table, it will automatically create a foreign key from AuthorId to the Id of the Author table.
Any of these conventions can be overridden, as demonstrated in Example 4-3, by removing the default to pluralize table names.
Example 4-4 contains an example connection string named BookContext that can be added to the Web.config file located in the root of the project. This connection string will use a SQL Server Express LocalDB Database. LocalDB is a lightweight version of SQL Server Express that stores your data inside of MDF files contained within the App_Data folder of your project. This is a convenient option for development purposes because it is installed by default with Visual Studio.
Example 4-4. BookContext connection string
<connectionStrings><addname="BookContext"connectionString="DataSource=(LocalDb)\v11.0;InitialCatalog=BootstrapIntroduction;IntegratedSecurity=SSPI;"providerName="System.Data.SqlClient"/></connectionStrings>
The connection string can be placed anywhere within your Web.config file inside of the configuration XML tags. I commonly place mine right below the configSections and above the appSettings section.
Using a Different Database?
If you want to use a different database than the LocalDb, you will need to update the connection string appropriately. You can find more information on Entity Framework Connection Strings on MSDN.
The models and EF context have now been successfully configured. The next chapter will demonstrate how to add, edit, delete, and fetch data from it.
Database First
For Database First, instead of creating classes to generate the database, you must create the database manually, or you can use an existing database if you have one. Just like in Code First, you can use a LocalDb database for Database First as well.
Let’s begin by creating a new LocalDb database. With Visual Studio open, follow these steps:
- Click View → Server Explorer (Ctrl-Alt-S).
- Right-click Data Connections and select Add Connection.
- For the Data Source, select Microsoft SQL Server. There is a checkbox that will let you always use this selection in the future to speed up the process. Click Continue to proceed.
- The Add Connection dialog will be displayed. See Figure 4-1 for the options I used.
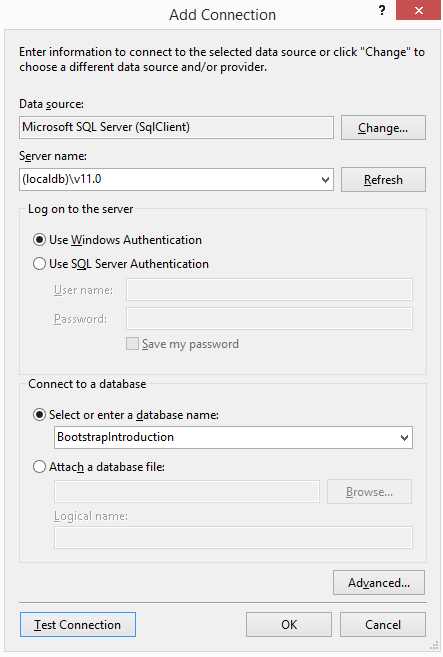
Figure 4-1. The Add Connection dialog box
- If the database you chose does not exist, you will be prompted to create it. Select Yes to continue.
The newly created database will now appear under the Data Connections.
With the database created, you can now create tables. Example 4-5 and Example 4-6 contain the SQL to create the Author and Book tables, respectively. To execute the SQL against the database, right-click the BootstrapIntroduction database and select New Query.
Click the green play button or press Ctrl-Shift-E to execute the SQL script.
Example 4-6. Book table
CREATETABLE[dbo].[Book]([Id]INTIDENTITY(1,1)NOTNULL,[AuthorId]INTNOTNULL,[Title]NVARCHAR(200)NULL,[Isbn]NVARCHAR(200)NULL,[Synopsis]NVARCHAR(200)NULL,[Description]NVARCHAR(2000)NULL,[ImageUrl]NVARCHAR(200)NULL,CONSTRAINT[PK_Book]PRIMARYKEYCLUSTERED([Id]ASC),CONSTRAINT[FK_Book_Author]FOREIGNKEY([AuthorId])REFERENCES[dbo].[Author]([Id])ONDELETECASCADE);
I’ve created the same columns in both the Author and Book tables as the Code First example. Example 4-6 also specifies a foreign key from the Book table to the Author table. This will allow Entity Framework to create the proper navigational properties in the next steps.
Once the tables are created, it’s time to create the EDMX file that will reverse-engineer the models from the database. Because the end result of the EDMX will create a DbContext (similar to Example 4-3), it should be created inside the previously created DAL (Data Access Layer) folder. Follow these steps to create the EDMX:
- Right-click the DAL folder and select Add → New Item.
- From the left menu, select Data, and if it’s not already selected, choose ADO.NET Entity Data Model.
- For the name, enter “BookDatabaseFirstContext” and click Add. You will now proceed through a wizard to complete the EDMX creation.
- This will be a Database First EDMX, so select EF Designer from the database and click Next.
- Now you need to choose the database connection. You’ll want to select BookContext (Settings) because this contains the previously created tables. Click Next to continue.
- In the final step, the database will be read, and a list of objects will be returned. Expand the Tables → dbo menu and select the Author and Book tables. Click Finish to complete the EDMX creation.
After Visual Studio has completed creating and adding the file, the new EDMX will open and should look similar to Figure 4-2.

Figure 4-2. Finished EDMX
In the Solution Explorer, if you expand the grouped files under the EDMX, you will see several files with the extension tt, which stands for Text Template. These files contain code that will automatically generate your models and DbContext from the EDMX file as shown in Figure 4-3.
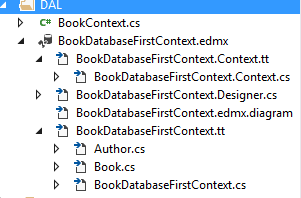
Figure 4-3. Expanded EDMX
Underneath the BookDatabaseFirstContext.tt file are the two models (Author and Book), and underneath the BookDatabaseFirstContext.Context.tt file is the DbContext. These three files are all autogenerated.
As you can see in Example 4-7, the BookDatabaseFirstContext.Context.cs file is almost identical to the DbContext created in Example 4-3 with the exception of class names and connection string references.
Example 4-7. Autogenerated DbContext
//------------------------------------------------------------------------------// <auto-generated>// This code was generated from a template.//// Manual changes to this file may cause unexpected behavior in your application.// Manual changes to this file will be overwritten if the code is regenerated.// </auto-generated>//------------------------------------------------------------------------------namespaceBootstrapIntroduction.DAL{usingSystem;usingSystem.Data.Entity;usingSystem.Data.Entity.Infrastructure;publicpartialclassBootstrapIntroductionEntities:DbContext{publicBootstrapIntroductionEntities():base("name=BootstrapIntroductionEntities"){}protectedoverridevoidOnModelCreating(DbModelBuildermodelBuilder){thrownewUnintentionalCodeFirstException();}publicvirtualDbSet<Author>Authors{get;set;}publicvirtualDbSet<Book>Books{get;set;}}}
The models and DBContext have now been automatically generated and whether you choose to continue with Code First or Database First, the next chapter will demonstrate how to add, edit, delete, and fetch data from it.
Creating Test Data
When Entity Framework first accesses a DbContext, if the database does not exist, the default behavior will be to create the database and tables. Immediately after this initial creation, EF allows you to provide a class that will automatically seed your database with real or test data.
This example will leverage the DbContext from the Code First examples because this database and its tables do not exist yet. Example 4-8 will seed the initial books and authors with books I’ve previously written. This should be placed in a new file called BookInitializer.cs inside the DAL folder.
Example 4-8. BookInitializer
usingBootstrapIntroduction.Models;usingSystem;usingSystem.Collections.Generic;usingSystem.Data.Entity;usingSystem.Linq;usingSystem.Web;namespaceBootstrapIntroduction.DAL{publicclassBookInitializer:DropCreateDatabaseIfModelChanges<BookContext>{protectedoverridevoidSeed(BookContextcontext){varauthor=newAuthor{Biography="...",FirstName="Jamie",LastName="Munro"};varbooks=newList<Book>{newBook{Author=author,Description="...",ImageUrl="http://ecx.images-amazon.com/images/I/51T%2BWt430bL._AA160_.jpg",Isbn="1491914319",Synopsis="...",Title="Knockout.js: Building Dynamic Client-Side Web Applications"},newBook{Author=author,Description="...",ImageUrl="http://ecx.images-amazon.com/images/I/51AkFkNeUxL._AA160_.jpg",Isbn="1449319548",Synopsis="...",Title="20 Recipes for Programming PhoneGap: Cross-Platform Mobile Development"},newBook{Author=author,Description="...",ImageUrl="http://ecx.images-amazon.com/images/I/51LpqnDq8-L._AA160_.jpg",Isbn="1449309860",Synopsis="...",Title="20 Recipes for Programming MVC 3: Faster, Smarter Web Development"},newBook{Author=author,Description="...",ImageUrl="http://ecx.images-amazon.com/images/I/41JC54HEroL._AA160_.jpg",Isbn="1460954394",Synopsis="...",Title="Rapid Application Development With CakePHP"}};books.ForEach(b=>context.Books.Add(b));context.SaveChanges();}}}
To seed the data, you simply create new objects of the model classes. Example 4-8 creates a single Author and a collection of Books. To save the data, you add each book to the Books DbSet in the BookContext. Finally, you call the SaveChanges function on the BookContext. When SaveChanges is called, EF will commit the changes to the database in a single transaction.
Saving the Author
If you notice in Example 4-8, the Author was not added to the Authors DbSet. This is the magic of EF, and it automatically knows that it needs to create the Author prior to saving the book because the Book model was initialized with a reference to the Author.
Configuration is required to complete the initialization process (shown in Example 4-9). Inside the global.asax.cs file, the Application_Start function will be updated to instantiate the BookContext, the BookInitializer, and tell the DbContext to initialize the database.
Example 4-9. Application_Start
usingBootstrapIntroduction.DAL;usingSystem;usingSystem.Collections.Generic;usingSystem.Data.Entity;usingSystem.Linq;usingSystem.Web;usingSystem.Web.Mvc;usingSystem.Web.Optimization;usingSystem.Web.Routing;namespaceBootstrapIntroduction{publicclassMvcApplication:System.Web.HttpApplication{protectedvoidApplication_Start(){AreaRegistration.RegisterAllAreas();FilterConfig.RegisterGlobalFilters(GlobalFilters.Filters);RouteConfig.RegisterRoutes(RouteTable.Routes);BundleConfig.RegisterBundles(BundleTable.Bundles);varbookContext=newBookContext();Database.SetInitializer(newBookInitializer());bookContext.Database.Initialize(true);}}}
When the application runs for the first time, it will execute the database initialization and create the one author and four books.
Database Initializers
In Example 4-8, the BookInitializer extended the class DropCreateDatabaseIfModelChanges. This tells EF that when it detects a change in the database, it should drop the database and recreate it, and then seed it with the provided data.
There are two other options as well: CreateDatabaseIfNotExists and DropCreateDatabaseAlways. The first one is the default and is quite common for production because you don’t want to be dropping the database each time it changes.
Summary
Although I suggest using SQL Server and Entity Framework for the database and ORM, you are certainly not limited to them. The support that both Visual Studio and Microsoft provides for them, though, make it worthwhile because there are many benefits when using them.
The next chapter will explore scaffolding of controllers and views, and a prerequisite to this is having Entity Framework and a database initialized like this chapter has done.
Going forward, I will be using Code First with Entity Framework because I find it translates better in examples for this book. Database First also works great; in fact, I use it on a day-to-day basis at work because my company wants complete control over all aspects of the database.
Get ASP.NET MVC 5 with Bootstrap and Knockout.js now with the O’Reilly learning platform.
O’Reilly members experience books, live events, courses curated by job role, and more from O’Reilly and nearly 200 top publishers.

