Chapter 1. Constructing Types and Apps
One of the first things we do as developers is design, organize, and create new types. This chapter helps with these tasks by offering several useful recipes for setting up the project, managing object lifetime, and establishing patterns.
Establishing Architecture
When you’re first setting up a project, you have to think about the overall architecture. There’s a concept called separation of concerns wherein each part of an application has a specific purpose (e.g., the UI layer interacts with users, a business logic layer manages rules, and a data layer interacts with a data source). Each layer has a purpose or responsibilities and contains the code to perform its operations.
In addition to promoting more loosely coupled code, separation of concerns makes it easier for developers to work with that code because it’s easier to find where a certain operation occurs. This makes it easier to add new features and maintain existing code. The benefits of this are higher quality applications and more productive work. It pays to get started right, which is why we have Recipe 1.5.
Related to loosely coupling code, there’s inversion of control (IoC), which helps decouple code and promotes testability. Recipe 1.2 explains how this works. When we look at ensuring quality, in Chapter 3, you’ll see how IoC fits in to unit testing.
Applying Patterns
A lot of the code we write is Transaction Script, where the user interacts with a UI and the code performs some type of create, read, update, or delete (CRUD) operation in the database and returns the result. Other times, we have complex interactions between objects that are difficult to organize. We need other patterns to solve these hard problems.
This chapter presents a few useful patterns in a rather informal manner. The idea is that you’ll have some code to rename and adapt to your purposes and a rationale on when a given pattern would be useful. As you read through each pattern, try to think about other code you’ve written or other situations where that pattern would have simplified the code.
If you run into the problem of having different APIs to different systems and needing to switch between them, you’ll be interested in reading Recipe 1.8. It shows how to build a single interface to solve this problem.
Managing Object Lifetime
Other important tasks we perform relate to object lifetime—that is, instantiating objects in memory, holding objects in memory for processing, and the subsequent release of that memory when the object is no longer needed. Recipes 1.3 and 1.4 show a couple of nice factory patterns that let you decouple object creation from code. This fits in with the IoC concepts mentioned previously.
One way to manage object creation is through a fluid interface, where you can include optional settings (via methods) and validate before object construction.
Another important object-lifetime consideration is disposal. Think about the drawbacks of excessive resource consumption, including memory use, file locks, and any other object that holds operating system resources. These problems often result in application crashes and are difficult to detect and fix. Performing proper resource cleanup is so important that it’s the first recipe we’ll cover in the book.
1.1 Managing Object End-of-Lifetime
Solution
Here’s the object with the original problem:
usingSystem;usingSystem.IO;publicclassDeploymentProcess{StreamWriterreport=newStreamWriter("DeploymentReport.txt");publicboolCheckStatus(){report.WriteLine($"{DateTime.Now} Application Deployed.");returntrue;}}
And here’s how to fix the problem:
usingSystem;usingSystem.IO;publicclassDeploymentProcess:IDisposable{booldisposed;readonlyStreamWriterreport=newStreamWriter("DeploymentReport.txt");publicboolCheckStatus(){report.WriteLine($"{DateTime.Now} Application Deployed.");returntrue;}protectedvirtualvoidDispose(booldisposing){if(!disposed){if(disposing){// disposal of purely managed resources goes here}report?.Close();disposed=true;}}~DeploymentProcess(){Dispose(disposing:false);}publicvoidDispose(){Dispose(disposing:true);GC.SuppressFinalize(this);}}
This is the Main method, using this object:
staticvoidMain(string[]args){using(vardeployer=newDeploymentProcess()){deployer.CheckStatus();}}
Discussion
The problem in this code was with the StreamWriter report. Whenever you’re using some type of resource, such as the report file reference, you need to release (or dispose) that resource. The specific problem here occurs because the app, through the StreamWriter, requested a file handle from the Windows OS. This app owns that file handle, and Windows expects the owning app to release the handle. If your app closes without releasing that handle, Windows prevents all applications, including subsequent running of your app, from accessing that file. In the worst case, everything crashes in a hard-to-find scenario that involves multiple people over a number of hours debugging a critical production problem. This occurs because Windows believes that file is still in use.
The solution is to implement the dispose pattern, which involves adding code that makes it easy to release resources. The solution code implements the IDisposable interface. IDisposable only specifies the Dispose() method, without parameters, and there’s more to be done than just adding that method, including another Dispose method overload that keeps track of what type of disposal to do and an optional finalizer.
Complicating the implementation is a field and parameter that control disposal logic: disposed and disposing. The disposed field ensures that this object gets disposed only one time. Inside the Dispose(bool) method, there’s an if statement, ensuring that if disposed is true (the object has been disposed), then it won’t execute any disposal logic. The first time through Dispose(bool), disposed will be false and the code in the if block will execute. Make sure that you also set disposed to true to ensure this code doesn’t run anymore—the consequences of not doing so bring exposure to unpredictable errors like an ObjectDisposedException.
The disposing parameter tells Dispose(bool) how it’s being called. Notice that Dispose() (without parameters) and the finalizer call Dispose(bool). When Dispose() calls Dispose(bool), disposing is true. This makes it easy for calling code, if written properly, to instantiate DeploymentProcess in a using statement or wrap it in the finally block of a try/finally.
The finalizer calls Dispose(bool) with disposing set to false, meaning that it isn’t being run by calling application code. The Dispose(bool) method uses the disposing value to determine whether it should release managed resources. Unmanaged resources are released regardless of whether Dispose() or the finalizer calls Dispose(bool).
Let’s clarify what is happening with the finalizer. The .NET CLR garbage collector (GC) executes an object’s finalizer when it cleans that object from memory. The GC can make multiple passes over objects, calling finalizers being one of the last things it does. Managed objects are instantiated and managed by the .NET CLR, and you don’t have control over when they’re released, which could potentially result in out-of-order releases. You have to check the disposing value to prevent an ObjectDisposedException in case the dependent object was disposed by the GC first.
What the finalizer gives you is a way to clean up unmanaged resources. An unmanaged resource, such as the file handle that StreamWriter obtained, doesn’t belong to the .NET CLR; it belongs to the Windows OS. There are situations where developers might need to explicitly call into a Win32/64 dynamic link library (DLL) to get a handle to an OS or third-party device. The reason you need the finalizer is that if your object doesn’t get disposed properly, there’s no other way to release that handle, which could crash your system for the same reason we need to release managed objects. So, the finalizer is a just-in-case mechanism to ensure the code that needs to release the unmanaged resource will execute.
A lot of applications don’t have objects that use unmanaged resources. In that case, don’t even add the finalizer. Having the finalizer adds overhead to the object because the GC has to do accounting to recognize objects that do have finalizers and call them in a multi-pass collection. Omitting the finalizer avoids this.
On a related note, remember to call GC.SuppressFinalize in the Dispose() method. This is another optimization telling the GC to not call the finalizer for this object, because all resources—managed and unmanaged—are released when the application calls IDisposable.Dispose().
Note
Generally, you should always call GC.SuppressFinalize in Dispose(), even if the class doesn’t have a finalizer. That said, there are some nuances that you might be interested in. If a class is both sealed and doesn’t have a finalizer, you can safely omit the call to GC.SuppressFinalize. However, classes that aren’t sealed could potentially be inherited by another class that does include a finalizer. In this case, calling GC.SuppressFinalize protects against improper implementations.
For classes without finalizers, GC.SuppressFinalize has no effect. If you chose to leave out the call to GC.SuppressFinalize and the class has a finalizer, the CLR will call that finalizer.
The Main method shows how to properly use the DeploymentProcess object. It instantiates and wraps the object in a using statement. The object exists in memory until the using statement block ends. At that time, the program calls the Dispose() method.
1.2 Removing Explicit Dependencies
Solution
Define the types you need:
publicclassDeploymentArtifacts{publicvoidValidate(){System.Console.WriteLine("Validating...");}}publicclassDeploymentRepository{publicvoidSaveStatus(stringstatus){System.Console.WriteLine("Saving status...");}}interfaceIDeploymentService{voidPerformValidation();}publicclassDeploymentService:IDeploymentService{readonlyDeploymentArtifactsartifacts;readonlyDeploymentRepositoryrepository;publicDeploymentService(DeploymentArtifactsartifacts,DeploymentRepositoryrepository){this.artifacts=artifacts;this.repository=repository;}publicvoidPerformValidation(){artifacts.Validate();repository.SaveStatus("status");}}
And start the application like this:
usingMicrosoft.Extensions.DependencyInjection;usingSystem;classProgram{readonlyIDeploymentServiceservice;publicProgram(IDeploymentServiceservice){this.service=service;}staticvoidMain(){varservices=newServiceCollection();services.AddTransient<DeploymentArtifacts>();services.AddTransient<DeploymentRepository>();services.AddTransient<IDeploymentService,DeploymentService>();ServiceProviderserviceProvider=services.BuildServiceProvider();IDeploymentServicedeploymentService=serviceProvider.GetRequiredService<IDeploymentService>();varprogram=newProgram(deploymentService);program.StartDeployment();}publicvoidStartDeployment(){service.PerformValidation();Console.WriteLine("Validation complete - continuing...");}}
Discussion
The term tightly coupled often means that one piece of code is overburdened with the responsibility of instantiating the types (dependencies) it uses. This requires the code to know how to construct, manage lifetime, and contain logic for dependencies. This distracts from the purpose of the code in solving the problem that it exists for. It duplicates instantiation of dependencies in different classes. This makes the code brittle because changes in dependency interfaces affect all other code that needs to instantiate that dependency. Additionally, code that instantiates its dependencies makes it difficult, if not impossible, to perform proper unit testing.
The solution is dependency injection, which is a technique to define dependency type instantiation in one place and expose a service that other types can use to obtain instances of those dependencies. There are a couple of ways to perform dependency injection: service locator and inversion of control (IoC). Which to use and when is an active debate; let’s avoid venturing into theoretical territory. To keep things simple, this solution uses IoC, which is a common and straightforward approach.
The specific solution requires that you have types that rely on other dependency types, configure type constructors to accept dependencies, reference a library to help manage the IoC container, and use the container to declare how to instantiate types. The following paragraphs explain how this works. Figure 1-1 shows the relationship of objects and sequence of IoC operations for the solution.
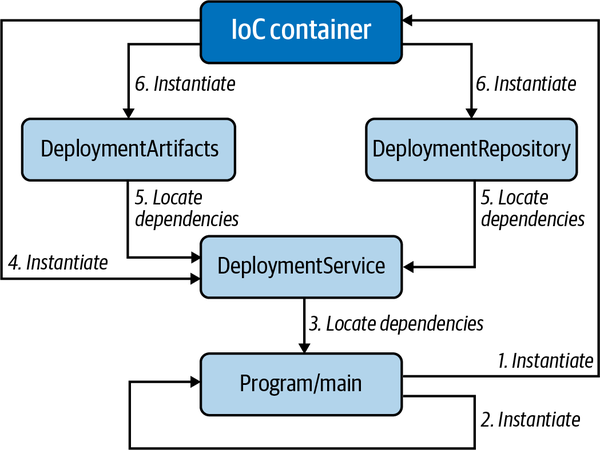
Figure 1-1. IoC for the solution
The solution is a utility to help manage a deployment process, validating whether the deployment process is configured properly. It has a DeploymentService class that runs the process. Notice that the DeploymentService constructor accepts the classes DeploymentArtifacts and DeploymentRepository. DeploymentService does not instantiate these classes—rather, they are injected.
To inject these classes, you can use an IoC container, which is a library that helps to automatically instantiate types and to automatically instantiate and provide instances of dependency types. The IoC container in the solution, as shown in the using declaration, is the Microsoft.Extensions.DependencyInjection namespace, which you can reference as the NuGet package by the same name.
While we want to inject all dependencies for every type in the application, you must still instantiate the IoC container directly, which is why the Main method instantiates ServiceCollection as services. Then use the services instance to add all of the dependencies, including DeploymentService.
The IoC container can help manage the lifetime of objects. This solution uses AddTransient, which means that the container should create a new instance every time its type is requested. A couple of other examples of managing object lifetime are AddSingleton, which instantiates an object only one time and passes that one instance to all objects, and AddScoped, which gives more control over the lifetime of the object. In ASP.NET, AddScoped is set to the current request. Over time, you’ll want to think more about what the lifetime of your objects should be and investigate these options in more depth. For now, it’s simple to get started with AddTransient.
The call to BuildServiceProvider converts services, a ServiceCollection, into a ServiceProvider. The term IoC container refers to this ServiceProvider instance—it instantiates and locates types to be injected.
You can see the container in action, calling GetRequiredService to return an instance implementing IDeploymentService. Going back to the ServiceCollection, notice that there’s an AddTransient associating the DeploymentService class with the IDeploymentService interface. This means that GetRequiredService will return an instance of DeploymentService.
Finally, Main instantiates Program, with the new DeploymentService instance.
Going back to the constructor for DeploymentService, you can see that it expects to be called with instances for DeploymentArtifacts and DeploymentRepository. Because we used the IoC container to instantiate DeploymentService, the IoC container also knows how to instantiate its dependencies, which were also added to the ServiceCollection, with calls to AddTransient. This solution only used three types; you can build object dependency graphs much deeper than this.
Also, notice how the DeploymentService constructor saves the injected instances in readonly fields, making them available for use by DeploymentService members.
The beauty of IoC is that instantiation only happens in one place, and you don’t have to code all of that in your constructors or in members that need a new instance of a dependency. This makes your code more loosely coupled and maintainable. It also opens the opportunity for higher quality by making the type more unit testable.
See Also
1.3 Delegating Object Creation to a Class
Solution
We want to instantiate this class:
usingSystem;publicclassThirdPartyDeploymentService{publicvoidValidate(){Console.WriteLine("Validated");}}
We’ll use this class for IoC:
publicinterfaceIValidatorFactory{ThirdPartyDeploymentServiceCreateDeploymentService();}
And here’s the IValidatorFactory implementation:
publicclassValidatorFactory:IValidatorFactory{publicThirdPartyDeploymentServiceCreateDeploymentService(){returnnewThirdPartyDeploymentService();}}
Then instantiate the factory like this:
publicclassProgram{readonlyThirdPartyDeploymentServiceservice;publicProgram(IValidatorFactoryfactory){service=factory.CreateDeploymentService();}staticvoidMain(){varfactory=newValidatorFactory();varprogram=newProgram(factory);program.PerformValidation();}voidPerformValidation(){service.Validate();}}
Discussion
As discussed in Recipe 1.2, IoC is a best practice because it decouples dependencies, making code easier to maintain, more adaptable, and easier to test. The problem is that there are exceptions and situations that cause difficulties with the best of plans. One of these problems occurs when trying to use a third-party API without an interface.
The solution shows a ThirdPartyDeploymentService class. You can see the code and what it does. In reality, even if you can read the code through reflection or disassembler, it doesn’t help because you can’t add your interface. Even if ThirdPartyDeploymentService were open source, you would have to weigh the decision to fork the library for your own modifications—the trade-off being that your modifications are brittle in the face of new features and maintenance to the original open source library. An example is the System.Net.HttpClient class in the .NET Framework, which doesn’t have an interface. Ultimately, you’ll need to evaluate the situation and make a decision that works for you, but the factory class described here can be an effective work-around.
To see how a factory class works, observe the IValidatorFactory interface. This is the interface we’ll use for IoC. Next, examine how the ValidatorFactory class implements the IValidatorFactory interface. Its CreateDeploymentService instantiates and returns the ThirdPartyDeploymentService. This is what a factory does: it creates objects for us.
Note
This is related to the proxy pattern. The ValidatorFactory controls access to a ThirdPartyDeploymentService instance. However, rather than returning an object to control access to members of ThirdPartyDeploymentService, CreateDeploymentService returns a direct ThirdPartyDeploymentService instance.
To simplify this example, the code doesn’t use an IoC container—though it would be normal to use factories alongside IoC. Instead, the Main method instantiates ValidatorFactory and passes that instance to the Program constructor, which is the important part of this example.
Examine how the constructor takes the IValidatorFactory reference and calls CreateDeploymentService. Now we’ve been able to inject the dependency and maintain the loose coupling we sought.
Another benefit is that since the ThirdPartyDeploymentService is instantiated in the factory class, you can make any future changes to class instantiation without affecting consuming code.
1.4 Delegating Object Creation to a Method
Solution
Here’s the abstract base class with the object creation contract:
publicabstractclassDeploymentManagementBase{IDeploymentPlugindeploymentService;protectedabstractIDeploymentPluginCreateDeploymentService();publicboolValidate(){if(deploymentService==null)deploymentService=CreateDeploymentService();returndeploymentService.Validate();}}
These are a couple of classes that instantiate associated plug-in classes:
publicclassDeploymentManager1:DeploymentManagementBase{protectedoverrideIDeploymentPluginCreateDeploymentService(){returnnewDeploymentPlugin1();}}publicclassDeploymentManager2:DeploymentManagementBase{protectedoverrideIDeploymentPluginCreateDeploymentService(){returnnewDeploymentPlugin2();}}
The plug-in classes implement the IDeploymentPlugin interface:
publicinterfaceIDeploymentPlugin{boolValidate();}
And here are the plug-in classes being instantiated:
publicclassDeploymentPlugin1:IDeploymentPlugin{publicboolValidate(){Console.WriteLine("Validated Plugin 1");returntrue;}}publicclassDeploymentPlugin2:IDeploymentPlugin{publicboolValidate(){Console.WriteLine("Validated Plugin 2");returntrue;}}
Finally, here’s how it all fits together:
classProgram{readonlyDeploymentManagementBase[]deploymentManagers;publicProgram(DeploymentManagementBase[]deploymentManagers){this.deploymentManagers=deploymentManagers;}staticDeploymentManagementBase[]GetPlugins(){returnnewDeploymentManagementBase[]{newDeploymentManager1(),newDeploymentManager2()};}staticvoidMain(){DeploymentManagementBase[]deploymentManagers=GetPlugins();varprogram=newProgram(deploymentManagers);program.Run();}voidRun(){foreach(varmanagerindeploymentManagers)manager.Validate();}}
Discussion
Plug-in systems are all around us. Excel can consume and emit different document types, Adobe works with multiple image types, and Visual Studio Code has numerous extensions. These are all plug-in systems, and whether the only plug-ins available are via vendor or third party, they all leverage the same concept—the code must be able to adapt to handling a new abstract object type.
While the previous examples are ubiquitous in our daily lives, many developers won’t be building those types of systems. That said, the plug-in model is a powerful opportunity for making our applications extensible. Application integration is a frequent use case where your application needs to consume documents from customers, other departments, or other businesses. Sure, web services and other types of APIs are popular, but needing to consume an Excel spreadsheet is normal. As soon as you do that, someone has data in a different format, like CSV, JSON, tab delimited, and more. Another side of the story is the frequent need to export data in a format that multiple users need to consume.
In this spirit, the solution demonstrates a situation where a plug-in system allows an application to add support for new deployment types. This is a typical situation where you’ve built the system to handle the deployment artifacts that you know about, but the system is so useful that everyone else wants to add their own deployment logic, which you never knew about when original requirements were written.
In the solution, each of the DeploymentManagers implement the abstract base class, DeploymentManagementBase. DeploymentManagementBase orchestrates the logic, and the derived DeploymentManager classes are simply factories for their associated plugins. Notice that DeploymentManagementBase uses polymorphism to let derived classes instantiate their respective plug-in classes.
Tip
If this is getting a little complex, you might want to review Recipes 1.2 and 1.3. This is one level of abstraction above that.
The solution shows two classes that implement the IDeploymentPlugin interface. The DeploymentManagementBase class consumes the IDeploymentPlugin interface, delegating calls to its methods to the plug-in classes that implement that interface. Notice how Validate calls Validate on the IDeploymentPlugin instance.
The Program has no knowledge of the plug-in classes. It operates on instances of DeploymentManagementBase, as demonstrated where Main calls GetPlugins and receives an array of DeploymentManagementBase instances. Program doesn’t care about the plug-ins. For demo simplicity, GetPlugins is a method in Program but could be another class with a mechanism for selecting which plug-ins to use. Notice in the Run method how it iterates through DeploymentManagementBase instances.
Note
Making DeploymentManagementBase implement an interface might make IoC more consistent if you’re using interfaces everywhere else. That said, an abstract base class can often work for most IoC containers, mocking, and unit testing tools.
To recap, the DeploymentManagementBase encapsulates all functionality and delegates work to plug-in classes. The code that makes the plug-in are the deployment managers, plug-in interface, and plug-in classes. The consuming code only works with a collection of DeploymentManagementBase and is blissfully unaware of the specific plug-in implementations.
Here’s where the power comes in. Whenever you or any third party you allow wants to extend the system for a new type of deployment, they do this:
-
Create a new
DeploymentPluginclass that implements yourIDeploymentPlugininterface. -
Create a new
DeploymentManagementclass that derives fromDeploymentManagementBase. -
Implement the
DeploymentManagement.CreateDeploymentServicemethod to instantiate and return the newDeploymentPlugin.
Finally, the GetPlugins method, or some other logic of your choosing, would add that new code to its collections of plug-ins to operate on.
1.5 Designing Application Layers
Solution
Here’s a data access layer class:
publicclassGreetingRepository{publicstringGetNewGreeting()=>"Welcome!";publicstringGetVisitGreeting()=>"Welcome back!";}
Here’s a business logic layer class:
publicclassGreeting{GreetingRepositorygreetRep=newGreetingRepository();publicstringGetGreeting(boolisNew)=>isNew?greetRep.GetNewGreeting():greetRep.GetVisitGreeting();}
These two classes are part of the UI layer:
publicclassSignIn{Greetinggreeting=newGreeting();publicvoidGreet(){Console.Write("Is this your first visit? (true/false): ");stringnewResponse=Console.ReadLine();bool.TryParse(newResponse,outboolisNew);stringgreetResponse=greeting.GetGreeting(isNew);Console.WriteLine($"\n*\n* {greetResponse} \n*\n");}}publicclassMenu{publicvoidShow(){Console.WriteLine("*------*\n"+"* Menu *\n"+"*------*\n"+"\n"+"1. ...\n"+"2. ...\n"+"3. ...\n"+"\n"+"Choose: ");}}
This is the application entry point (part of the UI layer):
classProgram{SignInsignIn=newSignIn();Menumenu=newMenu();staticvoidMain(){newProgram().Start();}voidStart(){signIn.Greet();menu.Show();}}
Discussion
There are endless ways to set up and plan the structure of new projects, with some approaches better than others. Rather than viewing this discussion as a definitive conclusion, think of it as a few options with trade-offs that help you think about your own approach.
The antipattern here is Big Ball of Mud (BBoM) architecture. BBoM is where a developer opens a single project and starts adding all the code at the same layer in the application. While this approach might help knock out a quick prototype, it has severe complications in the long run. Over time most apps need new features and maintenance to fix bugs. What happens is that the code begins to run together and there’s often much duplication, commonly referred to as spaghetti code. Seriously, no one wants to maintain code like this, and you should avoid it.
Warning
When under time pressure, it’s easy to think that creating a quick prototype might be an acceptable use of time. However, resist this urge. The cost of maintenance on a BBoM prototype project is high. The time required to work with spaghetti code to add a new feature or fix a bug quickly wipes out any perceived up-front gains from a sloppy prototype. Because of duplication, fixing a bug in one place leaves the same bug in other parts of the application. This means not only that a developer has to fix the bug multiple times but that the entire life cycle of QA, deployment, customer discovery, help desk service, and management wastes time on what would be multiple unnecessary cycles. The content in this section helps you avoid this antipattern.
The primary concept to grasp here is separation of concerns. You’ll often hear this simplified as a layered architecture where you have UI, business logic, and data layers, with each section named for the type of code placed in that layer. This section uses the layered approach with the goal of showing how to achieve separation of concerns and associated benefits.
Note
Sometimes the idea of a layered architecture makes people think they must route application communication through the layers or that certain operations are restricted to their layer. This isn’t quite true or practical. For example, business logic can be found in different layers, such as rules for validating user input in the UI layer as well as logic for how to process a certain request. Another example of exceptions to communication patterns is when a user needs to select a set of operations on a form—there isn’t any business logic involved and the UI layer can request the list of items from the data layer directly. What we want is separation of concerns to enhance the maintainability of the code; any dogmatic/idealistic restrictions that don’t make sense run counter to that goal.
The solution starts with a data access layer, GreetingRepository. This simulates the repository pattern, which is an abstraction so that calling code doesn’t need to think about how to retrieve the data. Ideally, creating a separate data project promises an additional benefit of reusing that data access layer in another project that needs access to the same data. Sometimes you get reuse and other times you don’t, though you always get the benefits of reducing duplication and knowing where the data access logic resides.
The business logic layer has a Greeting class. Notice how it uses the isNew parameter to determine which method of GreetingRepository to call. Anytime you find yourself needing to write logic for how to handle a user request, consider putting that code in another class that is considered part of the business logic layer. If you already have code like this, refactor it out into a separate object named for the type of logic it needs to handle.
Finally, there’s the UI layer, which is composed of the SignIn and Menu classes. These classes handle the interaction with the user, yet they delegate any logic to the business logic layer. Program might be considered part of the UI layer, though it’s only orchestrating interaction/navigation between other UI layer classes and doesn’t perform UI operations itself.
Note
The way I wrote the solution was so you would see the definition of a class before it was used. However, when actually doing the design, you might start with the UI layer and then work down through business logic and data access.
There are a couple of dimensions to separation of concerns in this code. GreetingRepository is only concerned with data, and Greeting data in particular. For example, if the app needed data to show in a Menu, you would need another class called MenuRepository that did CRUD operations on Menu data. Greeting only handles business logic for Greeting data. If a Menu had its own business logic, you might consider a separate business logic layer class for that, but only if it made sense. As you can see in the UI layer, SignIn only handles interaction with the user for signing into the app, and Menu only handles interaction with the user for displaying and choosing what they want to do. The beauty is that now you or anyone else can easily go into the application and find the code concerning the subject you need to address.
Figures 1-2, 1-3, and 1-4 show how you might structure each layer into a Visual Studio solution. Figure 1-2 is for a very simple app, like a utility that is unlikely to have many features. In this case, it’s OK to keep the layers in the same project because there isn’t a lot of code and anything extra doesn’t have tangible benefit.
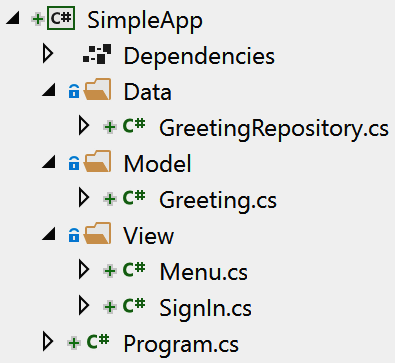
Figure 1-2. Project layout for a simple app
Figure 1-3 shows how you might structure a project that’s a little larger and will grow over time, which I’ll loosely call midsize for the sake of discussion. Notice that it has a separate data access layer. The purpose of that is potential reuse. Some projects offer different UIs for different customers. For example, there might be a chatbot or mobile app that accesses the data for users but a web app for administrators. Having the data access layer as a separate project makes this possible. Notice how SystemApp.Console has an assembly reference to SystemApp.Data.
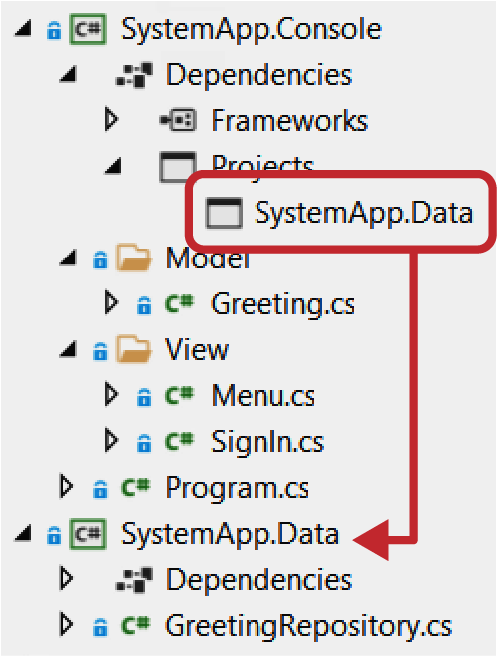
Figure 1-3. Project layout to separate UI and data layers
For larger enterprise apps, you’ll want to break the layers apart, as shown in Figure 1-4. The problem to solve here is that you want a cleaner break between sections of code to encourage loose coupling. Large applications often become complex and hard to manage unless you control the architecture in a way that encourages best practices.
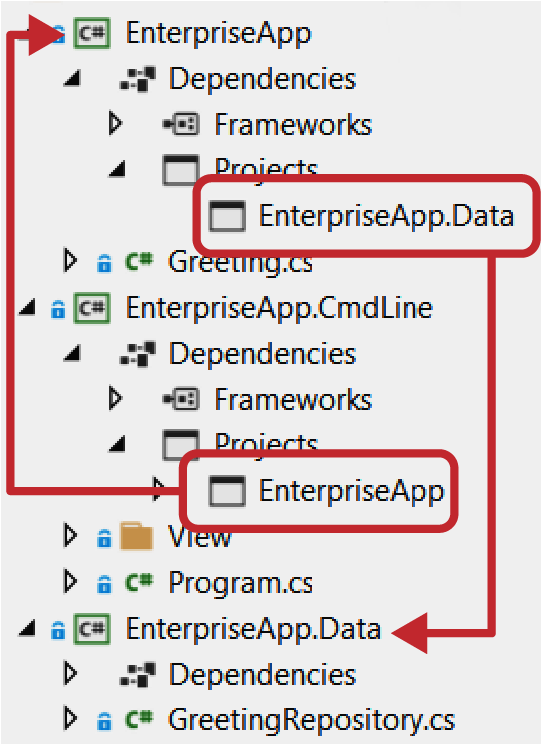
Figure 1-4. Project layout for separation of concerns
For the enterprise scenario, this example is small. However, imagine the complexity of a growing application. As you add new business logic, you’ll begin finding code that gets reused. Also, you’ll naturally have some code that can stand on its own, like a service layer for accessing an external API. The opportunity here is to have a reusable library that might be useful in other applications. Therefore, you’ll want to refactor anything reusable into its own project. On a growing project, you can rarely anticipate every aspect or feature that an app will support, and watching for these changes and refactoring will help to keep your code, project, and architecture healthier.
1.6 Returning Multiple Values from a Method
Solution
ValidationStatus has a deconstructor:
publicclassValidationStatus{publicboolDeployment{get;set;}publicboolSmokeTest{get;set;}publicboolArtifacts{get;set;}publicvoidDeconstruct(outboolisPreviousDeploymentComplete,outboolisSmokeTestComplete,outboolareArtifactsReady){isPreviousDeploymentComplete=Deployment;isSmokeTestComplete=SmokeTest;areArtifactsReady=Artifacts;}}
The DeploymentService shows how to return a tuple:
publicclassDeploymentService{public(booldeployment,boolsmokeTest,boolartifacts)PrepareDeployment(){ValidationStatusstatus=Validate();(booldeployment,boolsmokeTest,boolartifacts)=status;return(deployment,smokeTest,artifacts);}ValidationStatusValidate(){returnnewValidationStatus{Deployment=true,SmokeTest=true,Artifacts=true};}}
And here’s how to consume the returned tuple:
classProgram{readonlyDeploymentServicedeployment=newDeploymentService();staticvoidMain(string[]args){newProgram().Start();}voidStart(){(booldeployed,boolsmokeTest,boolartifacts)=deployment.PrepareDeployment();Console.WriteLine($"\nDeployment Status:\n\n"+$"Is Previous Deployment Complete? {deployed}\n"+$"Is Previous Smoke Test Complete? {smokeTest}\n"+$"Are artifacts for this deployment ready? {artifacts}\n\n"+$"Can deploy: {deployed && smokeTest && artifacts}");}}
Discussion
Historically, the typical way to return multiple values from a method was to create a custom type or add multiple out parameters. It always felt wasteful to create a custom type that would only be used one time for the purpose of returning values. The other option, to use multiple out parameters, felt clunky too. Using a tuple is more elegant. A tuple is a value type that lets you group data into a single object without declaring a separate type.
Note
The tuple type described in this section was a new feature of C# 7.0. It aliases the .NET ValueTuple, which is a mutable value type whose members are fields. In contrast, the .NET Framework has a Tuple class, which is an immutable reference type whose members are properties. Both ValueTuple and Tuple named members Item1, Item2, …, ItemN; in contrast, you’re free to provide more meaningful names for C# tuple members.
If using a version of .NET prior to 4.7, you must explicitly reference the System.ValueTuple NuGet package.
The solution shows a couple of different aspects of tuples, deconstruction, and how to return a tuple from a method. The ValidationStatus class has a Deconstruct method and C# uses that to produce a tuple from an instance of the class. This class wasn’t strictly necessary for this example, but it does demonstrate an interesting way of converting a class to a tuple.
The DeploymentService class shows how to return a tuple. Notice that the return type of the PrepareDeployment method is a tuple. The property names in the tuple return type are optional, though meaningful variable names could make the code easier to read.
The code calls Validate, which returns an instance of ValidationStatus. The next line, assigning status to the tuple, uses the deconstructor to return a tuple instance. PrepareDeployment uses those values to return a new tuple to the caller.
The solution implementation of PrepareDeployment shows the mechanics of working with tuples, which is useful for learning, though not very elegant. In practice, it would be cleaner to return status from the method because the deconstructor will run implicitly.
The Start method, in Program, shows how to call PrepareDeployment and consume the tuple it returns.
1.7 Converting from Legacy to Strongly Typed Classes
Solution
Here’s a Deployment class that we’ll be using:
publicclassDeployment{stringconfig;publicDeployment(stringconfig){this.config=config;}publicboolPerformHealthCheck(){Console.WriteLine($"Performed health check for config {config}.");returntrue;}}
And here’s a legacy CircularQueue collection:
publicclassCircularQueue{intcurrent=0;intlast=0;object[]items;publicCircularQueue(intsize){items=newobject[size];}publicvoidAdd(objectobj){if(last>=items.Length)thrownewIndexOutOfRangeException();items[last++]=obj;}publicobjectNext(){current%=last;objectitem=items[current];current++;returnitem;}}
This code shows how to use the legacy collection:
publicclassHealthChecksObjects{publicvoidPerformHealthChecks(intcycles){CircularQueuechecks=Configure();for(inti=0;i<cycles;i++){Deploymentdeployment=(Deployment)checks.Next();deployment.PerformHealthCheck();}}privateCircularQueueConfigure(){varqueue=newCircularQueue(5);queue.Add(newDeployment("a"));queue.Add(newDeployment("b"));queue.Add(newDeployment("c"));returnqueue;}}
Next, here’s the legacy collection refactored as a generic collection:
publicclassCircularQueue<T>{intcurrent=0;intlast=0;T[]items;publicCircularQueue(intsize){items=newT[size];}publicvoidAdd(Tobj){if(last>=items.Length)thrownewIndexOutOfRangeException();items[last++]=obj;}publicTNext(){current%=last;Titem=items[current];current++;returnitem;}}
With code that shows how to use the new generic collection:
publicclassHealthChecksGeneric{publicvoidPerformHealthChecks(intcycles){CircularQueue<Deployment>checks=Configure();for(inti=0;i<cycles;i++){Deploymentdeployment=checks.Next();deployment.PerformHealthCheck();}}privateCircularQueue<Deployment>Configure(){varqueue=newCircularQueue<Deployment>(5);queue.Add(newDeployment("a"));queue.Add(newDeployment("b"));queue.Add(newDeployment("c"));returnqueue;}}
Here’s demo code to show both collections in action:
classProgram{staticvoidMain(string[]args){newHealthChecksObjects().PerformHealthChecks(5);newHealthChecksGeneric().PerformHealthChecks(5);}}
Discussion
The first version of C# didn’t have generics. Instead, we had a System.Collections namespace with collections like Dictionary, List, and Stack that operated on instances of type object. If the instances in the collection were reference types, the conversion performance to/from object was negligible. However, if you wanted to manage a collection of value types, the boxing/unboxing performance penalty became more excruciating the larger the collection got or the more operations performed.
Microsoft had always intended to add generics, and they finally arrived in C# 2. However, in the meantime, there was a ton of nongeneric code written. Imagine all of the new object-based collections that developers needed to write on their own for things like sets, priority queues, and tree data structures. Add to that types like delegates, which were the primary means of method reference and async communication and operated on objects. There’s a long list of nongeneric code that’s been written, and chances are that you’ll encounter some of it as you progress through your career.
As C# developers, we appreciate the benefits of strongly typed code, making it easier to find and fix compile-time errors, making an application more maintainable, and improving quality. For this reason, you might have a strong desire to refactor a given piece of nongeneric code so that it too is strongly typed with generics.
The process is basically this: whenever you see type object, convert it to generic.
The solution shows a Deployment object that performs a health check on a deployed artifact. Since we have multiple artifacts, we also need to hold multiple Deployment instances in a collection. The collection is a (partially implemented) circular queue, and there’s a HealthCheck class that loops through the queue and periodically performs a health check with the next Deployment instance.
HealthCheckObject operates on old nongeneric code and HealthCheckGeneric operates on new generic code. The difference between the two is that the HealthCheckObject Configure method instantiates a nongeneric CircularQueue, and the HealthCheckGeneric Configure method instantiates a generic CircularQueue<T>. Our primary task is to convert CircularQueue to CircularQueue<T>.
Since we’re working with a collection, the first task is to add the type parameter to the class, CircularQueue<T>. Then look for anywhere the code uses the object type and convert that to the class type parameter, T:
-
Convert the
object items[]field toT items[]. -
In the constructor, instantiate a new
T[]instead ofobject[]. -
Change the
Addparameter fromobjecttoT. -
Change the
Nextreturn type fromobjecttoT. -
In
Next, change theobject itemvariable toT item.
After changing object types to T, you have a new strongly typed generic collection.
The Program class demonstrates how both of these collections work.
1.8 Making Classes Adapt to Your Interface
Solution
This is the interface we want to work with:
publicinterfaceIDeploymentService{voidValidate();}
Here are a couple of classes that implement that interface:
publicclassDeploymentService1:IDeploymentService{publicvoidValidate(){Console.WriteLine("Deployment Service 1 Validated");}}publicclassDeploymentService2:IDeploymentService{publicvoidValidate(){Console.WriteLine("Deployment Service 2 Validated");}}
Here’s a third-party class that doesn’t implement IDeploymentService:
publicclassThirdPartyDeploymentService{publicvoidPerformValidation(){Console.WriteLine("3rd Party Deployment Service 1 Validated");}}
This is the adapter that implements IDeploymentService:
publicclassThirdPartyDeploymentAdapter:IDeploymentService{ThirdPartyDeploymentServiceservice=newThirdPartyDeploymentService();publicvoidValidate(){service.PerformValidation();}}
This code shows how to include the third-party service by using the adapter:
classProgram{staticvoidMain(string[]args){newProgram().Start();}voidStart(){List<IDeploymentService>services=Configure();foreach(varsvcinservices)svc.Validate();}List<IDeploymentService>Configure(){returnnewList<IDeploymentService>{newDeploymentService1(),newDeploymentService2(),newThirdPartyDeploymentAdapter()};}}
Discussion
An adapter is a class that wraps another class but exposes the functionality of the wrapped class with the interface you need.
There are various situations where the need for an adapter class comes into play. What if you have a group of objects that implement an interface and want to use a third-party class that doesn’t match the interface that your code works with? What if your code is written for a third-party API, like a payment service, and you know you want to eventually switch to a different provider with a different API? What if you need to use native code via Platform Invocation Services (P/Invoke) or Component Object Model (COM) interop and didn’t want the details of that interface to bleed into your code? These scenarios are all good candidates for considering an adapter.
The solution has DeploymentService classes that implement IDeploymentService. You can see in the Program Start method that it only operates on instances that implement IDeploymentService.
Sometime later, you encounter the need to integrate ThirdPartyDeploymentService into the app. However, it doesn’t implement IDeploymentService, and you don’t have the code for ThirdPartyDeploymentService.
The ThirdPartyDeploymentAdapter class solves the problem. It implements the IDeploymentService interface and instantiates its own copy of ThirdPartyDeploymentService, and the Validate method delegates the call to ThirdPartyDeploymentService. Notice that the Program Configure method adds an instance of ThirdPartyDeploymentAdapter to the collection that Start operates on.
This was a demo to show you how to design an adapter. In practice, the PerformValidation method of ThirdPartyDeploymentService likely has different parameters and a different return type. The ThirdPartyDeploymentAdapter Validate method will be responsible for preparing arguments and reshaping return values to ensure they conform to the proper IDeploymentService interface.
1.9 Designing a Custom Exception
Solution
This is a custom exception:
[Serializable]publicclassDeploymentValidationException:Exception{publicDeploymentValidationException():this("Validation Failed!",null,ValidationFailureReason.Unknown){}publicDeploymentValidationException(stringmessage):this(message,null,ValidationFailureReason.Unknown){}publicDeploymentValidationException(stringmessage,ExceptioninnerException):this(message,innerException,ValidationFailureReason.Unknown){}publicDeploymentValidationException(stringmessage,ValidationFailureReasonreason):this(message,null,reason){}publicDeploymentValidationException(stringmessage,ExceptioninnerException,ValidationFailureReasonreason):base(message,innerException){Reason=reason;}publicValidationFailureReasonReason{get;set;}publicoverridestringToString(){returnbase.ToString()+$" - Reason: {Reason} ";}}
And this is an enum type for a property on that exception:
publicenumValidationFailureReason{Unknown,PreviousDeploymentFailed,SmokeTestFailed,MissingArtifacts}
This code shows how to throw the custom exception:
publicclassDeploymentService{publicvoidValidate(){thrownewDeploymentValidationException("Smoke test failed - check with qa@example.com.",ValidationFailureReason.SmokeTestFailed);}}
And this code catches the custom exception:
classProgram{staticvoidMain(){try{newDeploymentService().Validate();}catch(DeploymentValidationExceptionex){Console.WriteLine($"Message: {ex.Message}\n"+$"Reason: {ex.Reason}\n"+$"Full Description: \n {ex}");}}}
Discussion
The beautiful thing about C# exceptions are that they’re strongly typed. When your code catches them, you can write specific handling logic for just that type of exception. The .NET Framework has a few exceptions, like ArgumentNullException, that get some reuse (you can throw yourself) in the average code base, but often you’ll need to throw an exception with the semantics and data that gives a developer a fairer chance of figuring out why a method couldn’t complete its intended purpose.
The exception in the solution is DeploymentValidationException, which indicates a problem related to the deployment process during the validation phase. It derives from Exception. Depending on how extensive your custom exception framework is, you could create your own base exception for a hierarchy and classify a derived exception tree from that. The benefit is that you would have flexibility in catch blocks to catch more general or specific exceptions as necessary. That said, if you only need a couple of custom exceptions, the extra design work of an exception hierarchy might be overkill.
The first three constructors mirror the Exception class options for message and inner exception. You’ll also want custom constructors for instantiating with your custom data.
Note
In the past, there’s been discussion of whether a custom exception should derive from Exception or ApplicationException, where Exception was for .NET-type hierarchies and ApplicationException was for custom exception hierarchies. However, the distinction blurred over time with some .NET Framework types deriving from both with no apparent consistency or reason. So, deriving from Exception seems to be fine these days.
DeploymentValidationException has a property, of the enum type ValidationFailureReason. Besides having semantics unique to the reason for throwing an exception, another purpose of a custom exception is to include important information for exception handling and/or debugging.
Overriding ToString is also a good idea. Logging frameworks might just receive the Exception reference, resulting in a call to ToString. As in this example, you’ll want to ensure your custom data gets included in the string output. This ensures people can read the full state of the exception, along with the stack trace.
The Program Main method demonstrates how nice it is to be able to handle the specific type, rather than another type that might not fit or the general Exception class.
1.10 Constructing Objects with Complex Configuration
Solution
Here’s the DeploymentService class we want to build:
publicclassDeploymentService{publicintStartDelay{get;set;}=2000;publicintErrorRetries{get;set;}=5;publicstringReportFormat{get;set;}="pdf";publicvoidStart(){Console.WriteLine($"Deployment started with:\n"+$" Start Delay: {StartDelay}\n"+$" Error Retries: {ErrorRetries}\n"+$" Report Format: {ReportFormat}");}}
This is the class that builds the DeploymentService instance:
publicclassDeploymentBuilder{DeploymentServiceservice=newDeploymentService();publicDeploymentBuilderSetStartDelay(intdelay){service.StartDelay=delay;returnthis;}publicDeploymentBuilderSetErrorRetries(intretries){service.ErrorRetries=retries;returnthis;}publicDeploymentBuilderSetReportFormat(stringformat){service.ReportFormat=format;returnthis;}publicDeploymentServiceBuild(){returnservice;}}
Here’s how to use the DeploymentBuilder class:
classProgram{staticvoidMain(){DeploymentServiceservice=newDeploymentBuilder().SetStartDelay(3000).SetErrorRetries(3).SetReportFormat("html").Build();service.Start();}}
Discussion
In Recipe 1.9, the DeploymentValidationException class has multiple constructors. Normally, this isn’t a problem. The first three constructors are a typical convention for exception classes. Subsequent constructors add new parameters for initializing new fields.
However, what if the class you were designing had a lot of options and there was a strong possibility that new features would require new options? Further, developers will want to pick and choose what options to configure the class with. Imagine the exponential explosion of new constructors for every new option added to the class. In such a scenario, constructors are practically useless. The builder pattern can solve this problem.
An example of an object that implements the builder pattern is the ASP.NET ConfigSettings. Another is the ServiceCollection from Recipe 1.2—the code isn’t entirely written in a fluid manner, but it could be because it follows the builder pattern.
The Solution has a DeploymentService class, which is what we want to build. Its properties have default values in case a developer doesn’t configure a given value. In general terms, the class that the builder creates will also have other methods and members for its intended purpose.
The DeploymentBuilder class implements the builder pattern. Notice that all of the methods, except for Build, return the same instance (this) of the same type, DeploymentBuilder. They also use the parameter to configure the DeploymentService field that was instantiated with the DeploymentBuilder instance. The Build method returns the DeploymentService instance.
How the configuration and instantiation occur are implementation details of the DeploymentBuilder that you can vary as needed. You can also accept any parameter type you need and perform the configuration. Also, you can collect configuration data and only instantiate the target class when the Build method runs. Another advantage is that the order in which parameters are set is irrelevant. You have all the flexibility to design the internals of the builder for what makes sense to you.
Finally, notice how the Main method instantiates DeploymentBuilder, uses its fluent interface for configuration, and calls Build to return the DeploymentService instance. This example used every method, but that wasn’t required because you have the option to use some, none, or all.
Get C# Cookbook now with the O’Reilly learning platform.
O’Reilly members experience books, live events, courses curated by job role, and more from O’Reilly and nearly 200 top publishers.

