56 CCF-to-J2C Architecture Migration
5.1 Common post-migration steps
The following post-migration steps are required and are described in this section:
Update references from CCF to J2CA code
Replace EAB generated record types
Replace CCF exceptions
Remove transactional code
5.1.1 Updating references from CCF to J2CA
Your client code contains references to CCF code that must be updated to
reference the J2CA code you have generated.
Delete Enterprise Access Builder (EAB) code
Delete all generated EAB code from your application. When the application was
originally set up, the VisualAge for Java Enterprise Access Builder would have
generated these classes to connect to the EIS.
Note that all of the code in these classes should be generated. If methods were
added after EAB code generation, copy them into a utility class so that they are
not lost. All newly generated code should be left unmodified.
The deletion of this EAB code will generate errors in the client code that attempts
to access the deleted classes. These references will be fixed later.
An example of the code to delete is shown in Figure 5-1 on page 57. Note that
this code will look different in your application because the class names will not
be the same.

Chapter 5. Post-migration steps 57
Figure 5-1 Sample Enterprise Access Builder generated code
Remove CCF package import statements
Remove the CCF and EAB import statements from the client code. These are
imports of the packages that you deleted earlier.
Examples of packages that should be deleted are:
com.ibm.record.*
com.ibm.ivj.eab.*
Modify the Java build path
1. In the Java Perspective, right-click on the client project that accessed the EAB
code and select Properties.
2. Select Java Build Path from the left pane.
58 CCF-to-J2C Architecture Migration
3. Select the Projects tab and select the check box next to the service project
that contains your newly generated J2CA code. Click OK.
Repeat these steps for all projects that referenced EAB code.
If your workspace is not set to automatically build on resource modification
(specified in Window
→ Preferences → Workbench), rebuild the affected
projects.
Modify JAR dependencies
Complete the steps in this section if your application is an Enterprise Application.
1. Switch to the J2EE Perspective and expand Enterprise Applications on the
J2EE Hierarchy tab.
2. Right-click on the Enterprise Archive (EAR) file for your application and select
Open With
→ Deployment Descriptor Editor.
3. In the Application Deployment Descriptor window, select the Module tab.
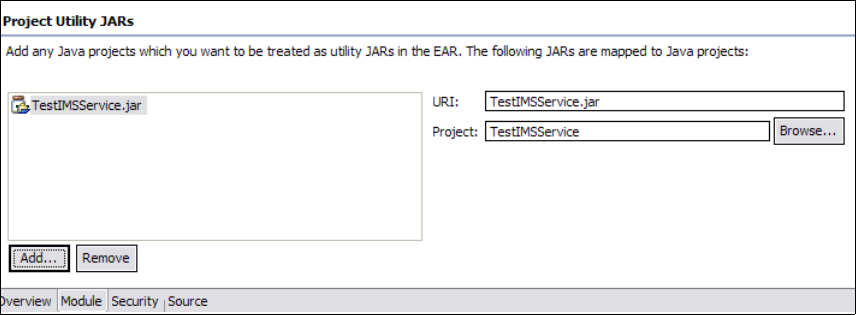
4. As shown in Figure 5-2, add the project that contains the newly generated
J2CA code to the list of Project Utility JARs by clicking Add in the Project
Utility JARs section.
5. Select the project from the list of projects found and click Finish.
Figure 5-2 Adding a Project Utility JAR to the Enterprise Archive file
6. Press Ctrl+S to save and then close the editor.
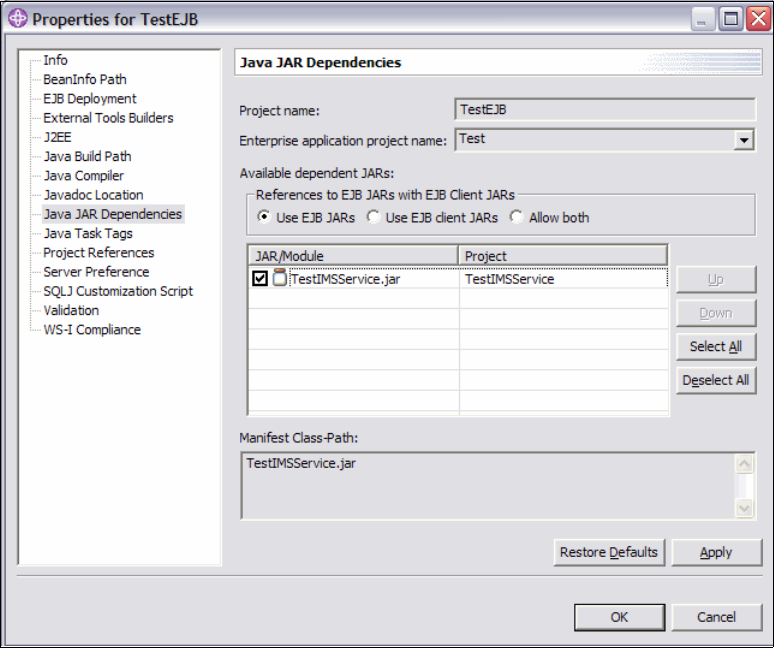
7. Switch to the Java Perspective, right-click the project that references the
newly generated J2CA code, and select Properties.
8. Select Java JAR Dependencies in the left pane.
Chapter 5. Post-migration steps 59
9. As shown in Figure 5-3, in the list of Available Dependent JARs, select the
check box next to the project that contains the J2CA code, and click OK.
Figure 5-3 Adding a JAR to the Project JAR Dependencies
Repeat steps 6 on page 58 through 8 on page 58 for all projects that referenced
EAB code.
If your workspace is not set to automatically build on resource modification
(specified in Window
→ Preferences → Workbench), rebuild the affected
projects.
Get CCF-to-J2C Architecture Migration now with the O’Reilly learning platform.
O’Reilly members experience books, live events, courses curated by job role, and more from O’Reilly and nearly 200 top publishers.

