Chapter 4. System Hardening
The domain “system hardening” deals with security aspects relevant to the underlying host system running the Kubernetes cluster nodes. Topics discussed here touch on techniques and configuration options that are fundamentally Linux core functionality. This includes disabling services and removing packages, managing users and groups, disabling ports, and setting up firewall rules. Finally, this chapter discusses Linux kernel hardening tools that can restrict what operations a process running in a container can perform on a host level.
At a high level, this chapter covers the following concepts:
-
Minimizing the host OS footprint
-
Minimizing IAM roles
-
Minimizing external access to the network
-
Using kernel hardening tools like AppArmor and seccomp
Minimizing the Host OS Footprint
Cluster nodes run on physical or virtual machines. In most cases, the operating system on those machines is a Linux distribution. Evidently, the operating system can expose security vulnerabilities.
Over time, you need to keep the version of the operating system up to date with the latest security fixes. This process could entail upgrading a node’s operating system from Ubuntu 18 to 22, for example. Upgrading the operating system is out of scope for this book; for more information, check the relevant Linux documentation.
Many Linux distributions, such as Ubuntu, come with additional tools, applications, and services that are not necessarily required for operating the Kubernetes cluster. It is your job as an administrator to identify security risks, disable or remove any operating system-specific functionality that may expose vulnerabilities, and keep the operating system patched to incorporate the latest security fixes. The less functionality an operating system has, the smaller the risk.
CIS benchmark for Ubuntu Linux
As a reference guide, you may want to compare your operating system’s configuration with the CIS benchmark for Ubuntu Linux.
Scenario: An Attacker Exploits a Package Vulnerability
Figure 4-1 illustrates an attacker exploiting a vulnerability of a package installed on the system. For example, the application could be the package manager snapd. Assume that the attacker takes advantage of the known vulnerability USN-5292-1 that has the potential of exposing sensitive information to an attacker.
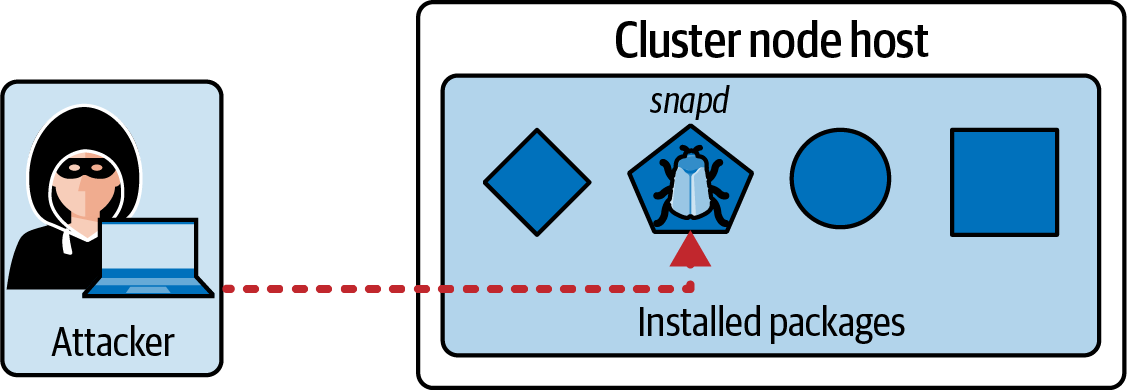
Figure 4-1. An attacker exploits an OS-level vulnerability
The following section will explain how to minimize security risks for services and packages that are not really needed for operating Kubernetes by simply disabling or removing them.
Disabling Services
On Linux, many applications run as services in the background. Services can be managed using the command line tool systemctl. The following systemctl command lists all running services:
$ systemctl | grep running
...
snapd.service   loaded active running   Snap Daemon
One of the services we will not need for operating a cluster node is the package manager snapd. For more details on the service, retrieve the status for it with the status subcommand:
$ systemctl status snapd
● snapd.service - Snap Daemon
     Loaded: loaded (/lib/systemd/system/snapd.service; enabled; vendor \
     preset: enabled)
     Active: active (running) since Mon 2022-09-19 22:49:56 UTC; 30min ago
TriggeredBy: ● snapd.socket
   Main PID: 704 (snapd)
      Tasks: 12 (limit: 2339)
     Memory: 45.9M
     CGroup: /system.slice/snapd.service
             └─704 /usr/lib/snapd/snapd
You can stop service using the systemctl subcommand stop:
$ sudo systemctl stop snapd
Warning: Stopping snapd.service, but it can still be activated by:
  snapd.socket
Execute the disable subcommand to prevent the service from being started again upon a system restart:
$ sudo systemctl disable snapd
Removed /etc/systemd/system/multi-user.target.wants/snapd.service.
The service has now been stopped and disabled:
$ systemctl status snapd
● snapd.service - Snap Daemon
     Loaded: loaded (/lib/systemd/system/snapd.service; disabled; vendor \
     preset: enabled)
     Active: inactive (dead) since Mon 2022-09-19 23:22:22 UTC; 4min 4s ago
TriggeredBy: ● snapd.socket
   Main PID: 704 (code=exited, status=0/SUCCESS)
Removing Unwanted Packages
Now that the service has been disabled, there’s no more point in keeping the package around. You can remove the package to free up additional disk space and memory. You can use the apt purge command to remove a package and its transitive packages, as demonstrated in the following:
$ sudo apt purge --auto-remove snapd
Reading package lists... Done
Building dependency tree
Reading state information... Done
The following packages will be REMOVED:
  snapd* squashfs-tools*
0 upgraded, 0 newly installed, 2 to remove and 116 not upgraded.
After this operation, 147 MB disk space will be freed.
Do you want to continue? [Y/n] y
...
You can use the same command even if the package isn’t controlled by a service. Identify the packages you don’t need and simply remove them. You should end up with a much slimmer footprint of your system.
A potential attacker cannot use the snapd service anymore to exploit the system. You should repeat the process for any unwanted services. As a result, the snapd service ceases to exist on the system:
$ systemctl status snapd
Unit snapd.service could not be found.
Minimizing IAM Roles
Identity and access management (IAM) on the system level involves management of Linux users, the groups they belong to, and the permissions granted to them. Any directory and file will have file permissions assigned to a user.
Proper user and access management is a classic responsibility of every system administrator. While your role as a Kubernetes administrator may not directly involve system-level IAM, it’s important to understand the implications to security. You will likely have to work with a peer to harden the system running the Kubernetes cluster.
This section will provide a short introduction on how to manage users and groups. We will also discuss how to set file permissions and ownership to minimize access as much as possible. We will only scratch the surface of the topic in this book. For more information, refer to the Linux documentation of your choice.
Scenario: An Attacker Uses Credentials to Gain File Access
A security breach can lead to stolen user credentials. Gaining access to valid user credentials opens the door for additional attack vectors. Figure 4-2 shows an attacker who could log into a cluster node with stolen user credentials and can now interact with all files and directories with the permissions granted to the user.
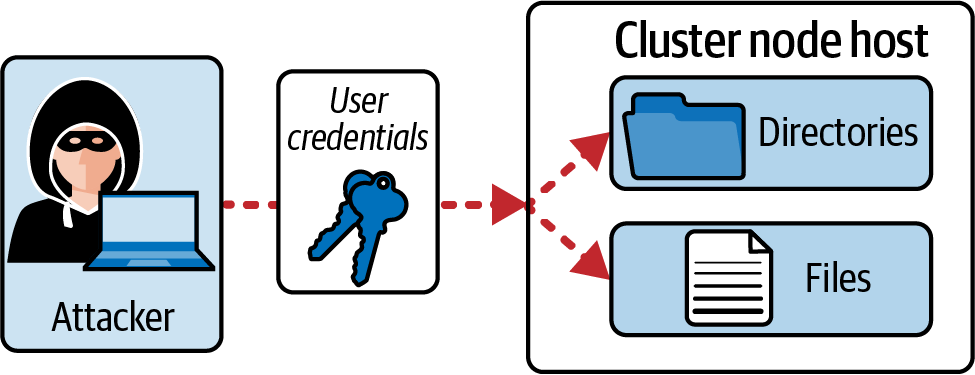
Figure 4-2. An attacker uses stolen credentials to access files
It’s recommended to follow the principle of least privilege. Only grant administrative permissions to a limited group of users. All other users should only be allowed to perform operations necessary to perform their jobs.
Understanding User Management
Every user must authenticate to a system to use it. The authenticated user has access to resources based on the assigned permissions. This section will walk you through the primary operations required to manage users.
Listing users
To list all users on the system, render the contents of the file /etc/passwd. Every entry follows the general pattern username:password:UID:GID:comment:home:shell. Some of the fields within the pattern may be empty:
$ cat /etc/passwd
root:x:0:0:root:/root:/bin/bash
nobody:x:65534:65534:nobody:/nonexistent:/usr/sbin/nologin
...
The command output renders the user root in the first position of the output. The last portion of the string for the root user, /bin/bash, indicates that the user is allowed to log into the system with a bash shell. Other users might not be allowed to log in at all. For those users, you will find the string /usr/sbin/nologin assigned to the shell field.
At any given point of time, you can see which processes have been started by users. The following command shows all bash processes, including the corresponding user that started it:
$ ps aux | grep bash
root         956  0.0  0.4  22512 19200 pts/0    Ss   17:57   0:00 -bash
root        7064  0.0  0.0   6608  2296 pts/0    S+   18:08   0:00 grep \
--color=auto bash
Adding a user
At some point, you may want to give team members access to the machines running the cluster nodes, with limited permissions. You can add new users to the system with the adduser command. Add the flag --shell /sbin/nologin to disable shell access for the user. The following command creates the user ben:
$ sudo adduser ben
Adding user ‘ben’ ...
Adding new group ‘ben’ (1001) ...
Adding new user ‘ben’ (1001) with group ‘ben’ ...
Creating home directory ‘/home/ben’ ...
Copying files from ‘/etc/skel’ ...
New password:
Retype new password:
...
The user entry has been added to the file /etc/passwd:
$ cat /etc/passwd
...
ben:x:1001:1001:,,,:/home/ben:/bin/bash
Switching to a user
You can change the user in a shell by using the su command. The following command switches to the user ben we created earlier. You will be asked to enter the user’s password:
$ su ben
Password:
ben@controlplane:/root$ pwd
/root
The shell will indicate the current user by its prompt. You will inherit the environment variables from the account you used when running the su command. To create a new environment, add the hyphen with the su command:
$ su - ben
ben@controlplane:~$ pwd
/home/ben
Another way to temporarily switch the user is by using the sudo command. You will need to have elevated privileges to execute the command. Therefore, the sudo command is equivalent to “run this command as administrator”:
$ sudo -u ben pwd
/root
Deleting a user
Team members, represented by users in the system, transition to other teams or may simply leave the company. You will want to revoke access to the user to prevent unauthorized use of the credentials. The following command deletes the user, including the user’s home directory:
$ sudo userdel -r ben
Understanding Group Management
It’s more convenient for a system administrator to group users with similar access requirements to control permissions on an individual user level. Linux systems offer the concept of a group as a way to organize users based on teams, or specific organizational roles. We’ll briefly touch on the most important aspects of group management.
Listing groups
Groups can be listed by inspecting the contents of the file /etc/group. Every entry follows the general pattern groupname:password:GID:group members:
$ cat /etc/group
root:x:0:
plugdev:x:46:packer
nogroup:x:65534:
...
As you can see in the output, some of the fields may be empty. The only group with an assigned member is plugdev, whose name is packer.
Assigning a user to a group
To assign a group to a user, use the usermod command. The following command adds the user ben to the group kube-developers:
$ sudo usermod -g kube-developers ben
The group identifier 1004 acts as a stand-in for the group kube-developers:
$ cat /etc/passwd | grep ben
ben:x:1001:1004:,,,:/home/ben:/bin/bash
Deleting a group
Sometimes you want to get rid of a group entirely. Maybe the organizational role referring to a Linux group that does not exist anymore. Use the groupdel command to delete a group. You will receive an error message if the members are still part of the group:
$ sudo groupdel kube-developers
groupdel: cannot remove the primary group of user ben
Before deleting a group, you should reassign group members to a different group using the usermod command. The following command changes the group from kube-developers to kube-admins. Assume that the group kube-admins has been created before:
$ sudo usermod -g kube-admins ben
$ sudo groupdel kube-developers
Understanding File Permissions and Ownership
Assigning the file permissions with as minimal access as possible is crucial to maximizing security. This is where Linux file permissions and ownership come into play. I am only going to discuss the relevant operations on a high level. Refer to the Linux Foundation’s blog post about Linux file permissions for more details.
Viewing file permissions and ownership
Every user can create new directories and files. For example, you could use the touch command to create an empty file. The following command creates a file with the name my-file in the current directory:
$ touch my-file
To see the contents of a directory in the “long” format, use the ls command. The long format of the output requested by the -l command line parameter renders the file permissions and the file ownership:
$ ls -l
total 0
-rw-r--r-- 1 root root 0 Sep 26 17:53 my-file
The important portion of the output is -rw-r--r--. The first character is a special permission character that can vary per system, followed by three groupings with the notation rwx. The first three characters stand for the owner permissions, the second set of three characters is for the group permissions, and the last three characters represent the permissions for all users. The symbol r means read permissions, w stands for write permissions, and x refers to execution permissions. In the previous example, the user root can read and write the file, whereas the group and all other users can only read the file.
Changing file ownership
Use the chown command to change the user and group assignment for a file or directory. The syntax of the command follows the pattern chown owner:group filename. The following command changes the ownership of the file to the user ben but does not reassign a group. The user executing the chown command needs to have write permissions:
$ chown ben my-file
$ ls -l
total 0
-rw-r--r-- 1 ben  root 0 Sep 26 17:53 my-file
Minimizing External Access to the Network
External access to your cluster nodes should only be allowed for the ports necessary to operate Kubernetes. We already discussed the standard Kubernetes ports in “Protecting Node Metadata and Endpoints”. Access to all other ports should be blocked.
Identifying and Disabling Open Ports
Applications like FTP servers, web servers, and file and print services such as Samba open ports as a means to expose a communication endpoint to clients. Running applications that open network communication can expose a security risk. You can eliminate the risk by simply disabling the service and deinstalling the application.
Let’s say we installed the Apache 2 HTTP web server on a control plane node with the following commands:
$ sudo apt update
$ sudo apt install apache2
Update about netstat command
The netstat command has been deprecated in favor of the faster, more human-readable ss command. For more information, refer to the documentation of the operating system you are using.
We can inspect all open ports using the command line tool ss, a utility with similar functionality to netstat. The following command renders all of the open ports, including their processes. Among them is port 80, exposed by Apache 2:
$ sudo ss -ltpn
State    Recv-Q   Send-Q   Local Address:Port   Peer Address:Port   Process
...
LISTEN   0        511      *:80                 *:*                 users: \
(("apache2",pid=18435,fd=4),("apache2",pid=18434,fd=4),("apache2", ]\
pid=18432,fd=4))
You may have only needed the web server temporarily and may have simply forgotten about installing it. The process is currently managed by a server. You can review the status of a service with the systemctl status command:
$ sudo systemctl status apache2
● apache2.service - The Apache HTTP Server
     Loaded: loaded (/lib/systemd/system/apache2.service; enabled; vendor \
     preset: enabled)
     Active: active (running) since Tue 2022-09-20 22:25:25 UTC; 39s ago
       Docs: https://httpd.apache.org/docs/2.4/
   Main PID: 18432 (apache2)
      Tasks: 55 (limit: 2339)
     Memory: 5.6M
     CGroup: /system.slice/apache2.service
             ├─18432 /usr/sbin/apache2 -k start
             ├─18434 /usr/sbin/apache2 -k start
             └─18435 /usr/sbin/apache2 -k start
Apache 2 is not needed by Kubernetes. We decide to shut down the service and deinstall the package:
$ sudo systemctl stop apache2
$ sudo systemctl disable apache2
Synchronizing state of apache2.service with SysV service script with \
/lib/systemd/systemd-sysv-install.
Executing: /lib/systemd/systemd-sysv-install disable apache2
Removed /etc/systemd/system/multi-user.target.wants/apache2.service.
$ sudo apt purge --auto-remove apache2
Verify that the port isn’t used anymore. The ss command doesn’t find an application exposing port 80 anymore:
$ sudo ss -ltpn | grep :80
Setting Up Firewall Rules
Another way to control ports is with the help of an operating-system-level firewall. On Linux, you could use the Uncomplicated Firewall (UFW). This section will give you a very brief introduction on how to enable UFW and how to configure firewall rules.
Following the principle of least privilege, it’s a good idea to start by enabling the firewall and setting up deny rules for any incoming and outgoing network traffic. The following commands demonstrate the steps to achieve that:
$ sudo ufw allow ssh
Rules updated
Rules updated (v6)
$ sudo ufw default deny outgoing
Default outgoing policy changed to deny
(be sure to update your rules accordingly)
$ sudo ufw default deny incoming
Default incoming policy changed to deny
(be sure to update your rules accordingly)
$ sudo ufw enable
Command may disrupt existing ssh connections. Proceed with operation (y|n)? y
Firewall is active and enabled on system startup
You will want to allow external tools like kubectl to connect to the API server running on port 6443. On the control plane node, execute the following command to allow access to the API server port:
$ sudo ufw allow 6443
Rule added
Rule added (v6)
You will have to repeat the same process to open up other ports on control plane and worker nodes. Ensure that all other ports not needed to operate Kubernetes are blocked.
Using Kernel Hardening Tools
Applications or processes running inside of a container can make system calls. A typical example could be the curl command performing an HTTP request. A system call is a programmatic abstraction running in the user space for requesting a service from the kernel. We can restrict which system calls are allowed to be made with the help of kernel hardening tools. The CKS exam explicitly mentions two tools in this space, AppArmor and seccomp. We’ll discuss both tools and the mechanics to integrate them with Kubernetes.
Using AppArmor
AppArmor provides access control to programs running on a Linux system. The tool implements an additional security layer between the applications invoked in the user space and the underlying system functionality. For example, we can restrict network calls or filesystem interaction. Many Linux distributions (e.g., Debian, Ubuntu, openSUSE) already ship with AppArmor. Therefore, AppArmor doesn’t have to be installed manually. Linux distributions that do not support AppArmor use Security-Enhanced Linux (SELinux) instead, which takes a similar approach to AppArmor. Understanding SELinux is out of scope for the CKS exam.
Understanding profiles
The rules that define what a program can or cannot do are defined in an AppArmor profile. Every profile needs to be loaded into AppArmor before it can take effect. AppArmor provides a command line tool for checking the profiles that have been loaded. Execute the command aa-status to see a summary of all loaded profiles. You will see that AppArmor already comes with a set of default application profiles to protect Linux services:
$ sudo aa-status
apparmor module is loaded.
31 profiles are loaded.
31 profiles are in enforce mode.
   /snap/snapd/15177/usr/lib/snapd/snap-confine
   ...
0 profiles are in complain mode.
14 processes have profiles defined.
14 processes are in enforce mode.
   /pause (11934) docker-default
   ...
0 processes are in complain mode.
0 processes are unconfined but have a profile defined.
The profile mode determines the treatment of rules at runtime should a matching event happen. AppArmor distinguishes two types of profile modes:
- Enforce
-
The system enforces the rules, reports the violation, and writes it to the syslog. You will want to use this mode to prevent a program from making specific calls.
- Complain
-
The system does not enforce the rules but will write violations to the log. This mode is helpful if you want to discover the calls a program makes.
Example 4-1 defines a custom profile in the file k8s-deny-write for restricting file write access. The file should be placed in the directory /etc/apparmor.d of every worker node that executes workload. It is out of scope of this book to explain all the rules in detail. For more information, have a look at the
AppArmor wiki.
Example 4-1. An AppArmor profile for restricting file write access
#include <tunables/global>
profile k8s-deny-write flags=(attach_disconnected) {  #include <abstractions/base>
file,
#include <abstractions/base>
file,  deny /** w,
  }
}The identifier after the
profilekeyword is the name of the profile.Apply to file operations.
Deny all file writes.
Setting a custom profile
To load the profile into AppArmor, run the following command on the worker node:
$ sudo apparmor_parser /etc/apparmor.d/k8s-deny-write
The command uses the enforce mode by default. To load the profile in complain mode, use the -C option. The aa-status command will now list the profile in addition to the default profiles. As you can see in the output, the profile is listed in enforce mode:
$ sudo aa-status
apparmor module is loaded.
32 profiles are loaded.
32 profiles are in enforce mode.
   k8s-deny-write
   ...
AppArmor supports additional convenience commands as part of a utilities package. You can manually install the package using the following commands if you want to use them:
$ sudo apt-get update
$ sudo apt-get install apparmor-utils
Once installed, you can use the command aa-enforce to load a profile in enforce mode, and aa-complain to load a profile in complain mode. For the exam, it’s likely easier to just go with the standard apparmor_parser command.
Applying a profile to a container
You need to ensure a couple of prerequisites before using AppArmor rules in a Pod definition. First, the container runtime needs to support AppArmor to let rules take effect. In addition, AppArmor needs to be installed on the worker node that runs the Pod. Last, make sure you loaded the profile, as described in the previous section.
Example 4-2 shows a YAML manifest for a Pod defined in the file pod.yaml. To apply a profile to the container, you will need to set a specific annotation. The annotation key needs to use the key in the format container.apparmor.security.beta.kubernetes.io/<container-name>. In our case, the container name is hello. The full key is container.apparmor.security.beta.kubernetes.io/hello. The value of the annotation follows the pattern localhost/<profile-name>. The custom profile we want to use here is k8s-deny-write. For more information on the configuration options, see the Kubernetes
documentation.
Example 4-2. A Pod applying an AppArmor profile to a container
apiVersion:v1kind:Podmetadata:name:hello-apparmorannotations:container.apparmor.security.beta.kubernetes.io/hello:\localhost/k8s-deny-writespec:containers:-name:helloimage:busybox:1.28command:["sh","-c","echo'HelloAppArmor!'&&sleep1h"]
The annotation key that consists of a hard-coded prefix and the container name separated by a slash character.
The profile name available on the current node indicated by
localhost.The container name.
We are ready to create the Pod. Run the apply command and point it to the YAML manifest. Wait until the Pod transitions into the “Running” status:
$ kubectl apply -f pod.yaml
pod/hello-apparmor created
$ kubectl get pod hello-apparmor
NAME             READY   STATUS    RESTARTS   AGE
hello-apparmor   1/1     Running   0          4s
You can now shell into the container and perform a file write operation:
$ kubectl exec -it hello-apparmor -- /bin/sh
/ # touch test.txt
touch: test.txt: Permission denied
AppArmor will prevent writing a file to the container’s filesystem. The message “Permission denied” will be rendered if you try to perform the operation.
Using seccomp
Seccomp, short for “Secure Computing Mode,” is another Linux kernel feature that can restrict the calls made from the userspace into the kernel. A seccomp profile is the mechanism for defining the rules for restricting syscalls and their arguments. Using seccomp can reduce the risk of exploiting a Linux kernel vulnerability. For more information on seccomp on Kubernetes, see the documentation.
Applying the default container runtime profile to a container
Container runtimes, such as Docker Engine or containerd, ship with a default seccomp profile. The default seccomp profile allows the most commonly used syscalls used by applications while at the same time forbidding the use of syscalls considered dangerous.
Kubernetes does not apply the default container runtime profile to containers when creating a Pod, but you can enable it using the SeccompDefault feature gate. Alternatively, you can opt into the feature on a Pod-by-Pod basis by setting the seccomp profile type to RuntimeDefault with the help of the security context attribute seccompProfile. Example 4-3 demonstrates its use.
Example 4-3. A Pod applying the default seccomp profile provided by the container runtime profile
apiVersion:v1kind:Podmetadata:name:hello-seccompspec:securityContext:seccompProfile:type:RuntimeDefaultcontainers:-name:helloimage:busybox:1.28command:["sh","-c","echo'Helloseccomp!'&&sleep1h"]
Applies the default container runtime profile.
You can start the Pod using the apply command and point to the YAML manifest. The Pod should transition into the “Running” status:
$ kubectl apply -f pod.yaml
pod/hello-seccomp created
$ kubectl get pod hello-seccomp
NAME            READY   STATUS    RESTARTS   AGE
hello-seccomp   1/1     Running   0          4s
The echo command executed in the container is considered unproblematic from a security perspective by the default seccomp profile. The following command inspects the logs of the container:
$ kubectl logs hello-seccomp
Hello seccomp!
The call was permitted and resulted in writing the message “Hello seccomp!” to standard output.
Setting a custom profile
You can create and set your own custom profile in addition to the default container runtime profile. The standard directory for those files is /var/lib/kubelet/seccomp. We’ll organize our custom profiles in the subdirectory profiles. Create the directory if it doesn’t exist yet:
$ sudo mkdir -p /var/lib/kubelet/seccomp/profiles
We decide to create our custom profile in the file mkdir-violation.json in the profile directory. Example 4-4 shows the details of the profile definition. In a nutshell, the rule set disallows the use of the mkdir syscall.
Example 4-4. A seccomp profile that prevents executing a mkdir syscall
{"defaultAction":"SCMP_ACT_ALLOW","architectures":["SCMP_ARCH_X86_64","SCMP_ARCH_X86","SCMP_ARCH_X32"],"syscalls":[{"names":["mkdir"],"action":"SCMP_ACT_ERRNO"}]}
The default action applies to all system calls. Here we’ll allow all syscalls using
SCMP_ACT_ALLOW.You can filter for specific architectures the default action should apply to. The definition of the field is optional.
The default action can be overwritten by declaring more fine-grained rules. The
SCMP_ACT_ERRNOaction will prevent the execution of themkdirsyscall.
Placing a custom profile into the directory /var/lib/kubelet/seccomp doesn’t automatically apply the rules to a Pod. You still need to configure a Pod to use it.
Applying the custom profile to a container
Applying a custom profile follows a similar pattern to applying the default container runtime profile, with minor differences. As you can see in Example 4-5, we point the seccompProfile attribute of the security profile to the file mkdir-violation.json and set the type to Localhost.
Example 4-5. A Pod applying a custom seccomp profile prevents a mkdir syscall
apiVersion:v1kind:Podmetadata:name:hello-seccompspec:securityContext:seccompProfile:type:LocalhostlocalhostProfile:profiles/mkdir-violation.jsoncontainers:-name:helloimage:busybox:1.28command:["sh","-c","echo'Helloseccomp!'&&sleep1h"]securityContext:allowPrivilegeEscalation:false
Refers to a profile on the current node.
Applies the profile with the name
mkdir-violation.jsonin the subdirectoryprofiles.
Create the Pod using the declarative apply command. Wait until the Pod transitions into the “Running” status:
$ kubectl apply -f pod.yaml
pod/hello-seccomp created
$ kubectl get pod hello-seccomp
NAME            READY   STATUS    RESTARTS   AGE
hello-seccomp   1/1     Running   0          4s
Shell into the container to verify that seccomp properly enforced the applied rules:
$ kubectl exec -it hello-seccomp -- /bin/sh
/ # mkdir test
mkdir: can't create directory test: Operation not permitted
As you can see in output, the operation renders an error message when trying to execute the mkdir command. The rule in the custom profile has been violated.
Summary
Addressing security aspects isn’t limited to Kubernetes cluster components or workload. There’s plenty you can do on the host system level. We discussed different OS capabilities and how to use them to minimize potential security vulnerabilities.
Many operating systems come with a wealth of packages and services to offer a more feature-rich experience to end users. It’s important to identify functionality not required to operate a Kubernetes cluster. Purge unnecessary packages and services rigorously and close ports you don’t need. You will also want to limited which users are allowed to have access to specific directories, files, and applications. Use Linux’s user management to restrict permissions.
It’s very common for applications and processes running in containers to make system calls. You can use Linux kernel hardening tools like AppArmor and seccomp to restrict those calls. Only allow system calls crucial to fulfill the needs of your application running the container.
Exam Essentials
- Have a basic understanding of Linux OS tooling.
-
The CKS exam primarily focuses on security functionality in Kubernetes. This domain crosses the boundary to Linux OS security features. It won’t hurt to explore Linux-specific tools and security aspects independent from the content covered in this chapter. On a high level, familiarize yourself with service, package, user, and network management on Linux.
- Know how to integrate Linux kernel hardening tools with Kubernetes.
-
AppArmor and seccomp are just some kernel hardening tools that can be integrated with Kubernetes to restrict system calls made from a container. Practice the process of loading a profile and applying it to a container. In order to expand your horizons, you may also want to explore other kernel functionality that works alongside Kubernetes, such as SELinux or sysctl.
Sample Exercises
Solutions to these exercises are available in the Appendix.
-
Navigate to the directory app-a/ch04/close-ports of the checked-out GitHub repository bmuschko/cks-study-guide. Start up the VMs running the cluster using the command
vagrant up. The cluster consists of a single control plane node namedkube-control-planeand one worker node namedkube-worker-1. Once done, shut down the cluster usingvagrant destroy -f.Identify the process listening on port 21 in the VM
kube-worker-1. You decided not to expose this port to reduce the risk of attackers exploiting the port. Close the port by shutting down the corresponding process.Prerequisite: This exercise requires the installation of the tools Vagrant and VirtualBox.
-
Navigate to the directory app-a/ch04/apparmor of the checked-out GitHub repository bmuschko/cks-study-guide. Start up the VMs running the cluster using the command
vagrant up. The cluster consists of a single control plane node namedkube-control-plane, and one worker node namedkube-worker-1. Once done, shut down the cluster usingvagrant destroy -f.Create an AppArmor profile named
network-deny. The profile should prevent any incoming and outgoing network traffic. Add the profile to the set of AppArmor rules in enforce mode. Apply the profile to the Pod namednetwork-callrunning in thedefaultnamespace. Check the logs of the Pod to ensure that network calls cannot be made anymore.Prerequisite: This exercise requires the installation of the tools Vagrant and VirtualBox.
-
Navigate to the directory app-a/ch04/seccomp of the checked-out GitHub repository bmuschko/cks-study-guide. Start up the VMs running the cluster using the command
vagrant up. The cluster consists of a single control plane node namedkube-control-plane, and one worker node namedkube-worker-1. Once done, shut down the cluster usingvagrant destroy -f.Create a seccomp profile file named
audit.jsonthat logs all syscalls in the standard seccomp directory. Apply the profile to the Pod namednetwork-callrunning in thedefaultnamespace. Check the log file/var/log/syslogfor log entries.Prerequisite: This exercise requires the installation of the tools Vagrant and VirtualBox.
-
Create a new Pod named
sysctl-podwith the imagenginx:1.23.1. Set the sysctl parametersnet.core.somaxconnto 1024 anddebug.iotraceto1. Check on the status of the Pod.
Get Certified Kubernetes Security Specialist (CKS) Study Guide now with the O’Reilly learning platform.
O’Reilly members experience books, live events, courses curated by job role, and more from O’Reilly and nearly 200 top publishers.

