
Configuring Security 117
• If you use EAP-MD5 with static WEP to authenticate, select Use Static
WEP Keys. Next, enter a static WEP key as explained in the “Configur-
ing WEP Keys” section of this chapter.
• If you use EAP-MD5 without WEP, select No WEP under WEP.
Figure 6-10 Selecting WEP Options
Step 3. Click OK to save changes and return to the previous window.
Step 4. Click OK to save changes and return to the previous window.
Configuring EAP in Windows
At this point, ACU cannot configure authentication on your client. You can mitigate
this and configure authentication settings on the client’s operating system.
Step 1. Do one of the following (make sure you know whether the client’s operating
system is Windows 2000 or Windows XP):
• Use the following process for Windows 2000 clients (the client must have
Service Pack 3 and the Windows 2000 Wireless 802.1X hotfix):
a. Follow My Computer > Control Panel > Network > Dial-up Con-
nections.
b. Right-click Local Area Connection.
118 Configuring Security
c. Click Properties, which brings up the Local Area Connection Proper-
ties screen.
• Use the following process for Windows XP clients:
a. Follow My Computer > Control Panel > Network Connections.
b. Right-click Wireless Network Connection.
c. Click Properties, calling up the Wireless Network Connection Prop-
erties screen.
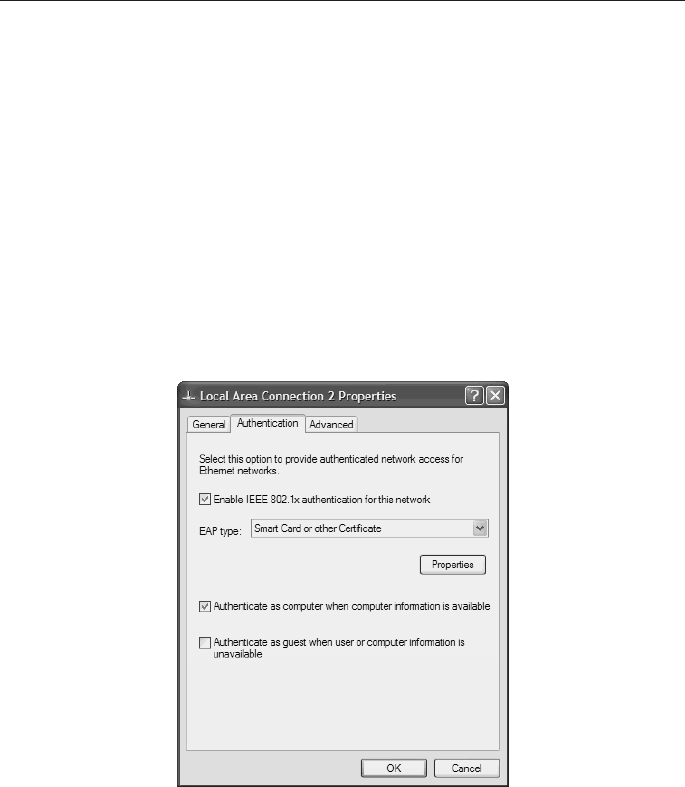
Step 4. Click the Authentication tab. The screen that appears is shown in
Figure 6-11.
Figure 6-11 Configuring Authentication Using Windows XP
Step 5. Select the Enable IEEE 802.1X Authentication for This Network check
box.
At this point, configuration branches off for each type of EAP authentication. EAP
authentication methods include the following:
• EAP-TLS
• PEAP
• EAP-SIM
Perform the steps outlined in the following sections based on which EAP
authentication method you use.
Configuring Security 119
EAP-TLS
Follow these steps to select EAP-TLS as your authentication method:
Step 1. Under EAP type, select Smart Card or Other Certificate.
Step 2. Click Properties.
Step 3. From the Smart Card or Other Certificate Properties screen, select Use a cer-
tificate on This Computer.
Step 4. Check the Validate server certificate check box.
Step 5. Ensure that the name of the certificate authority (CA) from which the
EAP-TLS certificate was downloaded is listed in the Trusted root certificate
authority field.
Step 6. The check box next to the CA must be selected and the user or computer’s
certificate must be on the machine.
Step 7. Click OK.
PEAP
Follow these steps to select PEAP as your authentication method:
Step 1. Under EAP type, select PEAP.
Step 2. Click Properties.
Step 3. On the PEAP Properties screen, select the Validate Server Certificate
check box if server certificate validation is required.
Step 4. Select the Connect only if server name ends with check box and enter the
server name suffix in the text box.
Step 5. Ensure that the CA name from which you downloaded the server certificate
is listed in the Trusted Root Certificate Authority field.
Step 6. Click Properties.
Step 7. On the Generic Token Card Properties screen, select either the Static Pass-
word (Windows NT/2000, LDAP) or the One Time Password option.
Step 8. If you chose One Time Password in Step 7, select one or both of the follow-
ing check boxes:
• Support Hardware Token—The hardware token device obtains the one-
time password.
• Support Software Token—The PEAP supplicant retrieves the one-time
password.
Step 9. Click OK.
120 Configuring Security
EAP-SIM
Follow these steps to select EAP-SIM as your authentication method:
Step 1. Under EAP type, select SIM Authentication.
Step 2. Click Properties.
Step 3. For access to resources on the SIM, the EAP-SIM supplicant must provide a
valid PIN to the SIM card. To indicate how the EAP-SIM supplicant should
handle the SIM card’s PIN, select one of the following on the SIM Authenti-
cation Properties screen:
• Ask for my PIN once after I turn my computer on (recommended).
• Ask for my PIN every time the network asks for authentication.
• Let me give my PIN to the computer now and never ask me again; PIN
will be encrypted and stored on computer (not recommended).
Step 4. Click OK.
Client configuration can seem like a lengthy process. However, if you understand the
requirements of the client adapter and how you can configure by both the operating
system and the ACU, it can be a straightforward process.
This page intentionally left blank
Get Cisco 802.11 Wireless Networking Quick Reference now with the O’Reilly learning platform.
O’Reilly members experience books, live events, courses curated by job role, and more from O’Reilly and nearly 200 top publishers.

