Chapter 4. Working with IndexedDB
Welcome to Deep Data
So far the options we’ve worked with for storing data on the client side have been relatively simple and relatively small in nature. Now it’s time to dig deep and work with a large-scale storage system, IndexedDB. IndexedDB is a powerful storage system with a great deal of flexibility. You can store just about anything and everything you want to on the user’s browser. However, with that great power and flexibility comes an API that isn’t quite as friendly as Web Storage. You’ll also find that IndexedDB does not quite yet have great support on mobile browsers, and even when it does, it can be poorly implemented. (iOS 8, in particular, has such bad support for IndexedDB that it is simply better that you pretend it doesn’t exist.) However, in the future, IndexedDB will probably become the standard method of storing large amounts of data on the client side. For more information, and an exciting read (honest!), check out the specification at http://www.w3.org/TR/IndexedDB/.
Like every other client-side storage system described so far, IndexedDB is unique to a domain. Limits are usually poorly defined but tend to be extremely large when they exist. In general, there are no limits, but the browser will begin clearing out other IndexedDB instances if space begins to get low. Like most “persistent” systems, anything stored in the browser is inherently not persistent over eternity, but the benefits of storing data, even only semi-persistently, are worth the effort.
Key IndexedDB Terms
Before we get into the code, let’s cover some important IndexedDB terms.
- Databases
- At the highest level of IndexedDB is the concept of a database. If you’ve ever worked with databases in server-side web applications, then you’re already familiar with this concept. Basically, a database is where you put your data. As the developer of your site, you have the option of making any number of databases you want, but typically, you will create only one database for your site’s needs. There’s no hard and fast rule here, but in general, one database per site or web application makes the most sense.
- Object stores
- An object store is an individual bucket to hold data. If you’ve worked with traditional relational databases, then you can think of an object store as a table. Basically, if you have one database for your web application, then you will have one object store for each type of data you’re storing. Given a website that persists documentation articles and user-generated notes, then you could imagine two object stores. Unlike with relational database tables, you do not have a rigid column structure that dictates how data is stored. So, for example, in a MySQL database table called “person,” you could have two character columns for first and last name and a numeric column for age. In IndexedDB, what you can store can be more loose. I can store a person with a first and last name but an age value of
unknownor eventoo old to matter. This can coexist with another person stored with a proper age. IndexedDB is much more flexible in letting you store data. That’s both good and bad. Just because you can “mix it up” doesn’t necessarily mean that you should! - Indexes
- This is where the “Indexed” of “IndexedDB” comes in. An index is a way of retrieving data from your object store. You can always get all of the data from an object store, but many times you want to get data by a particular property. So, for example, if you are storing people, then you may want to fetch them later by their name, or their Social Security number, or perhaps their gender. By using indexes, you’re telling the IndexedDB system to make it easier to fetch data by those properties later.
As we go on you’ll learn a few other important IndexedDB terms, but these three cover the main ones you’ll encounter throughout your development.
Checking for IndexedDB Support
Because IndexedDB still isn’t widely supported, it is important that you check for its support before actually using it. The simplest way of doing so is with a check of the window object.
if("indexedDB"inwindow){}
You could write this as a function too, of course:
functionidbOK(){return"indexedDB"inwindow;}
Due to the serious issues with IndexedDB and iOS 8, you may wish to consider modifying the code to return false on those platforms. This StackOverflow answer demonstrates a simple regex text that could be used:
functionidbOK(){return"indexedDB"inwindow&&!/iPad|iPhone|iPod/.test(navigator.platform);}
Working with Databases
As I’ve stated, the database is the top-level container for your data. How many databases you have, what you name them, and so forth is completely up to you. When creating a database, you provide a name and a version, typically starting at 1. The version number is both arbitrary and important. You can only modify your database structure (and to be clear, this means the object stores and indexes, not the actual data itself) when you change versions. This means if you have a web app out in the wild and need to store some new type of data, then you’ll need to increment your version to a new number.
Everything you do in IndexedDB is asynchronous, so opening a database means you’ll need to respond to an event in order to begin working with it. The events you get from a database open operation are success, error, upgradeneeded, and blocked.
The first two are self-explanatory, but what do the others mean? upgradeneeded is used when your database is first accessed by a user or when the version number has changed. This is where you will set up the structure of your data. blocked is used when the database isn’t available at all and cannot be used. Example 4-1 demonstrates a simple case of opening a database. We aren’t actually doing anything with it—just attempting to open it.
Example 4-1. test_1_1.html
<!doctype html><html><head><scripttype="text/javascript"src ="http://ajax.googleapis.com/ajax/libs/jquery/2.1.0/jquery.min.js"></script></head><body><script>functionidbOK(){return"indexedDB"inwindow;}vardb;$(document).ready(function(){//No support? Go in the corner and pout.if(!idbOK())return;varopenRequest=indexedDB.open("ora_idb1",1);openRequest.onupgradeneeded=function(e){console.log("running onupgradeneeded");}openRequest.onsuccess=function(e){console.log("running onsuccess");db=e.target.result;}openRequest.onerror=function(e){console.log("onerror!");console.dir(e);}});</script></body></html>
You can see that the code begins by checking if IndexedDB is supported at all. If it is, the indexedDB.open method is used to open the database. The first argument is the name. Since IndexedDB is private to an individual site, you don’t have to worry about your name conflicting with another database. The second argument is the version. Again, you can use any number here, but you should start with 1.
The result of this call is a request object that you can use to attach event listeners to. In the code here there is an event listener for all the events except blocked. The first time you run this code (assuming you’re using an IndexedDB-capable browser), you would see the output shown in Figure 4-1 in the console.

Figure 4-1. Notice the events being run
Since this was the first time you used the database, an upgradeneeded event is fired. This also represents the fact that the database itself was created. If you repeat this process, only the success event will be fired (see Figure 4-2).

Figure 4-2. Since the database already existed and the version didn’t change, only one event is fired
That’s the basics of working with the database; now let’s get deeper with object stores.
Working with Object Stores
As we said earlier, an IndexedDB object store is somewhat similar to an SQL database table. It should contain data of one “type”—for example, instances of “people” records or “notes” or something else. The idea is that you will have one object store for each type of data you need to persist.
Object stores can only be created during the upgradeneeded event. This is why the version number matters. Let’s say you design your database to support two object stores. A few months down the road, you decide you need to store a third type of data. You will need to do two things: first, change the version, and second, write the code to add the new object store.
In pseudocode, you can think of this process like so:
I request to open the database
If the request fired an upgrade needed event, create object stores
If the request fired a success event, I'm ready to roll
Making Object Stores
To create an object store, you should first check to see if it exists already. Using a database variable (which you will get from the event handlers associated with opening the database), you can access the property objectStoreNames. This property is a DOMStringList that will let you inspect it for an existing value. If it doesn’t exist, you can then create it using the method call createObjectStore("name", options). Let’s look at Example 4-2.
Example 4-2. test_2_1.html
<!doctype html><html><head><scripttype="text/javascript"src ="http://ajax.googleapis.com/ajax/libs/jquery/2.1.0/jquery.min.js"></script></head><body><script>functionidbOK(){return"indexedDB"inwindow;}vardb;$(document).ready(function(){//No support? Go in the corner and pout.if(!idbOK())return;varopenRequest=indexedDB.open("ora_idb2",1);openRequest.onupgradeneeded=function(e){varthisDB=e.target.result;console.log("running onupgradeneeded");if(!thisDB.objectStoreNames.contains("firstOS")){console.log("makng a new object store");thisDB.createObjectStore("firstOS");}}openRequest.onsuccess=function(e){console.log("running onsuccess");db=e.target.result;console.dir(db.objectStoreNames);}openRequest.onerror=function(e){console.log("onerror!");console.dir(e);}});</script></body></html>
After checking to ensure IndexedDB is supported, we open the database. (Note we are using a different name from the last example.) If upgradeneeded is fired, it means that either the user is visiting the page for the first time or had an earlier version of the database.
We fetch the database object itself by getting the result of the event’s target object. The objectStoreNames DOMStringList value lets us use contains to see if the name of our object store exists. If it does not, then we create it. Note that we pass only the name of the object store. The createObjectStore method also lets us pass a second argument with options. This is how we’ll define various configuration properties for the object store including indexes.
As before, the first time you run this, the upgradeneeded event will fire. This time it will actually do something (see Figure 4-3).
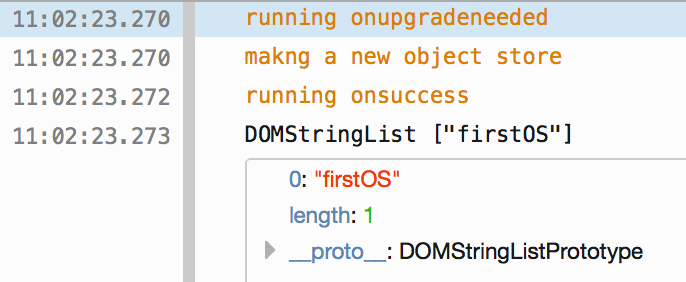
Figure 4-3. Notice the object store being created
On the next request, only the success handler is run, but our object store still exists (see Figure 4-4).

Figure 4-4. There’s our lovely little object store!
Defining Primary Keys
In a few moments we’ll begin discussing indexes, but before you begin defining different ways to fetch your data, you need to begin with a fundamental property: the primary key. In your object store, every piece of data must have a way to uniquely identify itself. For example, my name is Raymond Camden, and there are certainly other Raymond Camdens out there in the world, but I can be uniquely identified by my Social Security number. (OK, I know that applies only to Americans, but this wouldn’t be the first time an American acts like the rest of the world behaves the same.) When you define object stores, you have the opportunity to define how data will be uniquely identified.
Practically, there are two main ways of doing this. One way is to define a key path, which is basically a property that will always exist and contain the unique information. So if I were defining a people object store, I could say the key path is ssn. Another option is to use a key generator, which basically means a way to generate a unique value. Here are a few examples.
somedb.createObjectStore("people",{keyPath:"email"});
This example creates an object store called people where it is assumed that each piece of data will contain a property called email that is unique.
somedb.createObjectStore("notes",{autoIncrement:true});
This example creates an object store called notes. The primary key will be assigned automatically as an autoincrementing number.
somedb.createObjectStore("logs",{keyPath:"id",autoIncrement:true});
This example creates an object stored called notes. This time, the autoincrementing value will be used and stored as a property called id.
So which one is right? It depends. If you are working with data that has a property in it that should be unique, then you would want to use the keyPath option to enforce this uniqueness. If you are working with data where nothing in the data itself is unique, then using an autoincrementing value will make sense. Example 4-3 demonstrates.
Example 4-3. test_2_2.html
<!doctype html><html><head><scripttype="text/javascript"src ="http://ajax.googleapis.com/ajax/libs/jquery/2.1.0/jquery.min.js"></script></head><body><script>functionidbOK(){return"indexedDB"inwindow;}vardb;$(document).ready(function(){//No support? Go in the corner and pout.if(!idbOK())return;varopenRequest=indexedDB.open("ora_idb3",1);openRequest.onupgradeneeded=function(e){varthisDB=e.target.result;console.log("running onupgradeneeded");if(!thisDB.objectStoreNames.contains("people")){thisDB.createObjectStore("people",{keyPath:"email"});}if(!thisDB.objectStoreNames.contains("notes")){thisDB.createObjectStore("notes",{autoIncrement:true});}if(!thisDB.objectStoreNames.contains("logs")){thisDB.createObjectStore("logs",{keyPath:"id",autoIncrement:true});}}openRequest.onsuccess=function(e){console.log("running onsuccess");db=e.target.result;console.dir(db.objectStoreNames);}openRequest.onerror=function(e){console.log("onerror!");console.dir(e);}});</script></body></html>
The important part of this example is the upgradeneeded event. Three object stores are created, each of which demonstrates various ways of defining the primary key for the object stores. As we aren’t actually storing data yet, there isn’t much to see here.
Defining Indexes
After figuring out a primary key for your data, next you’ll need to decide on your indexes. As we said earlier, indexes define how you plan on fetching data from your object store. This is highly dependent on your data and application needs. Indexes must be made when you create your object stores and can also be used to define a unique constraint on your data. (This is different from the primary key.)
To create an index, you use an instance of an object store variable:
objectStore.createIndex("name of index","path",options);
The first argument is the name of the index, while the second refers to the property on the data you wish to index. Most of the time you’ll use the same value for both. The final argument is a set of options that defines how the index operates. There are only two options: one for uniqueness, and one used specifically for data that maps to an array. You’ll see an example of this later on. Here are two examples:
objectStore.createIndex("gender","gender",{unique:false});objectStore.createIndex("ssn","ssn",{unique:true});
The first index is on gender and, as you can imagine, allows you to fetch data based on a person’s gender. The second index is based on a Social Security number and is also unique.
Let’s look at an example. Example 4-4 is a slightly different version of the previous one, so we’ll share just the upgradeneeded event to keep it a bit more focused.
Example 4-4. Portion of test_2_3.html
openRequest.onupgradeneeded=function(e){varthisDB=e.target.result;console.log("running onupgradeneeded");if(!thisDB.objectStoreNames.contains("people")){varpeopleOS=thisDB.createObjectStore("people",{keyPath:"email"});peopleOS.createIndex("gender","gender",{unique:false});peopleOS.createIndex("ssn","ssn",{unique:true});}if(!thisDB.objectStoreNames.contains("notes")){varnotesOS=thisDB.createObjectStore("notes",{autoIncrement:true});notesOS.createIndex("title","title",{unique:false});}if(!thisDB.objectStoreNames.contains("logs")){thisDB.createObjectStore("logs",{keyPath:"id",autoIncrement:true});}}
In this updated example, the first and second object stores have indexes. In order to create them, we now use the result of createObjectStore so we can run the createIndex method on them. The third and final object store does not have indexes, and that’s totally fine. One thing to remember is that an index is going to be updated every time you add, edit, or delete data. More indexes mean more work for IndexedDB.
Working with Data
Finally, now that we’ve talked about the setup and initialization of an IndexedDB database, wouldn’t it be nice to actually—I don’t know—store data? First and foremost, all data operations with IndexedDB will be done in a transaction. You can think of a transaction as a safe wrapper around an operation. If something goes wrong in a transaction, any changes would be rolled back. Transactions add a level of security to your operations that ensure data integrity. What this means for you as a developer is that the simple act of creating, reading, updating, and deleting (CRUD) data will be slightly complex—especially when compared to the ease of use of Web Storage. Transactions in IndexedDB will be specific to one or more object stores, basically using whatever store you need to operate on. They can also be read-only or read and write. This signifies whether you are changing the database or simply reading from it. Let’s begin with creating data.
Creating Data
To create data, you simply call the add method of an object store object. At the simplest level, it could look like this:
someObjectStore.add(data);
If your object store requires you to pass in the primary key at creation, then you would pass that as the second argument:
someObjectStore.add(data,somekey);
The cool thing is that “data” can be anything you want—a string, a number, an object with strings and numbers, and so on. Like most operations, adding data is asynchronous so you’ll need to listen for an event to check the status of the addition.
Let’s look at an example. Before we begin, we’ll look at the demo in the browser. The demo has two simple forms: one for “Add Person” and one for “Add Note,” as seen in Figure 4-5.
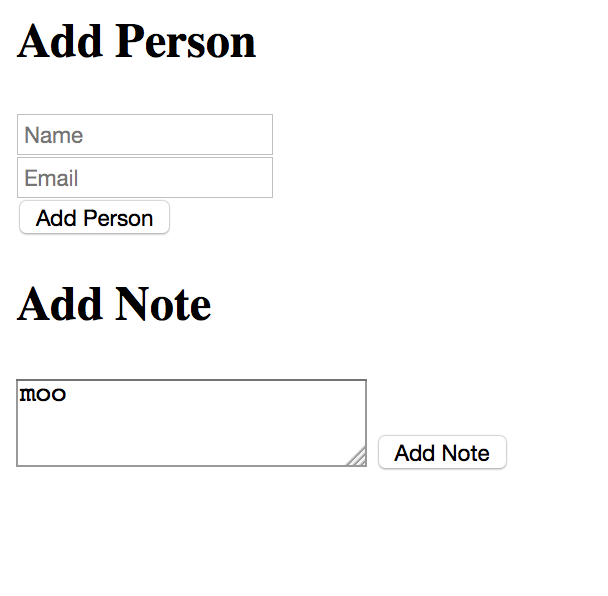
Figure 4-5. The two forms that will persist data
The first form asks for a name and email address, while the second simply asks for a string. The demo doesn’t include any type of form validation, but that could be added in a real application. In both forms, you can simply type in data and hit the relevant button, and then the console is used to report the outcome (see Figure 4-6).

Figure 4-6. The console reports on the success of the data entry
We aren’t actually displaying the data, but for now, this is sufficient to test adding data to IndexedDB. Now let’s look at the code (Example 4-5).
Example 4-5. test_3_1.html
<!doctype html><html><head><scripttype="text/javascript"src ="http://ajax.googleapis.com/ajax/libs/jquery/2.1.0/jquery.min.js"></script></head><body><h2>Add Person</h2><inputtype="text"id="name"placeholder="Name"><br/><inputtype="email"id="email"placeholder="Email"><br/><buttonid="addPerson">Add Person</button><h2>Add Note</h2><textareaid="note"></textarea><buttonid="addNote">Add Note</button><script>functionidbOK(){return"indexedDB"inwindow;}vardb;$(document).ready(function(){//No support? Go in the corner and pout.if(!idbOK())return;varopenRequest=indexedDB.open("ora_idb5",1);openRequest.onupgradeneeded=function(e){varthisDB=e.target.result;console.log("running onupgradeneeded");if(!thisDB.objectStoreNames.contains("people")){varpeopleOS=thisDB.createObjectStore("people",{keyPath:"email"});}if(!thisDB.objectStoreNames.contains("notes")){varnotesOS=thisDB.createObjectStore("notes",{autoIncrement:true});}}openRequest.onsuccess=function(e){console.log("running onsuccess");db=e.target.result;//Start listening for button clicks$("#addPerson").on("click",addPerson);$("#addNote").on("click",addNote);}openRequest.onerror=function(e){console.log("onerror!");console.dir(e);}});functionaddPerson(e){varname=$("#name").val();var=$("#email").val();console.log("About to add "+name+"/"+);//Get a transaction//default for OS list is all, default for type is readvartransaction=db.transaction(["people"],"readwrite");//Ask for the objectStorevarstore=transaction.objectStore("people");//Define a personvarperson={name:name,:,created:newDate().getTime()}//Perform the addvarrequest=store.add(person);request.onerror=function(e){console.log("Error",e.target.error.name);//some type of error handler}request.onsuccess=function(e){console.log("Woot! Did it");}}functionaddNote(e){varnote=$("#note").val();console.log("About to add "+note);//Get a transaction//default for OS list is all, default for type is readvartransaction=db.transaction(["notes"],"readwrite");//Ask for the objectStorevarstore=transaction.objectStore("notes");//Define a notevarnote={text:note,created:newDate().getTime()}//Perform the addvarrequest=store.add(note);request.onerror=function(e){console.log("Error",e.target.error.name);//some type of error handler}request.onsuccess=function(e){console.log("Woot! Did it");}}</script></body></html>
This is a rather large demo, so let’s break it down bit by bit. Begin by looking at the upgradeneeded event handler. This defines two object stores, one called people and one called note. For people we’ve defined the key path email as the primary key, and for notes we’re using an autoincrementing value. This decision here was arbitrary: for the demo we’ve decided people will be unique by email address, and notes will simply have an assigned primary key.
Notice that we don’t actually begin handling the form submissions until the onsuccess handler for the database runs. This makes sense, as we can’t start adding data until the database is ready to be used. But also note we copy a variable db to the global scope. This gives us a handler on the database object so we can add data later.
Now turn your attention to the addPerson function. This is run when the first form is submitted. After getting the values (and again, some validation could be added here), we begin the process of working with the IndexedDB database. First, a transaction is created. We define the transaction by specifying what object store we care about and what type of transaction we need:
vartransaction=db.transaction(["people"],"readwrite");
From the transaction we then ask for the object store.
varstore=transaction.objectStore("people");
Now comes the fun part. We need to define what we’re storing. IndexedDB lets you store pretty much anything you want to. So what I store here is completely up to my particular application needs. In my case I decided to use the values from the form as well as a timestamp for when the person was created. To be clear, this was arbitrary. It just shows that the form of your data is up to you.
varperson={name:name,:,created:newDate().getTime()}
Now comes the persistence. The actual storage request is rather simple:
varrequest=store.add(person);
But because it is asynchronous, we need to listen for the results. In our case we listen for the error and success events and simply use the console to report on them. The addNote function works the same way—the only difference being the object store that is worked with and the actual data being saved.
Reading Data
Reading data will also be asynchronous and also requires a transaction. Outside of that it is rather simple: someObjectStore.get(primaryKey). Our next demo builds upon the last, as you can see in Figure 4-7. We’ve added two new forms to let you fetch data based on the primary key.
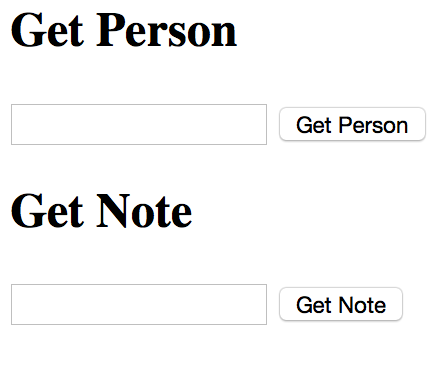
Figure 4-7. Fancy data retrieval forms
Since the code for this demo is so similar to the last one, we’ll just focus on the event handlers for the new forms (Example 4-6).
Example 4-6. Portion of test_3_2.html
functiongetPerson(e){varkey=$("#getemail").val();if(key==="")return;vartransaction=db.transaction(["people"],"readonly");varstore=transaction.objectStore("people");varrequest=store.get(key);request.onsuccess=function(e){varresult=e.target.result;console.dir(result);}request.onerror=function(e){console.log("Error");console.dir(e);}}functiongetNote(e){varkey=$("#getnote").val();if(key==="")return;vartransaction=db.transaction(["notes"],"readonly");varstore=transaction.objectStore("notes");varrequest=store.get(Number(key));request.onsuccess=function(e){varresult=e.target.result;console.dir(result);}request.onerror=function(e){console.log("Error");console.dir(e);}}
Let’s begin with getPerson. After getting the value representing the primary key you want to load, we once again create a transaction. Note that this time it is a readonly transaction. Then we simply fetch the data like so:
varrequest=store.get(key);
In the success handler we dump the result to the console. It looks like Figure 4-8.
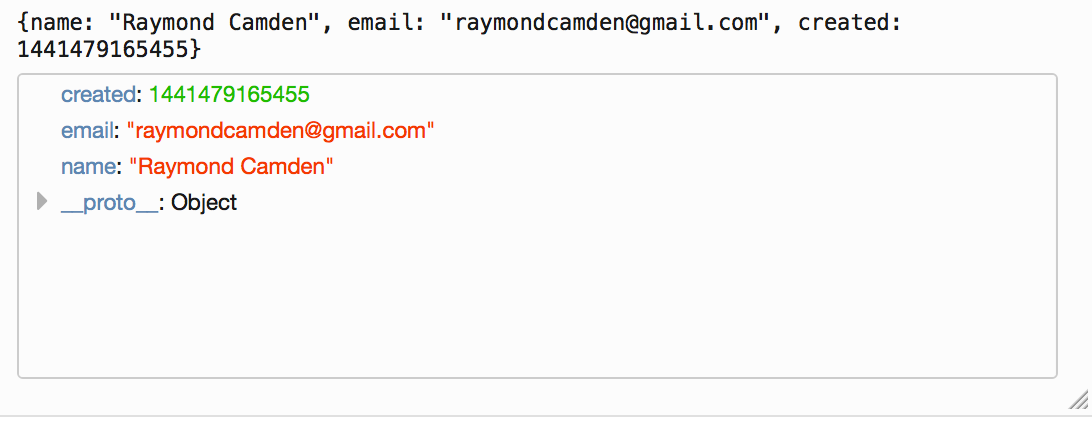
Figure 4-8. The data for one object in the database
If you try to fetch an object that does not exist, the success handler will still run, but the result will be undefined. In order for this demo to work for you, be sure to create at least one record and make note of the email address you used. (Later in this chapter we’ll look at how to inspect IndexedDB with dev tools and see what data is there.)
Updating Data
You can probably guess what I’m going to say here. Once again you’ll need to get a transaction, and once you do, you’ll use the put method on an object store variable returned from a transaction to store your data. It can be as simple as someobjectStore.put(data), but you can also use the second argument to specify a primary key.
The next demo is a bit more complex. It now asks you for the email address of an existing person (and again, remember to actually enter data in the previous demos). When you enter the email address of a person that exists, it will fill in a form so that you can update the data (see Figure 4-9).
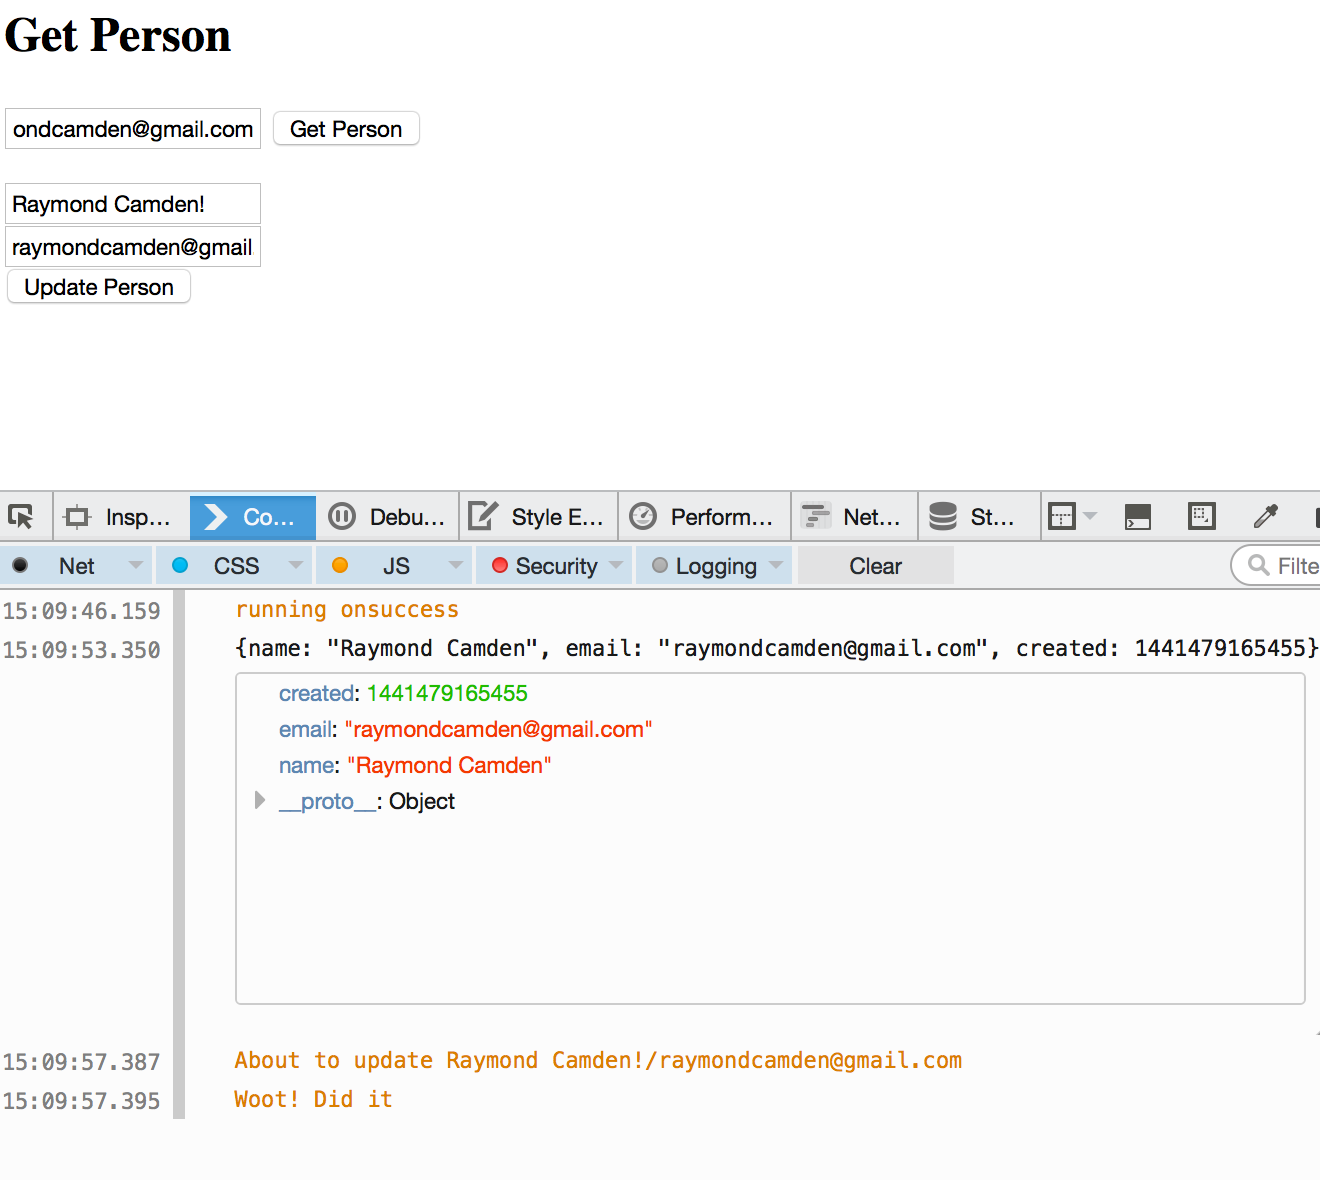
Figure 4-9. An example of updating data
The code that loads the person works the same as the previous demo. Example 4-7 demonstrates the important parts of this particular example.
Example 4-7. Portion of test_3_3.html
functiongetPerson(e){varkey=$("#getemail").val();if(key==="")return;vartransaction=db.transaction(["people"],"readonly");varstore=transaction.objectStore("people");varrequest=store.get(key);request.onsuccess=function(e){varresult=e.target.result;console.dir(result);$("#name").val(result.name);$("#email").val(result.);$("#created").val(result.created);}request.onerror=function(e){console.log("Error");console.dir(e);}}functionupdatePerson(e){varname=$("#name").val();var=$("#email").val();varcreated=$("#created").val();console.log("About to update "+name+"/"+);//Get a transaction//default for OS list is all, default for type is readvartransaction=db.transaction(["people"],"readwrite");//Ask for the objectStorevarstore=transaction.objectStore("people");varperson={name:name,:,created:created}//Perform the updatevarrequest=store.put(person);request.onerror=function(e){console.log("Error",e.target.error.name);//some type of error handler}request.onsuccess=function(e){console.log("Woot! Did it");}}
The getPerson code is similar to the previous example. Now we actually do something with the result: update the form. updatePerson simply takes the form values and persists it using the put method just described. Again, there are multiple places here where validation could be added to make things more stable, but you get the idea.
Deleting Data
Now for the final piece of the CRUD puzzle—deleting data. Once again, it will be in a transaction, and once again, it will be asynchronous. The method is simple: someObjectStore.delete(primarykey). Our final demo is likewise simple; it will prompt you for the email address of a person and then delete that person (Figure 4-10).
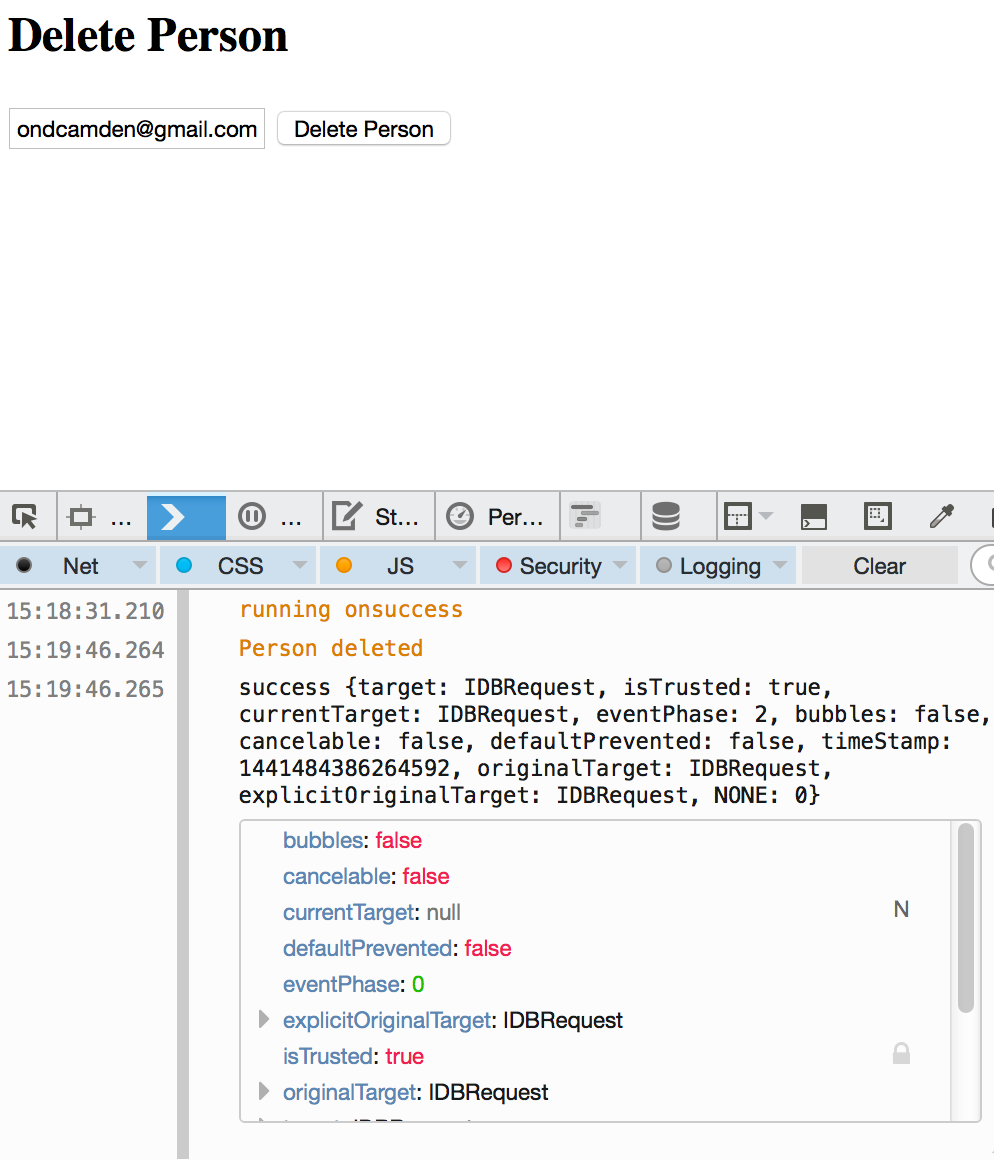
Figure 4-10. Person deleting—sounds brutal
Example 4-8 demonstrates the code that runs when the Delete Person button is clicked.
Example 4-8. Portion of test_3_4.html
functiondeletePerson(e){varkey=$("#email").val();if(key==="")return;vartransaction=db.transaction(["people"],"readwrite");varstore=transaction.objectStore("people");varrequest=store.delete(key);request.onsuccess=function(e){console.log("Person deleted");console.dir(e);}request.onerror=function(e){console.log("Error");console.dir(e);}}
Note that a delete operation will fire the success handler even if the person doesn’t exist. If you wanted to handle that with an error, you would need to get the person first, see if the result was defined, and then perform the delete. A transaction around the entire process would ensure data integrity, much like transactions in traditional relational databases.
Getting All the Data
Now that you’ve seen basic CRUD in action, let’s discuss how you can fetch all (and some) of the data in your database. To iterate over the data in an object store, IndexedDB makes use of something called a cursor. You can think of a cursor as a happy little beaver who runs into your object store to return one piece of data at a time. Every time it gets a piece of data it brings it back to you, and you ask it to get the next piece. Cursors can move in either direction (so can beavers) and can also be restricted to a “range” of data (not so much for beavers; they are free spirits).
Cursors, just like the CRUD operations, will work within transactions. As before, you’ll get a transaction, get an object store from the transaction, and then open a cursor upon that store. Here is an abstract example:
vartransaction=db.transaction(["test"],"readonly");varobjectStore=transaction.objectStore("test");varcursor=objectStore.openCursor();cursor.onsuccess=function(e){varres=e.target.result;if(res){//stuffres.continue();}}
Notice the success handler for the cursor. The event result contains the data that the beavercursor currently has. It also has a continue method. That’s how you tell the cursor to go fetch the next object. If the result was undefined, that means you were at the end of the cursor.
Our new demo, shown in Figure 4-11, now includes a way to list all the people in the database (as well as to add, in case you deleted everyone in the previous example).
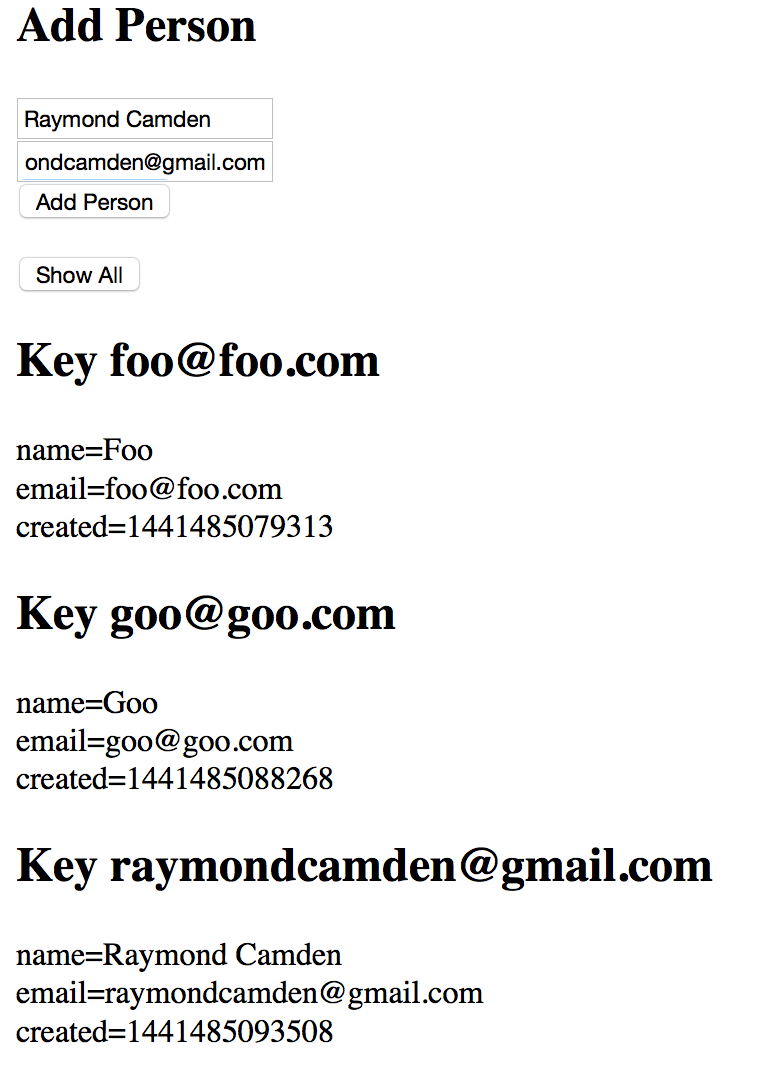
Figure 4-11. An example of listing data
Since the “Add” code isn’t new, let’s focus on the listing code (Example 4-9).
Example 4-9. Portion of test_4_1.html
functiongetPeople(e){vars="";vartransaction=db.transaction(["people"],"readonly");varpeople=transaction.objectStore("people");varcursor=people.openCursor();cursor.onsuccess=function(e){varcursor=e.target.result;if(cursor){s+="<h2>Key "+cursor.key+"</h2><p>";for(varfieldincursor.value){s+=field+"="+cursor.value[field]+"<br/>";}s+="</p>";cursor.continue();}}transaction.oncomplete=function(){$("#results").html(s);}}
As expected, you begin with a transaction, then move on to a store, and finally you open the cursor. The success handler is run every time an object is fetched. In order to update the web page, we’re going to use a variable, s, that contains HTML representing the data itself. Note that it would be nicer to use a template language like Handlebars here. The cursor object contains a key property that represents the primary key for this item. The cursor object also contains a value property that represents the data. We can iterate over each key in the object and add it to the string. In a “real” application you wouldn’t do this; you would know your data contains certain properties and output them directly. This code is just simple and generic.
The last part is crucial. How do you know when the cursor is complete? When you are no longer fetching data, the transaction object will fire a complete event. We can use that to take the string variable and inject it into the DOM.
Working with Ranges and Indexes
The cursor example you saw previously is useful for printing all the data, but typically you will want to work only with a subset of your data. This is where indexes come in. Indexes are based on a property of your data. Within that data, you can request a range of data.
So imagine an object store of people with an index on name. You could request a range of data based on names that begin with B and upward. (C, D, and so on.) You could instead request a range that begins at the “lowest” value for a name and goes up to T. Finally, you could request a range between R and S.
And to make things even more complex, for all of the preceding examples you can switch between an inclusive and exclusive mode. What does that mean? Imagine a range between B and E. An inclusive range will include B and E itself, giving you names like Barry and Elric. An exclusive range will give you values between B and E but not including names starting with those letters. So the first result may be Corwin. (And yes, numerical ranges work too.)
Finally, you can also create a “range” of one value, so, for example, just names that begin with R (like Raymond).
Working with ranges is only slightly different than cursors. Instead of opening a cursor on an object store, you open it on an index instead. As an example:
//make an IDBKeyRangerange=IDBKeyRange.upperBound("Camden");cursor=someIndex.openCursor(range);//orcursor=someIndex.openCursor(range,"prev");
Notice that the range uses an upper bound of "Camden", which means the name must be “lower” than Camden in a string comparison. So, for example, Cameron would not be lower, but Cade would be.
Ranges are created from an IDBKeyRange API. Methods include upperBound, lowerBound, bound (which means both), and only. Ranges are inclusive automatically, but if you pass false into the second (or in the case of bound, third) argument, you can specify exclusive. By default the direction of the cursor is "forward", but in the last example you can see how to specify a backward traversal.
All of that is rather complex, so let’s look at an example. The demo has been extended so that you can now search against people names, as shown in Figure 4-12. It lets you specify a search that starts at a letter, ends at a letter, or works between them both.
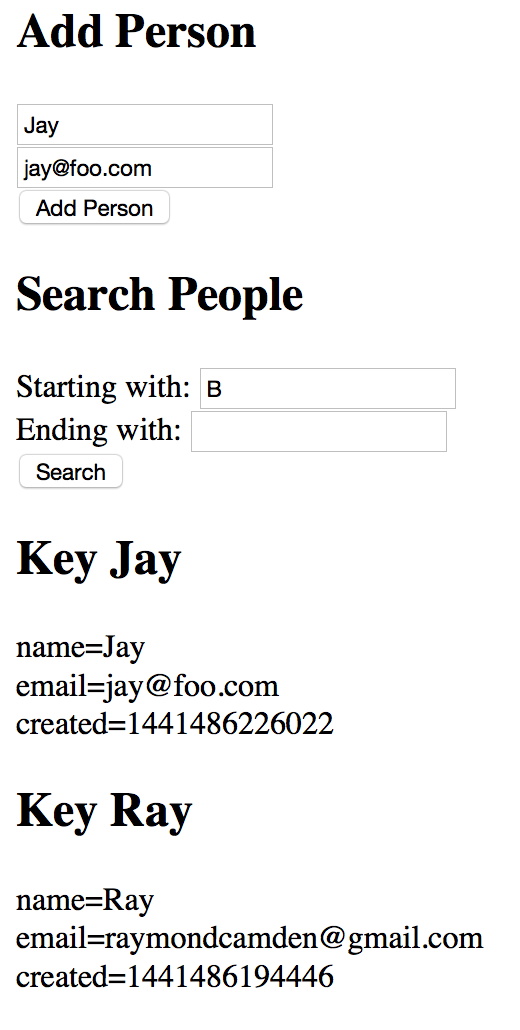
Figure 4-12. A person search form
Before you try this code yourself, note that it is using a new IndexedDB database. Be sure to enter some values in the Add Person form on top so you have data to actually search. Since adding people isn’t new, let’s focus on search in Example 4-10.
Example 4-10. Portion of test_4_2.html
functionsearchPeople(e){varlower=$("#lower").val();varupper=$("#upper").val();if(lower==""&&upper=="")return;varrange;if(lower!=""&&upper!=""){range=IDBKeyRange.bound(lower,upper);}elseif(lower==""){range=IDBKeyRange.upperBound(upper);}else{range=IDBKeyRange.lowerBound(lower);}vartransaction=db.transaction(["people"],"readonly");varstore=transaction.objectStore("people");varindex=store.index("name");vars="";index.openCursor(range).onsuccess=function(e){varcursor=e.target.result;if(cursor){s+="<h2>Key "+cursor.key+"</h2><p>";for(varfieldincursor.value){s+=field+"="+cursor.value[field]+"<br/>";}s+="</p>";cursor.continue();}}transaction.oncomplete=function(){//no results?if(s==="")s="<p>No results.</p>";$("#results").html(s);}}
The search function begins by reading the values from the search form and doing a tiny bit of validation. At this point, things get tricky. Remember that we can search from a letter, to a letter, or between letters. That means we need one of three types of ranges. That’s what the next code block does. Based on your input, it figures out the right type of range to use. Once past that, the transaction is opened, the object store is fetched, and then the name index is retrieved.
Now when the cursor is fetched, the range is passed to it as an argument. Outside of that, the cursor object is treated the same as before in Example 4-9.
You may be wondering, what about more complex search—for example, people with a name beginning with x that are gender y and have an age between 10 and 30? Unfortunately, complex search is not something IndexedDB is good at. It isn’t going to replace the power of a proper SQL database engine like MySQL. This is something to keep in mind when building your applications.
Even More with IndexedDB
We’re not quite done with IndexedDB yet. Let’s look at two interesting tricks you can do with the feature.
Storing Arrays
We mentioned earlier that nearly anything can be stored in IndexedDB, even array data. So, for example, this is completely fine:
varperson={name:"Ray",age:43,background:{born:1973,bornIn:"Virginia"},hobbies:["comics","movies","bike riding"]}someStore.add(person);
That’s cool and all, and just plain works, but it brings up an interesting question: What if you wanted to fetch people based on their hobbies? Well, this is where the multiEntry option comes into play. When defining an index on a property that is array based, simply use this option and set it to true.
objectStore.createIndex("hobbies","hobbies",{unique:false,multiEntry:true});
This tells IndexedDB to properly store each item in the array in the index so you can fetch someone based on one particular value. Let’s look at a demo (Figure 4-13).
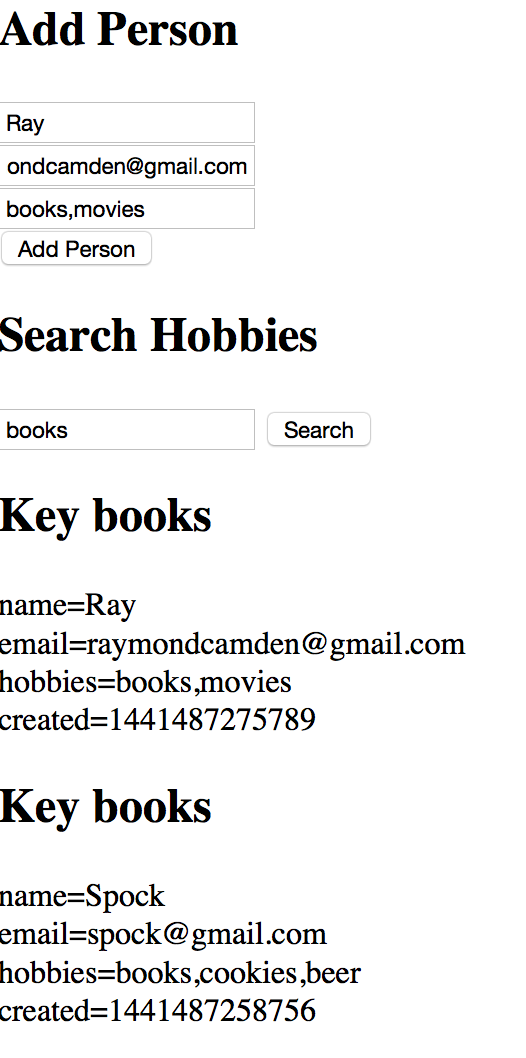
Figure 4-13. Our people have hobbies now
In Figure 4-13, you can see now that the Add Person form has been updated to include a hobby field. When testing, you should enter hobbies in a comma-separated list with no spaces between them—for example, cookies,beer,movies. Do not do cookies, beer, movies. (And again, in a released application you could handle spaces by removing them in code.) Now the search is hobby based. By entering the name of a hobby, you can find people who specified that as a hobby. Let’s look at the code, and since this is somewhat different than earlier examples, we’ll share the complete listing (Example 4-11).
Example 4-11. test_5_1.html
<!doctype html><html><head><scripttype="text/javascript"src="http://ajax.googleapis.com/ajax/libs/jquery/2.1.0/jquery.min.js"></script></head><body><h2>Add Person</h2><inputtype="text"id="name"placeholder="Name"><br/><inputtype="email"id="email"placeholder="Email"><br/><inputtype="text"id="hobbies"placeholder="Hobbies"><br/><buttonid="addPerson">Add Person</button><p/><h2>Search Hobbies</h2><inputtype="text"id="hobby"><buttonid="search">Search</button><divid="results"></div><script>functionidbOK(){return"indexedDB"inwindow;}vardb;$(document).ready(function(){//No support? Go in the corner and pout.if(!idbOK())return;varopenRequest=indexedDB.open("ora_idb7",1);openRequest.onupgradeneeded=function(e){varthisDB=e.target.result;console.log("running onupgradeneeded");if(!thisDB.objectStoreNames.contains("people")){varpeopleOS=thisDB.createObjectStore("people",{keyPath:"email"});peopleOS.createIndex("name","name",{unique:false});peopleOS.createIndex("hobbies","hobbies",{unique:false,multiEntry:true});}}openRequest.onsuccess=function(e){console.log("running onsuccess");db=e.target.result;//Start listening for button clicks$("#addPerson").on("click",addPerson);$("#search").on("click",searchPeople);}openRequest.onerror=function(e){console.log("onerror!");console.dir(e);}});functionaddPerson(e){varname=$("#name").val();var=$("#email").val();varhobbies=$("#hobbies").val();if(hobbies!="")hobbies=hobbies.split(",");console.log("About to add "+name+"/"+);//Get a transaction//default for OS list is all, default for type is readvartransaction=db.transaction(["people"],"readwrite");//Ask for the objectStorevarstore=transaction.objectStore("people");//Define a personvarperson={name:name,:,hobbies:hobbies,created:newDate().getTime()}//Perform the addvarrequest=store.add(person);request.onerror=function(e){console.log("Error",e.target.error.name);//some type of error handler}request.onsuccess=function(e){console.log("Woot! Did it");}}functionsearchPeople(e){varhobby=$("#hobby").val();if(hobby=="")return;varrange=IDBKeyRange.only(hobby);vartransaction=db.transaction(["people"],"readonly");varstore=transaction.objectStore("people");varindex=store.index("hobbies");vars="";index.openCursor(range).onsuccess=function(e){varcursor=e.target.result;if(cursor){s+="<h2>Key "+cursor.key+"</h2><p>";for(varfieldincursor.value){s+=field+"="+cursor.value[field]+"<br/>";}s+="</p>";cursor.continue();}}transaction.oncomplete=function(){//no results?if(s==="")s="<p>No results.</p>";$("#results").html(s);}}</script></body></html>
That’s quite a bit of code, but the changes really are somewhat minimal. First, make note of the new index on people:
peopleOS.createIndex("hobbies","hobbies",{unique:false,multiEntry:true});
As we said before, multiEntry being true is the magic flag to make this all work. Now scroll down to the addPerson logic. To store the array, we simply convert the string value from the form into a JavaScript array:
if(hobbies!="")hobbies=hobbies.split(",");
Finally, the search needs to find exact matches, so instead of a range to and from something it uses the only method.
varrange=IDBKeyRange.only(hobby);
Counting Data
For our final demo, we’re going to show how to count the data in an object store. You may have thought you’d need to iterate over the entire table using a cursor. However, there is a much simpler way of counting data: using the count method. The count method of an object store does exactly what you think it does—it asynchronously returns the number of objects in the store. Here is an example.
db.transaction(["note"],"readonly").objectStore("note").count().onsuccess=function(event){console.log('total is '+event.target.result);}
Notice that we’re chaining the various method calls together in one slick line so we can look cool to our coworkers. That is totally unnecessary. The actual count value is available in the event result value. You can find an example of this in the code that ships with the book (test_5_2.html).
Inspecting IndexedDB with Dev Tools
As with Web Storage, both Firefox and Chrome provide nice tools to let you work with IndexedDB. In Figure 4-14 you can see an example of Firefox’s support.

Figure 4-14. Firefox Dev Tools support for IndexedDB
Along with a high-level view of the databases and object stores, you can select a store for a detailed value list (see Figure 4-15).

Figure 4-15. Data view
Figure 4-16 shows how Chrome renders it. Note the crossed-out circle at the bottom. It lets you quickly delete data as well.
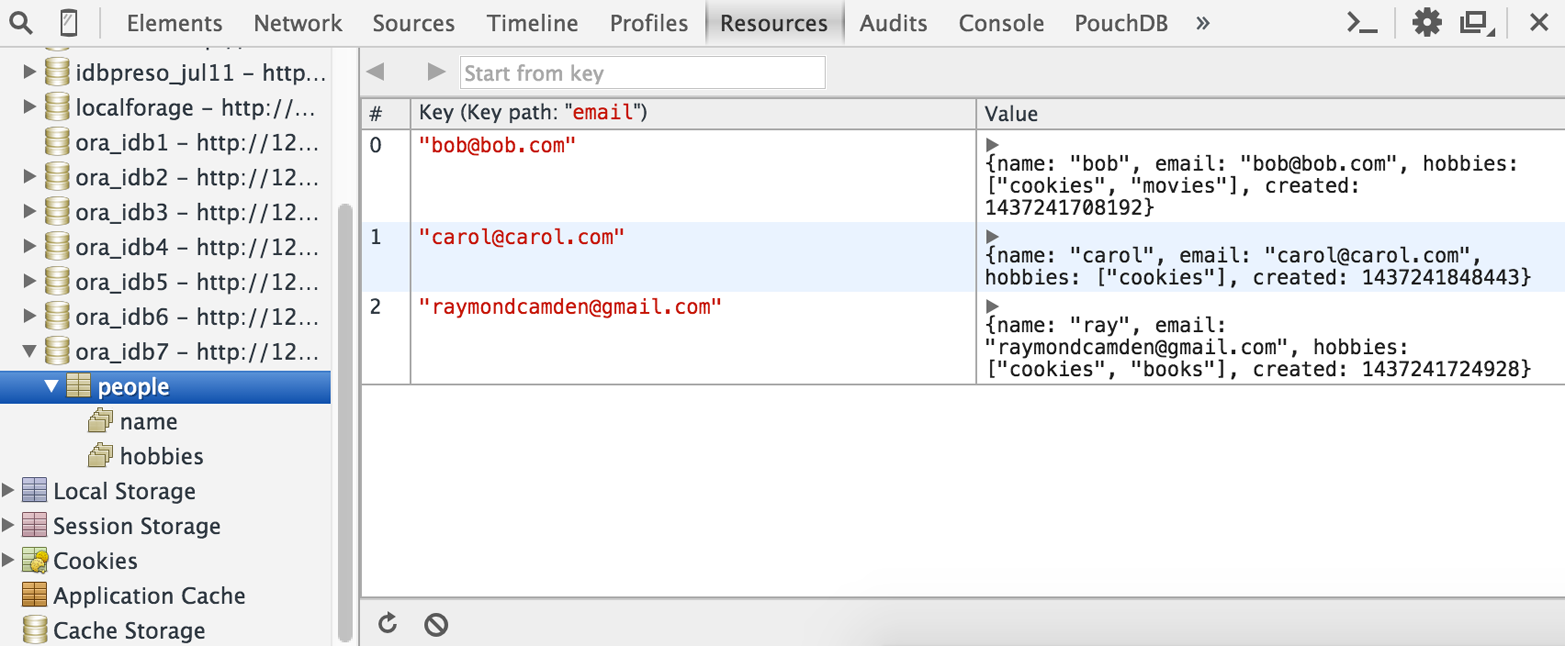
Figure 4-16. Chrome’s IndexedDB view
Support and Recommended Usage
So, how well is IndexedDB supported? Figure 4-17 shows the report from CanIUse.com.
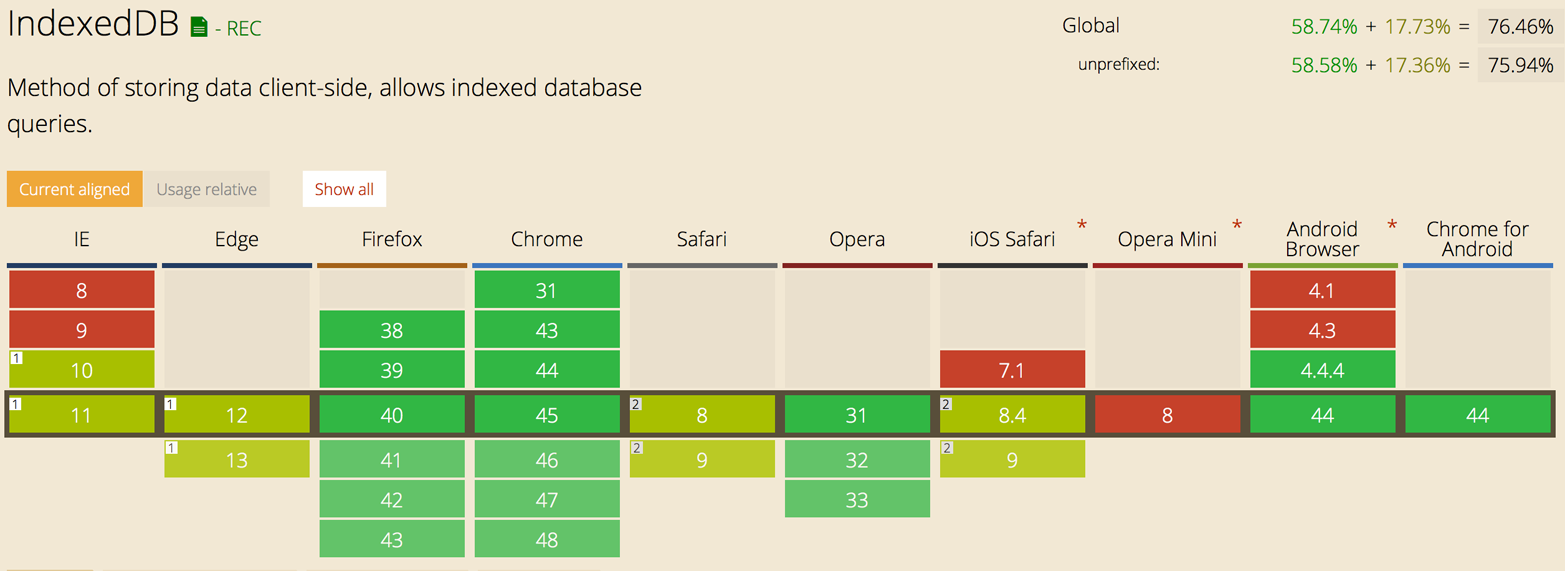
Figure 4-17. IndexedDB support table from CanIUse.com
That’s...OK but not stellar. It is growing, however, and even iOS will support it (properly) soon.
As for recommended uses, I’d consider anything that the user can create to be a good candidate for IndexedDB. You could use it to copy nonprivate intranet information locally for faster retrieval and offline support as well. Game assets, like small music files and game data, could be copied here too.
Get Client-Side Data Storage now with the O’Reilly learning platform.
O’Reilly members experience books, live events, courses curated by job role, and more from O’Reilly and nearly 200 top publishers.

