Every camera has a light metering system built in. It's supposed to measure the brightness of the scene and to adjust the overall exposure accordingly.
Note
Exposure means "How bright or dark the overall shot comes out." It comes, of course, from the days of film, when it referred to how long you exposed the film to light.
There are times, though, when this circuit gets confused. Bright windows behind the Christmas tree will make the camera say, "Ooh, very bright scene. I'll darken things a bit to compensate"—but that makes the tree come out too dark, with all the detail lost in shadow. Or imagine a campfire at night. The camera will say, "Wow, this scene is 70 percent pure black! I'd better brighten it up"—and the photo will wind up so bright that the flames become pure, blown-out white, with none of the cool colors you saw with your eye.
Most cameras offer two ways to handle these situations. (Often, you'll make these adjustments after you've seen what the camera does on its own—which is botch the shot.)
First, you can change how the camera assesses the scene. All SLRs, and some smaller cameras, let you choose from a selection of metering modes (they're in the menus somewhere):
Center-weighted. The name says it all: The camera assesses the light in the entire scene but gives special consideration to the exposure of the center chunk of the frame. Remember the Christmas tree example? If the exposure were center-weighted, it would have been more likely to come out properly exposed. The windows on either side would probably be "blown out" (that is, way too bright, practically white), but at least the tree would look right.
This is the oldest and least precise exposure method. Most modern cameras come set to use one of the following alternatives.
Matrix (multisegment) mode. In this mode, the camera chops up the scene into segments of various sizes and shapes. It measures the brightness, contrast, and sometimes even the color temperature of each segment separately, and then analyzes them, giving special weight to the part that's in focus.
Finally, the camera decides which parts of the scene are important for calculating exposure, and which parts it can ignore. This sophisticated anlaysis usually results in a very accurate assessment of exposure.
Spot-metering mode. This one's a lot like center-weighted, except the camera assesses the light on only a tiny spot, usually coinciding with the spot that's in focus, constituting maybe 1 or 2 percent of the entire photo. This is a good option when there's high contrast in the scene—very bright areas and very dark areas—and you want to make sure one particular object, face, or spot isn't lost in brightness or darkness. (If that item isn't in the center of the shot, aim the camera so it is, half press, and then move the camera to reframe the scene.)
Face recognition. Here again, using the face recognition option in most modern cameras (shown on Autofocus Assist Lamp) is a great solution when you're photographing people. It avoids all the fussiness of the other exposure modes and just tells the camera, "Make sure the faces come out. I don't care about the rest of it."
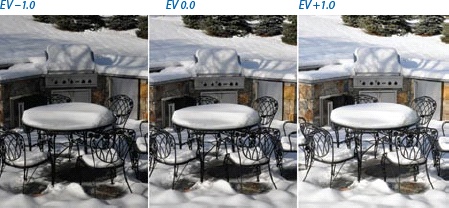
There may be times when, despite all of its options, the camera still guesses wrong about the exposure. You try the shot a couple of times, and it's still coming out too dark or too light. There's just something about the lighting in the scene that's throwing it off. (Bright snow or beach scenes tend to make cameras darken up too much; twilight or forest scenes can make it overbrighten.)
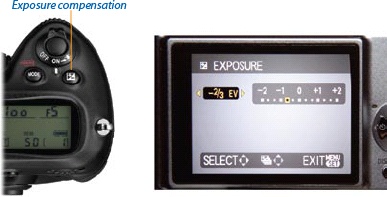
In those cases, you can manually override the camera's choices. You can dial up a darker or brighter scene, thanks to a little adjustment called exposure compensation. This one's so common, it even has a sliding scale and a special notation. On most cameras, you can nudge the exposure upward or downward by two or three steps, in third-of-a-step units.
Behind the scenes, you're actually telling the camera to adjust its aperture or shutter speed slightly to brighten or darken the shot.
On an SLR, there's a dedicated button just for exposure tweaks like this. It has a standard icon, shown on the next page at left.
On a compact camera, exposure compensation is usually hidden in the menus, if you have it at all. But once again you'll find a sliding scale, marked with values from, for example, EV–2 (much darker) to EV 0 (normal) to EV+2 (much brighter).
On both types of cameras, you may need to switch out of Auto mode to get access to these controls.
Tip
Whatever you do, don't forget to reset the exposure compensation to 0 when you're finished with this shot. Otherwise, you might go the entire day shooting precious photos at a cranked-up or cranked-down brightness. And you might not discover that all of your shots are ruined until it's too late: when you see them on the computer screen for the first time.
On an SLR, and on rare advanced compacts, you can request a useful little feature called exposure bracketing. That's when the camera takes three shots in a row, of the same thing, with the same settings each time—except for the exposure. The second shot uses the exposure that the camera considers best. But the first and third shots use slightly lower and higher exposure settings. So you wind up with three shots: one a tad darker than, one squarely on, and one a tad brighter than what the camera would choose for itself.
Since you're shooting digital, taking three shots instead of one costs you nothing. Later, you can look through the three and throw out the two that weren't quite right. In the meantime, you've just tripled your chances of getting exactly the right exposure.
If you burrow into the menus far enough, you'll find that you can specify how much darker and lighter those two bookend shots are, in EVs (steps of exposure). On some cameras, you can even opt for more than three shots in a bracket burst—five, for example.
When you're shooting a very important photo, or if you're having any trouble with exposure, bracketing is a very useful option. Don't forget about it.
Note
Exposure bracketing isn't the only kind of bracketing. SLRs may also offer white-balance bracketing (you get several shots of the same scene, each with a different white-balance setting); flash bracketing (several shots, each with the flash set to a different power); and focus bracketing (several shots, each focusing at a slightly different distance). Focus bracketing is handy in macro (super-close-up) photography, because when it's all over, you can choose the shot where the largest section of your bug, flower, or coin appears to be sharp.
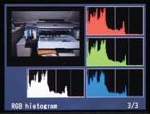
The histogram is a little graph you can call up onto the screens of SLRs and advanced compacts. It's a self-updating visual representation of the dark and light tones that make up your photograph.
Note
Sometimes it's a white graph on a black background; on advanced cameras, you can see each of the component photo colors (red, green, blue) in its own histogram.
The amount of the photo's darker shades appears toward the left side of the graph; the lighter tones are graphed on the right side.
Therefore, in a very dark photograph—a coal mine at midnight, say—you'll see big mountain peaks at the left side of the graph, trailing off to nothing toward the right. A shot of a brilliantly sunny snowscape, on the other hand, would show lots of information on the right, and probably very little on the left.
The best-balanced pictures have some data spread across the entire histogram, with a few spikes here and there. As long as there's visual information across the entire histogram—and the mountains reach ground level at the edges of the screen—then you've got a nicely exposed picture.
A severely under- or overexposed photo, meanwhile, has mountains all bunched at one end or the other. And if the mountains seem to get chopped off at one side, then you're going to lose some details in either the shadows or the bright spots of your photo. Fiddle with the exposure until the mountain ranges fit entirely on the screen.
This is, to be sure, an advanced topic, and plenty of people never lose a wink of sleep worrying about the histogram. In the meantime, it's good to know that the histogram is there, another tool in your arsenal for getting the exposure right.
If you turn on the highlights warning (Take the Shot) on your SLR or advanced compact, then certain parts of the preview on the screen—the brightest parts of the scene—slowly blink pure white, on and off. The camera is warning you that these are the parts of the shot that will be blown out; they'll be so overexposed, so white, that no detail will remain.
That could be a bad thing. If important parts of the picture are blinking, the scene is too bright and you need to back off the exposure—maybe by using the exposure compensation controls.
On the other hand, a little bit of that blinking is no big deal, especially if it's in unimportant parts of the shot, or parts that are supposed to be pure brilliant white, like sunlit twinkles from a lake. No digital camera can handle as great a range of darks to lights as your eye can, so getting perfect detail in both the darkest and the brightest parts of the same shot may be impossible.
Get David Pogue's Digital Photography: The Missing Manual now with the O’Reilly learning platform.
O’Reilly members experience books, live events, courses curated by job role, and more from O’Reilly and nearly 200 top publishers.


