Chapter 5. Vision, Framing, and Outcomes
If it disagrees with experiment, it’s wrong.
Dr. Richard Feynman
Traditionally, UX design projects are framed by requirements and deliverables; teams are given requirements and expected to produce deliverables. Lean UX radically shifts the way we frame our work. Our goal is not to create a deliverable, it’s to change something in the world—to create an outcome. We start with assumptions instead of requirements. We create and test hypotheses. We measure to see whether we’ve achieved our desired outcomes.
This chapter covers the main tool of outcome-focused work: the hypothesis statement. The hypothesis statement is the starting point for a project. It states a clear vision for the work and shifts the conversation between team members and their managers from outputs (e.g., “we will create a single sign-on feature”) to outcomes (e.g., “we want to increase the number of new sign-ups to our service”).
The hypothesis statement is a way of expressing assumptions in testable form. It is composed of the following elements:
- Assumptions
A high-level declaration of what we believe to be true.
- Hypotheses
More granular descriptions of our assumptions that target specific areas of our product or workflow for experimentation.
- Outcomes
The signal we seek from the market to help us validate or invalidate our hypotheses. These are often quantitative but can also be qualitative.
- Personas
Models of the people for whom we believe we are solving a problem.
- Features
The product changes or improvements we believe will drive the outcomes we seek.
Let’s take a look at each one of these elements in further detail.
Assumptions
The first step in the Lean UX process is to declare your assumptions. Every project starts with assumptions, but usually we don’t explicitly acknowledge this fact. Instead, we try to ignore assumptions, or worse, treat them as facts.
Declaring your assumptions allows your team to create a common starting point. By doing this as a team, you give every team member—designer and nondesigner alike—the opportunity to voice his or her opinion on how best to solve the problem. Going through an assumptions declaration exercise gets everyone’s ideas out on the whiteboard. It reveals the team’s divergence of opinions and also exposes a broad set of possible solutions.
Declaring assumptions is the first step in the Lean UX process; see Figure 5-1.
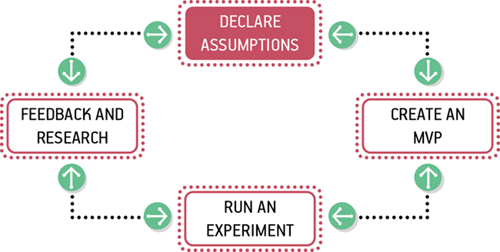
Figure 5-1. The Lean UX process, step 1
Method: Declaring Assumptions
Who
Declaring assumptions is a group exercise. Gather your team, making sure that all disciplines are represented, including any subject matter experts that could have vital knowledge about your project. For example, if you’re handling a frequent customer complaint, it might be beneficial to include a customer service representative from your call center. Call center reps speak to more customers than anyone else in the organization, and will likely have insight the rest of the team won’t.
Preparation
Give the team advance notice of the problem they will be taking on to give everyone a chance to prepare any material they need, or do any related research, before you begin. Important things to prepare in advance include:
Analytics reports that show how the current product is being used
Usability reports that illustrate why customers are taking certain actions in your product
Information about past attempts to fix this issue and their successes and failures
Analysis from the business stakeholder as to how solving this problem will affect the company’s performance
Competitive analyses that show how competitors are tackling the same issues
Method: Problem Statement
The team needs to have a starting point for the exercise. I’ve found it helpful to start with a problem statement. (See the template for this statement later in this section.) The problem statement gives your team a clear focus for their work. It also defines any important constraints. You need constraints for group work. They provide the guardrails that keep the team grounded and aligned.
Problem statement template
Problem statements are made up of three elements:
The current goals of the product or system
The problem the business stakeholder wants addressed (i.e., where the goals aren’t being met)
An explicit request for improvement that doesn’t dictate a specific solution
Template
[Our service/product] was designed to achieve [these goals]. We have observed that the product/service isn’t meeting [these goals], which is causing [this adverse effect] to our business. How might we improve [service/product] so that our customers are more successful based on [these measurable criteria]?
For example, here is a problem statement we used to begin a project at TheLadders, an online recruiting firm where I worked. (You’ll see many more examples from TheLadders throughout this book.)
Our service offers a conduit between job seekers and employers trying to hire them. Through our service, employers can reach out to job seekers in our ecosystem with employment opportunities. We have observed that one critical factor affecting customer satisfaction is how frequently job seekers respond to employer messages. Currently, job seekers are replying to these communications at a very low rate. How might we improve the efficacy of our communication products, thus making employers more successful in their jobs and job seekers more satisfied with our service?
Problem statements are filled with assumptions. The team’s job is to dissect the problem statement into its core assumptions. You can do that by using the following business assumptions worksheet. Note that some teams—especially teams starting from scratch—may not have a clear problem statement. That’s okay. You can still try out the worksheet. You’ll just have to expect that it may take longer to reach consensus on some of the questions.
Prioritizing assumptions
The reason we declare assumptions at the start of our work is so that we can identify project risks. Once you have a list of assumptions, you need to figure out which ones are the riskiest so that you can work on them first.
Lean UX is an exercise in ruthless prioritization. Understanding that you can’t test every assumption, how do you decide which one to test first? I like to create a chart like the one in Figure 5-2, and use it to map out the list of assumptions.
The goal is to prioritize a set of assumptions to test based on their level of risk (i.e., how bad would it be if we were wrong about this?) and how much understanding we have of the issue. The higher the risk and the more unknowns involved, the higher the priority to test those assumptions.
This doesn’t mean that assumptions that don’t make the first cut are gone forever. Keep a backlog of the other assumptions you’ve identified so you can come back to them and test them if and when it makes sense to do so.
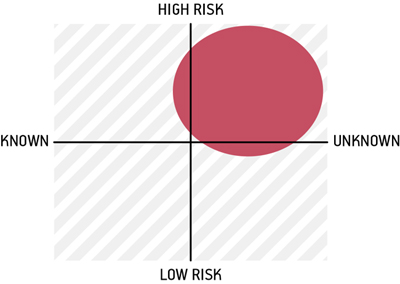
Figure 5-2. Prioritization matrix
Hypotheses
With your prioritized list of assumptions in hand, you’re ready to move to the next step: testing your assumptions. To do that, transform each assumption statement into a format that is easier to test: a hypothesis statement.
Generally, hypothesis statements use the format:
We believe [this statement is true].
We will know we’re [right/wrong] when we see the following feedback from the market:
[qualitative feedback] and/or [quantitative feedback] and/or [key performance indicator change].
You can see that this format has two parts. A statement of what you believe to be true, and a statement of the market feedback you’re looking for to confirm that you’re right.
Expressing your assumptions this way turns out to be a really powerful technique. It takes much of the subjective and political conversation out of the decision-making process and instead orients the team toward feedback from the market. It also orients the team toward users and customers.
Subhypotheses: Breaking the Hypothesis Down into Smaller Parts
Sometimes—if not most of the time—you will discover that your hypothesis is too big to test with one test. It will contain too many moving parts, too many subhypotheses. When this happens, I find it helpful to break the hypothesis down into smaller and more specific parts. Though there are many ways to do this, for product work I have found that this format is very helpful:
We believe that
[doing this/building this feature/creating this experience]
for [these people/personas]
will achieve [this outcome].
We will know this is true when we see
[this market feedback, quantitative measure, or qualitative insight].
The first field is completed with the feature or improvement you’re considering making to your product. The second field describes exactly which of your target customers will benefit from this feature. The last field speaks to the benefit those customers will get from that feature. The final statement ties it all together. This is the statement that determines whether your hypothesis was true. What market feedback will you look for to indicate that your idea is correct? This feedback could be a quantitatively measured usage of a feature, an increase in a business metric, or a qualitative assessment of some sort.
Let’s take a look at an example of how this works by going back to the problem statement we looked at earlier from TheLadders:
Our service offers a conduit between job seekers and employers trying to hire them. Through our service, employers can reach out to job seekers in our ecosystem with employment opportunities. We have observed that one critical factor affecting customer satisfaction is how frequently job seekers respond to employer messages. Currently, job seekers are replying to these communications at a very low rate. How can we improve the efficacy of our communication products, thus making employers more successful in their jobs and job seekers more satisfied with our service?
One assumption we make in this problem statement is that recruiters will use a new channel (TheLadders) to engage with candidates. This is not a proven fact and needs to be tested. How would we write the hypothesis for that statement? Let’s take our template and fill it out:
We believe that
creating an efficient communication system within TheLadders’ product experience
for recruiters and employers
will achieve a higher rate of contact success and an increase in product satisfaction.
We will know this is true when we see an increase in the number of replies from job seekers to recruiter contacts and an increase in the number of messages initiated by recruiters in our system.
Completing Your Hypothesis Statements
To create your hypothesis statements, start assembling the building blocks. Put together a list of outcomes you are trying to create, a definition of the personas you are trying to service, and a set of the features you believe might work in this situation. Once you’ve got all of this raw material, you can put them all together into a set of statements. Let’s take a closer look at each of these elements.
Outcomes
When you’re creating hypotheses to test, you want to try to be very specific regarding the outcomes you are trying to achieve. I discussed earlier how Lean UX teams focus less on output (the documents, the drawings, even the products and features that we create) and more on the outcomes that these outputs create: can we make it easier for people to log into our site? Can we encourage more people to sign up? Can we encourage greater collaboration among system users?
Together with your team, look at the problem you are trying to solve. You probably have a few high-level outcomes you are hoping to achieve (e.g., increasing signups, increasing usage, etc.). Consider how you can break down these high-level outcomes into smaller parts. What behaviors will predict greater usage: more visitors to the site? Greater click-through on email marketing? Increasing number of items in the shopping cart? Sometimes it’s helpful to run a team brainstorm to create a list of individual outcomes that, taken together, you believe will predict the larger outcome you seek.
Figure 5-3 shows an example from Giff Constable, in which an executive leadership team brainstormed and then voted on which key performance indicators (KPIs) the company should pursue next. After consolidating to the list shown in the photo, each executive was given four M&Ms. As long as they managed not to eat their votes, these executives were able to vote (with candy) for each metric they felt was most important. Ties were broken by the CEO.
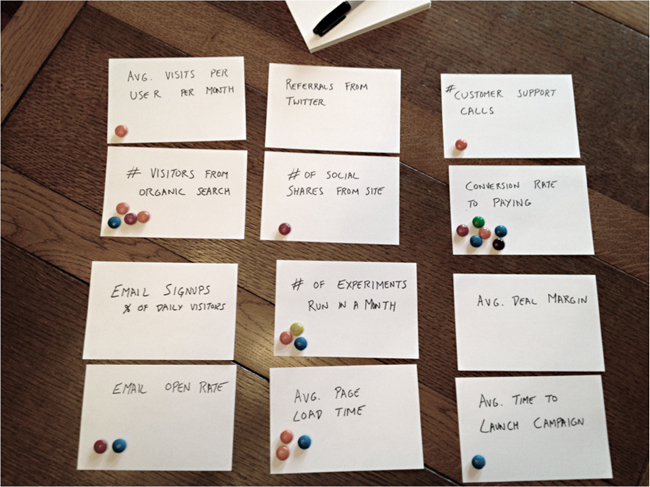
Figure 5-3. KPI prioritization with candy
Personas
Designers often create models called personas to represent the users of their systems. If your team already has a well-defined set of personas, the only thing you need to consider at this point is which ones you will be using in your hypothesis statements. If you don’t yet have personas, this section explains how to create personas for the Lean UX process.
Proto-Personas
Designers have long been advocates for the end user. Lean UX is no different. As we make assumptions about our business and the outcomes we’d like to achieve, we still need to keep the user front and center in our thinking.
Most of us learned to think about personas as a tool to represent what we learned in our research. It was often the case that we created personas as the output of lengthy, expensive research studies. The problem with personas that are created this way is the assumption that this is the only way to create personas, as well as the tendency to regard personas created through this process as untouchable because of all of the work that went into creating them.
In Lean UX, we change the order of operations in the persona process. When creating personas in this approach, we start with assumptions and then do research to validate our assumptions. Instead of spending months in the field interviewing people, we spend a few hours creating proto-personas. Proto-personas are our best guess as to who is using (or will use) our product and why. We sketch them on paper with the entire team contributing—we want to capture everyone’s assumptions. Then, as we learn from our ongoing research, we quickly find out how accurate our initial guesses are, and how we’ll need to adjust our target audience (and persona)—and thus our design.
Persona Format
We like to sketch proto-personas on paper using a hand-drawn quadrant, as in Figure 5-5 and Figure 5-6 (start by folding a sheet of paper into four boxes). The top-left quadrant holds a rough sketch of the persona and his or her name and role. The top-right box holds basic demographic information. Try to focus on demographic information that predicts a specific type of behavior. For example, there may be cases in which the persona’s age is totally irrelevant yet their access to a specific device, such as an iPhone, will completely change the way they interact with your product.
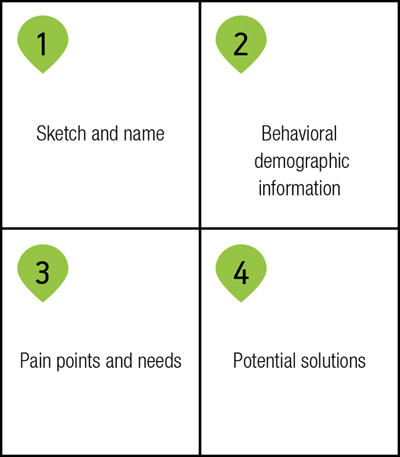
Figure 5-5. Blank persona template
The bottom half of the proto-persona is where we put the meat of the information. The bottom-left quadrant contains the user’s needs and frustration with the current product or situation, the specific pain points your product is trying to solve, and/or the opportunity you’re trying to address. The bottom-right quadrant contains potential solutions for those needs. You’ll use the bottom-right quadrant to capture feature and solution ideas.
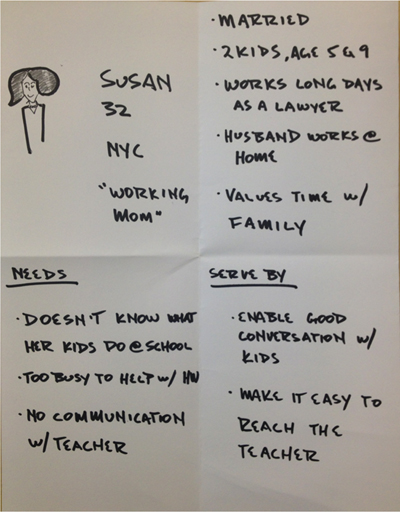
Figure 5-6. Completed persona template
Persona Creation Process
As with the other elements of the hypothesis statement, we like to start the persona creation process with a brainstorm. Team members offer up their opinions on who the project should be targeting and how that would affect each potential user’s use of the product. Once the brainstorming is complete, the team should narrow down the ideas to an initial set of three or four personas they believe are most likely to be the target audience. Try to differentiate the personas around needs and roles rather than by demographic.
Features
Once you have a list of outcomes in mind and have focused in on a group of users, it’s time to start thinking about what tactics, features, products, and services you can put in place to achieve those desired outcomes. Typically, everyone on the team has a strong opinion at this stage—after all, features are the most concrete things we work with, so it’s often easiest for us to express our ideas in terms of features. Too often, though, our design process starts when someone has a feature idea, and we end up working backward to try to justify the feature. In Lean UX, features exist to serve the needs of the business, the customer, and the user.
Feature Brainstorming Process
Employing the same techniques described earlier, we like to create feature lists by brainstorming them as a team. We’re looking for features we think will drive customer behavior in the desired direction. Have each team member write each idea, using a thick marker, on a sticky note. When time is up, ask everyone to post their notes to the wall and have the group arrange them into themes.
Assembling Your Subhypotheses
With all of your raw material created, you’re ready to organize this material into a set of testable hypotheses. We like to create a table like the one in Figure 5-7 and then complete it by using the material we’ve brainstormed.
As you write your hypotheses, consider which persona(s) you’re serving with your proposed solutions. It’s not unusual to find solutions that serve more than one persona at a time. It’s also not unusual to create a hypothesis in which one feature drives more than one outcome. When you see that happening, split the hypothesis into two parts—you want each statement to refer to only one outcome. The important thing to remember in this whole process is to keep your ideas specific enough so that you can create meaningful tests to see if each of your ideas hold water.
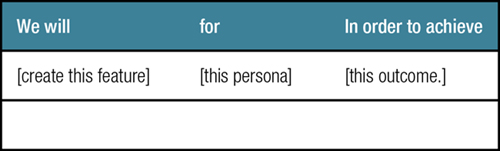
Figure 5-7. Hypothesis creation table
When your list of hypotheses is complete, you’re ready (finally!) to move on to the next step: design. If you’ve done the process to this point with your whole team (and I strongly recommend that you do), you’ll be in great position to move forward together. This process is a very effective way to create a shared understanding and shared mission across your whole team.
Conclusion
In this chapter, we discussed how we can reframe our work in terms of outcomes, which is is a vitally important Lean UX technique: framing our work with outcomes frees us (and our teams) to search for the best solutions to the problem at hand. We also looked at the process of declaring outcomes. In order to achieve these, we start with the project’s problem statements and then acknowledge our assumptions, then transform these assumptions into hypotheses. We also showed how to write hypothesis statements that capture intended features, audience, and goals, and that are specific enough to be tested. You’ll end up with statements that will serve as the roadmap for the next step of the Lean UX process: collaborative design.
In the next chapter, we define collaborative design and how it differs from traditional product design. We’ll discuss specific tools and techniques that empower teams to design together and demonstrate how designing together is the beginning of the hypothesis validation process.
Get Designing for Product Strategy now with the O’Reilly learning platform.
O’Reilly members experience books, live events, courses curated by job role, and more from O’Reilly and nearly 200 top publishers.

