You may have photos that aren’t digital. Perhaps they’re inherited family pictures or shots you took with a film camera. To take advantage of digital photo retouching or to email them to your sister, you need to scan these pictures. Scanners once lived only on the desktops of graphics professionals; today, they’re so inexpensive that they’re as affordable as a printer. For a growing crowd of photographers, they’ve become just as indispensable.
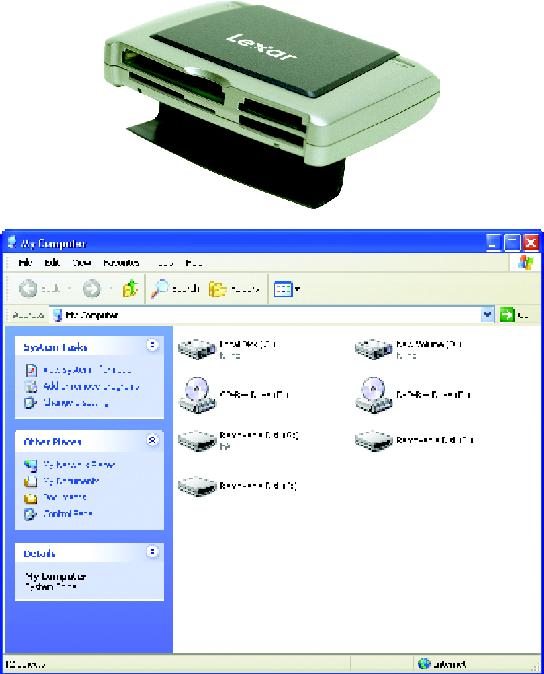
Figure 4-5. Top: Card readers provide a handy alternative to replacing a camera’s lost cable. They also work up to 40 times faster than some cables, particularly those from older cameras. Card readers come with tiny drives that accept storage cards from your camera, cell phone, PDA, and other gadgets.Bottom: When plugged in, a card reader adds several Removable Disk drive icons to My Computer, letting you insert a wide variety of card types. Unfortunately, the drives in My Computer rarely identify which removable drive contains your newly inserted card, forcing you to double-click them all until the correct one opens (you’ll know you’ve hit pay dirt when you see your images inside the drive).
The following sections explain how to choose a scanner and set it up to scan color and black and white photos.
You’ll generally find three types of scanners on the shelves at most office supply and computer stores
Flatbed (price range: $50 to $600). Flatbed scanners hide a large plate of glass beneath a large lid. Lift the lid, place your photo or other item on the glass, and close the lid. When you tell Windows to scan, the scanner converts your photo or other item into an image file. Flatbed scanners are the most popular model for consumers because they work so well at the most common tasks: scanning in photos, articles, receipts, and handwritten documents. Once you scan something, you can save it, reprint it, or send it to friends or coworkers. As you go up the price range, you get better resolution, greater dynamic range (sensitivity to gradations between black and white), and decent film-scanning capabilities, so you can scan your collection of negatives and slides into digital files.
All-in-one (price range: $150 to $300). These scanners come as part of an all-in-one printer, which places a scanner atop a printer, and then throws in the smarts of a copier and fax machine. All-in-one models pack four gadgets into something that costs much less than the sum of its parts. These devices are heavy, making them awkward to carry or move from one room to another. And the individual components are never as versatile as the dedicated models. But if you’re shopping for both a scanner and printer, they’re certainly convenient, and you can’t beat the cost savings.
Film scanner (price range: $200 to $2,000). While many flatbed scanners offer film scanning (as described above), doing so with them is labor-intensive. If you have a large collection of 35mm or smaller slides and/or negatives, you might want to invest in a dedicated film scanner. All but the cheapest of these will provide better quality film scans than the flatbeds offer, and some feature automated handling of filmstrips and slides. The upper end of the price range gives you both top scan quality and the ability to handle medium-format (120mm) film.
Installing a scanner works pretty much like installing a digital camera, but with one exception: Windows XP embraces most digital cameras as soon as they’re plugged in. Installing a scanner, by contrast, works better if you install the scanner’s bundled software before plugging in the scanner.
Follow these steps to connect your scanner to your PC.
Tip
Lost your scanner’s connection cable? Most scanners use USB or FireWire cables, which are available at any computer or office supply store.
Install the scanner’s installation software.
Install the software before plugging in the scanner. That way Windows XP recognizes your new device as soon as you plug it in.
Unlock the scanner, if necessary.
To keep the UPS man from banging around a scanner’s sensitive innards, most scanners come with a built-in locking mechanism inside that clenches all the delicate parts together tightly. You need to unlock the scanner before using it, or you’ll hear frightening grinding sounds.
Unlocking most models simply means turning a switch along one side of the scanner; on more advanced models, you need to unscrew a panel along one edge of the scanner to access the switch. Some locking switches hide beneath a strip of bright-plastic tape that says, “Unlock before use.”
Plug the scanner into the wall, and turn on its power switch.
The scanner’s light turns on, and the scanner makes some reassuring power-on test noises.
Connect the scanner’s cable to your PC.
Most scanners plug into a computer’s USB or FireWire port. Both ports let the scanner send large amounts of data to your PC as quickly as possible.
Note
A USB 2.0 scanner still works when plugged into an older USB 1.1 port, but the connection’s pretty darn slow. Most computers sold after 2003 come with USB 2.0 ports. To see if your computer already supports USB 2.0 right-click My Computer and then follow this path: Properties → Hardware tab → Device Manager → Universal Serial Bus Controllers. If you spot the words USB Enhanced Host Controller somewhere on the Device Manager’s right-side pane, your computer supports USB 2.0.
When you’re finished with the installation, your PC recognizes your scanner, automatically locates the software you installed in step 1, and adds its icon to your My Computer list of attached scanners and cameras (Start → My Computer).
Get Digital Photography: The Missing Manual now with the O’Reilly learning platform.
O’Reilly members experience books, live events, courses curated by job role, and more from O’Reilly and nearly 200 top publishers.


