
Chapter 2. Installing eClient 41
2.4 Installing Content Manager Version 8 eClient
This section provides instructions for installing, configuring and verifying IBM
DB2 Content Manager Version 8 eClient on a Windows platform.
If you have already installed Content Manager and Information Integrator for
Content on your machine, your machine should have all the prerequisites
required for installing eClient. For eClient hardware and software requirements,
refer to Chapter 2, “Requirements” in IBM Content Manager for Multiplatforms /
IBM Information Integrator for Content: Installing, Configuring, and Managing
eClient, SC27-1350.
Tip: If you receive the error message:
Your current security settings prohibit running ActiveX controls on this
page. As a result, the page may not display correctly.
while launching the Information Structuring Tool, most likely you do not have
Java plug-in installed on your browser. Do the following:
1. Go to http://java.sun.com/products/plugin and download the Java
plug-in, for example, Version 1.4.1_02.
2. Close all browsers.
3. Install the Java plug-in.
4. Open a browser and launch the Information Structuring Tool.
If you receive the error message Loading Java Applet Failed in the browser
status bar while launching the Information Structuring Tool, make sure that
you are not using a SOCKS proxy server. To turn off the SOCKS proxy server
in Internet Explorer:
1. Select Tools -> Internet options from menu bar.
2. Open the Connections tab.
3. Click the LAN Settings button.
4. Unselect Use a proxy server.
5. Close all browsers.
6. Open a browser and launch the Information Structuring Tool.

42 eClient 101 Customization and Integration
2.4.1 Preparing for installation
The eClient installation procedure will automatically deploy the eClient
application server in WebSphere Application Server. In order to ensure
successful deployment, make sure WebSphere Application Server is in the
proper status at the time of installation depending on the version of the
WebSphere Application Server you are using:
If you are using WebSphere Application Server AES V4.05, stop any
WebSphere Application Server server that is running.
If you are using WebSphere Application Server AE V4.05, the WebSphere
Application Server administration server (AE) service in a Windows Control
Panel must be running.
If you are using WebSphere Application Server V5.0, the WebSphere
Application Server administration server (server1) must be started.
2.4.2 Installing eClient
Complete the following steps to install eClient:
1. Log on to the machine as a system administrator user.
2. Make sure that your WebSphere Application Server is in the proper status.
For more details, see 2.4.1, “Preparing for installation” on page 42.
If the WebSphere Application Server has an incorrect status, eClient
installation process may not be able to successfully deploy the eClient
application server.
3. Insert the eClient V8.2 CD into the CD-ROM drive.
4. On the eClient installation LaunchPad window, click Install.
5. Click Next on the Welcome window.
6. Select a language and click Next.
7. Enter the installation directory. This is C:\CMeClient for our scenario. Click
Next.
Note: It is best practice to create a user, such as admin, and assign it to the
system administrator group on the machine right after the operating system is
installed. Then, you should log in as user admin to install all products,
including DB2, WebSphere Application Server, Content Manager, EIP, and
eClient.

Chapter 2. Installing eClient 43
8. If you have not installed EIP connectors, you will received error message and
the installation process is stopped. See 2.2.2, “Installing EIP” on page 22 for
connector installation instruction.
9. After reviewing installation options, click Next to start copying files.
10.Select Content Manager Version 8.2 as shown in Figure 2-8 and click Next.
Depending on what you select on this window, the installation will display
different windows for you to configure various content servers. For our
scenario, we will connect to the Content Manager V8.2 server.
Figure 2-8 Select server to connect
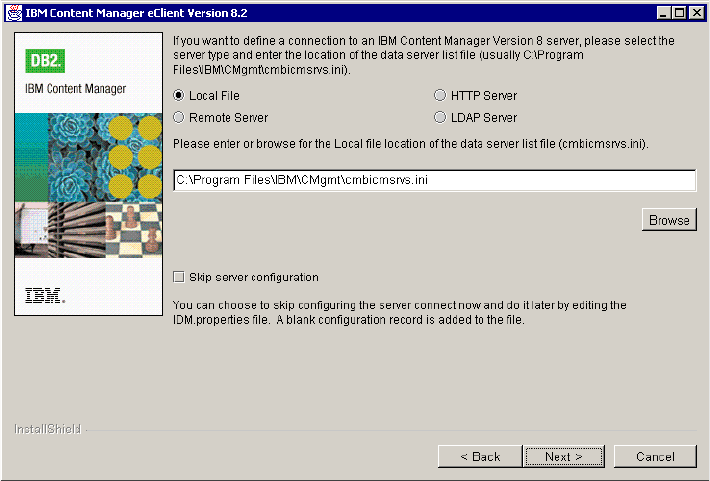
11.On the next window, shown in Figure 2-9 on page 44, enter the location of the
cmbicmsrvs.ini file. The default location is C:\Program
Files\IBM\CMgmt\cmbicmsrvs.ini on your local machine.
Note the server configuration file can reside on the local machine, an HTTP
server, remote server, or LDAP server. eClient uses the cmbicmsrvs.ini file to
populate the Content Manager server list on the logon window.
Click Next.
44 eClient 101 Customization and Integration
Figure 2-9 Specify the location for cmbicmsrvs.ini file
12.If you want the installation process to deploy the eClient application server,
click Next in the window shown in Figure 2-10 on page 45. If you prefer to
manually deploy it later, click Cancel.
In order to successfully deploy eClient application server, your WebSphere
Application Server must be in the proper status. Find details in 2.4.1,
“Preparing for installation” on page 42.
Get eClient 101 Customization and Integration now with the O’Reilly learning platform.
O’Reilly members experience books, live events, courses curated by job role, and more from O’Reilly and nearly 200 top publishers.

