
68 eClient 101 Customization and Integration
cm02. The application server name must be unique in the WebSphere
environment.
Verification
Before creating an eClient cluster server, you should test if the standard eClient
installation completed successfully on machine cm02. This may be done with the
following steps:
1. On the Deployment Manager node (machine cm02), launch the Network
Deployment Administrative Console. Click Start -> Programs -> IBM
WebSphere -> Application Server v5.0 -> Network Deployment
Administrative Console.
2. In the Network Deployment Administrative Console, select Servers ->
Application Servers in the Navigation pane on the left.
3. A list of servers appears in the Nodes window on the right. eClient_Server is
one of the servers on node cm02. See Figure 3-6 on page 67.
4. Select server eClient_Server and click Start to start the eClient server.
5. Follow the steps in 3.8, “Configuring HTTP Web server” on page 73 to
regenerate the Web server plug-in.
6. Open a browser on any machine and enter http://cm01/eClient82/IDMInit.
This should lead you to the eClient logon window.
7. If eClient does not work on cm02, you may consider removing the eClient
application server. Then, manually deploy it again in the following steps:
a. Open a command window.
b. Run the command cd c:\CmeClient\Save.
c. Run the command idmwas.bat [userid] [password] to deploy it again.
To verify the eClient installation on machine cm04, check to make sure the
C:\CMeClient directory and its subdirectory have been created.
3.7 Creating eClient cluster server
Up to this point, you have all the necessary components to create the eClient
cluster server. The WebSphere Application Server and Network Deployment
environment have been configured. EIP and eClient have been installed on each
node in the cell. The eClient has been deployed on node cm02, but not on node
Tip: It is not a failure that the eClient server is not automatically deployed in
Webpshere on node cm04.

Chapter 3. Installing eClient in a WebSphere Network Deployment environment 69
cm04. On node cm02, the directory C:\CmeClient\installedApp\
IBM_eClient_82.ear has been created and populated. On node cm04, the
directory C:\CmeClient\installedApp\ IBM_eClient_82.ear does not exist.
3.7.1 Creating eClient cluster server
Complete the following steps to create an eClient cluster server:
1. On the Deployment Manager node (machine cm02), launch the Network
Deployment Administrative Console. Click Start -> Programs -> IBM
WebSphere -> Application Server v5.0 -> Network Deployment
Administrative Console.
2. In the Network Deployment Administrative Console, select Servers ->
Clusters in the Navigation pane on the left. The Server Cluster window is
displayed on the right.
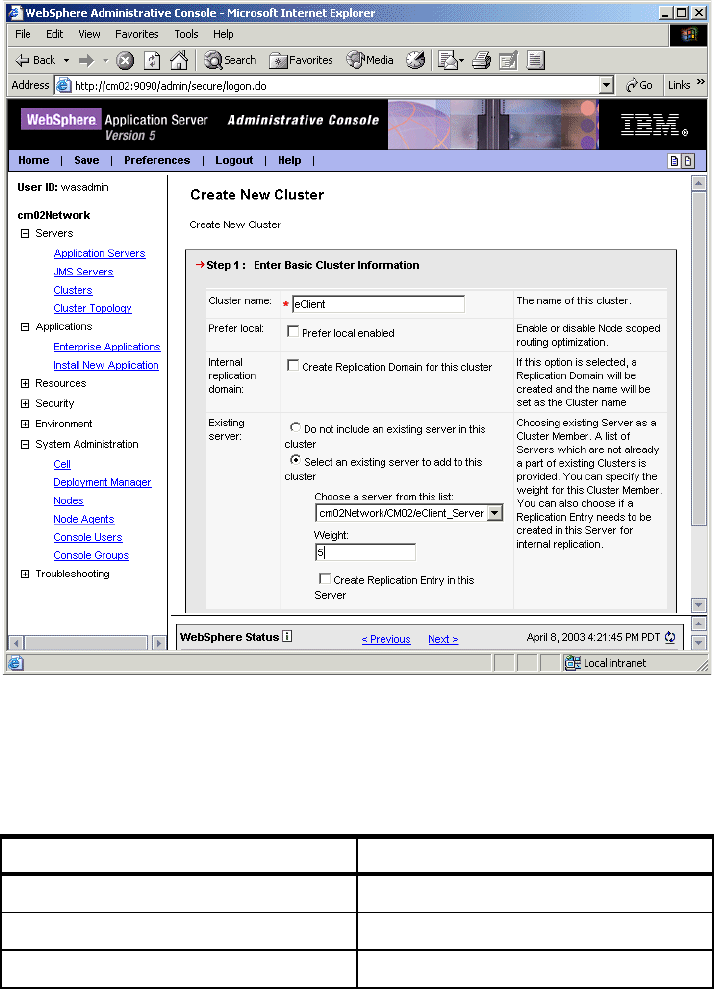
3. Click the New button to add a new cluster server.
4. Set the values of the fields in Table 3-3. See Figure 3-7 on page 70.
Table 3-3 Enter basic cluster information
The field Prefer local indicates if a request to an EJB should be routed to an
EJB on the local node if available. The field Internal replication domain
indicates if you want to use memory-to-memory replication for persistent
session management and that a replication domain should be created.
The field Server weight determines how workload is distributed among the
cluster members. For example, if all cluster members have identical weights,
work will be distributed among the cluster members equally. Servers with
higher weight values are given more work. A rule of thumb formula for
determining routing preference would be:
% routed to Server1 = weight1 /(weight1+weight2+...+weight n)
Field Value
Cluster name eClient
Prefer local False
Internal replication domain False
Existing server Select an existing server to add to this
cluster, and select
cm02Network/CM02/eClient_Server
from the server list.
Weight 5
Create replication entry in this server False
70 eClient 101 Customization and Integration
where there are n cluster members in the cluster.
Figure 3-7 Basic cluster information
5. Click Next to go to the next window.
6. Set the values for the fields in Table 3-4. See Figure 3-8 on page 71.
Table 3-4 More cluster server information
Field Value
Name eClient_Server_cm04
Server Node cm04
Weight 5
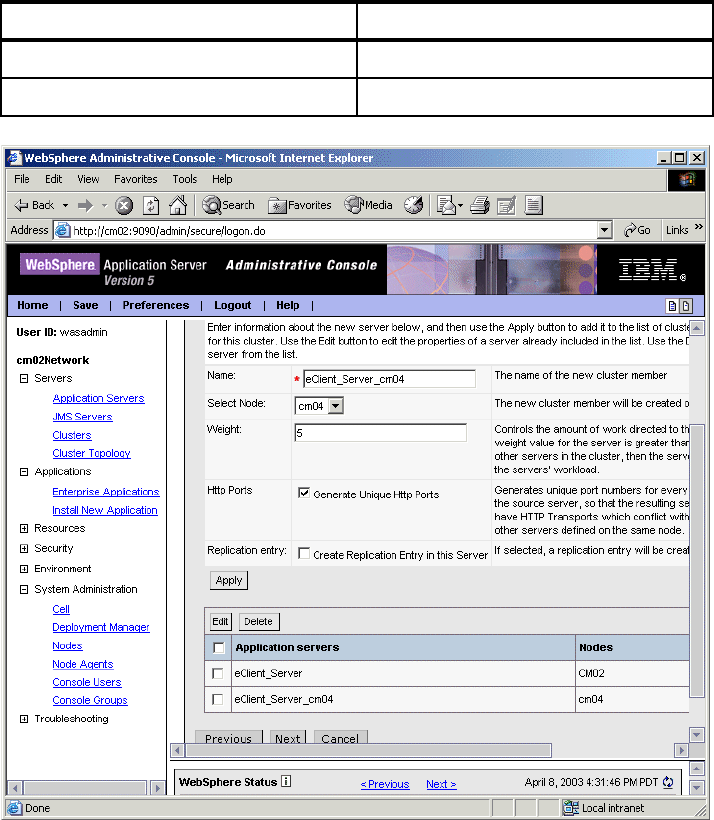
Chapter 3. Installing eClient in a WebSphere Network Deployment environment 71
Figure 3-8 More cluster server information
7. Click the Apply button to add the new cluster member.
8. If you plan to have more cluster members in the cluster server, repeat step 6
and step 7 for each additional cluster member.
9. After adding all cluster members, click Next.
10.Review the cluster summary information, then click Finish.
11.Click Save in the top-right corner to apply changes to the master
configuration.
Select Generate Unique Http Ports True
Create Replication Entry in this Server False
Field Value
Get eClient 101 Customization and Integration now with the O’Reilly learning platform.
O’Reilly members experience books, live events, courses curated by job role, and more from O’Reilly and nearly 200 top publishers.

