414 eClient 101 Customization and Integration
3. Replace all the encrypted passwords to plain text passwords. When you
restart the Resource Manager application server, the passwords will be
re-encrypted.
4. Restart the Resource Manager application server.
5. Repeat the above steps for each Resource Manager if there are multiple
ones.
17.3.3 Installing user exit
The user exit file ICMXLSLG.DLL must be installed to enable LDAP integration in
the Content Manager server. The file is located in the LDAP directory of the
Content Manager installation directory. By default, this directory is
C:\ICMROOT\LDAP.
The user exit file ICMXLSLG.DLL must be copied into the Library Server DLL
directory of the Content Manager installation directory. By default, this directory
is C:\ICMROOT\ICMNLSDB\DLL.
17.4 Configuring Content Manager V8.2 for SSO
In order to have the single sign-on feature working in the Content Manager
server, three things need to happen:
Enable the single sign-on feature in the Content Manager server.
Create a new privilege set, which must contain the following two privileges
and any other necessary privileges:
– AllowConnectToLogon, which allows the Content Manager user to log on
with a different DB2 connection user.
– AllowTrustedLogon, which allows the Content Manager user to log on with
a different DB2 connection user and without a password.
User IDs that are used to log on to the Content Manager server with single
sign-on must use the newly created privilege set.
17.4.1 Enabling single sign-on
You can enable Content Manager single sign-on feature during installation or
after installation. In the following, we show how to turn on this feature after
installation:
1. Launch a Content Manager System Administration Client by selecting Start
-> Programs -> IBM Content Manager for Multiplatforms V8.2 -> System
Administration Client.

Chapter 17. Single sign-on 415
2. In the Navigation pane on the left, select Library server parameters ->
Configuration.
3. The Library Server configuration is displayed in the Contents of configuration
pane on the right. Right-click it and select Properties.
4. Set the values of the fields in Table 17-11. See Figure 17-10.
Table 17-11 Enable single sign-on in Library Server
Figure 17-10 Enable single sign-on in Library Server
5. Click OK to save the change.
6. In the Navigation pane on the left, select Authentication -> Users. A list of
users is displayed in the Contents of users pane on the right. One of the users
is the connection user. By default, it is icmconct.
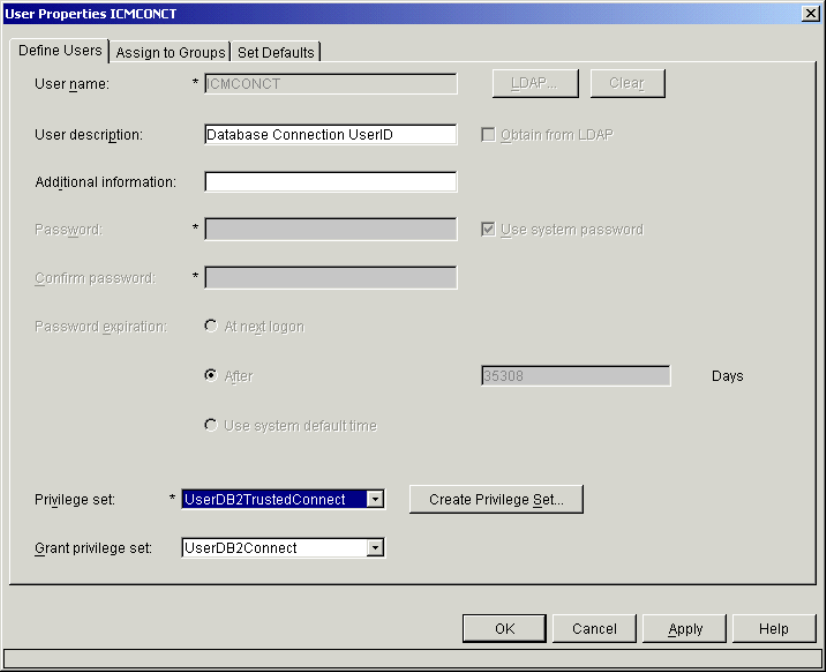
7. Right-click user icmconct and select Properties. The User properties
window is displayed with user icmconct’s definition.
8. Change the Privilege set field to UserDB2TrustedConnect. See Figure 17-11
on page 416. The privilege set
UserDB2TrustedConnects allows Content
Field Value
Max user action Allow logon without warning
Allow trusted logon True

416 eClient 101 Customization and Integration
Management users to connect to the DB2 database without having their own
DB2 user IDs. These users are also not required to have a password in the
Content Manager.
Figure 17-11 Grant UserDB2TrustedConnect privilege set to user icmconct
9. Click OK to save the change.
17.4.2 Creating new privilege set
Complete the following steps to create a new privilege set:
1. Launch a Content Manager System Administration Client by selecting Start
-> Programs -> IBM Content Manager for Multiplatforms V8.2 -> System
Administration Client.
2. In the Navigation pane on the left, select Authorization -> Privilege Set.

Chapter 17. Single sign-on 417
3. Right-click Privilege Set
and select New. The New privilege Set Definition
window is displayed.
4. Enter ClientSSO in the Name field for our scenario.
5. Select the ClientTaskLogon entry in the Privilege groups field.
6. Check the Select all box at the top of the Privileges field. Both
AllowConnectToLogon and AllowTrustedLogon entries are then included in
the Selected privileges field. See Figure 17-12.
Figure 17-12 Adding privileges to privilege set
Important: Steps 5 and 6 must be done for every privilege set used for single
sign-on.
Get eClient 101 Customization and Integration now with the O’Reilly learning platform.
O’Reilly members experience books, live events, courses curated by job role, and more from O’Reilly and nearly 200 top publishers.

