Chapter 11. Switching
11.0 Introduction
Most modern electronics are concerned with switching things. Microcontrollers and any other digital logic device use transistors as switches. Taking this a step further, devices like Arduino and Raspberry Pi can switch external devices, perhaps controlling lighting or power to a heater.
The recipes in this chapter are all concerned with using transistors and other devices to switch. This includes some recipes to extend the switching power of an Arduino and Raspberry Pi.
11.1 Switch More Power than Your Pi or Arduino Can Handle
Problem
You want to allow a pin, such as a microcontroller’s GPIO pin, to control more power than it otherwise could.
Solution
Use a transistor in a common-emitter arrangement as a “low-side” switch with a resistor to limit the base current. Figure 11-1 shows the schematic for this circuit, that, along with Recipe 11.2, you will use time and time again in your designs.
This type of switching is called “low-side” switching because the transistor acts as a switch between the low voltage of GND and the load.
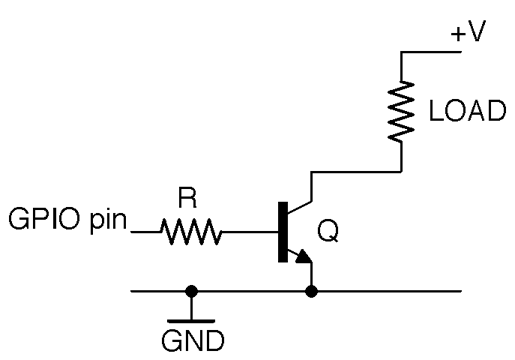
Figure 11-1. Using a Transistor as a Switch
Discussion
The resistor R makes sure that the current drawn from the GPIO pin does not exceed the current limit of the pin (40mA for Arduino and 16mA for Raspberry Pi; see also Recipe 10.7). It also protects the transistor from too much base current flowing. This ...
Get Electronics Cookbook now with the O’Reilly learning platform.
O’Reilly members experience books, live events, courses curated by job role, and more from O’Reilly and nearly 200 top publishers.

