
Want to build great programs really fast?
With C#, you’ve got a powerful programming language and a valuable tool at your fingertips. With the Visual Studio IDE, you’ll never have to spend hours writing obscure code to get a button working again. Even better, you’ll be able to focus on getting your work done, rather than remembering which method parameter was for the name of a button, and which one was for its label. Sound appealing? Turn the page, and let’s get programming.
C# and the Visual Studio IDE make it easy for you to get to the business of writing code, and writing it fast. When you’re working with C#, the IDE is your best friend and constant companion.
Note
The IDE—or Visual Studio Integrated Development Environment—is an important part of working in C#. It’s a program that helps you edit your code, manage your files, and publish your projects.
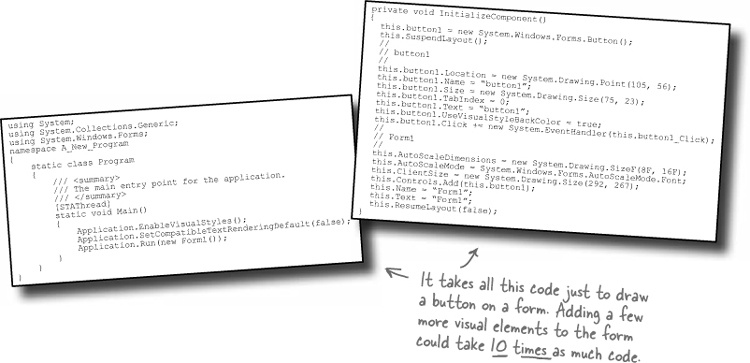
Every time you want to get started writing a program, or just putting a button on a form, your program needs a whole bunch of repetitive code.
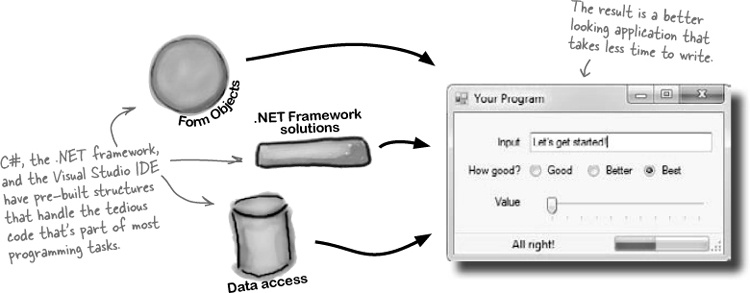
When you use C# and Visual Studio, you get all of these great features, without having to do any extra work. Together, they let you:
Build an application, FAST. Creating programs in C# is a snap. The language is powerful and easy to learn, and the Visual Studio IDE does a lot of work for you automatically. You can leave mundane coding tasks to the IDE and focus on what your code should accomplish.
Design a great looking user interface. The Form Designer in the Visual Studio IDE is one of the easiest design tools to use out there. It does so much for you that you’ll find that making stunning user interfaces is one of the most satisfying parts of developing a C# application. You can build full-featured professional programs without having to spend hours writing a graphical user interface entirely from scratch.
Create and interact with databases. The IDE includes an easy-to-use interface for building databases, and integrates seamlessly with SQL Server Compact Edition and many other popular database systems.
Focus on solving your REAL problems. The IDE does a lot for you, but you are still in control of what you build with C#. The IDE just lets you focus on your program, your work (or fun!), and your customers. But the IDE handles all the grunt work, such as:
Keeping track of all your projects
Making it easy to edit your project’s code
Keeping track of your project’s graphics, audio, icons, and other resources
Managing and interacting with databases
All this means you’ll have all the time you would’ve spent doing this routine programming to put into building killer programs.
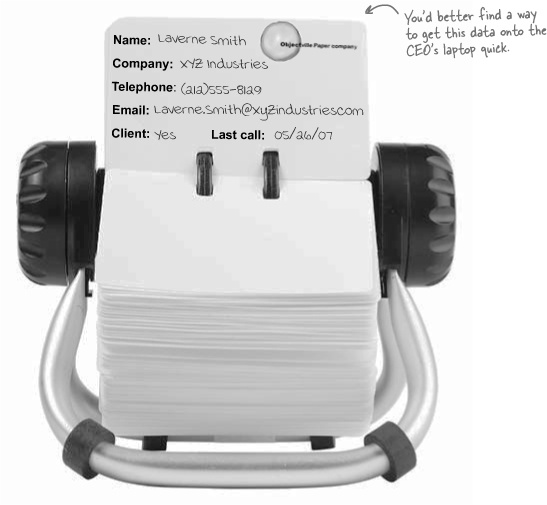
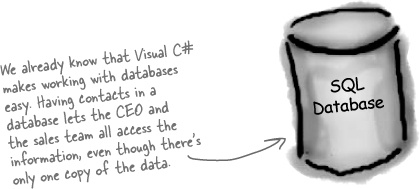
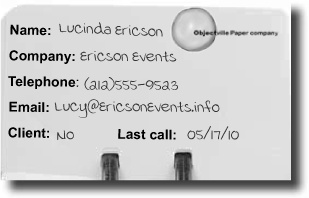
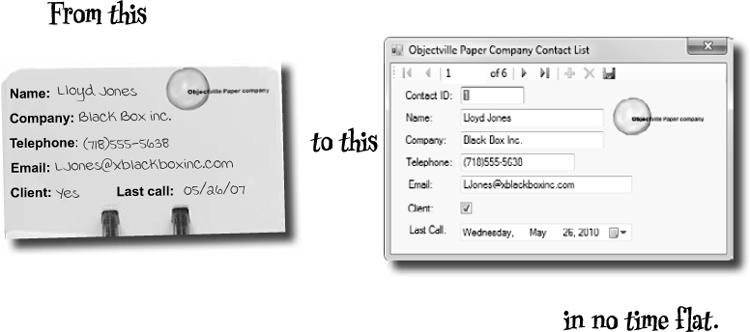
The Objectville Paper Company just hired a new CEO. He loves hiking, coffee, and nature...and he’s decided that to help save forests, he wants to become a paperless executive, starting with his contacts. He’s heading to Aspen to go skiing for the weekend, and expects a new address book program by the time he gets back. Otherwise...well...it won’t be just the old CEO who’s looking for a job.
Before we can start writing the address book application—or any application—we need to take a minute and think about who’s going to be using it, and what they need from the application.
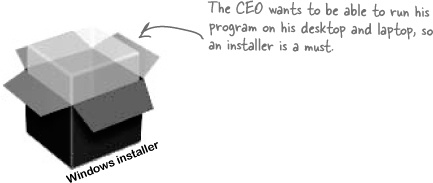
The CEO needs to be able to run his address book program at work and on his laptop, too. He’ll need an installer to make sure that all of the right files get onto each machine.
Think about your users and their needs before you start building the code, and they’ll be happy with the final product once you’re done!
The Objectville Paper Company sales team wants to access his address book, too. They can use his data to build mailing lists and get client leads for more paper sales.
The CEO figures a database would be the best way for everyone in the company to see his data, and then he can just keep up with one copy of all his contacts.
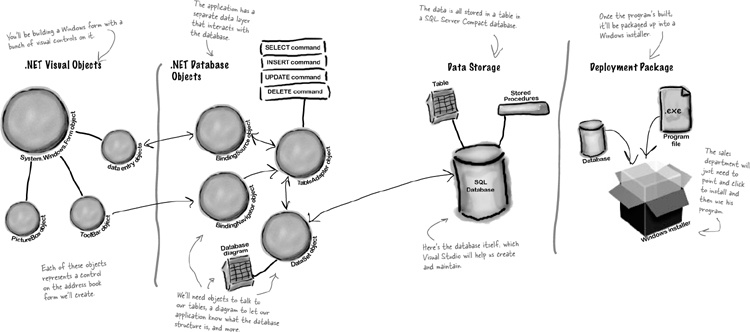
You’re going to need an application with a graphical user interface, objects to talk to a database, the database itself, and an installer. It sounds like a lot of work, but you’ll build all of this over the next few pages.
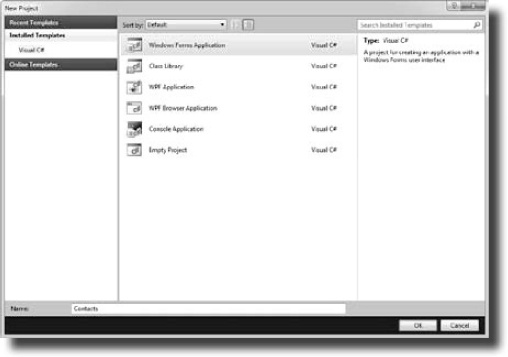
Go ahead and start up Visual Studio, if you haven’t already. Skip over the start page and select New Project from the File menu. Name your project “Contacts” and click OK. There are several project types to choose from. Select Windows Forms Application and choose “Contacts” as the name for your new project.
Note
Make sure that you save your project as soon as you create it by selecting “Save All” from the File menu—that’ll save all of the project files out to the folder. If you select “Save”, it just saves the one you’re working on.
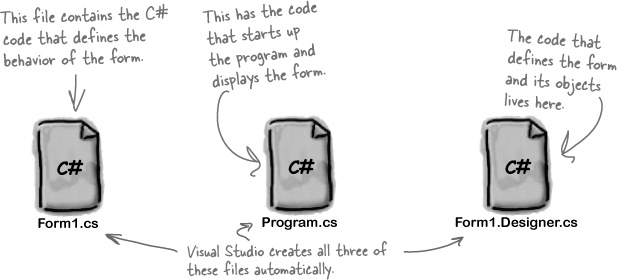
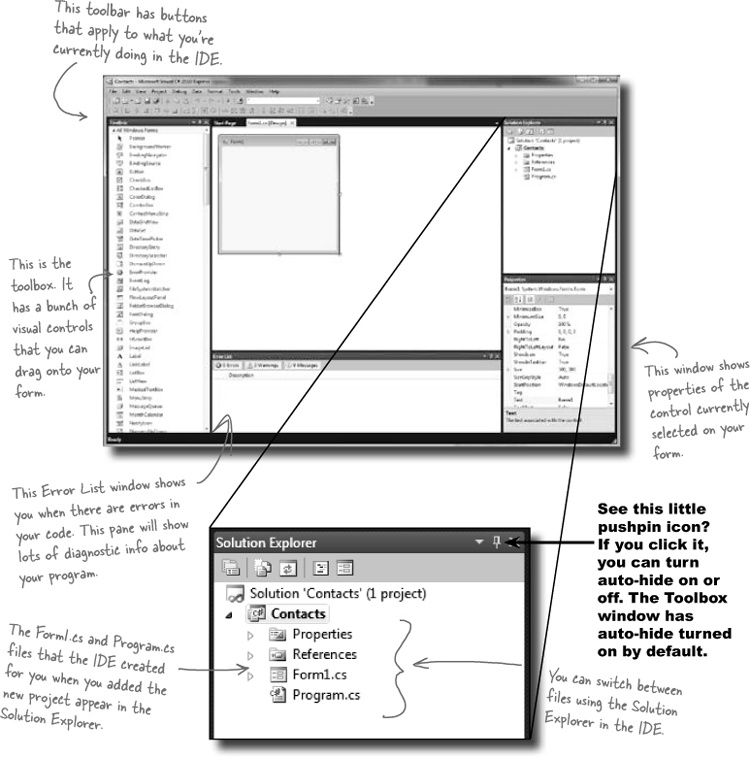
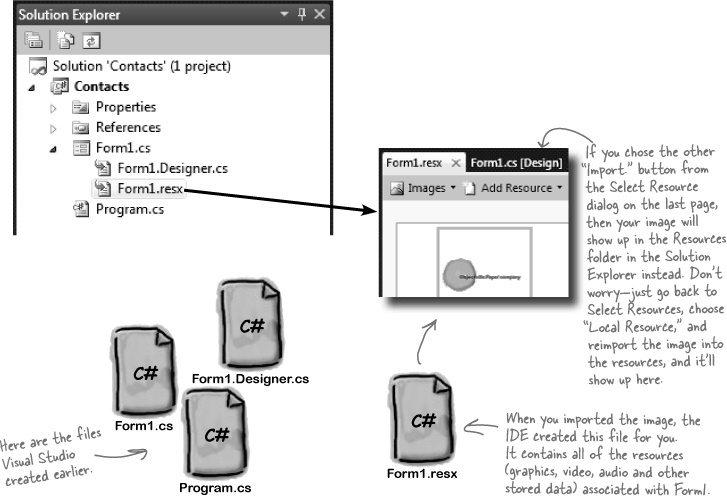
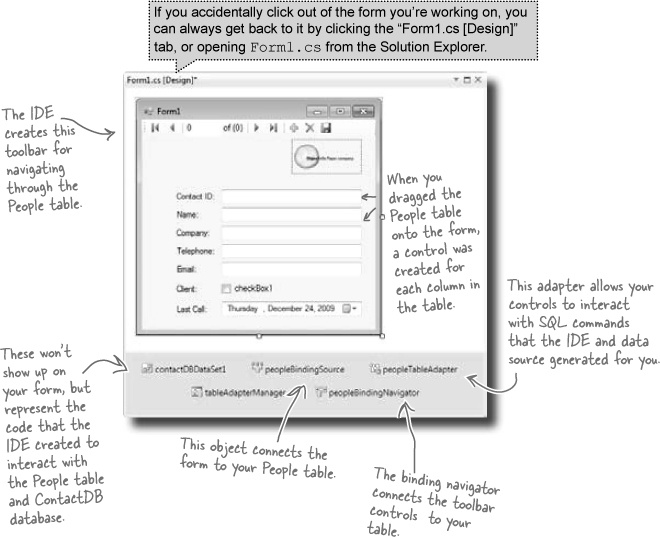
As soon as you save the project, the IDE creates Form1.cs, Form1.Designer.cs, and Program.cs file, when you create a new project. It adds these to the Solution Explorer window, and by default, puts those files in My Documents\Visual Studio 2010\Projects\Contacts\.
Sharpen your pencil
Below is what your screen probably looks like right now. You should be able to figure out the purpose of most of these windows and files based on what you already know. Make sure you open the Toolbox and Error List windows by choosing them from the View >> Other Windows menu. Then in each of the blanks, try and fill in an annotation saying what that part of the IDE does. We’ve done one to get you started.
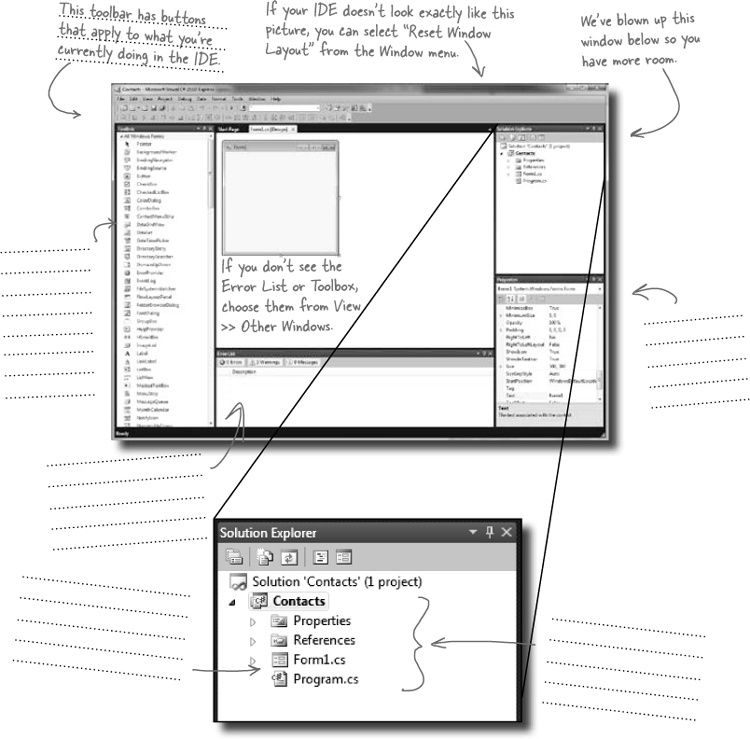
Sharpen your pencil Solution
We’ve filled in the annotations about the different sections of the Visual Studio C# IDE. You may have some different things written down, but you should have been able to figure out the basics of what each window and section of the IDE is used for.
Visual Studio will generate code you can use as a starting point for your applications.
Making sure the application does what it’s supposed to do is entirely up to you.
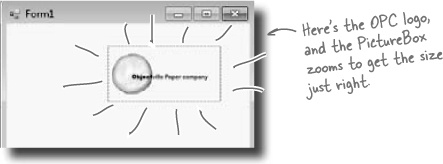
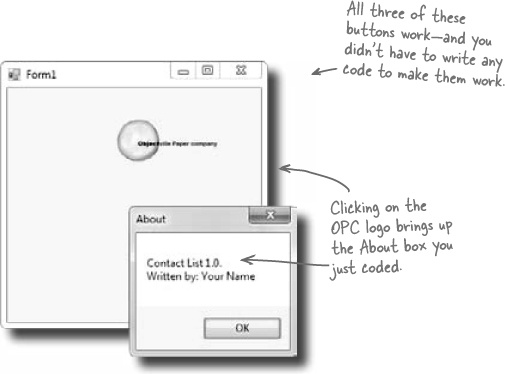
Adding controls and polishing the user interface is as easy as dragging and dropping with the Visual Studio IDE. Let’s add a logo to the form:
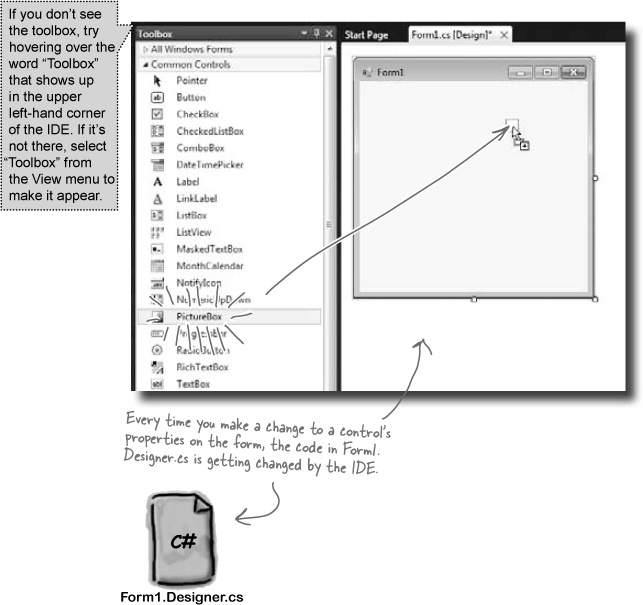
Use the PictureBox control to add a picture.
Click on the PictureBox control in the Toolbox, and drag it onto your form. In the background, the IDE added code to
Form1.Designer.csfor a new picture control.Set the PictureBox to Zoom mode.
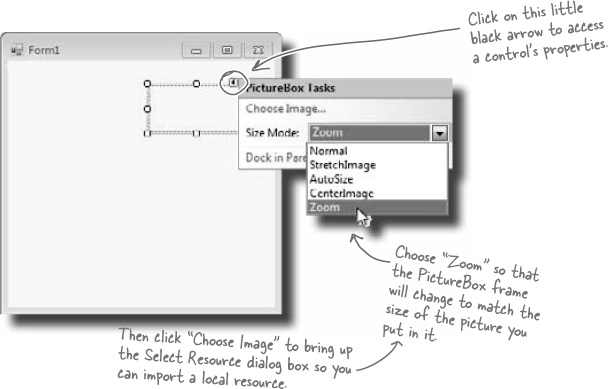
Every control on your form has properties that you can set. Click the little black arrow for a control to access these properties. Change the PictureBox’s Size property to “Zoom” to see how this works:
Download the Objectville Paper Company logo.
Download the Objectville Paper Co. logo from Head First Labs (http://www.headfirstlabs.com/books/hfcsharp) and save it to your hard drive. Then click the PictureBox properties arrow, and select Choose Image. You’ll see a Select Resources window pop up. Click the “Local Resource” radio button to enable the “Import...” button at the top of the form. Click that button, find your logo, and you’re all set.

Every time you do something in the Visual Studio IDE, the IDE is writing code for you. When you created the logo and told Visual Studio to use the image you downloaded, Visual Studio created a resource and associated it with your application. A resource is any graphics file, audio file, icon, or other kind of data file that gets bundled with your application. The graphics file gets integrated into the program, so that when it’s installed on another computer, the graphic is installed along with it and the PictureBox can use it.
When you dragged the PictureBox control onto your form, the IDE automatically created a resource file called Form1.resx to store that resource and keep it in the project. Double-click on this file, and you’ll be able to see the newly imported image.
Go to the Solution Explorer and click on the “expand” icon next to Form1.cs to expand it (if it’s not already expanded). This will display two files: Form1.Designer.cs and Form1.resx. Double-click on Form1.resx, click on the arrow next to “Strings”, and select “Images” from the drop-down list (or hit Ctrl-2) to see the logo that you imported. That file is what links it to the PictureBox, and the IDE added code to do the linking.
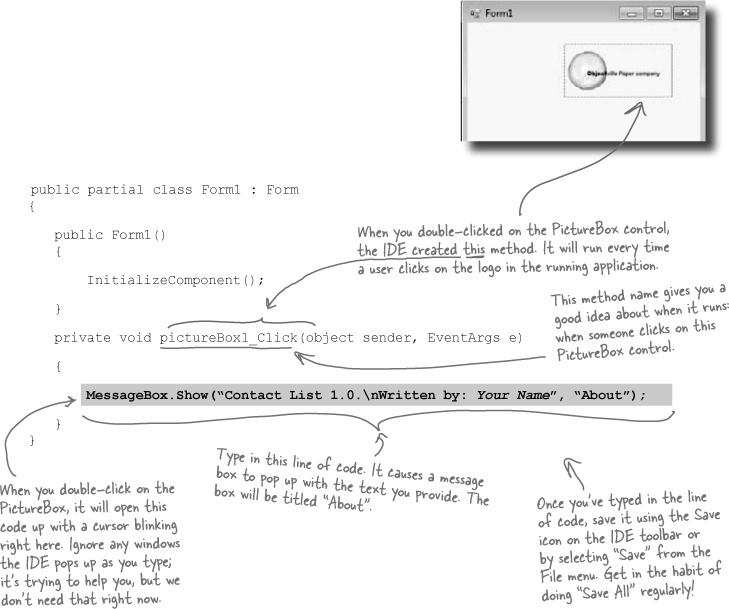
The IDE creates lots of code for you, but you’ll still want to get into this code and add to it. Let’s set the logo up to show an About message when the users run the program and click on the logo.
When you’re editing a form in the IDE, double-clicking on any of the toolbox controls causes the IDE to automatically add code to your project. Make sure you’ve got the form showing in the IDE, and then double-click on the PictureBox control. The IDE will add code to your project that gets run any time a user clicks on the PictureBox. You should see some code pop up that looks like this:
Press the F5 key on your keyboard, or click the green arrow button (![]() ) on the toolbar to check out what you’ve done so far. (This is called “debugging,” which just means running your program using the IDE.) You can stop debugging by selecting “Stop Debugging” from the Debug menu or clicking this toolbar button:
) on the toolbar to check out what you’ve done so far. (This is called “debugging,” which just means running your program using the IDE.) You can stop debugging by selecting “Stop Debugging” from the Debug menu or clicking this toolbar button: ![]() .
.
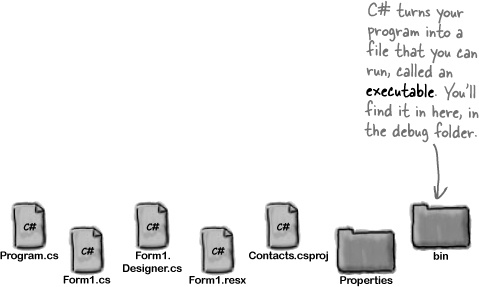
When you run your program, Visual Studio copies your files to My Documents\Visual Studio 2010\Projects\Contacts\Contacts\bin\debug. You can even hop over to that directory and run your program by double-clicking on the .exe file the IDE creates.
We’ve built a form and created a PictureBox object that pops up a message box when it’s clicked on. Next, we need to add all the other fields from the card, like the contact’s name and phone number.
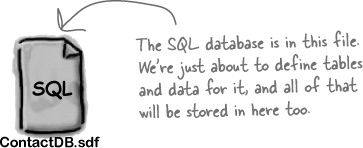
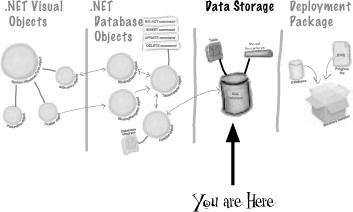
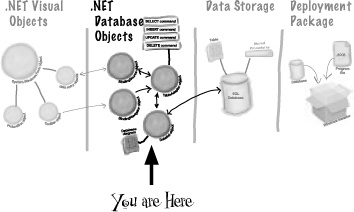
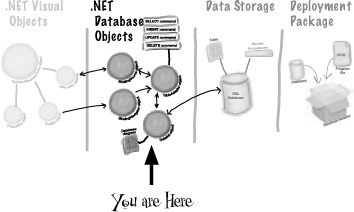
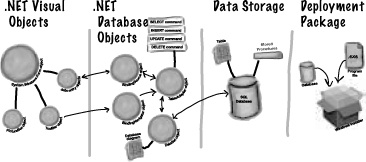
Let’s store that information in a database. Visual Studio can connect fields directly to that database for us, which means we don’t have to mess with lots of database access code (which is good). But for that to work, we need to create our database so that the controls on the form can hook up to it. So we’re going to jump from the .NET Visual Objects straight to the Data Storage section.
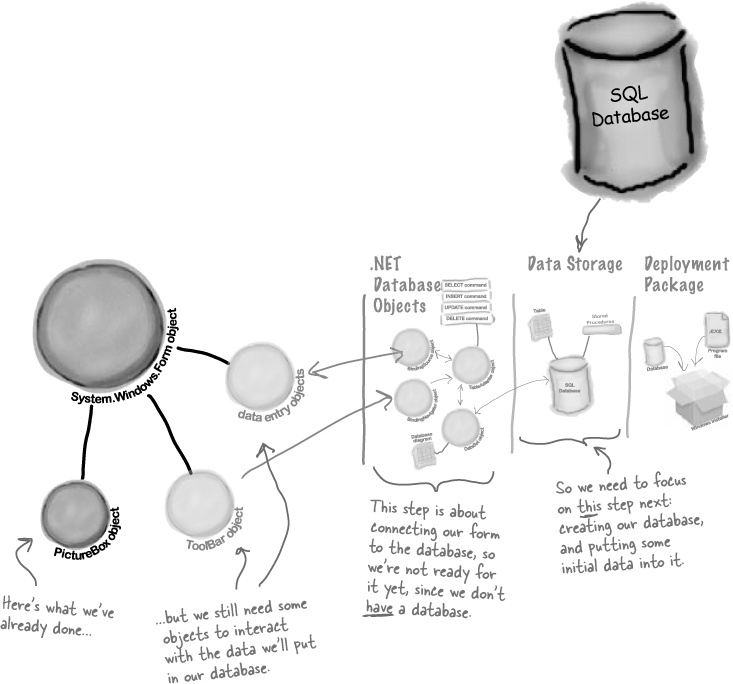
Before we add the rest of the fields to the form, we need to create a database to hook the form up to. The IDE can create lots of the code for connecting our form to our data, but we need to define the database itself first.
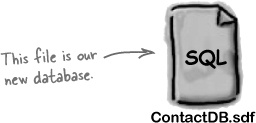
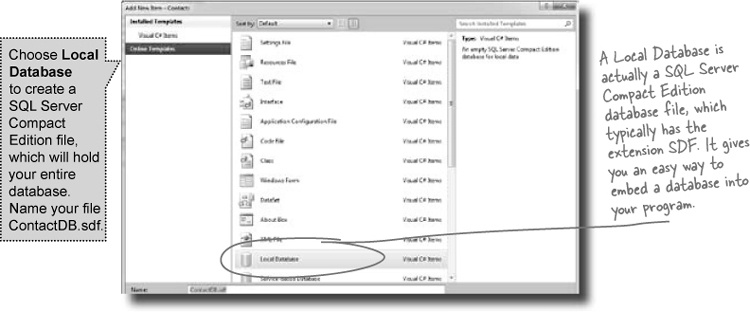
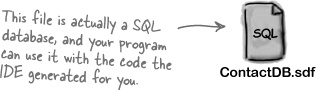
Add a new SQL database to your project.
In the Solution Explorer, right-click the Contacts project, select Add, and then choose New Item. Choose the SQL Database icon, and name it ContactDB.sdf.
Click on the Add button in the Add New Item window.
Watch it!
If you’re not using the Express edition, you’ll see “Server Explorer” instead of “Database Explorer.”
The Visual Studio 2010 Professional and Team Foundation editions don’t have a Database Explorer window. Instead, they have a Server Explorer window, which does everything the Database Explorer does, but also lets you explore data on your network.
Cancel the Data Source Configuration Wizard.
For now, we want to skip configuring a data source, so click the Cancel button. We’ll come back to this once we’ve set up our database structure.
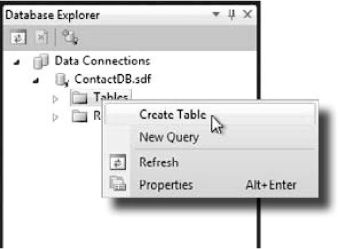
View your database in the Solution Explorer.
Go to the Solution Explorer, and you’ll see that ContactDB has been added to the file list. Double-click ContactDB.sdf in the Solution Explorer and look at the left side of your screen. The Toolbox has changed to a Database Explorer.

When you told the IDE to add a new SQL database to your project, the IDE created a new database for you. A SQL database is a system that stores data for you in an organized, interrelated way. The IDE gives you all the tools you need to maintain your data and databases.
Data in a SQL database lives in tables. For now, you can think of a table like a spreadsheet. It organizes your information into columns and rows. The columns are the data categories, like a contact’s name and phone number, and each row is the data for one contact card.
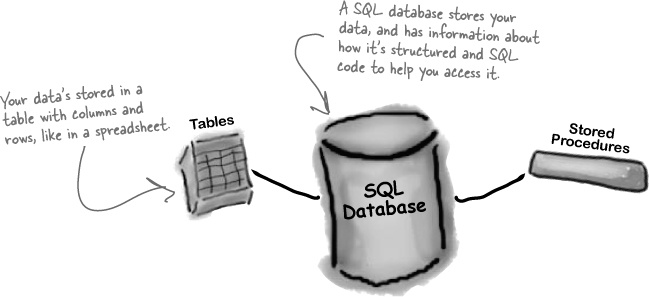
SQL stands for Structured Query Language. It’s a programming language for accessing data in databases. It’s got its own syntax, keywords, and structure. SQL code takes the form of statements and queries, which access and retrieve the data. A SQL database can hold stored procedures, which are a bunch of SQL statements and queries that are stored in the database and can be run at any time. The IDE generates SQL statements and stored procedures for you automatically to let your program access the data in the database.
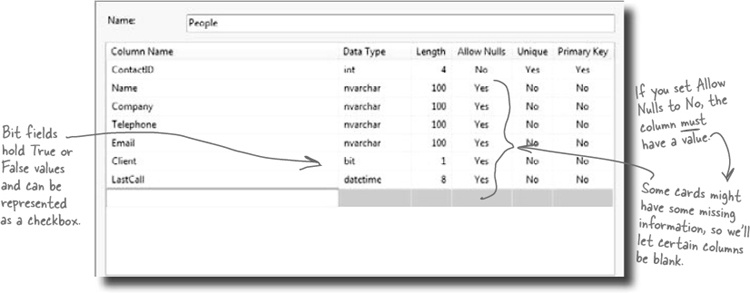
We have a database, and now we need to store information in it. But our information actually has to go into a table, the data structure that databases use to hold individual bits of data. For our application, let’s create a table called “People” to store all the contact information:
Add a table to the ContactDB database.
Right-click on Tables in the Database Explorer, and select Create Table. This will open up a window where you can define the columns in the table you just created.
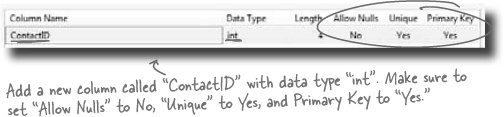
Now we need to add columns to our table. First, let’s add a column called ContactID to our new People table, so that each Contact record has its own unique ID.
Add a ContactID column to the People table.
Type “ContactID” in the Column Name field, and select Int from the Data Type drop-down box. Be sure to select “No” for Allow Nulls.
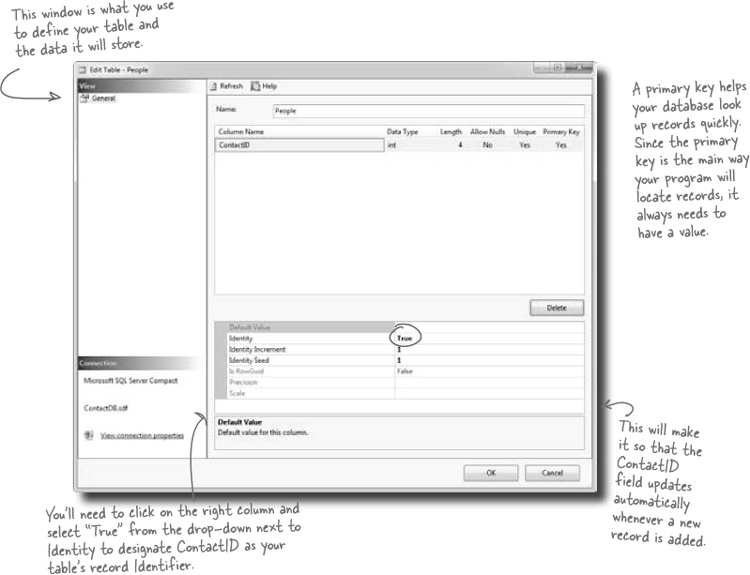
Finally, let’s make this the primary key of our table. Highlight the ContactID column you just created, and click the Primary Key button. This tells the database that each entry will have a unique primary key entry.
Tell the database to autogenerate IDs.
Since ContactID is a number for the database, and not our users, we can tell our database to handle creating and assigning IDs for us automatically. That way, we don’t have to worry about writing any code to do this.
In the properties below your table, set Identity to “True” to make ContactID an identity column for your table.
And make sure you specify the table name “People” in the Name box at the top of the window.

Now that you’ve created a primary key for the table, you need to define all of the fields you’re going to track in the database. Each field on our written contact card should become a column in the People table.
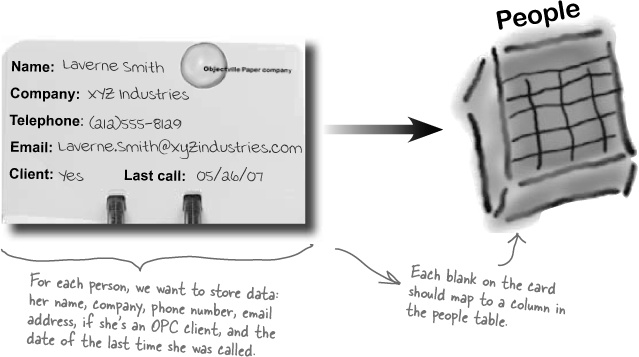

Go back to where you entered the ContactID column and add the other five columns from the contact card. Here’s what your database table should look like when you’re done:
Click on the OK button to save your new table. This will add an empty table to your database.
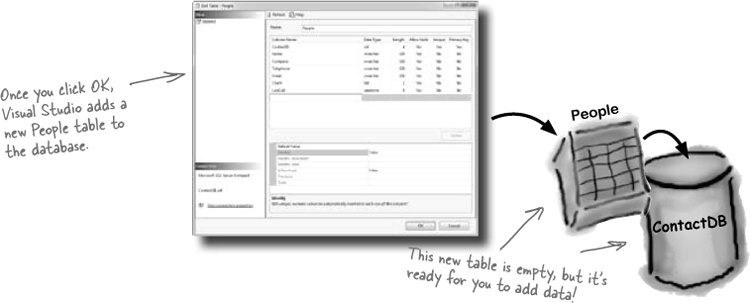
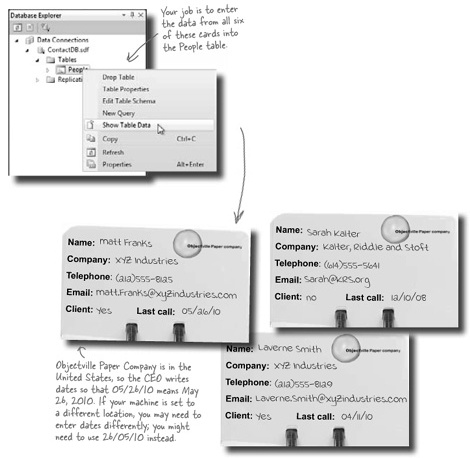
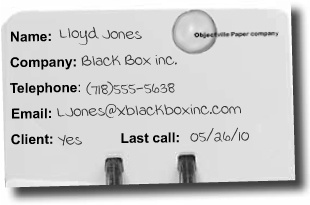
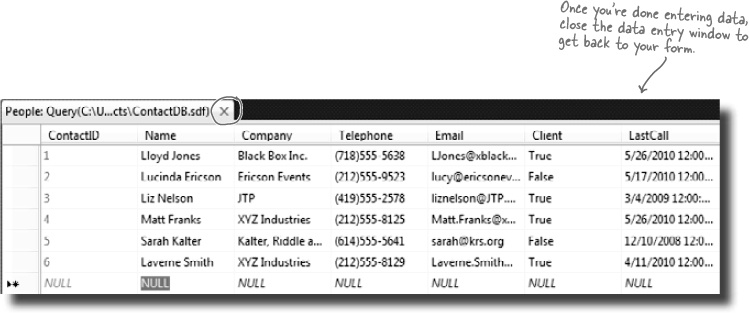
Now you’re ready to start entering cards into the database. Here are some of the boss’s contacts—we’ll use those to set up the database with a few records.
Expand Tables and then right-click on the People table in the Database Explorer (or Server Explorer) and select Show Table Data.
Once you see the Table grid in the main window, go ahead and add all of the data below. (You’ll see all null values at first—just type over them when you add your first row. And ignore the exclamation points that appear next to the data.) You don’t need to fill in the ContactID column; that happens automatically.
Once you’ve entered all six records, select Save All from the File menu again. That should save the records to the database.

There are no Dumb Questions
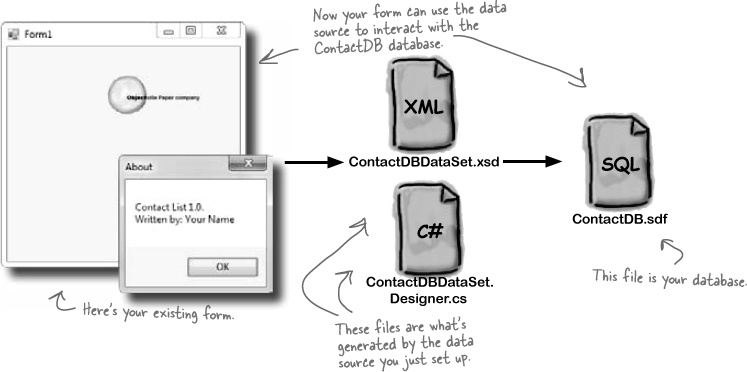
We’re finally ready to build the .NET database objects that our form will use to talk to your database. We need a data source, which is really just a collection of SQL statements your program will use to talk to the ContactDB database.
Go back to your application’s form.
Close out the People table and the ContactDB database diagram. You should now have the Form1.cs [Design] tab visible.
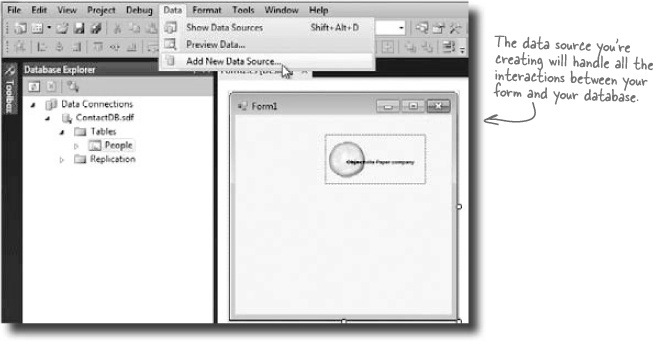
Add a new data source to your application.
This should be easy by now. Click the Data menu, and then select Add New Data Source...from the drop-down.
Configure your new data source.
Now you need to set up your data source to use the ContactDB database. Here’s what to do:
Step 1: Choose a Data Source Type. Select Database and click the Next button.
Step 2: Choose a Database Model. Select Dataset and click the Next button.
Step 3: Choose Your Data Connection. You should see your Contact database in the drop-down. Click Next.
Step 4: Choose Your Database Objects. Click the Tables checkbox.
In the Dataset Name field, make sure it says “ContactDBDataSet” and click Finish.
Now we can go back to our form and add some more controls. But these aren’t just any controls—they are controls that are bound to our database and the columns in the People table. That just means that a change to the data in one of the controls on the form automatically changes the data in the matching column in the database.
Note
It took a little work, but now we’re back to creating form objects that interact with our data storage.
Here’s how to create several database-driven controls:
Select the data source you want to use.
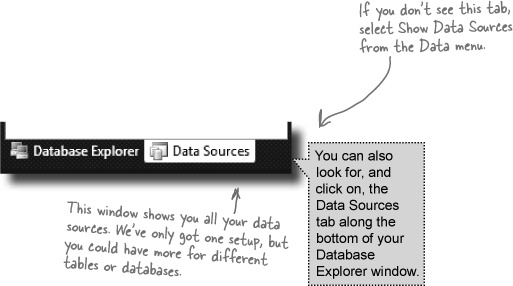
Select Show Data Sources from the Data pull-down menu. This will bring up the Data Sources window, showing the sources you have set up for your application.
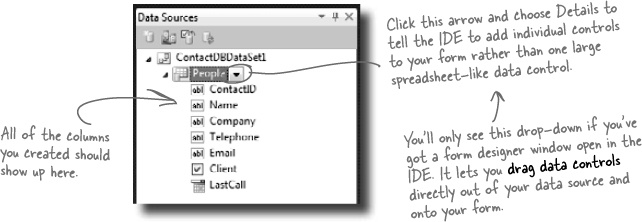
Select the People table.
Under the ContactDBDataSet, you should see the People table and all of the columns in it. Click the “expand” icon next to the People table to expand it—you’ll see the columns that you added to your table. When you click on the People table in the Data Sources window and drag it onto your form, the IDE automatically adds data controls to your form that the user can use to browse and enter data. By default it adds a DataGridView, which lets the user work with the data using one big spreadsheet-like control. Click the arrow next to the People table and select Details—that tells the IDE to add individual controls to your form for each column in the table.
Create controls that bind to the People table.
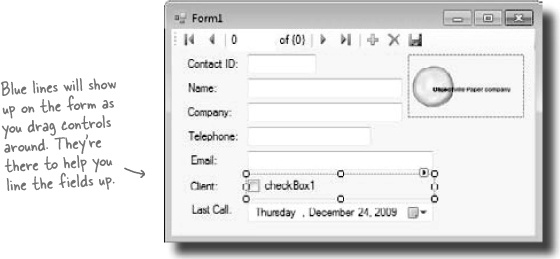
Drag and drop the People table onto your form in the form designer window. You should see controls appear for each column in your database. Don’t worry too much about how they look right now; just make sure that they all appear on the form.
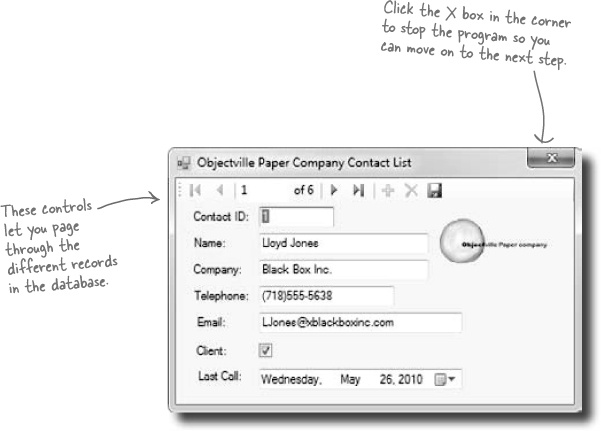
Right now, the form works. But it doesn’t look that great. Your application has to do more than be functional. It should be easy to use. With just a few simple steps, you can make the form look a lot more like the paper cards we were using at the beginning of the chapter.

Line up your fields and labels.
Line up your fields and labels along the left edge of the form. Your form will look like other applications, and make your users feel more comfortable using it.
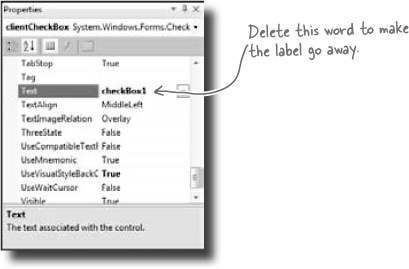
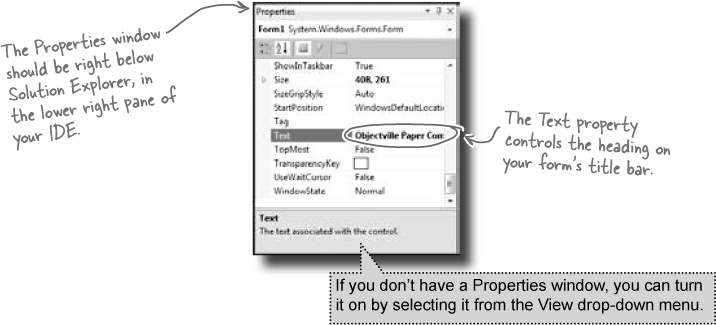
Change the Text Property on the Client checkbox.
When you first drag the fields onto the form, your Client checkbox will have a label to the right that needs to be deleted. Right below the Solution Explorer, you’ll see the Properties window. Scroll down to the Text property and delete the “checkbox1” label.
Make the application look professional.
You can change the name of the form by clicking on any empty space within the form, and finding the Text property in the Properties window of your IDE. Change the name of the form to Objectville Paper Company Contact List.
You can also turn off the Maximize and Minimize buttons in this same window, by looking for the MaximizeBox and MinimizeBox properties. Set these both to False.
Note
The reason you want to turn off the Maximize button is that maximizing your form won’t change the positions of the controls, so it’ll look weird.
A good application not only works, but is easy to use. It’s always a good idea to make sure it behaves as a typical user would expect it to.

OK, just one more thing to do... run your program and make sure it works the way you think it should! Do it the same way you did before—press the F5 key on your keyboard, or click the green arrow button ![]() on the toolbar (or choose “Run” from the Debug menu).
on the toolbar (or choose “Run” from the Debug menu).
You can always run your programs at any time, even when they’re not done—although if there’s an error in the code, the IDE will tell you and stop you from executing it.
Building your program overwrites the data in your database.
When you run your program in the IDE it actually does two things. First it builds your program, then it executes it. This involves a few distinct parts. It compiles the code, or turns it into an executable file. Then it places the compiled code, along with any resources and other files, into a subdirectory underneath the bin folder.
In this case, you’ll find the executable and SQL database file in bin/debug. Since it copies the database out each time, any changes you make will be lost the next time you run inside the IDE. But if you run the executable from Windows, it’ll save your data—until you build again, at which point the IDE will overwrite the SQL database with a new copy that contains the data you set up from inside the Database Explorer.
Watch it!
Every time you build your program, the IDE puts a fresh copy of the database in the bin folder. This will overwrite any data you added when you ran the program.
When you debug your program, the IDE rebuilds it if the code has changed—which means that your database will sometimes get overwritten when you run your program in the IDE. If you run the program directly from the bin/debug or bin/release folder, or if you use the installer to install it on your machine, then you won’t see this problem.

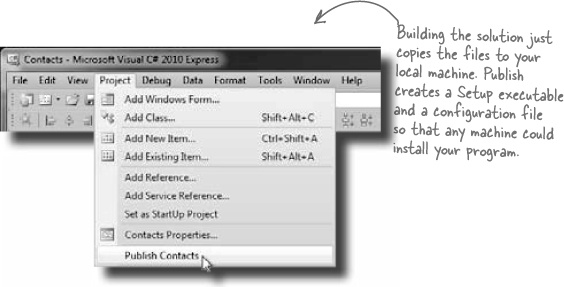
At this point, you’ve got a great program. But it only runs on your machine. That means that nobody else can use the app, pay you for it, see how great you are and hire you... and your boss and customers can’t see the reports you’re generating from the database.
C# makes it easy to take an application you’ve created, and deploy it. Deployment is taking an application and installing it onto other machines. And with the Visual C# IDE, you can set up a deployment with just two steps.
Select Publish Contacts from the Project menu.
Just accept all of the defaults in the Publish Wizard by clicking Finish. You’ll see it package up your application and then show you a folder that has your Setup.exe in it.
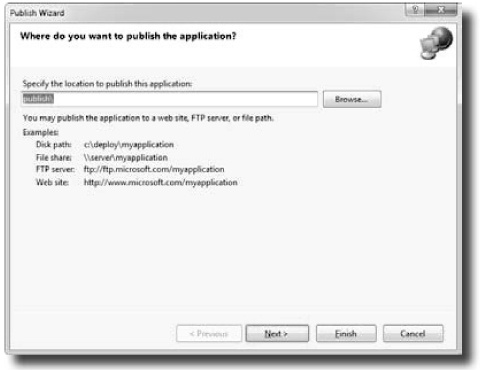
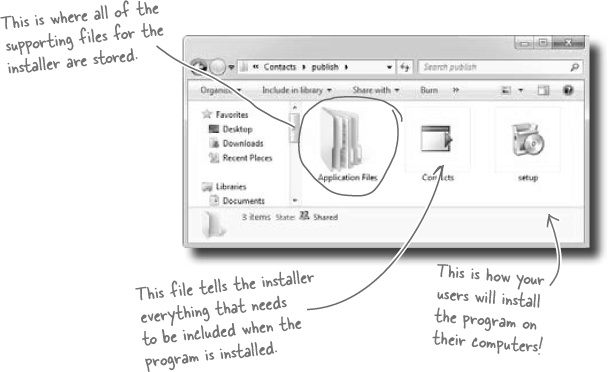
Once you’ve created a deployment, you’ll have a new folder called publish/. That folder has several things in it, all used for installation. The most important for your users is setup, a program that will let them install your program on their own computers.
Watch it!
You may need to run the installer as administrator.
If SQL Server Compact isn’t already installed on the machine, the installer will automatically download and install it. On some machines, this won’t work unless you run the setup as administrator, so right-click on “setup” and choose “Run as administrator” to install it. If you don’t have access to do that, don’t worry! You don’t need to in order to move forward in the book.

Before you pop the cork on any champagne bottles, you need to test your deployment and installation. You wouldn’t give anyone your program without running it first, would you?
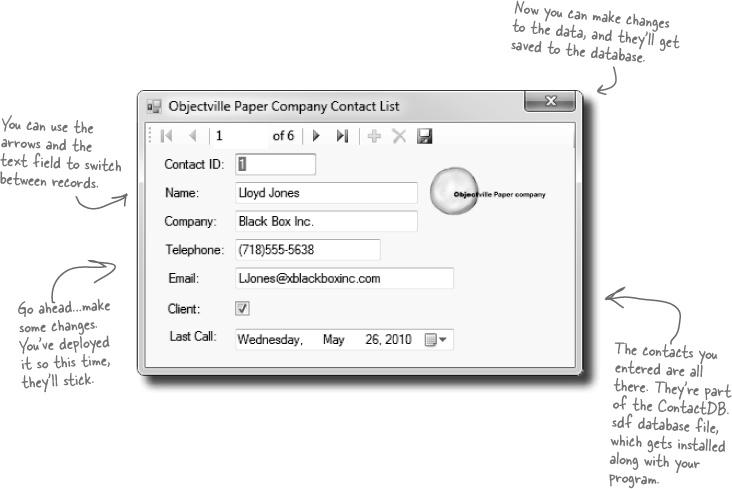
Close the Visual Studio IDE. Click the setup program, and select a location on your own computer to install the program. Now run it from there, and make sure it works like you expect. You can add and change records, too, and they’ll be saved to the database.
TEST EVERYTHING! Test your program, test your deployment, test the data in your application.
The Visual Studio IDE made it pretty easy to create a Windows application, create and design a database, and hook the two together. You even were able to build an installer with a few extra clicks.
The power of Visual C# is that you can quickly get up and running, and then focus on what your program’s supposed to do...not lots of windows, buttons, and SQL access code.
CSharpcross
Take some time to sit back and exercise your C# vocabulary with this crossword; all of the solution words are from this chapter.

Across | Down |
|---|---|
3. The __________ explorer is where you edit the contents of your SQL tables and bind them to your program 5. An image, sound, icon, or file that’s attached to your project in a way that your code can access easily 9. You build one of these so you can deploy your program to another computer 12. What the “I” in IDE stands for 14. When you double-clicked on a control, the IDE created this for you and you added code to it 15. Every row contains several of these, and all of them can have different data types 16. The _________ Explorer shows you all of the files in your project | 1. What’s happening when code is turned into an executable 2. What you change to alter the appearance or behavior of controls on your form 3. What you’re doing when you run your program from inside the IDE 4. The “About” box in the Objectville Paper Company Contact List program was one of these 6. You displayed the Objectville Paper Company logo with one of these 7. Before you start building a program, you should always think about users and their ______ 8. A database can use many of these to store data 10. The data type in a SQL database that you use to store true/false values 11. Before you can run your program, the IDE does this to create the executable and move files to the output directory 13. You drag controls out of this and onto your form |

Get Head First C#, 2nd Edition now with the O’Reilly learning platform.
O’Reilly members experience books, live events, courses curated by job role, and more from O’Reilly and nearly 200 top publishers.

