172 IBM Enterprise Workload Manager
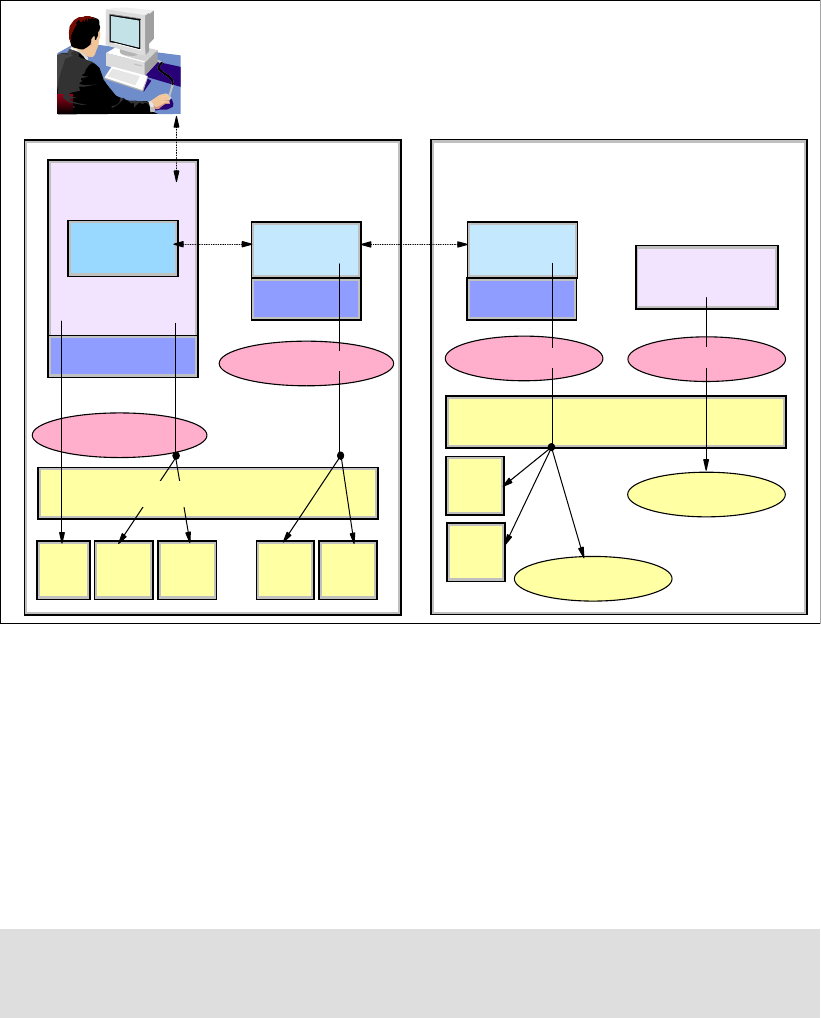
Figure 6-11 Security context and boundaries
The following sections describe which actions are already in place when you install EWLM
and what steps are required to further protect the EWLM data travelling across the different
domain boundaries:
Browser to Control Center
Control Center to domain manager
Domain manager to managed servers
Domain manager and load balancer (discussed in “EWLM and workload balancing
overview” on page 188)
6.2.1 Browser to Control Center
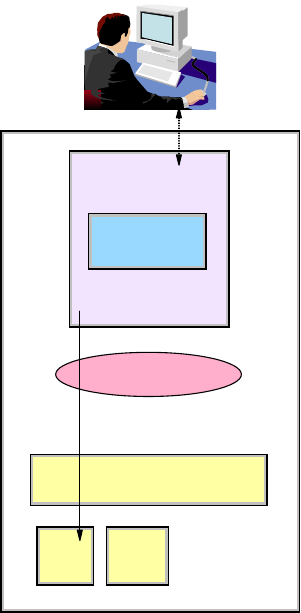
Figure 6-12 on page 173 shows an EWLM user logging into the Control Center through the
browser via a secure login.
In this portion of the data exchange, EWLM performs SSL encryption of the conversation to
protect the content of the data between the browser and the Control Center, and the Control
Center application performs authentication of the user by verifying that the userid and
password logging in are defined and valid to the application.
Note: Once you establish your certificates, remember to set up file system protections to
limit access to the keystore file. After the configuration is established, access should be
limited to the user ID under which the Control Center’s server instance runs.
Operating System
WebSphere
Control
Center
JVM
User accounts
JVM
Domain
Manager
User
Registry
Database
Store
SSL
Keystore
SSL
Keystore
Database
Store
User account
Operating System
SSL
Keystore
Database
Store
JVM
Managed
Server
User account
ARM APIs
OS
extensions
Instrumented
Application
User account
Browser
Chapter 6. Using a firewall and securing EWLM 173
For the authentication of the users, and before this login can happen, someone—typically the
system administrator responsible for installing and configuring EWLM and for managing its
users—must establish the user in the user registry and add the user to a Control Center role.
Your Control Center site has been already created using the createDM command, which
creates the Control Center along with the domain manager. For i5/OS, the createCC shell
command creates the Control Center. In both cases, the command establishes the userid
passed in the adminUser parameter as an administrator for the WebSphere Application
Server instance established for the site.
Figure 6-12 Communication between the browser and the Control Center
If we look at the SSL connection, EWLM establishes an SSL connection between the browser
and the Control Center, initially using a default pair of public/private keys.
When you log in to the Control Center (for example, in our configuration using the initial port
20003), you notice that EWLM immediately routes your connection on the SSL port 20004
and the conversation becomes SSL-encrypted from there on.
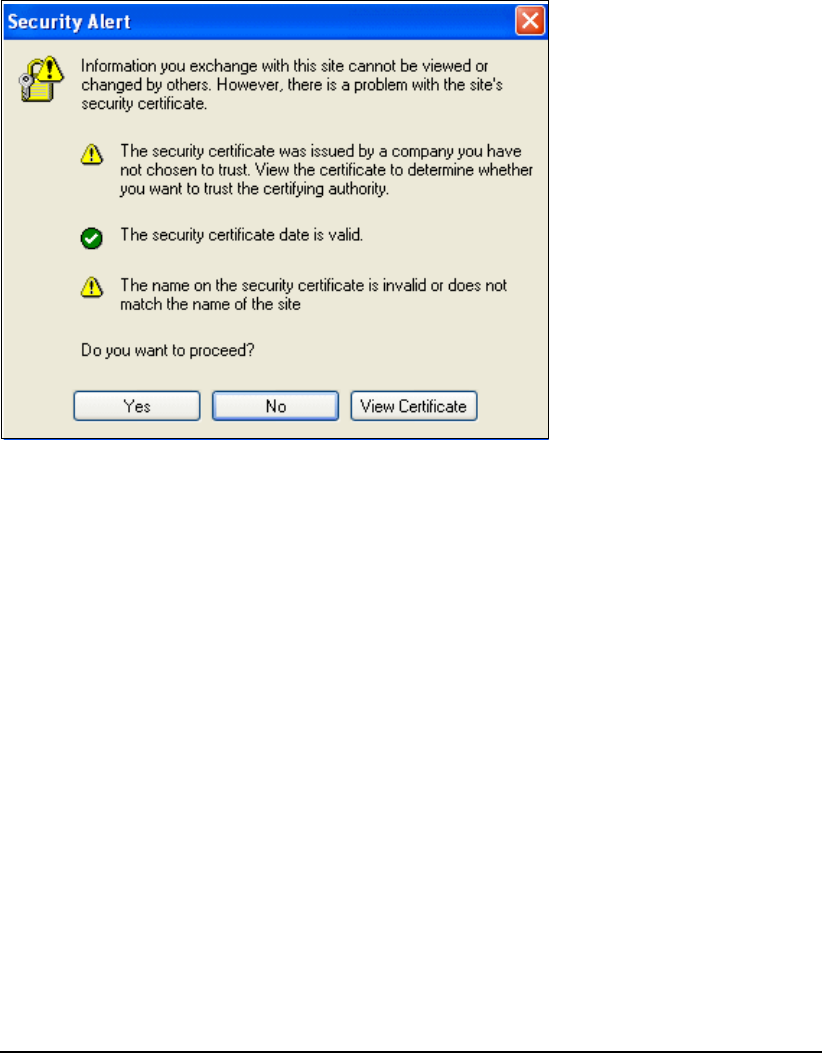
Also, when you perform the initial log in from your browser, you receive a security alert during
the sign-on process to ask you to accept the default certificate, as shown in Figure 6-13.
WebSphere
Control
Center
User account
User
Registry
SSL
Keystore
Operating System
Browser
174 IBM Enterprise Workload Manager
Figure 6-13 Security Alert at login
For your installation, we suggest that the EWLM administrator configure EWLM for Server
SSL and use a certificate authority to create and install the certificate on the browser. In our
configuration, after we created a default login, we acquired a secure (non-default)
public/private keypair and used the changeCC command to configure EWLM to use the keypair
for Server SSL between the Control Center and the browser. Your installation can use the
same procedure we used in our environment, or you can use a certificate authority to create
certificates instead of using the public/private keypair.
Here are the tasks required to change from a default security setting:
Create a keystore.
Install the keystore in WebSphere.
Trust the new certificate.
Create a keystore
We used the Java SDK tool to generate a certificate with our new key. As we mentioned
previously, this step is probably not going to take place in your installation. Most likely this will
be replaced by simply acquiring a key/certificate from a certificate authority.
As shown in Example 6-9, in our configuration we generated the keystore ks and stored it in
the /home/ibmewlm directory. This directory has limited access to ensure security of the
keystore.
Example 6-9 Keystore creation
[ibmewlm@ewlmdm1 ibmewlm]$ pwd
/home/ibmewlm
[ibmewlm@ewlmdm1 ibmewlm]$ keytool -genkey -alias ewlmdm1 -keyalg RSA -keystore ks
-validity 365
Enter keystore password: 111111
What is your first and last name?
[Unknown]: ewlmdm1
What is the name of your organizational unit?
[Unknown]: itso
What is the name of your organization?
[Unknown]: IBM
Get IBM Enterprise Workload Manager Release 1 now with the O’Reilly learning platform.
O’Reilly members experience books, live events, courses curated by job role, and more from O’Reilly and nearly 200 top publishers.

