Chapter 4. Collaboration

In this chapter we’ll start by looking at how to collaborate directly on a single repository—without using forks. We’ll then take some time to look more deeply into collaborating using pull requests, issues, and GitHub pages.

While forks are a good way to accept contributions from people you don’t work with regularly, they are a bit too cumbersome for everyday use in a team that is working together closely. Because of this, you’re probably going to want to collaborate directly on a single repository. However, it’s still important to use branches and pull requests to keep your work separate.

Committing to a Branch

I’ve created a simple single-repo-example under the pragmaticlearning organization, as you can see in Figure 4-1.

Figure 4-1. The single-repo-example repository

If I want to augment the README.md file, the first thing I need to do is create a branch. That way I’ll be able to keep my changes separate while I’m working on them. To do that, I can just click the “branch:master” button. This creates a drop-down list with the current branches in the project and a text box for entering the name of an existing branch or the new branch that I want to create. You can see this in Figure 4-2.
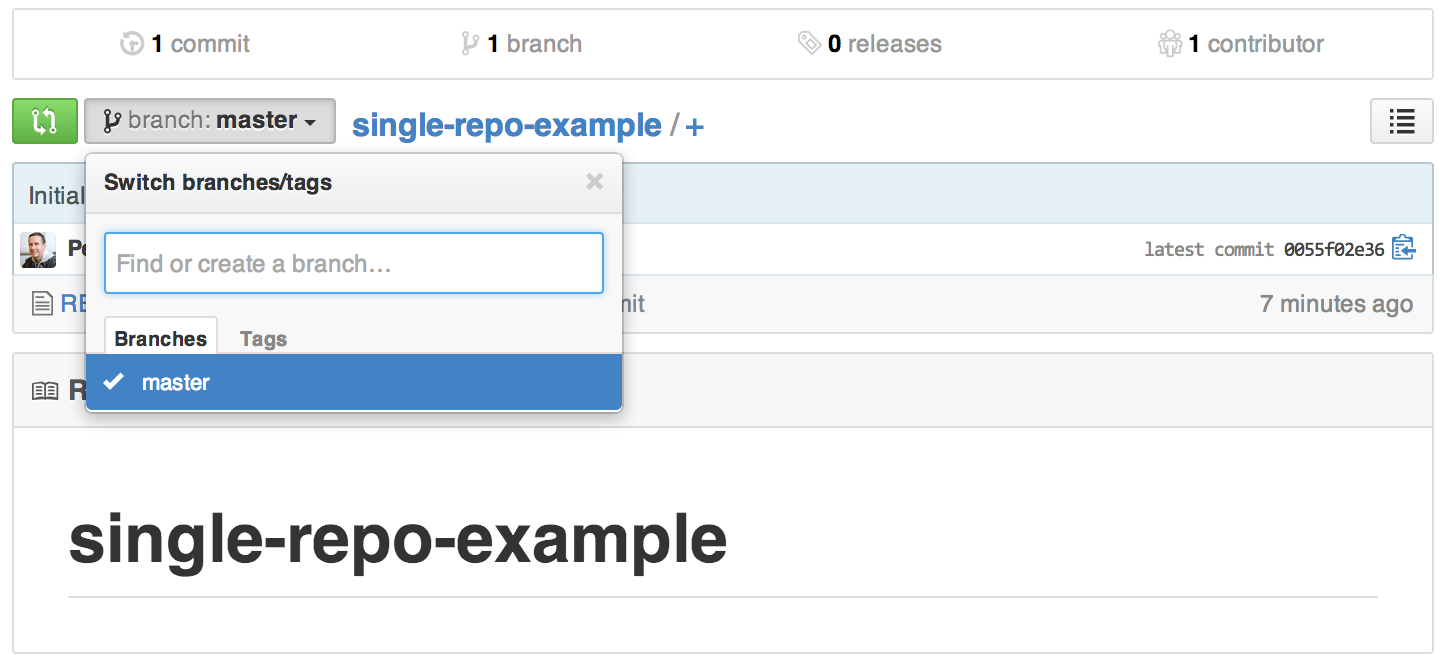
Figure 4-2. The branch drop-down list

If I create an update_readme branch, as you can see in Figure 4-3, GitHub automatically checks out that new branch. You can see this, both on the branch button where the current branch is displayed, and in the browser URL bar that ends with tree/update_readme, signifying that we’re on the update_readme branch.

Figure 4-3. On the update_readme branch

The next step is to start to make changes. I’ll edit the README.md file and commit the changes. As you can see in Figure 4-4, I have only one commit on the master branch, but if you look at Figure 4-5, where I’ve changed the branch to update_readme, in addition to the initial commit you can also see the new commit that I made on the update_readme branch.

Figure 4-4. There’s still only one commit on the master branch
Figure 4-5. But there are two commits on the update_readme branch

I might continue to work on the branch for a while, getting my changes just right. Once I’m ready to get some input, I’ll want to create a pull request to start a conversation about my proposed changes.

Creating a Pull Request from a Branch

To create a pull request, as in the previous chapter I’ll click the Pull Request tab on the right side of the project page, and then click the green button to create a “New pull request.” When I do this, as you can see in Figure 4-6, the experience is slightly different. Now GitHub isn’t sure what branches I want to create a pull request between, so I have to tell it.

Figure 4-6. Starting to create a pull request from a branch

On the left you can see the base:master. That is perfect as it means that if we create a pull request, once it is accepted, it will get merged into the master branch, which is exactly what we want. However, I do need to click the “compare: master” button to tell GitHub what branch I want to create a pull request for, as you can see in Figure 4-7. The “compare:” branch is the one that I’d like people to consider merging into master.

Figure 4-7. Selecting the branch for the pull request

Once I’ve selected a branch, the process is just the same as it was in Chapter 3 when I was creating a pull request from a fork. I click the green “Create pull request” button, enter a title and description to explain the reason for the pull request, and then click the “Create pull request” button. This creates the pull request shown in Figure 4-8.

Figure 4-8. The new pull request

Collaborating on Pull Requests

Pull requests are designed to start a conversation about a proposed change—usually either a new feature or a bug fix. Originally, pull requests were created only when coding was completed to ask someone to incorporate a completed set of changes, but these days pull requests are used in a couple of different ways.

If you have a change that you’re confident about, you can still create a new branch, make all your changes, and wait to create a pull request until you’re done with the work. In such a case, the purpose of the pull request is just as a double-check to make sure that the rest of your team agrees with the changes you made before the changes get merged into master and pushed to production.

However, there is another way to use pull requests. In many companies, employees will often create pull requests for features that they’d like to discuss. So if you have an idea for a change but aren’t sure whether it’s a good idea, consider creating a branch and making the simplest possible start on the work—maybe just a small text file describing it. Once you have a commit on the branch, you can then create a pull request to kick off a discussion about the idea.

Involving People with Pull Requests

 If you’ve created a pull request and would like feedback from specific people on a team, @mention (pronounced “at-mention”) them. To do this, within the pull request itself or a comment on the pull request, type @ and then type in the GitHub username. If the person is the owner or a collaborator on the project, the username will auto-complete.

If I wanted to get feedback from Brent Beer (a member of the GitHub training team and coauthor of this book) on some work I’d been doing, I might create a comment like “hey @brntbeer, mind looking at this PR and letting me know what you think?” The formality of the language will depend on the people you’re working with, but pull request comments are often written in a fairly informal style.

Reviewing Pull Requests

If you want to see what people are working on within a project, go to the project home page, click the Pull Requests tab on the right, and you’ll see a list of all of the currently open pull requests.

On most projects there should be only a few pull requests open at any one time. A good rule of thumb for a private repository is that you shouldn’t usually have more than one or two open pull requests per developer. Generally, the fewer pull requests you have open, the better, as it is more valuable to keep the team focused on finishing up existing features rather than on starting new ones. The number of open pull requests on open source projects will typically be much larger, as anyone can create a pull request, and sometimes it takes a while for the core project team to review, accept, and/or close them.

When you find a pull request that you want to review, click it to view the pull request detail page.

Commenting on Pull Requests

A really important part of working with a development team is to take the time to review all of the pull requests that you might care about. Nothing is more disheartening than to work on a feature for a couple of days, create a pull request, and then get no feedback at all. Also remember that anyone can merge their own pull request into master, so make sure to take the time to review people’s work so they aren’t tempted to merge it in without at least one or two people having a look at it.

Whenever you get an email or a web notification that you’ve been @mentioned in a pull request, make sure to take the time to check it out ASAP and provide some useful feedback. Even if you’re not named personally, take a little bit of time every day to make sure that you review any outstanding pull requests and provide your thoughts to ensure everyone is on the same page with where the project is going.

Commenting on pull requests is pretty simple. Skim down the pull request page, go to the comment box, type in your feedback, and click the Comment button.

Adding Color to Comments

Especially if you have a team that doesn’t work in the same office all of the time, commenting on pull requests is often one of the more frequent ways that your team gets to interact with each other. Because of that, it’s often a good idea to add a little bit of fun to the interactions.

GitHub has built-in support for emoji. Emoji are small images that are often used for displaying a mood or emotion graphically. If you look at Figure 4-9, you’ll see that this comment has the :+1: (I’m in support of this feature) and the :ship: (let’s merge this in and “ship” it) emoji.

Figure 4-9. A comment with some emoji

If you’d like to get a sense of some of the emoji available in GitHub, check out the Emoji Cheat Sheet shown in Figure 4-10.

Figure 4-10. The emoji cheat sheet

Another way to add some more color to your comments on GitHub is by using animated gifs. While emoji are subtle, most animated gifs are much larger and more striking—they’re often a great way to really lighten the mood or show strong support (or disapproval) for a change or a comment. To add an animated gif (or any other image) to a pull request, just drag and drop it into the comment box and it’ll get uploaded automatically.

Contributing to Pull Requests

Sometimes you’ll want to make a change directly to a pull request. Perhaps someone has added a new page and you’d like to fix up the marketing copy, the legal disclaimer, or even the CSS to make it display better in your favorite browser. It’s easy to make a change to someone else’s pull request.

The process is the same as for editing a file that we covered in the previous chapter. The only difference is that you must be on the correct branch. In this case I’m looking at the update_readme pull request for adding some content to the README.md file, as you can see in Figure 4-11.

Figure 4-11. The update_readme pull request

If I decided that it would be great if the file contained a brief contributors guide, rather than just commenting that the README was missing a contributors guide, I could add one.

To make the change, all I need to do is go to the project home page and select the update_readme branch from the drop-down list of branches. I can then click the file, click Edit, and I’ll get the edit screen, as you can see in Figure 4-12.

Figure 4-12. Editing README.md on the update_readme branch

I can then make my changes, scroll down the page, and enter some kind of commit message, as shown in Figure 4-13.

Figure 4-13. Adding a commit message

Now if I go back to the pull request page, you can see in Figure 4-14 that my commit has been added to the pull request. Anyone who is watching the pull request will get a notification that it has been updated so they can review my change and provide their feedback.

Figure 4-14. The new commit in the pull request

Testing a Pull Request

If you’re a developer, before you approve a pull request that includes substantive code changes that you can’t just review visually, you’re going to want to download a copy of the repository (clone the repo). Then check out the branch that the pull request relates to, run the automated tests to make sure they’re all passing, and then run the code and maybe do a little bit of manual testing just to make sure it seems solid. We cover cloning of repositories in Chapter 6.

If you’re not a developer, you can leave this to your development team, but you do want to make sure that at least one or two people are downloading the code, running the test suite, and maybe doing a little manual testing before approving a pull request.

Merging a Pull Request

When you’re ready to merge a pull request, just click the large green “Merge pull request” button, as shown in Figure 4-15.

Figure 4-15. The “Merge pull request” button

When you do so, GitHub will ask for a commit message (the default will be the title of the pull request), as shown in Figure 4-16. Once you’ve entered that, just click the “Confirm merge” button, and the pull request will get merged and closed, as described in Chapter 3.

Figure 4-16. Closing a pull request

You should have some kind of policy for closing pull requests. Many teams will require one or two people other than the primary author of the pull request to provide a :+1: before a pull request is merged. Have some kind of process, but keep it lightweight. Remember, you can always revert a merge, so it’s generally better to “move fast and (occasionally) break things” than have a list of 27 people who need to approve every single pull request before it can be merged.

Who Should Merge a Pull Request?

One question that often comes up is whether a pull request should be merged by the person who created the pull request or by someone else. I generally recommend that pull requests be merged by the person who created them. Here’s why.

Many companies have the rule that “the person who created a pull request can’t merge it.” The reason for this is to make sure that someone doesn’t just create a pull request and merge it in without getting any feedback. The idea is good, but I don’t think the recommendation is ideal.

Most of the time, the person who created the pull request is the person who knows the most about it. As such, I always want to have that person available when her work is merged in just in case it breaks something unexpected. One of the easiest ways of making sure that she’s around is to ask her to do the merge. So I’d recommend asking people to merge in their own pull requests, but making it clear that they shouldn’t do so until they’ve got at least a couple of :+1:s from the rest of the team.

Pull Request Notifications

If you create a pull request, comment on one, commit to one, or are @mentioned in one, by default you’ll be subscribed to the pull request. This means that whenever anyone comments on, commits to, merges, or closes the pull request, you’ll be sent a notification. You can see on the right side of Figure 4-17 that I am currently subscribed to that pull request.

Figure 4-17. I’m subscribed to this pull request

If you’re no longer interested in a pull request that you’ve been subscribed to, just click the Unsubscribe button and you’ll stop receiving notifications. You will get re-subscribed automatically if anyone @mentions you again in the comments. If you’re not subscribed to a pull request that you’d like to keep an eye on, just click the Subscribe button, as shown on the right in Figure 4-18, and you will start getting notifications of any activity on that pull request.

Figure 4-18. The Subscribe button on a pull request

Best Practices for Pull Requests

There are a few best practices that are worth bearing in mind when working with pull requests:

Create pull requests for everything
Anytime you want to fix a bug or add a new feature, make sure to do it on a branch and then create a pull request to get input before merging your work into master.
Make the titles descriptive
Other team members will be looking at the pull requests page to get a sense of what’s going on. The title should give them a good idea of what you’re working on.
Take the time to comment
Even if you’re not @mentioned. It’ll give you a good sense of what’s going on with the project and will improve the overall quality of the work.
@mention key people
If you want feedback from marketing, legal, and the operations team, @mention the necessary users to ensure they see the pull request and make it more likely you get feedback.
Run the tests
Make sure that at least one developer downloads the latest changes from a pull request, checks out the appropriate branch, and runs your automated tests. It isn’t enough just to look at the code visually for nontrivial changes.
Have a clear policy for approving pull requests
Most companies require that one or two people other than the primary author of the pull request review and provide a :+1: before the pull request is merged in.

While pull requests are used to collaborate on work that is being done, Issues is a tool for describing bugs or new feature requests that should be discussed or worked on.

Issues

GitHub Issues provides a lightweight, easy-to-use tool for managing outstanding work—whether it’s bugs that need to be fixed or new features that need to be built. Generally, when I start a new project, I’ll start by managing both bugs and features using GitHub Issues, and I’ll move to another tool like Pivotal tracker, JIRA, LightHouse, Trello, or Asana only if I need features that Issues doesn’t provide.

Creating a New Issue

To create a new issue, click the Issues tab and then click the “New issue” button, shown in Figure 4-19.

Figure 4-19. The “New issue” button

When you click the “New issue” button, you’ll see a form similar to Figure 4-20 for entering the details of the issue you want to document.

Figure 4-20. The “New issue” form

Enter a descriptive title that will quickly give people a sense of the bug or feature you want to describe. If you know who should be working on the issue, you can select that person from a drop-down list of contributors by clicking the button to the right of the “No one is assigned” text label. To the right of that label, you can also select a milestone if you’re assigning issues to sprints or other deadlines, and then enter a more comprehensive description below in the comment field. On the right you’ll notice a list of labels. Select all of the labels that apply, and then click the green “Submit new issue” button at the bottom of the page to create the issue.

Managing Milestones for Issues

The milestones feature of Issues is often used to assign issues to a particular sprint or an external deadline like “July 29th investor presentation.” To add a new milestone, click the Issues tab on the right side of the page. Then click the Milestones button in the upper-left portion of the screen next to “Issues,” “Pull requests,” and “Labels.” You’ll see the view look very similar to issues and pull requests, and on the right you’ll see a button to create a “New milestone,” as you can see in Figure 4-21.

Figure 4-21. The “New milestone” button

Click the “New milestone” button and you’ll see a form similar to Figure 4-22 asking you for a title, an optional description, and an optional due date.

Figure 4-22. Adding a new milestone

Enter at least a title and click the “Create milestone” button at the bottom right of the page; you’ll see the new milestone added to your list of milestones, as shown in Figure 4-23. You can now edit the milestone, close it, delete it, or browse a list of the issues associated with the milestone.

Figure 4-23. The new milestone

Managing Labels for Issues

You’ll probably also want to create some custom labels for your project. Click the Labels button in the upper-left portion of the screen next to “Issues,” “Pull requests,” and “Milestones.” From this page, shown in Figure 4-24, we’ll be able to edit titles and colors, and delete and create new labels.

Figure 4-24. The Labels page

To delete a label, click Delete on the right side of that label’s row. To edit a label, click Edit; it will change to allow you to edit both the text and the color for the label, as shown in Figure 4-25.

Figure 4-25. Editing a label

If you want to add a new label, click the “New label” button and you’ll see a text box, a set of colors to choose from, and a “Create label” button, as shown in Figure 4-26.

Figure 4-26. Adding a new label

Commenting on Issues

As with pull requests:

  • To comment on an issue, just click the issue, scroll down to the comment box, enter your comment, and click the Comment button.
  • Make sure to take a little time every day to see if there are any new issues, and respond to any @mentions ASAP.
  • Feel free to use emoji and animated gifs to add a little fun to the process of collaboration.

Referencing Issues in a Commit

If you make a commit that either relates to or fixes an issue, just include a pound sign (#) followed by the number of the issue somewhere in the commit message, and the commit will show up in the history for that issue. Prefix the issue number with a word like “closes,” “fixes,” or “resolves” if the commit solves the issue, and when that commit is merged into your default branch (usually master), the issue will be closed automatically!

Best Practices for Issues

 Here are some best practices to consider when thinking about how best to use GitHub issues:

Create “Bug” and “Feature” labels
To make it easy to just see outstanding bugs or features.
Use milestones if they fit your workflow
If you have either external deadlines or an internal cadence based around something like sprints, feel free to use milestones to assign issues to delivery dates. If you don’t use date-based deliveries, consider using milestones (without dates) to group like pieces of work. For example, you could have a milestone for “Complete site redesign” and another one for “Launch e-commerce features.”
Be careful when assigning issues
Generally, it’s better for members of your development team to “pull” the work they’re interested in rather than for you to “push” a bunch of work for them to do.
Make extensive use of labels
In addition to high-level labels to distinguish “Bugs” and “Features,” you can use labels for a range of other purposes. Consider adding labels to track the status of work, to assign the work to different groups (“iOS,” “server side,” “frontend,” etc.), and even for tracking other interesting information like the severity of a bug or the business objective that the new feature is designed to support.

Wikis

At some point in the life of your project, your README.md file will start to get too long to be usable. At that point (if not before), you should consider using the wiki feature in GitHub.

A wiki is a very simple content management system that makes it easy for a group of collaborators to build a set of interlinked pages. Typically, GitHub wikis are used for capturing end-user documentation, developer documentation, or both so that all of the information relating to a project is accessible through the project’s GitHub page.

Getting Started with a Wiki

If your project doesn’t yet have a wiki, start by going to Settings and scrolling down to the Features area, as shown in Figure 4-27. Make sure that the Wikis checkbox is selected. This is also a chance to check the next box if you’re going to be creating a public project and want to limit it so that only collaborators on the project are able to update the documentation on the wiki.

Figure 4-27. Ensuring that wikis are enabled

Once you’ve ensured that you have wikis enabled, click the Wiki tab on the right side of any page, and if you haven’t yet added any content, you’ll see a page like Figure 4-28.

Figure 4-28. The default wiki page

Click the green “Create the first page” button, and you’ll see a page similar to Figure 4-29.

Figure 4-29. Creating your first wiki page

By default the first page is called “home,” although you can change this by editing the title. Then you can enter your content in the text area. You’ll notice that there are a number of buttons above the text area for styling, but this is deliberately not a full, in-place WYSIWYG (what-you-see-is-what-you-get) editor. Instead, the buttons will just insert the appropriate markdown into the text area. If you want to see what it’ll look like, click the Preview tab above the formatting buttons and you’ll see the markdown rendered, as shown in Figure 4-30.

Figure 4-30. Previewing your new wiki page

If you click the “Edit mode” drop-down list, you get the option of changing to a range of different selected formatting syntaxes, as you can see in Figure 4-31. However, I’d recommend using markdown as it’s the same format used by the GitHub team and is used in other areas within GitHub, such as issues and pull request comments.

Figure 4-31. Alternative editing formats

When you’re done with the content, enter a short (optional) description in the “Edit message” text box to describe why you made the change, and click the “Save page” button.

Adding and Linking to a Page on Your Wiki

Anytime you want to add a new page to your wiki, just click the “New page” button at the top right of any wiki page and it’ll allow you to add a page to the site. Once you’ve added the page, it will appear in the Pages section to the right of the screen, as you can see in Figure 4-32.

Figure 4-32. The Pages list in a wiki

To add a link to a new page from an existing page, start by using the Pages list to navigate to the page you want to add a link to. Then copy the URL from your browser for that page to the clipboard—we’ll need that in a moment. Next, use the Pages list to navigate to the page you want to add the link on. Click the Edit button at the top of that page to the right. Go to the place in the content are a where you want to add the link and click the link button in the top bar (it looks like two circles linked together). Clicking it pops up a dialog box, as shown in Figure 4-33.

Figure 4-33. The Insert Link dialog box

In the first box, type whatever you want the link text to be—ideally something that describes the page it’s linking to. Then in the URL text box, paste the URL of the wiki page you want to link to from your clipboard.

If you’d really like to make the most of your wiki (or issues or pull request comments), make sure to check out this page that provides a really good introduction to GitHub flavored markdown.

GitHub Pages

Wikis are a great tool for creating documentation on GitHub, and because they live right next to the code, they’re much more likely to be kept updated than a separate document. However, sometimes you want to create a more customized website to share information about yourself, your organization, or your project. That’s where GitHub pages come in. GitHub pages is a feature that allows you to create and host web pages right on GitHub.

Creating a Website for Your Project

Whenever you create a repository on GitHub, you have the option of adding GitHub pages to provide a web page for promoting or describing the project. To get started with GitHub pages, click Settings, scroll down to the GitHub Pages area, and click the “Automatic page generator” button. You’ll see a screen similar to Figure 4-34.

Figure 4-34. The GitHub pages form

The form allows you to enter a project name, a tagline, a body where you can create a first cut of the content for the page using markdown, and if you want, there is an option to add a tracking ID to record traffic information using Google Analytics. Once you’re done with the first page, click the “Continue to layouts” button, which takes you to a page similar to Figure 4-35, where you can pick from a range of pre-designed themes to get started with.

Figure 4-35. Selecting a layout for your GitHub pages site

When you’re happy with the look and feel, click Publish page toward the top right of the page, and your website will be created. You can view the website at http://organization_name.github.io/projectname. For example, I just created a web page for a project called github-example that is under the pragmaticlearning organization, and the page is available at http://pragmaticlearning.github.io/github-example.

Under the hood, when you create a GitHub page for a project, it adds a new gh-pages branch to your project. Select that branch from the drop-down list and you’ll see a screen similar to Figure 4-36, which shows the generated website code that you can customize if you’re comfortable working with HTML and CSS.

Figure 4-36. The contents of your gh-pages branch

Creating a Website for Yourself or Your Organization

If you want to create a website for yourself or your organization using GitHub pages, you need to create a project named username.github.io. For personal and organizational GitHub pages, instead of having a gh-pages branch, the contents of your master branch are used to build your website.

If you want to create a website for your organization, go to the organization home page and click the “+ New repository” button. Make sure to make the repository name “organization_name.github.io,” and then check the “Initialize this repository with a README” checkbox, as shown in Figure 4-37.

Figure 4-37. Creating a GitHub pages repo for an organization

If you create such a project, click the Settings link, and scroll down to the GitHub Pages section, you’ll see that it shows that you’ve already been published as a GitHub Pages website (see Figure 4-38).

Figure 4-38. The settings tab for a GitHub pages organization site

If you know HTML and CSS, you can just build your website here. If you want to take advantage of the built-in generator, you can overwrite the project by clicking the Automatic page generator button, which will work just as it did for the project GitHub pages websites.

Get Introducing GitHub now with the O’Reilly learning platform.

O’Reilly members experience books, live events, courses curated by job role, and more from O’Reilly and nearly 200 top publishers.