Chapter 4. Amazon Web Services Elastic Block Storage
This chapter explores the Amazon Web Services (AWS) Elastic Block Storage (EBS) platform. You will learn which types of storage are available, compare the cost and performance impact with EBS storage types, and look at practical examples of operational tasks with EBS using both the web console and the AWS command-line interface (CLI).
Block storage for EC2 instances and other systems needing block volumes will be provided by EBS. You can attach these volumes to instances, as well as clone, archive, and even detach and reattach them to other machines. Block storage is needed in many cases for Infrastructure as a Service (IaaS) instances. It’s important that you understand the costs and performance impact of choices for EBS tiers.
Storage Tiers/Types in EBS
EBS volumes are all scalable to 16 TB at a maximum, and each type comes in four storage performance tiers, which vary in features and functionality. Choosing which type is important because this affects the cost, performance, and scaling of the storage, plus it must match the EC2 instance type to ensure that you are getting the most out of your storage.
- gp2
-
EBS General Purpose SSD—default when launching EC2 instances—good for boot volumes, general mid-performance volumes, and active data volumes.
- io1
-
Provisioned IOPS SSD—guaranteed input/output operations per second (IOPS) with a maximum of 32 K IOPS—good for database or high-volume data storage.
- st1
-
Throughput Optimized HDD—high throughput with maximum 500 IOPS—good for lower-access frequencies, but larger files are good. Can be used for some boot volumes on lower-demand instances.
- sc1
-
Cold HDD—“slow and low” with a maximum of 250 IOPS—good for archival data that must be on block storage.
You can make storage tier changes after initial deployment. This is important because you might find that your compute workloads require different performance and throughput over time. Making the initial move to high-performance storage is a pricey way to avoid the problem of changing storage tiers down the road.
EBS storage is charged at an hourly rate per gigabyte per month for the allocated amount. This is sometimes confusing because many cloud resources are thought to be pay-for-what-you-use when it is actually pay-for-what-you-allocate. A 200 GB EBS volume with 5 GB of data will be charged as 200 GB per month for the Region in which it is located.
Understanding EBS Snapshots
EBS has the ability to create point-in-time incremental snapshots of an existing EBS volume. These snapshots are stored only as the incremental changes (see Figure 4-1) since the last snapshot was taken, which helps reduces the cost and size. You can spawn another volume or instance using a snapshot, which creates a fully inflated live storage volume from the cumulative snapshots.

Figure 4-1. Snapshot example of an EBS Volume
Taking a snapshot is done easily from the EBS view, as shown in Figure 4-2, by selecting a volume and using the Create Snapshot action. You are prompted for a snapshot description and then can view active snapshots in the EBS view under snapshots.

Figure 4-2. Creating an EBS snapshot in the AWS console
The associated AWS CLI is quite simple, needing only the volume-id and a description, which is more for readability and searchability later.
aws ec2 create-snapshot
--description "umrk pre-launch web snapshot"
--volume-id vol-024e8fc8350b3add0
Managing the UMRK EBS Volumes
Your UMRK web servers must each have additional EBS volumes, which will store the data used by the WebOps team to carry out future upgrades of its custom applications.
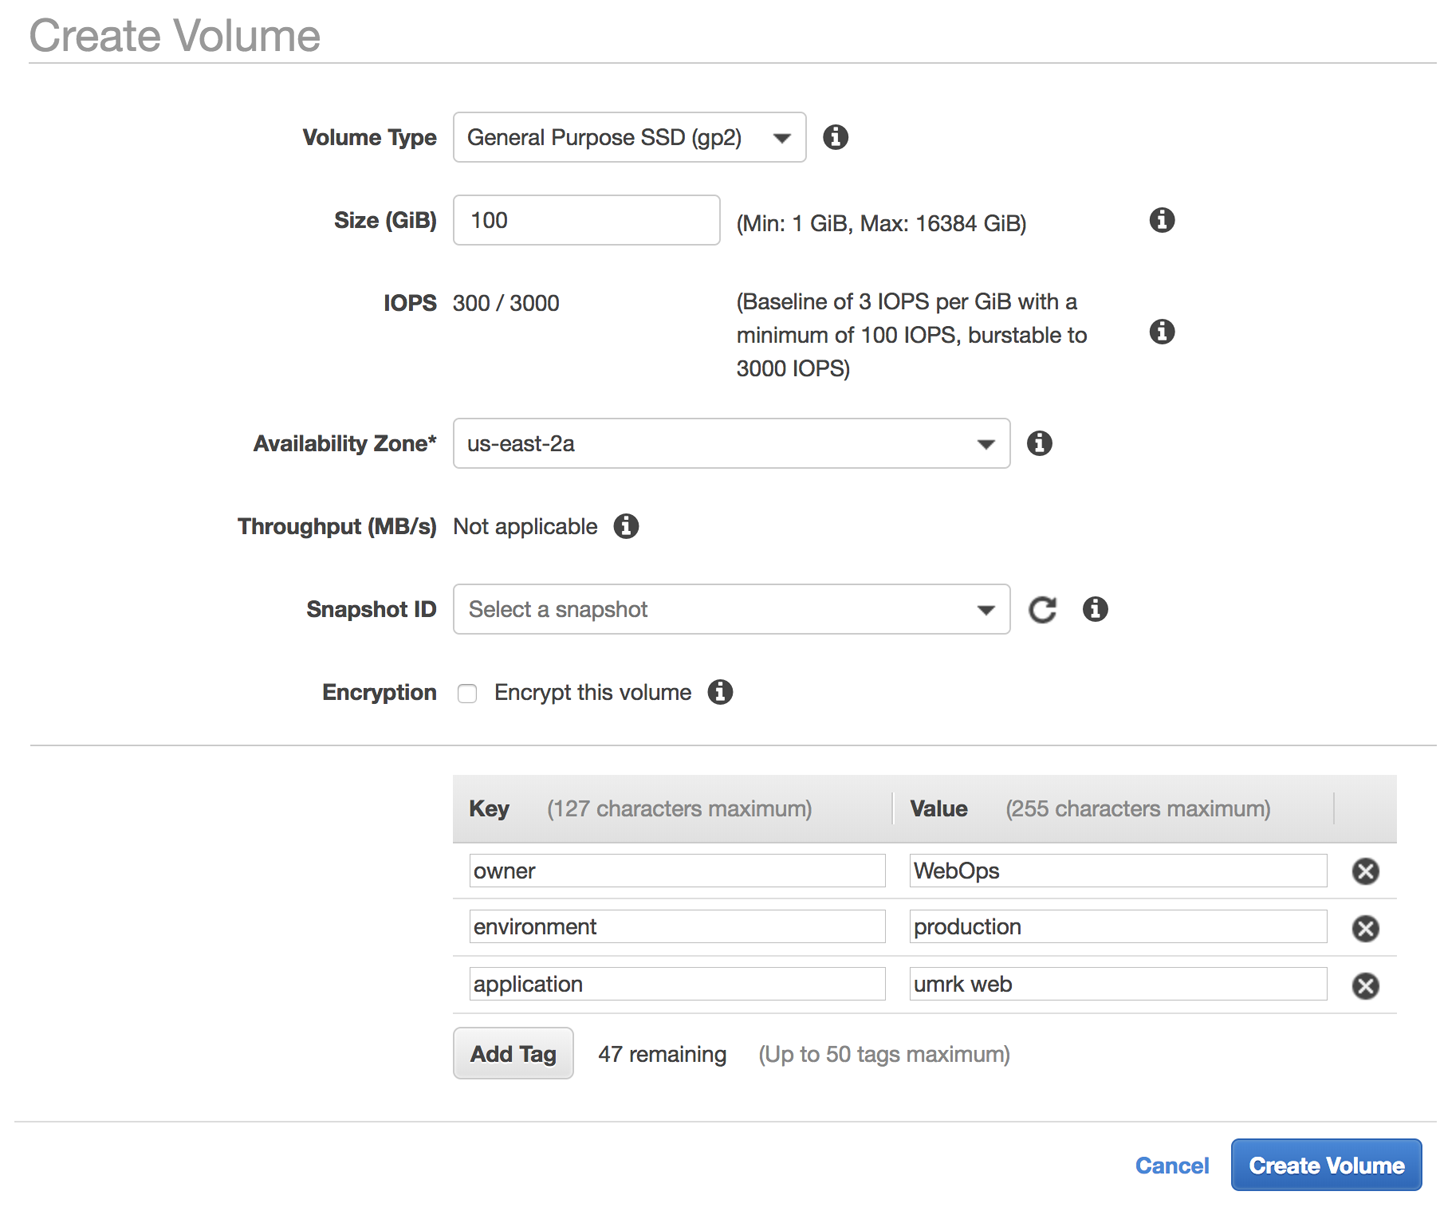
Open the EC2 console and then click the Create Volume button located in the Elastic Block Store | Volumes section of the page. Follow the prompts shown in Figure 4-3 to choose a size (100 GB in the example), the Availability Zone (must be located with the EC2 instance due to iSCSI network requirements), and create any tags that are relevant for the volume.

Figure 4-3. Creating the EBS volume in the AWS console
The AWS CLI to do this same task is shown in the following code example, which shows your AZ, volume size, volume type, and the tags:
aws ec2 create-volume --availability-zone us-east-2c
--size 109 --volume-type gp2
--tag-specifications 'ResourceType=volume,
Tags=[{Key=owner,Value=WebOps},
{Key=application,Value="umrkweb"},
{Key=environment,Value=production}]'
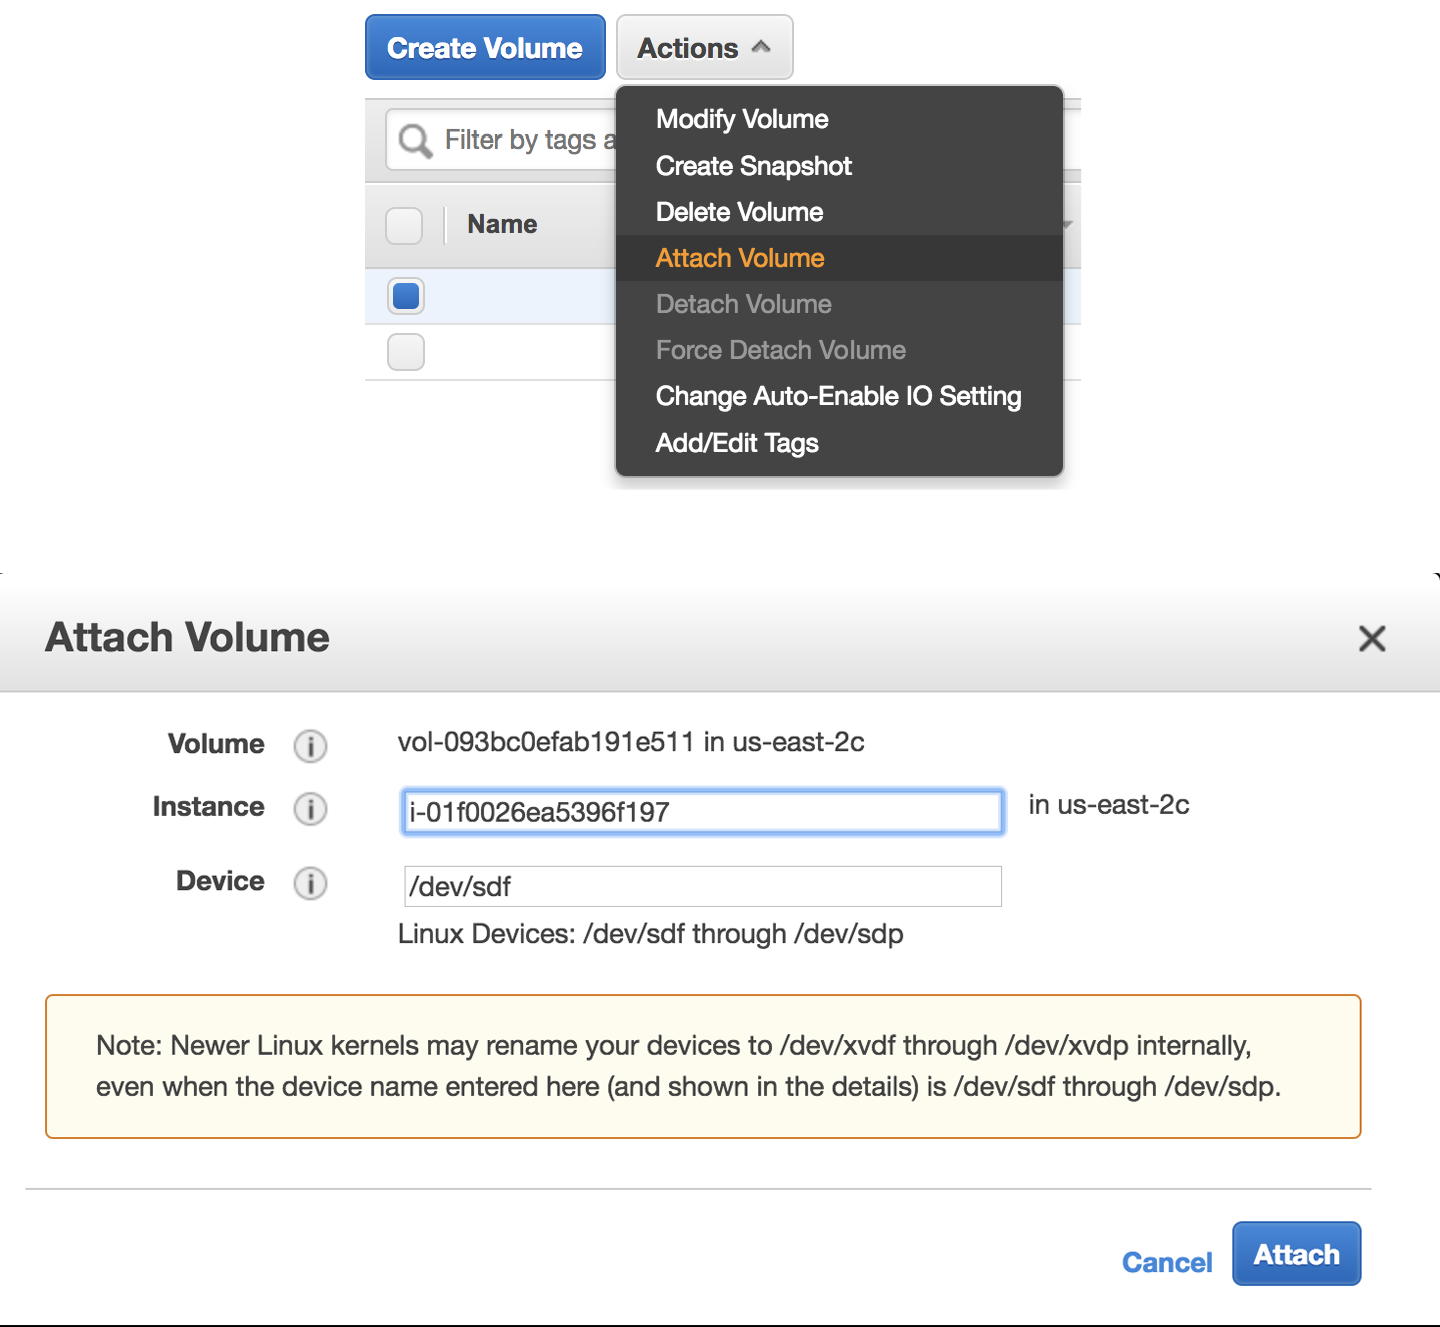
Figure 4-4 demonstrates attaching the volume, which you do in the Volumes section of the EC2 console.

Figure 4-4. Attaching the new EBS volume to an EC2 instance
The associated AWS CLI requires only your device name, volume-id of the EBS Volume and the instance-id for your EC2 instance.
aws ec2 attach-volume --device /dev/sdf --volume-id
vol-041b8dcb66cdbb40b --instance-id i-01f0026ea5396f197
You now have your new volume created, presented, and attached to the EC2 instance.
Design and Operational Patterns for Availability Using EBS
With EBS, there are not as many design patterns as there are operational patterns to consider, aside from those that require understanding the storage needs of your cloud workloads:
- Choose your default carefully
-
The default is gp2 for new instances, which might be more than you require for I/O and also for cost. You can carry out storage-tier migrations nondisruptively, which is helpful to reduce outages during future changes.
- Manage snapshots carefully
-
Snapshots are not backups! Be sure that you understand the point-in-time nature and what you want to use snapshots for. You should use them for short-term protection ideally and then remove them to reduce overhead and cost.
- Backup your volumes and instances
-
Data is still vulnerable to loss, corruption, and external access or even malware. It is critical that you have a backup and recovery strategy for your AWS data and applications. Contact your data protection vendor to make sure that you are licensed and able to protect your cloud assets.
- Beware of cost versus performance decisions
-
Choosing lower-cost volumes can affect performance but choosing higher-throughput volumes could be expensive and unnecessary. Performance will also change over time with application and consumption pattern changes. These are not one-time decisions.
- Match storage to instance capabilities
-
Make sure that your high-throughput storage is attached to the right instance type to fully use the performance features (e.g., EBS optimized).
Conclusion
Volume management is quite simple on AWS through the AWS console as well as the CLI. You now have completed the requirements for our UMRK example and have a solid foundation to start operating your own AWS instances and volumes.
Next Steps in Your AWS Journey
This guide has been created to give some specific examples of core IaaS service use on AWS and a general coverage of the compute, storage, and networking for AWS features. This is only the beginning of your journey to learning AWS. The next steps are to define what your use-cases and goals are for AWS for personal and work purposes.
If you would like to seek additional learning, resources, detailed code examples, and technical certification, there are resources available in the accompanying website.
Get Introduction to AWS IaaS Solutions now with the O’Reilly learning platform.
O’Reilly members experience books, live events, courses curated by job role, and more from O’Reilly and nearly 200 top publishers.

