Chapter 4. Deploying Istio
To gain familiarity with the complete set of Istio’s capabilities, we need to get Istio up and running. Let’s begin by understanding its supported platforms and preparing our environment for deployment. Istio is a large project, providing a number of capabilities and quite a few deployment options. In this chapter, we perform a basic installation on your local machine and deploy a few services onto the mesh. Later chapters dive deeper into various aspects of Istio functionality.
Preparing Your Environment for Istio
In addition to Istio, we’ll deploy its sample application, Bookinfo. Our Istio and Bookinfo deployments will lay down a number of containers. We will use Kubernetes as the platform to manage these containers. Kubernetes is a robust container orchestration system capable of forming clusters (a collection of nodes) and scheduling containers across nodes within the fleet of host machines (nodes) that form the cluster. Nodes are Linux or Windows servers capable of running containers that have a Kubernetes agent, kubelet, installed. As one of a number of to-be-supported underlying platforms, Kubernetes is the first and best-supported platform. So, we use Kubernetes throughout our examples. To be clear, Istio is not dependent on Kubernetes. Designed to be platform agnostic, Istio supports multiple deployment platforms, including those without a container orchestrator.
Docker Desktop as the Installation Environment
There are many options for deploying Kubernetes. In this book, we use Docker Desktop as a convenient option. Docker Desktop is an easy-to-install application for your Mac or Windows environment that enables you to start running Kubernetes and Istio from your local machine.
To install Docker Desktop and verify that you have a functional Docker environment, on the command line, run ++$ docker run hello-world++. A “Hello from Docker!” message confirms that Docker was able to pull images, create new instances, and is running as expected.
Note
We chose Docker Desktop as a convenient Kubernetes platform that requires manual deployment of Istio (so you can see Istio’s innards without needing to fuss with Kubernetes cluster deployment). You can also use the management plane, Meshery, which quickly deploys Istio and the sample application, Bookinfo. No matter which tool you use to deploy Istio, the examples used here should work within any Istio environment running on Kubernetes. For a list of supported platforms, see the Istio documentation.
As of July 2018, Docker Desktop for Mac and Windows includes support for running a standalone Kubernetes server and client as well as Docker CLI integration. We use Docker Desktop to run Kubernetes and Kubernetes as the platform to deploy Istio. The Docker Desktop–managed Kubernetes server runs locally within your Docker instance, is not configurable, and is a single-node Kubernetes cluster.
The Docker Desktop for Mac Kubernetes integration provides the Kubernetes CLI executable at /usr/local/bin/kubectl. The Docker Desktop for Windows Kubernetes integration provides the Kubernetes CLI executable at C:\>Program Files\Docker\Docker\Resources\bin\kubectl.exe. This location might not be in your shell’s PATH variable; if so, type the full path of the command or add it to the PATH. For more information about kubectl, see the official documentation.
Configuring Docker Desktop
To ensure that your Docker Desktop VM has enough memory to run Kubernetes, Istio, and Istio’s sample application, Bookinfo, you will need to configure your Docker VM with at least 4 GB of memory. This amount of memory allocation is required for all Istio and Bookinfo services to run. Pilot, specifically, might have trouble running as it requests 2 GB of memory in an Istio deployment with default settings (for a quick review of Pilot’s purpose, see Chapter 3). Docker Desktop’s default limit also happens to be 2 GB, so Pilot might refuse to start due to insufficient resources, if this isn’t increased in your Docker installation.
Instead of increasing the amount of memory allocated to your Docker Desktop installation, as shown in Figure 4-1, you might, alternatively, reduce the amount of memory that Pilot requests of your Kubernetes cluster. There are a couple of ways you can do this, depending upon whether you’re using a package manager like Helm or simply Kubernetes spec files directly.
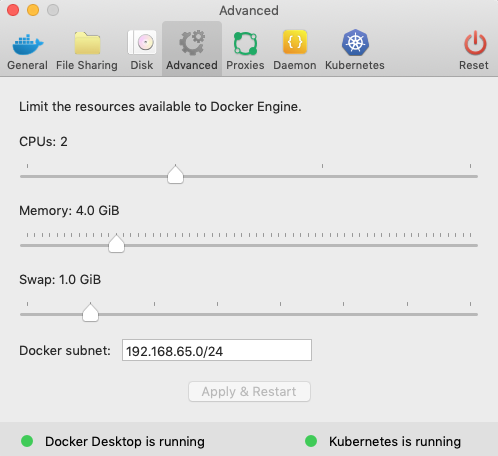
Figure 4-1. Increasing Docker’s memory limit in the Advanced pane
Using install/kubernetes/istio-demo.yaml as an example manifest, Example 4-1 highlights which section of the Pilot specification to edit in order to reduce the 2 GB of memory requested by Pilot to something smaller, like 512 MB.
Example 4-1. istio-demo.yaml showing memory resource requested for Pilot container
apiVersion:extensions/v1beta1kind:Deploymentmetadata:name:istio-pilotnamespace:istio-system...resources:requests:cpu:500mmemory:2048Mi...
Or you can provide a custom configuration when using Helm (a package manager for Kubernetes) to deploy Istio. To customize Istio install using Helm, use the --set <key>=<value> option in the Helm command to override one or more values, as demonstrated in Example 4-2.
Example 4-2. Customizing Istio’s configuration using Helm
$ helm template install/kubernetes/helm/istio --name istio --namespace istio-system
     --set pilot.resources.requests.memory="512Mi" | kubectl apply -f -
Deploying Kubernetes
If Kubernetes is not installed on your desktop, enable it in your Docker Desktop preferences. Verify the kubectl installation by running Example 4-3.
Example 4-3. Listing client (kubectl binary) and server (Kubernetes cluster) version numbers
$ kubectl version --short
Client Version: v1.13.0
Server Version: v1.13.0
If you see both client and server version numbers, your kubectl client is installed in your PATH, and a Kubernetes cluster is accessible. Verify the Kubernetes installation and your current context by running $ kubectl get nodes (see Example 4-4), which will confirm that your kubeconfig (typically located at ~/.kube/config) is correctly configured to the docker-desktop context and your single-node cluster is up.
Example 4-4. List of Kubernetes nodes as retrieved by kubectl
$ kubectl get nodes
NAME             STATUS   ROLES    AGE   VERSION
docker-desktop   Ready    master   32m   v1.13.0
Warning
This installation creates sample users, secrets, applications, and other objects within your cluster. Objects created in this tutorial are for illustrative and educational purposes only. Do not run this configuration in a production environment.
Installing Kubernetes Dashboard
Kubernetes Dashboard is a web-based UI for managing your cluster and its resources. You can use it to deploy and troubleshoot containerized applications. Kubernetes Dashboard also provides information on the state of Kubernetes resources in your cluster and on any errors that might have occurred. Dashboard is useful for reinforcing your understanding of how Istio is running. The easiest and most common way to access the cluster is through kubectl proxy, which creates a local web server that securely proxies data to Dashboard through the Kubernetes API Server. Deploy the Kubernetes Dashboard by running the following command:
$ kubectl create -f https://raw.githubusercontent.com/kubernetes/dashboard/
        master/aio/deploy/recommended/kubernetes-dashboard.yaml
Then access Dashboard by using the kubectl command-line tool by running the following command:
$ kubectl proxy
This command creates a local web server that securely proxies data to Dashboard through the Kubernetes API Server. Understand that you can access Dashboard only from the machine where the command is executed. See kubectl proxy --help for more options and Kubernetes Dashboard documentation for more information. kubectl makes Dashboard available, as illustrated in Figure 4-2.
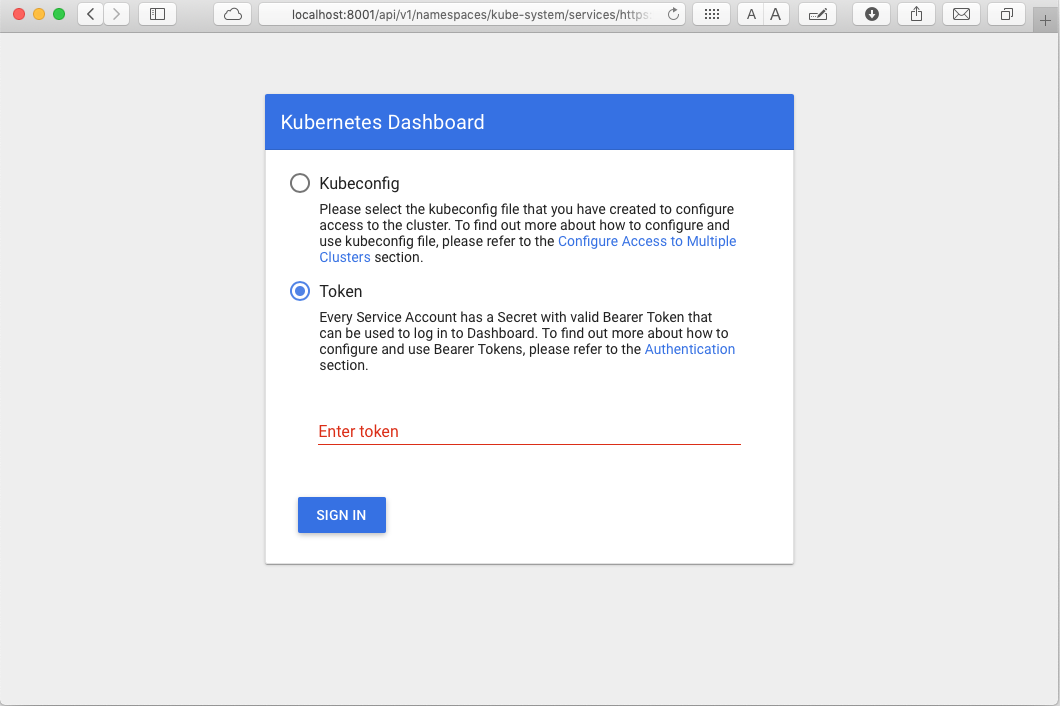
Figure 4-2. Authenticating to the Kubernetes Dashboard
To protect your cluster data, Dashboard deploys with a minimal role-based access control (RBAC) configuration by default. Currently, Dashboard only supports logging in with a bearer token. You can either create a sample user and use its token or use an existing token provided by your Docker Desktop deployment, as shown here:
$ kubectl -n kube-system describe secret $(kubectl -n kube-system get secret |
      awk '/default-token/ {print $1}')
This prints something like Example 4-5.
Example 4-5. Output of describing a Kubernetes secret
Name:         default-token-tktcn
Namespace:    kube-system
Labels:       <none>
Annotations:  kubernetes.io/service-account.name: default
              kubernetes.io/service-account.uid: 3a0a68b1-4abd-11e9-8561-025...

Type:  kubernetes.io/service-account-token

Data
====
ca.crt:     1025 bytes
namespace:  11 bytes
token:      eyJhbGciOiJSUzI1NiIsImtpZCI6IiJ9.eyJpc3MiOiJrdWJlcm5ldGVzL3NlcnZp...
Copy the token and use it to authenticate in Dashboard.
Installing Istio
With Kubernetes deployed and Dashboard up, it’s time to install our service mesh. You can download the latest Istio release by running the following command:
$ curl -L https://git.io/getLatestIstio | sh -
This script fetches the latest Istio release candidate and untars it.
Note
Mac and Linux users should find curl readily available on their system. Windows users may need to download curl for Windows.
To fetch a particular version of Istio, specify the desired version number, as shown here:
$ curl -L https://git.io/getLatestIstio | ISTIO_VERSION=1.1.0 sh -
Even though Istio as a project provides backward compatibility from minor version to minor version (unless noted in release changelogs), you might want to specify ISTIO_VERSION=1.1.0 to ensure that the examples in this book function as described.
You can also download Istio from the Istio release page. You can choose from Windows, macOS, and Linux releases. Irrespective of which OS you use, after you’ve downloaded the distribution for your OS, extract the compressed file to a directory and familiarize yourself with the contents of the distribution.
Each release includes istioctl (this binary will be specific to your OS), configuration samples, a sample application, and platform-specific installation resources. Also installable via your favorite package manager, istioctl is an important CLI for service operators to debug and diagnose their Istio service mesh.
Tip
After downloading, be sure to move the release distribution to a folder where it will not be deleted.
To explore release contents on macOS or Linux, for example, change directory to istio-x.x.x, as shown here (as of this writing, the latest version of Istio is 1.1.7):
$ cd istio-1.1.0
This directory (see Example 4-6) contains the files necessary for installing Istio, sample files, and also istioctl.
Example 4-6. Contents of the top-level folder containing an Istio release
$ ls -l
total 48
-rw-r--r--   1 lee  staff  11343 Mar 18 16:08 LICENSE
-rw-r--r--   1 lee  staff   5921 Mar 18 16:08 README.md
drwxr-xr-x   3 lee  staff     96 Mar 18 16:08 bin
drwxr-xr-x   7 lee  staff    224 Mar 18 16:08 install
-rw-r--r--   1 lee  staff    602 Mar 18 16:08 istio.VERSION
drwxr-xr-x  16 lee  staff    512 Mar 18 16:08 samples
drwxr-xr-x  21 lee  staff    672 Mar 18 16:08 tools
The installation directory contains Istio installation YAML files for Kubernetes in install/, sample applications in samples/, and the istioctl client binary in the bin/ directory. The istio.VERSION configuration file contains a list of Istio components and their version numbers for the release’s distribution.
You can use the istioctl CLI for creating routing rules and policies. You also can use it when you’re manually injecting Envoy as a service proxy. Other uses include creating, listing, modifying, and deleting configuration resources in the Istio system. Let’s add it to your PATH environment variable:
$ export PATH=$PWD/bin:$PATH
You can verify your istioctl installation by running:
$ istioctl version
This should validate the path and istioctl command options (see Example 4-7). If not, see the “Istio Installation, Upgrade, and Uninstall”.
Example 4-7. Confirmation that istioctl runs on your machine
version.BuildInfo{
Version:"1.1.0", GitRevision:"82797c0c0649a3f73029b33957ae105260458c6e",
User:"root",
Host:"996cd064-49c1-11e9-813c-0a580a2c0506", GolangVersion:"go1.10.4",
DockerHub:"docker.io/istio",
BuildStatus:"Clean",
GitTag:"1.1.0-rc.6"
}
Now that we have downloaded an Istio distribution and verified that the istioctl CLI is functional on our local machine, let’s perform a basic installation.
Istio Installation Options
There are many different installation methods and deployment architectures. Commonly, installations generally fall across the categories in the following subsections.
Choice of security configuration
- Install with strict mTLS authentication
-
Recommended for a fresh Kubernetes cluster. This method enforces authentication between sidecars by default.
- Install with permissive mTLS authentication between sidecars
-
-
This is recommended if you have existing clusters and services.
-
Use this if you have applications where services with an Istio sidecar need to communicate with other non-Istio Kubernetes services.
-
- Custom deployments that include or exclude certain default Istio components
-
-
This is recommended if a function of one of Istio’s components isn’t necessary or desired in your environment (e.g., removal of Citadel if mTLS is not to be used).
-
Choice of deployment utility
Consider the following when choosing a deployment utility:
-
Does it render Kubernetes manifests directly with kubectl?
-
Is it recommended for understanding Istio’s underpinnings more explicitly?
-
Will it render Kubernetes manifests with a package/configuration management system like Helm or Ansible?
-
Is it recommended for production deployments with templated configuration?
This list isn’t exhaustive; however, no matter which approach you take to installing Istio, each will include installation of Kubernetes custom resource definitions (CRDs) for Istio. CRDs allow definition and registration of nondefault Kubernetes resources. When Istio CRDs are deployed, Istio’s objects are registered as Kubernetes objects, providing a highly integrated experience with Kubernetes as a deployment platform.
Registering Istio’s Custom Resources
Now, with an understanding of the power and convenience of custom resources under your belt, let’s register Istio’s CustomResourceDefinitions with your Kubernetes cluster. Use the following command to apply Istio’s CustomResourceDefinition objects to your cluster:
$ for i in install/kubernetes/helm/istio-init/files/crd*yaml;
      do kubectl apply -f $i; done
This installation does not use Helm. The generally preferred method for any installation of Istio that might find its way into production is to use Helm or Ansible; both are included in the distribution you just downloaded. With Helm or Ansible, you gain flexibility regarding which components you install, and you can customize things in detail.
Example 4-8. Istio’s CRDs, loaded as resources into kube-api and available for interaction
$ kubectl  api-resources | grep istio
meshpolicies         authentication.istio.io    false    MeshPolicy
policies             authentication.istio.io    true     Policy
adapters             config.istio.io            true     adapter
apikeys              config.istio.io            true     apikey
attributemanifests   config.istio.io            true     attributemanifest
authorizations       config.istio.io            true     authorization
bypasses             config.istio.io            true     bypass
checknothings        config.istio.io            true     checknothing
circonuses           config.istio.io            true     circonus
cloudwatches         config.istio.io            true     cloudwatch
...
Istio registers new CRDs (see Example 4-8), which you can manipulate (create/update/delete) just like any other Kubernetes object:
$ kubectl get crd | grep istio
adapters.config.istio.io               2019-03-24T03:17:08Z
apikeys.config.istio.io                2019-03-24T03:17:07Z
attributemanifests.config.istio.io     2019-03-24T03:17:07Z
authorizations.config.istio.io         2019-03-24T03:17:07Z
bypasses.config.istio.io               2019-03-24T03:17:07Z
checknothings.config.istio.io          2019-03-24T03:17:07Z
circonuses.config.istio.io             2019-03-24T03:17:07Z
cloudwatches.config.istio.io           2019-03-24T03:17:08Z
clusterrbacconfigs.rbac.istio.io       2019-03-24T03:17:07Z
deniers.config.istio.io                2019-03-24T03:17:07Z
destinationrules.networking.istio.io   2019-03-24T03:17:07Z
dogstatsds.config.istio.io             2019-03-24T03:17:08Z
edges.config.istio.io                  2019-03-24T03:17:08Z
envoyfilters.networking.istio.io       2019-03-24T03:17:07Z
...
Note
After you deploy Istio’s CRDs, you can address Istio resources through istioctl or kubectl, as shown in Example 4-9.
Example 4-9. Using istioctl to display information about Istio gateways
$ istioctl get gateway
Command "get" is deprecated, Use `kubectl get` instead (see https://kubernetes.io
     /docs/tasks/tools/install-kubectl)
No resources found.
Notice the message regarding deprecation of certain istioctl commands. Be aware that while istioctl is still maintained and being enhanced as a CLI to manage Istio, kubectl is the preferred method of interaction with Istio’s custom resources (see Example 4-10). istioctl provides some Istio-specific utilities not found in kubectl.
Example 4-10. Using kubectl to display information about Istio gateways
$ kubectl get gateway
NAME               AGE
No resources found.
As an alternative to looping through the install/kubernetes/helm/istio-init/files/crd*yaml manifests, we could apply istio-demo.yaml, which has these same CRD manifests included. The istio-demo.yaml file also includes all of Istio’s control-plane components (not just the CRDs). Within the install/ folder of your release distribution folder, you’ll find installation files for different supported platforms to run Istio. Given that Kubernetes is the platform we’ve chosen to work with in this book, open the install/kubernetes/ folder. There, you’ll find the istio-demo.yaml file, which contains all necessary Istio components (in the form of CRDs, clusteroles, configmaps, services, HPAs, deployments, services, and so on) and a few helpful adapters like Grafana and Prometheus.
Once you register Istio’s custom resources with Kubernetes, you can install Istio’s control-plane components.
Installing Istio Control-Plane Components
We use the istio-demo.yaml specification file, which contains Istio configurations that enable services to operate in mTLS permissive mode. Use of mTLS permissive mode is recommended if you have existing services or applications in your Kubernetes cluster. However, if you’re starting with a fresh cluster, security best practices suggest switching to istio-demo-auth.yaml to enforce encryption of service traffic between sidecars.
$ kubectl apply -f install/kubernetes/istio-demo.yaml
Wait a few minutes to let the installation run, the Docker images to properly download, and the deployments to succeed. The application of this extensive YAML file allows Kubernetes to realize many new CRDs.
Istio’s control plane is installed in its own istio-system namespace, and from this namespace it manages services running in all other namespaces having services with sidecar proxies; or, in other words, all other namespaces that have services on the mesh. The control plane acts on a cluster-wide basis, which means that it behaves in a single-tenant fashion, as demonstrated in Example 4-11.
Example 4-11. istio-system namespace created for Istio control-plane components
$ kubectl get namespaces
NAME           STATUS   AGE
default        Active   49d
docker         Active   49d
istio-system   Active   2m15s
kube-public    Active   49d
kube-system    Active   49d
You can verify installation of the control plane into the istio-system namespace by using the commands shown in Example 4-12. If the installation is successful, you should see similar output.
Example 4-12. Istio control-plane services and pods running in the istio-system namespace
$ kubectl get svc -n istio-system
NAME          TYPE      CLUSTER-IP     EXTERNAL-IP PORT(S)           AGE

grafana       ClusterIP 10.108.237.105 <none>   3000/TCP             11d
istio-citadel ClusterIP 10.108.165.14  <none>   8060/TCP,15014/TCP   11d
istio-egressgateway ClusterIP 10.107.148.169 <none>   80/TCP,443/TCP,15443/TCP 11d
...

$ kubectl get pod -n istio-system
NAME                                      READY   STATUS      RESTARTS   AGE
grafana-57586c685b-jr2pd                  1/1     Running     0          5m45s
istio-citadel-645ffc4999-8j4v6            1/1     Running     0          5m45s
istio-cleanup-secrets-1.1.0-4c9pc         0/1     Completed   0          5m48s
istio-egressgateway-5c7fd57fdb-85g26      1/1     Running     0          5m46s
istio-galley-978f9447f-mj5xj              1/1     Running     0          5m46s
istio-grafana-post-install-1.1.0-g49gh    0/1     Completed   0          5m48s
istio-ingressgateway-8ccdc79bc-8mk4p      1/1     Running     0          5m46s
istio-pilot-649455846-klc8c               2/2     Running     0          5m45s
istio-policy-7b7d7f644b-sqsp8             2/2     Running     4          5m45s
istio-security-post-install-1.1.0-v4ffp   0/1     Completed   0          5m48s
istio-sidecar-injector-6dcc9d5c64-tklqz   1/1     Running     0          5m45s
istio-telemetry-6d494cd676-n6pkz          2/2     Running     4          5m45s
istio-tracing-656f9fc99c-nn9hd            1/1     Running     0          5m44s
kiali-69d6978b45-7q7ms                    1/1     Running     0          5m45s
prometheus-66c9f5694-2xzpm                1/1     Running     0          5m45s
Wait a second, you’re asking, why is there only a single replica of each Istio control-plane component? How is this not a single point of failure? Well…you’re right. Single-replica control-plane components are an issue for a production deployment. The Istio control plane should be deployed in a high-availability (HA) architecture (with multiple replicas of each component) in any environment for which down time isn’t tolerable. Does it bother you that the data plane is inline? What if it fails or loses connection with the control plane? Fortunately, the data plane has some built-in resilience that’s able to retain configuration and continue to operate in the event that control-plane components fail or disconnect from the control plane. As you continue through this book, you’ll see that Istio is designed to be highly resilient. It needs to be. Failures in distributed systems are near guaranteed.
Thus far, we’ve deployed only half of the service mesh—the control plane. Prior to deploying the sample application and, consequently, the data plane, you might consider that no proxies are running; however, you would be overlooking the fact that two proxies are already running. Both the ingress and egress gateways are up and running instances of our service proxy. Let’s inspect these.
Note
Our simple demo deployment includes an egress gateway for purposes of gaining familiarity with and facilitating exploration of Istio. This optional gateway is disabled by default as of v1.1. If you need to control and secure your outbound traffic through the egress gateway, you’ll need to manually enable gateways.istio-egressgateway.enabled=true in any non-demo deployment configuration profiles.
Using the istioctl proxy-status command allows you to get an overview of your mesh; this is an example of an istioctl utility that’s not found in kubectl, as shown in Example 4-13. If you suspect one of your sidecars isn’t receiving configuration or is not synchronized, proxy-status will let you know. We get further into using istioctl to debug Istio in Chapter 11.
Example 4-13. Confirming Istio ingress and egress gateways have sidecar proxies deployed and synchronized using istioctl proxy-status
$ istioctl proxy-status
NAME                     CDS    LDS    EDS       RDS       PILOT           VERSION
istio-egressgateway-...  SYNCED SYNCED SYNCED... NOT SENT  istio-pilot-... 1.1.0
istio-ingressgateway-... SYNCED SYNCED SYNCED... NOT SENT  istio-pilot-... 1.1.0
Understanding how Istio is managing the configuration of Envoy deployed as gateways in the control plane is enlightening in relation to how Envoy instances are managed in the data plane. If you recall, the data plane is composed of intelligent proxies deployed as sidecars alongside application services. Let’s deploy our data plane. We’ll do that by deploying the Bookinfo sample application.
Deploying the Bookinfo Sample Application
Let’s now deploy our first set of services (an application) onto the service mesh. For this, we use Istio’s sample application, Bookinfo, which is designed to showcase many aspects of the value proposition of service meshes. The Kubernetes manifest files for Bookinfo are found in your release distribution folder at samples/bookinfo/. Since we use Bookinfo as the example application throughout this book, let’s become more familiar with it.
From left to right in Figure 4-3, users call the productpage microservice, which in turn calls the details and reviews microservices to populate the page. The details microservice contains book information.
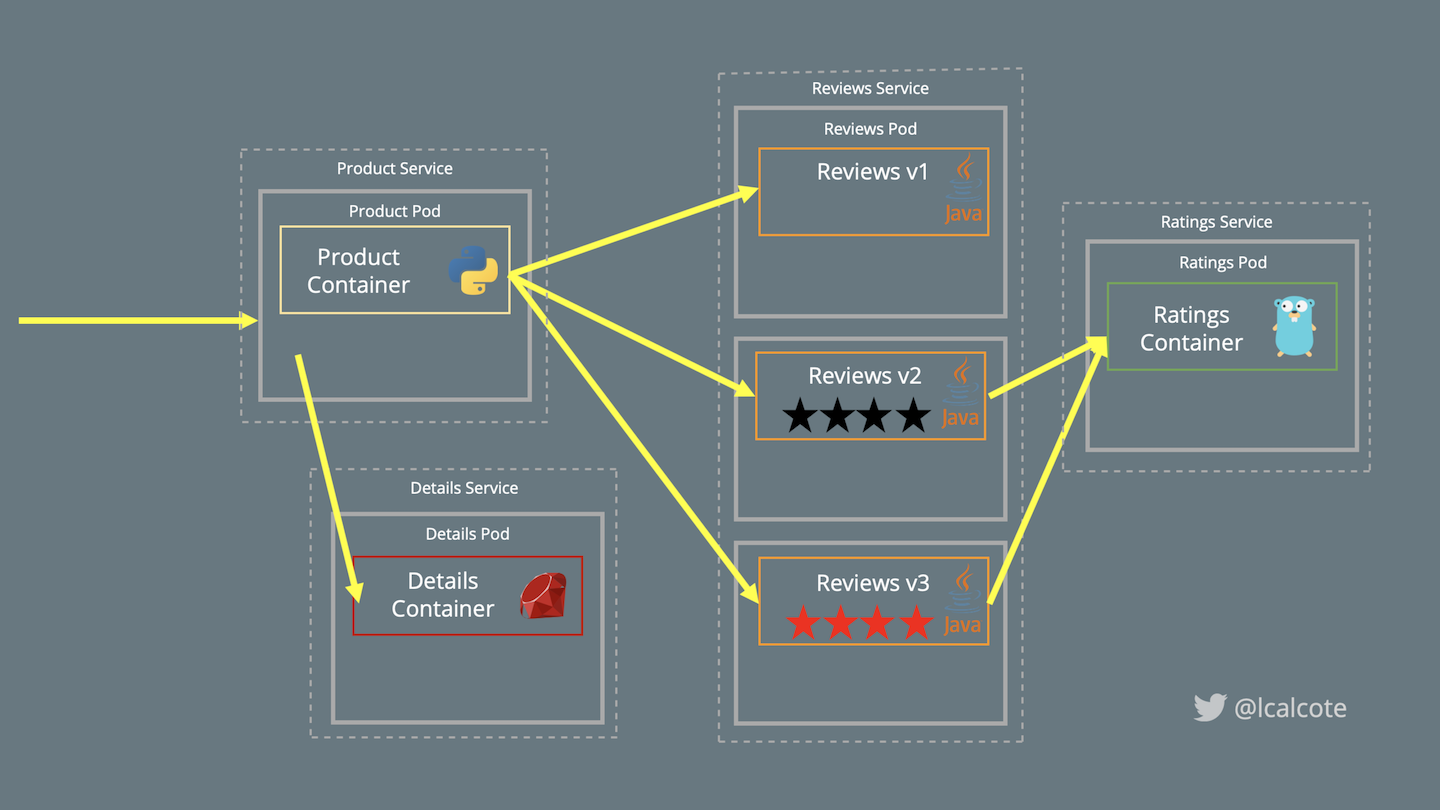
Figure 4-3. Bookinfo, showing separate microservices that show various Istio features
The reviews microservice contains book reviews and subsequently calls the ratings microservice to retrieve reviews. The ratings microservice contains book rankings in the form of a 1- to 5-star book reviews. The reviews microservice has three versions:
-
reviewsv1 has no ratings (does not call theratingsservice) -
reviewsv2 has ratings of 1 to 5 black stars (calls theratingsservice) -
reviewsv3 has ratings of 1 to 5 red stars (calls theratingsservice)
That each of these application services is written in a different language—Python, Ruby, Java, and Node.js—further demonstrates the value of a service mesh.
Note
Most service mesh projects include a sample application. They do this so that adopters can quickly come to learn how the service mesh works and demonstrate the value that it provides.
Running the sample with Istio doesn’t require making changes to the application. Instead, we simply configure and run the services in an Istio-enabled environment with service proxies as sidecars injected alongside each service. Istio’s service proxies can be manually or automatically injected as sidecars to application services (see Figure 4-4). Let’s look at how automatic sidecar injection works as we deploy our sample application. (We further examine manual sidecar injection in Chapter 5.)
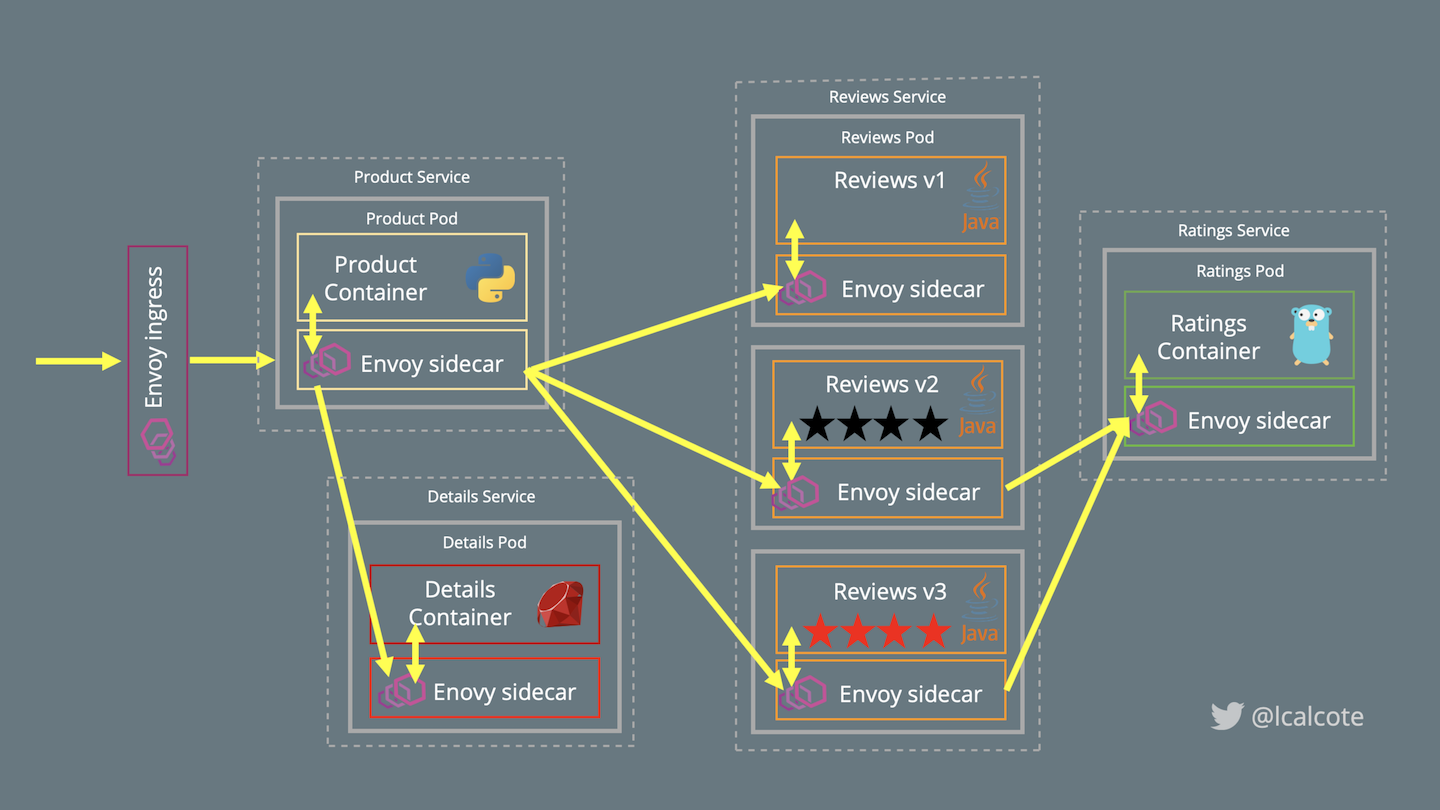
Figure 4-4. Bookinfo deployed on an Istio mesh with service proxies as sidecars
Deploying the Sample App with Automatic Sidecar Injection
To have Envoy deployed as sidecars to each of our services, Istio will deploy a sidecar injector. Chapter 5 looks at the sidecar injector in greater detail. For now, in Example 4-14 let’s verify the presence of the sidecar injector deployment and its namespace label used to designate that pods of a particular namespace will automatically have sidecars injected upon deployment (admission).
Example 4-14. Verifying the presence of the Istio sidecar injector
$ kubectl -n istio-system get deployment -l istio=sidecar-injector
NAME                     READY   UP-TO-DATE   AVAILABLE   AGE
istio-sidecar-injector   1/1     1            1           82m
The NamespaceSelector decides whether to run the webhook on an object based on whether the namespace for that object matches the selector.
Label the default namespace with istio-injection=enabled:
$ kubectl label namespace default istio-injection=enabled
Then confirm which namespaces have the istio-injection label:
$ kubectl get namespace -L istio-injection
NAME           STATUS    AGE       ISTIO-INJECTION
default        Active    1h        enabled
Docker         Active    1h        enabled
istio-system   Active    1h        disabled
kube-public    Active    1h
kube-system    Active    1h
The istio-demo.yaml deployment we ran has automatic injection configured.
Now that we have the sidecar injector with mutating admission webhook in place and the namespace labeled for automatic sidecar injection, we can deploy the sample app. For an in-depth description of Kubernetes mutating admission webhooks, see “Automatic Sidecar Injection”. Next, give Bookinfo’s manifest to Kubernetes for deployment of our sample application:
$ kubectl apply -f samples/bookinfo/platform/kube/bookinfo.yaml
With the sample application deployed, you can confirm that automatic sidecar injection is working in your environment by inspecting any one of the Bookinfo pods and noting the istio-proxy container as a new addition to the application pod:
$ kubectl describe po/productpage-v1-....
...
istio-proxy:
    Container ID:  docker://f28abdf1f0acf92687711488f7fcca8cc5968e2ed39d…
    Image:         docker.io/istio/proxyv2:1.1.7
    Image ID:      docker-pullable://istio/proxyv2@sha256:e6f039115c7d5e…
    Port:          15090/TCP
    Host Port:     0/TCP
    Args:
      proxy
      sidecar
...
Note
Sidecars may be removed from application pods even if the namespace carries the sidecar-injection label. We cover this procedure in Chapter 5.
Networking with the Sample App
Now that the Bookinfo services are up and running, you need to make the application accessible from outside of your Kubernetes cluster; for example, from a browser. We use an Istio Gateway for this purpose. You will need to define the ingress gateway for the application:
$ kubectl apply -f samples/bookinfo/networking/bookinfo-gateway.yaml
Confirm the gateway has been created:
$ kubectl get gateway

NAME               AGE
bookinfo-gateway   7m
To interact with the freshly deployed application, find where the productpage has been exposed as a service available to receive requests originating outside of the cluster. This can be seen in Example 4-15.
Example 4-15. Identifying the IP address and port number of the exposed sample application on Istio ingress gateway
$ echo "http://$(kubectl get nodes -o template --template='{{range.items}}
     {{range.status.addresses}}{{if eq .type "InternalIP"}}{{.address}}{{end}}{{end}}
     {{end}}'):$(kubectl get svc istio-ingressgateway
     -n istio-system -o jsonpath='{.spec.ports[0].nodePort}')/
     productpage"

http://x.x.x.x:31380/productpage
You’ll also want to ensure that your applications don’t use the same network ports that Istio’s components use. Table 4-1 lists the ports used by Istio.
| Port | Protocol | Used by | Description |
|---|---|---|---|
8060 |
HTTP |
Citadel |
GRPC server |
9090 |
HTTP |
Prometheus |
Prometheus |
9091 |
HTTP |
Mixer |
Policy/Telemetry |
9093 |
HTTP |
Citadel |
TCP server |
15000 |
TCP |
Envoy |
Envoy admin port (commands/diagnostics) |
15001 |
TCP |
Envoy |
Envoy |
15004 |
HTTP |
Mixer, Pilot |
Policy/Telemetry - mTLS |
15010 |
HTTP |
Pilot |
Pilot service - XDS pilot - discovery |
15011 |
TCP |
Pilot |
Pilot service - mTLS - Proxy - discovery |
15014 |
HTTP |
Citadel, Mixer, Pilot |
Control-plane monitoring |
15030 |
TCP |
Prometheus |
Prometheus |
15090 |
HTTP |
Mixer |
Proxy |
42422 |
TCP |
Mixer |
Telemetry - Prometheus |
With our application up and accessible, we can begin manipulating service traffic. The ability to access our application is a simple way of confirming how we’re affecting the application, but an application’s exposure to the mesh is not a requirement for manipulating its traffic.
Uninstalling Istio
Deleting the istio-system namespace will not uninstall Istio. It’s a common mistake to think that it does, but deleting the istio-system removes Istio’s control-plane components, leaving CRDs, sidecars, and other artifacts resident in your cluster. The logic here is that CRDs contain the runtime configuration set by service operators. Given this, it follows that service operators are better served in being made to explicitly delete the runtime configuration data rather than unexpectedly parts with it. In our case, we’re not beholden to our installation, and so uninstalling Istio is as simple as running this command from within your Istio release folder:
$ kubectl delete -f install/kubernetes/istio-demo.yaml
This will not delete all of the Istio CRDs, mesh configuration, and sample application, however. To delete those, run the following:
$ for i in install/kubernetes/helm/istio-init/files/crd*yaml;
     do kubectl delete -f $i; done
$ kubectl delete -f samples/bookinfo/platform/kube/bookinfo.yaml
$ kubectl delete -f samples/bookinfo/networking/bookinfo-gateway.yaml
You can verify that Istio and Bookinfo were successfully removed by running the following:
$ kubectl get crds
$ kubectl get pods
If you still get CRDs after attempting to uninstall, see Chapter 11 for some debugging suggestions.
Helm-Based Installations
Package managers like Helm (without Tiller) or configuration managers like Ansible are generally recommended for facilitating idempotency as a desired practice when deploying Istio in production environments. An Istio operator is in progress to replace the Helm Tiller installation as the project’s recommended utility for controlling upgrades.
Install Helm
You will need to have access to a system with Helm installed. Helm can be installed by placing the binary in your PATH, or with your favorite package manager.
-
Download the latest Helm release relevant to your OS.
-
Unpack the downloaded file.
-
Locate Helm and move it to its desired location (e.g., /usr/local/bin/helm).
Or you can add the unpackaged directory to your PATH by navigating to it on the CLI and using the following command:
export PATH=$PWD:$PATH
To install on your local (macOS) system, alternatively, you can use Homebrew to install, as shown in Example 4-16.
Example 4-16. Installing Helm on macOS with Homebrew
$ brew install kubernetes-helm
For other systems, see Helm’s installation documentation.
With Helm installed, you can proceed with Tiller (Helm install) or without Tiller (Helm template). Tiller is the server-side component of Helm that runs in your cluster. Tiller interacts directly with the Kubernetes API Server to install, upgrade, query, and remove Kubernetes resources. It also stores the objects that represent releases.
Install with Helm Template
Let’s briskly walk through a Helm template deployment (without Tiller). Create a namespace for Istio’s control-plane components and then install all of Istio’s CRDs. Render Istio’s core components to a Kubernetes manifest called istio.yaml using the following command from the Istio release directory:
$ kubectl create namespace istio-system
$ helm template install/kubernetes/helm/istio-init --name istio-init
     --namespace istio-system | kubectl apply -f -
$ helm template install/kubernetes/helm/istio --name istio
     --namespace istio-system | kubectl apply -f -
Part of the benefit of using a Helm-based method of deployment is that you can relatively easily customize your Istio configuration by adding one or more --set <key>=<value> installation options to the Helm command, like so:
$ helm install install/kubernetes/helm/istio --name istio
     --namespace istio-system \
  --set global.controlPlaneSecurityEnabled=true \
  --set mixer.adapters.useAdapterCRDs=false \
  --set grafana.enabled=true --set grafana.security.enabled=true \
  --set tracing.enabled=true \
  --set kiali.enabled=true
Istio’s installation options highlight how configurable Istio deployments are. Production deployments typically take advantage of a package or configuration manager like Helm or Ansible. Istio deployments initially performed with these tools should also be upgraded to new versions of Istio using that same tool.
Confirming a Helm-Based Installation
Just as when you installed using kubectl, Helm-based installations deploy Istio to its own Kubernetes namespace, istio-system. To check whether Istio is deployed and to also see all of the pieces that are deployed, run the following:
$ kubectl get svc -n istio-system
Ensure that these services are running:
$ kubectl get pods -n istio-system
Uninstalling a Helm-Based Installation
To uninstall Istio after it was deployed using the Helm template, run the following commands to remove Istio from your Kubernetes cluster:
$ helm template install/kubernetes/helm/istio --name istio
     --namespace istio-system | kubectl delete -f -
$ kubectl delete -f install/kubernetes/helm/istio-init/files
$ kubectl delete namespace istio-system
Other Environments
It’s not all about Kubernetes. A number of other platforms are supported for deployment. Mesh expansion is the term the Istio community uses to describe the onboarding of existing services onto the service mesh. We won’t walk through all of the ways that you can expand the Istio service mesh in this book, but we will note that supported platforms include the following:
-
Bare metal and VMs
-
Apache Mesos and Cloud Foundry
-
Nomad and Consul
-
Eureka
Additionally, there are a number of Istio managed-service offerings offered by various public clouds and managed-services vendors.
Get Istio: Up and Running now with the O’Reilly learning platform.
O’Reilly members experience books, live events, courses curated by job role, and more from O’Reilly and nearly 200 top publishers.

