Chapter 1. Juniper MX Architecture
Back in 1998, Juniper Networks released its first router, the M40. Leveraging Application-Specific Integrated Circuits (ASICs), the M40 was able to outperform any other router architecture. The M40 was also the first router to have a true separation of the control and data planes, and the M Series was born. Originally, the model name M40 referred to its ability to process 40 million packets per second (Mpps). As the product portfolio expanded, the “M” now refers to the multiple services available on the router, such as MPLS with a wide variety of VPNs. The primary use case for the M Series was to allow Service Providers to deliver services based on IP while at the same time supporting legacy frame relay and ATM networks.
Fast-forward 10 years and the number of customers that Service Providers have to support has increased exponentially. Frame relay and ATM have been decimated, as customers are demanding high-speed Layer 2 and Layer 3 Ethernet-based services. Large Enterprise companies are becoming more Service Provider-like and are offering IP services to departments and subsidiaries.
Nearly all networking equipment connects via Ethernet. It’s one of the most well understood and deployed networking technologies used today. Companies have challenging requirements to reduce operating costs and at the same time provide more services. Ethernet enables the simplification in network operations, administration, and maintenance.
The MX Series was introduced in 2007 to solve these new challenges. It is optimized for delivering high-density and high-speed Layer 2 and Layer 3 Ethernet services. The “M” still refers to the multiple services heritage, while the “X” refers to the new switching capability and focus on 10G interfaces and beyond; it’s also interesting to note that the Roman numeral for the number 10 is “X.”
It’s no easy task to create a platform that’s able to solve these new challenges. The MX Series has a strong pedigree: although mechanically different, it leverages technology from both the M and T Series for chassis management, switching fabric, and the Routing Engine.
Features that you have come to know and love on the M and T Series are certainly present on the MX Series, as it runs on the same image of Junos. In addition to the “oldies, but goodies,” is an entire feature set focused on Service Provider switching and broadband network gateway (BNG). Here’s just a sample of what is available on the MX:
- High availability
Non-Stop Routing (NSR), Non-Stop Bridging (NSB), Graceful Routing Engine Switchover (GRES), Graceful Restart (GR), and In-Service Software Upgrade (ISSU)
- Routing
RIP, OSPF, IS-IS, BGP, and Multicast
- Switching
Full suite of Spanning Tree Protocols (STP), Service Provider VLAN tag manipulation, QinQ, and the ability to scale beyond 4,094 bridge domains by leveraging virtual switches
- Inline services
Network Address Translation (NAT), IP Flow Information Export (IPFIX), Tunnel Services, and Port Mirroring
- MPLS
L3VPN, L2VPNs, and VPLS
- Broadband services
PPPoX, DHCP, Hierarchical QoS, and IP address tracking
- Virtualization
Multi-Chassis Link Aggregation, Virtual Chassis, Logical Systems, Virtual Switches
With such a large feature set, the use case of the MX Series is very broad. It’s common to see it in the core of a Service Provider network, providing BNG, or in the Enterprise providing edge routing or core switching.
This chapter introduces the MX platform, features, and architecture. We’ll review the hardware, components, and redundancy in detail.
Junos OS
The Junos OS is a purpose-built networking operating system based on one of the most stable and secure operating systems in the world: FreeBSD. Junos software was designed as a monolithic kernel architecture that places all of the operating system services in the kernel space. Major components of Junos are written as daemons that provide complete process and memory separation. Since Junos 14.x, a big change was introduced—modularity. Although Junos is still based on FreeBSD, it becomes independent of the “guest OS” and offers a separation between the Core OS and the HW drivers. Many improvements are coming over the next few years.
Indeed, the Junos OS is starting its great modernization as this Second Edition of this book is being written. For scaling purposes, it will be more modular, faster, and easier to support all the new virtual functionality coming on the heels of SDN. Already Junos is migrating to recent software architectures such as Kernel SMP and multi-core OS.
One Junos
Creating a single network operating system that’s able to be leveraged across routers, switches, and firewalls simplifies network operations, administration, and maintenance. Network operators need only learn Junos once and become instantly effective across other Juniper products. An added benefit of a single Junos instance is that there’s no need to reinvent the wheel and have 10 different implementations of BGP or OSPF. Being able to write these core protocols once and then reuse them across all products provides a high level of stability, as the code is very mature and field-tested.
Software Releases
For a long time (nearly 15 years) there has been a consistent and predictable release of Junos every calendar quarter. Recently, Juniper has changed its release strategy, starting with Junos 12.x and 13.x, which each offered three major releases, and then Junos 14.x, which offered two major releases. The development of the core operating system is now a single release train allowing developers to create new features or fix bugs once and share them across multiple platforms. Each Junos software release is built for both 32-bit and 64-bit Routing Engines.
The release numbers are now in a major and minor format. The major number is the version of Junos for a particular calendar year and the minor release indicates which semester of that year the software was released. When there are several major and minor release numbers, it identifies a major release—for example, 14.1, 14.2.
Since Junos 14.x, each release of the Junos OS (the two majors per year) is supported for 36 months. In other words, every Junos software has a known Extended End of Life (EEOL), as shown in Figure 1-1.
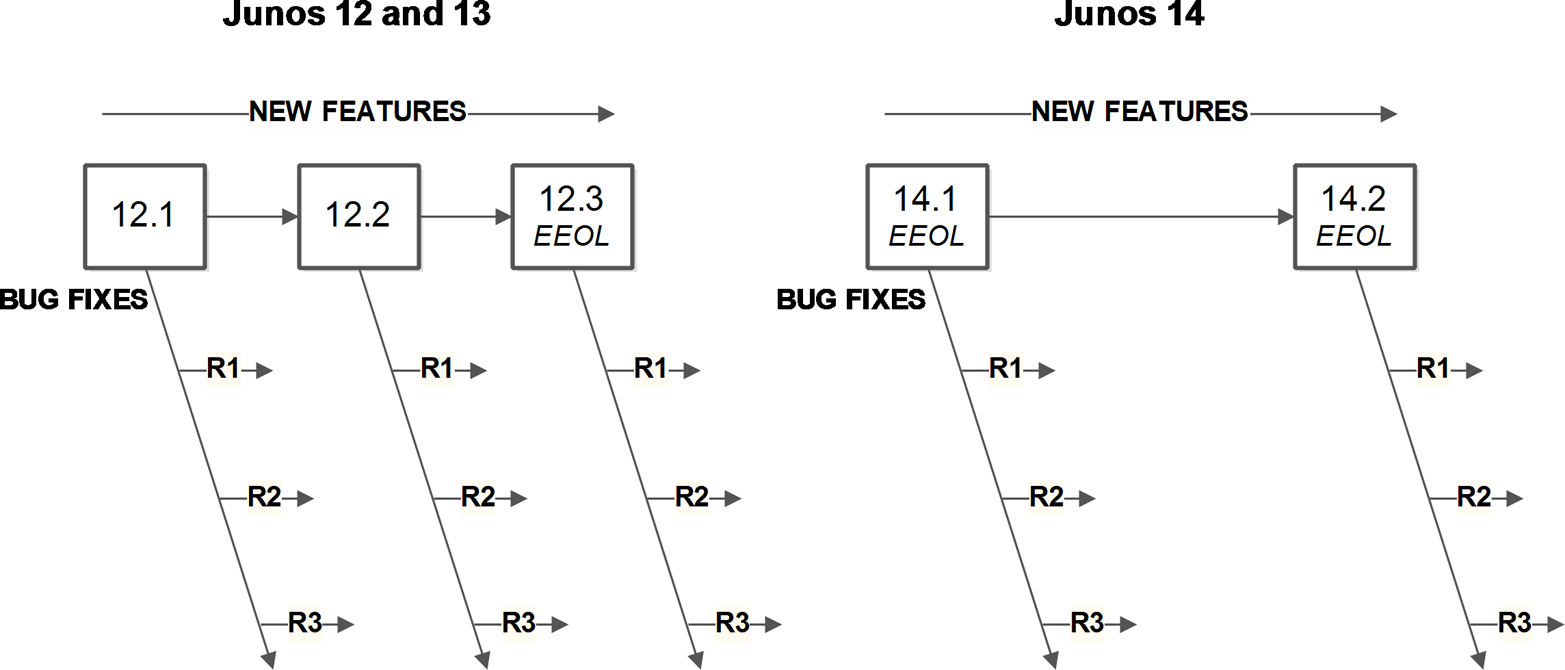
Figure 1-1. Junos release model and cadence
There are a couple of different types of Junos that are released more frequently to resolve issues: maintenance and service releases. Maintenance releases are released about every eight weeks to fix a collection of issues and they are prefixed with “R.” For example, Junos 14.2R2 would be the second maintenance release for Junos 14.2. Service releases are released on demand to specifically fix a critical issue that has yet to be addressed by a maintenance release. These releases are prefixed with an “S.” An example would be Junos 14.2R3-S2.
The general rule of thumb is that new features are added every minor release and bug fixes are added every maintenance release. For example, Junos 14.1 to 14.2 would introduce new features, whereas Junos 14.1R1 to 14.1R2 would introduce bug fixes.
The next Junos release “15” introduces the concept of “Innovation” release prefixes with F. Each major release will offer two innovation releases that should help customers to quickly implement innovative features. The innovative features will then be included in the next major release. For example, the major release 15.1 will have two “F” releases: 15.1F1 and 15.2F2. And that will be the same for the second major release, 15.2. The innovations developed in 15.1F1 will then be natively included in the first maintenance release of the next major software: 15.2R1
Junos Continuity—JAM
JAM means Junos Agile deployment Methodology, a new concept also known by its marketing name Junos Continuity.
The JAM feature is one of the new Junos modularity enhancements. In releases prior to 14.x, the hardware drivers were embedded into the larger Junos software build, which did not allow you to install new line card models (for example, those not yet available before a given Junos release) without requiring a complete new Junos installation.
Since Junos 14.x, a separation between the Junos core and the hardware drivers has been made, allowing an operator to deploy new hardware onto existing Junos releases, as shown in Figure 1-2. It’s a significant advancement in terms of time spent for testing, validating, and upgrading a large network. Indeed, new hardware is usually requested by customers more often than a new software addition, usually to upgrade their bandwidth capacity, which grows very quickly in Internet Service or Content Provider networks. You only need more 10G or 100G interfaces per slot with just the parity features set. The ability to install newer, faster, and denser hardware while keeping the current stable Junos release you have configured is a great asset. JAM functionalities also prevent downtime because installing new hardware with JAM doesn’t require any reboot of the router. Awesome, isn’t it?
The JAM model is made of two major components:
- The JAM database
Included in the Junos OS itself (in other words, in a JAM-aware Junos release) so the OS maintains platform-specific parameters and attributes.
- The JAM package
A set of line card and chipset drivers (JFB file).
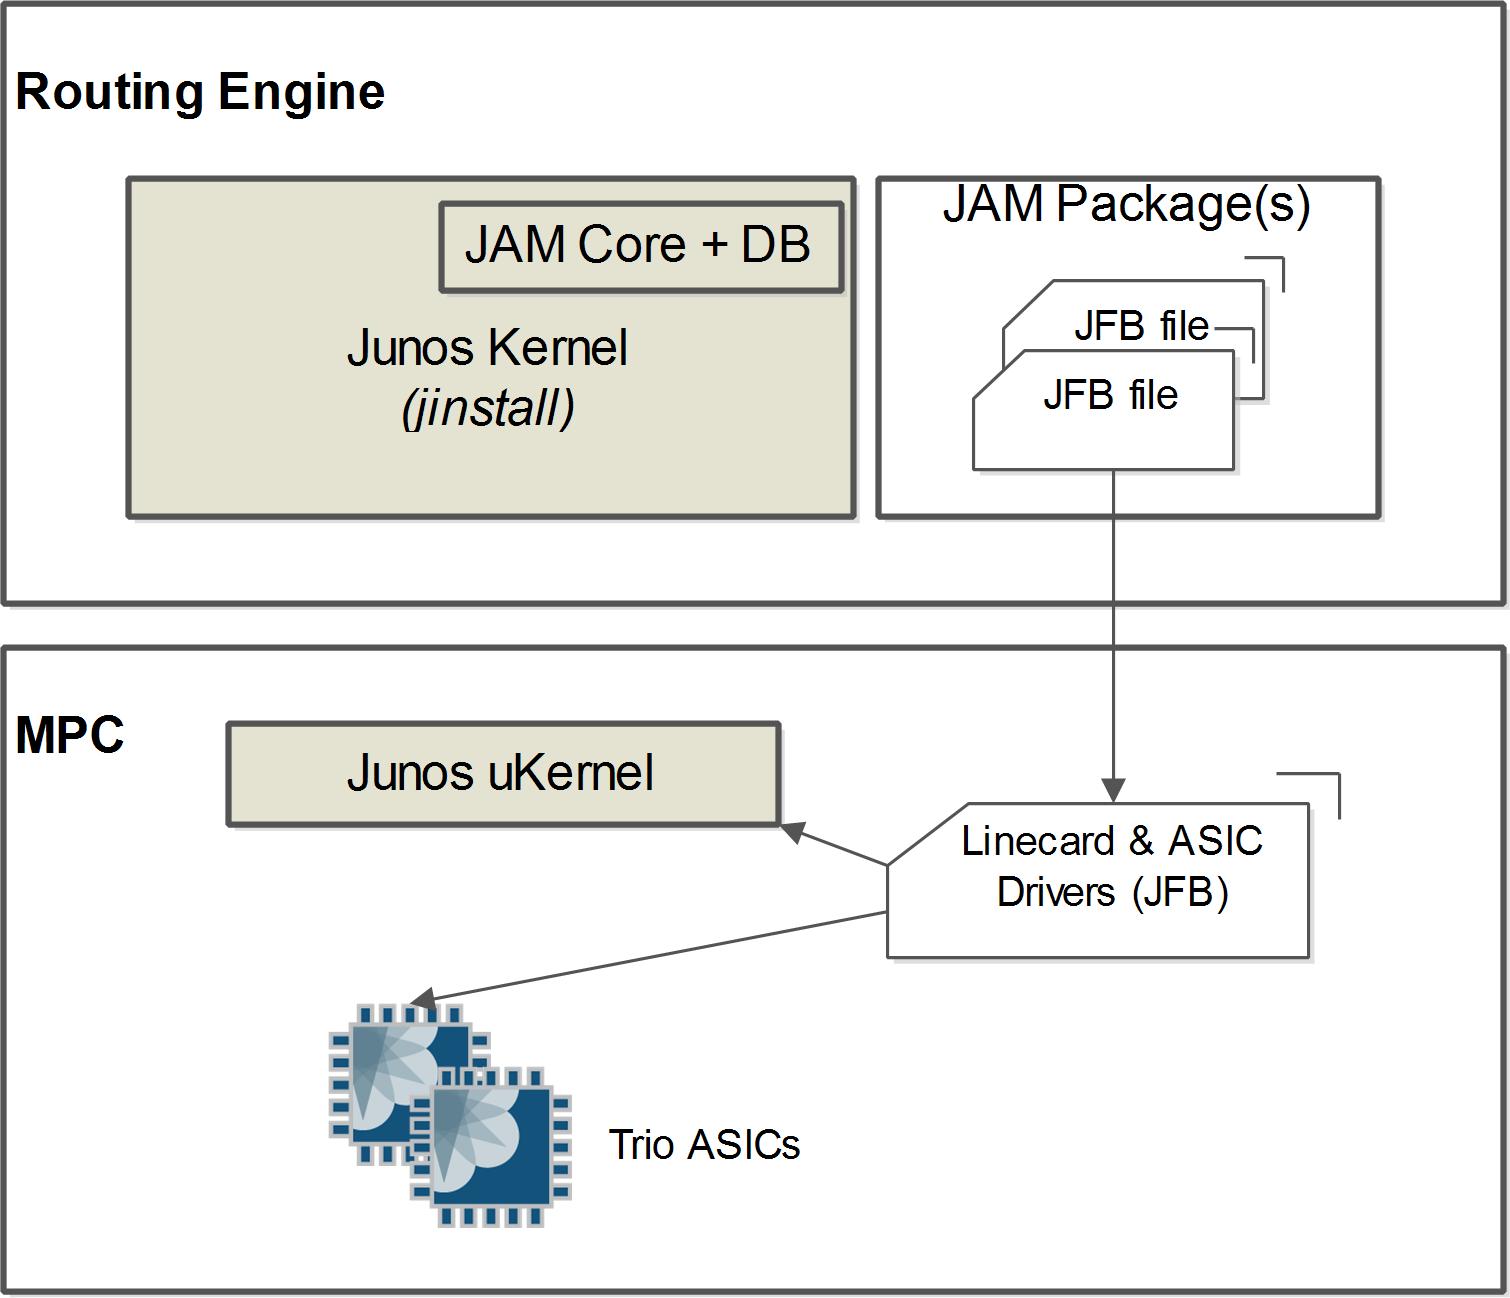
Figure 1-2. The JAM model
There are two methods for implementing JAM and getting the most benefit from it:
With a standalone JAM package available for any existing elected release (a release that officially supports JAM model). The first elected releases for JAM are 14.1R4 and 14.2R3. A standalone JAM package is different than a jinstall package which is prefixed by “jam-xxxx”
.Through an integrated JAM release. In this configuration, JAM packages are directly integrated into the jinstall package.
Let’s take the example of the first JAM package already available (jam-mpc-2e-3e-ng64): JAM for NG-MPC2 and NG-MPC3 cards. This single JAM package includes hardware drivers for the following new cards:
MPC2E-3D-NG
MPC2E-3D-NG-Q
MPC3E-3D-NG
MPC3E-3D-NG-Q
The elected releases for this package are 14.1R4 and 14.2R3, as mentioned before. Customers who use these releases could install the above next-generation of MPC cards without any new Junos installation. They could follow the typical installation procedure:
Insert new MPC (MPC stays offline because it is not supported).
Install the standalone JAM package for the given FRU.
Bring the MPC online.
MPC retrieves its driver from the JAM database (on the RE).
MPC then boots and is fully operational.
Users that use older releases should use the integrated mode by installing Junos release 14.1 or 14.2, which include a JAM package for these cards. Finally, another choice might be to use the native release, which provides built-in support for these new MPCs; for NG-MPC 2 and NG -MPC3 cards, the native release is 15.1.R1.
Software Architecture
Junos was designed from the beginning to support a separation of control and forwarding plane. This is true for the MX Series, where all of the control plane functions are performed by the Routing Engine while all of the forwarding is performed by the packet forwarding engine (PFE). PFEs are hosted on the line card, which also has a dedicated CPU to communicate with the RE and handle some specific inline features.
Providing this level of separation ensures that one plane doesn’t impact the other. For example, the forwarding plane could be routing traffic at line rate and performing many different services while the Routing Engine sits idle and unaffected control plane functions come in many shapes and sizes. There’s a common misconception that the control plane only handles routing protocol updates. In fact, there are many more control plane functions. Some examples include:
Updating the routing table
Answering SNMP queries
Processing SSH or HTTP traffic to administer the router
Changing fan speed
Controlling the craft interface
Providing a Junos micro kernel to the PFEs
Updating the forwarding table on the PFEs
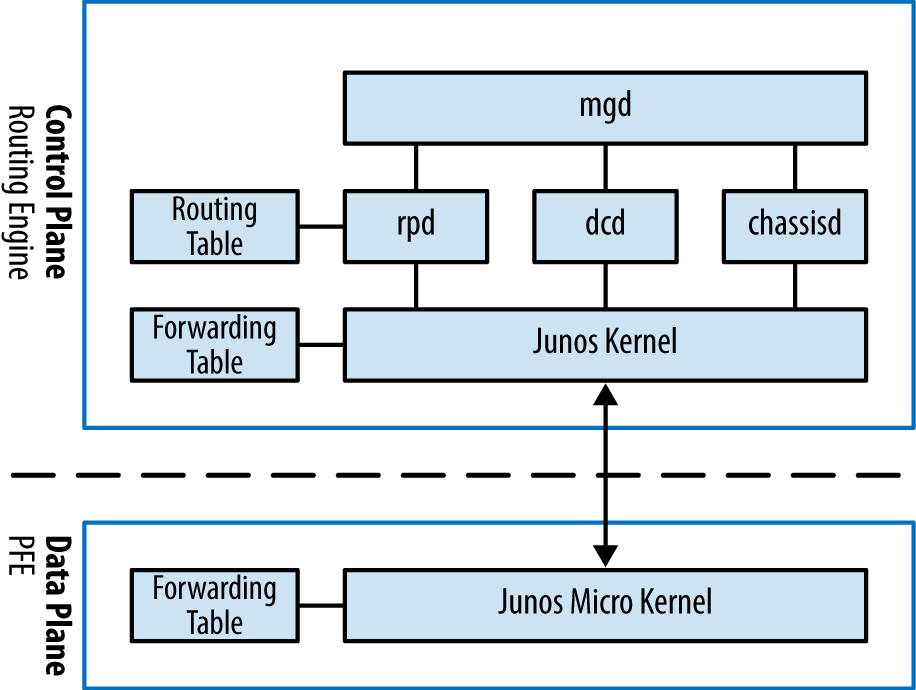
Figure 1-3. Junos software architecture
At a high level, the control plane is implemented within the Routing Engine while the forwarding plane is implemented within each PFE using a small, purpose-built kernel that contains only the required functions to route and switch traffic. Some control plane tasks are delegated to the CPU of the Trio line cards in order to scale more. This is the case for the ppmd process detailed momentarily.
The benefit of control and forwarding separation is that any traffic that is being routed or switched through the router will always be processed at line rate on the PFEs and switch fabric; for example, if a router was processing traffic between web servers and the Internet, all of the processing would be performed by the forwarding plane.
The Junos kernel has five major daemons; each of these daemons plays a critical role within the MX and work together via Interprocess Communication (IPC) and routing sockets to communicate with the Junos kernel and other daemons. The following daemons take center stage and are required for the operation of Junos:
Management daemon (
mgd)Routing protocol daemon (
rpd)Periodic packet management daemon (
ppmd)Device control daemon (
dcd)Chassis daemon (
chassisd)
There are many more daemons for tasks such as NTP, VRRP, DHCP, and other technologies, but they play a smaller and more specific role in the software architecture.
Management daemon
The Junos User Interface (UI) keeps everything in a centralized database. This allows Junos to handle data in interesting ways and open the door to advanced features such as configuration rollback, apply groups, and activating and deactivating entire portions of the configuration.
The UI has four major components: the configuration database, database schema, management daemon (mgd), and the command-line interface (cli).
The management daemon (mgd) is the glue that holds the entire Junos User Interface (UI) together. At a high level, mgd provides a mechanism to process information for both network operators and daemons.
The interactive component of mgd is the Junos cli; this is a terminal-based application that allows the network operator an interface into Junos. The other side of mgd is the extensible markup language (XML) remote procedure call (RPC) interface. This provides an API through Junoscript and Netconf to allow for the development of automation applications.
The cli responsibilities are:
Command-line editing
Terminal emulation
Terminal paging
Displaying command and variable completions
Monitoring log files and interfaces
Executing child processes such as ping, traceroute, and ssh
mgd responsibilities include:
Passing commands from the
clito the appropriate daemonFinding command and variable completions
Parsing commands
It’s interesting to note that the majority of the Junos operational commands use XML to pass data. To see an example of this, simply add the pipe command display xml to any command. Let’s take a look at a simple command such as show isis adjacency:
{master}
dhanks@R1-RE0> show isis adjacency
Interface             System         L State        Hold (secs) SNPA
ae0.1                 R2-RE0         2  Up                   23
So far everything looks normal. Let’s add the display xml to take a closer look:
{master}dhanks@R1-RE0> show isis adjacency | display xml
<rpc-reply xmlns:junos="http://xml.juniper.net/junos/11.4R1/junos">
    <isis-adjacency-information xmlns="http://xml.juniper.net/junos/11.4R1/junos
    -routing" junos:style="brief">
        <isis-adjacency>
            <interface-name>ae0.1</interface-name>
            <system-name>R2-RE0</system-name>
            <level>2</level>
            <adjacency-state>Up</adjacency-state>
            <holdtime>22</holdtime>
        </isis-adjacency>
    </isis-adjacency-information>
   <cli>
        <banner>{master}</banner>
    </cli>
</rpc-reply>
As you can see, the data is formatted in XML and received from mgd via RPC.
This feature (available since the beginning of Junos) is a very clever mechanism of separation between the data model and the data processing, and it turns out to be a great asset in our newly found network automation era—in addition to the netconf protocol, Junos offers the ability to remotely manage and configure the MX in an efficient manner.
Routing protocol daemon
The routing protocol daemon (rpd) handles all of the routing protocols configured within Junos. At a high level, its responsibilities are receiving routing advertisements and updates, maintaining the routing table, and installing active routes into the forwarding table. In order to maintain process separation, each routing protocol configured on the system runs as a separate task within rpd. The other responsibility of rpd is to exchange information with the Junos kernel to receive interface modifications, send route information, and send interface changes.
Let’s take a peek into rpd and see what’s going on. The hidden command set task accounting toggles CPU accounting on and off:
{master}
dhanks@R1-RE0> set task accounting on
Task accounting enabled.
Now we’re good to go. Junos is currently profiling daemons and tasks to get a better idea of what’s using the Routing Engine CPU. Let’s wait a few minutes for it to collect some data.
We can now use show task accounting to see the results:
{master}
dhanks@R1-RE0> show task accounting
Task accounting is enabled.

Task                       Started    User Time  System Time  Longest Run
Scheduler                      265        0.003        0.000        0.000
Memory                           2        0.000        0.000        0.000
hakr                             1        0.000            0        0.000
ES-IS I/O./var/run/ppmd_c        6        0.000            0        0.000
IS-IS I/O./var/run/ppmd_c       46        0.000        0.000        0.000
PIM I/O./var/run/ppmd_con        9        0.000        0.000        0.000
IS-IS                           90        0.001        0.000        0.000
BFD I/O./var/run/bfdd_con        9        0.000            0        0.000
Mirror Task.128.0.0.6+598       33        0.000        0.000        0.000
KRT                             25        0.000        0.000        0.000
Redirect                         1        0.000        0.000        0.000
MGMT_Listen./var/run/rpd_        7        0.000        0.000        0.000
SNMP Subagent./var/run/sn       15        0.000        0.000        0.000
Not too much going on here, but you get the idea. Currently, running daemons and tasks within rpd are present and accounted for.
Once you’ve finished debugging, make sure to turn off accounting:
{master}
dhanks@R1-RE0> set task accounting off
Task accounting disabled.
Warning
The set task accounting command is hidden for a reason. It’s possible to put additional load on the Junos kernel while accounting is turned on. It isn’t recommended to run this command on a production network unless instructed by JTAC. Again, after your debugging is finished, don’t forget to turn it back off with set task accounting off.
Periodic packet management daemon
Periodic packet management (ppmd) is a specific process dedicated to handling and managing Hello packets from several protocols. In the first Junos releases, RPD managed the adjacencies state. Each task, such as OSPF and ISIS, was in charge of receiving and sending periodic packets and maintaining the time of each adjacency. In some configurations, in large scaling environments with aggressive timers (close to the second), RPD could experience scheduler SLIP events, which broke the real time required by the periodic hellos.
Juniper decided to put the management of Hello packets outside RPD in order to improve stability and reliability in scaled environments. Another goal was to provide subsecond failure detection by allowing new protocols like BFD to propose millisecond holding times.
First of all, ppmd was developed for ISIS and OSPF protocols, as part of the routing daemon process. You can show this command to check which task of RPD has delegated its hello management to ppmd:
jnpr@R1> show task | match ppmd_control
 39 ES-IS I/O./var/run/ppmd_control               40 <>
 39 IS-IS I/O./var/run/ppmd_control               39 <>
 40 PIM I/O./var/run/ppmd_control                 41 <>
 40 LDP I/O./var/run/ppmd_control                 16 <>
ppmd was later extended to support other protocols, including LACP, BFD, VRRP, and OAM LFM. These last protocols are not coded within RPD but have a dedicated, correspondingly named process: lacpd, bfdd, vrrpd, lfmd, and so on.
The motivation of ppmd is to be as dumb as possible against its clients (RPD, LACP, BFD...). In other words, notify the client’s processes only when there is an adjacency change or to send back gathered statistics.
For several years, ppmd has not been a single process hosted on the Routing Engine and now it has been developed to work in a distributed manner. Actually, ppmd runs on the Routing Engine but also on each Trio line card, on the line card’s CPU, where it is called PPM Manager, also known as ppm man. The following PFE command shows the ppm man thread on a line card CPU:
NPC11(R1 vty)# show threads
[...]
54 M  asleep    PPM Manager           4664/8200   0/0/2441 ms  0%
The motivation for the delegation of some control processing to the line card CPU originated with the emergence of subsecond protocols like BFD. Recently, the Trio line card offers a third enhanced version of ppm, driven also by the BFD protocol in scaled environments, which is called inline ppm. In this case, the Junos OS has pushed the session management out to the packet forwarding engines themselves.
To check which adjacency is delegated to hardware or not, you can use these following hidden commands:
/* all adjacencies manages by ppmd */
jnpr@R1> show ppm adjacencies
Protocol   Hold time (msec)
VRRP       9609
LDP        15000
LDP        15000
ISIS       9000
ISIS       27000
PIM        105000
PIM        105000
LACP       3000
LACP       3000
LACP       3000
LACP       3000

Adjacencies: 11, Remote adjacencies: 4

/* all adjacencies manages by remote ppmd (ppm man or inline ppmd) */
jnpr@R1> show ppm adjacencies remote
Protocol   Hold time (msec)
LACP       3000
LACP       3000
LACP       3000
LACP       3000

Adjacencies: 4, Remote adjacencies: 4
The ppm delegation and inline ppm features are enabled by default, but can be turned off. In the following configuration, only the ppmd instance of the Routing Engine will work.
set routing-options ppm no-delegate-processing

set routing-options ppm no-inline-processing
Note
Why disable the ppm delegation features?
Protocol delegation is not compatible with the embedded tcpdump tool (monitor traffic interface). You cannot capture control plane packets that are managed by ppm man or inline ppmd. So for lab testing or maintenance window purposes, it could be helpful to disable temporally the delegation/inline modes to catch packets via the monitor traffic interface command.
Figure 1-4 illustrates the relationship of ppmd instances with other Junos processes.
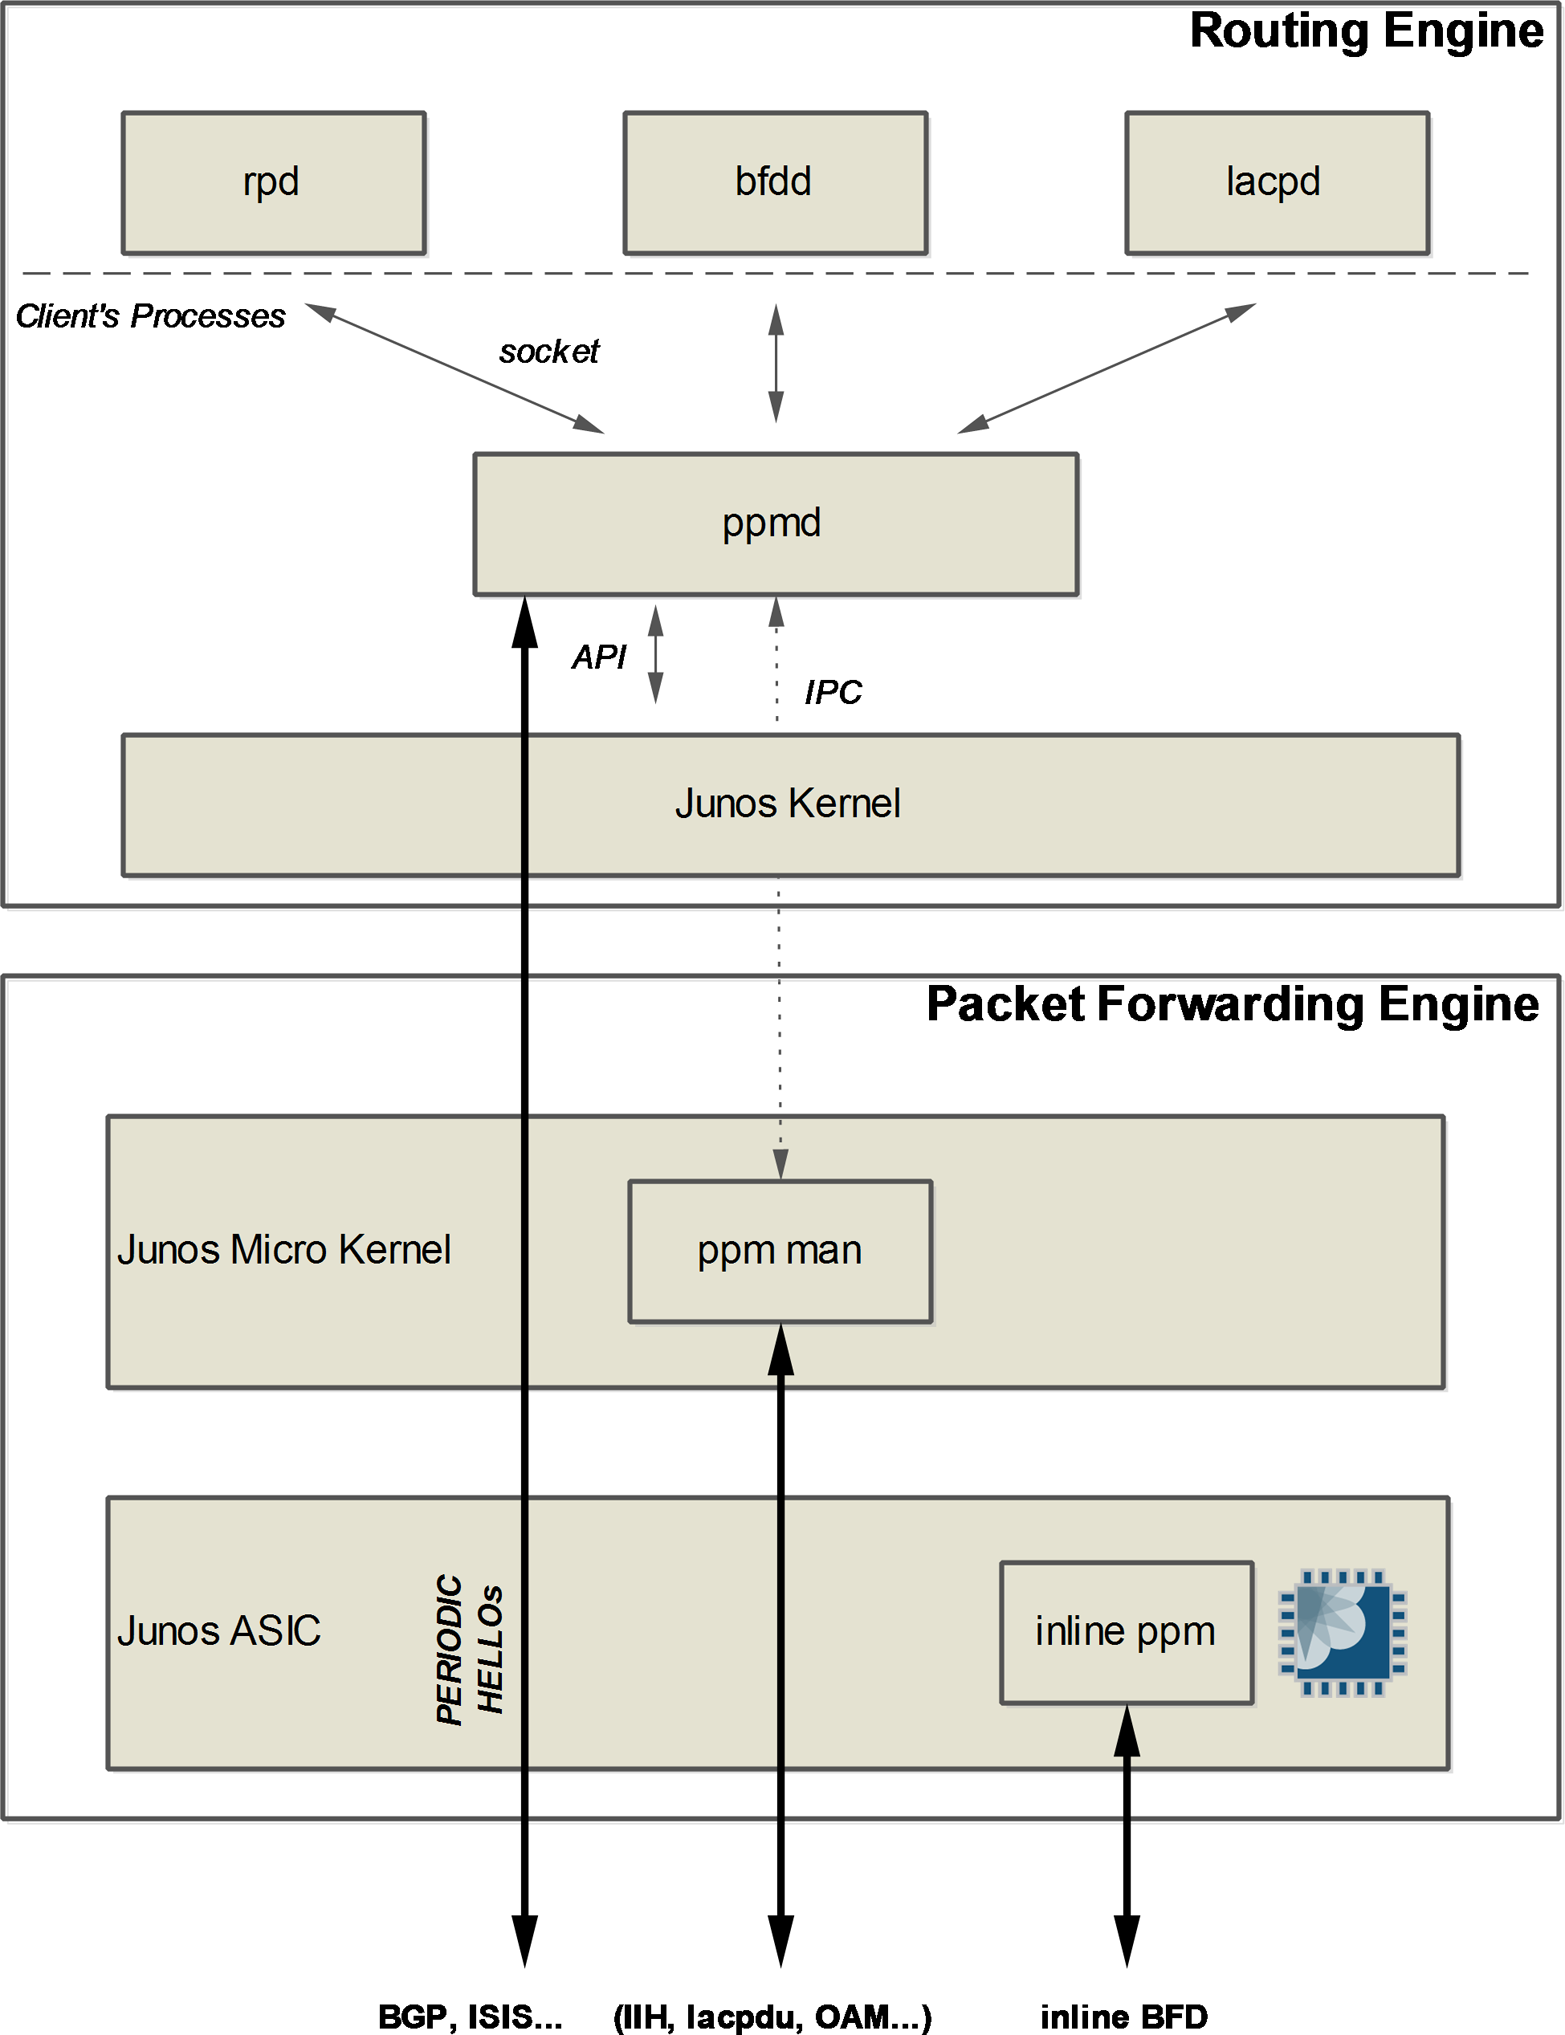
Figure 1-4. PPM architecture
Device control daemon
The device control daemon (dcd) is responsible for configuring interfaces based on the current configuration and available hardware. One feature of Junos is being able to configure nonexistent hardware, as the assumption is that the hardware can be added at a later date and “just work.” An example is the expectation that you can configure set interfaces ge-1/0/0.0 family inet address 192.168.1.1/24 and commit. Assuming there’s no hardware in FPC1, this configuration will not do anything. As soon as hardware is installed into FPC1, the first port will be configured immediately with the address 192.168.1.1/24.
Chassis daemon (and friends)
The chassis daemon (chassisd) supports all chassis, alarm, and environmental processes. At a high level, this includes monitoring the health of hardware, managing a real-time database of hardware inventory, and coordinating with the alarm daemon (alarmd) and the craft daemon (craftd) to manage alarms and LEDs.
It should all seem self-explanatory except for craftd; the craft interface that is the front panel of the device as shown in Figure 1-5. Let’s take a closer look at the MX960 craft interface.

Figure 1-5. Juniper MX960 craft interface
The craft interface is a collection of buttons and LED lights to display the current status of the hardware and alarms. Information can also be obtained:
dhanks@R1-RE0> show chassis craft-interface

Front Panel System LEDs:
Routing Engine    0    1
--------------------------
OK                *    *
Fail              .    .
Master            *    .

Front Panel Alarm Indicators:
-----------------------------
Red LED      .
Yellow LED   .
Major relay  .
Minor relay  .

Front Panel FPC LEDs:
FPC    0   1   2
------------------
Red    .   .   .
Green  .   *   *

CB LEDs:
 CB    0   1
--------------
Amber  .   .
Green  *   *

PS LEDs:
  PS   0   1   2   3
--------------------
Red    .   .   .   .
Green  *   .   .   .

Fan Tray LEDs:
  FT   0
----------
Red    .
Green  *
One final responsibility of chassisd is monitoring the power and cooling environmentals. chassisd constantly monitors the voltages of all components within the chassis and will send alerts if the voltage crosses any thresholds. The same is true for the cooling. The chassis daemon constantly monitors the temperature on all of the different components and chips, as well as fan speeds. If anything is out of the ordinary, chassisd will create alerts. Under extreme temperature conditions, chassisd may also shut down components to avoid damage.
Routing Sockets
Routing sockets are a UNIX mechanism for controlling the routing table. The Junos kernel takes this same mechanism and extends it to include additional information to support additional attributes to create a carrier-class network operating system.
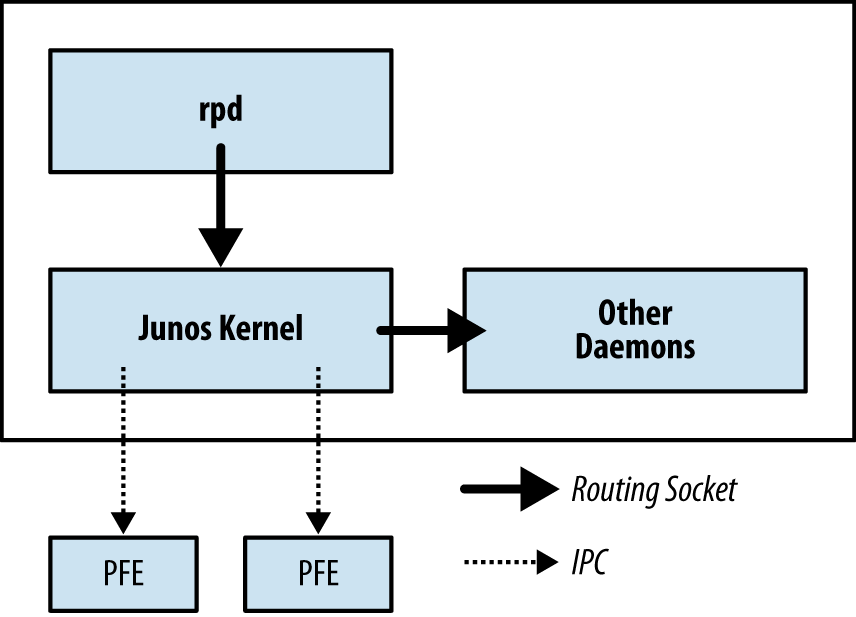
Figure 1-6. Routing socket architecture
At a high level, there are two actors when using routing sockets: state producer and state consumer. The rpd daemon is responsible for processing routing updates and thus is the state producer. Other daemons are considered state consumers because they process information received from the routing sockets.
Let’s take a peek into the routing sockets and see what happens when we configure ge-1/0/0.0 with an IP address of 192.168.1.1/24. Using the rtsockmon command from the shell will allow us to see the commands being pushed to the kernel from the Junos daemons:
{master}
dhanks@R1-RE0> start shell
dhanks@R1-RE0% rtsockmon -st
        sender    flag   type       op
[16:37:52] dcd   P    iflogical  add    ge-1/0/0.0 flags=0x8000
[16:37:52] dcd   P    ifdev      change ge-1/0/0 mtu=1514 dflags=0x3
[16:37:52] dcd   P    iffamily   add    inet mtu=1500 flags=0x8000000200000000
[16:37:52] dcd   P    nexthop    add    inet 192.168.1.255 nh=bcst
[16:37:52] dcd   P    nexthop    add    inet 192.168.1.0 nh=recv
[16:37:52] dcd   P    route      add    inet 192.168.1.255
[16:37:52] dcd   P    route      add    inet 192.168.1.0
[16:37:52] dcd   P    route      add    inet 192.168.1.1
[16:37:52] dcd   P    nexthop    add    inet 192.168.1.1 nh=locl
[16:37:52] dcd   P    ifaddr     add    inet local=192.168.1.1
[16:37:52] dcd   P    route      add    inet 192.168.1.1 tid=0
[16:37:52] dcd   P    nexthop    add    inet nh=rslv flags=0x0
[16:37:52] dcd   P    route      add    inet 192.168.1.0 tid=0
[16:37:52] dcd   P    nexthop    change inet nh=rslv
[16:37:52] dcd   P    ifaddr     add    inet local=192.168.1.1 dest=192.168.1.0
[16:37:52] rpd   P    ifdest     change ge-1/0/0.0, af 2, up, pfx 192.168.1.0/24
Note
We configured the interface ge-1/0/0 in a different terminal window and committed the change while the rtstockmon command was running.
The command rtsockmon is a Junos shell command that gives the user visibility into the messages being passed by the routing socket. The routing sockets are broken into four major components: sender, type, operation, and arguments. The sender field is used to identify which daemon is writing into the routing socket. The type identifies which attribute is being modified. The operation field is showing what is actually being performed. There are three basic operations: add, change, and delete. The last field is the arguments passed to the Junos kernel. These are sets of key and value pairs that are being changed.
In the previous example, you can see how dcd interacts with the routing socket to configure ge-1/0/0.0 and assign an IPv4 address:
dcdcreates a new logical interface (IFL).dcdchanges the interface device (IFD) to set the proper MTU.dcdadds a new interface family (IFF) to support IPv4.dcdsets the nexthop, broadcast, and other attributes that are needed for the RIB and FIB.dcdadds the interface address (IFA) of 192.168.1.1.rpdfinally adds a route for 192.168.1.1 and brings it up.
Junos OS Modernization
Starting with Junos 14.2, Juniper has launched its Junos OS modernization program. The aim is to provide more scalabilty, faster boots and commits, convergence improvements, and so on.
This huge project has been phased and the key steps are:
RPD 64 bits: even though Junos 64 bits has been available since the introduction of the Routing Engine with 64-bit processors, the RPD daemon was still a 32-bit process, which cannot address more than 4 GB of memory. Starting with Junos 14.1, you can explicitly turn on the RPD 64-bit mode allowing the device to address more memory on the 64-bit RE. It is very useful for environments that request large amounts of routes in RIB:
{master}[edit system]
jnpr@R1# set processes routing force-64-bit
FreeBSD upgrade and Junos independence: At release 15.1, Junos becomes totally autonomous with respect to the FreeBSD operating system. In addition, FreeBSD has been also upgraded with version 10 to support recent OS enhancements (like Kernel SMP). Junos and FreeBSD can be upgraded independently allowing smarter installation packaging and offering better reactivity for FreeBSD updates (security patches, new OS features, etc.).
Kernel SMP (Symmetric Multi-Processing) support: recently introduced in Junos 15.1.
RPD modularity: RPD will no longer be a monolithic process and instead will be split into several processes to introduce a clean separation between I/O modules and the protocols themselves. This separation will begin with the BGP and RSVP protocols at Junos 16.x.
RPD multi-core: The complete multi-core system infrastructure is scheduled after Junos 16.x.
Note
Note that starting with release 15.x, the performance of the Junos OS is dramatically improved, especially in term of convergence.
The micro-kernel of the MPC is also earmarked by the Junos modernization program. Actually, the new MPCs, starting with NG-MPC2 and NG-MPC-3, support a new multi-core processor with a customized Linux operating system, as shown in Figure 1-7. (The previous micro-kernel becomes a process over Linux OS.) This new system configuration of MPC allows more modularity, and will allow future processes to be implemented into the MPC, such as the telemetry process.
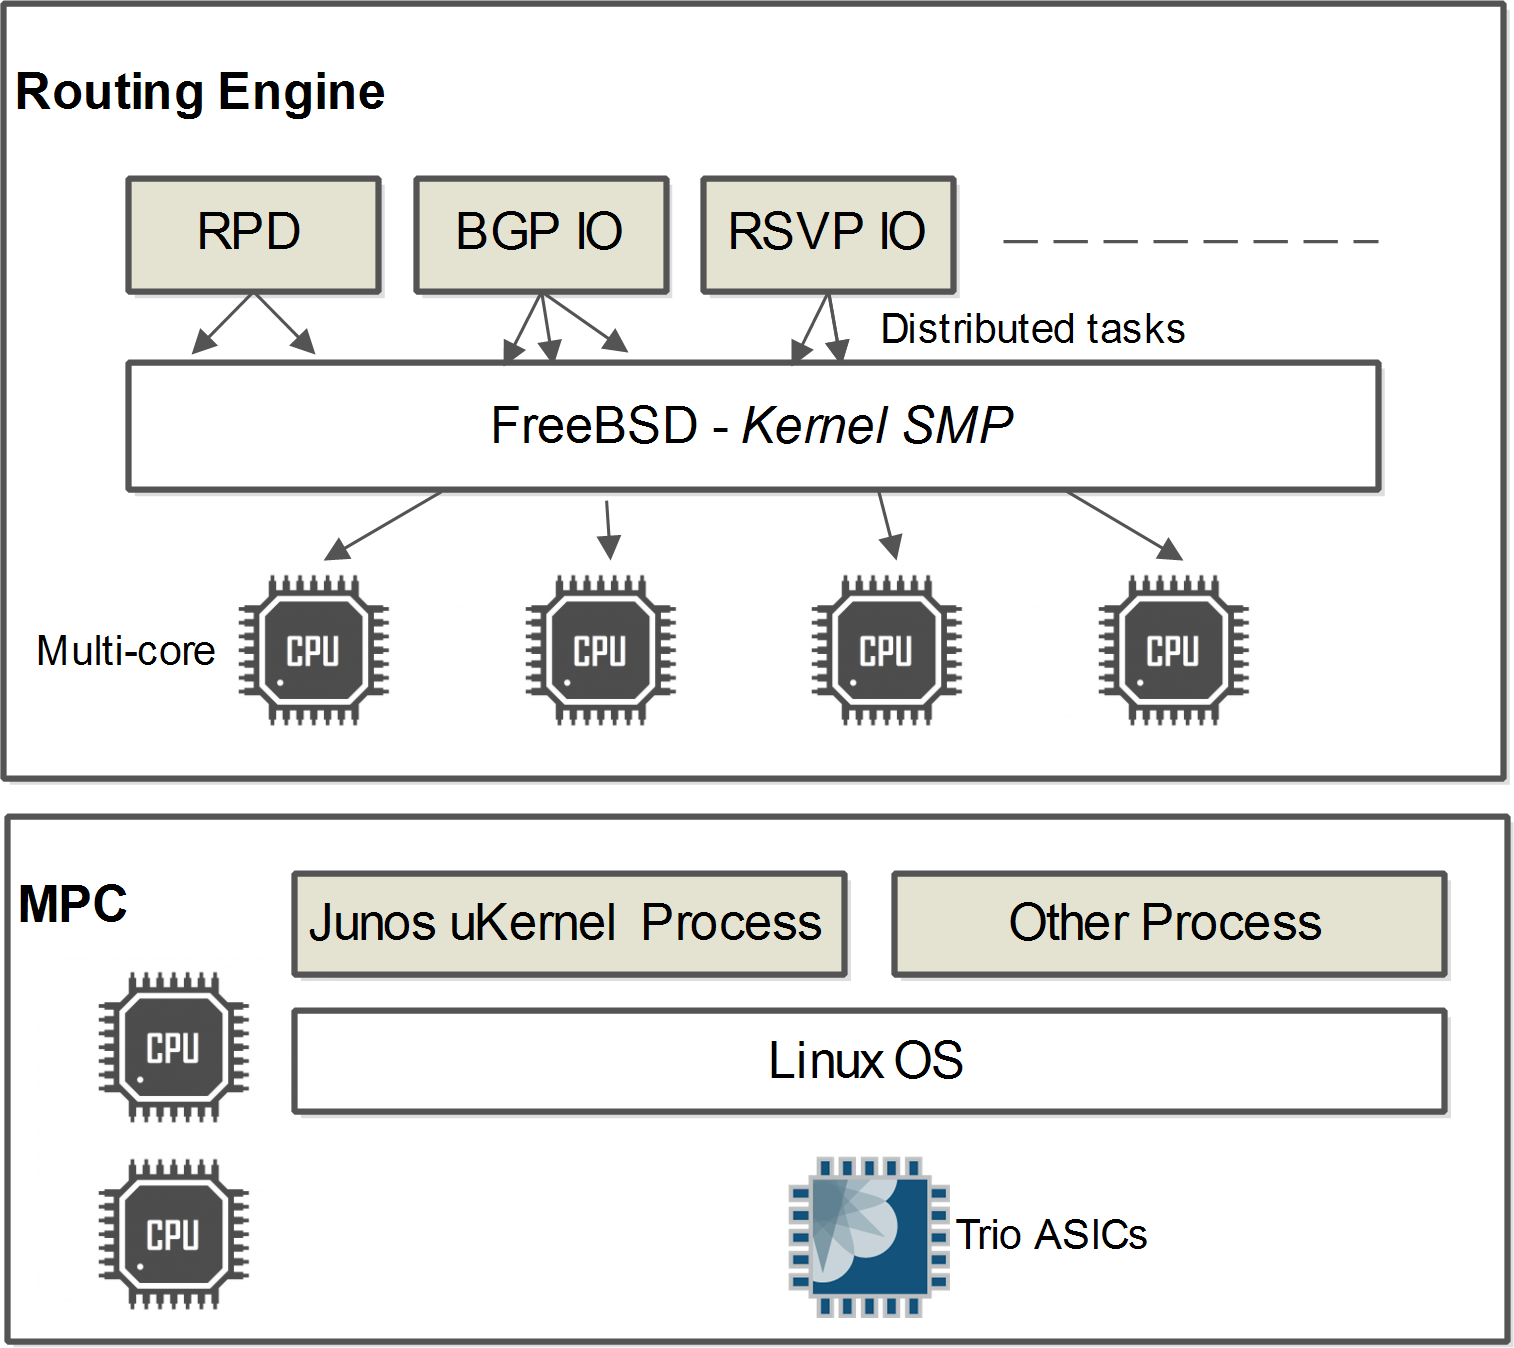
Figure 1-7. Junos modernization
Juniper MX Chassis
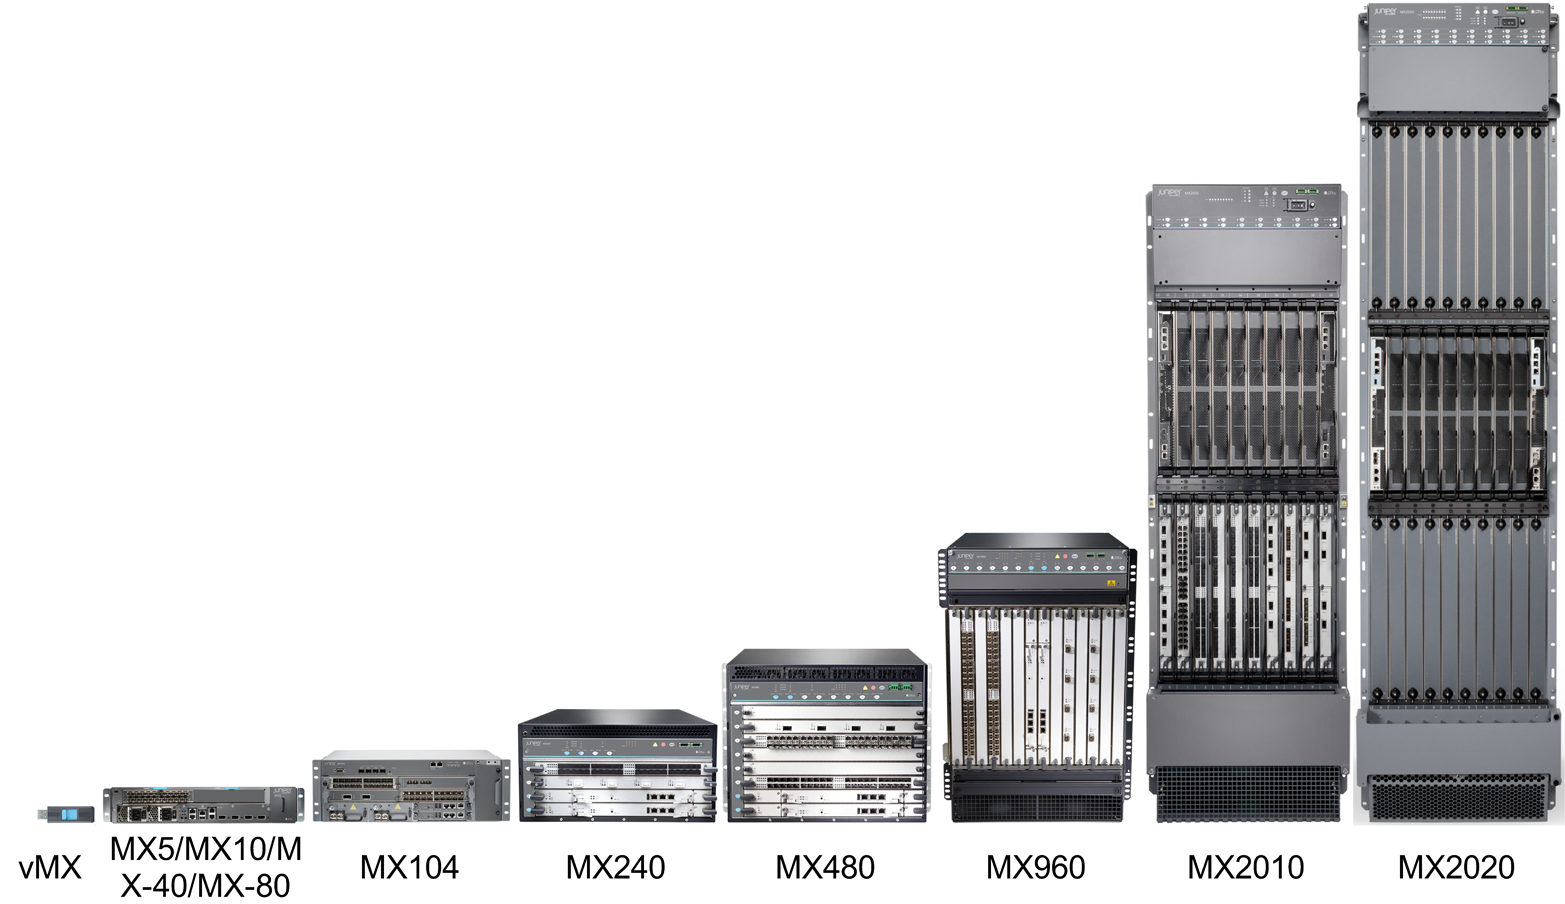
Figure 1-8. Juniper MX family
Ranging from virtual MX (vMX) to 45U, the MX comes in many shapes and configurations. From left to right: vMX, MX5/10/40/80, MX104, MX240, MX480, MX960, MX2010, and MX2020. The MX240 and higher models have chassis that house all components such as line cards, Routing Engines, and switching fabrics. The MX104 and below are considered midrange and only accept interface modules.
| Model | DPC capacity | MPC capacity |
|---|---|---|
| vMX | N/A | 160 Gbps |
| MX5 | N/A | 20 Gbps |
| MX10 | N/A | 40 Gbps |
| MX40 | N/A | 60 Gbps |
| MX80 | N/A | 80 Gbps |
| MX104 | N/A | 80 Gbps |
| MX240 | 240 Gbps | 1.92 Tbps |
| MX480 | 480 Gbps | 5.12 Tbps |
| MX960 | 960 Gbps | Scale up to 9.92 Tbps |
| MX2010 | N/A | Scale up to 40 Tbps |
| MX2020 | N/A | 80 Tbps |
Note
Note that the DPC and MPC capacity is based on current hardware—4x10GE DPC and MPC5e or MPC6e—and is subject to change in the future as new hardware is released. This information only serves as an example. Always check online at www.juniper.net for the latest specifications.
vMX
The book’s MX journey begins with the virtual MX or vMX. While vMX has a dedicated chapter in this book, it’s important to note here that vMX is not only a clone of the control plane entity of the classical Junos. vMX is a complete software router with, as its hardware “father,” a complete separation of the control plane and the forwarding plane. vMX is made of two virtual machines (VM):
VCP VM: Virtual Control Plane
VFP VM: Virtual Forwarding Plane
Both VMs run on top of a KVM hypervisor; moreover, the guest OS of the VCP virtual machine runs on FreeBSD and VFP on Linux. The two VMs communicate with each other through the virtual switch of the KVM host OS. Figure 1-9 illustrates the system architecture of the vMX. Chapter 11 describes each component and how the entity operates.
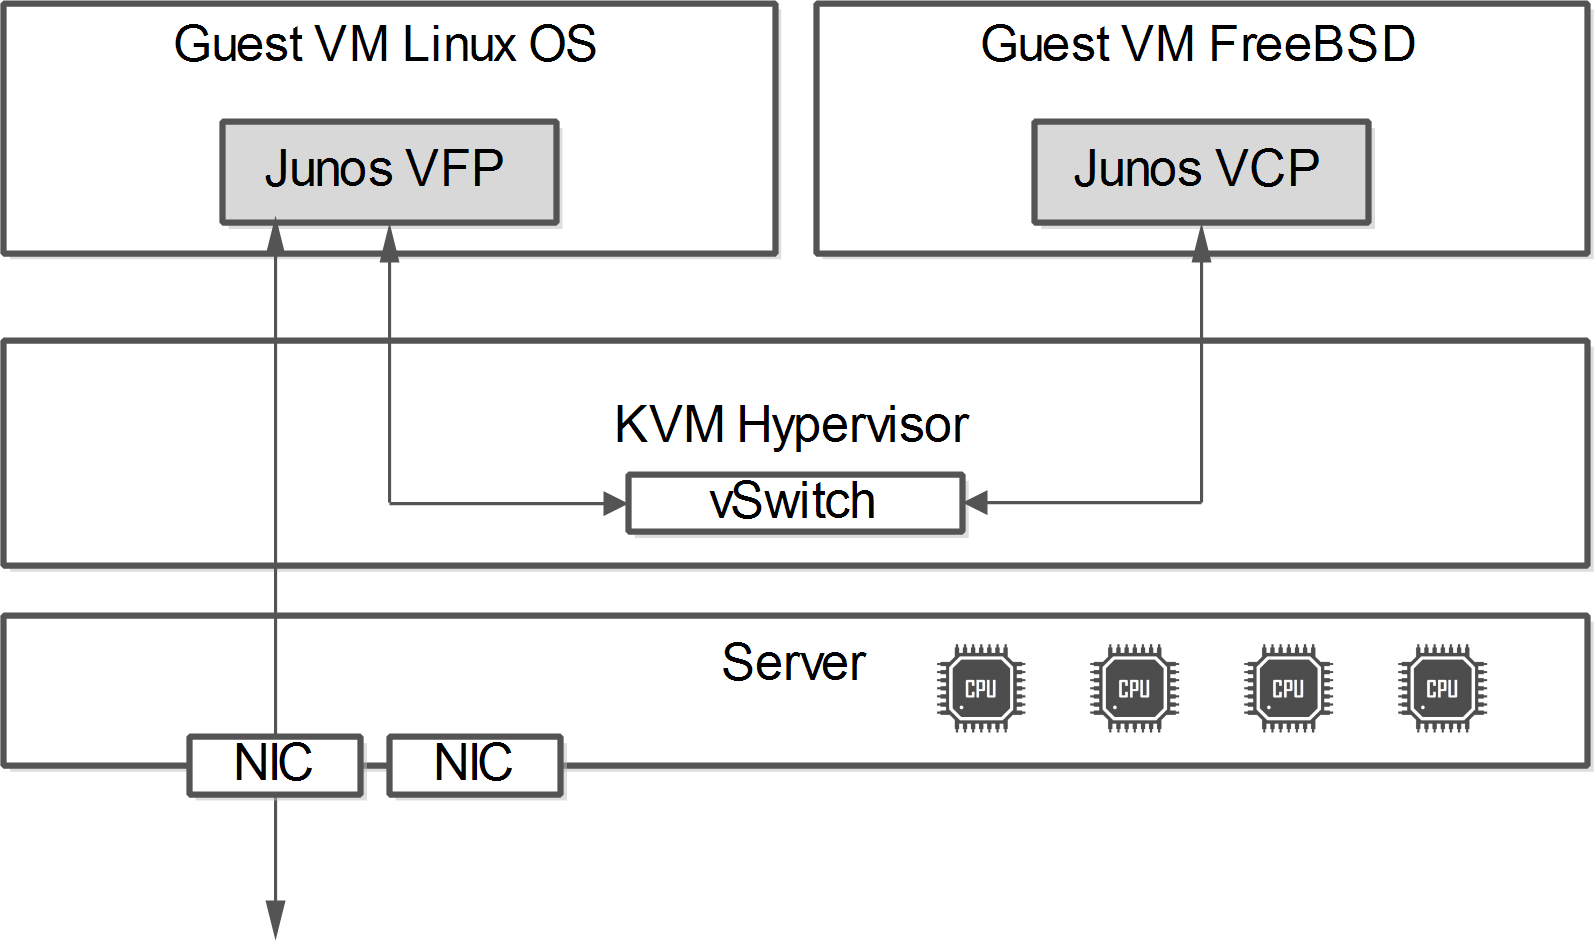
Figure 1-9. The vMX basic system architecture
MX80
The MX80 is a small, compact 2U router that comes in two models: the MX80 and MX80-48T. The MX80 supports two Modular Interface Cards (MICs), whereas the MX80-48T supports 48 10/100/1000BASE-T ports. Because of the small size of the MX80, all of the forwarding is handled by a single Trio chip and there’s no need for a switch fabric. The added bonus is that in lieu of a switch fabric, each MX80 comes with four fixed 10GE ports.

Figure 1-10. The Juniper MX80-48T supports 48x1000BASE-T and 4x10GE ports
Each MX80 comes with field-replaceable, redundant power supplies and fan trays. The power supplies come in both AC and DC. Because the MX80 is so compact, it doesn’t support slots for Routing Engines, Switch Control Boards (SCBs), or FPCs. The Routing Engine is built into the chassis and isn’t replaceable. The MX80 only supports MICs.
Note
The MX80 has a single Routing Engine and currently doesn’t support features such as NSR, NSB, and ISSU.
But don’t let the small size of the MX80 fool you. This is a true hardware-based router based on the Juniper Trio chipset. Here are some of the performance and scaling characteristics at a glance:
55 Mpps
1,000,000 IPv4 prefixes in the Forwarding Information Base (FIB)
4,000,000 IPv4 prefixes in the Routing Information Base (RIB)
16,000 logical interfaces (IFLs)
512,000 MAC addresses
MX80 interface numbering
The MX80 has two FPCs: FPC0 and FPC1. FPC0 will always be the four fixed 10GE ports located on the bottom right. The FPC0 ports are numbered from left to right, starting with xe-0/0/0 and ending with xe-0/0/3.
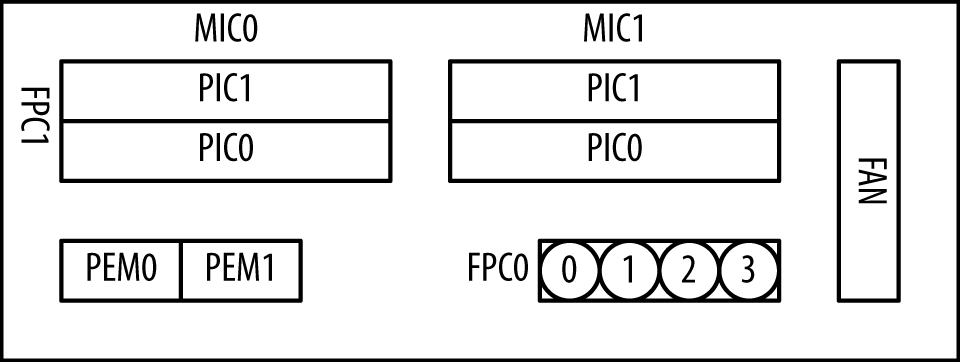
Figure 1-11. Juniper MX80 FPC and PIC locations
Note
The dual power supplies are referred to as a Power Entry Module (PEM): PEM0 and PEM1.
FPC1 is where the MICs are installed. MIC0 is installed on the left side and MIC1 is installed on the right side. Each MIC has two Physical Interface Cards (PICs). Depending on the MIC, such as a 20x1GE or 2x10GE, the total number of ports will vary. Regardless of the number of ports, the port numbering is left to right and always begins with 0.
MX80-48T interface numbering
The MX80-48T interface numbering is very similar to the MX80. FPC0 remains the same and refers to the four fixed 10GE ports. The only difference is that FPC1 refers to the 48x1GE ports. FPC1 contains four PICs; the numbering begins at the bottom left, works its way up, and then shifts to the right starting at the bottom again. Each PIC contains 12x1GE ports numbered 0 through 11.
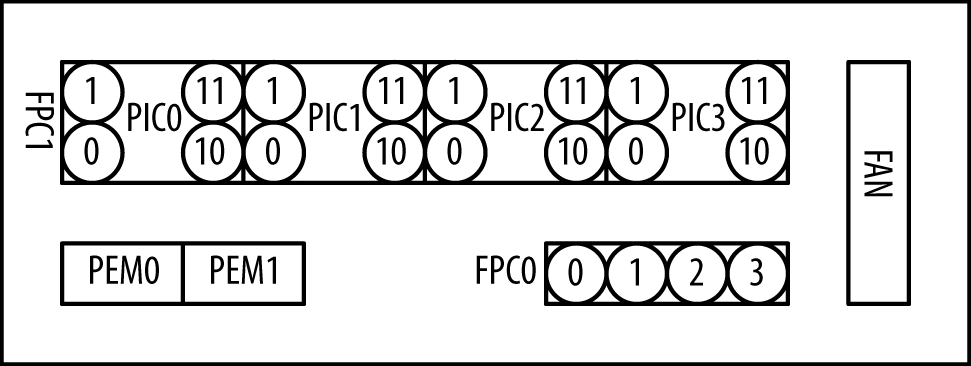
Figure 1-12. Juniper MX80-48T FPC and PIC locations
| FPC | PIC | Interface names |
|---|---|---|
| FPC0 | PIC0 | xe-0/0/0 through xe-0/0/3 |
| FPC1 | PIC0 | ge-1/0/0 through ge-1/0/11 |
| FPC1 | PIC1 | ge-1/1/0 through ge-1/1/11 |
| FPC1 | PIC2 | ge-1/2/0 through ge-1/2/11 |
| FPC1 | PIC3 | ge-1/3/0 through ge-1/3/11 |
With each PIC within FPC1 having 12x1GE ports and a total of four PICs, this brings the total to 48x1GE ports.
The MX80-48T has a fixed 48x1GE and 4x10GE ports and doesn’t support MICs. These ports are tied directly to a single Trio chip as there is no switch fabric.
Midrange

Figure 1-13. Juniper MX5
If the MX80 is still too big of a router, there are licensing options to restrict the number of ports on the MX80. The benefit is that you get all of the performance and scaling of the MX80, but at a fraction of the cost. These licensing options are known as the MX Midrange: the MX5, MX10, MX40, and MX80.
| Model | MIC slot 0 | MIC slot 1 | Fixed 10GE ports | Services MIC |
|---|---|---|---|---|
| MX5 | Available | Restricted | Restricted | Available |
| MX10 | Available | Available | Restricted | Available |
| MX40 | Available | Available | Two ports available | Available |
| MX80 | Available | Available | All four ports available | Available |
Each router is software upgradable via a license. For example, the MX5 can be upgraded to the MX10 or directly to the MX40 or MX80.
When terminating a small number of circuits or Ethernet handoffs, the MX5 through the MX40 are the perfect choice. Although you’re limited in the number of ports, all of the performance and scaling numbers are identical to the MX80. For example, given the current size of a full Internet routing table is about 420,000 IPv4 prefixes, the MX5 would be able to handle over nine full Internet routing tables.
Keep in mind that the MX5, MX10, and MX40 are really just an MX80. There is no difference in hardware, scaling, or performance. The only caveat is that the MX5, MX10, and MX40 use a different front view on the front of the router for branding.
The only restriction on the MX5, MX10, and MX40 are which ports are allowed to be configured. The software doesn’t place any sort of bandwidth restrictions on the ports at all. There’s a common misconception that the MX5 is a “5-gig router,” but this isn’t the case. For example, the MX5 comes with a 20x1GE MIC and is fully capable of running each port at line rate.
MX104
The MX104 is a high-density router for pre-aggregation and access. It was designed to be compact and compatible with floor-to-ceiling racks. Even if it was optimized for aggregating mobile traffic, the MX104 is also useful as a PE for Enterprise and residential access networks.
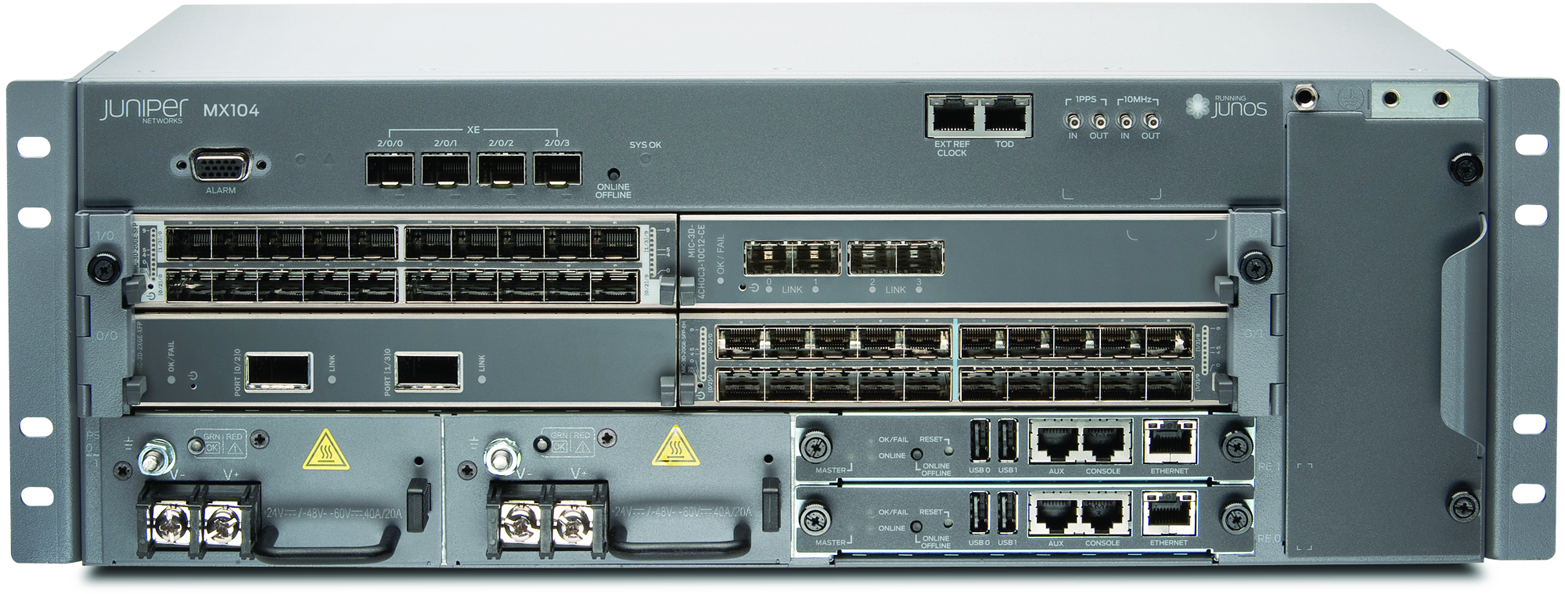
Figure 1-14. Juniper MX104
The MX104 provides redundancy for power and the Routing Engine. The chassis offers four slots to host MICs—these MICs are compatible with those available for the MX5/MX10/MX40 and MX80 routers. The MX104 also provides four built-in 10-Gigabit Ethernet SFP+ ports.
Interface numbering
Each MX104 router has three built-in MPCs, which are represented in the CLI as FPC 0 through FPC 2. The numbering of the MPCs is from bottom to top. MPC 0 and 1 can both host two MICs. MPC 2 hosts a built-in MIC with four 10GE ports. Figure 1-15 illustrates interface numbering on the MX104.
Note
Each MIC can number ports differently, and Figure 1-15 illustrates two types of MICs as examples.
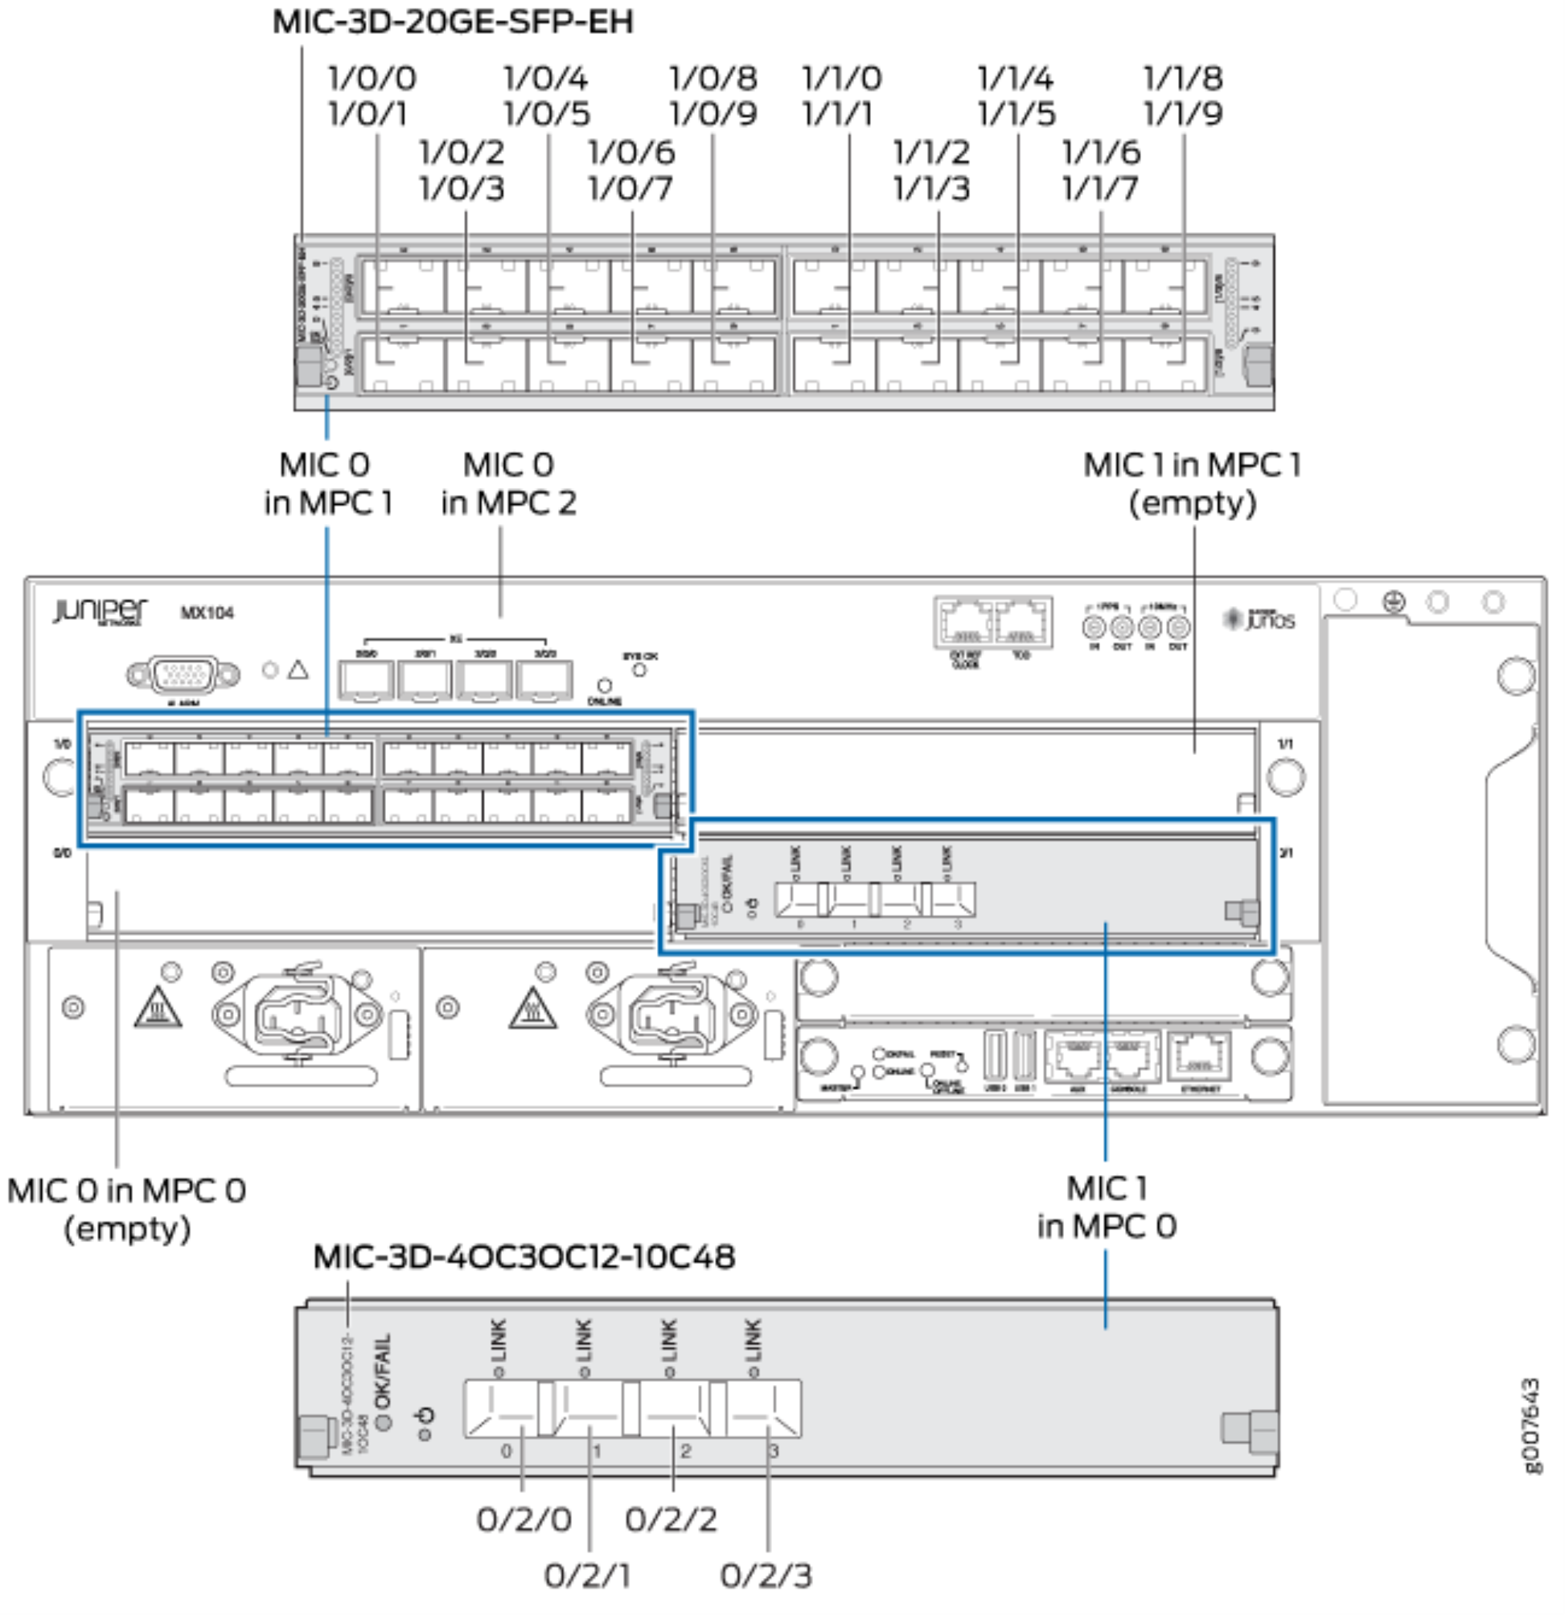
Figure 1-15. Juniper MX104 interface numbering
MX240
The MX240 (see Figure 1-16) is the first router in the MX Series lineup that has a chassis supporting modular Routing Engines, SCBs, and FPCs. The MX240 is 5U tall and supports four horizontal slots. There’s support for one Routing Engine, or optional support for two Routing Engines. Depending on the number of Routing Engines, the MX240 supports either two or three FPCs.
Note
The Routing Engine is installed into an SCB and will be described in more detail later in the chapter.
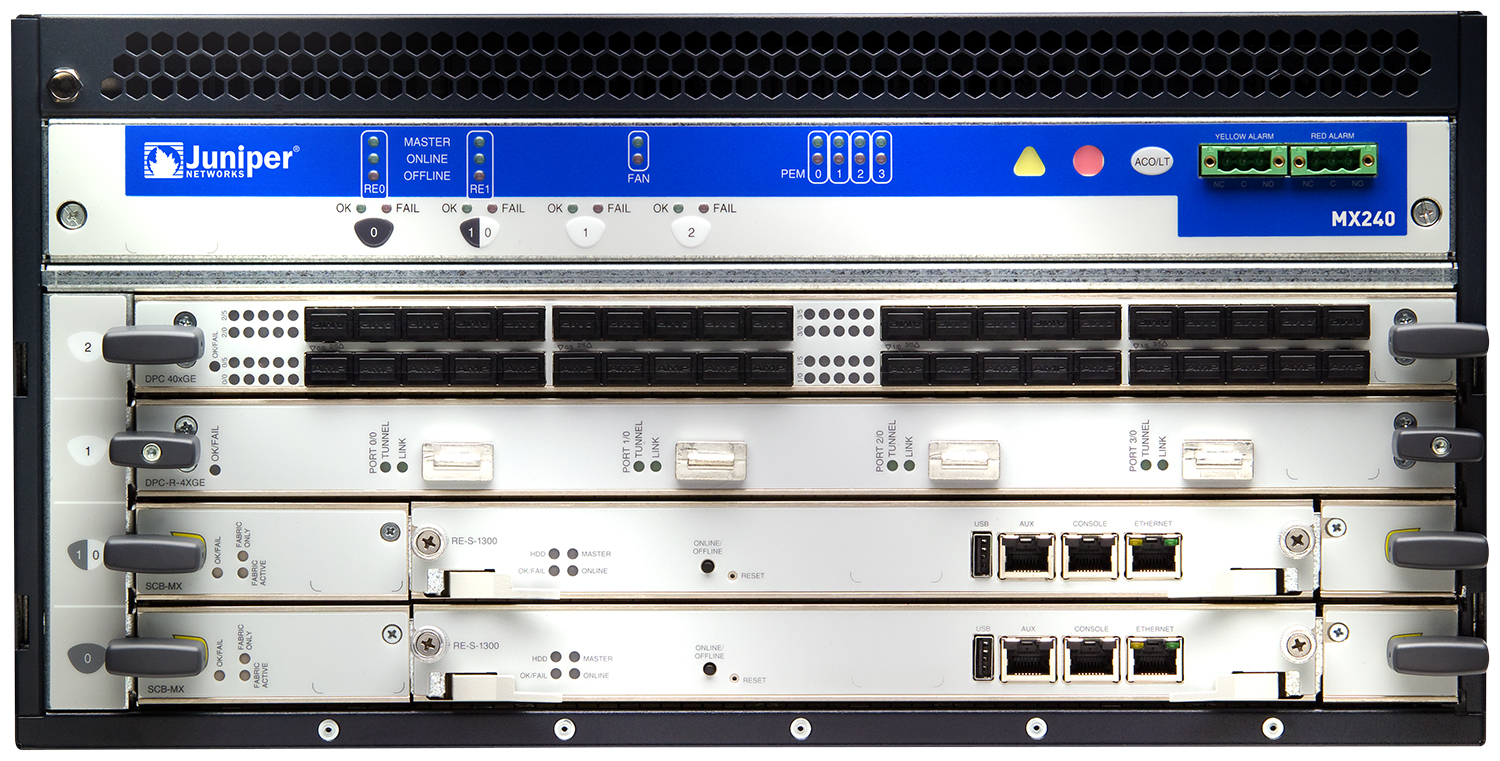
Figure 1-16. Juniper MX240
To support full redundancy, the MX240 requires two SCBs and Routing Engines. If a single SCB fails, there is enough switch fabric capacity on the other SCB to support the entire router at line rate. This is referred to as 1 + 1 SCB redundancy. In this configuration, only two FPCs are supported.
Alternatively, if redundancy isn’t required, the MX240 can be configured to use a single SCB and Routing Engine. This configuration allows for three FPCs instead of two.
Interface numbering
The MX240 is numbered from the bottom up starting with the SCB. The first SCB must be installed into the very bottom slot. The next slot up is a special slot that supports either a SCB or FPC, and thus begins the FPC numbering at 0. From there, you may install two additional FPCs as FPC1 and FPC2.
Full redundancy
The SCBs must be installed into the very bottom slots to support 1 + 1 SCB redundancy (see Figure 1-17). These slots are referred to as SCB0 and SCB1. When two SCBs are installed, the MX240 supports only two FPCs: FPC1 and FPC2.
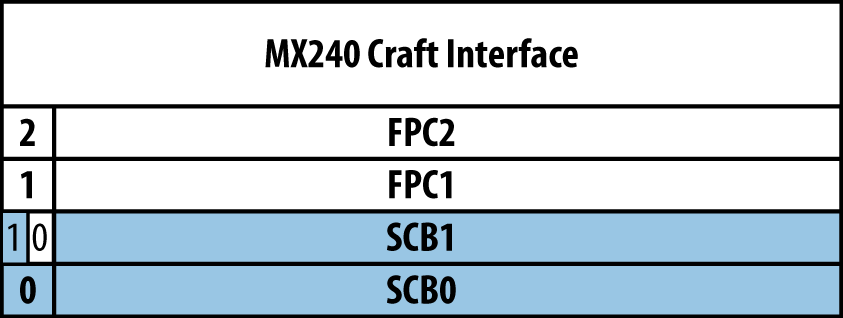
Figure 1-17. Juniper MX240 interface numbering with SCB redundancy
No redundancy
When a single SCB is used, it must be installed into the very bottom slot and obviously doesn’t provide any redundancy; however, three FPCs are supported. In this configuration, the FPC numbering begins at FPC0 and ends at FPC2, as shown in Figure 1-18.
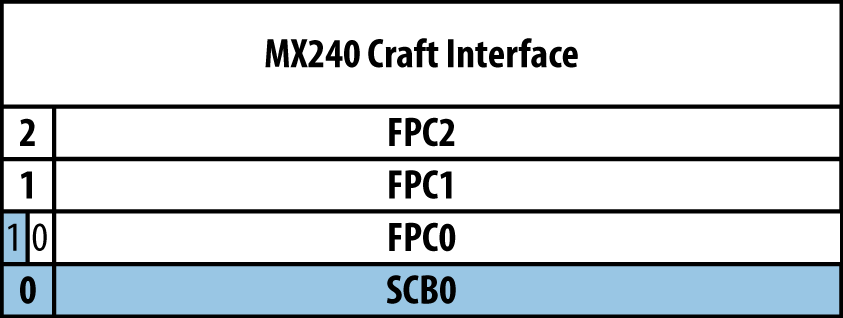
Figure 1-18. Juniper MX240 interface numbering without SCB redundancy
MX480
The MX480 is the big brother to the MX240. There are eight horizontal slots total. It supports two SCBs and Routing Engines as well as six FPCs in only 8U of space. The MX480 tends to be the most popular MX Series in Enterprise because six slots tends to be the “sweet spot” for the number of slots (see Figure 1-19).
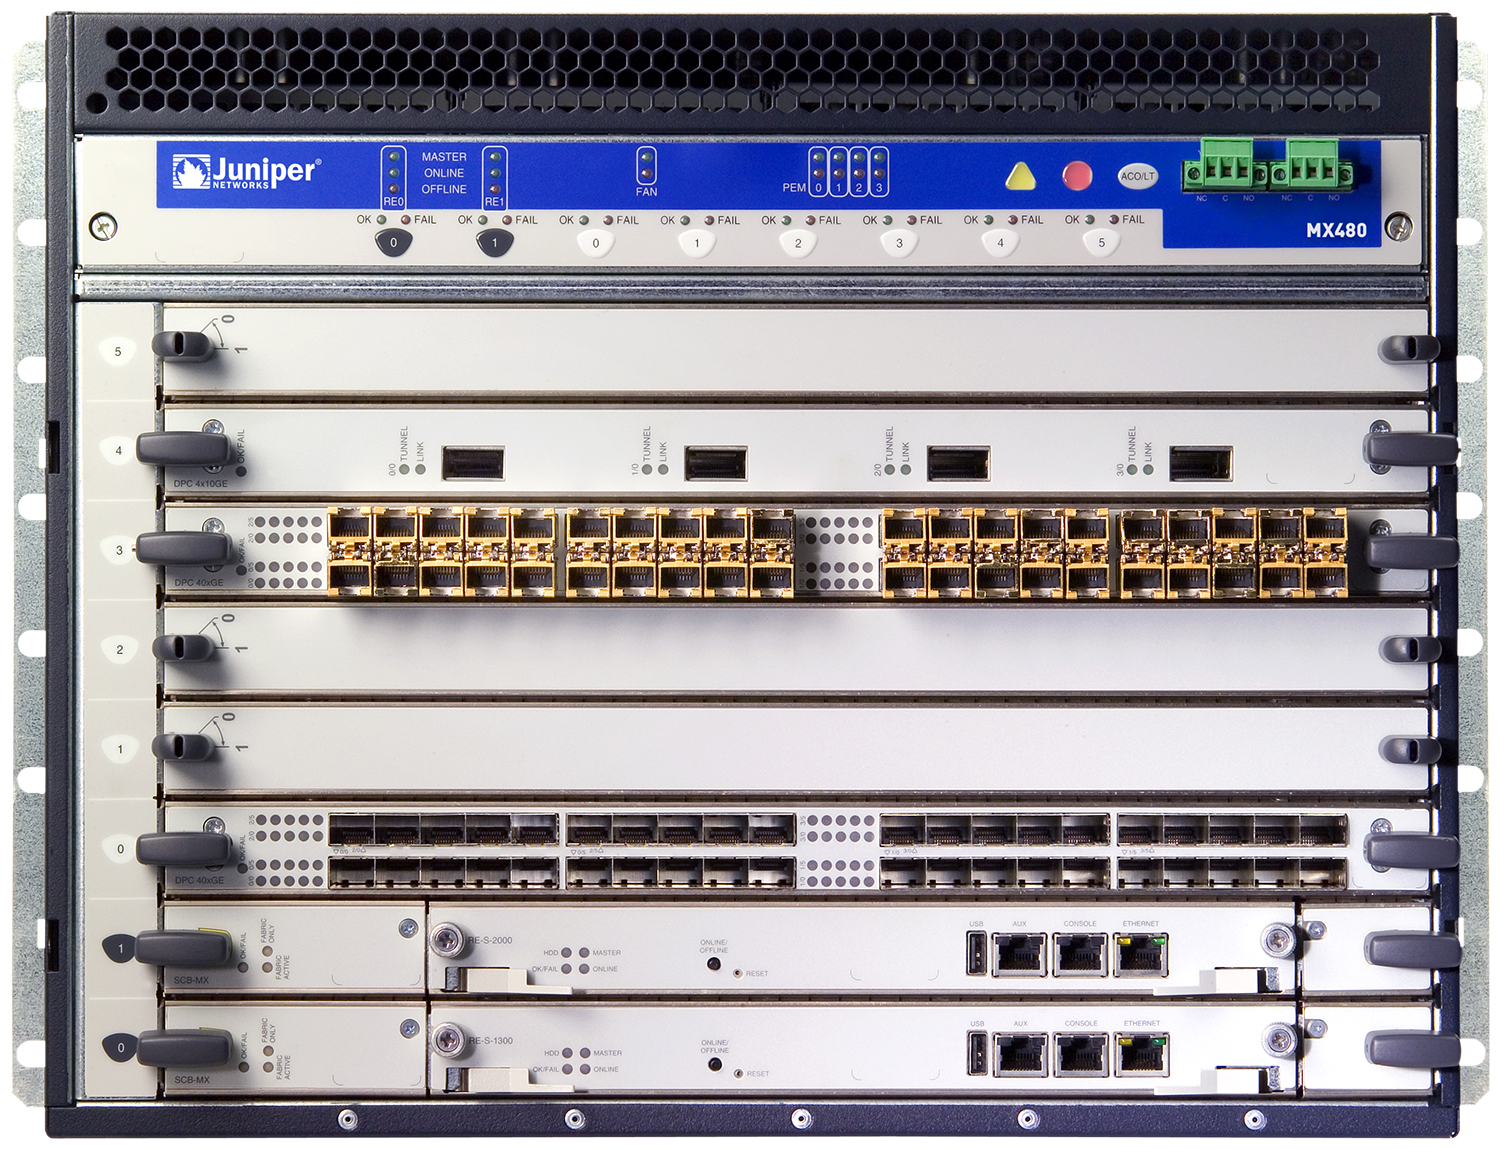
Figure 1-19. Juniper MX480
Like its little brother, the MX480 requires two SCBs and Routing Engines for full redundancy. If a single SCB were to fail, the other SCB would be able to support all six FPCs at line rate.
All components between the MX240 and MX480 are interchangeable. This makes the sparing strategy cost effective and provides FPC investment protection.
Note
There is custom keying on the SCB and FPC slots so that an SCB cannot be installed into an FPC slot and vice versa. In the case where the chassis supports either an SCB or FPC in the same slot, such as the MX240 or MX960, the keying will allow for both.
The MX480 is a bit different from the MX240 and MX960, as it has two dedicated SCB slots that aren’t able to be shared with FPCs.
Interface numbering
The MX480 is numbered from the bottom up (see Figure 1-20). The SCBs are installed into the very bottom of the chassis into SCB0 and SCB1. From there, the FPCs may be installed and are numbered from the bottom up as well.
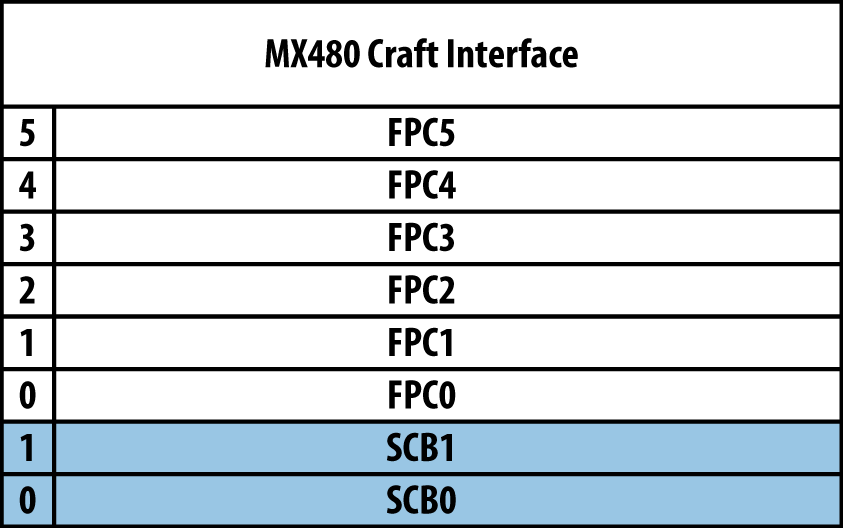
Figure 1-20. Juniper MX480 interface numbering with SCB redundancy
MX960
Some types of traffic require a big hammer. The MX960, the sledgehammer of the MX Series, fills this need. The MX960 is all about scale and performance. It stands at 16U and weighs in at 334 lbs. The SCBs and FPCs are installed vertically into the chassis so that it can support 14 slots side to side.
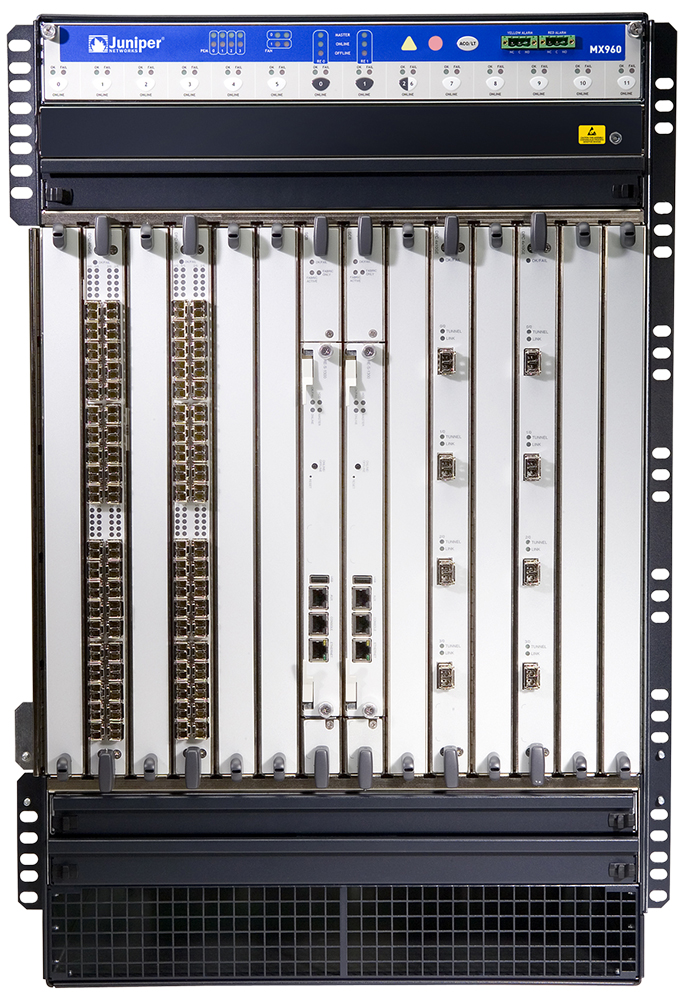
Figure 1-21. Juniper MX960
Because of the large scale, three SCBs are required for full redundancy. This is referred to as 2 + 1 SCB redundancy. If any SCB fails, the other two SCB are able to support all 11 FPCs at line rate.
If you like living life on the edge and don’t need redundancy, the MX960 requires at least two SCBs to switch the available 12 FPCs.
Note
The MX960 requires special power supplies that are not interchangeable with the MX240 or MX480.
Interface numbering
The MX960 is numbered from the left to the right. The SCBs are installed in the middle, whereas the FPCs are installed on either side. Depending on whether or not you require SCB redundancy, the MX960 is able to support 11 or 12 FPCs.
Full redundancy
The first six slots are reserved for FPCs and are numbered from left to right beginning at 0 and ending with 5, as shown in Figure 1-22. The next two slots are reserved and keyed for SCBs. The next slot is keyed for either an SCB or FPC. In the case of full redundancy, SCB2 needs to be installed into this slot. The next five slots are reserved for FPCs and begin numbering at 7 and end at 11.
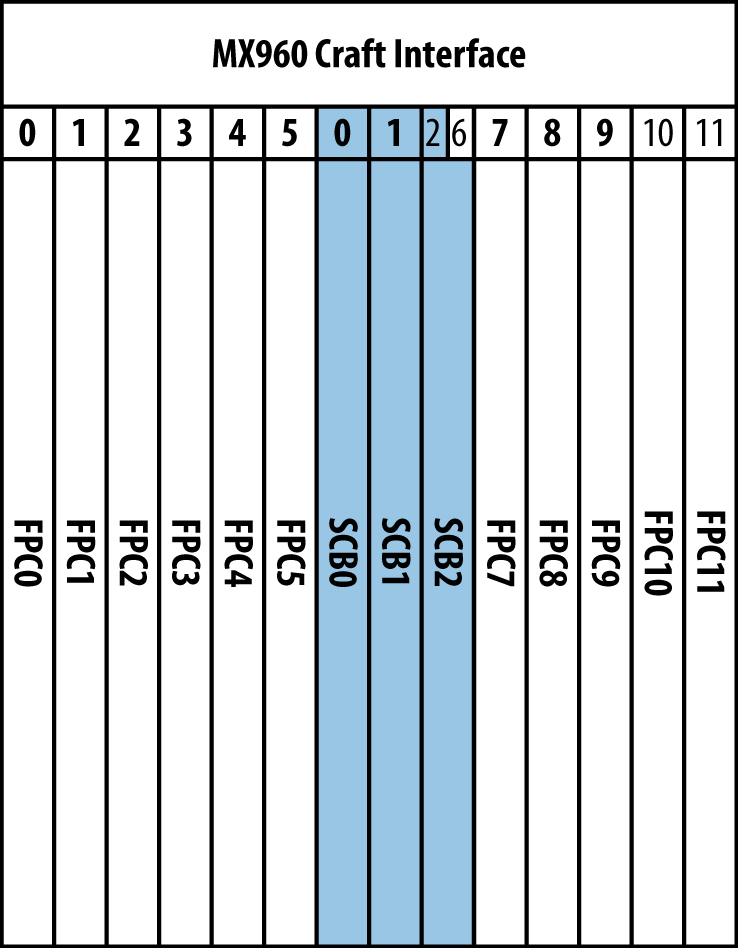
Figure 1-22. Juniper MX960 interface numbering with full 2 + 1 SCB redundancy
No redundancy
Running with two SCBs gives you the benefit of being able to switch 12 FPCs at line rate. The only downside is that there’s no SCB redundancy. Just like before, the first six slots are reserved for FPC0 through FPC5. The difference now is that SCB0 and SCB1 are to be installed into the next two slots. Instead of having SCB2, you install FPC6 into this slot. The remaining five slots are reserved for FPC7 through FPC11.
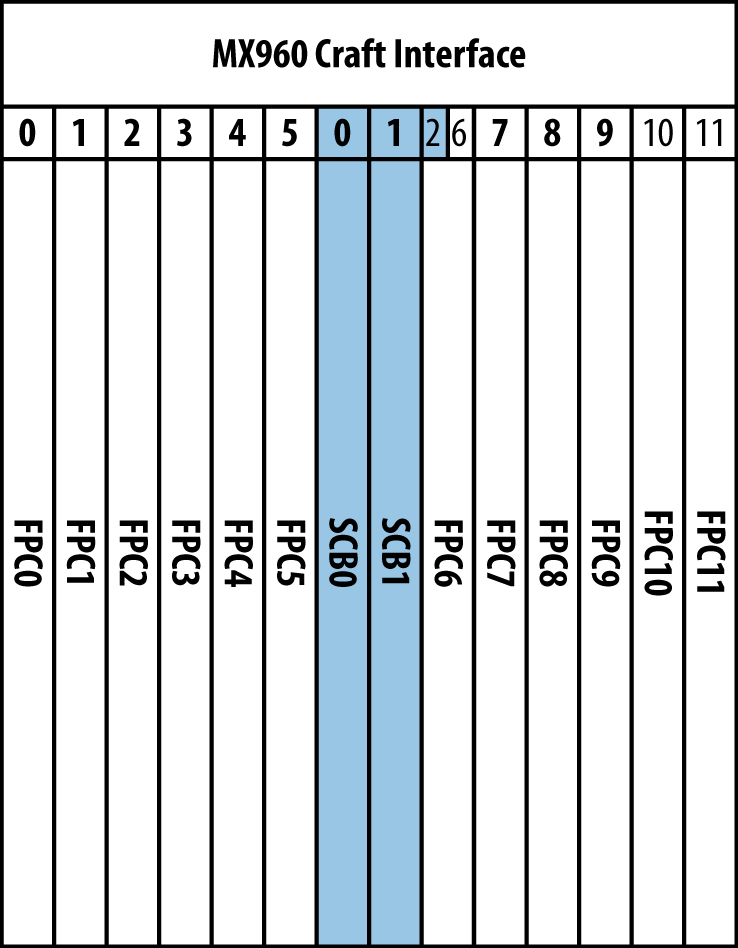
Figure 1-23. Juniper MX960 interface numbering without SCB redundancy
MX2010 and MX2020
The MX2K family (MX2010 and MX2020) is a router family in the MX Series that’s designed to solve the 10G and 100G high port density needs of Content Service Providers (CSP), Multisystem Operators (MSO), and traditional Service Providers. At a glance, the MX2010 supports ten line cards, eight switch fabric boards, and two Routing Engines, and its big brother the MX2020 supports twenty line cards, eight switch fabric boards, and two Routing Engines as well.
The chassis occupies 34RU for MX2010 and 45RU for MX2020 and has front-to-back cooling.
MX2020 architecture
The MX2020 is a standard backplane-based system, albeit at a large scale. There are two backplanes connected together with centralized switch fabric boards (SFB). The Routing Engine and control board is a single unit that consumes a single slot, as illustrated in Figure 1-24 on the far left and right.
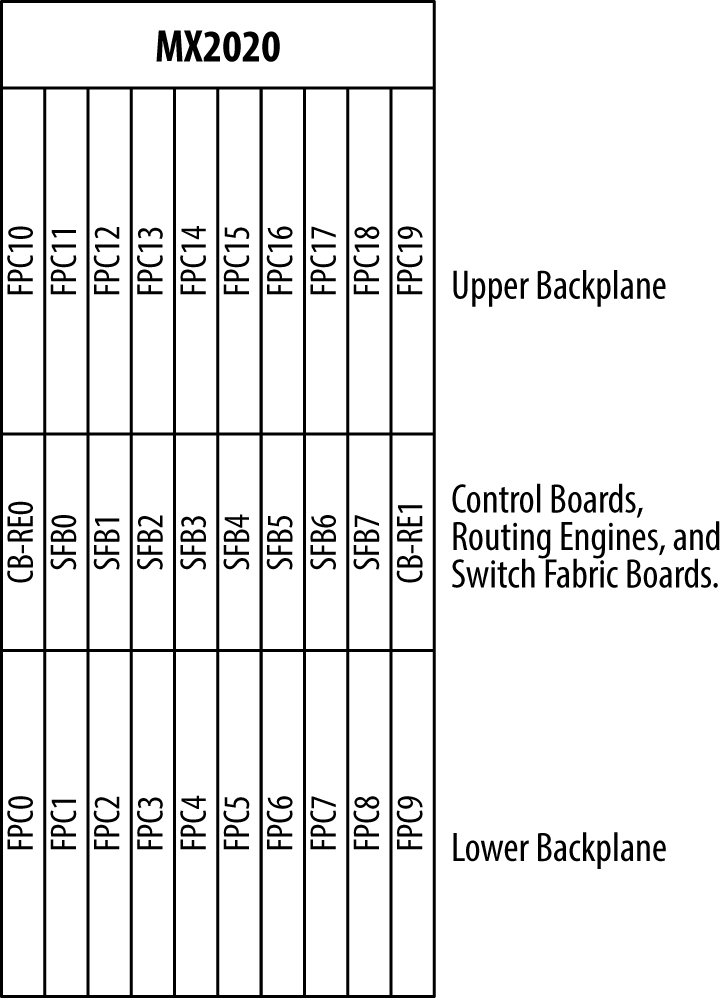
Figure 1-24. Illustration of MX2020 architecture
The FPC numbering is the standard Juniper method of starting at the bottom and moving left to right as you work your way up. The SFBs are named similarly, with zero starting on the left and going all the way to seven on the far right. The Routing Engine and control boards are located in the middle of the chassis on the far left and far right.
Switch fabric board
Each backplane has 10 slots that are tied into eight SFBs in the middle of the chassis. Because of the high number of line cards and PFEs the switch fabric must support, a new SFB was created specifically for the MX2020. The SFB is able to support more PFEs and has a much higher throughput compared to the previous SCBs. Recall that the SCB and SCBE presents its chipsets to Junos as a fabric plane and can be seen with the show chassis fabric summary command—the new SFB has multiple chipsets as well, but presents them as an aggregate fabric plane to Junos. In other words, each SFB will appear as a single fabric plane within Junos. Each SFB will be in an Active state by default. Let’s take a look at the installed SFBs first:
dhanks@MX2020> show chassis hardware | match SFB
SFB 0            REV 01   711-032385   ZE5866            Switch Fabric Board
SFB 1            REV 01   711-032385   ZE5853            Switch Fabric Board
SFB 2            REV 01   711-032385   ZB7642            Switch Fabric Board
SFB 3            REV 01   711-032385   ZJ3555            Switch Fabric Board
SFB 4            REV 01   711-032385   ZE5850            Switch Fabric Board
SFB 5            REV 01   711-032385   ZE5870            Switch Fabric Board
SFB 6            REV 04   711-032385   ZV4182            Switch Fabric Board
SFB 7            REV 01   711-032385   ZE5858            Switch Fabric Board
There are eight SFBs installed; now let’s take a look at the switch fabric status:
dhanks@MX2020> show chassis fabric summary
Plane   State    Uptime
 0      Online   1 hour, 25 minutes, 59 seconds
 1      Online   1 hour, 25 minutes, 59 seconds
 2      Online   1 hour, 25 minutes, 59 seconds
 3      Online   1 hour, 25 minutes, 59 seconds
 4      Online   1 hour, 25 minutes, 59 seconds
 5      Online   1 hour, 25 minutes, 59 seconds
 6      Online   1 hour, 25 minutes, 59 seconds
 7      Online   1 hour, 25 minutes, 59 seconds
Depending on which line cards are being used, only a subset of the eight SFBs need to be present in order to provide a line-rate switch fabric, but this is subject to change with line cards.
Power supply
The power supply on the MX2020 is a bit different than the previous MX models, as shown in Figure 1-25. The MX2020 power system is split into two sections: top and bottom. The bottom power supplies provide power to the lower backplane line cards, lower fan trays, SFBs, and CB-REs. The top power supplies provide power to the upper backplane line cards and fan trays. The MX2020 provides N + 1 power supply redundancy and N + N feed redundancy. There are two major power components that supply power to the MX2K:
- Power Supply Module
The Power Supply Modules (PSMs) are the actual power supplies that provide power to a given backplane. There are nine PSMs per backplane, but only eight are required to fully power the backplane. Each backplane has 8 + 1 PSM redundancy.
- Power Distribution Module
There are two Power Distribution Modules (PDM) per backplane, providing 1 + 1 PDM redundancy for each backplane. Each PDM contains nine PSMs to provide 8 + 1 PSM redundancy for each backplane.
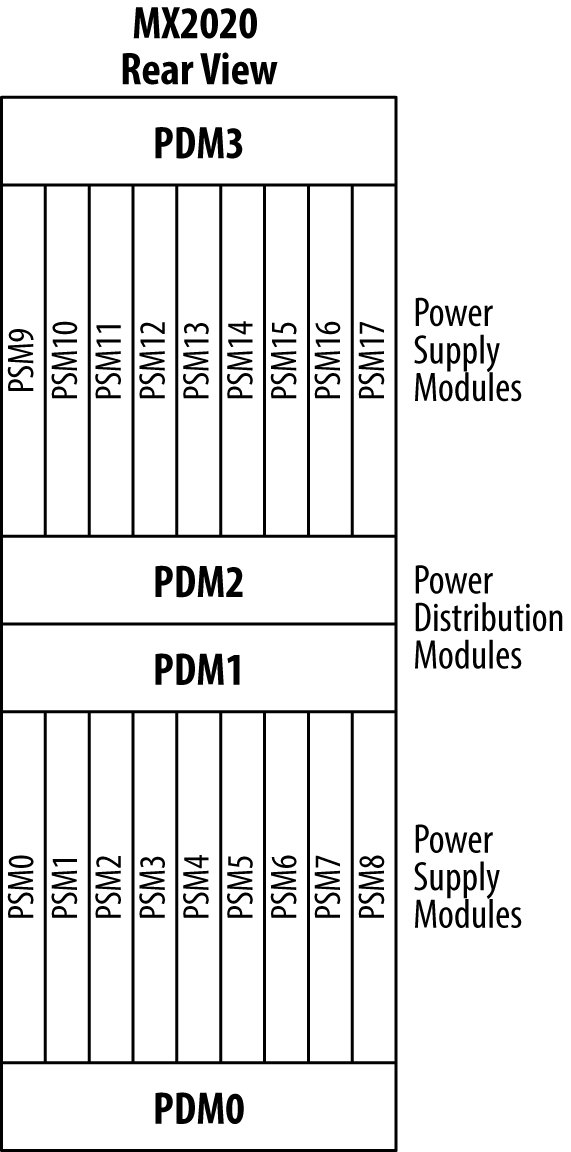
Figure 1-25. Illustration of MX2020 power supply architecture
Air flow
The majority of data centers support hot and cold aisles, which require equipment with front-to-back cooling to take advantage of the airflow. The MX2020 does support front-to-back cooling and does so in two parts, as illustrated in Figure 1-26. The bottom inlet plenum supplies cool air from the front of the chassis and the bottom fan trays force the cool air through the bottom line cards; the air is then directed out of the back of the chassis by a diagonal airflow divider in the middle card cage. The same principal applies to the upper section. The middle inlet plenum supplies cool air from the front of the chassis and the upper fan trays push the cool air through the upper card cage; the air is then directed out the back of the chassis.
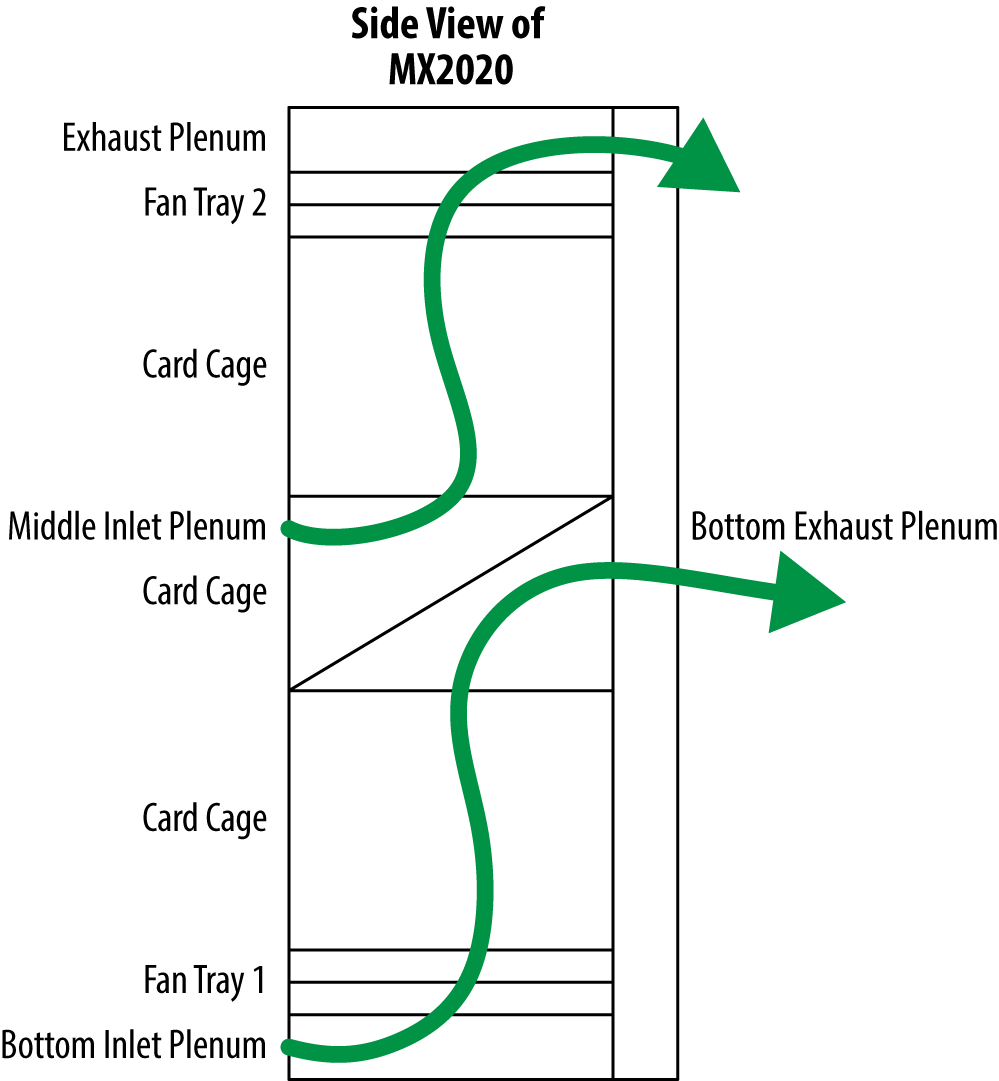
Figure 1-26. Illustration of MX2020 front-to-back air flow
Line card compatibility
The MX2020 is compatible with all Trio-based MPC line cards; however, there will be no backwards compatibility with the first-generation DPC line cards. The caveat is that the MPC1E, MPC2E, MPC3E, MPC4E, MPC5E, and MPC7E line cards will require a special MX2020 Line Card Adapter. The MX2020 can support up to 20 Adapter Cards (ADC) to accommodate 20 MPC1E through MPC7E line cards. Because the MX2020 uses a newer-generation SFB with faster bandwidth, line cards that were designed to work with the SCB and SCBE must use the ADC in the MX2020.
The ADC is merely a shell that accepts MPC1E through MPC7E line cards in the front and converts power and switch fabric in the rear. Future line cards built specifically for the MX2020 will not require the ADC. Let’s take a look at the ADC status with the show chassis adc command:
dhanks@MX2020> show chassis adc
Slot  State                            Uptime
 3    Online 6 hours, 2 minutes, 52 seconds
 4    Online 6 hours, 2 minutes, 46 seconds
 8    Online 6 hours, 2 minutes, 39 seconds
 9    Online 6 hours, 2 minutes, 32 seconds
11    Online 6 hours, 2 minutes, 26 seconds
16    Online 6 hours, 2 minutes, 19 seconds
17    Online 6 hours, 2 minutes, 12 seconds
18    Online 6 hours, 2 minutes, 5 seconds
In this example, there are eight ADC cards in the MX2020. Let’s take a closer look at FPC3 and see what type of line card is installed:
dhanks@MX2020> show chassis hardware | find "FPC 3"
FPC 3            REV 22   750-028467   YE2679            MPC 3D 16x 10GE
  CPU            REV 09   711-029089   YE2832            AMPC PMB
  PIC 0                   BUILTIN      BUILTIN           4x 10GE(LAN) SFP+
    Xcvr 0       REV 01   740-031980   B10M00015         SFP+-10G-SR
    Xcvr 1       REV 01   740-021308   19T511101037      SFP+-10G-SR
    Xcvr 2       REV 01   740-031980   AHK01AS           SFP+-10G-SR
  PIC 1                   BUILTIN      BUILTIN           4x 10GE(LAN) SFP+
  PIC 2                   BUILTIN      BUILTIN           4x 10GE(LAN) SFP+
    Xcvr 0       REV 01   740-021308   19T511100867      SFP+-10G-SR
  PIC 3                   BUILTIN      BUILTIN           4x 10GE(LAN) SFP+
The MPC-3D-16X10GE-SFPP is installed into FPC3 using the ADC for compatibility. Let’s check the environmental status of the ADC installed into FPC3:
dhanks@MX2020> show chassis environment adc | find "ADC 3"
ADC 3 status:
  State                      Online
  Intake Temperature         34 degrees C / 93 degrees F
  Exhaust Temperature        46 degrees C / 114 degrees F
  ADC-XF1 Temperature        51 degrees C / 123 degrees F
  ADC-XF0 Temperature        61 degrees C / 141 degrees F
Each ADC has two chipsets, as shown in the example output: ADC-XF1 and ADC-XF2. These chipsets convert the switch fabric between the MX2020 SFB and the MPC1E through MPC7E line cards.
Aside from the simple ADC carrier to convert power and switch fabric, the MPC-3D-16X10GE-SFPP line card installed into FPC3 works just like a regular line card with no restrictions. Let’s just double-check the interface names to be sure:
dhanks@MX2020> show interfaces terse | match xe-3
Interface               Admin Link Proto    Local                 Remote
xe-3/0/0                up    down
xe-3/0/1                up    down
xe-3/0/2                up    down
xe-3/0/3                up    down
xe-3/1/0                up    down
xe-3/1/1                up    down
xe-3/1/2                up    down
xe-3/1/3                up    down
xe-3/2/0                up    down
xe-3/2/1                up    down
xe-3/2/2                up    down
xe-3/2/3                up    down
xe-3/3/0                up    down
xe-3/3/1                up    down
xe-3/3/2                up    down
xe-3/3/3                up    down
Just as expected: the MPC-3D-16X10GE-SFPP line card has 16 ports of 10GE interfaces grouped into four PICs with four interfaces each.
The MPC6e is the first MX2K MPC which is not request ADC card. The MPC6e is a modular MPC that can host two high-density MICs. Each MIC slot has a 240Gbps full-duplex bandwidth capacity.
Trio
Juniper Networks prides itself on creating custom silicon and making history with silicon firsts. Trio is the latest milestone:
1998: First separation of control and data plane
1998: First implementation of IPv4, IPv6, and MPLS in silicon
2000: First line-rate 10 Gbps forwarding engine
2004: First multi-chassis router
2005: First line-rate 40 Gbps forwarding engine
2007: First 160 Gbps firewall
2009: Next generation silicon: Trio
2010: First 130 Gbps PFE; next generation Trio
2013: New generation of the lookup ASIC; XL chip upgrades to the PFE 260Gbps
2015: First “all-in-one” 480Gbps PFE ASIC: EAGLE (3rd generation of Trio)
Trio is a fundamental technology asset for Juniper that combines three major components: bandwidth scale, services scale, and subscriber scale (see Figure 1-27). Trio was designed from the ground up to support high-density, line-rate 10G and 100G ports. Inline services such as IPFIX, NAT, GRE, and BFD offer a higher level of quality of experience without requiring an additional services card. Trio offers massive subscriber scale in terms of logical interfaces, IPv4 and IPv6 routes, and hierarchical queuing.
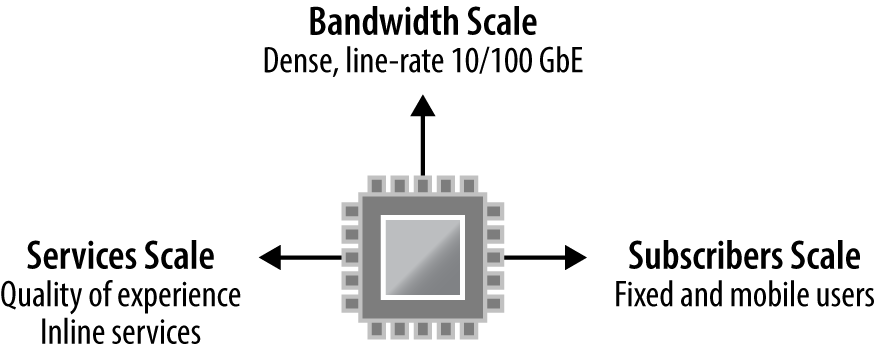
Figure 1-27. Juniper Trio scale: Services, bandwidth, and subscribers
Trio is built upon a Network Instruction Set Processor (NISP). The key differentiator is that Trio has the performance of a traditional ASIC, but the flexibility of a field-programmable gate array (FPGA) by allowing the installation of new features via software. Here is just an example of the inline services available with the Trio chipset:
Tunnel encapsulation and decapsulation
IP Flow Information Export
Network Address Translation
Bidirectional Forwarding Detection
Ethernet operations, administration, and management
Instantaneous Link Aggregation Group convergence
Trio Architecture
As shown in Figure 1-28, the Trio chipset is comprised of four major building blocks: Buffering, Lookup, Interfaces, and Dense Queuing. Depending on the Trio generation chipset, these blocks might be split into several hardware components or merge into the same chipset (which is the case for the latest generation of Trio chipsets as well as future upcoming versions).
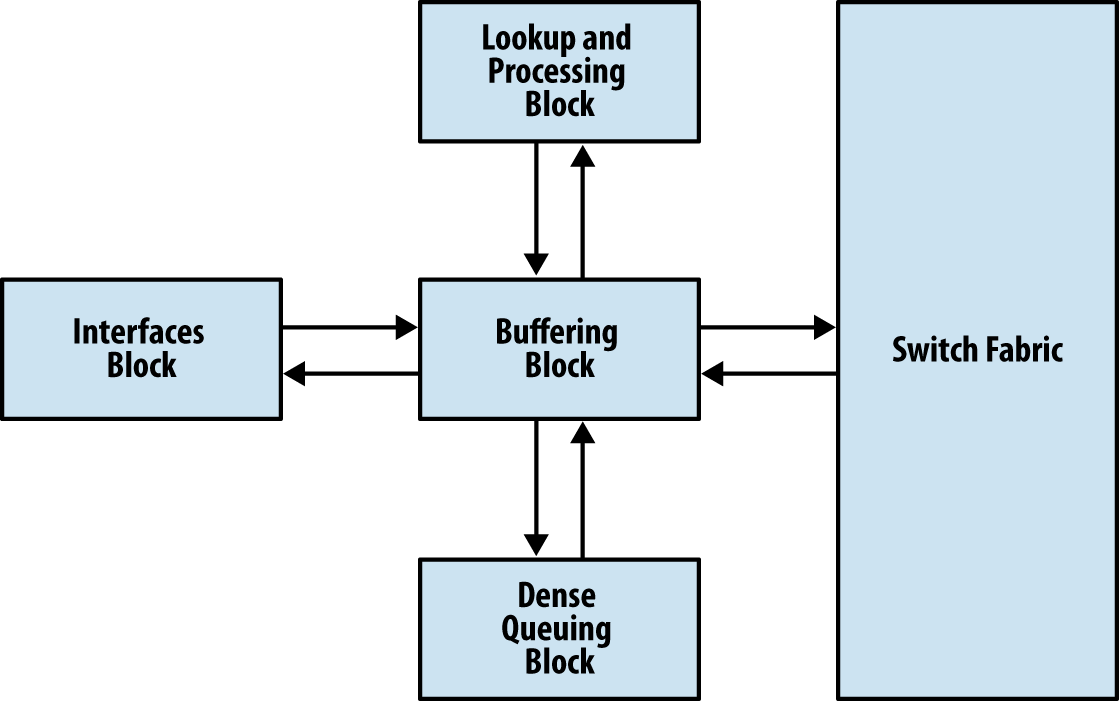
Figure 1-28. Trio functional blocks: Buffering, Lookup, Interfaces, and Dense Queuing
Each function is separated into its own block so that each function is highly optimized and cost efficient. Depending on the size and scale required, Trio is able to take these building blocks and create line cards that offer specialization such as hierarchical queuing or intelligent oversubscription.
Trio Generations
The Trio chipset has evolved in terms of scaling and features, but also in terms of the number of ASICs (see Figure 1-29):
The first generation of Trio was born with four specifics ASICs: IX (interface management for oversubscribed MIC), MQ (Buffering/Queuing Block), LU (Lookup Block), and QX (Dense Queuing Block). This first generation of Trio is found on MPC1, 2, and the 16x10GE MPCs.
The intermediate generation, called the 1.5 Generation, updated and increased the capacity of the buffering ASIC with the new generation of XM chipsets. This also marked the appearance of multi-LU MPCs, such as MPC3e and MPC4e.
The actual second generation of Trio enhanced the Lookup and Dense Queuing Blocks: the LU chip became the XL chip and the QX chip became the XQ, respectively. This second generation of Trio equips the MPC5e, MPC6e and the NG-MPC2e and NG-MPC3e line cards.
The third generation of Trio is a revolution. It embeds all the functional blocks in one ASIC. The Eagle ASIC, also known as the EA Chipset, is the first 480Gbits/s option in the marketplace and equips the new MPC7e, MPC8e, and MPC9e.
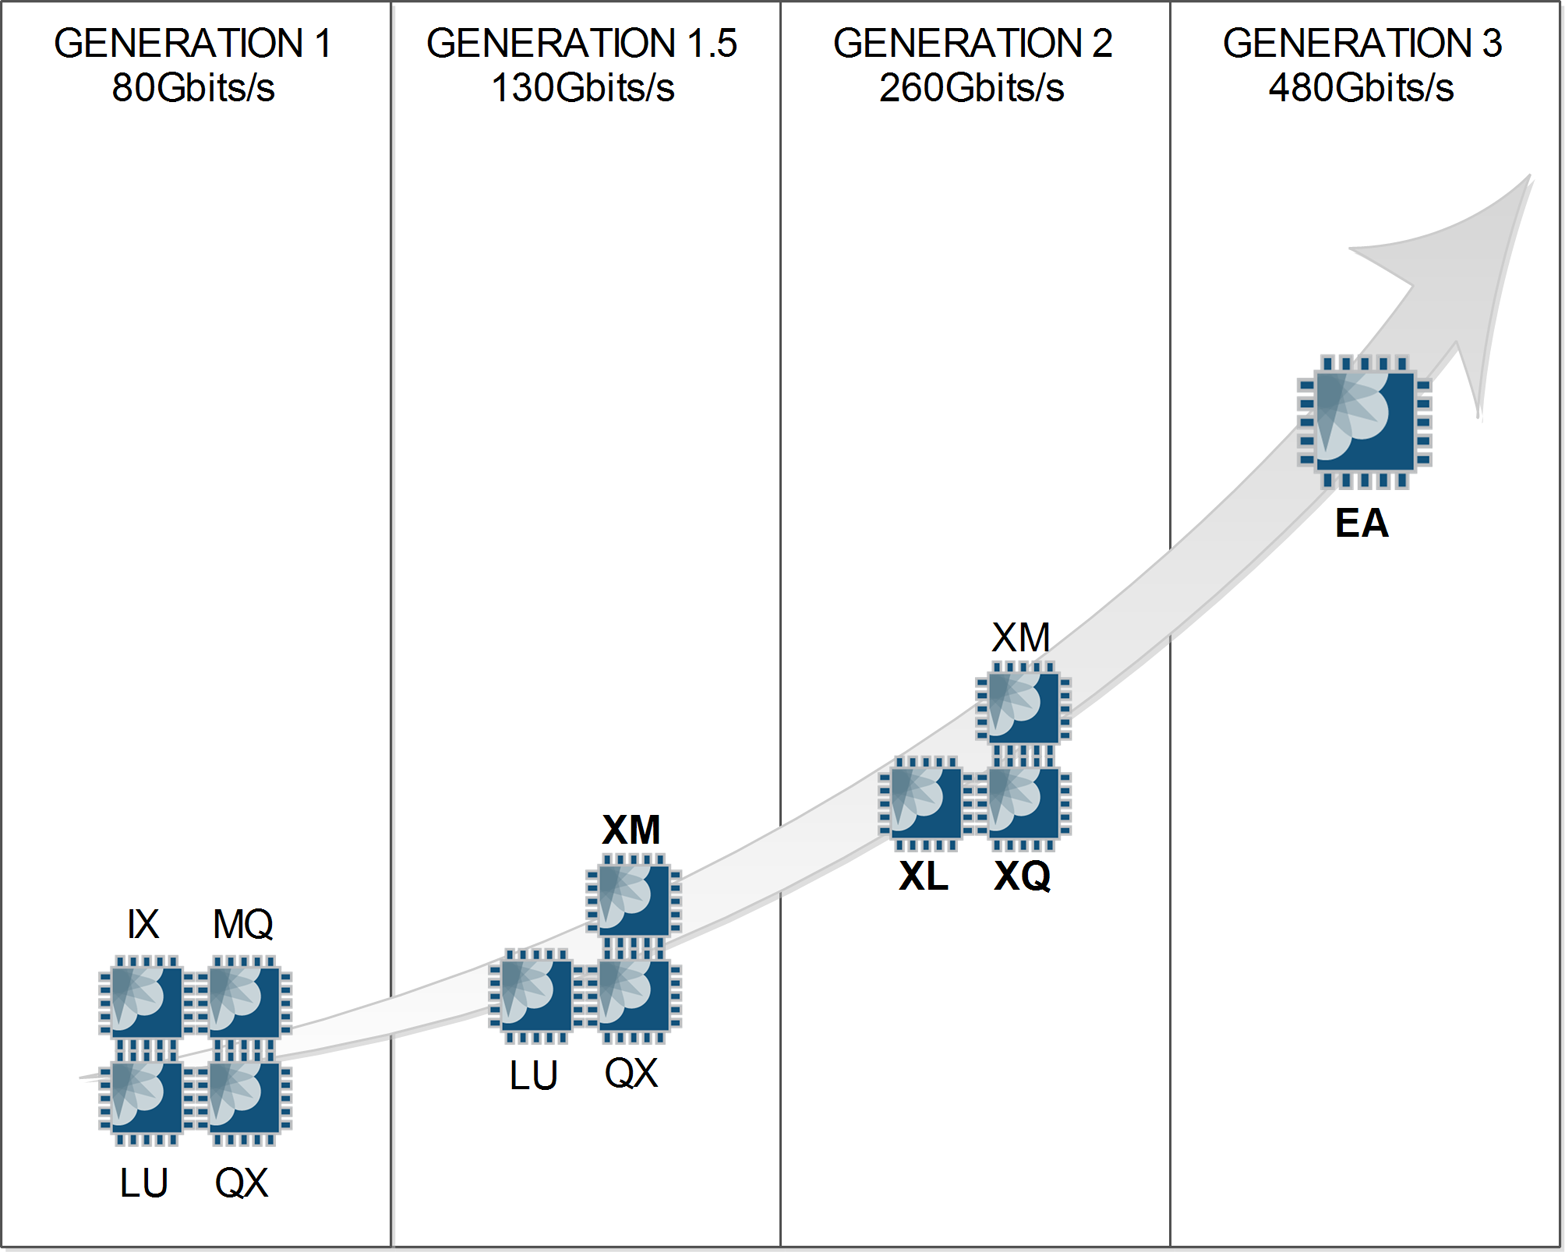
Figure 1-29. Trio chipset generations
Buffering Block
The Buffering Block is part of the MQ, XM, and EA ASICs, and ties together all of the other functional Trio blocks. It primarily manages packet data, fabric queuing, and revenue port queuing. The interesting thing to note about the Buffering Block is that it’s possible to delegate responsibilities to other functional Trio blocks. As of the writing of this book, there are two primary use cases for delegating responsibility: process oversubscription and revenue port queuing.
In the scenario where the number of revenue ports on a single MIC is less than 24x1GE or 2x10GE, it’s possible to move the handling of oversubscription to the Interfaces Block. This opens the doors to creating oversubscribed line cards at an attractive price point that are able to handle oversubscription intelligently by allowing control plane and voice data to be processed during congestion.
The Buffering Block is able to process basic per port queuing. Each port has eight hardware queues by default, large delay buffers, and low-latency queues (LLQs). If there’s a requirement to have hierarchical class of service (H-QoS) and additional scale, this functionality can be delegated to the Dense Queuing Block.
Lookup Block
The Lookup Block is part of the LU, XL, and EA ASICs. The Lookup Block has multi-core processors to support parallel tasks using multiple threads. This is the bread and butter of Trio. The Lookup Block also supports all of the packet header processing, including:
Route lookups
Load balancing
MAC lookups
Class of service (QoS) classification
Firewall filters
Policers
Accounting
Encapsulation
Statistics
Inline periodic packet management (such as inline BFD)
A key feature in the Lookup Block is that it supports Deep Packet Inspection (DPI) and is able to look over 256 bytes into the packet. This creates interesting features such as Distributed Denial-of-Service (DDoS) protection, which is covered in Chapter 4.
As packets are received by the Buffering Block, the packet headers are sent to the Lookup Block for additional processing. This chunk of packet is called the Parcel. All processing is completed in one pass through the Lookup Block regardless of the complexity of the workflow. Once the Lookup Block has finished processing, it sends the modified packet headers back to the Buffering Block to send the packet to its final destination.
In order to process data at line rate, the Lookup Block has a large bucket of reduced-latency dynamic random access memory (RLDRAM) that is essential for packet processing.
Let’s take a quick peek at the current memory utilization in the Lookup Block:
{master}
dhanks@R1-RE0> request pfe execute target fpc2 command "show jnh 0 pool usage"
SENT: Ukern command: show jnh 0 pool usage
GOT:
GOT: EDMEM overall usage:
GOT: [NH///|FW///|CNTR//////|HASH//////|ENCAPS////|--------------]
GOT: 0     2.0   4.0        9.0        16.8       20.9           32.0M
GOT:
GOT: Next Hop
GOT: [*************|-------] 2.0M (65% | 35%)
GOT:
GOT: Firewall
GOT: [|--------------------] 2.0M (1% | 99%)
GOT:
GOT: Counters
GOT: [|----------------------------------------] 5.0M (<1% | >99%)
GOT:
GOT: HASH
GOT: [*********************************************] 7.8M (100% | 0%)
GOT:
GOT: ENCAPS
GOT: [*****************************************] 4.1M (100% | 0%)
GOT:
LOCAL: End of file
The external data memory (EDMEM) is responsible for storing all of the firewall filters, counters, next-hops, encapsulations, and hash data. These values may look small, but don’t be fooled. In our lab, we have an MPLS topology with over 2,000 L3VPNs including BGP route reflection. Within each VRF, there is a firewall filter applied with two terms. As you can see, the firewall memory is barely being used. These memory allocations aren’t static and are allocated as needed. There is a large pool of memory and each EDMEM attribute can grow as needed.
Hypermode feature
Starting with Junos 13.x, Juniper introduced a concept called hypermode. The fact was that MX line cards embed a lot of rich features—from basic routing and queuing, to advanced BNG inline features. The lookup chipset (LU/XL block) is loaded with the full micro-code which supports all the functions from the more basic to the more complex. Each function is viewed as a functional block and depending on the configured features, some of these blocks are used during packet processing. Even if all blocks are not used at a given time, there are some dependencies between each of them. These dependencies request more CPU instructions and thus more time, even if the packet just simply needs to be forwarded.
Warning
Actually, you can only see an impact on the performance when you reach the line rate limit of the ASIC for very small packet size (around 64 bytes).
To overcome this kind of bottleneck and improve the performance at line rate for small packet size, the concept of hypermode was developed. It disables and doesn’t load some of the functional block into the micro-code of the lookup engine, reducing the number of micro-code instructions that need to be executed per packet. This mode is really interesting for core routers or a basic PE with classical configured features such as routing, filtering, and simple queuing models. When hypermode is configured, the following features are no longer supported:
Creation of virtual chassis
Interoperability with legacy DPCs, including MS-DPCs (the MPC in hypermode accepts and transmits data packets only from other existing MPCs)
Interoperability with non-Ethernet MICs and non-Ethernet interfaces such as channelized interfaces, multilink interfaces, and SONET interfaces
Padding of Ethernet frames with VLAN
Sending Internet Control Message Protocol (ICMP) redirect messages
Termination or tunneling of all subscriber-based services
Hypermode dramatically increases the line rate performance for forwarding and filtering purposes as illustrated by the Figure 1-30.
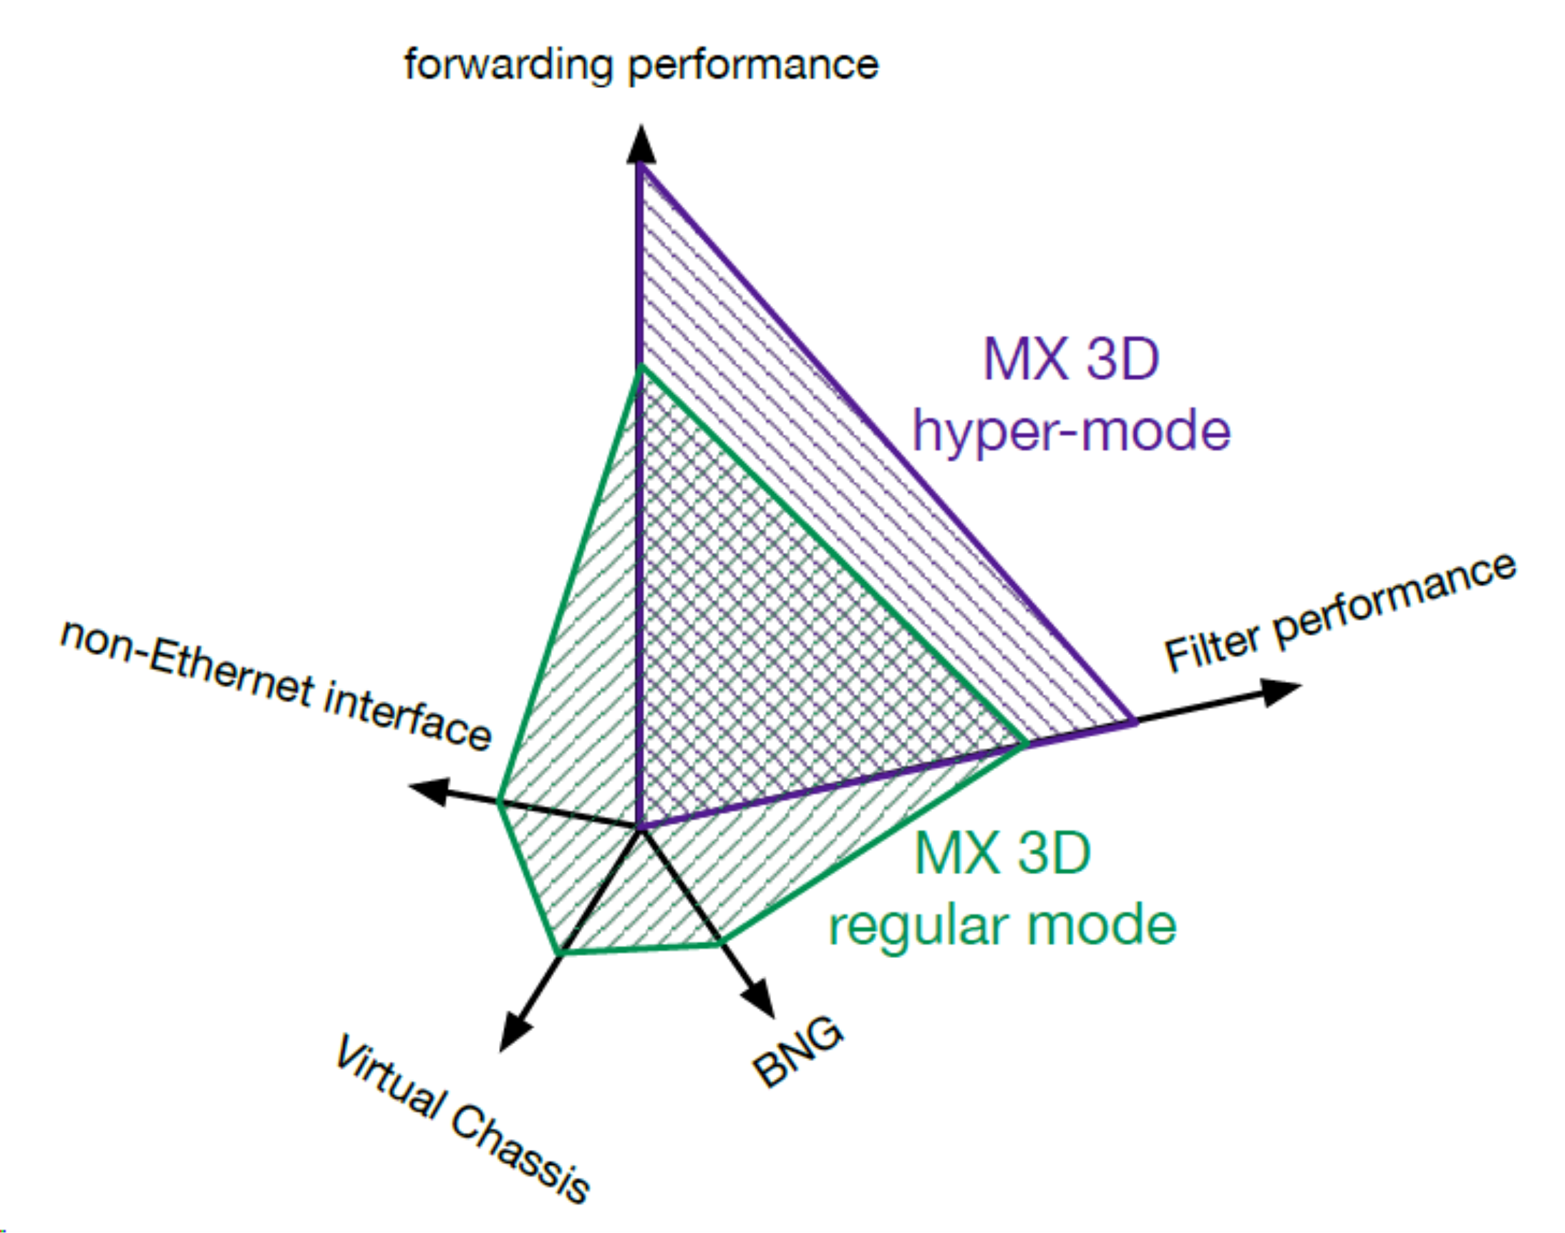
Figure 1-30. Comparison of regular mode and hypermode performance
To configure hypermode, the following statement must be added on the forwarding-options:
{master}[edit]
jnpr@R1# set forwarding-options hyper-mode
Committing this new config requires a reboot of the node:
jnpr@R1# commit
re0:
warning: forwarding-options hyper-mode configuration changed. A system reboot is
mandatory. Please reboot the system NOW. Continuing without a reboot might
result in unexpected system behavior.
configuration check succeeds
Once the router has been rebooted, you can check if hypermode is enabled with this show command:
{master}
jnpr@R1> show forwarding-options hyper-mode
Current mode: hyper mode
Configured mode: hyper mode
Is hypermode supported on all line cards? Actually the answer is “no,” but “not supported” doesn’t mean not compatible. Indeed, prior to MPC4e, hypermode is said to be compatible, meaning that MPC1, 2, and 3 and 16x10GE MPCs accept the presence of the knob into the configuration but do not take it into account. In other words, the lookup chipset of these cards is fully loaded with all functions. Since MPC4e, hypermode is supported and can be turned on to load smaller micro-code with better performances for forwarding and filtering features onto LU/XL/EA ASICs. Table 1-4 summarizes which MPCs are compatible and which ones support the hypermode feature.
| Line card model | Hypermode compatible? | Hypermode support? |
|---|---|---|
| DPC / MS-DPC | No | No |
| MPC1 / MPC1e | Yes | No |
| MPC2 / MPC2e | Yes | No |
| MPC3e | Yes | No |
| MPC4e | Yes | Yes |
| MPC5e | Yes | Yes |
| MPC6e | Yes | Yes |
| NG-MPC2e / NG-MPC3e | Yes | Yes |
Interfaces Block
One of the optional components is the Interfaces Block (the Buffering Block is part of the IX-specific ASIC). Its primary responsibility is to intelligently handle oversubscription. When using a MIC that supports less than 24x1GE or 2x10GE MACs, the Interfaces Block is used to manage the oversubscription.
Note
As new MICs are released, they may or may not have an Interfaces Block depending on power requirements and other factors. Remember that the Trio function blocks are like building blocks and some blocks aren’t required to operate.
Each packet is inspected at line rate, and attributes such as Ethernet Type Codes, Protocol, and other Layer 4 information are used to evaluate which buffers to enqueue the packet towards the Buffering Block. Preclassification allows the ability to drop excess packets as close to the source as possible, while allowing critical control plane packets through to the Buffering Block.
There are four queues between the Interfaces and Buffering Block: real-time, control traffic, best effort, and packet drop. Currently, these queues and preclassifications are not user configurable; however, it’s possible to take a peek at them.
Let’s take a look at a router with a 20x1GE MIC that has an Interfaces Block:
dhanks@MX960> show chassis hardware
Hardware inventory:
Item             Version  Part number  Serial number     Description
Chassis                                JN10852F2AFA      MX960
Midplane         REV 02   710-013698   TR0019            MX960 Backplane
FPM Board        REV 02   710-014974   JY4626            Front Panel Display
Routing Engine 0 REV 05   740-031116   9009066101        RE-S-1800x4
Routing Engine 1 REV 05   740-031116   9009066210        RE-S-1800x4
CB 0             REV 10   750-031391   ZB9999            Enhanced MX SCB
CB 1             REV 10   750-031391   ZC0007            Enhanced MX SCB
CB 2             REV 10   750-031391   ZC0001            Enhanced MX SCB
FPC 1            REV 28   750-031090   YL1836            MPC Type 2 3D EQ
  CPU            REV 06   711-030884   YL1418            MPC PMB 2G
  MIC 0          REV 05   750-028392   JG8529            3D 20x 1GE(LAN) SFP
  MIC 1          REV 05   750-028392   JG8524            3D 20x 1GE(LAN) SFP
We can see that FPC1 supports two 20x1GE MICs. Let’s take a peek at the preclassification on FPC1:
dhanks@MX960> request pfe execute target fpc1 command "show precl-eng summary"
SENT: Ukern command: show precl-eng summary
GOT:
GOT:  ID  precl_eng name       FPC PIC   (ptr)
GOT: --- -------------------- ---- ---  --------
GOT:   1 IX_engine.1.0.20       1   0  442484d8
GOT:   2 IX_engine.1.1.22       1   1  44248378
LOCAL: End of file
It’s interesting to note that there are two preclassification engines. This makes sense as there is an Interfaces Block per MIC. Now let’s take a closer look at the preclassification engine and statistics on the first MIC:
usr@MX960> request pfe execute target fpc1 command "show precl-eng 1 statistics"
SENT: Ukern command: show precl-eng 1 statistics
GOT:
GOT:          stream    Traffic
GOT:  port      ID       Class      TX pkts         RX pkts        Dropped pkts
GOT: ------  -------  ----------    ---------       ------------   ------------
GOT:   00      1025        RT       000000000000    000000000000   000000000000
GOT:   00      1026        CTRL     000000000000    000000000000   000000000000
GOT:   00      1027        BE       000000000000    000000000000   000000000000
Each physical port is broken out and grouped by traffic class. The number of packets dropped is maintained in a counter on the last column. This is always a good place to look if the router is oversubscribed and dropping packets.
Let’s take a peek at a router with a 4x10GE MIC that doesn’t have an Interfaces Block:
{master}
dhanks@R1-RE0> show chassis hardware
Hardware inventory:
Item             Version  Part number  Serial number     Description
Chassis                                JN111992BAFC      MX240
Midplane         REV 07   760-021404   TR5026            MX240 Backplane
FPM Board        REV 03   760-021392   KE2411            Front Panel Display
Routing Engine 0 REV 07   740-013063   1000745244        RE-S-2000
Routing Engine 1 REV 06   740-013063   1000687971        RE-S-2000
CB 0             REV 03   710-021523   KH6172            MX SCB
CB 1             REV 10   710-021523   ABBM2781          MX SCB
FPC 2            REV 25   750-031090   YC5524            MPC Type 2 3D EQ
  CPU            REV 06   711-030884   YC5325            MPC PMB 2G
  MIC 0          REV 24   750-028387   YH1230            3D 4x 10GE  XFP
  MIC 1          REV 24   750-028387   YG3527            3D 4x 10GE  XFP
Here we can see that FPC2 has two 4x10GE MICs. Let’s take a closer look at the preclassification engines:
{master}
dhanks@R1-RE0> request pfe execute target fpc2 command "show precl-eng summary"
SENT: Ukern command: show precl-eng summary
GOT:
GOT:  ID  precl_eng name       FPC PIC   (ptr)
GOT: --- -------------------- ---- ---  --------
GOT:   1 MQ_engine.2.0.16       2   0  435e2318
GOT:   2 MQ_engine.2.1.17       2   1  435e21b8
LOCAL: End of file
The big difference here is the preclassification engine name. Previously, it was listed as “IX_engine” with MICs that support an Interfaces Block. MICs such as the 4x10GE do not have an Interfaces Block, so the preclassification is performed on the Buffering Block, or, as listed here, the “MQ_engine.”
Note
Hidden commands are used here to illustrate the roles and responsibilities of the Interfaces Block. Caution should be used when using these commands, as they aren’t supported by Juniper.
The Buffering Block’s WAN interface can operate either in MAC mode or in the Universal Packet over HSL2 (UPOH) mode. This creates a difference in operation between the MPC1 and MPC2 line cards. The MPC1 only has a single Trio chipset, and thus the MPC2 is only MICs that can operate in MAC mode are compatible with this line card. On the other hand, the MPC2 has two Trio chipsets. Each MIC on the MPC2 is able to operate in either mode, thus compatible with more MICs. This will be explained in more detail later in the chapter.
Dense Queuing Block
The Buffering Block is part of the QX, XQ and EA ASICs. Depending on the line card, Trio offers an optional Dense Queuing Block that offers rich Hierarchical QoS that supports up to 512,000 queues with the current generation of hardware. This allows for the creation of schedulers that define drop characteristics, transmission rate, and buffering that can be controlled separately and applied at multiple levels of hierarchy.
The Dense Queuing Block is an optional functional Trio block. The Buffering Block already supports basic per port queuing. The Dense Queuing Block is only used in line cards that require H-QoS or additional scale beyond the Buffering Block.
Line Cards and Modules
To provide high-density and high-speed Ethernet services, a new type of Flexible Port Concentrator (FPC) had to be created called the Dense Port Concentrator (DPC). This first-generation line card allowed up to 80 Gbps ports per slot.
The DPC line cards utilize a previous ASIC from the M series called the I-Chip. This allowed Juniper to rapidly build the first MX line cards and software.
The Modular Port Concentrator (MPC) is the second-generation line card created to further increase the density to 160 Gbps ports per slot. This generation of hardware is created using the Trio chipset. The MPC supports MICs that allow you to mix and match different modules on the same MPC.
| FPC type/Module type | Description |
|---|---|
| Dense Port Concentrator (DPC) | First-generation high-density and high-speed Ethernet line cards |
| Modular Port Concentrator (MPC) | Second-generation high-density and high-speed Ethernet line cards supporting modules |
| Module Interface Card (MIC) | Second-generation Ethernet and optical modules that are inserted into MPCs |
It’s a common misconception that the “modular” part of MPC derives its name only from its ability to accept different kinds of MICs. This is only half of the story. The MPC also derives its name from being able to be flexible when it comes to the Trio chipset. For example, the MPC-3D-16x10GE-SFPP line card is a fixed port configuration, but only uses the Buffering Block and Lookup Block in the PFE complex. As new line cards are introduced in the future, the number of fundamental Trio building blocks will vary per card as well, thus living up to the “modular” name.
Dense Port Concentrator
The DPC line cards come in six different models to support varying different port configurations. There’s a mixture of 1G, 10G, copper, and optical. There are three DPC types: routing and switching (DPCE-R), switching (DPCE-X), and enhanced queuing (DPCE-Q).
The DPCE-R can operate at either Layer 3 or as a pure Layer 2 switch. It’s generally the most cost-effective when using a sparing strategy for support. The DPCE-R is the most popular choice, as it supports very large route tables and can be used in a pure switching configuration as well.
The DPCE-X has the same features and services as the DPCE-R; the main difference is that the route table is limited to 32,000 prefixes and cannot use L3VPNs on this DPC. These line cards make sense when being used in a very small environment or in a pure Layer 2 switching scenario.
The DPCE-Q supports all of the same features and services as the DPCE-R and adds additional scaling around H-QoS and number of queues.
| Model | DPCE-R | DPCE-X | DPCE-Q |
|---|---|---|---|
| 40x1GE SFP | Yes | Yes | Yes |
| 40x1GE TX | Yes | Yes | No |
| 20x1GE SFP | No | No | Yes |
| 4x10GE XFP | Yes | Yes | Yes |
| 2x10GE XFP | Yes | No | No |
| 20x1GE and 2x10GE | Yes | Yes | Yes |
Note
The DPC line cards are still supported, but there is no active development of new features being brought to these line cards. For new deployments, it’s recommended to use the newer, second-generation MPC line cards. The MPC line cards use the Trio chipset and are where Juniper is focusing all new features and services.
Modular Port Concentrator
The MPC line cards are the second generation of line cards for the MX. There are two significant changes when moving from the DPC to MPC: chipset and modularity. All MPCs are now using the Trio chipset to support more scale, bandwidth, and services. The other big change is that now the line cards are modular using MICs.
The MPC can be thought of as a type of intelligent shell or carrier for MICs. This change in architecture allows the separation of physical ports, oversubscription, features, and services, as shown in Figure 1-31. All of the oversubscription, features, and services are managed within the MPC. Physical port configurations are isolated to the MIC. This allows the same MIC to be used in many different types of MPCs depending on the number of features and scale required.
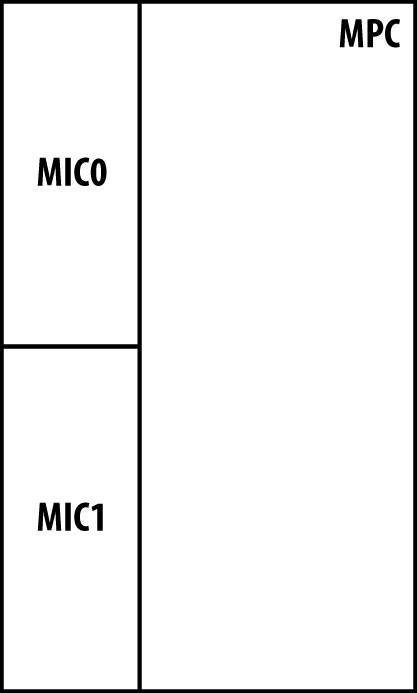
Figure 1-31. High-level architecture of MPCs and MICs
As of Junos 14.2, there are twelve different categories of MPCs. Each model has a different number of Trio chipsets providing different options of scaling and bandwidth, as listed in Table 1-7.
| Model | # of PFE complex | Per MPC bandwidth | Interface support |
|---|---|---|---|
| MPC1 | 1 | 40 Gbps | 1GE and 10GE |
| MPC2 | 2 | 80 Gbps | 1GE and 10GE |
| MPC 16x10GE | 4 | 140 Gbps | 10GE |
| MPC3E | 1 | 130 Gbps | 1GE, 10GE, 40GE, and 100GE |
| MPC4e | 2 | 260 Gbps | 10GE and 100GE |
| MPC5e | 1 | 240 Gbps | 10GE, 40GE, 100GE |
| MPC6e | 2 | 520 Gbps | 10GE and 100GE |
| NG-MPC2e | 1 | 80 Gbps | 1GE, 10GE |
| NG-MPC3e | 1 | 130 Gbps | 1GE, 10GE |
| MPC7e | 2 | 480 Gbps | 10GE 40GE and 100GE |
| MPC8e | 4 | 960 Gbps | 10GE 40GE and 100GE |
| MPC9e | 4 | 1600 Gbps | 10GE 40GE and 100GE |
Warning
Next-generation cards (MPC7e, MPC8e, and MPC9e) host the third generation of Trio ASIC (EA), which has a bandwidth capacity of 480Gbps. The EA ASIC has been “rate-limited” for these card models either at 80Gbps, 130Gbps or 240Gbps
Note
It’s important to note that the MPC bandwidth listed previously represents current-generation hardware that’s available as of the writing of this book and is subject to change with new software and hardware releases.
Similar to the first-generation DPC line cards, the MPC line cards also support the ability to operate in Layer 2, Layer 3, or Enhanced Queuing modes. This allows you choose only the features and services required.
| Model | Full Layer 2 | Full Layer 3 | Enhanced queuing |
|---|---|---|---|
| MX-3D | Yes | No | No |
| MX-3D-Q | Yes | No | Yes |
| MX-3D-R-B | Yes | Yes | No |
| MX-3D-Q-R-B | Yes | Yes | Yes |
Most Enterprise customers tend to choose the MX-3D-R-B model as it supports both Layer 2 and Layer 3. Typically, there’s no need for Enhanced Queuing or scale when building a data center. Most Service Providers prefer to use the MX-3D-Q-R-B as it provides both Layer 2 and Layer 3 services in addition to Enhanced Queuing. A typical use case for a Service Provider is having to manage large routing tables and many customers, and provide H-QoS to enforce customer service-level agreements (SLAs).
The MX-3D-R-B is the most popular choice, as it offers full Layer 3 and Layer 2 switching support.
The MX-3D has all of the same features and services as the MX-3D-R-B but has limited Layer 3 scaling. When using BGP or an IGP, the routing table is limited to 32,000 routes. The other restriction is that MPLS L3VPNs cannot be used on these line cards.
The MX-3D-Q has all of the same features, services, and reduced Layer 3 capacity as the MX-3D, but offers Enhanced Queuing. This adds the ability to configure H-QoS and increase the scale of queues.
The MX-3D-Q-R-B combines all of these features together to offer full Layer 2, Layer 3, and Enhanced Queuing together in one line card.
MPC1
Let’s revisit the MPC models in more detail. The MPC starts off with the MPC1, which has a single Trio chipset (Single PFE). The use case for this MPC is to offer an intelligently oversubscribed line card for an attractive price. All of the MICs that are compatible with the MPC1 have the Interfaces Block (IX Chip) built into the MIC to handle oversubscription, as shown in Figure 1-32.
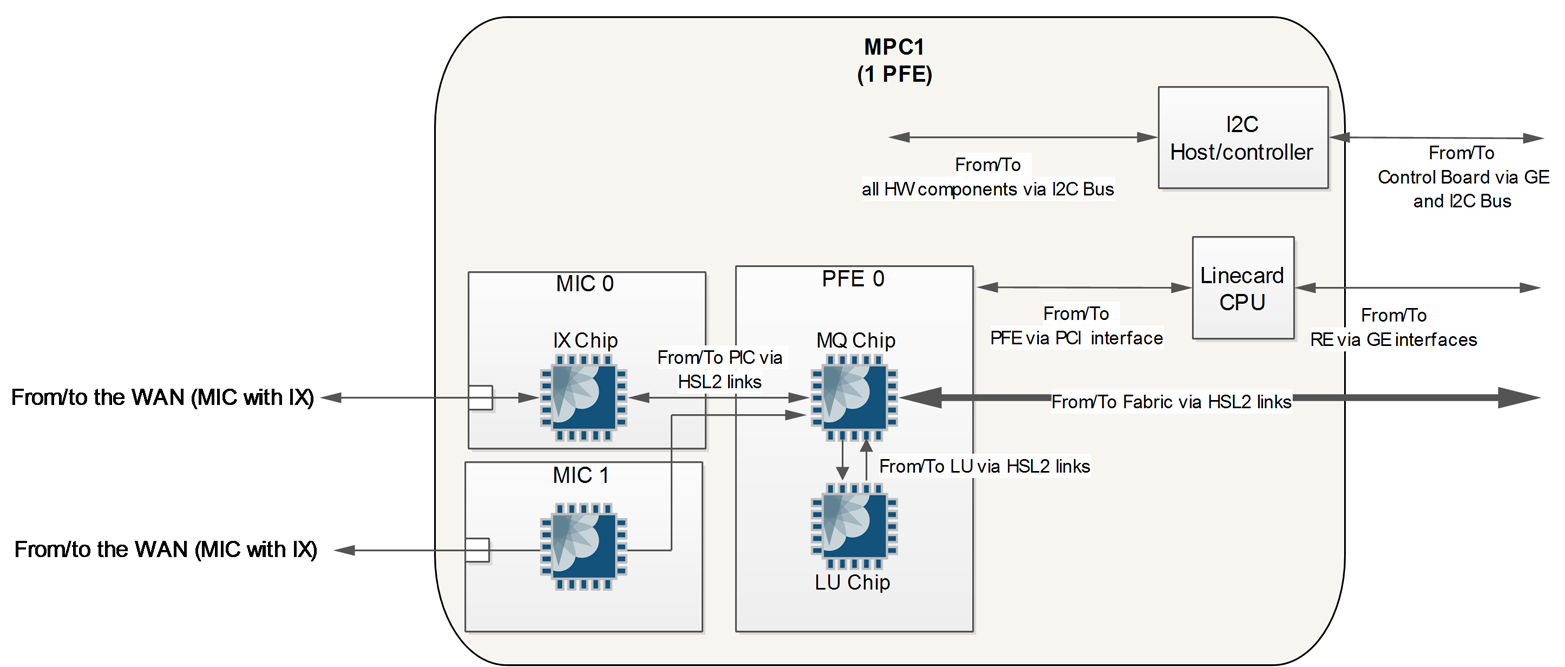
Figure 1-32. MPC1 architecture
With the MPC1, the single Trio chipset handles both MICs. Each MIC is required to share the bandwidth that’s provided by the single Trio chipset, thus the Interfaces Block is delegated to each MIC to intelligently handle oversubscription. Chipsets communicate with each other with High Link Speed (HSL2)
MPC2
The MPC2 is very similar in architecture to the MPC1, but adds an additional Trio chipset (PFE) for a total count of two.
The MPC2 offers a dedicated Trio chipset per MIC, effectively doubling the bandwidth and scaling from the previous MPC1. In the MPC2 architecture, it’s possible to combine MICs such as the 2x10GE and 4x10GE. Figure 1-33 shows antables and MPC2 in “Q” mode. This model supports the Dense Queuing ASIC (QX).
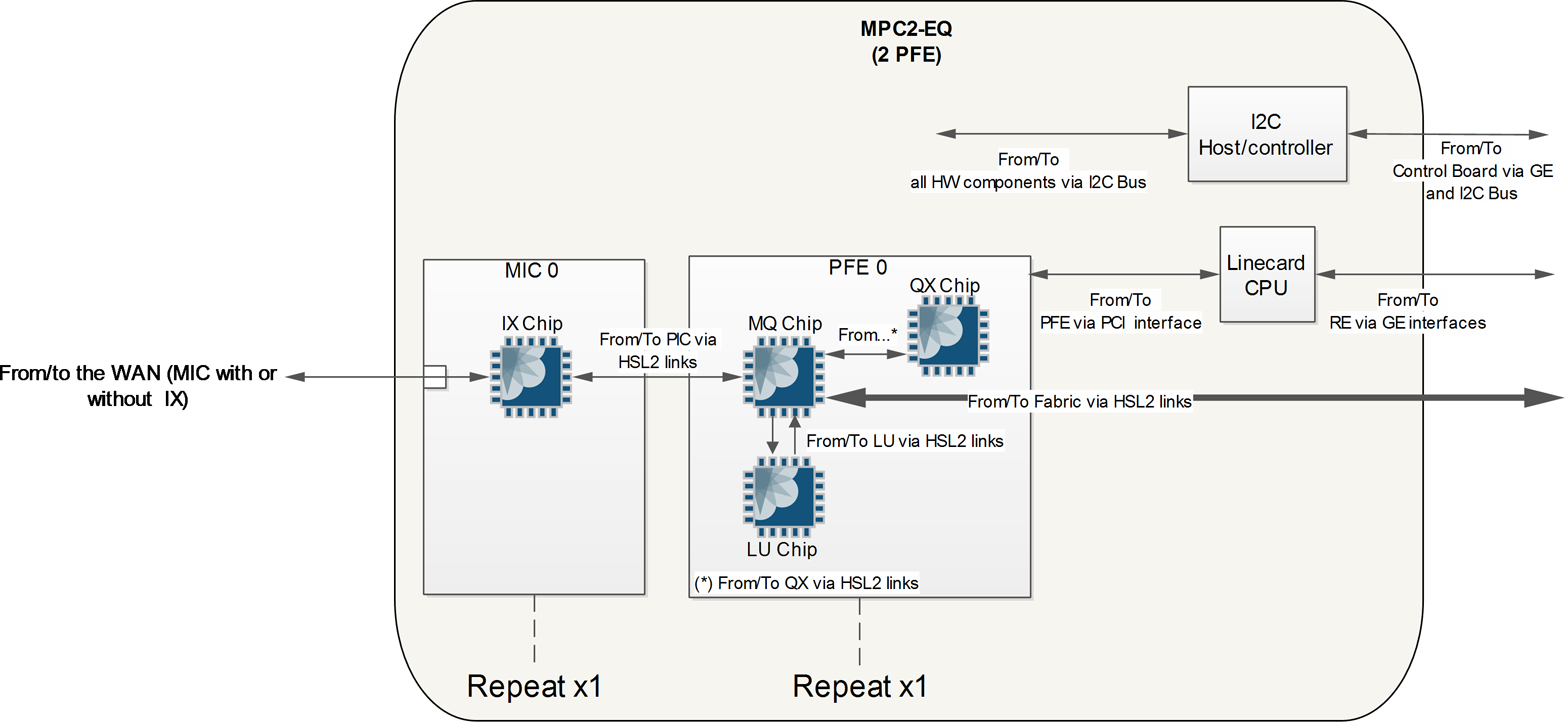
Figure 1-33. MPC2 architecture
The 2x10GE MIC is designed to operate in both the MPC1 and MPC2 and thus has an Interfaces Block to handle oversubscription. In the case of the 4x10GE MIC, it’s designed to only operate in the MPC2 and thus doesn’t require an Interfaces Block, as it ties directly into a dedicated Buffering Block (MQ chip).
MPC-3D-16X10GE-SFPP
The MPC-3D-16X10GE-SFPP is a full-width line card that doesn’t support any MICs. However, it does support 16 fixed 10G ports. This MPC was actually one of the most popular MPCs because of the high 10G port density and offers the lowest price per 10G port.
The MPC-3D-16X10GE-SFPP has four Trio chipsets (see Figure 1-34) equally divided between its 16 ports. This allows each group of 4x10G interfaces to have a dedicated Trio chipset.
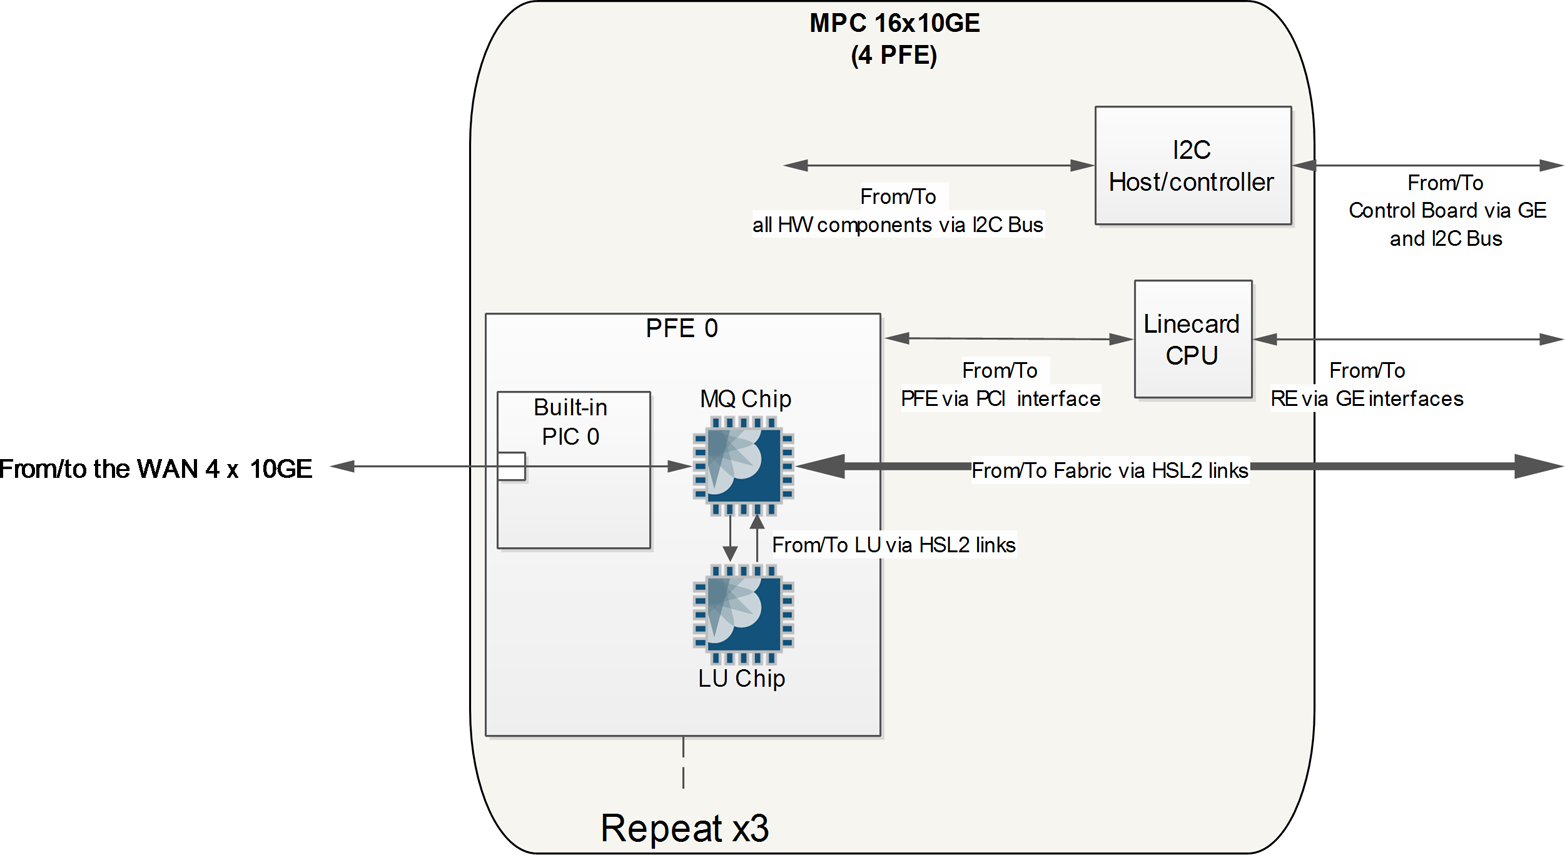
Figure 1-34. High-level architecture of MPC-3D-16x10GE-SFPP
If you’re ever curious how many PFEs are on a FPC, you can use the show chassis fabric map command. First, let’s find out which FPC the MPC-3D-16X10GE-SFPP is installed into:
dhanks@MX960> show chassis hardware | match 16x
FPC 3            REV 23   750-028467   YJ2172            MPC 3D 16x 10GE
The MPC-3D-16X10GE-SFPP is installed into FPC3. Now let’s take a peek at the fabric map and see which links are Up, thus detecting the presence of PFEs within FPC3:
dhanks@MX960> show chassis fabric map | match DPC3
DPC3PFE0->CB0F0_04_0    Up         CB0F0_04_0->DPC3PFE0    Up
DPC3PFE1->CB0F0_04_1    Up         CB0F0_04_1->DPC3PFE1    Up
DPC3PFE2->CB0F0_04_2    Up         CB0F0_04_2->DPC3PFE2    Up
DPC3PFE3->CB0F0_04_3    Up         CB0F0_04_3->DPC3PFE3    Up
DPC3PFE0->CB0F1_04_0    Up         CB0F1_04_0->DPC3PFE0    Up
DPC3PFE1->CB0F1_04_1    Up         CB0F1_04_1->DPC3PFE1    Up
DPC3PFE2->CB0F1_04_2    Up         CB0F1_04_2->DPC3PFE2    Up
DPC3PFE3->CB0F1_04_3    Up         CB0F1_04_3->DPC3PFE3    Up
DPC3PFE0->CB1F0_04_0    Up         CB1F0_04_0->DPC3PFE0    Up
DPC3PFE1->CB1F0_04_1    Up         CB1F0_04_1->DPC3PFE1    Up
DPC3PFE2->CB1F0_04_2    Up         CB1F0_04_2->DPC3PFE2    Up
DPC3PFE3->CB1F0_04_3    Up         CB1F0_04_3->DPC3PFE3    Up
DPC3PFE0->CB1F1_04_0    Up         CB1F1_04_0->DPC3PFE0    Up
DPC3PFE1->CB1F1_04_1    Up         CB1F1_04_1->DPC3PFE1    Up
DPC3PFE2->CB1F1_04_2    Up         CB1F1_04_2->DPC3PFE2    Up
DPC3PFE3->CB1F1_04_3    Up         CB1F1_04_3->DPC3PFE3    Up
That wasn’t too hard. The only tricky part is that the output of the show chassis fabric command still lists the MPC as DPC in the output. No worries, we can perform a match for DPC3. As we can see, the MPC-3D-16X10GE-SFPP has a total of four PFEs, thus four Trio chipsets. Note that DPC3PFE0 through DPC3PFE3 are present and listed as Up. This indicates that the line card in FPC3 has four PFEs.
The MPC-3D-16X10GE-SFPP doesn’t support H-QoS because there’s no Dense Queuing Block. This leaves only two functional Trio blocks per PFE on the MPC-3D-16X10GE-SFPP: the Buffering Block and Lookup Block.
Let’s verify this by taking a peek at the preclassification engine:
dhanks@MX960> request pfe execute target fpc3 command "show precl-eng summary"
SENT: Ukern command: show prec sum
GOT:
GOT:  ID  precl_eng name       FPC PIC   (ptr)
GOT: --- -------------------- ---- ---  --------
GOT:   1 MQ_engine.3.0.16       3   0  4837d5b8
GOT:   2 MQ_engine.3.1.17       3   1  4837d458
GOT:   3 MQ_engine.3.2.18       3   2  4837d2f8
GOT:   4 MQ_engine.3.3.19       3   3  4837d198
LOCAL: End of file
As expected, the Buffering Block is handling the preclassification. It’s interesting to note that this is another good way to see how many Trio chipsets are inside of an FPC. The preclassification engines are listed ID 1 through 4 and match our previous calculation using the show chassis fabric map command.
MPC3E
The MPC3E was the first modular line card for the MX Series to accept 100G and 40G MICs. It’s been designed from the ground up to support interfaces beyond 10GE, but also remains compatible with some legacy MICs.
There are several new and improved features on the MPC3E as shown in Figure 1-35. The most notable is that the Buffering Block (XM chip) has been increased to support 130 Gbps and the number of Lookup Blocks (LU chip) has increased to four in order to support 100GE interfaces. The other major change is that the fabric switching functionality has been moved out of the Buffering Block and into a new Fabric Functional Block (XF Chip).
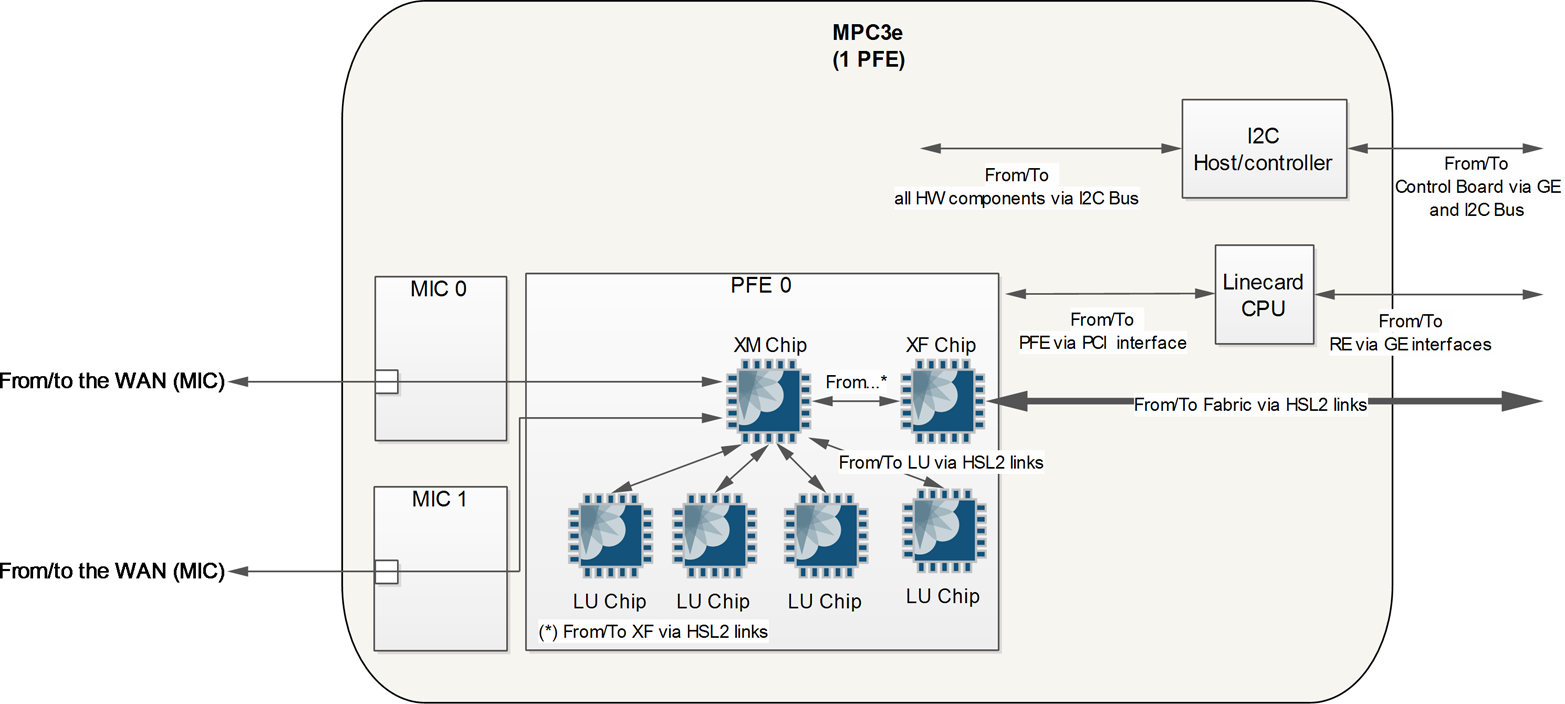
Figure 1-35. MPC3E architecture
The MPC3E can provide line-rate performance for a single 100GE interface; otherwise it’s known that this line card is oversubscribed 1.5:1. For example, the MPC3E can support 2x100GE interfaces, but the Buffering Block can only handle 130Gbps. This can be written as 200:130, or roughly 1.5:1 oversubscription.
Enhanced Queuing isn’t supported on the MPC3E due to the lack of a Dense Queuing Block. However, this doesn’t mean that the MPC3E isn’t capable of class of service. The Buffering Block, just like the MPC-3D-16x10GE-SFPP, is capable of basic port-level class of service.
Multiple Lookup Block architecture
All MPC line cards previous to the MPC3E had a single Lookup Block per Trio chipset; thus, no Lookup Block synchronization was required. The MPC3E is the first MPC to introduce multiple Lookup Blocks. This creates an interesting challenge in synchronizing the Lookup Block operations.
In general, the Buffering Block will spray packets across all Lookup Blocks in a round-robin fashion. This means that a particular traffic flow will be processed by multiple Lookup Blocks.
Source MAC learning
At a high level, the MPC3E learns the source MAC address from the WAN ports. One of the four Lookup Blocks is designated as the master and the three remaining Lookup Blocks are designated as the slaves.
The Master Lookup Block is responsible for updating the other Slave Lookup Blocks. Figure 1-36 illustrates the steps taken to synchronize all of the Lookup Blocks:
The packet enters the Buffering Block and happens to be sprayed to LU1, which is designated as a Slave Lookup Block.
LU1 updates its own table with the source MAC address. It then notifies the Master Lookup Block LU0. The update happens via the Buffering Block to reach LU0.
The Master Lookup Block LU0 receives the source MAC address update and updates its local table accordingly. LU0 sends the source MAC address update to the MPC CPU.
The MPC CPU receives the source MAC address update and in turn updates all Lookup Blocks in parallel.
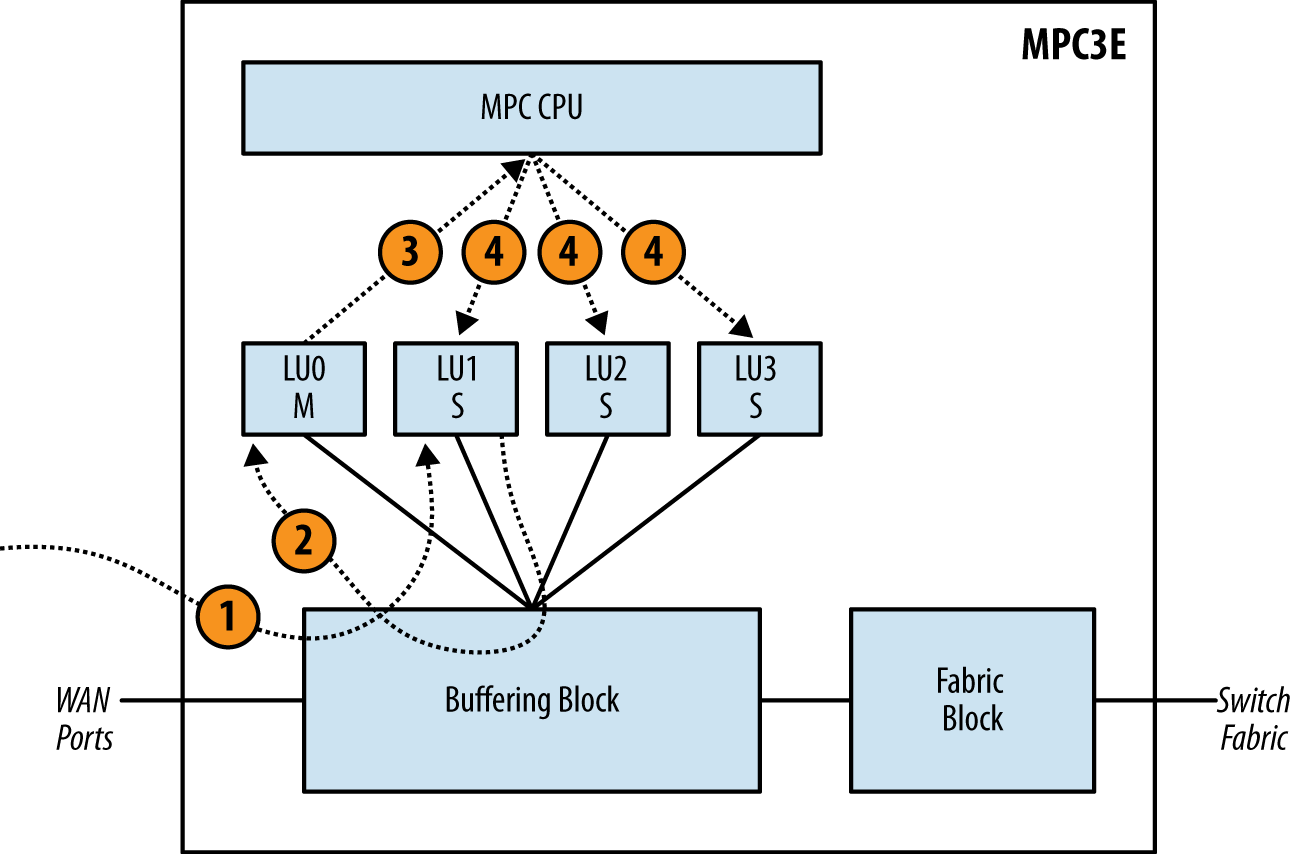
Figure 1-36. MPC3E source MAC learning
Destination MAC learning
The MPC3E learns destination MAC addresses based off the packet received from other PFEs over the switch fabric. Unlike source MAC learning, there’s no concept of a master or slave Lookup Block.
The Lookup Block that receives the packet from the switch fabric is responsible for updating the other Lookup Blocks. Figure 1-37 illustrates how destination MAC addresses are synchronized:
The packet enters the Fabric Block and Buffering Block. The packet happens to be sprayed to LU1. LU1 updates its local table.
LU1 then sends updates to all other Lookup Blocks via the Buffering Block.
The Buffering Block takes the update from LU1 and then updates the other Lookup Blocks in parallel. As each Lookup Block receives the update, the local table is updated accordingly.
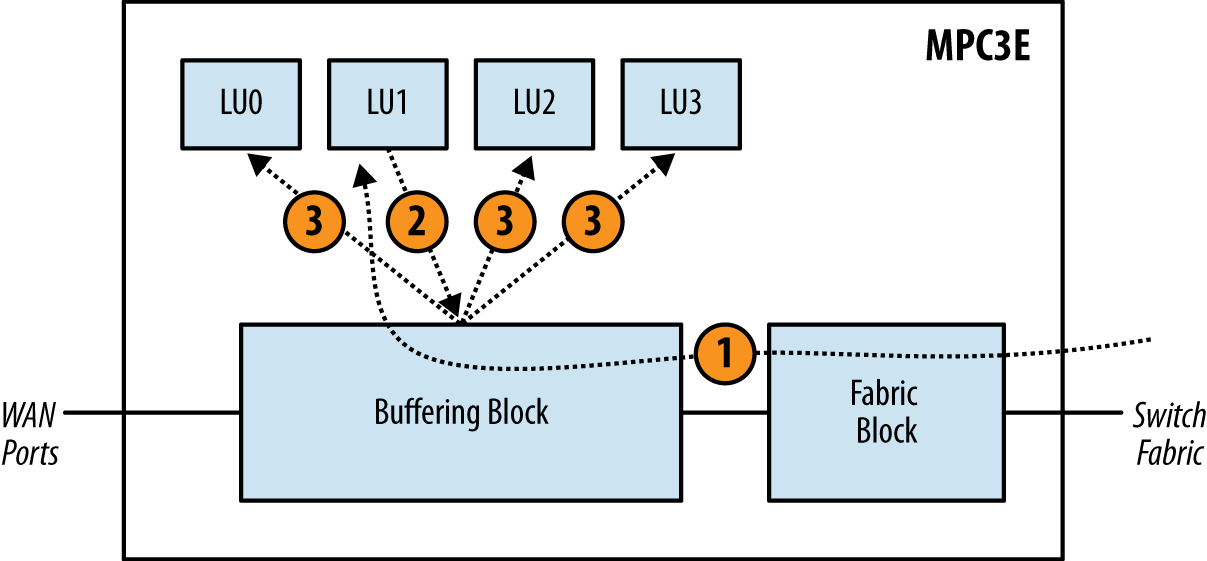
Figure 1-37. MPC3E destination MAC learning
Policing
Recall that the Buffering Block on the MPC3E sprays packets across Lookup Blocks evenly, even for the same traffic flow. Statistically, each Lookup Block receives about 25% of all traffic. When defining and configuring a policer, the MPC3E must take the bandwidth and evenly distribute it among the Lookup Blocks. Thus each Lookup Block is programmed to police 25% of the configured policer rate. Let’s take a closer look:
firewall {
    policer 100M {
        if-exceeding {
            bandwidth-limit 100m;
            burst-size-limit 6250000;
        }
        then discard;
    }
}
The example policer 100M is configured to enforce a bandwidth-limit of 100m. In the case of the MPC3E, each Lookup Block will be configured to police 25m. Because packets are statistically distributed round-robin to all four Lookup Blocks evenly, the aggregate will equal the original policer bandwidth-limit of 100m. 25m * 4 (Lookup Blocks) = 100m.
MPC4E
The MPC4e is a new monolithic card with two PFEs of 130Gbps each. It is available in two models:
32x10GE split in two sets of 16xGE ports per PFE
2x100GE + 8x10GE split in two groups of 1x100GE + 4x10GE per PFE
Each new buffering ASIC (XM) is connected with two Lookup Blocks (LUs). You can see in Figure 1-38 that the MPC4e, unlike the MPC3e, is directly connected to the fabric through its XM chip.
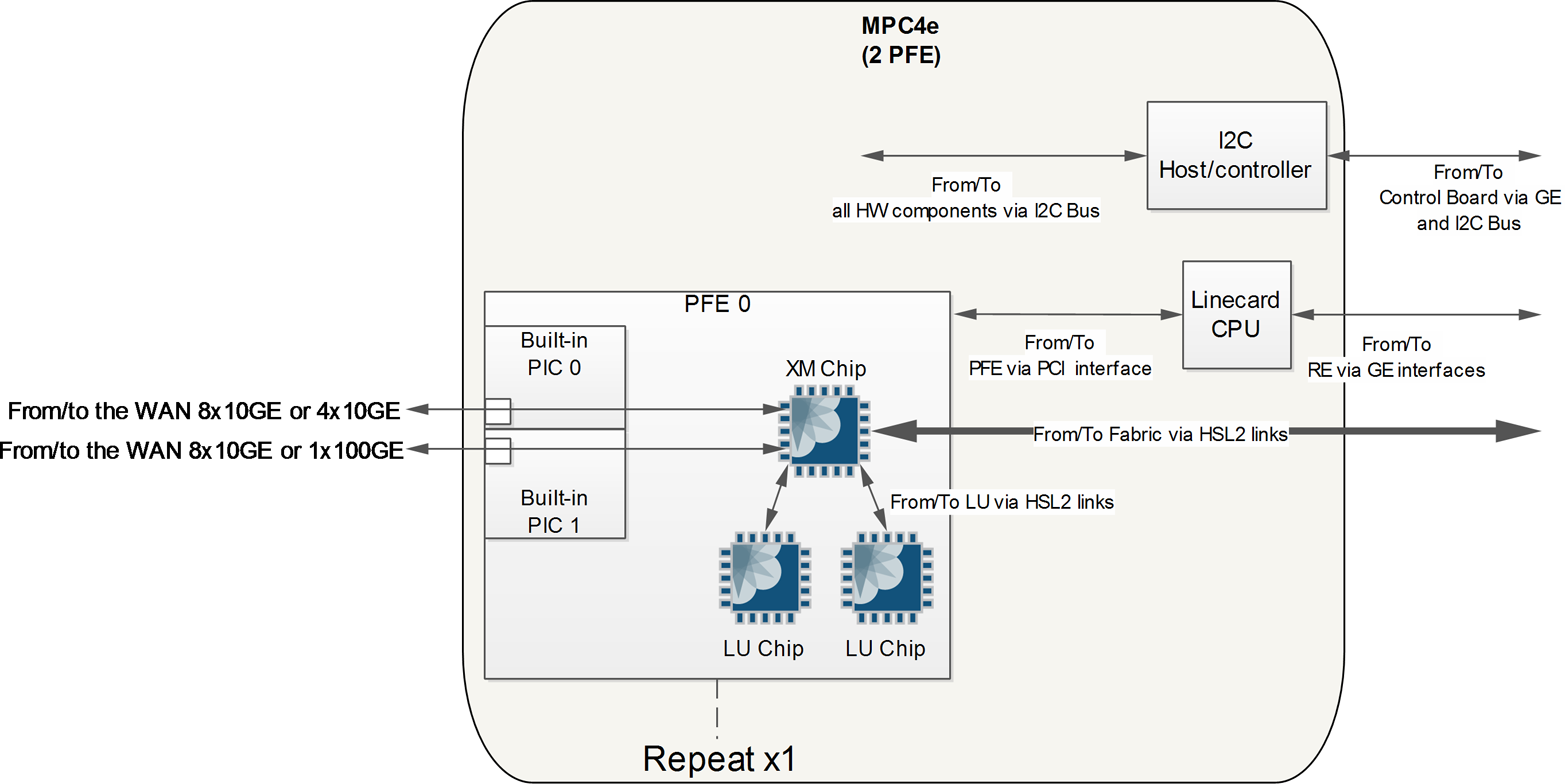
Figure 1-38. MPC4e architecture
The MPC4e does not support Dense Queuing and operates in oversubscription mode:
For the 32x10GE model: there are 160Gbps of link bandwidth for 130Gbps of PFE capacity.
For the 2x100GE+8x10GE model: there are 140Gbps of link bandwidth for 130Gbps of PFE capacity.
MPC5E
The MPC5e is an enhancement of the MPC4e. It is made of one PFE of the second generation of the Trio ASIC with 240Gbps of capacity.
There are four models of MPC5e—and two models support Dense Queuing with the new XQ ASIC.
MPC5E-40G10G / MPC5EQ-40G10G (Dense Queuing): six built-in 40-Gigabit Ethernet ports and 24 built-in 10-Gigabit Ethernet ports
MPC5E-100G10G / MPC5EQ-100G10G (Dense Queuing): two built-in 100-Gigabit Ethernet ports and four built-in 10-Gigabit Ethernet ports
The first model of MPC5e (6x40GE + 24x10GE) is a 1:2 oversubscribed card as shown in Figure 1-39. The second model is fully line rate.
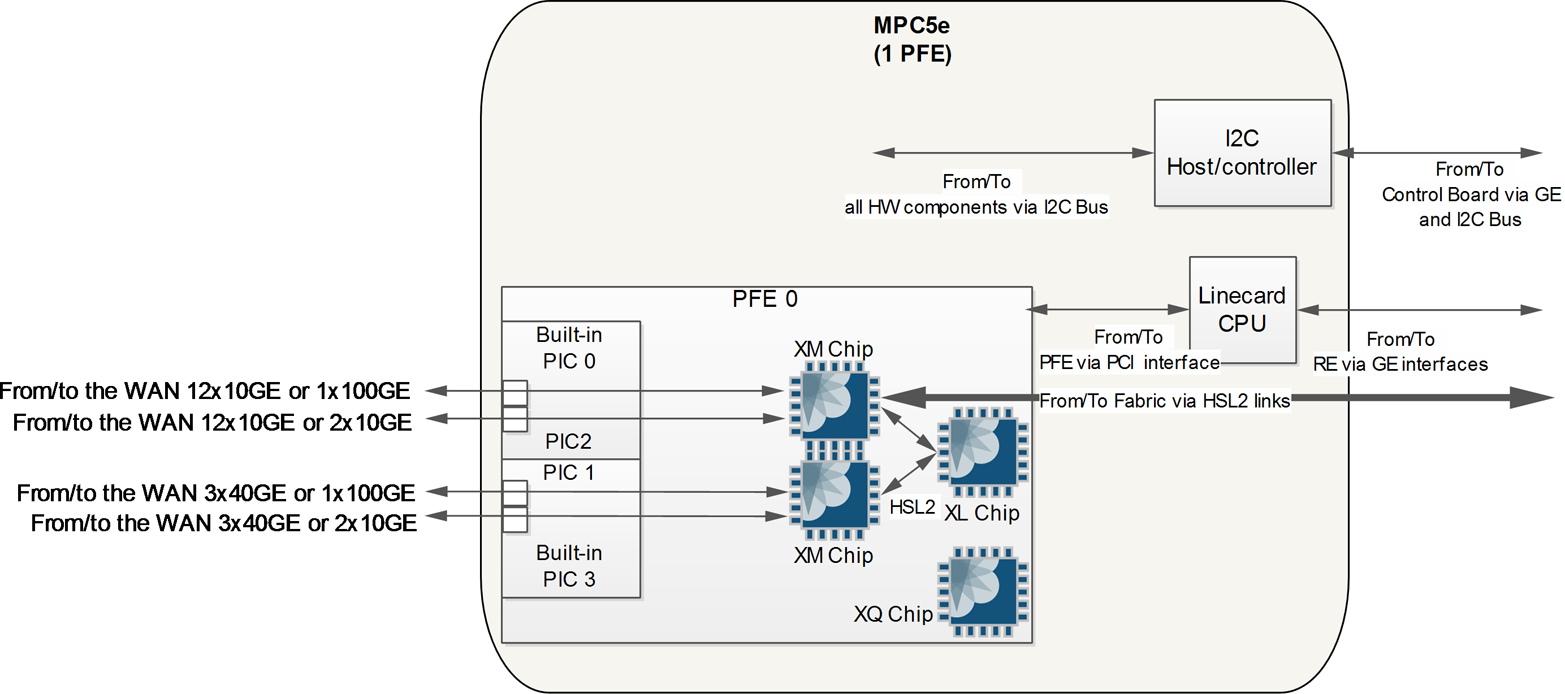
Figure 1-39. MPC5e architecture
MPC6E
The MPC6e is the first MX2K Series dedicated MPC. It’s a modular MPC with two PFEs of 260Gbps each, as shown in Figure 1-40. The MPC can host two MICs—some of them are oversubscribed MICs (like the last one in this list):
MIC6-10G: 10-Gigabit Ethernet MIC with SFP+ (24 ports)
MIC6-100G-CFP2: 100-Gigabit Ethernet MIC with CFP2 (2 ports)
MIC6-100G-CXP: 100-Gigabit Ethernet MIC with CXP (4 ports)
The first two MICs, the most popular, are not oversubscribed and run at line rate.
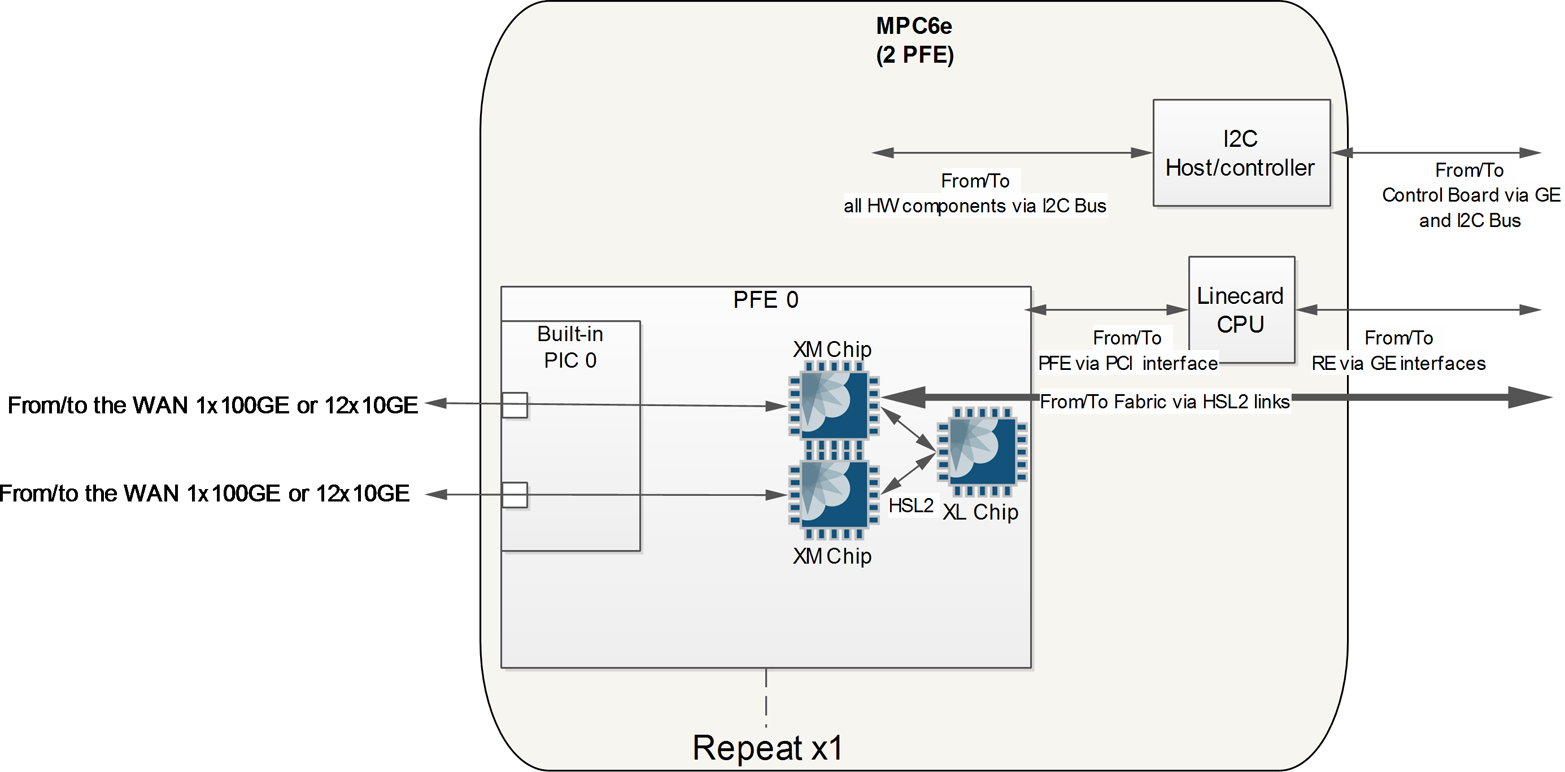
Figure 1-40. MPC6e architecture
NG-MPC2e and NG-MPC3e
The next-generation of MPC2 and 3 are based on the XL/XM/XQ set of ASICs. The two types of cards have exactly the same hardware architecture. The only difference is the “PFE clocking.” Actually, the PFE of the NG-MPC2e has a bandwidth of 80Gbps and the while the PFE of the NG-MPC3e has a bandwidth of 130Gbits. Both MPCs are implemented around one PFE made of one XL chip and one XM chip and for some models (with the suffix “Q” for enhanced queuing) the XQ chip is also present (see Figure 1-41).
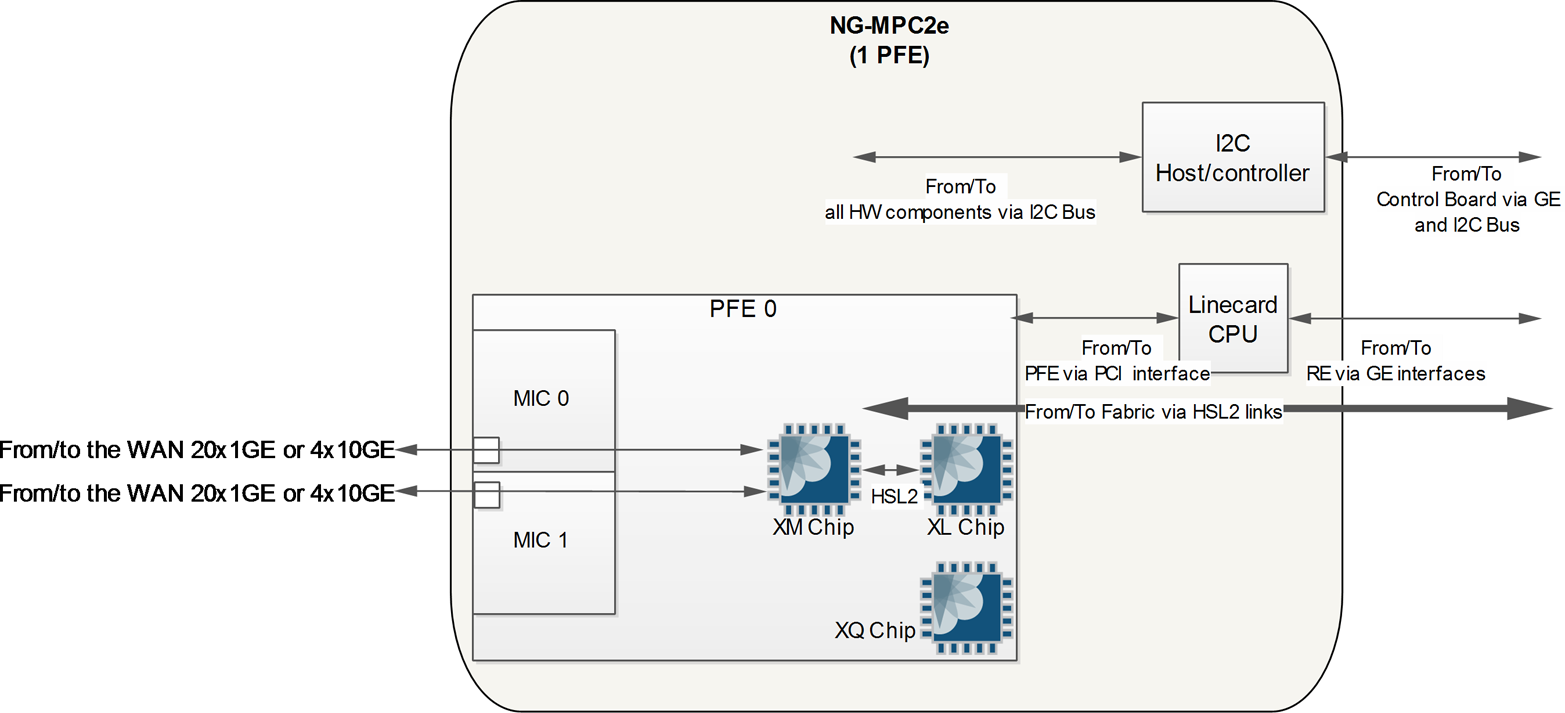
Figure 1-41. NG-MPC2e architecture
MPC7e
The MPC7e is the first MPC based on the latest generation of the Trio ASIC: the EA ASIC. This MPC has a total bandwidth of 480Gbps and is made of two PFEs where each PFE is actually made of one Eagle (EA) chip.
Note
The EA chip on the MPC7e is rate limited at 240Gbps.
There are 2 models of MPC7e:
MPC7e multi-rate: fixed configuration with 12 x QSFP ports (6 x QSFP ports per built-in PIC). All ports support 4 x 10GE, 40GE optics and 4 ports support 100GE (QSFP 28).
MPC7e 10GE: fixed configuration with 40 x 10GE SFP+ ports (2 x 20GE built-in PIC). Support for SR, LR, ER and DWDM optics.
Figure 1-42 illustrates the hardware architecture of the MPC7e multi-rate.
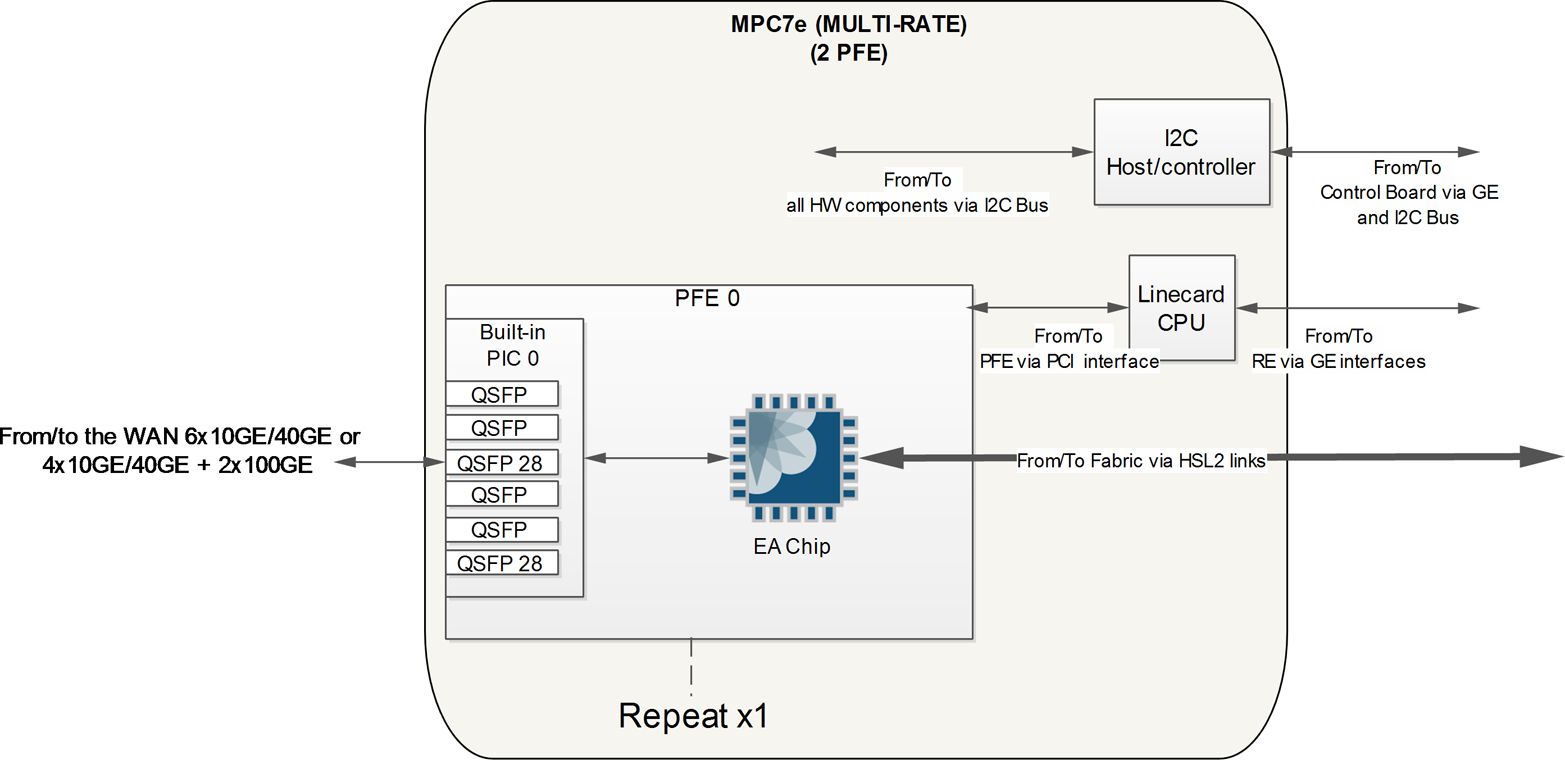
Figure 1-42. MPC7e multi-rate architecture
Figure 1-43 depicts the architecture of the MPC7e 10GE.
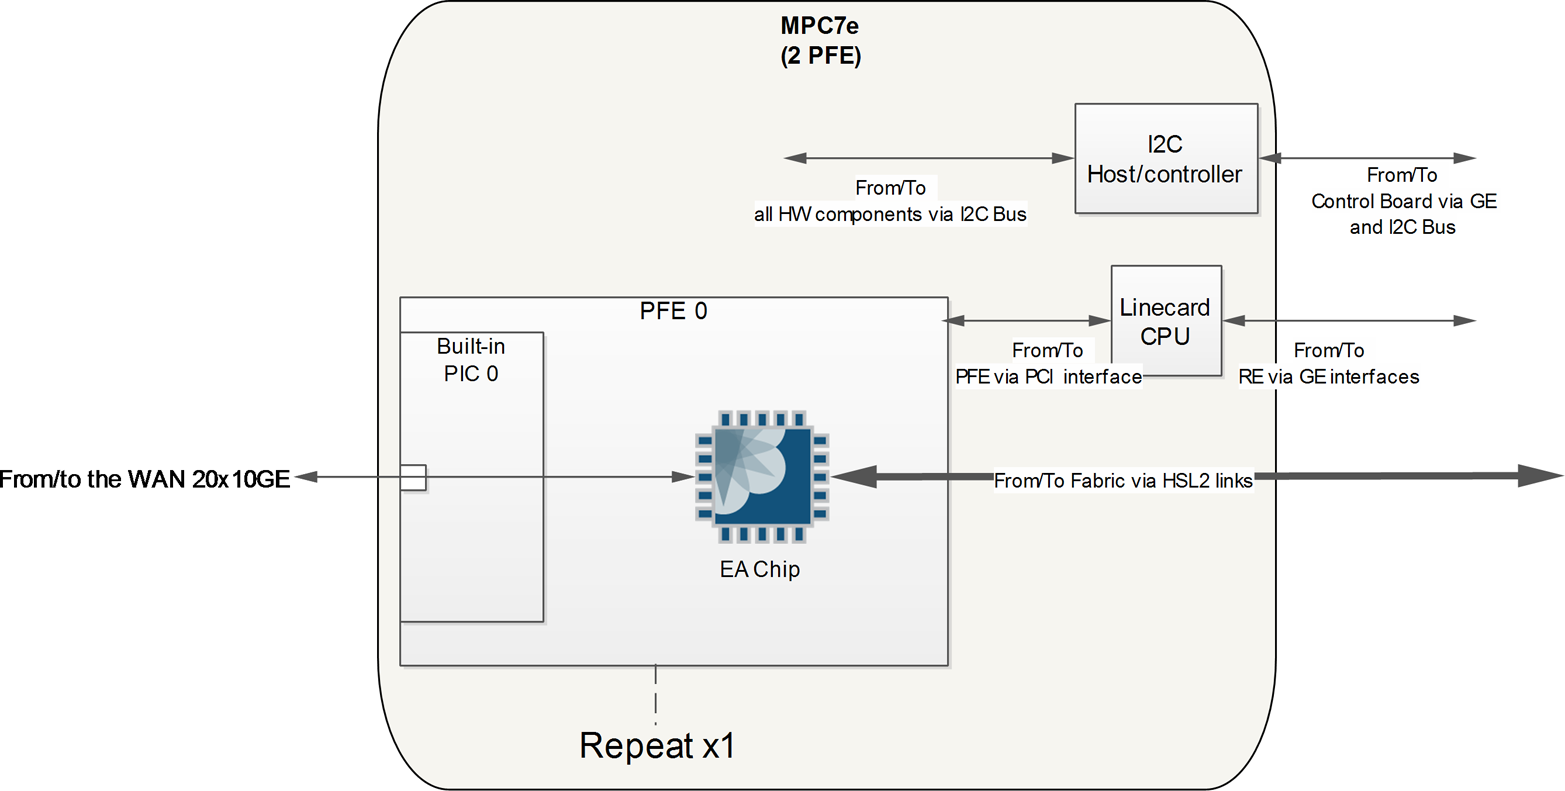
Figure 1-43. MPC7e 10GE architecture
MPC8e
The MPC8e is an MX2K MPC. It is based on the EA chip. The MPC8e is a modular card which can host two MICs. Each MIC is attached to two PFEs, each of them made of one EA. There are four EA chips on the MPC8e. This MPC is optimized for 10 and 40 GE interfaces. MPC8e supports also 12 x QSFP MIC-MRATE.
Note
The EA chip on the MPC8e is rate limited at 240Gbps.
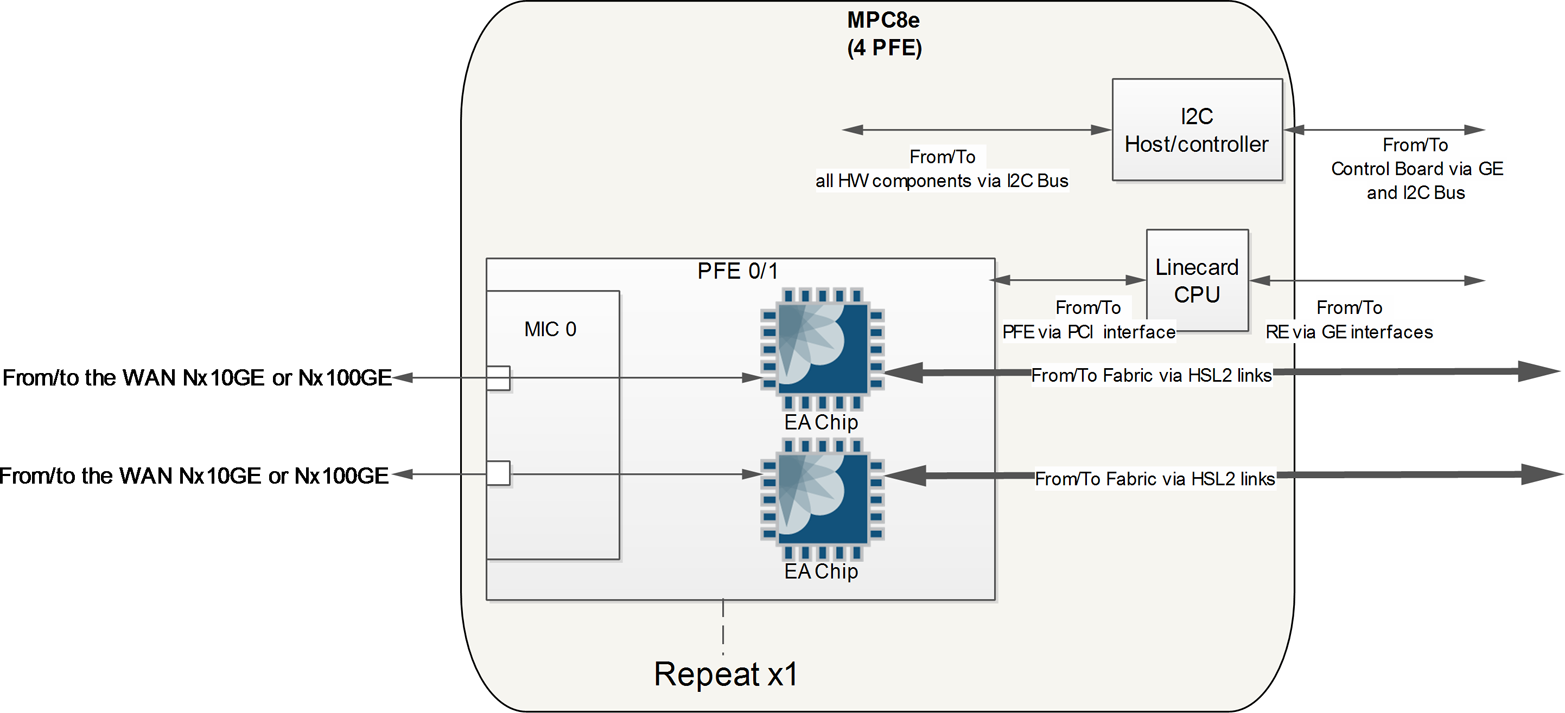
Figure 1-44. MPC8e architecture
MPC9e
As with the MPC8e, the MPC9e is a MX2K modular MPC. It accepts 2 MICs; each of them is attached at 2 PFE (each of them made of 1 EA chip). In this configuration the EA chip works at 400Gbps. This MPC9e helps to scale the number of 100GE interfaces per slot. With the power the new generation of the ASIC, the MPC9e can host until 16x100GE at line rate. The MIC slot also supports 12 x QSFP MIC-MRATE.
Warning
To take advantage of the full power of MPC8e and MPC9e on the MX2K, the next generation of fabric plane for MX2K is needed. This next generation of fabric card is called SFB2.
Figure 1-45 illustrates the MPC9e hardware architecture.
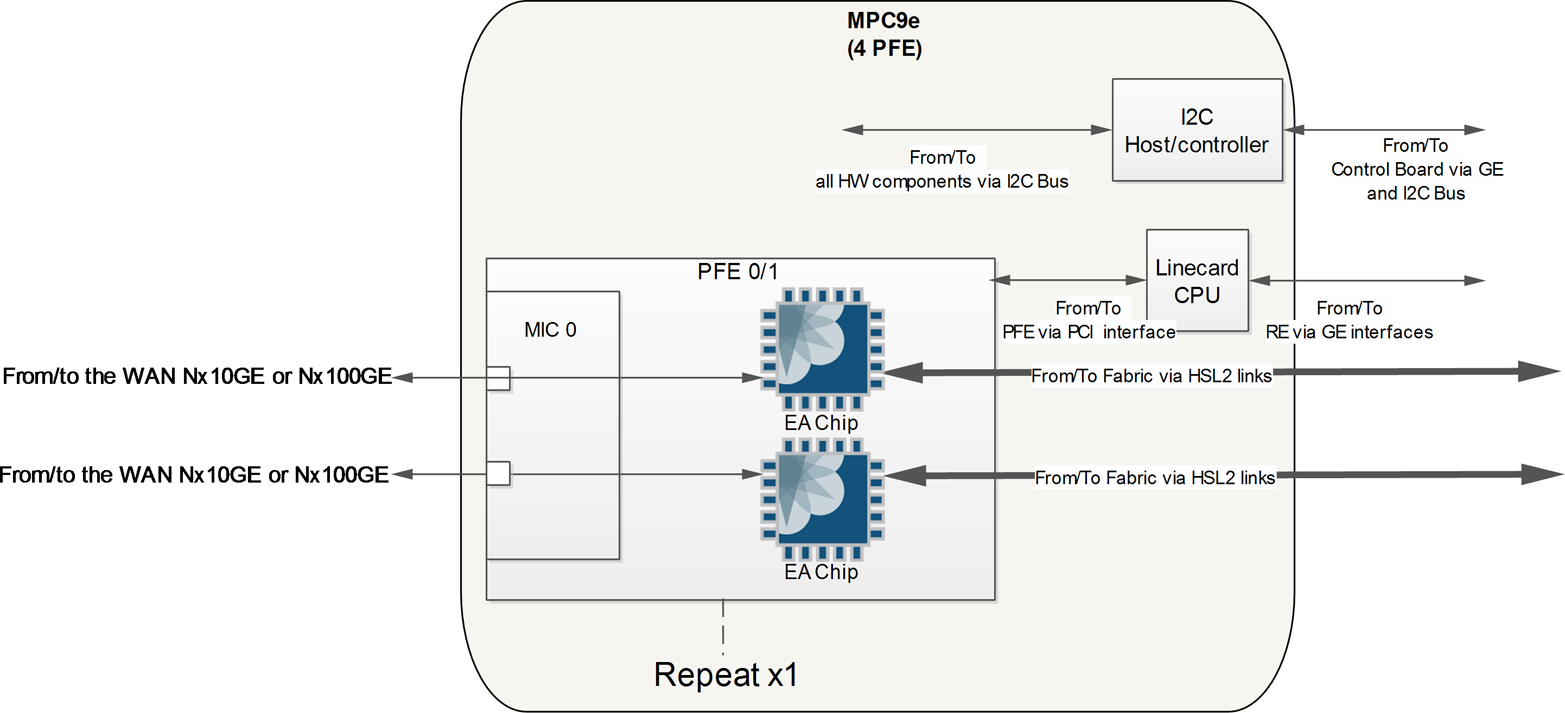
Figure 1-45. MPC9e architecture
Packet Walkthrough
Now that you have an understanding of the different Trio functional blocks and the layout of each line card, let’s take a look at how a packet is processed through each of the major line cards. Because there are so many different variations of functional blocks and line cards, let’s take a look at the most sophisticated configurations that use all available features.
MPC1 and MPC2 with enhanced queuing
The only difference between the MPC1 and MPC2 at a high level is the number of Trio chipsets. Otherwise, they are operationally equivalent. Let’s take a look at how a packet moves through the Trio chipset. There are two possible scenarios: ingress and egress.
Ingress packets are received from the WAN ports on the MIC and are destined to another PFE:
The packet enters the Interfaces Block from the WAN ports. The Interfaces Block will inspect each packet and perform preclassification. Depending on the type of packet, it will be marked as high or low priority.
The packet enters the Buffering Block. The Buffering Block will enqueue the packet as determined by the preclassification and service the high priority queue first.
The packet enters the Lookup Block. A route lookup is performed and any services such as firewall filters, policing, statistics, and QoS classification are performed.
The packet is sent back to the Buffering Block and is enqueued into the switch fabric where it will be destined to another PFE. If the packet is destined to a WAN port within itself, it will simply be enqueued back to the Interfaces Block.
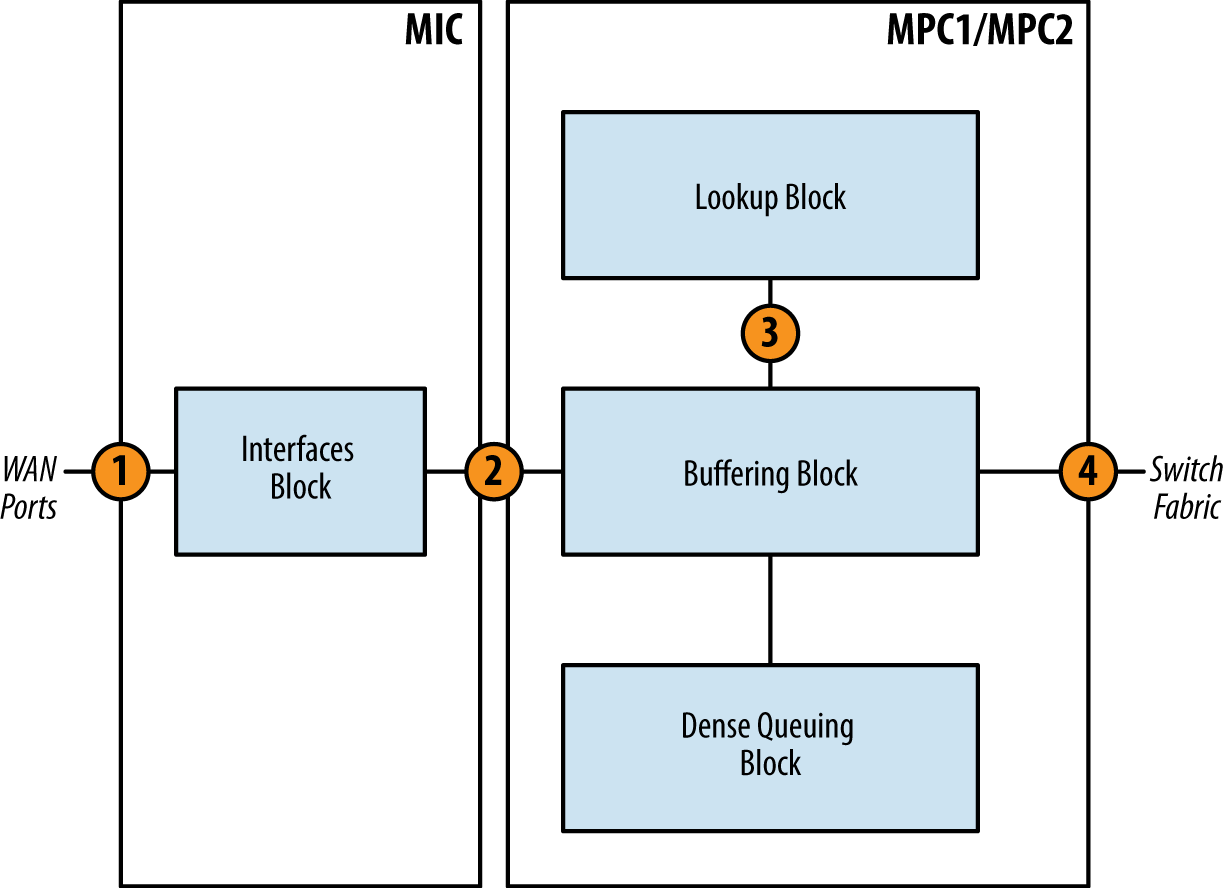
Figure 1-46. MPC1/MPC2 packet walkthrough: Ingress
Egress packets are handled a bit differently (the major difference is that the Dense Queuing Block will perform class of service, if configured, on egress packets):
The packet enters the Buffering Block. If class of service is configured, the Buffering Block will send the packet to the Dense Queuing Block.
The packet enters the Dense Queuing Block. The packet will then be subject to scheduling, shaping, and any other hierarchical class of service as required. Packets will be enqueued as determined by the class of service configuration. The Dense Queuing Block will then dequeue packets that are ready for transmission and send them to the Buffering Block.
The Buffering Block receives the packet and sends it to the Lookup Block. A route lookup is performed as well as any services such as firewall filters, policing, statistics, and accounting.
The packet is then sent out to the WAN interfaces for transmission.
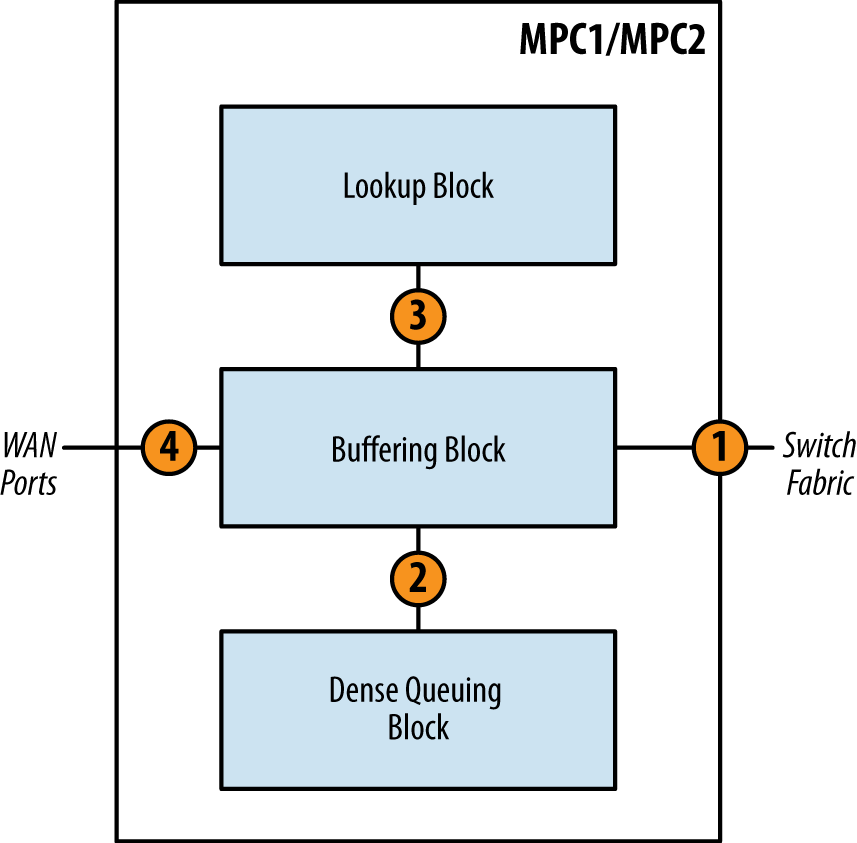
Figure 1-47. MPC1/MPC2 packet walkthrough: Egress
MPC3E
The packet flow of the MPC3E is similar to the MPC1 and MPC2, with a couple of notable differences: introduction of the Fabric Block and multiple Lookup Blocks. Let’s review the ingress packet first:
The packet enters the Buffering Block from the WAN ports and is subject to preclassification. Depending on the type of packet, it will be marked as high or low priority. The Buffering Block will enqueue the packet as determined by the preclassification and service the high-priority queue first. A Lookup Block is selected via round-robin and the packet is sent to that particular Lookup Block.
The packet enters the Lookup Block. A route lookup is performed and any services such as firewall filters, policing, statistics, and QoS classification are performed. The Lookup Block sends the packet back to the Buffering Block.
The packet is sent back to the Fabric Block and is enqueued into the switch fabric where it will be destined to another PFE. If the packet is destined to a WAN port within itself, it will simply be enqueued back to the Interfaces Block.
The packet is sent to the switch fabric.
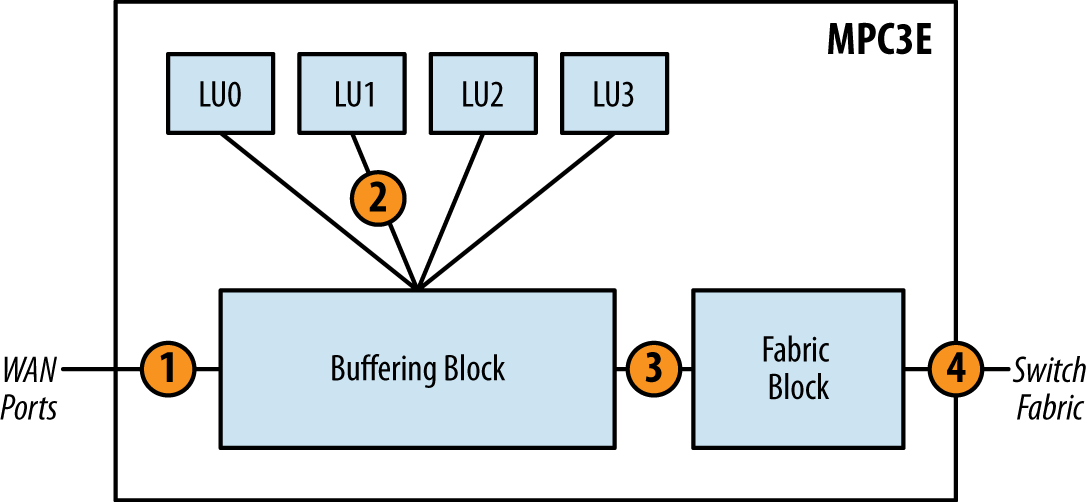
Figure 1-48. MPC3E packet walkthrough: Ingress
Egress packets are very similar to ingress, but the direction is simply reversed (the only major difference is that the Buffering Block will perform basic class of service, as it doesn’t support Enhanced Queuing due to the lack of a Dense Queuing Block):
The packet is received from the switch fabric and sent to the Fabric Block. The Fabric Block sends the packet to the Buffering Block.
The packet enters the Buffering Block. The packet will then be subject to scheduling, shaping, and any other class of service as required. Packets will be enqueued as determined by the class of service configuration. The Buffering Block will then dequeue packets that are ready for transmission and send them to a Lookup Block selected via round-robin.
The packet enters the Lookup Block. A route lookup is performed as well as any services such as firewall filters, policing, statistics, and QoS classification. The Lookup Block sends the packet back to the Buffering Block.
The Buffering Block receives the packet and sends it to the WAN ports for transmission.
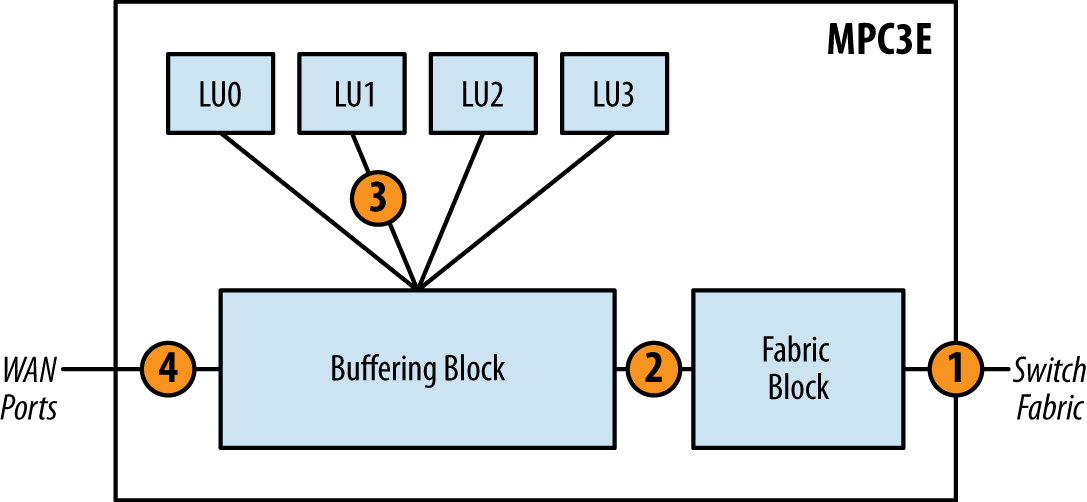
Figure 1-49. MPC3E packet walkthrough: Egress
Modular Interface Card
As described previously, the MICs provide the physical ports and are modules that are to be installed into various MPCs. Two MICs can be installed into any of the MPCs. There is a wide variety of physical port configurations available. The speeds range from 1G to 100G and support different media such as copper or optical.
Note
The MIC-3D-40GE-TX is a bit of an odd man out, as it’s a double-wide MIC that consumes both MIC slots on the MPC.
Being modular in nature, the MICs are able to be moved from one MPC to another except the specific MPC6e MIC. They are hot-swappable and do not require a reboot to take effect. MICs offer the greatest investment protection as they’re able to be used across all of the MX platforms and various MPCs. However, there are a few caveats specific to the 4x10GE and 1x100GE MICs.
Note
To get the most up-to-date compatibility table to determine what MICs can be used where, see http://juni.pr/29wclEP.
Network Services
The MX240, MX480, and MX960 are able to operate with different types of line cards at the same time. For example, it’s possible to have a MX240 operate with FPC1 using a DPCE-R line card while FPC2 uses an MX-MPC-R-B line card. Because there are many different variations of DPC, MPC, Ethernet, and routing options, a chassis control feature called network services can be used force the chassis into a particular compatibility mode.
If the network services aren’t configured, then by default when an MX chassis boots up, the FPC that is powered up first will determine the mode of the chassis. If the first FPC to be powered up is DPC, then only DPCs within the chassis will be allowed to power up. Alternatively, if the first powered up FPC is MPC, then only MPCs within the chassis will be allowed to power up.
The chassis network services can be configured with the set chassis network-services knob. There are five different options the network services can be set to:
-
ip Allow all line cards to power up, except for DPCE-X. The
iphints toward being able to route, thus line cards such as the DPCE-X will not be allowed to power up, as they only support bridging.-
ethernet Allow all line cards to power up. This includes the DPCE-X, DPCE-R, and DPCE-Q.
-
enhanced-ip Allow all Trio-based MPCs to be powered up. This is the default mode on the MX2K router.
-
enhanced-ethernet Allow only Trio-based MPC-3D, MPC-3D-Q, and MPC-3D-EQ line cards to be powered up.
-
all-ip Allow both DPC and MPC line cards to be powered up, except for DPCE-X line cards. This option was hidden in Junos 10.0 and was used for manufacturing testing.
-
all-ethernet Allow both DPC and MPC line cards to be powered up. This includes the DPCE-X and other line cards that are Layer 2 only. This option was hidden in Junos 10.0 and was used for manufacturing testing.
Warning
The
all-ipandall-ethernetmodes are deprecated and shouldn’t be used. These options were used exclusively for developer and manufacturing testing.
It’s possible to change the value of network services while the chassis is running. There are many different combinations; some require a reboot, while others do not:
-
Change from
iptoethernet Any DPCE-X will boot up. No reboot required.
-
Change from
ethernettoip This change will generate a commit error. It’s required that any DPCE-X line cards be powered off before the change can take effect.
-
Change
enhanced-iptoenhanced-ethernet Any MPC-3D, MPC-3D-Q, and MPC-3D-EQ line cards will boot up. No reboot required.
-
Change
enhanced-ethernettoenhanced-ip No change.
-
Change between
iporethernettoenhanced-iporenhanced-ethernet The commit will complete but will require a reboot of the chassis.
To view which mode the network services is currently set to, use the show chassis network-services command:
dhanks@R1> show chassis network-services
Network Services Mode: IP
Switch and Control Board
At the heart of the MX Series is the Switch and Control Board (SCB), or the Control Board (CB) + Switch Fabric Board (SFB) for the MX2K Series. It’s the glue that brings everything together.
The SCB has three primary functions: switch data between the line cards, control the chassis, and house the Routing Engine. The SCB is a single-slot card and has a carrier for the Routing Engine on the front. An SCB contains the following components:
An Ethernet switch for chassis management
Two switch fabrics
Control board (CB) and Routing Engine state machine for mastership arbitration
Routing Engine carrier
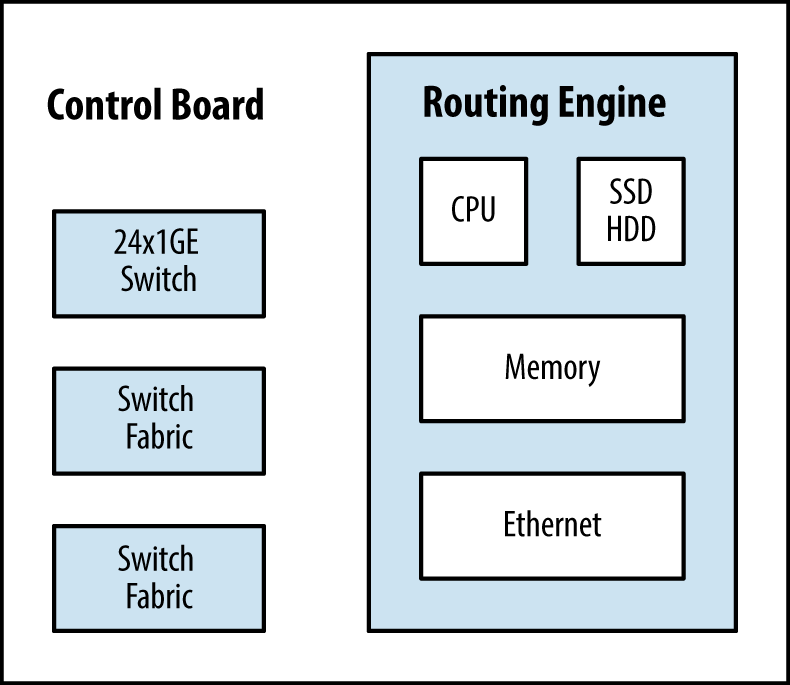
Figure 1-50. Switch and control board components
Unlike other MX Series, the MX2010 and MX2020 have separated control boards which still host the Routing Engine but not the fabric ASICs. Indeed, a new card called an SFB (Switch Fabric Board) is dedicated for inter-PFE forwarding purposes. Each SFB hosts one switch fabric plane made of several fabric Chipsets.
Depending on the MX chassis (except in the case of the MX2K Series) and the level of redundancy, the number of SCBs can vary. The MX240 and MX480 require two SCBs for 1 + 1 redundancy, whereas the MX960 requires three SCBs for 2 + 1 redundancy. On an MX router with a redundancy SCB available, a specific knob allows an operator to turn on all the SCBs to offer more fabric bandwidth. It’s useful if you want to benefit from the full power of a given MPC: therefore, for MPC4e with SCBE fabric plane.
The knob is called increased-bandwidth and is configurable like this:
{master}
droydavi@R1-RE0# set chassis fabric redundancy-mode increased-bandwidth
And you can check the current redundancy mode:
{master}
droydavi@R1-RE0> show chassis fabric redundancy-mode
Fabric redundancy mode: Increased Bandwidth
Then the six planes of the MX960 come online and are used to forward traffic (no more spare plane):
{master}
droydavi@R1-RE0>  show chassis fabric summary
Plane   State    Uptime
 0      Online   449 days, 16 hours, 19 minutes, 4 seconds
 1      Online   449 days, 16 hours, 18 minutes, 58 seconds
 2      Online   449 days, 16 hours, 18 minutes, 53 seconds
 3      Online   449 days, 16 hours, 18 minutes, 48 seconds
 4      Online   449 days, 16 hours, 18 minutes, 43 seconds
 5      Online   449 days, 16 hours, 18 minutes, 38 seconds
This MX2K Series has eight SFB cards, all online and conveying traffic. However only seven are required to support the full chassis capacity.
Ethernet Switch
Each SCB, or CB on the MX2000 Series, contains a Gigabit Ethernet switch. This internal switch connects the two Routing Engines and all of the FPCs together. Each Routing Engine has two networking cards. The first NIC is connected to the local onboard Ethernet switch, whereas the second NIC is connected to the onboard Ethernet switch on the other SCB. This allows the two Routing Engines to have internal communication for features such as NSR, NSB, ISSU, and administrative functions such as copying files between the Routing Engines.
Each Ethernet switch has connectivity to each of the FPCs, as shown in Figure 1-51. This allows for the Routing Engines to communicate to the Junos microkernel onboard each of the FPCs. A good example would be when a packet needs to be processed by the Routing Engine. The FPC would need to send the packet across the SCB Ethernet switch and up to the master Routing Engine. Another good example is when the Routing Engine modifies the forwarding information base (FIB) and updates all of the PFEs with the new information.
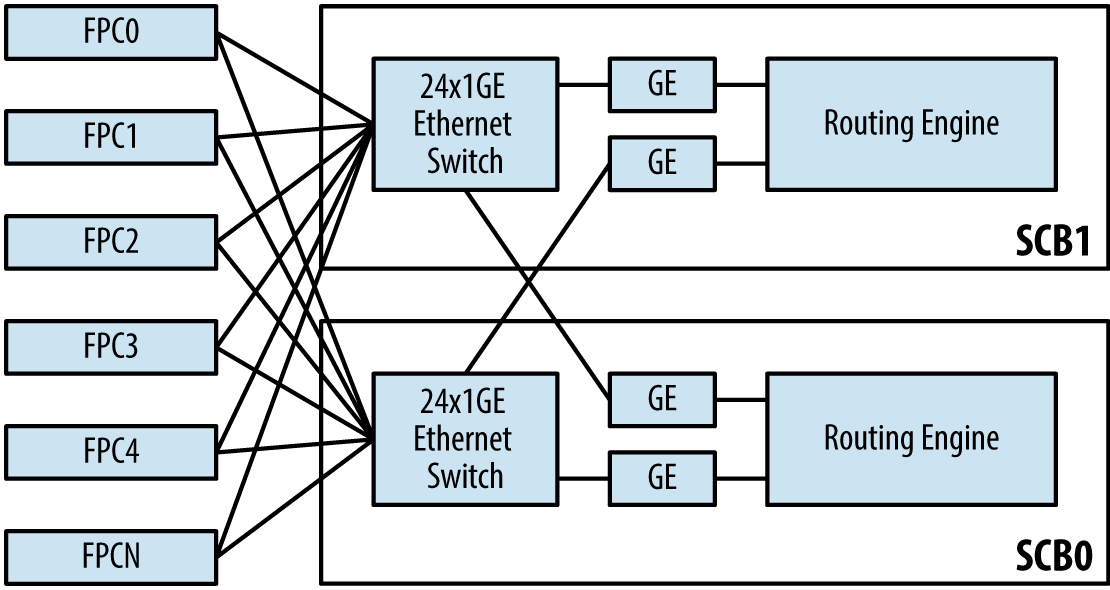
Figure 1-51. MX-SCB Ethernet switch connectivity
It’s possible to view information about the Ethernet switch inside of the SCB. The command show chassis ethernet-switch will show which ports on the Ethernet switch are connected to which devices at a high level:
{master}
dhanks@R1-RE0> show chassis ethernet-switch

Displaying summary for switch 0
Link is good on GE port 1 connected to device: FPC1
  Speed is 1000Mb
  Duplex is full
  Autonegotiate is Enabled
  Flow Control TX is Disabled
  Flow Control RX is Disabled

Link is good on GE port 2 connected to device: FPC2
  Speed is 1000Mb
  Duplex is full
  Autonegotiate is Enabled
  Flow Control TX is Disabled
  Flow Control RX is Disabled

Link is good on GE port 12 connected to device: Other RE
  Speed is 1000Mb
  Duplex is full
  Autonegotiate is Enabled
  Flow Control TX is Disabled
  Flow Control RX is Disabled

Link is good on GE port 13 connected to device: RE-GigE
  Speed is 1000Mb
  Duplex is full
  Autonegotiate is Enabled
  Flow Control TX is Disabled
  Flow Control RX is Disabled
  Receive error count = 012032
The Ethernet switch will only be connected to FPCs that are online and Routing Engines. As you can see, R1-RE0 is showing that its Ethernet switch is connected to both FPC1 and FPC2. Let’s check the hardware inventory to make sure that this information is correct:
{master}
dhanks@R1-RE0> show chassis fpc
                     Temp  CPU Utilization (%)   Memory    Utilization (%)
Slot State            (C)  Total  Interrupt      DRAM (MB) Heap     Buffer
  0  Empty
  1  Online            35     21          0       2048       12         13
  2  Online            34     22          0       2048       11         16

{master}
dhanks@R1-RE0>
As you can see, FPC1 and FPC2 are both online. This matches the previous output from the show chassis ethernet-switch. Perhaps the astute reader noticed that the Ethernet switch port number is paired with the FPC location. For example, GE port 1 is connected to FPC1, GE port 2 is connected to FPC2, and so on and so forth all the way up to FPC11.
Although each Ethernet switch has 24 ports, only 14 are being used, as listed in Table 1-9. GE ports 0 through 11 are reserved for FPCs, while GE ports 12 and 13 are reserved for connections to the Routing Engines.
| GE port | Description |
|---|---|
| 0 | FPC0 |
| 1 | FPC1 |
| 2 | FPC2 |
| 3 | FPC3 |
| 4 | FPC4 |
| 5 | FPC5 |
| 6 | FPC6 |
| 7 | FPC7 |
| 8 | FPC8 |
| 9 | FPC9 |
| 10 | FPC10 |
| 11 | FPC11 |
| 12 | Other Routing Engine |
| 13 | Routing Engine GE |
Note
One interesting note is that the show chassis ethernet-switch command is relative to where it’s executed. GE port 12 will always be the other Routing Engine. For example, when the command is executed from re0, GE port 12 would be connected to re1 and GE port 13 would be connected to re0.
To view more detailed information about a particular GE port on the SCB Ethernet switch, you can use the show chassis ethernet-switch statistics command. Let’s take a closer look at GE port 13, which is connected to the local Routing Engine:
{master}
dhanks@R1-RE0> show chassis ethernet-switch statistics 13

Displaying port statistics for switch 0
Statistics for port 13 connected to device RE-GigE:
  TX Packets 64 Octets        29023890
  TX Packets 65-127 Octets    101202929
  TX Packets 128-255 Octets   14534399
  TX Packets 256-511 Octets   239283
  TX Packets 512-1023 Octets  610582
  TX Packets 1024-1518 Octets  1191196
  TX Packets 1519-2047 Octets  0
  TX Packets 2048-4095 Octets  0
  TX Packets 4096-9216 Octets  0
  TX 1519-1522 Good Vlan frms  0
  TX Octets                   146802279
  TX Multicast Packets        4
  TX Broadcast Packets        7676958
  TX Single Collision frames  0
  TX Mult. Collision frames   0
  TX Late Collisions          0
  TX Excessive Collisions     0
  TX Collision frames         0
  TX PAUSEMAC Ctrl Frames     0
  TX MAC ctrl frames          0
  TX Frame deferred Xmns      0
  TX Frame excessive deferl   0
  TX Oversize Packets         0
  TX Jabbers                  0
  TX FCS Error Counter        0
  TX Fragment Counter         0
  TX Byte Counter             2858539809

<output truncated for brevity>
Although the majority of the traffic is communication between the two Routing Engines, exception traffic is also passed through the Ethernet switch. When an ingress PFE receives a packet that needs additional processing—such as a BGP update or SSH traffic destined to the router—the packet needs to be encapsulated and sent to the Routing Engine. The same is true if the Routing Engine is sourcing traffic that needs to be sent out an egress PFE.
Switch Fabric
The switch fabric connects all of the ingress and egress PFEs within the chassis to create a full mesh. Each SCB and SFB are made of several switch fabric ASICs. The number of switch fabric chipsets depends on the model of the SCB or SFB.
The MX240 and MX480 support two SCBs for a total of four switch fabrics and eight fabric planes. The MX960 supports three SCBs for a total of six switch fabrics and six fabric planes. The MX2010 and MX2020 support eight switch fabrics/planes.
This begs the question, what is a fabric plane? Think of the switch fabric as a fixed unit that can support N connections. When supporting 48 PFEs on the MX960, all of these connections on the switch fabric are completely consumed. Now think about what happens when you apply the same logic to the MX480. Each switch fabric now only has to support 24 PFEs, thus half of the connections aren’t being used. What happens on the MX240 and MX480 is that these unused connections are grouped together and another plane is created so that the unused connections can now be used (see Table 1-10). The benefit is that the MX240 and MX480 only require a single SCB to provide line rate throughput, and thus only require an additional SCB for 1 + 1 SCB redundancy.
| MX-SCB | MX240 | MX480 | MX960 | MX2K |
|---|---|---|---|---|
| PFEs | 12 | 24 | 48 | 80 |
| SCBs | 2 | 2 | 3 | 8 (SFB) |
| Switch Fabrics | 4 | 4 | 6 | 8 |
| Fabric Planes | 8 | 8 | 6 | 8 |
| Spare Planes | 4 (1 + 1 SCB redundancy) | 4 (1 + 1 SCB redundancy) | 2 (2 + 1 SCB redundancy) | 8 (only 7 needed—7+1 mode SFB redundancy) |
Each plane is made of one or several Fabric ASICs also designed by Juniper. The Fabric ASIC is connected to all the PFE with dedicated links (called SERDES). Depending on the version of Fabric ASIC and the type of MPC connected on, a “fabric link” is programmed to work at a given rate.
MX Switch Control Board
The MX SCB is the first-generation switch fabric for the MX240, MX480, and MX960. This MX SCB was designed to work with the first-generation DPC line cards. As described previously, the MX SCB provides line-rate performance with full redundancy.
The MX240 and MX480 provide 1 + 1 MX SCB redundancy when used with the DPC line cards. The MX960 provides 2 + 1 MX SCB redundancy when used with the DPC line cards.
Each of the fabric planes on the first-generation SCB is able to process 20 Gbps of bandwidth. The MX240 and MX480 use eight fabric planes across two SCBs, whereas the MX960 uses six fabric planes across three SCBs (see Table 1-11). Because of the fabric plane virtualization, the aggregate fabric bandwidth between the MX240, MX480, and MX960 is different.
| Model | SCBs | Switch fabrics | Fabric planes | Fabric bandwidth per slot |
|---|---|---|---|---|
| MX240 | 2 | 4 | 8 | 160 Gbps |
| MX480 | 2 | 4 | 8 | 160 Gbps |
| MX960 | 3 | 6 | 6 | 120 Gbps |
MX SCB and MPC caveats
The only caveat is that the first-generation MX SCBs are not able to provide line-rate redundancy with some of the new-generation MPC line cards. When the MX SCB is used with the newer MPC line cards, it places additional bandwidth requirements onto the switch fabric. The additional bandwidth requirements come at a cost of oversubscription and a loss of redundancy.
Note
The new-generation Enhanced MX SCB is required to provide line-rate fabric bandwidth with full redundancy for high-density MPC line cards such as the MPC-3D-16x10GE-SFPP.
MX240 and MX480
As described previously, the MX240 and MX480 have a total of eight fabric planes when using two MX SCBs. When the MX SCB and MPCs are being used on the MX240 and MX480, there’s no loss in performance and all MPCs are able to operate at line rate. The only drawback is that all fabric planes are in use and are Online.
Let’s take a look at a MX240 with the first-generation MX SCBs and new-generation MPC line cards:
{master}
dhanks@R1-RE0> show chassis hardware | match FPC
FPC 1            REV 15   750-031088   ZB7956            MPC Type 2 3D Q
FPC 2            REV 25   750-031090   YC5524            MPC Type 2 3D EQ

{master}
dhanks@R1-RE0> show chassis hardware | match SCB
CB 0             REV 03   710-021523   KH6172            MX SCB
CB 1             REV 10   710-021523   ABBM2781          MX SCB

{master}
dhanks@R1-RE0> show chassis fabric summary
Plane   State    Uptime
 0      Online   10 days, 4 hours, 47 minutes, 47 seconds
 1      Online   10 days, 4 hours, 47 minutes, 47 seconds
 2      Online   10 days, 4 hours, 47 minutes, 47 seconds
 3      Online   10 days, 4 hours, 47 minutes, 47 seconds
 4      Online   10 days, 4 hours, 47 minutes, 47 seconds
 5      Online   10 days, 4 hours, 47 minutes, 46 seconds
 6      Online   10 days, 4 hours, 47 minutes, 46 seconds
 7      Online   10 days, 4 hours, 47 minutes, 46 seconds
As we can see, R1 has the first-generation MX SCBs and new-generation MPC2 line cards. In this configuration, all eight fabric planes are Online and processing J-cells.
If a MX SCB fails on a MX240 or MX480 using the new-generation MPC line cards, the router’s performance will degrade gracefully. Losing one of the two MX SCBs would result in a loss of half of the router’s performance.
MX960
In the case of the MX960, it has six fabric planes when using three MX SCBs. When the first-generation MX SCBs are used on a MX960 router, there isn’t enough fabric bandwidth to provide line-rate performance for the MPC-3D-16X10GE-SFPP or MPC3-3D line cards. However, with the MPC1 and MPC2 line cards, there’s enough fabric capacity to operate at line rate, except when used with the 4x10G MIC.
Let’s take a look at a MX960 with a first-generation MX SCB and second-generation MPC line cards:
dhanks@MX960> show chassis hardware | match SCB
CB 0             REV 03.6 710-013385   JS9425            MX SCB
CB 1             REV 02.6 710-013385   JP1731            MX SCB
CB 2             REV 05   710-013385   JS9744            MX SCB

dhanks@MX960> show chassis hardware | match FPC
FPC 2            REV 14   750-031088   YH8454            MPC Type 2 3D Q
FPC 5            REV 29   750-031090   YZ6139            MPC Type 2 3D EQ
FPC 7            REV 29   750-031090   YR7174            MPC Type 2 3D EQ

dhanks@MX960> show chassis fabric summary
Plane   State    Uptime
 0      Online   11 hours, 21 minutes, 30 seconds
 1      Online   11 hours, 21 minutes, 29 seconds
 2      Online   11 hours, 21 minutes, 29 seconds
 3      Online   11 hours, 21 minutes, 29 seconds
 4      Online   11 hours, 21 minutes, 28 seconds
 5      Online   11 hours, 21 minutes, 28 seconds
As you can see, the MX960 has three of the first-generation MX SCB cards. There’s also three second-generation MPC line cards. Taking a look at the fabric summary, we can surmise that all six fabric planes are Online. When using high-speed MPCs and MICs, the oversubscription is approximately 4:3 with the first-generation MX SCB. Losing an MX SCB with the new-generation MPC line cards would cause the MX960 to gracefully degrade performance by a third.
MX240 and MX480 fabric planes
Given that the MX240 and MX480 only have to support a fraction of the number of PFEs as the MX960, we’re able to group together the unused connections on the switch fabric and create a second fabric plane per switch fabric. Thus we’re able to have two fabric planes per switch fabric, as shown in Figure 1-52.

Figure 1-52. Juniper MX240 and MX480 switch fabric planes
As you can see, each control board has two switch fabrics: SF0 and SF1. Each switch fabric has two fabric planes. Thus the MX240 and MX480 have eight available fabric planes. This can be verified with the show chassis fabric plane-location command:
{master}
dhanks@R1-RE0> show chassis fabric plane-location
------------Fabric Plane Locations-------------
Plane 0                         Control Board 0
Plane 1                         Control Board 0
Plane 2                         Control Board 0
Plane 3                         Control Board 0
Plane 4                         Control Board 1
Plane 5                         Control Board 1
Plane 6                         Control Board 1
Plane 7                         Control Board 1

{master}
dhanks@R1-RE0>
Because the MX240 and MX480 only support two SCBs, they support 1 + 1 SCB redundancy. By default, SCB0 is in the Online state and processes all of the forwarding. SCB1 is in the Spare state and waits to take over in the event of an SCB failure. This can be illustrated with the show chassis fabric summary command:
{master}
dhanks@R1-RE0> show chassis fabric summary
Plane   State    Uptime
 0      Online   18 hours, 24 minutes, 57 seconds
 1      Online   18 hours, 24 minutes, 52 seconds
 2      Online   18 hours, 24 minutes, 51 seconds
 3      Online   18 hours, 24 minutes, 46 seconds
 4      Spare    18 hours, 24 minutes, 46 seconds
 5      Spare    18 hours, 24 minutes, 41 seconds
 6      Spare    18 hours, 24 minutes, 41 seconds
 7      Spare    18 hours, 24 minutes, 36 seconds

{master}
dhanks@R1-RE0>
As expected, planes 0 to 3 are Online and planes 4 to 7 are Spare. Another useful tool from this command is the Uptime. The Uptime column displays how long the SCB has been up since the last boot. Typically, each SCB will have the same uptime as the system itself, but it’s possible to hot-swap SCBs during a maintenance window; the new SCB would then show a smaller uptime than the others.
MX960 fabric planes
The MX960 is a different beast because of the PFE scale involved (see Figure 1-53). It has to support twice the number of PFEs as the MX480, while maintaining the same line-rate performance requirements. An additional SCB is mandatory to support these new scaling and performance requirements.
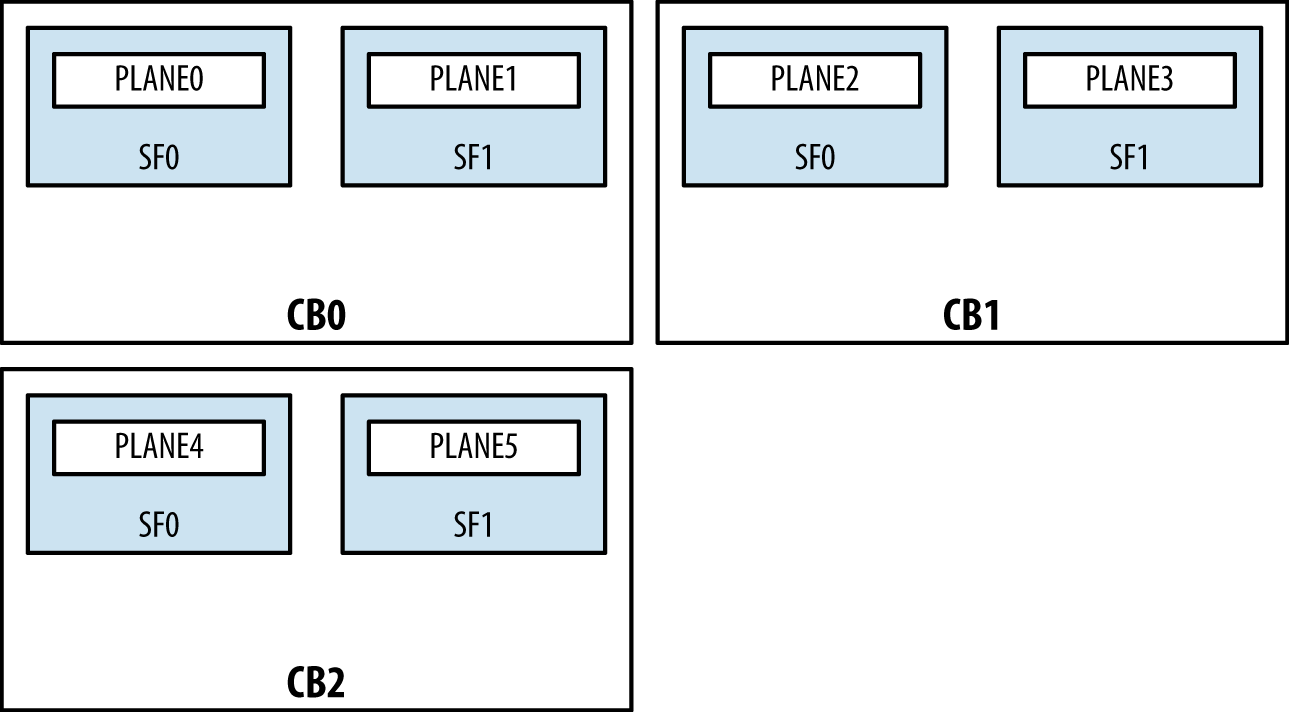
Figure 1-53. Juniper MX960 switch fabric planes
Unlike the MX240 and MX480, the switch fabric ASICs only support a single fabric plane because all available links are required to create a full mesh between all 48 PFEs. Let’s verify this with the show chassis fabric plane-location command:
{master}
dhanks@MX960> show chassis fabric plane-location
------------Fabric Plane Locations-------------
Plane 0                         Control Board 0
Plane 1                         Control Board 0
Plane 2                         Control Board 1
Plane 3                         Control Board 1
Plane 4                         Control Board 2
Plane 5                         Control Board 2

{master}
dhanks@MX960>
As expected, things seem to line up nicely. We see there are two switch fabrics per control board. The MX960 supports up to three SCBs providing 2 + 1 SCB redundancy. At least two SCBs are required for basic line rate forwarding, and the third SCB provides redundancy in case of an SCB failure. Let’s take a look at the show chassis fabric summary command:
{master}
dhanks@MX960> show chassis fabric summary
Plane   State    Uptime
 0      Online   18 hours, 24 minutes, 22 seconds
 1      Online   18 hours, 24 minutes, 17 seconds
 2      Online   18 hours, 24 minutes, 12 seconds
 3      Online   18 hours, 24 minutes, 6 seconds
 4      Spare    18 hours, 24 minutes, 1 second
 5      Spare    18 hours, 23 minutes, 56 seconds

{master}
dhanks@MX960>
Everything looks good. SCB0 and SCB1 are Online, whereas the redundant SCB2 is standing by in the Spare state. If SCB0 or SCB1 fails, SCB2 will immediately transition to the Online state and allow the router to keep forwarding traffic at line rate.
Enhanced MX Switch Control Board
There are actually three generations of MX Switch Control Board: SCB, SCBE, and SCBE2. The SCBE was designed to be used specifically with the MPC3e line cards to provide full line-rate performance and redundancy without a loss of bandwidth. Even if MPC4e’s are working fine on the SCBE with increased bandwidth mode, the SCBE2 was designed to retrieve the fabric redundancy for this specific line card and to provide more capacity for MPC5e, the NG MPC2/3 line cards, and the MPC7e.
The SCB is made using the SF ASIC, SCBE with XF1, and SCBE2 with XF2 ASIC. The SFB is also made using the XF2 ASIC, as listed in Table 1-12.
| Fabric card | ASIC used | ASIC per plane | MPC1 BW per plane | MPC2 BW per plane | MPC 16x10GE BW per plane | MPC3 BW per plane | MPC4 BW per plane | MPC5 BW per plane | MPC6 BW per plane |
|---|---|---|---|---|---|---|---|---|---|
| SCB | SF | 1 | ~5Gbps | ~10Gbps | ~20Gbps | N/A | N/A | N/A | N/A |
| SCBE | XF1 | 1 | ~10Gbps | ~20Gbps | ~40Gbps | ~40Gbps | ~40Gbps | ~40Gbps | N/A |
| SCBE2 | XF2 | 1 | ~10Gbps | ~20Gbps | ~40Gbps | ~40Gbps | ~54 or ~65Gbps |
~54 or ~65Gbps |
N/A |
| SFB | XF2 | 3 | ~10Gbps | ~20Gbps | ~40Gbps | ~40Gbps | ~65Gbps | ~65Gbps | ~130Gbps |
Why 54 or 65Gbps? To provide the maximum capacity of SCBE2, the requirement is to have the capacity of the last version of the chassis midplane. With the old midplane, SCBE2 worked at 54Gbps per MPC, while the new one works at 65Gbps.
Note
In the preceding table, “BW per plane” means fabric bandwidth available between the MPC and one plane. To know the total fabric bandwidth available of a given MPC, you need to multiply this value by the number of active planes.
Let’s use an example where we compute the MPC4e fabric bandwidth with SCBE or SCBE2 planes: if the MPC4e has two PFEs, each of them with a capacity of 130Gbps, we have an MPC4e PFE capacity of 260Gbps.
With SCBE and redundancy mode enabled
In this fabric configuration, there are four planes online. Referring to Table 1-12, the fabric bandwidth per plane for MPC4e is around 40Gbps. So, the total fabric bandwidth is:
MPC4e Fab BW = 4 x 40 = 160Gbps
Notice that in this configuration the fabric is the bottleneck: 260Gbps of PFE BW for 160Gbps available on the fabric path.
This is why it is recommended to turn off redundancy with the increased-bandwidth Junos knob and bring the six planes online. In this configuration, the fabric bandwidth available will be:
MPC4e Fab BW = 6 * 40 = 240Gbps
The fabric is still a bottleneck, but the fabric bandwidth is now close to the PFE bandwidth.
With SCBE2 and redundancy mode enabled
In this configuration, the fabric bandwidth depends on of the chassis midplane versions. Let’s take two cases into account:
MPC4e Fab BW = 4 * 54 = 216Gbps with the old midplane (in this configuration,
increased-bandwidthis also highly recommended).
Or:
MPC4e Fab BW = 4 * 65 = 260Gbps with the new midplane version (in this configuration, which also accommodates the benefit of fabric redundancy, the fabric is not a bottleneck anymore for the MPC4e).
J-Cell
As packets move through the MX from one PFE to another, they need to traverse the switch fabric. Before the packet can be placed onto the switch fabric, it first must be broken into J-cells. A J-cell is a 64-byte fixed-width unit, as shown in Figure 1-54.
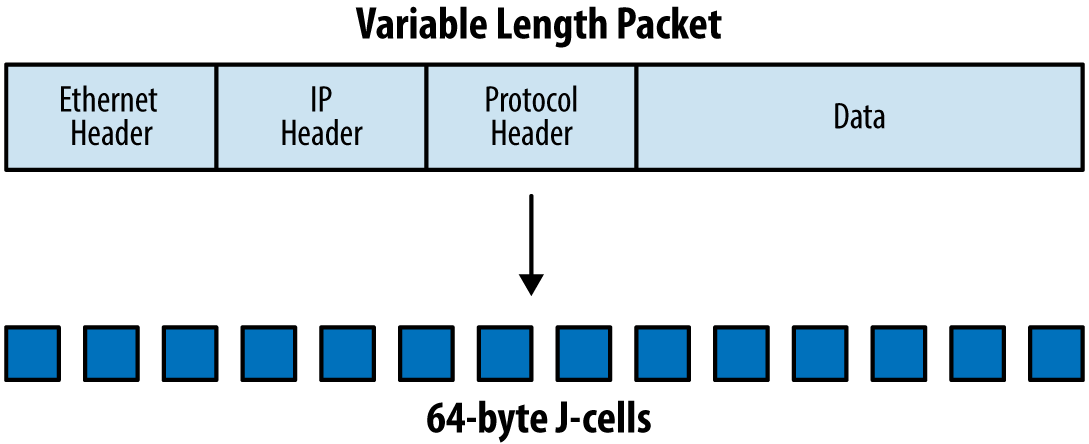
Figure 1-54. Cellification of variable-length packets
The benefit of J-cells is that it’s much easier for the router to process, buffer, and transmit fixed-width data. When dealing with variable-length packets with different types of headers, it adds inconsistency to the memory management, buffer slots, and transmission times. The only drawback when segmenting variable data into a fixed-width unit is the waste, referred to as “cell tax.” For example, if the router needed to segment a 65-byte packet, it would require two J-cells: the first J-cell would be fully utilized, the second J-cell would only carry 1 byte, and the other 63 bytes of the J-cell would go unused.
Note
For those of you old enough (or savvy enough) to remember ATM, go ahead and laugh.
J-Cell format
There are some additional fields in the J-cell to optimize the transmission and processing:
Request source and destination address
Grant source and destination address
Cell type
Sequence number
Data (64 bytes)
Checksum
Each PFE has an address that is used to uniquely identify it within the fabric. When J-cells are transmitted across the fabric a source and destination address is required, much like the IP protocol. The sequence number and cell type aren’t used by the fabric, but instead are important only to the destination PFE. The sequence number is used by the destination PFE to reassemble packets in the correct order. The cell type identifies the cell as one of the following: first, middle, last, or single cell. This information assists in the reassembly and processing of the cell on the destination PFE.
J-Cell flow
As the packet leaves the ingress PFE, the Trio chipset will segment the packet into J-cells. Each J-cell will be sprayed across all available fabric links. Figure 1-55 represents a MX960 fully loaded with 48 PFEs and 3 SCBs. The example packet flow is from left to right.
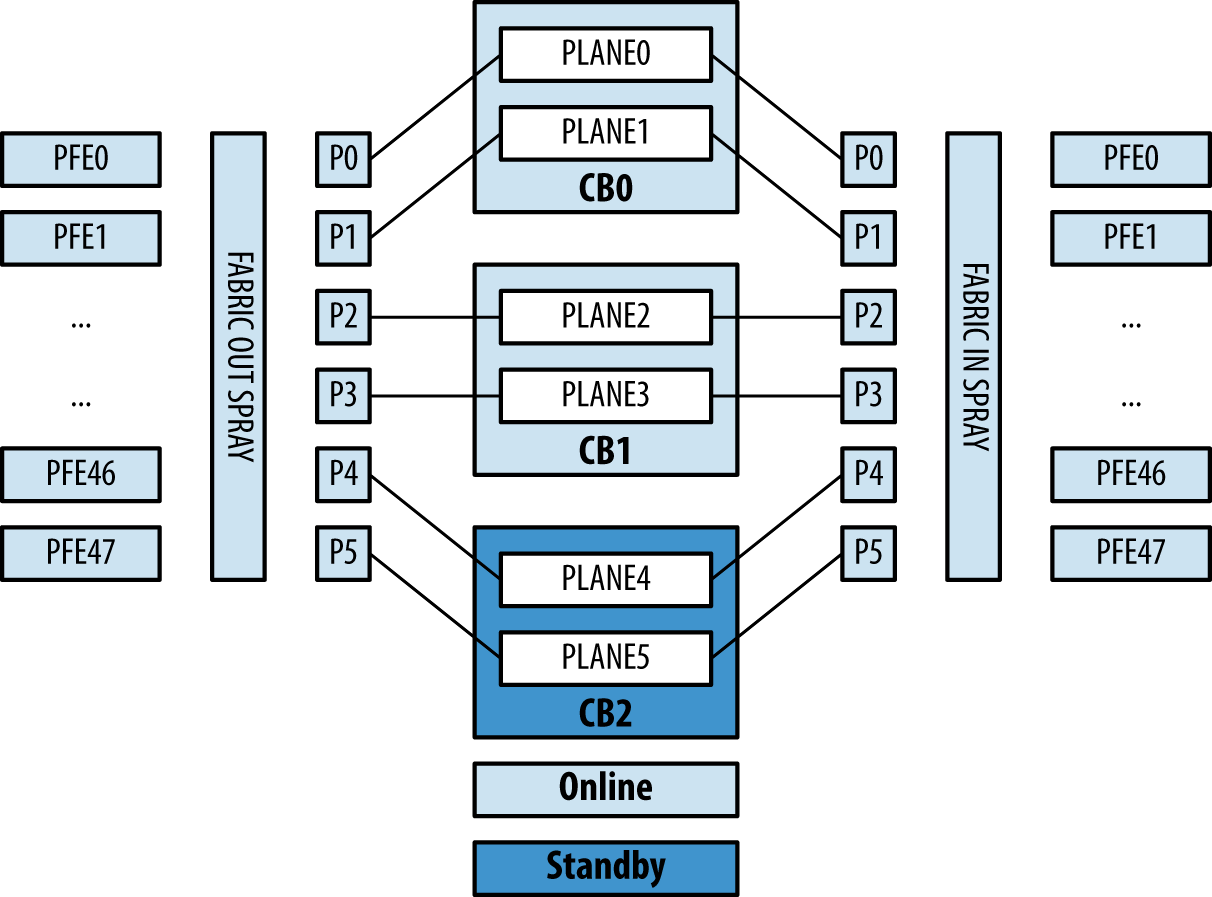
Figure 1-55. Juniper MX960 fabric spray and reordering across the MX-SCB
J-cells will be sprayed across all available fabric links. Keep in mind that only PLANE0 through PLANE3 are Online, whereas PLANE4 and PLANE5 are Standby.
Request and grant
Before the J-cell can be transmitted to the destination PFE, it needs to go through a three-step request and grant process:
The source PFE will send a request to the destination PFE.
The destination PFE will respond back to the source PFE with a grant.
The source PFE will transmit the J-cell.
The request and grant process guarantees the delivery of the J-cell through the switch fabric. An added benefit of this mechanism is the ability to quickly discover broken paths within the fabric and provide a method of flow control (see Figure 1-55).

Figure 1-56. Juniper MX fabric request and grant process
As the J-cell is placed into the switch fabric, it’s placed into one of two fabric queues: high or low. In the scenario where there are multiple source PFEs trying to send data to a single destination PFE, it’s going to cause the destination PFE to be oversubscribed. One tool that’s exposed to the network operator is the fabric priority knob in the class of service configuration. When you define a forwarding class, you’re able to set the fabric priority. By setting the fabric priority to high for a specific forwarding class, it will ensure that when a destination PFE is congested, the high-priority traffic will be delivered. This is covered in more depth in Chapter 5.
Summary
This chapter has covered a lot of topics, ranging from software to hardware. It’s important to understand how the software and hardware are designed to work in conjunction with each other. This combination creates carrier-class routers that are able to solve the difficult challenges networks are facing with the explosion of high-speed and high-density Ethernet services.
Junos has a very simple and elegant design that allows for the clear and distinct separation of the control and data planes. Juniper has a principle of “distribute what you can and centralize what you must.” There are a handful of functions that can be distributed to the data plane to increase performance. Examples include period packet management, such as Hello packets of routing protocols, and point of local repair (PLR) features, such as MPLS Fast Reroute (FRR) or Loop Free Alternate (LFA) routes in routing protocols. By distributing these types of features out to the data plane, the control plane doesn’t become a bottleneck and the system can scale with ease and restore service in under 50 ms.
The MX Series ranges from a small 2U router to a giant 45U chassis that’s able to support 20 line cards. The Trio chipset is the pride and joy of the MX family; the chipset is designed for high-density and high-speed Ethernet switching and routing. Trio has the unique ability to provide inline services directly within the chipset without having to forward the traffic to a special service module. Example services include NAT, GRE, IP tunneling, port mirroring, and IP Flow Information Export (IPFIX).
The Juniper MX is such a versatile platform that it’s able to span many domains and use cases. Both Enterprise environments (EE) and Service Providers have use cases that are aligned with the feature set of the Juniper MX:
- Data Center Core and Aggregation
Data centers that need to provide services to multiple tenants require multiple learning domains, routing instances, and forwarding separation. Each instance is typically mapped to a specific customer and a key requirement is collecting accounting and billing information.
- Data Center Interconnect
As the number of data centers increase, the transport between them must be able to deliver the services mandated by the business. Legacy applications, storage replication, and VM mobility may require a common broadcast domain across a set of data centers. MPLS provides two methods to extend a broadcast domain across multiple sites: Virtual Private LAN Service (VPLS) and Ethernet VPN (E-VPN).
- Enterprise Wide Area Network
As Enterprise customers grow, the number of data centers, branch offices, and campuses increase and create a requirement to provide transport between each entity. Most customers purchase transport from a Service Provider, and the most common provider edge (PE) to customer edge (CE) routing protocol is BGP.
- Service Provider Core and Aggregation
The core of a Service Provider network requires high-density and high-speed interfaces to switch MPLS labels. Features such as LFA in routing protocols and MPLS FRR are a requirement to provide PLR within 50 ms.
- Service Provider Edge
The edge of Service Provider networks requires high scale in terms of routing instances, number of routing prefixes, and port density to support a large number of customers. To enforce customer service-level agreements (SLAs), features such as policing and hierarchical class of service (H-CoS) are required.
- Broadband Subscriber Management
Multiplay and triple play services require high subscriber scale and rich features such as authentication, authorization, and accounting (AAA); change of authorization (CoA); and dynamic addressing and profiles per subscriber.
- Mobile Backhaul
The number of cell phones has skyrocketed in the past 10 years and is placing high demands on the network. The varying types of service require class of service to ensure that voice calls are not queued or dropped, interactive applications are responsive, and web browsing and data transfer is best effort. Another key requirement is packet-based timing support features such as E-Sync and 1588v2.
The Juniper MX supports a wide variety of line cards that have Ethernet interfaces such as 1GE, 10GE, 40GE, and 100GE. The MPC line cards also support traditional time-division multiplexing (TDM) MICs such as T1, DS3, and OC-3. The line cards account for the bulk of the investment in the MX family, and a nice investment protection is that the line cards and MICs can be used in any Juniper MX chassis.
Each chassis is designed to provide fault protection through full hardware and software redundancy. All power supplies, fan trays, switch fabric boards, control boards, Routing Engines, and line cards can be host-swapped and do not require downtime to replace. Software control plane features such as graceful Routing Engine switchover (GRES), non-stop routing (NSR), and non-stop bridging (NSB) ensure that Routing Engine failures do not impact transit traffic while the backup Routing Engine becomes the new master. The Juniper MX chassis also supports In-Service Software Upgrades (ISSU) that allows you to upgrade the software of the Routing Engines without impacting transit traffic or downtime. Junos high-availability features will be covered in Chapter 9. The Juniper MX is a phenomenal piece of engineering that’s designed from the ground up to forward packets and provide network services at all costs.
Chapter Review Questions
- 1. Which version of Junos is supported for three years?
The first major release of the year
The last maintenance release of the year
The last major release of the year
The last service release of the year
- 2. Which is not a function of the control plane?
Processing SSH traffic destined to the router
Updating the RIB
Updating the FIB
Processing a firewall filter on interface
xe-0/0/0.0
- 3. How many Switch Control Boards does the MX960 require for redundancy?
1 + 1
2 + 1
1
2
- 4. Which is a functional block of the Trio architecture?
Interfaces Block
Routing Block
BGP Block
VLAN Block
- 5. Which MPC line card provides full Layer 2 and limited Layer 3 functionality?
MX-3D-R-B
MX-3D-Q-R-B
MX-3D
MX-3D-X
- 6. How many Trio chipsets does the MPC2 line card have?
1
2
3
4
- 7. What’s the purpose of the Ethernet switch located on the SCB?
To provide additional SCB redundancy
Remote management
Provide communication between line cards and Routing Engines
To support additional H-QoS scaling
- 8. What J-cell attribute is used by the destination PFE to reassemble packets in the correct order?
Checksum
Sequence number
ID number
Destination address
Chapter Review Answers
- 1. Answer: C.
- The last major release of Junos of a given calendar year is known as the Extended End of Life (EEOL) release and is supported for three years.
- 2. Answer: D.
- The data/forwarding plane handles all packet processing such as firewall filters, policers, or counters on the interface
xe-0/0/0.0. - 3. Answer: B.
- The MX960 requires three SCBs for full redundancy. This is known as 2 + 1 SCB redundancy.
- 4. Answer: A.
- The major functional blocks of Trio are Interfaces, Buffering, Dense Queuing, and Lookup.
- 5. Answer: C.
- The MX-3D provides full Layer 2 and limited Layer 3 functionality. There’s a limit of 32,000 prefixes in the route table.
- 6. Answer: B.
- The MPC2 line card has two Trio chipsets. This allows each MIC to have a dedicated Trio chipset.
- 7. Answer: C.
- The Ethernet switch located on the MX SCB is used to create a full mesh between all line cards and Routing Engines. This network processes updates and exception packets.
- 8. Answer: B.
- The sequence number is used to reassemble out of order packets on the destination PFE.
Get Juniper MX Series, 2nd Edition now with the O’Reilly learning platform.
O’Reilly members experience books, live events, courses curated by job role, and more from O’Reilly and nearly 200 top publishers.

