Chapter 1. Kubernetes Concepts
Kubernetes is an open source orchestration system for managing containerized applications across multiple hosts, providing basic mechanisms for the deployment, maintenance, and scaling of applications.
Kubernetes, or “k8s” or “kube” for short, allows the user to declaratively specify the desired state of a cluster using high-level primitives. For example, the user may specify that she wants three instances of the WildFly server container running. Kubernetes’ self-healing mechanisms, such as autorestarting, rescheduling, and replicating containers, then converge the actual state toward the desired state.
Kubernetes supports Docker and Rocket containers. An abstraction around the containerization layer allows for other container image formats and runtimes to be supported in the future. But while multiple container formats are supported, Docker is by far the most prevalent format used with Kubernetes.
All resource files in this chapter are available on GitHub.
Pods
A pod is the smallest deployable unit that can be created, scheduled, and managed. It’s a logical collection of containers that belong to an application. Pods are created in a namespace. All containers in a pod share the namespace, volumes, and networking stack. This allows containers in the pod to “find” each other and communicate using localhost.
Each resource in Kubernetes can be defined using a configuration file. For example, a WildFly pod can be defined with the configuration file shown in Example 1-1.
Example 1-1. Pod configuration
apiVersion:v1kind:Podmetadata:name:wildfly-podlabels:name:wildfly-podspec:containers:-name:wildflyimage:jboss/wildfly:10.1.0.Finalports:-containerPort:8080
This configuration file uses the following properties:

apiVersiondefines the version of the Kubernetes API. This is now fixed atv1and allows for the API to evolve in the future.
kinddefines the type of this resource—in this example, that value isPod.
metadataallows you to attach information about the resource.
Each resource must have a
nameattribute. If this attribute is not set, then you must specify thegenerateNameattribute, which is then used as a prefix to generate a unique name. Optionally, you can use anamespaceproperty to specify a namespace for the pod. Namespaces provide a scope for names and are explained further in “Namespaces”.In addition to these properties, there are two types of metadata:
metadata.labelsandmetadata.annotations. They both are defined as key/value pairs.
Labels are designed to specify identifying attributes of the object that are meaningful and relevant to the users, but which do not directly imply semantics to the core system. Multiple labels can be attached to a resource. For example,
name: wildfly-podis a label assigned to this pod. Labels can be used to organize and to select subsets of objects.Annotations are defined using
metadata.annotations[]. They are designed to be nonidentifying arbitrary information attached to the object. Some information that can be recorded here is build/release information, such as release IDs, Git branch, and PR numbers.
specdefines the specification of the resource, pod in our case.
containersdefines all the containers within the pod.
Each container must have a uniquely identified
nameandimageproperty.namedefines the name of the container, andimagedefines the Docker image used for that container. Some other commonly used properties in this section are:args-
A command array containing arguments to the entry point
env-
A list of environment variables in
key:valueformat to set in the container

portsdefine the list of ports to expose from the container. WildFly runs on port 8080, and thus that port is listed here. This allows other resources in Kubernetes to access this container on this port.
In addition, restartPolicy can be used to define the restart policy of all containers within the pod. volumes[] can be used to list volumes that can be mounted by containers belonging to the pod.
Pods are generally not created directly, as they do not survive node or scheduling failures. They are mostly created using a replication controller or deployment.
More details about the pod configuration file are available at the Kubernetes website.
Replication Controllers
A replication controller (RC) ensures that a specified number of pod “replicas” are running at any one time. Unlike manually created pods, the pods maintained by a replication controller are automatically replaced if they fail, get deleted, or are terminated. A replication controller ensures the recreation of a pod when the worker node fails or reboots. It also allows for both upscaling and downscaling the number of replicas.
A replication controller creating two instances of a WildFly pod can be defined as shown in Example 1-2.
Example 1-2. Replication controller configuration
apiVersion: v1 kind: ReplicationControllermetadata: name: wildfly-rc spec: replicas: 2selector:app: wildfly-rc-pod template:metadata: labels: app: wildfly-rc-pod spec: containers: - name: wildfly image: jboss/wildfly:10.1.0.Final ports: - containerPort: 8080
The apiVersion, kind, metadata, and spec properties serve the same purpose in all configuration files.
This configuration file has the following additional properties:
The value of
kindisReplicationController, which indicates that this resource is a replication controller.replicasdefines the number of replicas of the pod that should concurrently run. By default, only one replica is created.selectoris an optional property. The replication controller manages the pods that contain the labels defined by thespec.selectorproperty. If specified, this value must matchspec.template.metadata.labels.All labels specified in the
selectormust match the labels on the selected pod.templateis the only required field ofspecin this case. The value of this field is exactly the same as a pod, except it is nested and does not have anapiVersionorkind. Note thatspec.template.metadata.labelsmatches the value specified inspec.selector. This ensures that all pods started by this replication controller have the required metadata in order to be selected.
Each pod started by this replication controller has a name in the format <name-of-the-RC>-<hash-value-of-pod-template>. In our case, all names will be wildfly-rc-xxxxx, where xxxxx is the hash value of the pod template.
More details about replication controllers are available at the Kubernetes website.
Replica Sets
Replica sets are the next-generation replication controllers. Just like a replication controller, a replica set ensures that a specified number of pod replicas are running at any one time. The only difference between a replication controller and a replica set is the selector support.
For replication controllers, matching pods must satisfy all of the specified label constraints. The supported operators are =, ==, and !=. The first two operators are synonyms and represent equality. The last operator represents inequality.
For replica sets, filtering is done according to a set of values. The supported operators are in, notin, and exists (only for the key). For example, a replication controller can select pods such as environment = dev. A replica set can select pods such as environment in ["dev", "test"].
A replica set creating two instances of a WildFly pod can be defined as shown in Example 1-3.
Example 1-3. Replica set configuration
apiVersion:extensions/v1beta1kind:ReplicaSetmetadata:name:wildfly-rsspec:replicas:2selector:matchLabels:app:wildfly-rs-podmatchExpressions:-{key:tier,operator:In,values:["backend"]}-{key:environment,operator:NotIn,values:["prod"]}template:metadata:labels:app:wildfly-rs-podtier:backendenvironment:devspec:containers:-name:wildflyimage:jboss/wildfly:10.1.0.Finalports:-containerPort:8080
The key differences between Examples 1-2 and 1-3 are as follows:
The
apiVersionproperty value isextensions/v1beta1. This means that this object is not part of the “core” API at this time, but is only a part of theextensionsgroup. Read more about API versioning at the Kubernetes GitHub page.The value of
kindisReplicasetand indicates the type of this resource.matchLabelsdefines the list of labels that must be on the selected pod. Each label is a key/value pair.wildfly-rs-podis the exact label that must be on the selected pod.matchExpressionsdefines the list of pod selector requirements.Each expression can be defined as a combination of three key/value pairs. The keys are
key,operator, andvalues. The values are one of the keys from the labels; one of the operatorsIn,NotIn,Exist, orDoesNotExist; and a nonempty set of values, respectively.All the requirements, from both
matchLabelsandmatchExpressions, must match for the pod to be selected.
Replica sets are generally never created on their own. Deployments own and manage replica sets to orchestrate pod creation, deletion, and updates. See the following section for more details about deployments.
More details about replica sets are available at the Kubernetes website.
Deployments
Deployments provide declarative updates for pods and replica sets. You can easily achieve the following functionality using deployment:
-
Start a replication controller or replica set.
-
Check the status of deployment.
-
Update deployment to use a new image, without any outages.
-
Roll back deployment to an earlier revision.
A WildFly replica set with three replicas can be defined using the configuration file shown in Example 1-4.
Example 1-4. Deployment configuration
apiVersion:extensions/v1beta1kind:Deploymentmetadata:name:wildfly-deploymentspec:replicas:3template:metadata:labels:app:wildflyspec:containers:-name:wildflyimage:jboss/wildfly:10.1.0.Finalports:-containerPort:8080
Two main differences from Example 1-2 are:
-
The
apiVersionproperty value isextensions/v1beta1. This means that this object is not part of the “core” API at this time and is only a part of theextensionsgroup. Read more about API versioning at the Kubernetes GitHub page. -
The value of the
kindproperty isDeployment, which indicates the type of resource.
More details about deployment are available in the Kubernetes user guide.
Services
A pod is ephemeral. Each pod is assigned a unique IP address. If a pod that belongs to a replication controller dies, then it is recreated and may be given a different IP address. Further, additional pods may be created using replication controllers. This makes it difficult for an application server such as WildFly to access a database such as Couchbase using its IP address.
A service is an abstraction that defines a logical set of pods and a policy by which to access them. The IP address assigned to a service does not change over time, and thus can be relied upon by other pods. Typically, the pods belonging to a service are defined by a label selector. This is similar to how pods belong to a replication controller.
This abstraction of selecting pods using labels enables a loose coupling. The number of pods in the replication controller may scale up or down, but the application server can continue to access the database using the service.
Multiple resources, such as a service and a replication controller, may be defined in the same configuration file. In this case, each resource definition in the configuration file needs to be separated by ---.
For example, a WildFly service and a replication controller that creates matching pods can be defined as shown in Example 1-5.
Example 1-5. Service configuration
apiVersion:v1kind:Servicemetadata:name:wildfly-servicespec:selector:app:wildfly-rc-podports:-name:webport:8080---apiVersion:v1kind:ReplicationControllermetadata:name:wildfly-rcspec:replicas:2template:metadata:labels:app:wildfly-rc-podspec:containers:-name:wildflyimage:jboss/wildfly:10.1.0.Finalports:-containerPort:8080
Multiple resources are created in the order they are specified in the file.
In this configuration file:
There are two resources: a service and a replication controller.
The service selects any pods that contain the label
app: wildfly-rc-pod. The replication controller attaches those labels to the pod.portdefines the port on which the service is accessible. A service can map an incoming port to any target port in the container usingtargetPort. By default,targetPortis the same asport.A service may expose multiple ports. In this case, each port must be given a unique name:
ports:-name:webport:8080---is the separator between multiple resources.
By default, a service is available only inside the cluster. It can be exposed outside the cluster, as covered in “Exposing a Service”.
More details about services are available at the Kubernetes website.
Jobs
A job creates one or more pods and ensures that a specified number of them successfully complete. When the specified number of pods has successfully completed, the job itself is complete. The job will start a new pod if the pod fails or is deleted due to hardware failure.
This is different from a replication controller or a deployment, which ensure that a certain number of pods are always running. If a pod in a replication controller or deployment terminates, it is restarted. This makes replication controllers and deployments both long-running processes, which is well suited for an application server such as WildFly. But a job is completed only when the specified number of pods successfully completes, which is well suited for tasks that need to run only once. For example, a job may convert one image format to another. Restarting this pod in a replication controller would not only cause redundant work but may even be harmful in certain cases.
There are two main types of jobs:
- Nonparallel jobs
-
Job specification consists of a single pod. The job completes when the pod successfully terminates.
- Parallel jobs
-
A predefined number of pods successfully completes. Alternatively, a work queue pattern can be implemented where pods can coordinate among themselves or with an external service to determine what each should work on.
A nonparallel job can be defined using the configuration file shown in Example 1-6.
Example 1-6. Job configuration
apiVersion:batch/v1kind:Jobmetadata:name:waitspec:template:metadata:name:waitspec:containers:-name:waitimage:ubuntucommand:["sleep","20"]restartPolicy:Never
In this configuration file:
Jobs are defined in their own API group using the path batch/v1.
The
Jobvalue defines this resource to be of the type job.specspecifies the job resource as a pod template. This is similar to a replication controller.This job uses the base image of
ubuntu. Usually, this will be a custom image that will perform the run-once task.By default, running the
ubuntuimage starts the shell. In this case,commandoverrides the default command and waits for 20 seconds. Note, this is only an example usage. The actual task would typically be done in the image itself.Each pod template must explicitly specify the
restartPolicyequal toNeverorOnFailure. A value ofNevermeans that the pod is markedSucceededorFaileddepending upon the number of containers running and how they exited. A value ofOnFailuremeans the pod is restarted if the container in the pod exits with a failure. More details about these policies are available at the Kubernetes website.
Kubernetes 1.4 introduced a new alpha resource called ScheduledJob. This resource was renamed to CronJob starting in version 1.5.
CronJob allows you to manage time-based jobs. There are two primary use cases:
-
Run jobs once at a specified point in time.
-
Run jobs repeatedly at a specified point in time.
Note, this is an alpha resource, so it needs to be explicitly enabled.
Volumes
Pods are ephemeral and work well for a stateless container. They are restarted automatically when they die, but any data stored in their filesystem is lost with them. Stateful containers, such as Couchbase, require data to be persisted outside the lifetime of a container running inside a pod. This is where volumes help.
A volume is a directory that is accessible to the containers in a pod. The directory, the medium that backs it, and the contents within it are determined by the particular volume type used. A volume outlives any containers that run within the pod, and the data is preserved across container restarts.
Multiple types of volumes are supported. Some of the commonly used volume types are shown in Table 1-1.
| Volume type | Mounts into your pod |
|---|---|
|
A file or directory from the host node’s filesystem |
|
Existing Network File System share |
|
An Amazon Web Service EBS volume |
|
A Google Compute Engine persistent disk |
Two properties need to be defined for a volume to be used inside a pod: spec.volumes to define the volume type, and spec.containers.volumeMounts to specify where to mount the volume. Multiple volumes in a pod and multiple mount points in a container can be easily defined. A process in a container sees a filesystem view composed of the Docker image and volumes in the pod.
A volume defined in the pod configuration file is shown in Example 1-7.
Example 1-7. Volume configuration
apiVersion: v1 kind: Pod metadata: name: couchbase-pod labels: name: couchbase-pod spec: containers: - name: couchbase image: arungupta/couchbase-oreilly:k8sports: - containerPort: 8091 volumeMounts:- mountPath: /var/couchbase/libname: couchbase-datavolumes:- name: couchbase-datahostPath:path: /opt/data
In this configuration file:
The pod in the replication controller uses the image at arungupta/oreilly-couchbase:k8s. This image is created using Couchbase. It uses the Couchbase REST API to configure the Couchbase server and create a sample bucket in it.
The
volumeMountsproperty defines where the volume is mounted in the container.mountPathdefines the path where the volume is mounted in the container.namerefers to a named volume defined usingvolumes. This value must match the value of thenameproperty of one of the volumes defined involumes.volumesdefines the volumes accessible to the pod.hostPathdefines the type of volume mounted. This volume type is mounting a directory from host node’s filesystem. A differe volume type may be specified here./opt/data is the path in the host node filesystem.
You can create an Amazon Elastic Block Storage (EBS) volume using the aws ec2 create-volume command. Alternatively, you can create a Google Cloud persistent disk using the gcloud compute disks create command. You can mount these volumes in the container using the awsElasticBlockStore and gcePersistentDisk volume types, respectively.
More details about volumes, including different types of volumes and how to configure them, are available at the Kubernetes website.
Architecture
The key components of the Kubernetes architecture are shown in Figure 1-1.
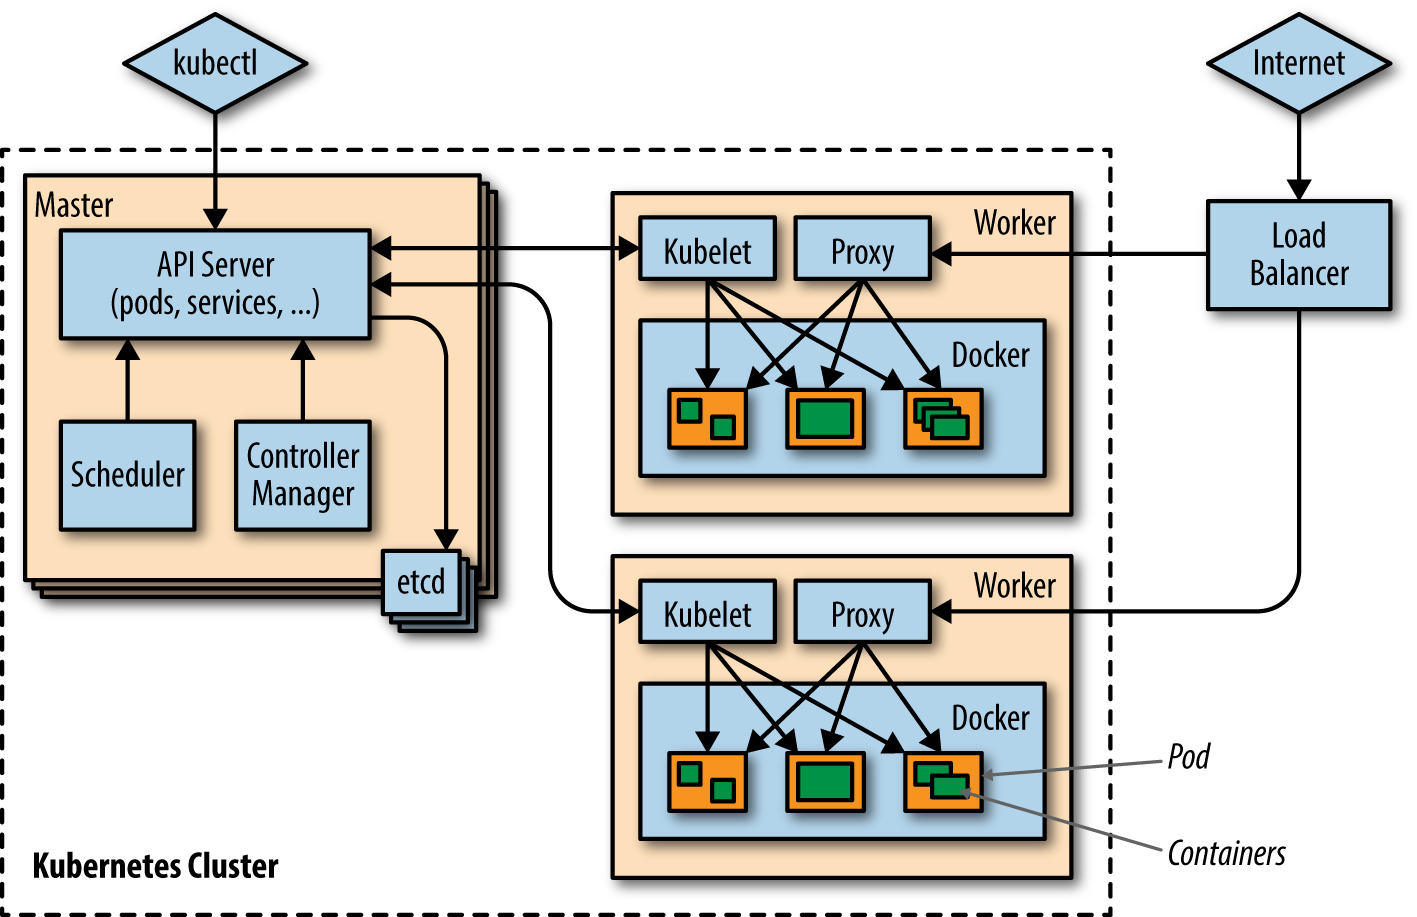
Figure 1-1. Kubernetes architecture
A Kubernetes cluster is a set of physical or virtual machines and other infrastructure resources that are used to run your applications. Each machine is called a node. The machines that manage the cluster are called master nodes, and the machines that run the containers are called worker nodes. Each node handles the necessary services to run application containers.
The two typical interaction points with Kubernetes are kubectl and the client application running in the internet.
Master nodes
A master node is a central control plane that provides a unified view of the cluster. You can easily create a Kubernetes cluster with a single master node for development. Alternatively, you could create a Kubernetes cluster with high availability with multiple master nodes. Let’s look at the key components in the master node:
kubectl-
This is a command-line tool that send commands to the master node to create, read, update, and delete resources. For example, it can request to create a pod by passing the pod configuration file, or it can query more details about the replicas running for a replica set. It reads container manifests as YAML or JSON files that describe each resource. A typical way to provide this manifest is using the configuration file as shown in the previous sections. This process is explained more in “Running Your First Java Application”.
- API server
-
Each command from
kubectlis translated into a REST API and issued to the API server running inside the master node. The API server processes REST operations, validates them, and persists the state in a distributed watchable storage. This is implemented usingetcdfor Kubernetes. - Scheduler
-
The scheduler works with the API server to schedule pods to the nodes. The scheduler has information about resources available on the worker nodes, as well as the ones requested by the pods. It uses this information to decide which node will be selected to deploy a specific pod.
- Controller manager
-
The controller manager is a daemon that watches the state of the cluster using the API server for different controllers and reconciles the actual state with the desired one (e.g., the number of pods to run for a replica set). Some other controllers that come with Kubernetes are the namespace controller and the horizontal pod autoscaler.
etcd-
This is a simple, distributed, watchable, and consistent key/value store. It stores the persistent state of all REST API objects—for example, how many pods are deployed on each worker node, labels assigned to each pod (which can then be used to include the pods in a service), and namespaces for different resources. For reliability,
etcdis typically run in a cluster.
Worker nodes
A worker node runs tasks as delegated by the master. Each worker node can run multiple pods:
- Kubelet
-
This is a service running on each node that manages containers and is managed by the master. It receives REST API calls from the master and manages the resources on that node. Kubelet ensures that the containers defined in the API call are created and started.
Kubelet is a Kubernetes-internal concept and generally does not require direct manipulation.
- Proxy
-
This runs on each node, acting as a network proxy and load balancer for a service on a worker node. Client requests coming through an external load balancer will be redirected to the containers running in a pod through this proxy.
- Docker
-
Docker Engine is the container runtime running on each node. It understands the Docker image format and knows how to run Docker containers. Alternatively, Kubernetes may be configuired to use
rktas the container runtime. More details about that are available in the guide to running Kubernetes withrkt.
Get Kubernetes for Java Developers now with the O’Reilly learning platform.
O’Reilly members experience books, live events, courses curated by job role, and more from O’Reilly and nearly 200 top publishers.

