Chapter 4. Authorization
In this chapter, we focus on authorization in Kubernetes—assigning permissions to users and applications and in turn enforcing those. Authorization in Kubernetes verifies whether a certain action (such as “list pods” or “create a secret”) is allowed by a certain user or application, and if it is allowed, performs that action or otherwise rejects it and potentially logs the attempt. We’re building on the concepts and flows presented in Chapter 3, so if you haven’t read that chapter yet, now is a good time.
Authorization Concepts
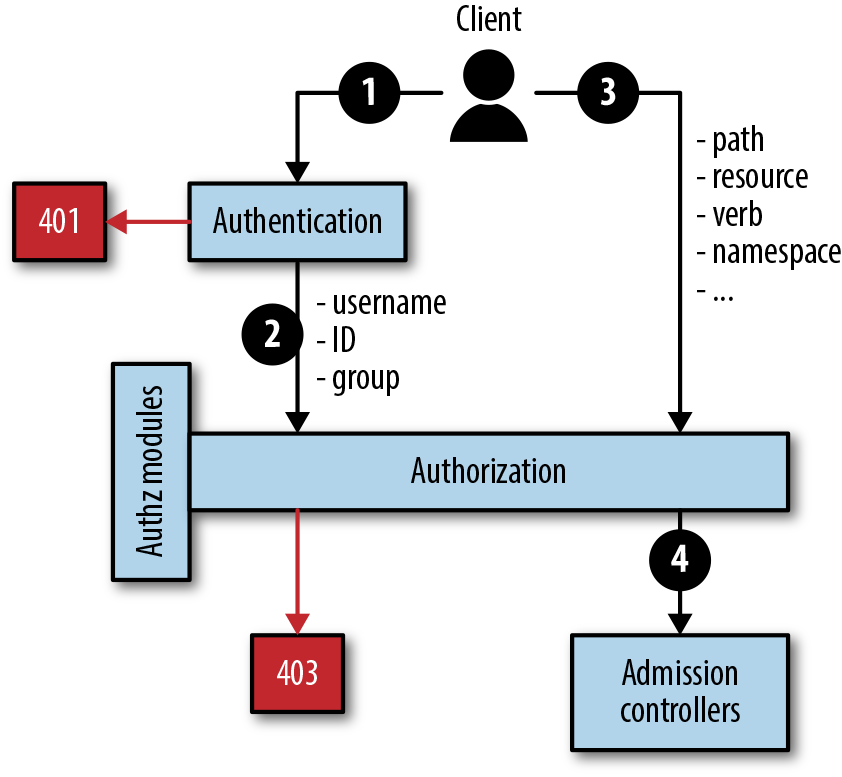
Kubernetes authorizes API requests by using the API server, evaluating the request attributes against the policies and subsequently allowing or denying the request. By default, permissions are denied, unless explicitly allowed by a policy. Conceptually, authorization in Kubernetes works as depicted in Figure 4-1.

Figure 4-1. Authorization concepts
The authorization flow is as follows:
-
The client’s request is authenticated. See “Authentication Concepts” for details on this step.
-
If the authentication was successful, the credentials are taken as one input of the authorization module.
-
The second input to the authorization module is a vector containing the request path, resource, verb, and namespace (and other secondary attributes).
-
If the user or application is permitted to execute a certain action on a certain resource, the request is passed on further to the next component in the chain, the admission controller. If not, the authorization module returns an HTTP
403 Forbiddenclient error status response code, and with that the request fails.
Now that you know how authorization works in principle in Kubernetes, let’s look at the ways permissions can be enforced.
Authorization Modes
Kubernetes offers multiple ways to enforce permissions, represented by various authorization modes and modules:
- Node authorization
-
A special-purpose authorizer that grants permissions to kubelets based on the pods they are scheduled to run.
- Attribute-based access control (ABAC)
-
An authorizer through which access rights are granted to users through policies combining attributes (user attributes, resource attributes, objects, etc.).
- Webhook
-
A webhook is an HTTP callback—an HTTP
POSTthat occurs when something happens. This mode allows for integration with Kubernetes-external authorizers. - Role-based access control (RBAC)
-
This is explained in detail in the following section.
Since RBAC is the most important authorization method for both developers and admins in Kubernetes, let’s look at it in greater detail.
Access Control with RBAC
Developed originally at Red Hat in the context of OpenShift, role-based access control (RBAC) was upstreamed to Kubernetes and is stable as of version 1.8 access. You should use RBAC for access control and not use ABAC or, even worse, use none.
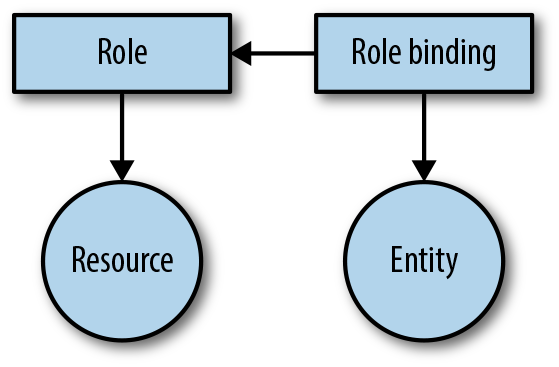
As you can see in Figure 4-2, you have a few moving parts when dealing with RBAC:
- Entity
-
A group, user, or service account (representing an app—that wants to carry out a certain operation and requires permissions in order to do so).
- Resource
-
A pod, service, or secret that the entity wants to access.
- Role
-
Used to define rules for actions on resources.
- Role binding
-
This process attaches (or binds) a role to an entity, stating that a set of actions is permitted for a certain entity on the specified resources.

Figure 4-2. The RBAC concept
The actions on a resource that a role uses in its rules are the so-called verbs, such as the following:
-
get,list(read-only) -
create,update,patch,delete,deletecollection(read-write)
Concerning the roles, we differentiate between two types:
- Cluster-wide
-
Cluster roles and their respective cluster role bindings
- Namespace-wide
-
Roles and role bindings
Sometimes it’s not obvious whether you should use a role or a cluster role and/or role binding, so here are a few rules of thumb you might find useful:
-
If you want to grant access to a namespaced resource (like a service or a pod) in a particular namespace, use a role and a role binding.
-
If you want to reuse a role in a couple of namespaces, define a cluster role and use a role binding to bind it to a “subject” (an entity such as a user or service account).
-
If you want to grant access to cluster-wide resources such as nodes or to namespaced resources across all namespaces, use a cluster role with a cluster role binding.
Note
Kubernetes prevents users from escalating privileges by editing roles or role bindings. Users can create or update a role only if they already have all the permissions contained in the role. For example, if user alice does not have the ability to list secrets cluster-wide, that user cannot create a cluster role containing that permission.
Kubernetes defines default roles that you should consider using before you start defining your own roles:
- User-facing roles
-
cluster-admin,admin(for namespaces),edit, andviewthat you can use out of the box for your end users. - Core components
-
The Kubernetes control-plane components as well as nodes have predefined roles, such as
system:kube-controller-managerorsystem:node, defining exactly the permissions the respective component needs in order to work properly. - Other components
-
Kubernetes defines roles for noncore components that are almost always used alongside the core bits. For example, there’s a role called
system:persistent-volume-provisionerfor enabling dynamic volume provisioning.
Other kinds of predefined roles also exist—for example, discovery roles (such as system:basic-user) or controller roles (such as system:controller:deployment-controller). These are internal to Kubernetes, and unless you’re an admin debugging an installation or upgrade, they are typically not very relevant to your daily routine. If you want to know which roles are predefined and available in your environment, use the following (which in our case listed more than 50 roles, output omitted here):
$ kubectl get clusterrolesNow, this may sound intimidating and complex, so let’s look at a concrete example. Say you have an application that needs to have access to pod information. You could use the view default cluster role for it:
$kubectl describe clusterrole view Name: view Labels: kubernetes.io/bootstrapping=rbac-defaults Annotations: rbac.authorization.kubernetes.io/autoupdate=truePolicyRule: Resources ... Verbs --------- ... ----- bindings ...[get list watch]configmaps ...[get list watch]endpoints ...[get list watch]events ...[get list watch]limitranges ...[get list watch]namespaces ...[get list watch]namespaces/status ...[get list watch]persistentvolumeclaims ...[get list watch]pods ...[get list watch]pods/log ...[get list watch]pods/status ...[get list watch]replicationcontrollers ...[get list watch]replicationcontrollers/scale ...[get list watch]replicationcontrollers/status ...[get list watch]resourcequotas ...[get list watch]resourcequotas/status ...[get list watch]serviceaccounts ...[get list watch]services ...[get list watch]daemonsets.apps ...[get list watch]deployments.apps ...[get list watch]deployments.apps/scale ...[get list watch]replicasets.apps ...[get list watch]replicasets.apps/scale ...[get list watch]statefulsets.apps ...[get list watch]horizontalpodautoscalers.autoscaling ...[get list watch]cronjobs.batch ...[get list watch]jobs.batch ...[get list watch]daemonsets.extensions ...[get list watch]deployments.extensions ...[get list watch]deployments.extensions/scale ...[get list watch]ingresses.extensions ...[get list watch]networkpolicies.extensions ...[get list watch]replicasets.extensions ...[get list watch]replicasets.extensions/scale ...[get list watch]replicationcontrollers.extensions/scale ...[get list watch]networkpolicies.networking.k8s.io ...[get list watch]poddisruptionbudgets.policy ...[get list watch]
As you can see, the view default role would work, but it additionally allows your application access to many other resources such as deployments and services. This is a potential security risk and goes against the principle of least privilege, so let’s create a dedicated role for it. A role that allows you to retrieve only info about pods.
Since we want to set permissions for an application rather than a user whose identity is managed outside Kubernetes, we first have to create a dedicated service account representing the application’s identity toward the API server. Also, it’s a good practice to not use the default namespace, so let’s start by creating a namespace coolapp that our application will live in and then a service account myappid in this namespace:
$kubectl create namespace coolapp namespace"coolapp"created$kubectl --namespace=coolapp create serviceaccount myappid serviceaccount"myappid"created
Now that we have established an identity for our application, we can define a role podview that allows only viewing and listing pods in its namespace:
$kubectl --namespace=coolapp create role podview\--verb=get --verb=list\--resource=pods$kubectl --namespace=coolapp describe role/podview Name: podview Labels: <none> Annotations: <none> PolicyRule: Resources Non-Resource URLs Resource Names Verbs --------- ----------------- -------------- ----- pods[][][get list]
That looks more like it! The role podview allows only for viewing pods. Next, we need to attach the role podview to our application, represented by the service account myappid. We do this by creating a role binding (which binds a role to a human or machine user) called mypodviewer, like so:
$kubectl --namespace=coolapp create rolebinding mypodviewer\--role=podreader\--serviceaccount=coolapp:myappid rolebinding.rbac.authorization.k8s.io"mypodviewer"created$kubectl --namespace=coolapp describe rolebinding/mypodviewer Name: mypodviewer Labels: <none> Annotations: <none> Role: Kind: Role Name: podreader Subjects: Kind Name Namespace ---- ---- --------- ServiceAccount myappid coolapp
Note that for the service account parameter, we had to use the fully qualified name ($NAMESPACE:$SERVICEACCOUNT). And with this last command, the service account myappid representing our application is bound to the podreader role and all of that in the namespace coolapp.
But how can you be sure that only the required permissions have been granted? You can check it like so:
$kubectl --namespace=coolapp auth can-i\--as=system:serviceaccount:coolapp:myappid list pods yes$kubectl --namespace=coolapp auth can-i\--as=system:serviceaccount:coolapp:myappid list services no
The last step, not shown here, is simply to use serviceAccountName in the pod spec of your app, as you saw in the example at the end of “Identity”.
Tooling and Good Practices
Several tools focus on authorization with RBAC (see also the up-to-date list on our website):
- audit2rbac
-
A tool that allows you to automatically determine what permissions are necessary for a certain application and generate RBAC roles and bindings for you.
- rbac-manager
-
A Kubernetes operator that simplifies the management of role bindings and service accounts.
- kube2iam
-
A tool that provides AWS IAM credentials to containers based on annotations.
In the last section of this chapter, we look at good practices in the context of authorization:
- Use RBAC
-
This should be the standard now—if not, please do upgrade Kubernetes to a version equal to or greater than 1.8. Pass the
--authorization-mode=RBACparameter to the API server to enable this. - Disable automounting of the default service account token
-
Most applications don’t need to talk to the API server, so they don’t need an access token. This is especially important if you’re not using RBAC. You can do this by specifying
automountServiceAccountToken: falsein the PodSpec for your applications, or you can patch the default service account so that its credentials are not automatically mounted into pods:
$kubectl patch serviceaccount default\-p$'automountServiceAccountToken: false'serviceaccount"default"patched
- Use dedicated service accounts
-
If your application needs access to the API server, either because it’s a system-level thing or has been written with Kubernetes in mind, it is good practice to create a dedicated service account per application and configure RBAC to be specifically limited to the needs of that application. Bear in mind that if a pod is compromised in some way, the attacker will have access to the service account associated with that pod, and its corresponding permissions. See also “Identity” for more details.
To learn more about RBAC and how to use it, check out the resources on the accompanying website, in the “Authorization” section.
Now that you’re familiar with the basics of performing authentication and authorization in Kubernetes, let’s discuss how to make your applications more secure, starting with container images in the next chapter.
Get Kubernetes Security now with the O’Reilly learning platform.
O’Reilly members experience books, live events, courses curated by job role, and more from O’Reilly and nearly 200 top publishers.

