The IR transmitter LEDs look similar to normal LEDs, but are slightly larger than the normal LEDs:
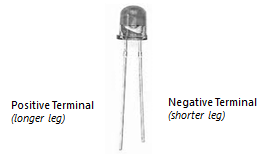
Figure 12: A typical IR transmitter LED
An IR transmitter LED has two legs (terminals) as shown in the preceding figure:
- Positive terminal (longer leg), this pin will be connected to the 5-volt power supply pin of the Arduino.
- Negative terminal (shorter leg), this pin will be connected to the GND pin of the Arduino, via a transistor.
The parts required for building the IR transmitter prototype are listed as follows:
- One Arduino Uno R3
- One USB A to USB B cable
- One IR transmitter LED (Blue/Transparent/other color) ...

