Chapter 1. Setting Up Your Go Environment
Every programming language needs a development environment, and Go is no exception. If youâve already written a Go program or two, you should have a working environment, but you might have missed out on some of the newer techniques and tools. If this is your first time setting up Go on your computer, donât worry; installing Go and its supporting tools is easy. After we set up our environment and verify it, weâll build a simple program, learn about the different ways to build and run Go code, and then explore some tools and techniques that make Go development easier.
Installing the Go Tools
To write Go code, you first need to download and install the Go development tools. The latest version of the tools can be found at the downloads page on the Go website. Choose the download for your platform and install it. The .pkg installer for Mac and the .msi installer for Windows automatically install Go in the correct location, remove any old installations, and put the Go binary in the default executable path.
Tip
If you are a Mac developer, you can install Go using Homebrew with the command brew install go. Windows developers who use Chocolatey can install Go with the command choco install golang.
The various Linux and FreeBSD installers are gzipped tar files and expand to a directory named go. Copy this directory to /usr/local and add /usr/local/go/bin to your $PATH so that the go command is accessible:
$ tar -C /usr/local -xzf go1.15.2.linux-amd64.tar.gz
$ echo 'export PATH=$PATH:/usr/local/go/bin' >> $HOME/.profile
$ source $HOME/.profile
Note
Go programs compile to a single binary and do not require any additional software to be installed in order to run them. Install the Go development tools only on computers that build Go programs.
You can validate that your environment is set up correctly by opening up a terminal or command prompt and typing:
$ go version
If everything is set up correctly, you should see something like this printed:
go version go1.15.2 darwin/amd64
This tells you that this is Go version 1.15.2 on Mac OS. (Darwin is the name of the kernel for Mac OS and amd64 is the name for the 64-bit CPU architecture from both AMD and Intel.)
If you get an error instead of the version message, itâs likely that you donât have go in your executable path, or you have another program named go in your path. On Mac OS and other Unix-like systems, use which go to see the go command being executed, if any. If it isnât the go command at /usr/local/go/bin/go, you need to fix your executable path.
If youâre on Linux or FreeBSD, itâs possible you installed the 64-bit Go development tools on a 32-bit system or the development tools for the wrong chip architecture.
The Go Workspace
Since the introduction of Go in 2009, there have been several changes in how Go developers organize their code and their dependencies. Because of this churn, thereâs lots of conflicting advice, and most of it is obsolete.
For modern Go development, the rule is simple: you are free to organize your projects as you see fit.
However, Go still expects there to be a single workspace for third-party Go tools installed via go install (see âGetting Third-Party Go Toolsâ). By default, this workspace is located in $HOME/go, with source code for these tools stored in $HOME/go/src and the compiled binaries in $HOME/go/bin. You can use this default or specify a different workspace by setting the $GOPATH environment variable.
Whether or not you use the default location, itâs a good idea to explicitly define GOPATH and to put the $GOPATH/bin directory in your executable path. Explicitly defining GOPATH makes it clear where your Go workspace is located and adding $GOPATH/bin to your executable path makes it easier to run third-party tools installed via go install, which weâll talk about in a bit.
If you are on a Unix-like system using bash, add the following lines to your
.profile. (If you are using zsh, add these lines to .zshrc instead):
export GOPATH=$HOME/go
export PATH=$PATH:$GOPATH/bin
Youâll need to source $HOME/.profile to make these changes take effect in your current terminal window.
On Windows, run the following commands at the command prompt:
setx GOPATH %USERPROFILE%\go
setx path "%path%;%GOPATH%\bin"
After running these commands, you must close your current command prompt and open a new one for these changes to take effect.
There are other environment variables that are recognized by the go tool. You can get a complete list, along with a brief description of each variable, using the go env command. Many of them control low-level behavior that can be safely ignored, but we cover some of these variables when discussing modules and cross-compilation.
The go Command
Out of the box, Go ships with many development tools. You access these tools via the go command. They include a compiler, code formatter, linter, dependency manager, test runner, and more. As we learn how to build high-quality idiomatic Go, weâll explore many of these tools throughout the book. Letâs start with the ones that we use to build Go code and use the go command to build a simple application.
go run and go build
There are two similar commands available via go: go run and go build. Each takes either a single Go file, a list of Go files, or the name of a package. We are going to create a simple program and see what happens when we use these commands.
go run
Weâll start with go run. Create a directory called ch1, open up a text editor, enter the following text, and save it inside ch1 to a file named hello.go:
packagemainimport"fmt"funcmain(){fmt.Println("Hello, world!")}
After the file is saved, open up a terminal or command prompt and type:
go run hello.go
You should see Hello, world! printed in the console. If you look inside the directory after running the go run command, you see that no binary has been saved there; the only file in the directory is the hello.go file we just created. You might be thinking: I thought Go was a compiled language. Whatâs going on?
The go run command does in fact compile your code into a binary. However, the binary is built in a temporary directory. The go run command builds the binary, executes the binary from that temporary directory, and then deletes the binary after your program finishes. This makes the go run command useful for testing out small programs or using Go like a scripting language.
Tip
Use go run when you want to treat a Go program like a script and run the source code immediately.
go build
Most of the time you want to build a binary for later use. Thatâs where you use the go build command. On the next line in your terminal, type:
go build hello.go
This creates an executable called hello (or hello.exe on Windows) in the current directory. Run it and you unsurprisingly see Hello, world! printed on the screen.
The name of the binary matches the name of the file or package that you passed in. If you want a different name for your application, or if you want to store it in a different location, use the -o flag. For example, if we wanted to compile our code to a binary called âhello_world,â we would use:
go build -o hello_world hello.go
Tip
Use go build to create a binary that is distributed for other people to use. Most of the time, this is what you want to do. Use the -o flag to give the binary a different name or location.
Getting Third-Party Go Tools
While some people choose to distribute their Go programs as pre-compiled binaries, tools written in Go can also be built from source and installed into your Go workspace via the go install command.
Goâs method for publishing code is a bit different than most other languages. Go developers donât rely on a centrally hosted service, like Maven Central for Java or the NPM registry for JavaScript. Instead, they share projects via their source code repositories. The go install command takes an argument, which is the location of the source code repository of the project you want to install, followed by an @ and the version of the tool you want (if you just want to get the latest version, use @latest). It then downloads, compiles, and installs the tool into your $GOPATH/bin directory.
Letâs look at a quick example. Thereâs a great Go tool called hey that load tests HTTP servers. You can point it at the website of your choosing or an application that youâve written. Hereâs how to install hey with the go install command:
$ go install github.com/rakyll/hey@latest
go: downloading github.com/rakyll/hey v0.1.4
go: downloading golang.org/x/net v0.0.0-20181017193950-04a2e542c03f
go: downloading golang.org/x/text v0.3.0
This downloads hey and all of its dependencies, builds the program, and installs the binary in your $GOPATH/bin directory.
Note
As weâll talk about in âModule Proxy Serversâ, the contents of Go repositories are cached in proxy servers. Depending on the repository and the values in your GOPROXY environment variable, go install may download from a proxy or directly from a repository. If go install downloads directly from a repository, it relies on command-line tools being installed on your computer. For example, you must have Git installed to download from
GitHub.
Now that we have built and installed hey, we can run it with:
$ hey https://www.golang.org

Summary:
  Total:	0.6864 secs
  Slowest:	0.3148 secs
  Fastest:	0.0696 secs
  Average:	0.1198 secs
  Requests/sec:	291.3862
If you have already installed a tool and want to update it to a newer version, rerun go install with the newer version specified or with @latest:
go install github.com/rakyll/hey@latest
Of course, you donât need to leave tools written in Go in your Go workspace; they are regular executable binaries and can be stored anywhere on your computer. Likewise, you donât have to distribute programs written in Go using go install; you can put a binary up for download. However, go install is a very convenient way to distribute Go programs to other Go developers.
Formatting Your Code
One of the chief design goals for Go was to create a language that allowed you to write code efficiently. This meant having simple syntax and a fast compiler. It also led Goâs authors to reconsider code formatting. Most languages allow a great deal of flexibility on how code is laid out. Go does not. Enforcing a standard format makes it a great deal easier to write tools that manipulate source code. This simplifies the compiler and allows the creation of some clever tools for generating code.
There is a secondary benefit as well. Developers have historically wasted extraordinary amounts of time on format wars. Since Go defines a standard way of formatting code, Go developers avoid arguments over One True Brace Style and Tabs vs. Spaces, For example, Go programs use tabs to indent, and it is a syntax error if the opening brace is not on the same line as the declaration or command that begins the block.
Note
Many Go developers think the Go team defined a standard format as a way to avoid developer arguments and discovered the tooling advantages later. However, Russ Cox has publicly stated that better tooling was his original motivation.
The Go development tools include a command, go fmt, which automatically reformats your code to match the standard format. It does things like fixing up the whitespace for indentation, lining up the fields in a struct, and making sure there is proper spacing around operators.
Thereâs an enhanced version of go fmt available called goimports that also cleans up your import statements. It puts them in alphabetical order, removes unused imports, and attempts to guess any unspecified imports. Its guesses are sometimes inaccurate, so you should insert imports yourself.
You can download goimports with the command go install golang.org/x/tools/cmd/goimports@latest. You run it across your project with the command:
goimports -l -w .
The -l flag tells goimports to print the files with incorrect formatting to the console. The -w flag tells goimports to modify the files in-place. The . specifies the files to be scanned: everything in the current directory and all of its subdirectories.
Tip
Always run go fmt or goimports before compiling your code!
Linting and Vetting
While go fmt ensures your code is formatted correctly, itâs just the first step in ensuring that your code is idiomatic and of high quality. All Go developers should read through Effective Go and the Code Review Comments page on Goâs wiki to understand what idiomatic Go code looks like.
There are tools that help to enforce this style. The first is called golint. (The term âlinterâ comes from the Unix team at Bell Labs; the first linter was written in 1978.) It tries to ensure your code follows style guidelines. Some of the changes it suggests include properly naming variables, formatting error messages, and placing comments on public methods and types. These arenât errors; they donât keep your programs from compiling or make your program run incorrectly. Also, you cannot automatically assume that golint is 100% accurate: because the kinds of issues that golint finds are more fuzzy, it sometimes has false positives and false negatives. This means that you donât have to make the changes that golint suggests. But you should take the suggestions from golint seriously. Go developers expect code to look a certain way and follow certain rules, and if your code does not, it sticks out.
Note
2022 Update: golint has been deprecated. In addition to golangci-lint, other recommended replacements are staticcheck and revive. This section will be updated in future editions.
Install golint with the following command:
go install golang.org/x/lint/golint@latest
And run it with:
golint ./...
That runs golint over your entire project.
There is another class of errors that developers run into. The code is syntactically valid, but there are mistakes that are not what you meant to do. This includes things like passing the wrong number of parameters to formatting methods or assigning values to variables that are never used. The go tool includes a command called go vet to detect these kinds of errors. Run go vet on your code with the command:
go vet ./...
There are additional third-party tools to check code style and scan for potential bugs. However, running multiple tools over your code slows down the build because each tool spends time scanning the source code for itself. Rather than use separate tools, you can run multiple tools together with golangci-lint. It combines golint, go vet, and an ever-increasing set of other code quality tools. Once it is installed, you run golangci-lint with the
command:
golangci-lint run
Because golangci-lint runs so many tools (as of this writing, it runs 10 different linters by default and allows you to enable another 50), itâs inevitable that your team may disagree with some of its suggestions. You can configure which linters are enabled and which files they analyze by including a file named .golangci.yml at the root of your project. Check out the documentation for the file format.
I recommend that you start off using go vet as a required part of your automated build process and golint as part of your code review process (since golint might have false positives and false negatives, you canât require your team to fix every issue it reports). Once you are used to their recommendations, try out golangci-lint and tweak its settings until it works for your team.
Tip
Make golint and go vet (or golangci-lint) part of your development process to avoid common bugs and nonidiomatic code. But if you are using golangci-lint, make sure your team agrees on the rules that you want to enforce!
Choose Your Tools
While we wrote a small Go program using nothing more than a text editor and the go command, youâll probably want more advanced tools when working on larger projects. Luckily, there are excellent Go development tools for most text editors and IDEs. If you donât already have a favorite tool, two of the most popular Go development environments are Visual Studio Code and Goland.
Visual Studio Code
If you are looking for a free development environment, Visual Studio Code from Microsoft is your best option. Since it was released in 2015, VS Code has become the most popular source code editor for developers. It does not ship with Go support, but you can make it a Go development environment by downloading the Go extension from the extensions gallery.
VS Codeâs Go support relies on third-party tools. This includes the Go Development tools, The Delve debugger, and gopls, a Go Language Server developed by the Go team. While you need to install the Go development kit yourself, the Go extension will install Delve and gopls for you.
Note
What is a language server? Itâs a standard specification for an API that enables editors to implement intelligent editing behavior, like code completion, linting, and finding usages. You can check out the language server protocol.
Once your tools are set up, you can then open your project and work with it. Figure 1-1 shows you what your project window should look like. Getting Started with VS Code Go is a walkthrough that demonstrates the VS Code Go extension.
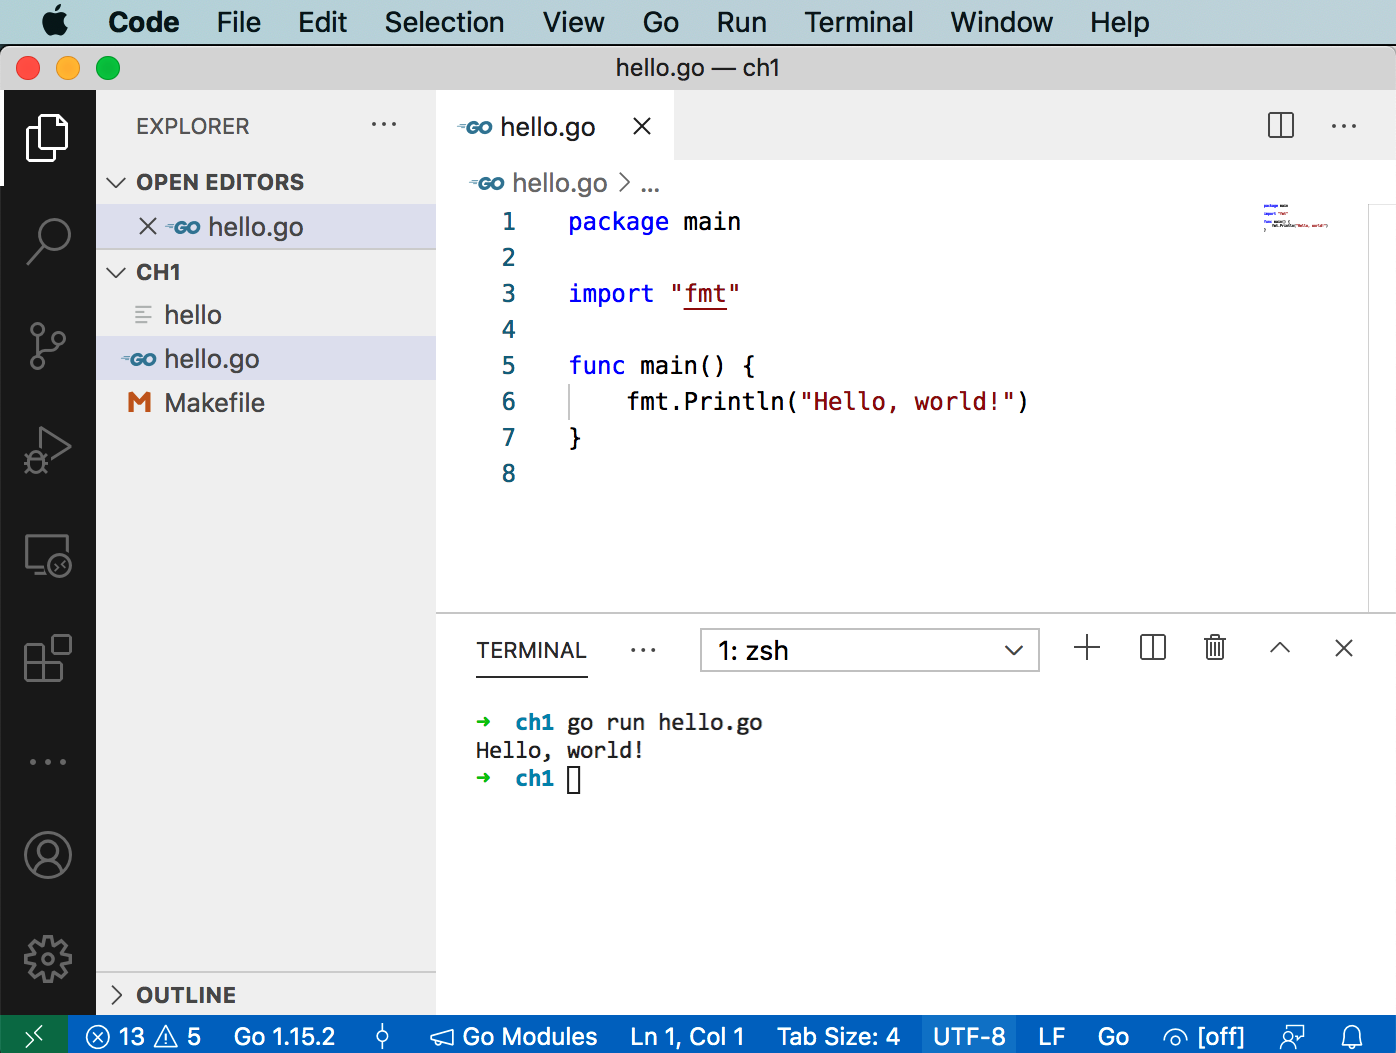
Figure 1-1. Visual Studio Code
GoLand
GoLand is the Go-specific IDE from JetBrains. While JetBrains is best known for Java-centric tools, GoLand is an excellent Go development environment. As you can see in Figure 1-2, GoLandâs user interface looks similar to IntelliJ, PyCharm, RubyMine, WebStorm, Android Studio, or any of the other JetBrains IDEs. Its Go support includes refactoring, syntax highlighting, code completion and navigation, documentation pop-ups, a debugger, code coverage, and more. In addition to Go support, GoLand includes JavaScript/HTML/CSS and SQL database tools. Unlike VS Code, GoLand doesnât require you to download any additional tools to get it to work.
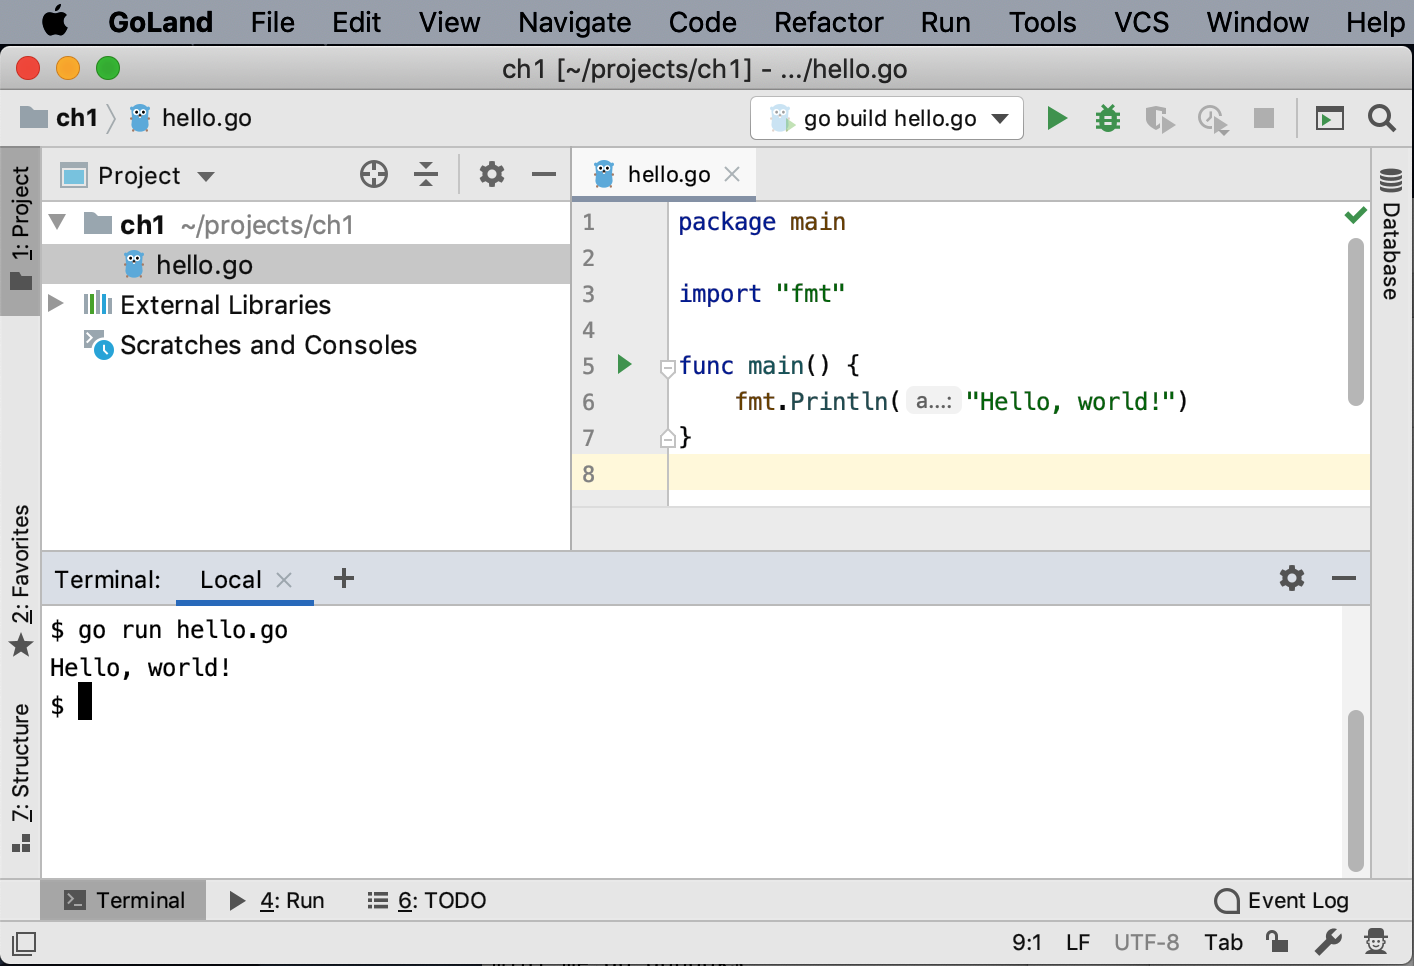
Figure 1-2. GoLand
If you already subscribe to IntelliJ Ultimate (or qualify for a free license), you can add Go support via a plug-in. Otherwise, you have to pay for GoLand; there is no free version available.
The Go Playground
Thereâs one more important tool for Go development, but this is one that you donât install. Visit The Go Playground and youâll see a window that resembles Figure 1-3. If you have used a command-line environment like irb, node, or python, youâll find The Go Playground has a very similar feel. It gives you a place to try out and share small programs. Enter your program into the window and click the Run button to execute the code. The Format button runs go fmt on your program, and checking the Imports checkbox cleans up your imports like goimports. The Share button creates a unique URL that you can send to someone else to take a look at your program or to come back to your code at a future date (the URLs have been persistent for a long time, but I wouldnât use the playground as your source code repository).
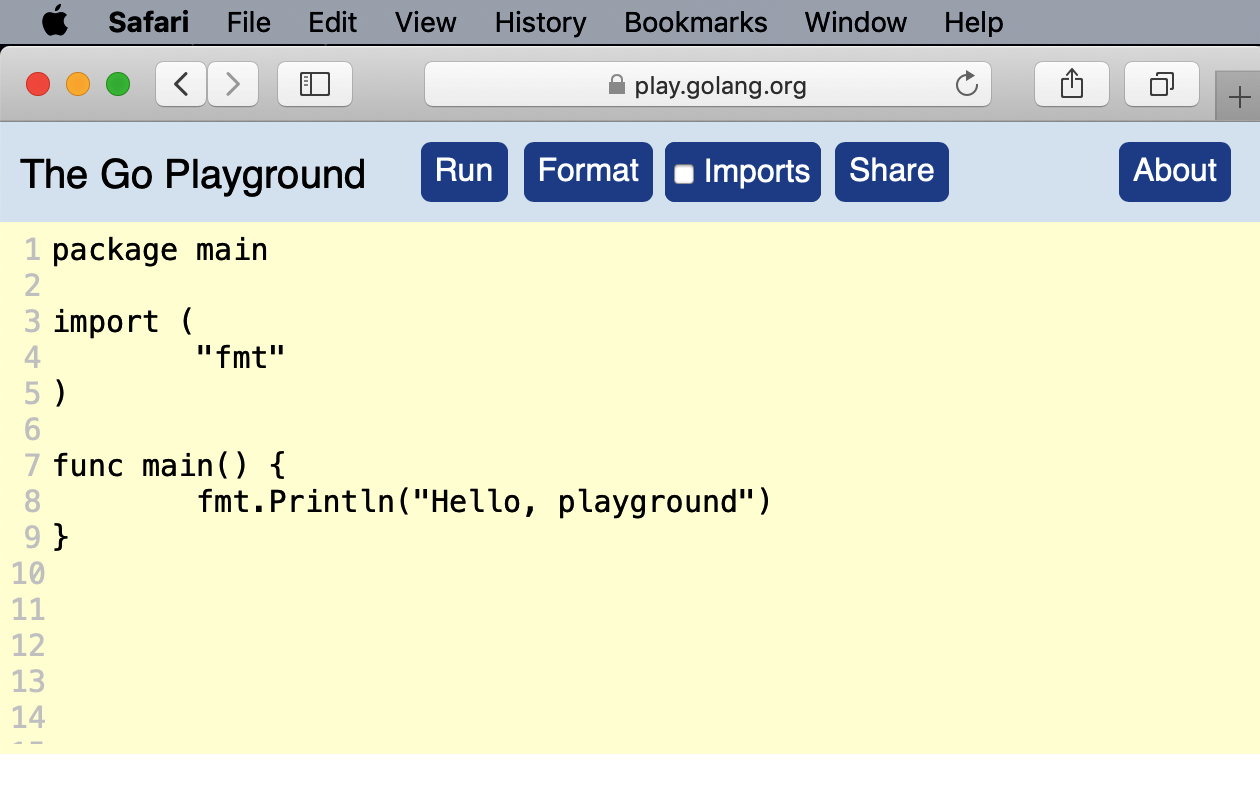
Figure 1-3. The Go Playground
As you can see in Figure 1-4, you can even simulate multiple files by separating each file with a line that looks like -- filename.go --.
Be aware that The Go Playground is someone elseâs computer (in particular, it is Googleâs computer), so you donât have completely free rein. It always runs the latest stable version of Go. You cannot make network connections, and processes that run for too long or use too much memory are stopped. If your program depends on time, be aware that the clock is set to November 10, 2009, 23:00:00 UTC (the date of the initial announcement of Go). But even with these limitations, The Go Playground is a very useful way to try out new ideas without creating a new project locally. Throughout this book, youâll find links to The Go Playground so you can run code examples without copying them onto your computer.
Warning
Do not put sensitive information (such as personally identifiable information, passwords, or private keys) into your playground! If you click the Share button, the information is saved on Googleâs servers and is accessible to anyone who has the associated Share URL. If you do this by accident, contact Google at security@golang.org with the URL and the reason the content needs to be removed.
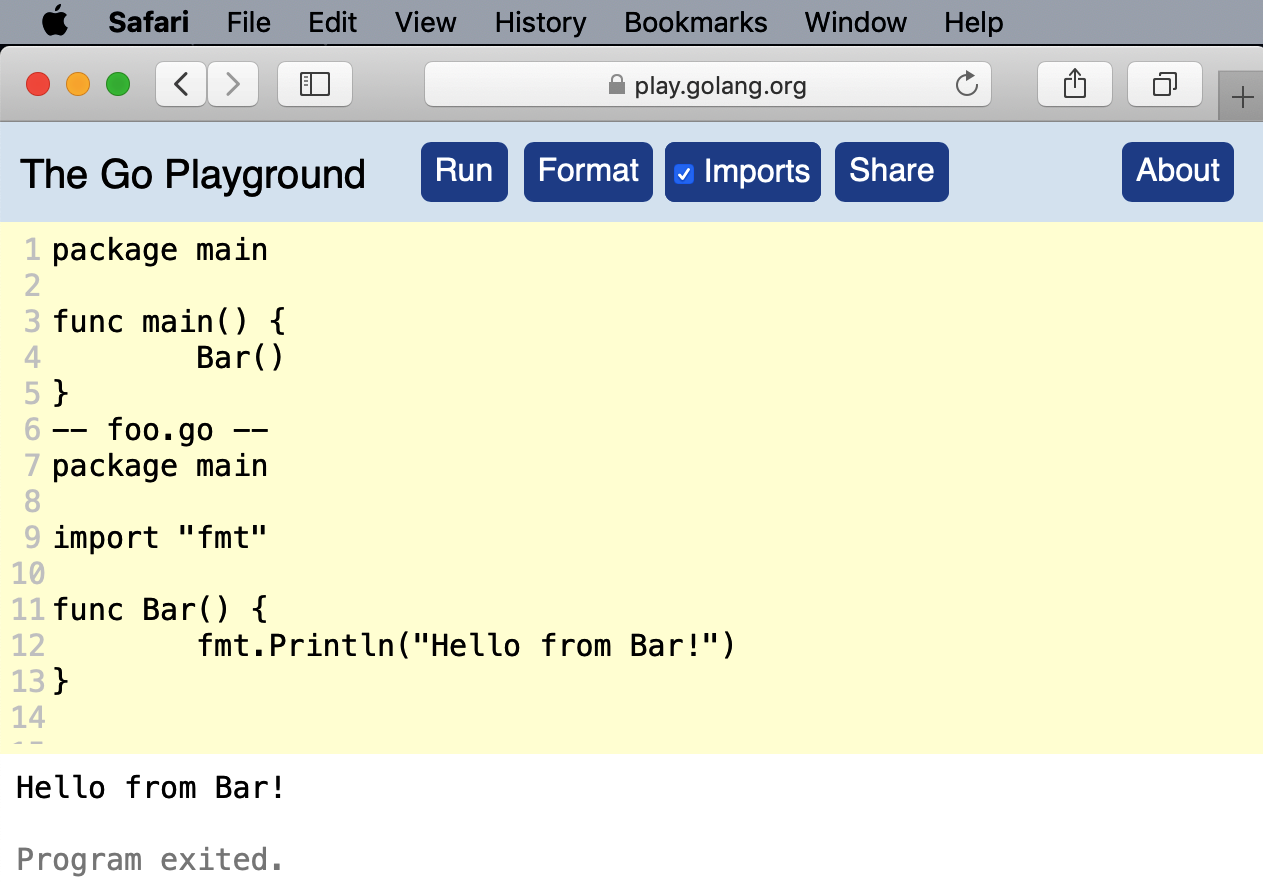
Figure 1-4. The Go Playground supports multiple files
Makefiles
An IDE is nice to use, but itâs hard to automate. Modern software development relies on repeatable, automatable builds that can be run by anyone, anywhere, at any time. This avoids the age-old developer excuse of âIt works on my machine!â The way to do this is to use some kind of script to specify your build steps. Go developers have adopted make as their solution. You may not be familiar with make, but itâs been used to build programs on Unix systems since 1976.
Hereâs a sample Makefile to add to our very simple project:
.DEFAULT_GOAL:=buildfmt:go fmt ./....PHONY:fmtlint:fmtgolint ./....PHONY:lintvet:fmtgo vet ./....PHONY:vetbuild:vetgo build hello.go.PHONY:build
Even if you havenât seen a Makefile before, itâs not too difficult to figure out what is going on. Each possible operation is called a target. The .DEFAULT_GOAL defines which target is run when no target is specified. In our case, we are going to run the build target. Next we have the target definitions. The word before the colon (:) is the name of the target. Any words after the target (like vet in the line build: vet) are the other targets that must be run before the specified target runs. The tasks that are performed by the target are on the indented lines after the target. (The .PHONY line keeps make from getting confused if you ever create a directory in your project with the same name as a target.)
Before you can use this Makefile, you need to make this project a Go module. Weâll cover modules in Chapter 9, but for now, change to the ch1 directory and type in the following command:
go mod init ch1
Now you can use the Makefile. Type:
make
You should see the following output:
go fmt ./...
go vet ./...
go build hello.go
By entering a single command, we make sure the code was formatted correctly, vet the code for nonobvious errors, and compile. We can also run the linter with make lint, vet the code with make vet, or just run the formatter with make fmt. This might not seem like a big improvement, but ensuring that formatting and vetting always happen before a developer (or a script running on a continuous integration build server) triggers a build means you wonât miss any steps.
One drawback to Makefiles is that they are exceedingly picky. You must indent the steps in a target with a tab. They are also not supported out-of-the-box on Windows. If you are doing your Go development on a Windows computer, you need to install make first. The easiest way to do so is to first install a package manager like Chocolatey and then use it to install make (for Chocolatey, the command is choco install make.)
Staying Up to Date
As with all programming languages, there are periodic updates to the Go development tools. Go programs are native binaries that donât rely on a separate runtime, so you donât need to worry that updating your development environment could cause your currently deployed programs to fail. You can have programs compiled with different versions of Go running simultaneously on the same computer or virtual machine.
Since Go 1.2, there has been a new major release roughly every six months. There are also minor releases with bug and security fixes released as needed. Given the rapid development cycles and the Go teamâs commitment to backward compatibility, Go releases tend to be incremental rather than expansive. The Go Compatibility Promise is a detailed description of how the Go team plans to avoid breaking Go code. It says that there wonât be backward-breaking changes to the language or the standard library for any Go version that starts with 1, unless the change is required for a bug or security fix. However, there might be (and have been) backward-incompatible changes to the flags or functionality of the go commands.
Despite these backward compatibility guarantees, bugs do happen, so itâs natural to want to make sure that a new release doesnât break your programs. One option is to install a secondary Go environment. For example, if you are currently running version 1.15.2 and wanted to try out version 1.15.6, you would use the following commands:
$ go get golang.org/dl/go.1.15.6
$ go1.15.6 download
You can then use the command go1.15.6 instead of the go command to see if version 1.15.6 works for your programs:
$ go1.15.6 build
Once you have validated that your code works, you can delete the secondary environment by finding its GOROOT, deleting it, and then deleting its binary from your $GOPATH/bin directory. Hereâs how to do that on Mac OS, Linux, and BSD:
$ go1.15.6 env GOROOT
/Users/gobook/sdk/go1.15.6
$ rm -rf $(go1.15.6 env GOROOT)
$ rm $(go env GOPATH)/bin/go1.15.6
When you are ready to update the Go development tools installed on your computer, Mac and Windows users have the easiest path. Those who installed with brew or
chocolatey can use those tools to update. Those who used the installers on https://golang.org/dl can download the latest installer, which removes the old version when it installs the new one.
Linux and BSD users need to download the latest version, move the old version to a backup directory, expand the new version, and then delete the old version:
$ mv /usr/local/go /usr/local/old-go
$ tar -C /usr/local -xzf go1.15.2.linux-amd64.tar.gz
$ rm -rf /usr/local/old-go
Wrapping Up
In this chapter, we learned how to install and configure our Go development environment. We also talked about tools for building Go programs and ensuring code quality. Now that our environment is ready, weâre on to our next chapter, where we explore the built-in types in Go and how to declare variables.
Get Learning Go now with the O’Reilly learning platform.
O’Reilly members experience books, live events, courses curated by job role, and more from O’Reilly and nearly 200 top publishers.

