Chapter 1. Foundations of Kali Linux
Kali Linux is a specialized distribution of the Linux operating system. It is targeted at people who want to engage in security work. This may be security testing, it may be exploit development or reverse engineering, or it may be digital forensics. The thing about Linux distributions is that they aren’t the same. Linux is really just the kernel—the actual operating system and the core of the distribution. Each distribution layers additional software on top of that core, making it unique. In the case of Kali, what gets layered on are not only the essential utilities, but also hundreds of software packages that are specific to security work.
One of the really nice things about Linux, especially as compared to other operating systems, is that it is almost completely customizable. This includes the shell in which you type commands and the graphical desktop you use. Even beyond that, you can change the look of each of those things. Using Linux is all about making the system work for you, rather than having the system force the way you work because of how it works, looks, and feels.
Linux actually has a long history, if you trace it back to its beginnings. Understanding this history will help provide some context for why Linux is the way it is—especially the seemingly arcane commands that are used to manage the system, manipulate files, and just get work done.
Heritage of Linux
Once upon a time, back in the days of the dinosaur, there existed an operating system called Multics. The goal of Multics was to support multiple users and offer compartmentalization of processes and files on a per user basis. After all, this was an era when the computer hardware necessary to run operating systems like Multics ran into the millions of dollars. At a minimum, computer hardware was hundreds of thousands of dollars. As a point of comparison, a $7 million system today (at the time of this writing, in late 2017) would have cost about $44 million then. Having a system that could support only a single user at a time was just not cost-effective—thus the development of Multics by MIT, Bell Labs, and GE was a way of making computers more cost-effective.
Inevitably, the project slowly fell apart, though the operating system was eventually released. One of the programmers assigned to the project from Bell Labs returned to his regular job and eventually decided to write his own version of an operating system in order to play a game he had originally written for Multics but wanted to play on a PDP-7 that was available at Bell Labs. Ken Thompson needed a decent environment to redevelop the game for the PDP-7. In those days, systems were largely incompatible. They had entirely different hardware instructions (operation codes), and they sometimes had different memory word sizes. As a result, programs written for one environment, particularly if very low-level languages were used, would not work in another environment. The resulting environment, developed by a programmer to make his life easier as he was getting Space Travel working on the PDP-7, was named Unics. Eventually, other Bell Labs programmers joined the project, and it was eventually renamed Unix.
Unix had a simple design. Because it was developed as a programming environment for a single user at a time, it ended up getting used, first within Bell Labs and then outside, by other programmers. One of the biggest advantages to Unix over other operating systems was that the kernel was rewritten in the C programming language in 1972. Using a higher-level language than assembly, which was more common then, made it portable across multiple hardware systems. Rather than being limited to the PDP-7, Unix could run on any system that had a C compiler in order to compile the source code needed to build Unix. This allowed for a standard operating system across numerous hardware platforms.
In addition to having a simple design, Unix had the advantage of being distributed with the source code. This allowed researchers not only to read the source code in order to understand it better, but also to extend and improve the source. Unix has spawned many child operating systems that all behaved just as Unix did, with the same design. In some cases, these other operating system distributions started with the Unix source that was provided by AT&T. In other cases, Unix was essentially reverse engineered based on documented functionality and was the starting point for two popular Unix-like operating systems: BSD and Linux.
Note
As you will see later, one of the advantages of the Unix design—using small, simple programs that do one thing, but allow you to feed the output of one into the input of another—is the power that comes with chaining. One common use of this function is to get a process list by using one utility and feed the output into another utility that will then process that output, either searching specifically for one entry or manipulating the output to strip away some of it to make it easier to understand.
About Linux
As Unix spread, the simplicity of its design and its focus on being a programming environment led to it being taught in computer science programs around the world. A number of books about operating system design were written in the 1980s based on the design of Unix. One of these implementations was written by Andrew Tannenbaum for his book Operating Systems: Design and Implementation (Prentice Hall, 1987). This implementation, called Minix, was the basis for Linus Torvalds’ development of Linux. What Torvalds developed was the Linux kernel, which some consider the operating system. Without the kernel, nothing works. What he needed was a set of userland programs to sit on top of his operating system as an operating environment for users to do useful things.
The GNU Project, started in the late 1970s by Richard Stallman, had a collection of programs that either were duplicates of the standard Unix utilities or were functionally the same with different names. The GNU Project wrote programs primarily in C, which meant they could be ported easily. As a result, Torvalds, and later other developers, bundled the GNU Project’s utilities with his kernel to create a complete distribution of software that anyone could develop and install to their computer system.
Linux inherited the majority of Unix design ideals, primarily because it was begun as something functionally identical to the standard Unix that had been developed by AT&T and was reimplemented by a small group at the University of California at Berkeley as the Berkeley Systems Distribution (BSD). This meant that anyone familiar with how Unix or even BSD worked could start using Linux and be immediately productive. Over the decades since Torvalds first released Linux, many projects have started up to increase the functionality and user-friendliness of Linux. This includes several desktop environments, all of which sit on top of the X/Windows system, which was first developed by MIT (which, again, was involved in the development of Multics).
The development of Linux itself, meaning the kernel, has changed the way developers work. As an example, Torvalds was dissatisfied with the capabilities of software repository systems that allowed concurrent developers to work on the same files at the same time. As a result, Torvalds led the development of git, a version-control system that has largely supplanted other version-control systems for open source development. If you want to grab the current version of source code from most open source projects these days, you will likely be offered access via git. Additionally, there are now public repositories for projects to store their code that support the use of git, a source code manager, to access the code.
Linux is available, generally free of charge, in distributions. A Linux distribution is a collection of software packages that have been selected by the distribution maintainers. Also, the software packages have been built in a particular way, with features determined by the package maintainer. These software packages are acquired as source code, and many packages can have multiple options—whether to include database support, which type of database, whether to enable encryption—that have to be enabled when the package is being configured and built. The package maintainer for one distribution may make different choices for options than the package maintainer for another distribution.
Different distributions will also have different package formats. As an example, RedHat and its associated distributions, like RedHat Enterprise Linux (RHEL) and Fedora Core, use the RedHat Package Manager (RPM) format. In addition, RedHat uses both the RPM utility as well as the Yellowdog Updater Modified (yum) to manage packages on the system. Other distributions may use the different package management utilities used by Debian. Debian uses the Advanced Package Tool (APT) to manage packages in the Debian package format. Regardless of the distribution or the package format, the object of the packages is to collect all the files necessary for the software to function and make those files easy to put into place to make the software functional.
Over the years, another difference between distributions has come with the desktop environment that is provided by default by the distribution. In recent years, distributions have created their own custom views on existing desktop environments. Whether it’s the GNU Object Model Environment (GNOME), the K Desktop Environment (KDE), or Xfce, they can all be customized with different themes and wallpapers and organization of menus and panels. Distributions will often provide their own spin on a different desktop environment. Some distributions, like ElementaryOS, have even provided their own desktop environment.
While in the end the software all works the same, sometimes the choice of package manager or even desktop environment can make a difference to users. Additionally, the depth of the package repository can make a difference to some users. They may want to ensure they have a lot of choices in software they can install through the repository rather than trying to build the software by hand and install it. Different distributions may have smaller repositories, even if they are based on the same package management utilities and formats as other distributions. Because of dependencies of software that need to be installed before the software you are looking for will work, packages are not always mix-and-match between even related distributions.
Sometimes, different distributions will focus on specific groups of users, rather than being general-purpose distributions for anyone who wants a desktop. Beyond that, distributions like Ubuntu will even have two separate installation distributions per release, one for a server installation and one for a desktop installation. A desktop installation generally includes a graphical user interface (GUI), whereas a server installation won’t, and as a result will install far fewer packages. The fewer packages, the less exposure to attack, and servers are often where sensitive information is stored in addition to being systems that may be more likely to be exposed to unauthorized users.
Kali Linux is a distribution that is specifically tailored to a particular type of user—those who are interested in performing security testing or forensics work. Kali Linux, as a distribution focused on security testing, falls into the desktop category, and there is no intention to limit the number of packages that are installed to make Kali harder to attack. Someone focused on security testing will probably need a wide variety of software packages, and Kali loads their distribution out of the gate. This may seem mildly ironic, considering distributions that focus on keeping their systems safe from attack (sometimes called secure) tend to limit the packages. Kali, though, is focused on testing, rather than keeping the distribution safe from attack.
Acquiring and Installing Kali Linux
The easiest way to acquire Kali Linux is to visit its website. From there, you can gather additional information about the software, such as lists of packages that are installed. You will be downloading an ISO image that can be used as is if you are installing into a virtual machine (VM), or it can be burned to a DVD to install to a physical machine.
Kali Linux is based on Debian. This was not always the case, at least as directly as it is now. There was a time when Kali was named BackTrack Linux. BackTrack was based on Knoppix Linux, which is primarily a live distribution, meaning that it was designed to boot from CD, DVD, or USB stick and run from the source media rather than being installed to a destination hard drive. Knoppix, in turn, inherits from Debian. BackTrack was, just as Kali Linux is, a distribution focused on penetration testing and digital forensics. The last version of BackTrack was released in 2012, before the Offensive Security team took the idea of BackTrack and rebuilt it to be based on Debian Linux. One of the features that Kali retains that was available in BackTrack is the ability to live boot. When you get boot media for Kali, you can choose to either install or boot live. In Figure 1-1, you can see the boot options.
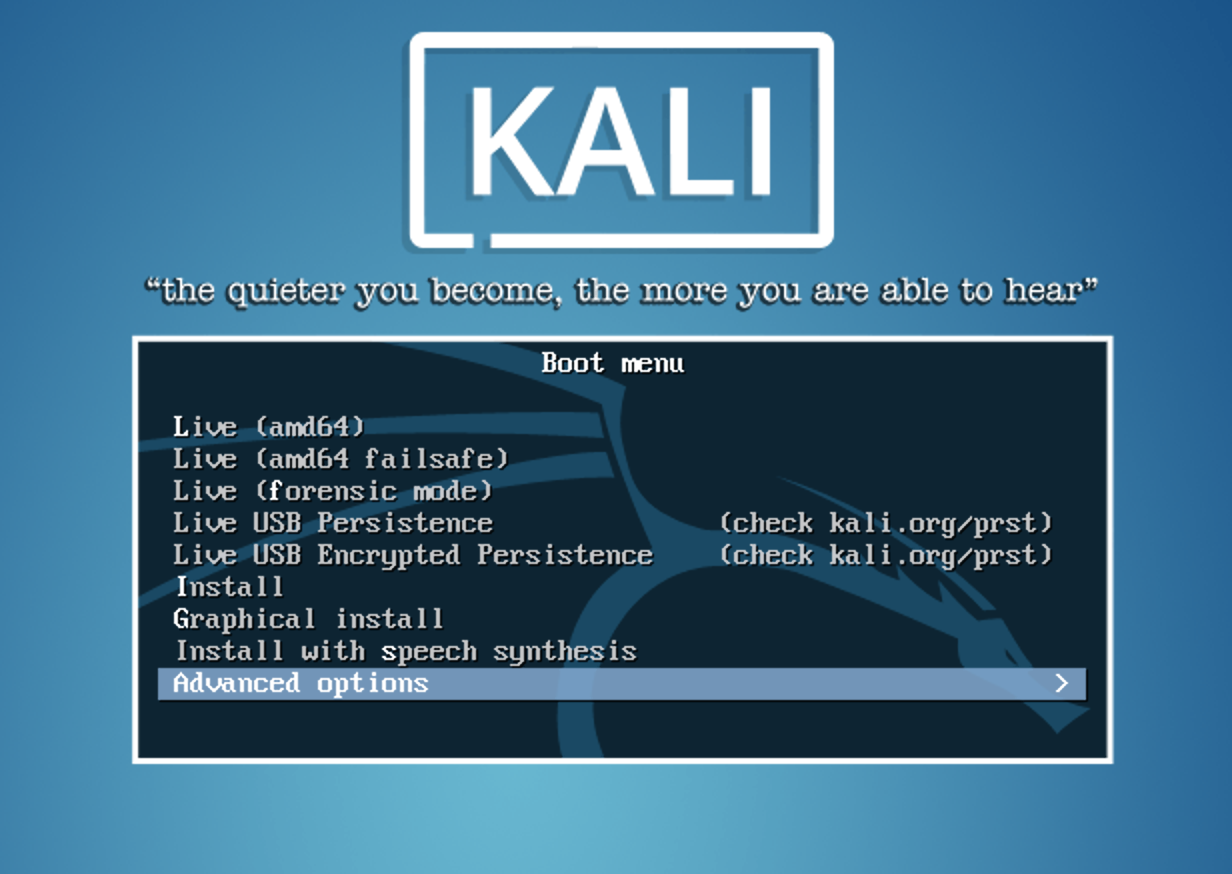
Figure 1-1. Boot screen for Kali Linux
Whether you run from the DVD or install to a hard drive is entirely up to you. If you boot to DVD and don’t have a home directory stored on some writable media, you won’t be able to maintain anything from one boot to another. If you don’t have writable media to store information to, you will be starting entirely from scratch every time you boot. There are advantages to this if you don’t want to leave any trace of what you did while the operating system was running. If you customize or want to maintain SSH keys or other stored credentials, you’ll need to install to local media.
Installation of Kali is straightforward. You don’t have the options that other distributions have. You won’t select package categories. Kali has a defined set of packages that gets installed. You can add more later or even take some away, but you start with a fairly comprehensive set of tools for security testing or forensics. What you need to configure is selecting a disk to install to and getting it partitioned and formatted. You also need to configure the network, including hostname and whether you are using a static address rather than DHCP. Once you have configured that and set your time zone as well as some other foundational configuration settings, the packages will get updated and you will be ready to boot to Linux.
Fortunately, Kali doesn’t require its own hardware. It runs nicely inside a VM. If you intend to play around with security testing, and most especially penetration testing, getting a virtual lab started isn’t a bad idea. I’ve found that Kali runs quite nicely in 4 GB of memory with about 20 GB of disk space. If you want to store a lot of artifacts from your testing, you may want additional disk space. You should be able to get by with 2 GB of memory, but obviously, the more memory you can spare, the better the performance will be.
There are many hypervisors you can choose from, depending on your host operating system. VMware has hypervisors for both Mac and PC. Parallels will run on Macs. VirtualBox, on the other hand, will run on PCs, Macs, Linux systems, and even Solaris. VirtualBox has been around since 2007, but was acquired by Sun Microsystems in 2008. As Sun was acquired by Oracle, VirtualBox is currently maintained by Oracle. Regardless of who maintains it, VirtualBox is free to download and use. If you are just getting started in the world of VMs, this may be a place for you to start. Each works in a slightly different way in terms of how it interacts with users. Different keys to break out of the VM. Different levels of interaction with the operating system. Different support for guest operating systems, since the hypervisor has to provide the drivers for the guest. In the end, it comes down to how much you want to spend and which of them you feel comfortable using.
Note
As a point of possible interest, or at least connection, one of the primary developers on BSD was Bill Joy, who was a graduate student at the University of California at Berkeley. Joy was responsible for the first implementation in Berkeley Unix of TCP/IP. He became a cofounder of Sun Microsystems in 1982 and while there wrote a paper about a better programming language than C++, which served as the inspiration for the creation of Java.
One consideration is the tools provided by the hypervisor. The tools are drivers that get installed into the kernel to better integrate with the host operating system. This may include print drivers, drivers to share the filesystem from the host into the guest, and better video support. VMware can use the VMware tools that are open source and available within the Kali Linux repository. You can also get the VirtualBox tools from the Kali repository. Parallels, on the other hand, provides its own tools. At the time of this writing, you can install the Parallels tools in Kali, but they’re not fully supported. But in my experience, they work well even if they aren’t fully supported.
If you’d prefer not to do an install from scratch but are interested in using a VM, you can download either a VMware or VirtualBox image. Kali provides support for not only virtual environments but also ARM-based devices like the Raspberry Pi and the BeagleBone. The advantage to using the VM images is that it gets you up and running faster. You don’t have to take the time to do the installation. Instead, you download the image, load it into your chosen hypervisor, and you’re up and running. If you choose to go the route of using a preconfigured VM, you can find the images at the page on Kali’s site for downloading one of these custom images.
Another low-cost option for running Kali Linux is a Raspberry Pi. The Pi is a very low-cost and small-footprint computer. You can, though, download an image specific for the Pi. The Pi doesn’t use an Intel or AMD processor as you would see on most desktop systems. Instead, it uses an Advanced RISC Machine (ARM) processor. These processors use a smaller instruction set and take less power than the processors you would usually see in desktop computers. The Pi comes as just a very small board that fits in the palm of your hand. You can get multiple cases to insert the board into and then outfit it with any peripherals you may want, such as a keyboard, mouse, and monitor.
One of the advantages of the Pi is that it can be used in physical attacks, considering its small size. You can install Kali onto the Pi and leave it at a location you are testing but it does require power and some sort of network connection. The Pi has an Ethernet connection built in, but there are also USB ports for WiFi adapters. Once you have Kali in place, you can perform even local attacks remotely by accessing your Pi from inside the network. We’ll get into some of that later.
With so many options to get yourself started, it should be easy to get an installation up quickly. Once you have the installation up and running, you’ll want to get familiar with the desktop environment so you can start to become productive.
Desktops
You’re going to be spending a lot of time interacting with the desktop environment, so you may as well get something that you’ll feel comfortable with. Unlike proprietary operating systems like Windows and macOS, Linux has multiple desktop environments. Kali supports the popular ones from their repository without needing to add any additional repositories. If the desktop environment that is installed by default doesn’t suit you, replacing it is easy. Because you’ll likely be spending a lot of time in the environment, you really want to be not only comfortable but also productive. This means finding the right environment and toolsets for you.
GNOME Desktop
The default environment provided in Kali Linux is based on the GNOME desktop. This desktop environment was part of the GNU (GNU’s Not Unix, which is referred to as a recursive acronym) Project. Currently, RedHat is the primary contributor and uses the GNOME desktop as its primary interface, as does Ubuntu and others. In Figure 1-2, you can see the desktop environment with the main menu expanded.
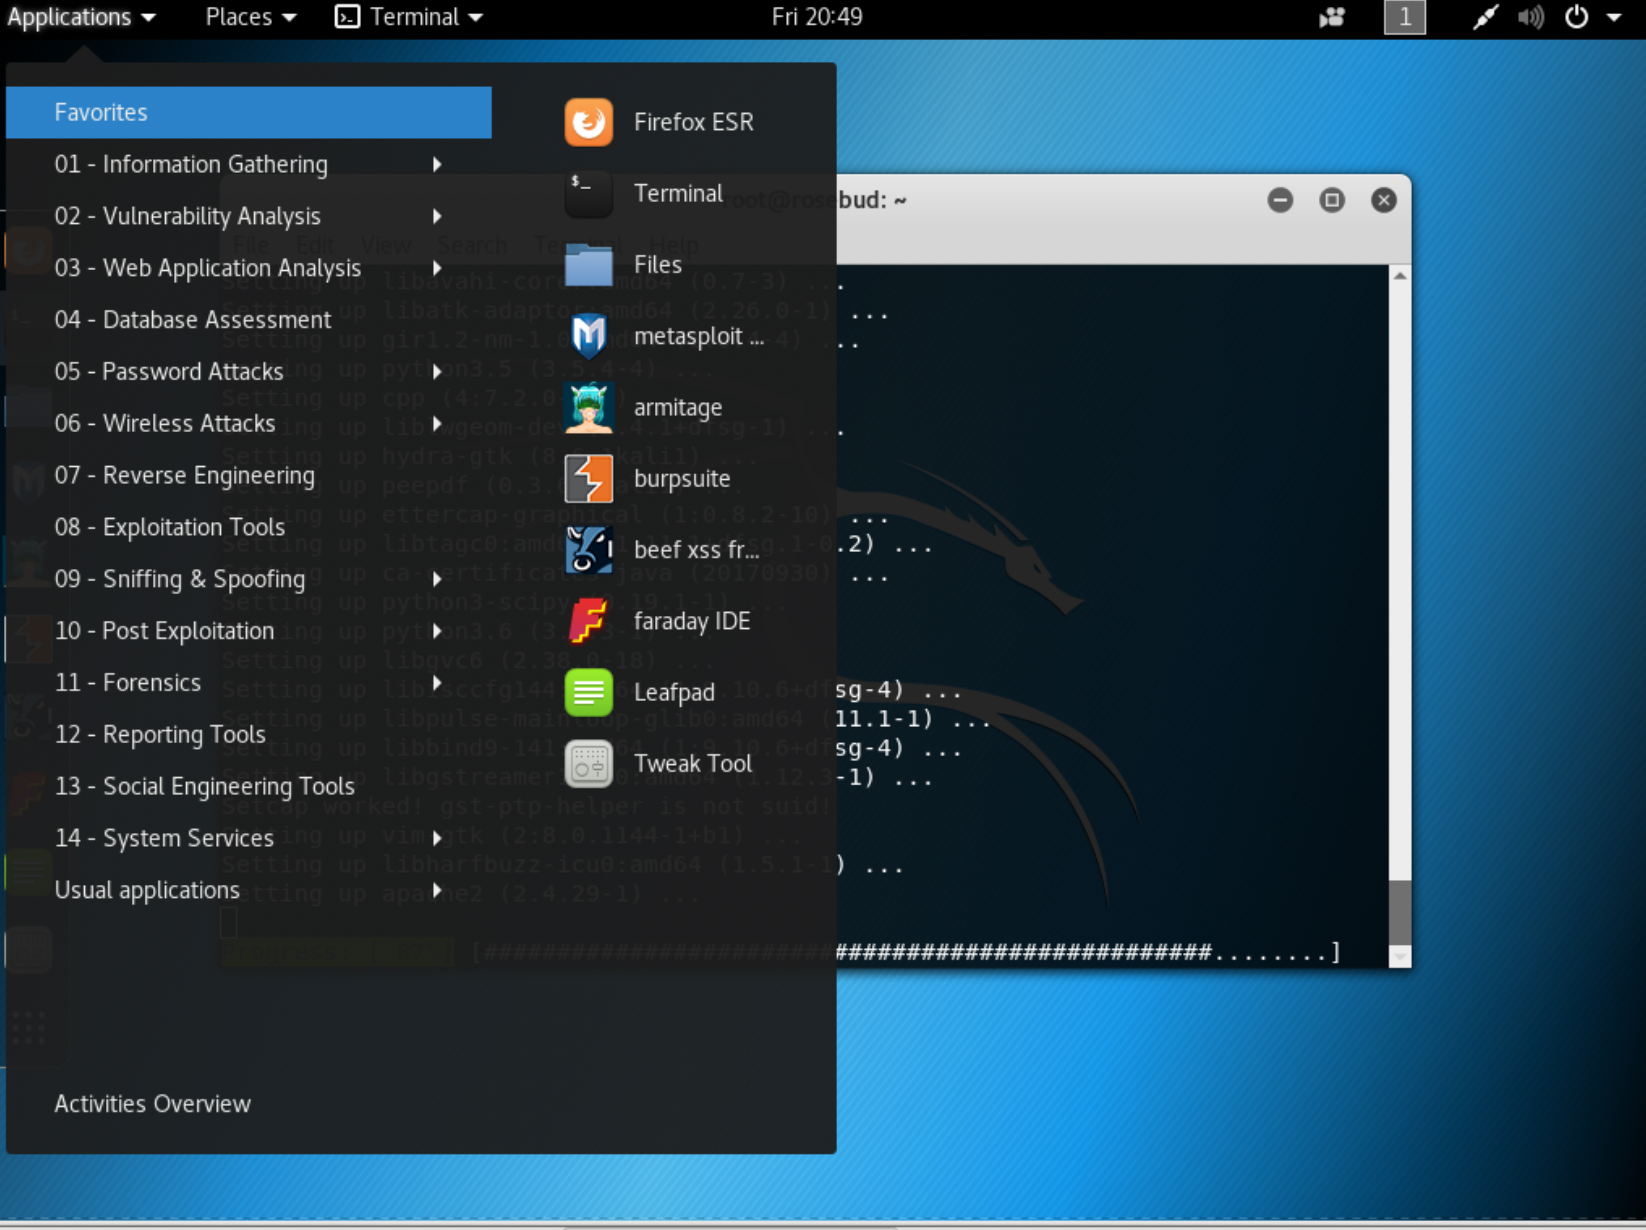
Figure 1-2. GNOME desktop for Kali Linux
Just as with Windows, if that’s what you are mostly familiar with, you get an application menu with shortcuts to the programs that have been installed. Rather than being broken into groups by software vendor or program name, Kali presents the programs in groups based on functionality. The categories presented, and ones covered over the course of this book, are as follows:
-
Information Gathering
-
Vulnerability Analysis
-
Web Application Analysis
-
Database Assessment
-
Password Attacks
-
Wireless Attacks
-
Reverse Engineering
-
Exploitation Tools
-
Sniffing & Spoofing
-
Post Exploitation
-
Forensics
-
Reporting Tools
-
Social Engineering Tools
Alongside the Applications menu is a Places menu, providing shortcuts to locations you may want to get to quickly. This includes your Home directory, Desktop directory, Computer, and Network. Next to the Places menu is a menu associated with the application with a focus on the desktop. If no program is running, there is no menu there. Essentially, it’s similar to the taskbar in Windows, except that running applications don’t line up in the menu bar at the top of the screen. The only one you will see there is the application in the foreground.
As in other modern operating systems, you’ll have a little collection of icons in the far right of the menu bar, which GNOME calls a panel, including a pull-down that brings up a small dialog box providing quick access to customizations, logout, power functions, sound, and network settings. Figure 1-3 shows this dialog box and the features supported through it. Mostly, it provides quick access to system functions if you want to use menu actions to perform them.
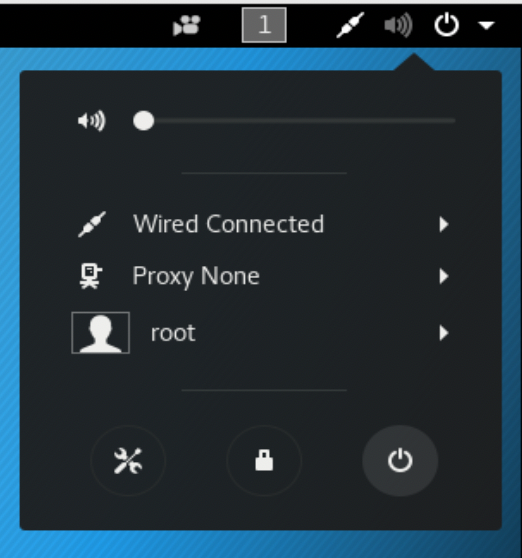
Figure 1-3. GNOME panel menu
Along with the menu in the top panel, there is a dock along the left side. The dock includes commonly used applications like the Terminal, Firefox, Metasploit, Armitage, Burp Suite, Leafpad, and Files. The dock is similar to the dock in macOS. Clicking one of the icons once launches the application. The options in the dock to start with also show up as favorites in the menu accessible from the panel. Any program that is not in the dock will be added to the dock while it is running. Again, this is the same behavior as in macOS. Whereas Windows has a taskbar that includes buttons for running applications, and also has a quick launch bar where you can pin application icons, the purpose of the dock in macOS and GNOME is to store the application shortcuts. Additionally, the Windows taskbar stretches the width of the screen. The dock in GNOME and macOS is only as wide as it needs to be to store the icons that have been set to persist there, plus the ones for running applications.
Note
The dock in macOS comes from the interface in the NeXTSTEP operating system, which was designed for the NeXT Computer. This is the computer Steve Jobs formed a company to design and build after he was forced out of Apple in the 1980s. Many of the elements of the NeXTSTEP user interface (UI) were incorporated into the macOS UI when Apple bought NeXT. Incidentally, NeXTSTEP was built over the top of a BSD operating system, which is why macOS has Unix under the hood if you open a terminal window.
Logging In Through the Desktop Manager
Although GNOME is the default desktop environment, others are available without much effort. If you have multiple desktop environments installed, you will be able to select one in the display manager when you log in. First, you need to enter your username so the system can identify the default environment you have configured. This may be the last one you logged into. Figure 1-4 shows environments that I can select from on one of my Kali Linux systems.
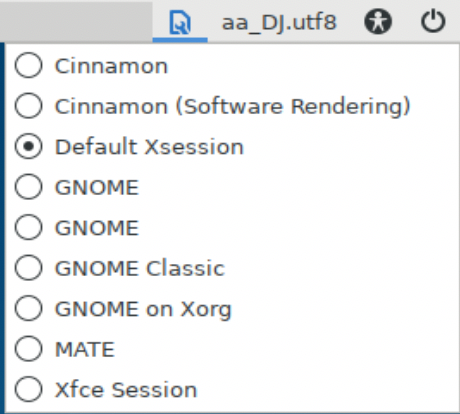
Figure 1-4. Desktop selection at login
There have been numerous display managers over the years. Initially, the login screen was something the X window manager provided, but other display managers have been developed, expanding the capabilities. One of the advantages of LightDM is that it’s considered lightweight. This may be especially relevant if you are working on a system with fewer resources such as memory and processor.
Xfce Desktop
One desktop environment that has been somewhat popular as an alternative over the years is Xfce. One of the reasons it has been popular is that it was designed to be fairly lightweight for a full desktop environment and, as a result, more responsive. Many hardcore Linux users I have known over the years have gravitated to Xfce as their preferred environment, if they needed a desktop environment. Again, the reason is that it has a simple design that is highly configurable. In Figure 1-5, you can see a basic setup of Xfce. The panel on the bottom of the desktop is entirely configurable. You can change where it’s located and how it behaves, and add or remove items as you see fit, based on how you prefer to work. This panel includes an applications menu that includes all the same folders/categories that are in the GNOME menu.
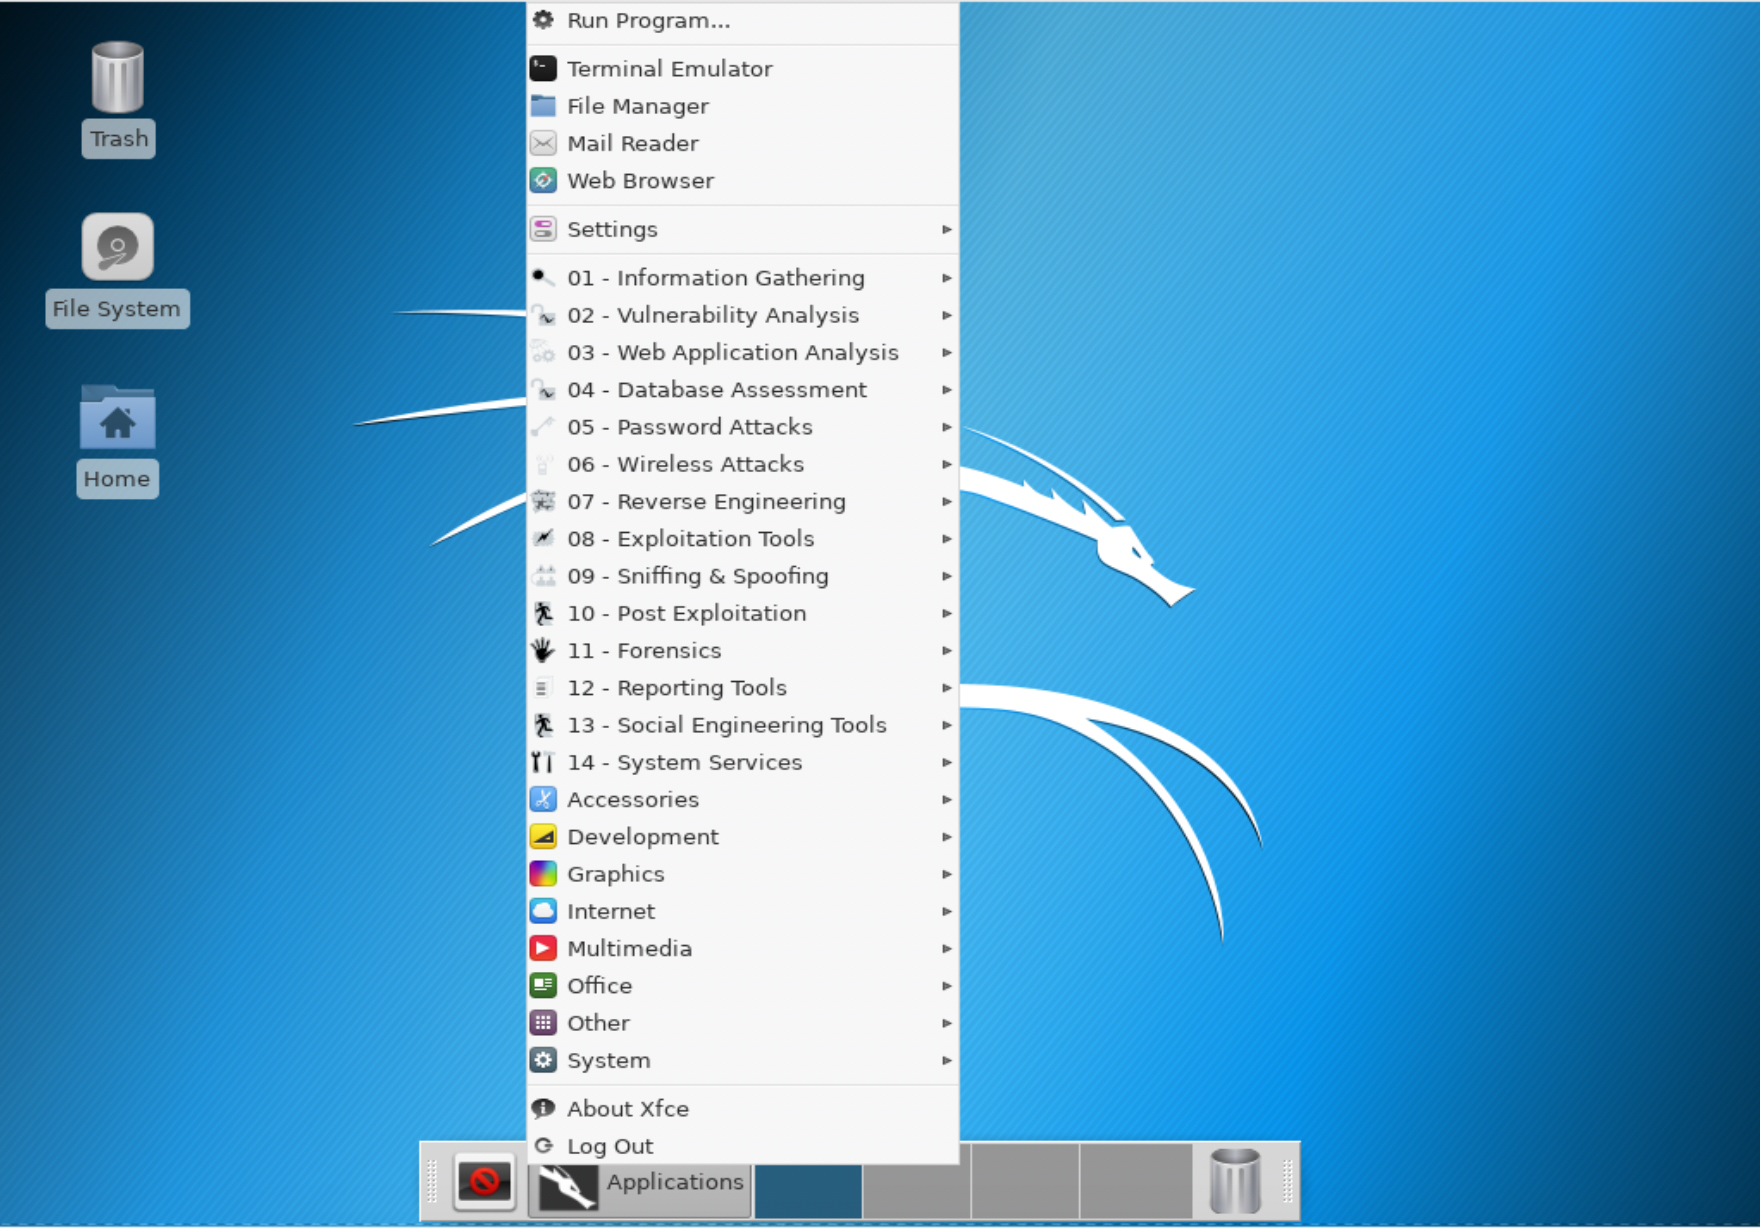
Figure 1-5. Xfce desktop showing applications menu
While Xfce is based on the GNOME Toolkit (GTK), it is not a fork of GNOME. It was developed on top of an older version of GTK. The intention was to create something that was simpler than the direction GNOME was going in. It was intended to be lighter weight and, as a result, have better performance. The feeling was that the desktop shouldn’t get in the way of the real work users want to do.
Cinnamon and MATE
Two other desktops, Cinnamon and MATE, owe their origins to GNOME as well. The Linux distribution, Linux Mint, wasn’t sure about GNOME 3 and its GNOME shell, the desktop interface that came with it. As a result, it developed Cinnamon, which was initially just a shell sitting on top of GNOME. With the second version of Cinnamon, it became a desktop environment in its own right. One of the advantages to Cinnamon is that it bears a strong resemblance to Windows in terms of where things are located and how you get around. You can see that there is a Menu button at the bottom left, much like the Windows button, as well as a clock and other system widgets at the right of the menu bar or panel. You can see the panel as well as the menu in Figure 1-6. Again, the menu is just like the one you see in GNOME and Xfce.
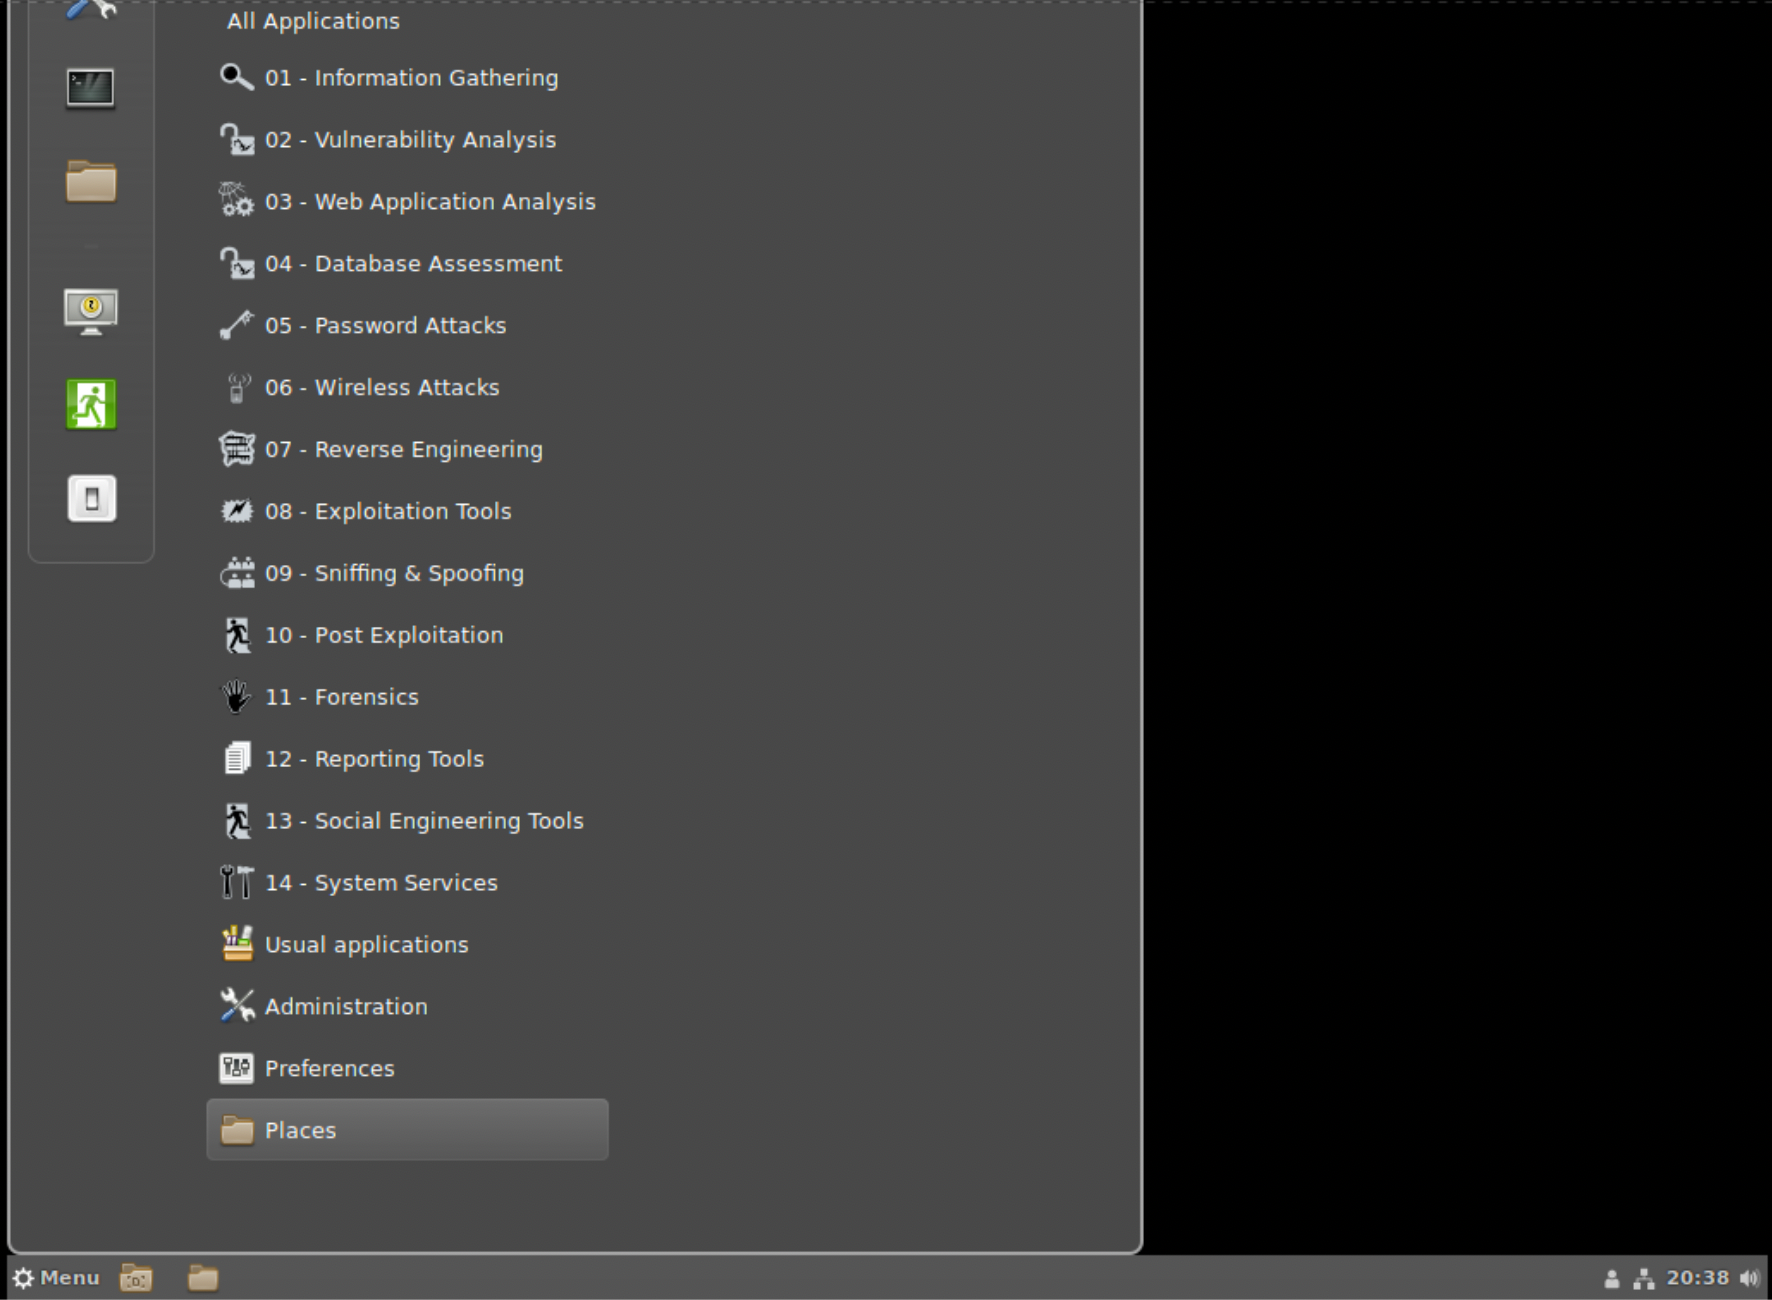
Figure 1-6. Cinnamon desktop with menu
As I’ve suggested above, there were concerns about GNOME 3 and the change in the look and behavior of the desktop. Some might say this was an understatement, and the reversion of some distributions to other looks might be considered proof of that. Regardless, Cinnamon was one response to GNOME 3 by creating a shell that sat on top of the underlying GNOME 3 architecture. MATE, on the other hand, is an outright fork of GNOME 2. For anyone familiar with GNOME 2, MATE will seem familiar. It’s an implementation of the classic look of GNOME 2. You can see this running on Kali in Figure 1-7. Again, the menu is shown so you can see that you will get the same easy access to applications in all of the environments.
The choice of desktop environment is entirely personal. One desktop that I have left off here but that is still very much an option is the K Desktop Environment (KDE). There are two reasons for this. The first is that I have always found KDE to be fairly heavyweight, although this has evened out some with GNOME 3 and the many packages it brings along with it. KDE never felt as quick as GNOME and certainly Xfce. However, a lot of people like it. More particularly, one reason for omitting an image of it is that it looks an awful lot like Cinnamon. One of the objectives behind KDE always seemed to be to clone the look and feel of Windows so users coming from that platform would feel comfortable.
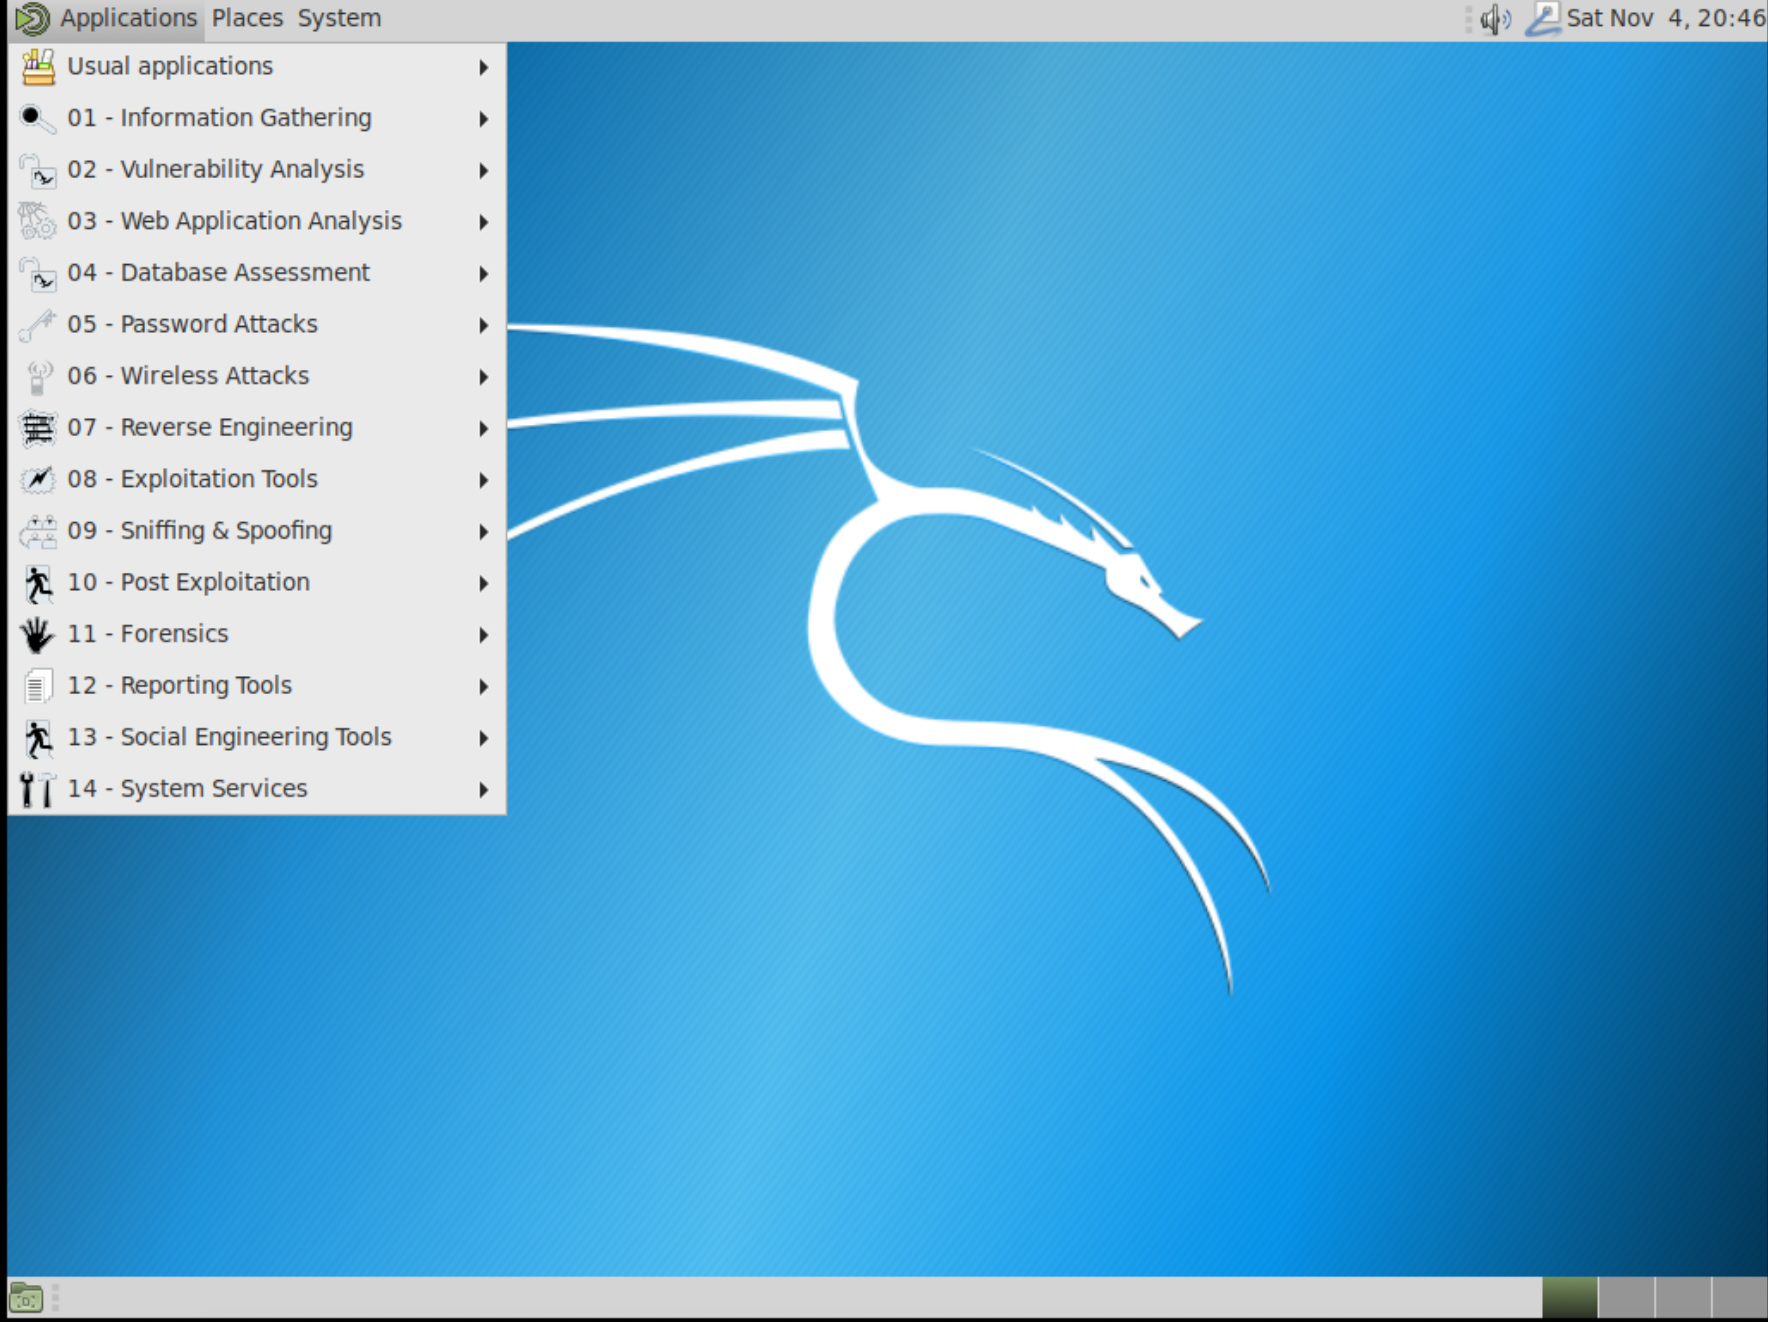
Figure 1-7. MATE desktop with menu
If you are serious about really getting started with Kali and working with it, you may want to spend some time playing with the different desktop environments. It’s important that you are comfortable and can get around the interface efficiently. If you have a desktop environment that gets in your way or is hard to navigate, you probably don’t have a good fit for you. You may try another one. It’s easy enough to install additional environments. When we get to package management a little later, you’ll learn how to install additional packages and, as a result, desktop environments. You may even discover some that aren’t included in this discussion.
Using the Command Line
You will find over the course of this book that I have a great fondness for the command line. There are a lot of reasons for this. For one, I started in computing when terminals didn’t have what we call full screens. And we certainly didn’t have desktop environments. What we had was primarily command lines. As a result, I got used to typing. When I started on Unix systems, all I had was a command line so I needed to get used to the command set available there. The other reason for getting comfortable with the command line is that you can’t always get a UI. You may be working remotely and connecting over a network. This may get you only command-line programs without additional work. So, making friends with the command line is useful.
Another reason for getting used to the command line and the locations of program elements is that GUI programs may have failures or may leave out details that could be helpful. This may be especially true of some security or forensics tools. As one example, I much prefer to use The Sleuth Kit (TSK), a collection of command-line programs, over the web-based interface, Autopsy, which is more visual. Since Autopsy sits on top of TSK, it’s just a different way of looking at the information TSK is capable of generating. The difference is that with Autopsy, you don’t get all of the details, especially ones that are fairly low level. If you are just learning how to do things, understanding what is going on may be far more beneficial than learning a GUI. Your skills and knowledge will be far more transferable to other situations and tools. So, there’s that too.
A UI is often called a shell. This is true whether you are referring to the program that manages the desktop or the program that takes commands that you type into a terminal window. The default shell in Linux is the Bourne Again Shell (bash). This is a play on the Bourne Shell, which was an early and long-standing shell. However, the Bourne Shell had limitations and missing features. As a result, in 1989, the Bourne Again Shell was released. It has since become the common shell in Linux distributions. There are two types of commands you will run on the command line. One is called a built-in. This is a function of the shell itself and it doesn’t call out to any other program—the shell handles it. The other command you will run is a program that sits in a directory. The shell has a listing of directories where programs are kept that is provided (and configurable) through an environment variable.
Note
Keep in mind that Unix was developed by programmers for programmers. The point was to create an environment that was both comfortable and useful for the programmers using it. As a result, the shell is, as much as anything else, a programming language and environment. Each shell has different syntax for the control statements that it uses, but you can create a program right on the command line because, as a programming language, the shell will be able to execute all of the statements.
In short, we’re going to spend some time with the command line because it’s where Unix started and it’s also powerful. To start with, you’ll want to get around the filesystem and get listings of files, including details like permissions. Other commands that are useful are ones that manage processes and general utilities.
File and Directory Management
To start, let’s talk about getting the shell to tell you the directory you are currently in. This is called the working directory. To get the working directory, the one we are currently situated in from the perspective of the shell, we use the command pwd, which is shorthand for print working directory. In Example 1-1, you can see the prompt, which ends in #, indicating that the effective user who is currently logged in is a superuser. The # ends the prompt, which is followed by the command that is being entered and run. This is followed on the next line by the results, or output, of the command.
Example 1-1. Printing your working directory
root@rosebud:~# pwd
/root
Note
When you get to the point where you have multiple machines, either physical or virtual, you may find it interesting to have a theme for the names of your different systems. I’ve known people who named their systems for The Hitchhiker’s Guide to the Galaxy characters, for instance. I’ve also seen coins, planets, and various other themes. For ages now, my systems have been named after Bloom County characters. The Kali system here is named for Rosebud the Basselope.
Once we know where in the filesystem we are, which always starts at the root directory (/) and looks a bit like a tree, we can get a listing of the files and directories. You will find that with Unix/Linux commands, the minimum number of characters is often used. In the case of getting file listings, the command is ls. While ls is useful, it only lists the file and directory names. You may want additional details about the files, including times and dates as well as permissions. You can see those results by using the command ls -la. The l (ell) specifies long listing, including details. The a specifies that ls should show all the files, including files that are otherwise hidden. You can see the output in Example 1-2.
Example 1-2. Getting a long listing
root@rosebud:~# ls -la
total 164
drwxr-xr-x 17 root root  4096 Nov  4 21:33 .
drwxr-xr-x 23 root root  4096 Oct 30 17:49 ..
-rw-------  1 root root  1932 Nov  4 21:31 .ICEauthority
-rw-------  1 root root    52 Nov  4 21:31 .Xauthority
-rw-------  1 root root    78 Nov  4 20:24 .bash_history
-rw-r--r--  1 root root  3391 Sep 16 19:02 .bashrc
drwx------  8 root root  4096 Nov  4 21:31 .cache
drwxr-xr-x  3 root root  4096 Nov  4 21:31 .cinnamon
drwxr-xr-x 15 root root  4096 Nov  4 20:46 .config
-rw-r--r--  1 root root    47 Nov  4 21:31 .dmrc
drwx------  2 root root  4096 Oct 29 21:10 .gconf
drwx------  3 root root  4096 Oct 29 21:10 .gnupg
drwx------  3 root root  4096 Oct 29 21:10 .local
-rw-r--r--  1 root root   148 Sep  4 09:51 .profile
-rw-------  1 root root  1024 Sep 16 19:36 .rnd
-rw-------  1 root root  1092 Nov  4 21:33 .viminfo
-rw-r--r--  1 root root 20762 Nov  4 20:37 .xfce4-session.verbose-log
-rw-r--r--  1 root root 16415 Nov  4 20:29 .xfce4-session.verbose-log.last
-rw-------  1 root root  8530 Nov  4 21:31 .xsession-errors
-rw-------  1 root root  7422 Nov  4 21:31 .xsession-errors.old
drwxr-xr-x  2 root root  4096 Nov  4 20:06 .zenmap
drwxr-xr-x  2 root root  4096 Oct 29 21:10 Desktop
drwxr-xr-x  2 root root  4096 Oct 29 21:10 Documents
drwxr-xr-x  2 root root  4096 Oct 29 21:10 Downloads
drwxr-xr-x  2 root root  4096 Oct 29 21:10 Music
drwxr-xr-x  2 root root  4096 Oct 29 21:10 Pictures
drwxr-xr-x  2 root root  4096 Oct 29 21:10 Public
drwxr-xr-x  2 root root  4096 Oct 29 21:10 Templates
drwxr-xr-x  2 root root  4096 Oct 29 21:10 Videos
Starting in the left column, you can see the permissions. Unix has a simple set of permissions. Each file or directory has a set of permissions that are associated with the user owner, then a set of permissions associated with the group that owns the file, and finally a set of permissions that belong to everyone else, referred to as the world. Directories are indicated with a d in the very first position. The other permissions available are read, write, and execute. On Unix-like operating systems, a program gets the execute bit set to determine whether it’s executable. This is different from Windows, where a file extension may make that determination. The executable bit determines not only whether a file is executable, but also who can execute it, depending on which category the execute bit is set in (user, group, world).
You can also see the owner (user) and group, both of which are root in these cases. This is followed by the file size, the last time the file or directory was modified, and then the name of the file or directory. You may notice at the top that there are files that start with a dot, or period. The dot files and directories store user-specific settings and logs. Because they are managed by the applications that create them, as a general rule, they are hidden from regular directory listings.
The program touch can be used to update the modified date and time to the moment that touch is run. If the file doesn’t exist, touch will create an empty file that has the modified and created timestamp set to the moment touch was executed.
Other file- and directory-related commands that will be really useful are ones related to setting permissions and owners. Every file and directory gets a set of permissions, as indicated previously, as well as having an owner and a group. To set permissions on a file or directory, you use the chmod command, which can take a numerical value for each of the possible permissions. Three bits are used, each either on or off for whether the permission is set or not. Since they are bits, we are talking about powers of 2. It’s easiest to remember the powers of 2 as well as the order read, write, and execute. If you read left to right as the people of most Western cultures do, you will think about the most significant value being to the left. Since we are talking about bits, we have the powers of 2 with exponents 0–2. Read has the value of 22, or 4. Write has the value of 21, or 2. Finally, execute has the value of 20, or 1. As an example, if you want to set both read and write permissions on a file, you would use 4 + 2, or 6. The bit pattern would be 110, if it’s easier to see it that way.
There are three sets of permissions: owner, group, and world (everyone). When you are setting permissions, you specify a numeric value for each, meaning you have a three-digit value. As an example, in order to set read, write, and execute for the owner but just read for the group and everyone, you use chmod 744 filename, where filename is the name of the file you are setting permissions for. You could also just specify the bit you want either set or unset, if that’s easier. For example, you could use chmod u+x filename to add the executable bit for the owner.
The Linux filesystem is generally well-structured, so you can be sure of where to look for files. However, in some cases, you may need to search for files. On Windows or macOS, you may understand how to look for files, as the necessary tools are embedded in the file managers. If you are working from the command line, you need to know the means you can use to locate files. The first is locate, which relies on a system database. The program updatedb will update that database, and when you use locate, the system will query the database to find the location of the file.
If you are looking for a program, you can use another utility. The program which will tell you where the program is located. This may be useful if you have various locations where executables are kept. The thing to note here is that which uses the PATH variable in the user’s environment to search for the program. If the executable is found in the PATH, the full path to the executable is displayed.
A more multipurpose program for location is find. While find has a lot of capabilities, a simple approach is to use something like find / -name foo -print. You don’t have to provide the -print parameter, since printing the results is the default behavior; it’s just how I learned how to run the command and it’s stayed with me. Using find, you specify the path to search in. find performs a recursive search, meaning it starts at the directory specified and searches all directories under the specified directory. In the preceding example, we are looking for the file named foo. You can use regular expressions, including wildcards, in your search. If you want to find a file that begins with the letters foo, you use find / -name “foo*” -print. If you are using search patterns, you need to put the string and pattern inside double quotes. While find has a lot of capabilities, this will get you started.
Process Management
When you run a program, you initiate a process. You can think of a process as a dynamic, running instance of a program, which is static as it sits on a storage medium. Every running Linux system has dozens or hundreds of processes running at any given time. In most cases, you can expect the operating system to manage the processes in the best way. However, at times you may want to get yourself involved. As an example, you may want to check whether a process is running, since not all processes are running in the foreground. A foreground process is one that currently has the potential for the user to see and interact with, as compared with a background process, which a user wouldn’t be able to interact with unless it was brought to the foreground and designed for user interaction. For example, just checking the number of processes running on an otherwise idle Kali Linux system, I discovered 141 processes. Out of that 141, only one was in the foreground. All others were services of some sort.
To get a list of processes, you can use the ps command. The command all by itself doesn’t get you much more than the list of processes that belong to the user running the program. Every process, just like files, has an owner and a group. The reason is that processes need to interact with the filesystem and other objects, and having an owner and a group is the way the operating system determines whether the process should be allowed access. In Example 1-3, you can see what just running ps looks like.
Example 1-3. Getting a process list
root@rosebud:~# ps
  PID TTY          TIME CMD
 4068 pts/1    00:00:00 bash
 4091 pts/1    00:00:00 ps
 </pre>
What you see in Example 1-3 is the identification number of the process, commonly known as the process ID, or PID, followed by the teletypewriter port the command was issued on, the amount of time spent in the processor, and finally the command. Most of the commands you will see have parameters you can append to the command line, and these will change the behavior of the program.
Interestingly, AT&T Unix diverged a bit from BSD Unix. This has resulted in some command-line parameter variations, depending on which Unix derivation you may have begun with. For more detailed process listings, including all of the processes belonging to all users (since without specifying, you get only processes belonging to your user), you might use either ps -ea or ps aux. Either will provide the complete list, though there will be differences in the details provided.
The thing about using ps is that it’s static: you run it once and get the list of processes. Another program can be used to watch the process list change in near-real time. While it’s possible to also get statistics like memory and processor usage from ps, with top, you don’t have to ask for it. Running top will give you the list of processes, refreshed at regular intervals. You can see sample output in Example 1-4.
Example 1-4. Using top for process listings
top - 20:14:23 up 3 days, 49 min,  2 users,  load average: 0.00, 0.00, 0.00
Tasks: 139 total,   1 running, 138 sleeping,   0 stopped,   0 zombie
%Cpu(s):  0.3 us,  0.2 sy,  0.0 ni, 99.5 id,  0.0 wa,  0.0 hi,  0.0 si,  0.0 st
KiB Mem :  4050260 total,  2722564 free,   597428 used,   730268 buff/cache
KiB Swap:  4192252 total,  4192252 free,        0 used.  3186224 avail Mem

  PID USER      PR  NI    VIRT    RES    SHR S  %CPU %MEM     TIME+ COMMAND
 6995 root      20   0  105384   6928   5932 S   0.3  0.2   0:00.11 sshd
 7050 root      20   0   47168   3776   3160 R   0.3  0.1   0:00.09 top
    1 root      20   0  154048   8156   6096 S   0.0  0.2   0:02.45 systemd
    2 root      20   0       0      0      0 S   0.0  0.0   0:00.06 kthreadd
    4 root       0 -20       0      0      0 S   0.0  0.0   0:00.00 kworker/0:+
    5 root      20   0       0      0      0 S   0.0  0.0   0:01.20 kworker/u4+
    6 root       0 -20       0      0      0 S   0.0  0.0   0:00.00 mm_percpu_+
    7 root      20   0       0      0      0 S   0.0  0.0   0:00.20 ksoftirqd/0
    8 root      20   0       0      0      0 S   0.0  0.0   0:38.25 rcu_sched
    9 root      20   0       0      0      0 S   0.0  0.0   0:00.00 rcu_bh
In addition to providing a list of processes, the amount of memory they are using, the percentage of CPU being used, as well as other specifics, top shows details about the running system, which you will see at the top. Each time the display refreshes, the process list will rearrange, indicating which processes are consuming the most resources at the top. As you will note, top itself consumes some amount of resources, and you will often see it near the top of the process list. One of the important fields that you will see not only in top but also in ps is the PID. In addition to providing a way of clearly identifying one process from another, particularly when the name of the process is the same, it also provides a way of sending messages to the process.
You will find two commands invaluable when you are managing processes. They are closely related, performing the same function, though offering slightly different capabilities. The first command is kill, which, perhaps unsurprisingly, can kill a running process. More specifically, it sends a signal to the process. The operating system will interact with processes by sending signals to them. Signals are one means of interprocess communication (IPC). The default signal for kill is the TERM signal (SIGTERM), which means terminate, but if you specify a different signal, kill will send that signal instead. To send a different signal, you issue kill -# pid, where # indicates the number that equates to the signal you intend to send, and pid is the process identification number that you can find from using either ps or top.
The second program that you should become acquainted with is killall. The difference between kill and killall is that with killall you don’t necessarily need the PID. Instead, you use the name of the process. This can be useful, especially when a parent may have spawned several child processes. If you want to kill all of them at the same time, you can use killall, and it will do the work of looking up the PIDs from the process table and issuing the appropriate signal to the process. Just as in the case of kill, killall will take a signal number to send to the process. If you need to forcefully kill all instances of the process named firefox, for instance, you would use killall -9 firefox.
Other Utilities
Obviously, we aren’t going to go over the entire list of commands available on the Linux command line. However, some additional ones are useful to get your head around. Keep in mind that Unix was designed to have simple utilities that could be chained together. It does this by having three standard input/output streams: STDIN, STDOUT, and STDERR. Each process inherits these three streams when it starts. Input comes in using STDIN, output goes to STDOUT, and errors are sent to STDERR, though perhaps that all goes without saying. The advantage to this is if you don’t want to see errors, for example, you can send the STDERR stream somewhere so you don’t have your normal output cluttered.
Each of these streams can be redirected. Normally, STDOUT and STDERR go to the same place (typically, the console). STDIN originates from the console. If you want your output to go somewhere else, you can use the > operator. If, for instance, I wanted to send the output of ps to a file, I might use ps auxw > ps.out. When you redirect the output, you don’t see it on the console anymore. In this example, if there were an error, you would see that, but not anything going to STDOUT. If you wanted to redirect input, you would go the other way. Rather than >, you would use <, indicating the direction you want the information to flow.
Understanding the different I/O streams and redirection will help you down the path of understanding the | (pipe) operator. When you use |, you are saying, “Take the output from what’s on the left side and send it to the input for what’s on the right side.” You are effectively putting a coupler in place between two applications, STDOUT → STDIN, without having to go through any intermediary devices.
One of the most useful uses of command chaining or piping is for searching or filtering. As an example, if you have a long list of processes from the ps command, you might use the pipe operator to send the output of ps to another program, grep, which can be used to search for strings. As an example, if you want to find all the instances of the program named httpd, you use ps auxw | grep httpd. grep is used to search an input stream for a search string. While it’s useful for filtering information, you can also search the contents of files with grep. As an example, if you want to search for the string wubble in all the files in a directory, you can use grep wubble *. If you want to make sure that the search follows all the directories, you tell grep to use a recursive search with grep -R wubble *.
User Management
When you start up Kali, you have the root user in place. Unlike other Linux distributions, you won’t be asked to create another user. This is because much of what you may be doing in Kali will require superuser (root) permissions. As a result, there’s no reason to create another user, even though it’s not good practice to stay logged in as the root user. The expectation is that someone using Kali probably knows enough of what they are doing that they wouldn’t be as likely to shoot themselves in the foot with the root permissions.
However, it is still possible to add and otherwise manage users in Kali, just as it is with other distributions. If you want to create a user, you can just use the useradd command. You might also use adduser. Both accomplish the same goal. When you are creating users, it’s useful to understand some of the characteristics of users. Each user should have a home directory, a shell, a username, and a group at a minimum. If I want to add my common username, for instance, I would use useradd -d /home/kilroy -s /bin/bash -g users -m kilroy. The parameters given specify the home directory, the shell the user should execute when logging in interactively, and the default group. The -m specified indicates that useradd should create the home directory. This will also populate the home directory with the skeleton files needed for interactive logins.
In the case of the group ID specified, useradd requires that the group exist. If you want your user to have its own group, you can use groupadd to create a new group and then use useradd to create the user that belongs to the new group. If you want to add your user to multiple groups, you can edit the /etc/group file and add your user to the end of each group line you want your user to be a member of. To pick up any permissions associated with those groups’ access to files, for example, you need to log out and log back in again. That will pick up the changes to your user, including the new groups.
Once you have created the user, you should set a password. That’s done using the passwd command. If you are root and want to change another user’s password, you use passwd kilroy in the case of the user created in the preceding example. If you just use passwd without a username, you are going to change your own password.
Shells
The common default shell used is the Bourne Again Shell (bash). However, other shells can be used. If you are feeling adventurous, you could look at other shells like zsh, fish, csh, or ksh. A shell like zsh offers the possibility of a lot of customization using features including plug-ins. If you want to permanently change your shell, you can either edit /etc/passwd or just use chsh and have your shell changed for you.
Service Management
For a long time, there were two styles of service management: the BSD way and the AT&T way. This is no longer true. There are now three ways of managing services. Before we get into service management, we should first define a service. A service in this context is a program that runs without any user intervention. The operating environment starts it up automatically and it runs in the background. Unless you got a list of processes, you may never know it was running. Most systems have a decent number of these services running at any point. They are called services because they provide a service either to the system, to the users, or sometimes to remote users.
Since there is no direct user interaction, generally, in terms of the startup and termination of these services, there needs to be another way to start and stop the services that can be called automatically during startup and shutdown of the system. With the facility to manage the services in place, users can also use the same facility to start, stop, restart, and get the status of these services.
Administrative Privileges for Services
Services are system-level. Managing them requires administrative privileges. Either you need to be root or you need to use sudo to gain temporary root privileges in order to perform the service management functions.
For a long time, many Linux distributions used the AT&T init startup process. This meant that services were run with a set of scripts that took standard parameters. The init startup system used runlevels to determine which services started. Single-user mode would start up a different set of services than multiuser mode. Even more services would be started up when a display manager is being used, to provide GUIs to users. The scripts were stored in /etc/init.d/ and could be managed by providing parameters such as start, stop, restart, and status. As an example, if you wanted to start the SSH service, you might use the command /etc/init.d/ssh start. The problem with the init system, though, was that it was generally serial in nature. This caused performance issues on system startup because every service would be started in sequence rather than multiple services starting at the same time. The other problem with the init system was that it didn’t support dependencies well. Often, one service may rely on other services that had to be started first.
Along comes systemd, which was developed by software developers at RedHat. The goal of systemd was to improve the efficiency of the init system and overcome some of its shortcomings. Services can declare dependencies, and services can start in parallel. There is no longer a need to write bash scripts to start up the services. Instead, there are configuration files, and all service management is handled with the program systemctl. To manage a service using systemctl, you would use systemctl verb service, where verb is the command you are passing and service is the name of the service. As an example, if you wanted to enable the SSH service and then start it, you would issue the commands in Example 1-5.
Example 1-5. Enabling and starting SSH service
root@rosebud:~# systemctlenablessh Synchronizing state of ssh.service with SysV service script with /lib/systemd/systemd-sysv-install. Executing: /lib/systemd/systemd-sysv-installenablessh root@rosebud:~# systemctl start ssh
The first thing we do is enable the service: you are telling your system that when you boot, you want this service to start. The different system startup modes that the service will start in are configured in the configuration file associated with the service. Every service has a configuration file. Instead of runlevels, as the old init system used, systemd uses targets. A target is essentially the same as a runlevel, in that it indicates a particular mode of operation of your system. In Example 1-6, you can see an example of one of these scripts from the syslog service.
Example 1-6. Configuring service for systemd
[Unit]
Description=System Logging Service
Requires=syslog.socket
Documentation=man:rsyslogd(8)
Documentation=http://www.rsyslog.com/doc/

[Service]
Type=notify
ExecStart=/usr/sbin/rsyslogd -n
StandardOutput=null
Restart=on-failure

[Install]
WantedBy=multi-user.target
Alias=syslog.service
The Unit section indicates requirements and the description as well as documentation. The Service section indicates how the service is to be started and managed. The Install service indicates the target that is to be used. In this case, syslog is in the multi-user target.
Kali is using a systemd-based system for initialization and service management, so you will primarily use systemctl to manage your services. In rare cases, a service that has been installed doesn’t support installing to systemd. In that case, you will install a service script to /etc/init.d/ and you will have to call the script there to start and stop the service. For the most part, these are rare occurrences, though.
Package Management
While Kali comes with an extensive set of packages, not everything Kali is capable of installing is in the default installation. In some cases, you may want to install packages. You are also going to want to update your set of packages. To manage packages, regardless of what you are trying to do, you can use the Advanced Package Tool (apt) to perform package management functions. There are also other ways of managing packages. You can use frontends, but in the end, they are all just programs that sit on top of apt. You can use whatever frontend you like, but apt is so easy to use, it’s useful to know how to use it. While it’s command line, it’s still a great program. In fact, it’s quite a bit easier to use than some of the frontends I’ve seen on top of apt over the years.
The first task you may want to perform is updating all the metadata in your local package database. These are the details about the packages that the remote repositories have, including version numbers. The version information is needed to determine whether the software you have is out-of-date and in need of upgrading. To update your local package database, you tell apt you want to update, as you can see in Example 1-7.
Example 1-7. Updating package database using apt
root@rosebud:~# apt update
Get:1 http://kali.localmsp.org/kali kali-rolling InRelease [30.5 kB]
Get:2 http://kali.localmsp.org/kali kali-rolling/main amd64 Packages [15.5 MB]
Get:3 http://kali.localmsp.org/kali kali-rolling/non-free amd64 Packages [166 kB]
Get:4 http://kali.localmsp.org/kali kali-rolling/contrib amd64 Packages [111 kB]
Fetched 15.8 MB in 2s (6437 kB/s)
Reading package lists... Done
Building dependency tree
Reading state information... Done
142 packages can be upgraded. Run 'apt list --upgradable' to see them.
Once your local package database has been updated, apt will tell you whether you have updates to what you have installed. In this case, 142 packages are in need of updating. To update all the software on your system, you can use apt upgrade. Just using apt upgrade will update all the packages. If you need to update just a single package, you can use apt upgrade packagename, where packagename is the name of the package you want to update. The packaging format used by Debian and, by extension, Kali, tells apt what the required packages are. This list of dependencies tells Kali what needs to be installed for a particular package to work. In the case of upgrading software, it helps to determine the order in which packages should be upgraded.
If you need to install software, it’s as easy as typing apt install packagename. Again, the dependencies are important here. apt will determine what software needs to be installed ahead of the package you are asking for. As a result, when you are asking for a piece of software to be installed, apt will tell you that other software is needed. You will get a list of all the necessary software and be asked whether you want to install all of it. You may also get a list of optional software packages. Packages may have a list of related software that can be used with the packages you are installing. If you want to install them, you will have to tell apt separately that you want to install them. The optional packages are not required at all.
Removing packages uses apt remove packagename. One of the issues with removing software is that although there are dependencies for installation, the same software may not necessarily get removed—simply because once it’s installed, it may be used by other software packages. apt will, though, determine whether software packages are no longer in use. When you perform a function using apt, it may tell you that there are packages that could be removed. To remove packages that are no longer needed, you use apt autoremove.
All of this assumes that you know what you are looking for. You may not be entirely sure of a package name. In that case, you can use apt-cache to search for packages. You can use search terms that may be partial names of packages, since sometimes packages may not be named quite what you expect. Different Linux distributions may name a package with a different name. As an example, as you can see in Example 1-8, I have searched for sshd because the package name may be sshd, ssh, or something else altogether. You can see the results.
Example 1-8. Searching for packages using apt-cache
root@rosebud:~# apt-cache search sshd
fail2ban - ban hosts that cause multiple authentication errors
libconfig-model-cursesui-perl - curses interface to edit config data through
Config::Model
libconfig-model-openssh-perl - configuration editor for OpenSsh
libconfig-model-tkui-perl - Tk GUI to edit config data through Config::Model
openssh-server - secure shell (SSH) server, for secure access from remote machines
What you can see is that the SSH server on Kali appears to be named openssh-server. If that package weren’t installed but you wanted it, you would use the package name openssh-server to install it. This sort of assumes that you know what packages are installed on your system. With thousands of software packages installed, it’s unlikely you would know everything that’s already in place. If you want to know what software is installed, you can use the program dpkg, which can also be used to install software that isn’t in the remote repository but you have located a .deb file, which is a Debian package file. To get the list of all the software packages installed, you use dpkg --list. This is the same as using dpkg -l. Both will give you a list of all the software installed.
The list you get back will provide the package name as well as a description of the package and the version number that’s installed. You will also get the CPU architecture that the package was built to. If you have a 64-bit CPU and have installed the 64-bit version of Kali, you will likely see that most packages have the architecture set as amd64, though you may also see some flagged as all, which may just mean that no executables are in the package. Any documentation package would be for all architectures, as an example.
Another place you can use dpkg is installing software you find that isn’t in the Kali repository. If you find a .deb file, you can download it and then use dpkg -i <packagename> to install it. You may also want to remove a package that has been installed. While you can use apt for that, you can also use dpkg, especially if the package was installed that way. To remove a package by using dpkg, you use dpkg -r <packagename>. If you are unsure of the package name, you can get it from the list of packages installed you can use dpkg to obtain.
Each software package may include a collection of files including executables, documentation, default configuration files, and libraries as needed for the package. If you want to view the contents of a package, you can use dpkg -c <filename>, where the filename is the full name of the .deb file. In Example 1-9, you can see the partial contents of a log management package, nxlog. This package is not provided as part of the Kali repository but is provided as a free download for the community edition. The contents of this package include not only the files, but also permissions, including the owner and group. You can also see the date and time associated with the file from the package.
Example 1-9. Partial contents of nxlog package
root@rosebud:~# dpkg -c nxlog-ce_2.9.1716_debian_squeeze_amd64.deb drwxr-xr-x root/root02016-07-05 08:32 ./ drwxr-xr-x root/root02016-07-05 08:32 ./usr/ drwxr-xr-x root/root02016-07-05 08:32 ./usr/lib/ drwxr-xr-x root/root02016-07-05 08:32 ./usr/lib/nxlog/ drwxr-xr-x root/root02016-07-05 08:32 ./usr/lib/nxlog/modules/ drwxr-xr-x root/root02016-07-05 08:32 ./usr/lib/nxlog/modules/processor/ -rw-r--r-- root/root53282016-07-05 08:32 ./usr/lib/nxlog/modules/processor/ pm_null.so -rw-r--r-- root/root422082016-07-05 08:32 ./usr/lib/nxlog/modules/processor/ pm_pattern.so -rw-r--r-- root/root94002016-07-05 08:32 ./usr/lib/nxlog/modules/processor/ pm_filter.so -rw-r--r-- root/root242482016-07-05 08:32 ./usr/lib/nxlog/modules/processor/ pm_buffer.so -rw-r--r-- root/root110962016-07-05 08:32 ./usr/lib/nxlog/modules/processor/ pm_norepeat.so
One thing to take into account is that packages that you get in .deb files are generally created for a particular distribution. This occurs because there are usually dependencies that the person or group creating the package knows the distribution can supply. Other distributions may not have the right versions to satisfy the requirements for the software package. If that’s the case, the software may not run correctly. dpkg will error if the dependencies aren’t satisfied. You can force the install by using --force-install as a command-line parameter in addition to -i, but although the software will install, there is no guarantee that it will function correctly.
dpkg has other capabilities that enable you to look into software packages, query installed software, and more. The options listed previously will more than get you started. With the extensive number of packages available in the Kali repository, it would be unusual, though not impossible, that you would need to do any external installations. It’s still useful to know about dpkg and its capabilities, however.
Log Management
For the most part, if you are doing security testing, you may never really need to look at the logs on your system. However, over a lot of years, I have found logs to be utterly invaluable. As solid a distribution as Kali is, there is always the possibility that something will go wrong and you will need to investigate. Even when everything is going well, you may still want to see what an application is logging. Because of that, you need to understand the logging system in Linux. To do that, you need to know what you are using. Unix has long used syslog as the system logger, though it began its life as a logging facility for the sendmail mail server.
Over the years, syslog has had many implementations. Kali Linux comes with the rsyslog implementation installed by default. It is a fairly straightforward implementation, and it’s easy to determine the locations for the files you will need to look in for log information. In general, all logs go to /var/log. However, there are specific files you will need to look in for log entries in different categories of information. On Kali, you would check the /etc/rsyslog.conf file. In addition to a lot of other configuration settings, you will see the entries shown in Example 1-10.
Example 1-10. Log configuration for rsyslog
auth,authpriv.* /var/log/auth.log *.*;auth,authpriv.none -/var/log/syslog#cron.* /var/log/cron.logdaemon.* -/var/log/daemon.log kern.* -/var/log/kern.log lpr.* -/var/log/lpr.log mail.* -/var/log/mail.log user.* -/var/log/user.log
What you see on the left side is a combination of facility and severity level. The word before the dot is the facility. The facility is based on the different subsystems that are logging using syslog. You may note that syslog goes back a long way, so there are still facilities identified for subsystems and services that you are unlikely to see much of these days. In Table 1-1, you will see the list of facilities as defined for use in syslog. The Description column indicates what the facility is used for in case the facility itself doesn’t give that information to you.
| Facility number | Facility | Description |
|---|---|---|
0 |
kern |
Kernel messages |
1 |
user |
User-level messages |
2 |
Mail system |
|
3 |
daemon |
System daemons |
4 |
auth |
Security/authorization messages |
5 |
syslog |
Messages generated internally by syslogd |
6 |
lpr |
Line printer subsystem |
7 |
news |
Network news subsystem |
8 |
uucp |
UUCP subsystem |
9 |
Clock daemon |
|
10 |
authpriv |
Security/authorization messages |
11 |
ftp |
FTP daemon |
12 |
- |
NTP subsystem |
13 |
- |
Log audit |
14 |
- |
Log alert |
15 |
cron |
Scheduling daemon |
16 |
local0 |
Local use 0 (local0) |
17 |
local1 |
Local use 1 (local1) |
18 |
local2 |
Local use 2 (local2) |
19 |
local3 |
Local use 3 (local3) |
20 |
local4 |
Local use 4 (local4) |
21 |
local5 |
Local use 5 (local5) |
22 |
local6 |
Local use 6 (local6) |
23 |
local7 |
Local use 7 (local7) |
Along with the facility is the severity. The severity has potential values of Emergency, Alert, Critical, Error, Warning, Notice, Informational, and Debug. These severities are listed in descending order, with the most severe listed first. You may determine that Emergency logs should be sent somewhere different from other severity levels. In Example 1-8, all of the severities are being sent to the log associated with each facility. The “*” after the facility name indicates all facilities. If you wanted to, for instance, send errors from the auth facility to a specific log file, you would use auth.error and indicate the file you want to use.
Once you know where the logs are kept, you need to be able to read them. Fortunately, syslog log entries are easy enough to parse. If you look at Example 1-11, you will see a collection of log entries from the auth.log on a Kali system. Starting on the left of the entry, you will see the date and time that the log entry was written. This is followed by the hostname. Since syslog has the capability to send log messages to remote hosts, like a central log host, the hostname is important to be able to separate one entry from another if you are writing logs from multiple hosts into the same log file. After the hostname is the process name and PID. Most of these entries are from the process named realmd that has a PID 803.
Example 1-11. Partial auth.log contents
Oct 29 21:10:40 rosebud realmd[803]: Loaded settings from:
/usr/lib/realmd/realmd-defaults.conf /usr/lib/realmd/realmd-distro.conf
Oct 29 21:10:40 rosebud realmd[803]: holding daemon: startup
Oct 29 21:10:40 rosebud realmd[803]: starting service
Oct 29 21:10:40 rosebud realmd[803]: connected to bus
Oct 29 21:10:40 rosebud realmd[803]: released daemon: startup
Oct 29 21:10:40 rosebud realmd[803]: claimed name on bus: org.freedesktop.realmd
Oct 29 21:10:48 rosebud gdm-password]: pam_unix(gdm-password:session): session opened
for user root by (uid=0)
The challenging part of the log isn’t the preamble, which is created and written by the syslog service, but the application entries. What we are looking at here is easy enough to understand. However, the contents of the log entries are created by the application itself, which means the programmer has to call functions that generate and write out the log entries. Some programmers may be better about generating useful and understandable log entries than others. Once you have gotten used to reading logs, you’ll start to understand what they are saying. If you run across a log entry that you really need but you don’t understand, internet search engines can always help find someone who has a better understanding of that log entry. Alternately, you can reach out to the software development team for help.
Not all logs run through syslog, but all system-related logs do. Even when syslog doesn’t manage the logs for an application, as in the case of the Apache web server, the logs are still likely to be in /var/log/. In some cases, you may have to go searching for the logs. This may be the case with some third-party software that installs to /opt.
Summary
Linux has a long history behind it, going back to the days when resources were very constrained. This has led to some arcane commands whose purpose was to allow users (primarily programmers) to be efficient. It’s important to find an environment that works well for you so you too can be efficient in your work. Here are some key points to take away from this chapter:
-
Unix is an environment created by programmers for programmers using the command line.
-
Unix was created with simple, single-purpose tools that can be combined for more complex tasks.
-
Kali Linux has several potential GUIs that can be installed and utilized; it’s important to find one that you’re most comfortable with.
-
Each desktop environment has a lot of customization options.
-
Kali is based on systemd, so service management uses systemctl.
-
Processes can be managed using signals, including interrupt and kill.
-
Logs will be your friends and help you troubleshoot errors. Logs are typically stored in /var/log.
-
Configuration files are typically stored in /etc, though individual configuration files are stored in the home directory.
Useful Resources
-
Linux in a Nutshell, 6e, by Ellen Siever, Stephen Figgins, Robert Love, and Arnold Robbins (O’Reilly, 2009)
-
Linux System Administration, by Tom Adelstein and Bill Lubanovic (O’Reilly, 2009)
-
The Kali Linux website
-
“Linux System Administration Basics” by Linode
Get Learning Kali Linux now with the O’Reilly learning platform.
O’Reilly members experience books, live events, courses curated by job role, and more from O’Reilly and nearly 200 top publishers.

