Chapter 4. Looking for Vulnerabilities
After you perform reconnaissance activities and gather information about your target, you normally move on to identifying entry points. You are looking for vulnerabilities in the organization, which can be open to exploitation. You can identify vulnerabilities in various ways. Based on your reconnaissance, you may have even identified one or two. These may be based on the different pieces of information you obtained through open sources.
Vulnerabilities can be scanned for. Tools are available to look for them. Some of these tools that Kali provides are designed to look across different types of systems and platforms. Other tools, though, are designed to specifically look for vulnerabilities in devices like routers and switches. It may not be much of a surprise that there are scanners for Cisco devices.
Most of the tools we’ll look at will search for existing vulnerabilities. These are ones that are known, and identifying them is something that can be done based on interactions with the system or its applications. Sometimes, though, you may want to identify new vulnerabilities. Tools are available in Kali that can help generate application crashes, which can become vulnerabilities. These tools are commonly called fuzzers. This is a comparatively easy way of generating a lot of malformed data that can be provided to applications to see how they handle that data.
To even start this process, though, you need to understand what a vulnerability is. It can be easy to misunderstand vulnerabilities or confuse them with other concepts. One important notion to keep in mind is that just because you have identified vulnerabilities does not mean they are going to be exploitable. Even if an exploit matches the vulnerability you find, it doesn’t mean that the exploit will work. It’s hard to understate the importance of this idea. Vulnerabilities do not necessarily lead to exploitation.
Understanding Vulnerabilities
Before going any further, let’s make sure we’re all on the same page when it comes to the definition of a vulnerability. They are sometimes confused with exploits, and when we start talking about risk and threats, these terms can get really muddled. A vulnerability is a weakness in a system or piece of software. This weakness is a flaw in the configuration or development of the system or software. If that vulnerability can be taken advantage of to gain access or impair the system, it is exploitable. The process to take advantage of that weakness is the exploit. A threat is the possibility of harm to a system or of having it become unavailable. Risk is the intersection of loss and probability, meaning you have to have loss or damage that is measurable and a probability of that loss, or damage, becomes actualized.
This is all fairly abstract, so let’s talk about this in concrete terms. Say someone leaves default usernames and passwords configured on a system. This creates a vulnerability because the password could be guessed. The process of guessing the password is the exploit of that vulnerability. This is an example of a vulnerability that comes from a misconfiguration. The vulnerabilities that are more regularly recognized are programmatic in nature and often come from poor input validation.
If you’re interested in vulnerabilities and keeping track of the work that goes into discovering them, you can subscribe to mailing lists like Bugtraq. You can get details about vulnerabilities that have been found, sometimes including the proof-of-concept code that can be used to exploit the discovered vulnerability. With so much software out in the world, including web applications, a lot of vulnerabilities are being found daily. Some are more trivial than others, of course.
We’re going to take a look at a couple of types of vulnerabilities. The first are local vulnerabilities. These are ones that can be triggered only if you are logged into the system with local access. It doesn’t mean that you are sitting at the console—just that you have some interactive access to the system. This may include something like a privilege escalation vulnerability: a user with regular permissions gains higher-level privileges up to administrative rights. Using something like this, users may gain access to resources they shouldn’t otherwise have access to.
The other type of vulnerability is a remote vulnerability. This is a vulnerability that can be triggered without local access. This does, though, require that a service be exposed that an attacker can get to. Remote vulnerabilities may be authenticated or unauthenticated. If an unauthenticated user can exploit a vulnerability to get local access to the system, that would be a bad thing. Not all remote vulnerabilities lead to local or interactive access to a system. Vulnerabilities can lead to denial of service, data compromise, integrity compromise, or possibly complete, interactive access to the system.
Note
You may be thinking that exploits requiring authentication are also bad. They are bad, but in a different way. If someone has to present credentials, meaning they are authenticated, in order to exploit a vulnerability, it means one of two things: either an insider attack or compromised credentials. An insider attach is a different situation because if you can already authenticate and you want to cause a problem, you probably don’t need to use a vulnerability. If you instead have compromised credentials, this should be addressed in other ways as well. If I can get access to your system without any authentication, though, that’s really bad because it means anyone can do it.
Network devices like switches and routers are also prone to vulnerabilities. If one of these devices were to be compromised, it could be devastating to the availability or even confidentiality of the network. Someone who has access to a switch or a router can potentially redirect traffic to devices that shouldn’t otherwise have it. Kali comes with tools that can be used to test for vulnerabilities on network devices. As Cisco is a prominent vendor, it’s not surprising that a majority of tools focused on vulnerabilities in network devices are focused on Cisco.
Vulnerability Types
The Open Web Application Security Project (OWASP) maintains a list of common vulnerability categories. Each year, OWASP issues a list of top 10 application security risks. Software is released and updated each year, and every piece of software has bugs in it. When it comes to security-related bugs that create vulnerabilities, some common ones should be considered. Before we get into how to search for these vulnerabilities, you should understand a little bit about what each of these vulnerabilities is.
Buffer Overflow
Buffer overflow is a common vulnerability and has been for decades. Although some languages perform a lot of checking on the data being entered into the program as well as data that is being passed around in the program, not all languages do that. It is sometimes up to the language and how it creates the executable to perform these sorts of checks. However, some languages perform no such checks. Checking data automatically creates overhead, and not all languages want to force that sort of overhead on programmers and programs.
A buffer overflow takes advantage of the way data is structured in memory. Each program gets a chunk of memory. Some of that memory is allocated for the code, and some is allocated for the data the code is meant to act on. Part of that memory is a data structure called a stack. Think about going through a cafeteria line or even a buffet. The plates or trays are in a stack. Someone coming through pulls from the top of the stack, but when the plates or trays are replenished, the new plates or trays are put on the top of the stack. When the stack is replenished in this way, you can think about pushing onto the stack. However, when the topmost item is removed, you can think about popping off the top of the stack.
Programs work in the same way. Programs are generally structured through the use of functions. A function is a segment of code that performs a particular action. It allows for the same segment of code to be called multiple times in multiple places in the program without having to duplicate that segment. It also allows for nonlinear code execution. Rather than having one long program that is run serially, using functions allows the program to alter its flow of execution by jumping around in memory. When functions are called, they often need parameters. This is data the functions act on. When a function is called, the parameters and the local variables to the function are placed on the stack. This block of data is called a stack frame.
Inside the stack frame is not only the data associated with the function, but also the address the program should return to after the function is completed. This is how programs can run nonlinearly. The CPU doesn’t maintain the entire flow of the program. Instead, before a function is called, the address within the code block where the program was last executing is also pushed on the stack.
Buffer overflows happen when a variable is allocated space on the stack. Let’s say you expect to take in data from the user that is 10 bytes long. If the user enters 15 characters, that’s 5 more bytes than the space that was allocated for the variable that is being copied into it. Because of the way the stack is structured, all of the variables and data come before the return instruction pointer. The data being placed into the buffer has nowhere to go if the language doesn’t do any of the checking ahead of time to truncate the data. Instead, it just writes over the next addresses in memory. This can result in the return instruction pointer being overwritten.
Figure 4-1 shows a simplified example of a stack frame for an individual function. Some elements that belong on the stack frame aren’t demonstrated here. Instead, we’re focusing on just the parts that we care about. If the function is reading into var2, what the attacker can do is input more than the 32 characters expected. Once the 32 characters has been exceeded, any additional data will be written into the address space where the return instruction address is stored. When the function returns, that value will be read from the stack, and the program will try to jump to that address. A buffer overflow tries to get the program to jump to a location known by or under the control of the attacker to execute the attacker’s code.
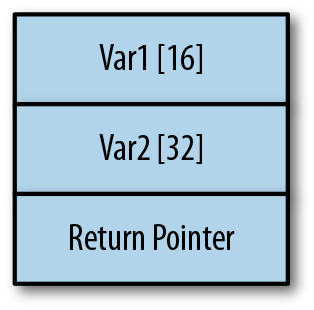
Figure 4-1. Simplified view of a stack frame
When an attacker runs code they want rather than the program’s code, you will see it referred to as arbitrary code execution. This means the attacker can control the flow of execution of the program. Once the attacker can do that, they can potentially get access to resources the program owner has permissions to access.
Race Condition
Any program running does not have exclusive access to the processor. While a program is in running mode, it is being swapped into and out of the processor queue so the code can be executed. Modern programs are often multithreaded; they have multiple, simultaneous paths of execution. These execution threads still have access to the same data space, and if I have two threads running that are both altering a particular variable, and the threads somehow get out of sequence, problems can arise in the way the program operates. Example 4-1, shows a small section of C code.
Example 4-1. Simple C function
int x;void update(int y){x=x + yif(x==100){printf("we are at the value");}}
Let’s say we have two threads simultaneously running that function. The variable x is being incremented by some unknown value by two separate threads. A race condition is what happens when two separate execution paths are accessing the same set of data at the same time. When the memory isn’t locked, a read can be taking place at a time when a write has happened that wasn’t expected. It all depends on timing.
If the correct flow of a program requires specific timing, there is a chance of a race condition. Variables may be altered before a critical read that can control functionality of the program. You may have something like a filename that could be inserted before the value is read and operated on. Race conditions can be tricky to find and isolate because of the asynchronous nature of programs with multiple threads. Without controls like semaphores to indicate when values are in a state they can be read or written to safely, you may get inconsistent behavior simply because the programmer can’t directly control which thread will get access to the CPU in which order.
Input Validation
Input validation is a broad category that somewhat encompasses buffer overflows. If the buffer passed in is too long and hasn’t been checked, that’s an input validation problem. However, far more issues occur with input validation than just buffer overflows. Example 4-2 shows a small fragment of C code that could easily be vulnerable to attack without proper input validation.
Example 4-2. C Program with potential input validation errors
int tryThis(char *value){int ret;ret=system(value);returnret;}
This is a small function that takes a string in as a parameter. The parameter is passed directly to the C library function system, which passes execution to the operating system. If the value useradd attacker were to be passed in, that would be passed directly to the operating system, and if the program had the right permissions, it would be creating a user called attacker. Any operating system command could be passed through like this. Without proper input validation, this could be a significant issue, especially without appropriate permissions given to the program under attack.
This is an issue that is perhaps more likely to be seen in web applications. Command injection, SQL injection, and XML injection attacks are all examples of poor input validation. Values are being passed into elements of an application without being checked. This input could potentially be an operating system command or SQL code, as examples. If the programmer isn’t properly validating input before acting on it, bad things can happen.
Access Control
Access control is a bit of a catchall category. One area where this is a problem is when programs are given more permissions or privileges than they need to function. Any program running as root, for example, is potentially problematic. If the code can be exploited, as with poorly validated input or a buffer overflow, anything the attacker does will have root permissions.
This is not strictly limited to programs running as root. Any program runs with the permissions of the program’s owner. If any program owner has permissions to access any resource on a system, an exploit of that program can give an attacker access to that resource. These types of attacks can lead to a privilege escalation: a user gets access to something they shouldn’t have access to in the normal state of affairs within the system.
This particular issue could be alleviated, at least to a degree, by requiring authentication within the application. At least, that’s a hurdle for an attacker to clear before just exploiting a program—they would have to circumvent the authentication either by a direct attack or by acquiring or guessing a password. Sometimes the best we can hope for is to make getting access an annoyance.
Local Vulnerabilities
Local vulnerabilities require some level of access to the system. The object of a local vulnerability is not to gain access. Access needs to have already been obtained before a local vulnerability can be exploited. The idea of exploiting a local vulnerability is often to gain access to something the attacker doesn’t otherwise have access to.
The thing about local vulnerabilities is that they can occur in any program on a system. This includes running services—programs that are running in the background without direct user interaction and often called daemons—as well as any other program that a user can get access to. A program like passwd is setuid to allow any user to run it and get temporary root privileges. This is necessary because changing a user’s password requires changes to a file that only root can write to. If I wanted to change my password, I could run passwd, but because the password database has to be changed, the passwd program needs to have root privileges to write to the needed file. If there were a vulnerability in the passwd program, that program would be running temporarily as root, which means any exploit may be running with root permissions.
Note
A program that has the setuid bit set starts up as the user that owns the file. Normally, the user that owns a file would be root because there are some functions users need to be able to perform that require root privileges, like changing their own password. However, a setuid program can be for any user. No matter the user that started the program, when it’s running, it will appear as though the owner of program on disk is running the program.
Using lynis for Local Checks
Programs are available on most Linux distributions that can run tests for local vulnerabilities. Kali is no different. One of these programs is lynis, a vulnerability scanner that runs on the local system and runs through numerous checks for settings that would be common in a hardened operating system installation. Operating systems that are hardened are configured to be resistant to attacks. This can mean enabling logging, tightening permissions, and choosing other settings.
The program lynis has settings for different scan types. You can do quick scans or complete scans, depending on the depth you want to go. There is also the possibility of running in pentest mode, which is an unprivileged scan. This limits what can be checked. Anything that requires root access, like looking at some configuration files, can’t be checked in pentest mode. This can provide you good insight into what an attacker can do if they gain access to a regular, unprivileged account. Example 4-3 shows partial output of a run of lynis against a basic Kali installation.
Example 4-3. Output from lynis
[+]Memory and Processes ------------------------------------ - Checking /proc/meminfo[FOUND]- Searchingfordead/zombie processes[OK]- SearchingforIO waiting processes[OK][+]Users, Groups and Authentication ------------------------------------ - Administrator accounts[OK]- Unique UIDs[OK]- Consistency of group files(grpck)[OK]- Unique group IDs[OK]- Unique group names[OK]- Password file consistency[OK]- Query system users(non daemons)[DONE]- NIS+ authentication support[NOT ENABLED]- NIS authentication support[NOT ENABLED]- sudoers file[FOUND]- Check sudoers file permissions[OK]- PAM password strength tools[SUGGESTION]- PAM configuration files(pam.conf)[FOUND]- PAM configuration files(pam.d)[FOUND]- PAM modules[FOUND]- LDAP module in PAM[NOT FOUND]- Accounts without expire date[OK]- Accounts without password[OK]- Checking user password aging(minimum)[DISABLED]- User password aging(maximum)[DISABLED]- Checking expired passwords[OK]- Checking Linux single user mode authentication[WARNING]- Determining defaultumask-umask(/etc/profile)[NOT FOUND]-umask(/etc/login.defs)[SUGGESTION]- LDAP authentication support[NOT ENABLED]- Logging failed login attempts[ENABLED]
As you can see from the output, lynis found problems with the pluggable authentication module (PAM) password strength tools, such that it was willing to offer a suggestion. Additionally, it found a problem with the default file permission settings. This is the umask setting that it checked in /etc/login.defs. Finally, it found a problem with the single-user mode authentication. Single-user mode is when you can gain physical access to the system and reboot it. Unless specifically set, booting into single-user mode doesn’t require authentication, and the single user is root. Anyone with physical access to a system can boot into it in single user and add users, change passwords, and make other changes before booting back into the normal mode.
The console output provides one level of detail, but there is a log file that is created. Looking at the log file, which defaults to /var/log/lynis.log, you can see far more details. Example 4-4 shows a fragment of the output from that file, from the preceding run. The output in this log file shows every step taken by the program as well as the outcome from each step. You will also notice that when there are findings, the program will indicate them in the output. You will see in the case of libpam-usb that there is a suggestion for what can be done to further harden the operating system against attack.
Example 4-4. Log file from run of lynis
2018-01-06 20:11:48===------------------------------------------------===2018-01-06 20:11:48 PerformingtestID CUST-0280(Checkingiflibpam-tmpdir is installed and enabled.)2018-01-06 20:11:49 - libpam-tmpdir is not installed. 2018-01-06 20:11:49 Hardening: assigned partial number of hardening points(0of 2). Currently having0points(out of 2)2018-01-06 20:11:49 Suggestion: Install libpam-tmpdir toset$TMPand$TMPDIRforPAM sessions[test:CUST-0280][details:-][solution:-]2018-01-06 20:11:49 Status: Checkingiflibpam-usb is installed and enabled... 2018-01-06 20:11:49===------------------------------------------------===2018-01-06 20:11:49 PerformingtestID CUST-0285(Checkingiflibpam-usb is installed and enabled.)2018-01-06 20:11:49 - libpam-usb is not installed. 2018-01-06 20:11:49 Hardening: assigned partial number of hardening points(0of 10). Currently having0points(out of 12)2018-01-06 20:11:49 Suggestion: Install libpam-usb toenablemulti-factor authenticationforPAM sessions[test:CUST-0285][details:-][solution:-]2018-01-06 20:11:49 Status: Starting file system checks... 2018-01-06 20:11:49 Status: Starting file system checksfordm-crypt, cryptsetup&cryptmount...
This is a program that can be used on a regular basis by anyone who operates a Linux system so they can be aware of issues they need to correct. As someone involved in penetration or security testing, though, this is a program you can be running on Linux systems that you get access to. If you are working hand in hand with the company you are testing for, performing local scans will be easier. You may be provided local access to the systems so you can run programs like this. You would need this program installed on any system you wanted to run it against, of course. In that case, you wouldn’t be running it from Kali itself. However, you can get a lot of experience with lynis by running it on your local system and referring to the output.
OpenVAS Local Scanning
You are not limited to testing on the local system for local vulnerabilities. By this I mean that you don’t have to be logged in to running programs in order to perform testing. Instead, you can use a remote vulnerability scanner and provide it with login credentials. This will allow the scanner to log in remotely and run the scans through a login session.
As an example, OpenVAS is a vulnerability scanner that can be installed on Kali Linux. While it is primarily a remote vulnerability scanner, as you will see, it can be provided with credentials to log in. Those login credentials, shown being configured in Figure 4-2, will be used by OpenVAS to log in remotely in order to run tests locally through the login session. You can select the option for OpenVAS to autogenerate, which will have OpenVAS trying passwords against a specified username.
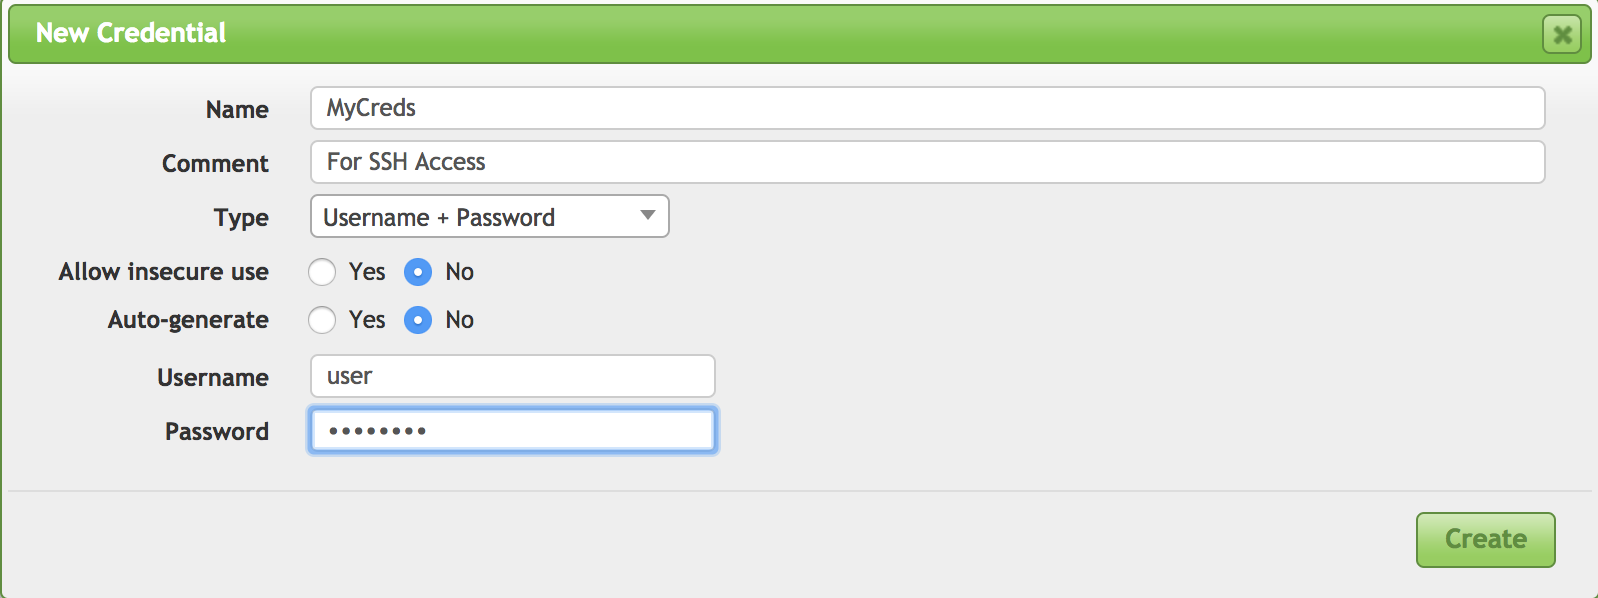
Figure 4-2. Credential setting in OpenVAS
The credential setting is only part of the process, though. You still need to configure a scan that can use the credentials. The first thing to do is to either identify or create a scan configuration that includes local vulnerabilities for the target operating systems you have. As an example, Figure 4-3 shows a dialog box displaying a section of the vulnerability families available in OpenVAS. You can see a handful of operating systems listed with local vulnerabilities. This includes CentOS as well Debian and Fedora. Many other operating systems are included, and each family may have hundreds, if not thousands, of vulnerabilities.

Figure 4-3. Selecting vulnerability families in OpenVAS
Once you have your vulnerabilities selected, you need to create targets and apply your credentials. Figure 4-4 shows the dialog box in OpenVAS creating a target. This requires that you specify an IP address, or an IP address range, or a file that includes the list of IP addresses that are meant to be the targets. Although this dialog box provides other options, the ones that we are most concerned with are the ones where we specify credentials. The credentials created here have been selected to be used against targets that have SSH servers running on port 22. If you have previously identified other SSH servers, you can specify other ports. In addition to SSH, you can select SMB and ESXi as protocols to log in with.

Figure 4-4. Selecting a target in OpenVAS
Each operating system is going to be different, and this is especially true with Linux, which is why there are different families in OpenVAS for local vulnerabilities. Each distribution is configured a little differently and has different sets of packages. Beyond the distribution, users can have a lot of choices for categories of packages. Once the base is installed, hundreds of additional packages could typically be installed, and each of those packages can introduce vulnerabilities.
Note
One common approach to hardening is to limit the number of packages that are installed. This is especially true when it comes to server systems in which the bare minimum amount of software necessary to operate the services should be installed.
Root Kits
While not strictly a vulnerability scanner, it’s worth knowing about Rootkit Hunter. This program can be run locally on a system to determine whether it has been compromised and has a root kit installed. A root kit is a software package that is meant to facilitate a piece of malware. It may include replacement operating system utilities to hide the existence of the running malware. For example, the ps program may be altered to not show the processes associated with the malware. Additionally, ls may hide the existence of the malware files. Root kits may also implement a backdoor that will allow attackers remote access.
If root kit software has been installed, it may mean that a vulnerability somewhere has been exploited. It also means that software that you don’t want is running on your system. Knowing about Rootkit Hunter can be useful to allow you to scan systems. You may want to spend time running this program on any system that you have run scanners against and found vulnerabilities. This may be an indication that the system has been compromised. Running Rootkit Hunter will allow you to determine whether root kits are installed on your system.
The name of the executable is rkhunter and it’s easy to run, though it’s not installed in a default build of the current Kali Linux distribution. rkhunter runs checks to determine whether root kits have been installed. To start with, it runs checks on file permissions, which you can see a sample of in Example 4-5. Beyond that, rkhunter does pattern searches for signatures of what known root kits look like. Just like most antivirus programs, rkhunter can’t find what it doesn’t know about. It will look for anomalies, like incorrect file permissions. It will look for files that it knows about from known root kits. If there are root kits it doesn’t know about, those won’t be detected.
Example 4-5. Running Rootkit Hunter
root@rosebud:~# rkhunter --check[Rootkit Hunter version 1.4.4]Checking system commands... Performing'strings'commandchecks Checking'strings'command[OK]Performing'shared libraries'checks Checkingforpreloading variables[None found]Checkingforpreloaded libraries[None found]Checking LD_LIBRARY_PATH variable[Not found]Performing file properties checks Checkingforprerequisites[OK]/usr/sbin/adduser[OK]/usr/sbin/chroot[OK]/usr/sbin/cron[OK]/usr/sbin/groupadd[OK]/usr/sbin/groupdel[OK]/usr/sbin/groupmod[OK]/usr/sbin/grpck[OK]
As with lynis, this is a software package; you would need to install Rootkit Hunter on a system that you were auditing. If you are doing a lot of work with testing and exploits on your Kali instance, it’s not a bad idea to keep checking your own system. Any time you run software from a source you don’t necessarily trust completely, which may be the case if you are working with proof-of-concept exploits, you should be checking your system for viruses and other malware. Yes, this is just as true on Linux as it is on other platforms. Linux is not invulnerable to attacks or malware. Best to keep your system as clean and safe as you can.
Remote Vulnerabilities
While you may sometimes be given access to systems by working closely with your target, you definitely will have to run remote checks for vulnerabilities when you are doing security testing. When you get complete access, which may include credentials to test with, desktop builds to audit without impacting users, or configuration settings from network devices, you are doing white-box testing. If you have no cooperation from the target, aside from a clear agreement with them about what you are planning on doing, you are doing black-box testing; you don’t know anything at all about what you are testing. You may also do gray-box testing. This is somewhere between white box and black box, though there are a lot of gradations in between.
When testing for remote vulnerabilities, it’s useful to get a head start. You will need to use a vulnerability scanner. The vulnerability scanner OpenVAS can be easily installed on Kali Linux. While it’s not the only vulnerability scanner that can be used, it is freely available and included with the Kali Linux repositories. This should be considered a starting point for your vulnerability testing. If all it took was to just run a scanner, anyone could do it. Running vulnerability scanners isn’t hard. The value of someone doing security testing isn’t loading up a bunch of automated tools. Instead, it’s the interpretation and validation of the results as well as going beyond the automated tools.
Earlier, we explored how OpenVAS can be used for local scanning. It can also be used, and perhaps is more commonly known, for scanning for remote vulnerabilities. This is what we’re going to be spending some time looking at now. OpenVAS is a fairly dense piece of software, so we’ll be skimming through some of its capabilities rather than providing a comprehensive overview. The important part is to get a handle on how vulnerability scanners work.
Note
The OpenVAS project began when Nessus, a well-known vulnerability scanner, became closed source with a commercial offering. OpenVAS began as a fork of the last open source version of Nessus. Since that time, significant architectural changes have occurred in the design of the software. Although Nessus has gone to a web interface, there is no resemblance at all between OpenVAS and Nessus.
When using OpenVAS or any vulnerability scanner, there will be a collection or database of known vulnerabilities. This means the collection should be regularly updated, just like antivirus programs. When you set up OpenVAS, one of the first things that happens is that the current collection of vulnerability definitions will be downloaded. If you have the system running regularly with the OpenVAS services, your vulnerabilities will get updated for you. If you have had OpenVAS down for a time and you want to run a scan, it’s worth making sure that all of your signatures are updated. You can do this on the command line by using the command greenbone-nvt-sync. OpenVAS uses the Security Content Automation Protocol to exchange information between your installation and the remote servers where the content is stored.
OpenVAS uses a web interface, much like a lot of other applications today. To get access to the web application, you go to https://localhost:9392. When you log in, you are presented with a dashboard. This includes graphs related to your own tasks. The dashboard also presents information about the vulnerabilities it knows about and their severities. In Figure 4-5, you can see a web page open to the dashboard. You will see the URL is a host on my local network because I’m accessing it remotely from my laptop. If you were on the desktop of your Kali system, you would use the preceding URL. The OpenVAS team calls their UI the Greenbone Security Assistant.
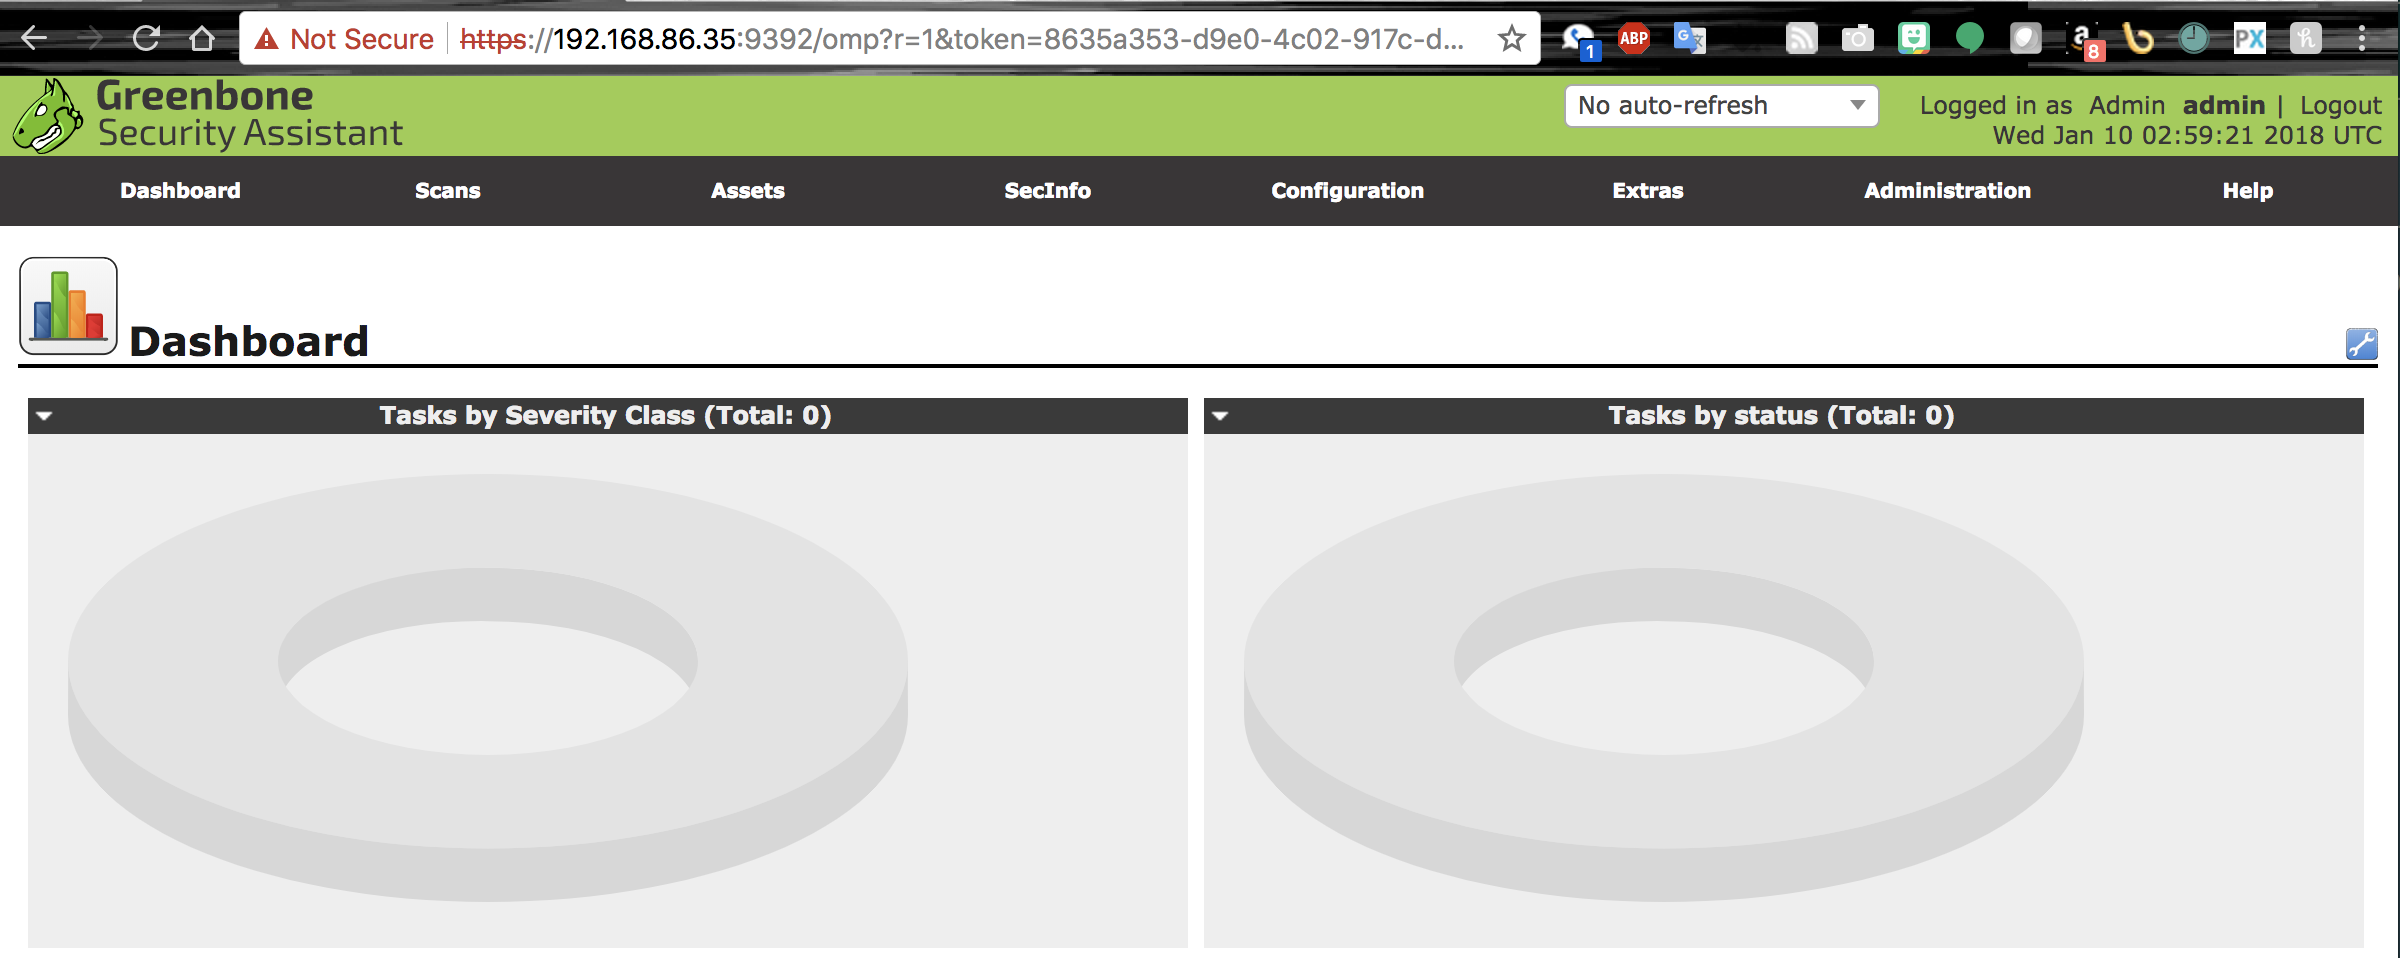
Figure 4-5. Greenbone Security Assistant
The menus for accessing features and functions are along the top of the page. From there, you can access features related to the scans, assets, and configurations, as well as the collection of security information that OpenVAS knows about, with all the vulnerabilities it is aware of.
Quick Start with OpenVAS
While OpenVAS is certainly a dense piece of software, providing a lot of capabilities for customization, it does provide a simple way to get started. A scan wizard allows you to just provide a target and get started scanning. If you want to get a quick sense of common vulnerabilities that may be found on the target, this is a great way to go. A simple scan using the wizard will use the defaults, which is a way to get you started quickly. To get started with the wizard, you navigate to the Scans menu and select Tasks. At the top left of that page, you will see some small icons. The purple one that looks like a wizard’s wand opens the Task Wizard. Figure 4-6 shows the menu that pops up when you roll your cursor over that icon.
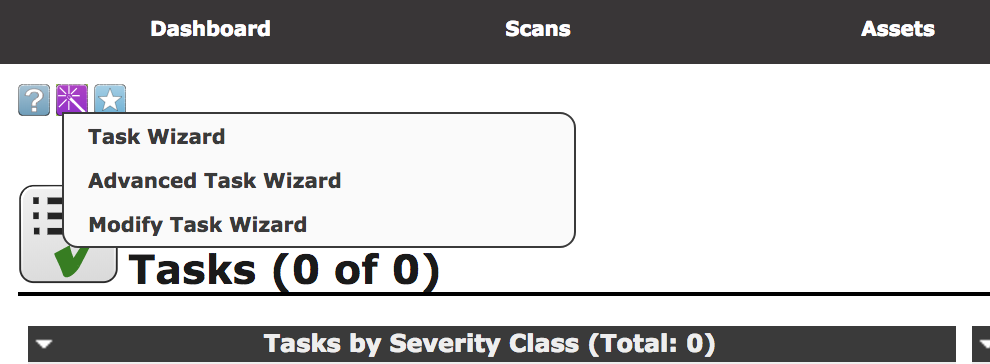
Figure 4-6. Task Wizard menu
From that menu, you can select the Advanced Task Wizard, which gives you more control over assets and credentials, among other settings. You can also select the Task Wizard, which you can see in Figure 4-7. Using the Task Wizard, you will be prompted for a target IP address. The IP address that is populated when it’s brought up is the IP address of the host from which you are connected to the server. You can enter not only a single IP address here—such as the one seen in Figure 4-7, 192.168.86.45—but also an entire network. For my case, I would use 192.168.86.0/24. That is the entire network range from 192.168.86.0–255. The /24 is a way of designating network ranges without using subnet masks or a range notation. You will see this a lot, and it’s commonly called CIDR notation, which is the Classless Inter-Domain Routing notation.
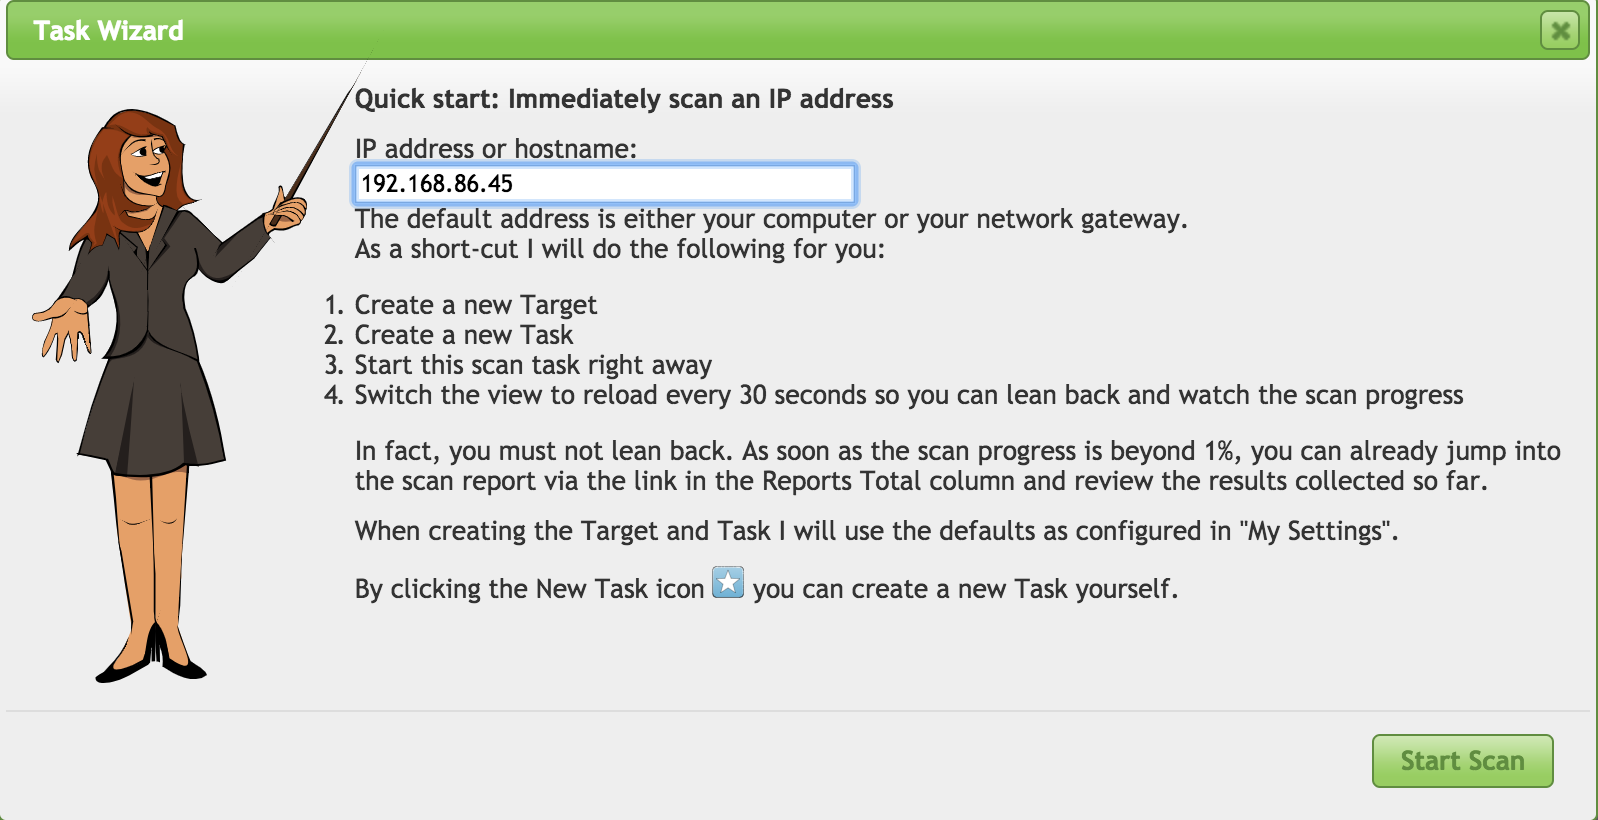
Figure 4-7. Task Wizard
Once you have entered your target or targets, all you need to do is click Start Scan, and OpenVAS is off to the races, so to speak. You have started your very first vulnerability scan.
Tip
It may be useful to have some vulnerable systems around when you are running your scans. Although you can get various systems (and a simple web search for vulnerable operating systems will turn them up) one is really useful. Metasploitable 2 is a deliberately vulnerable Linux installation. Metasploitable 3 is the updated version based on Windows Server 2008. Metasploitable 2 is a straight-up download. Metasploitable 3 is a build-it-on-your-own-system operating system. It requires VirtualBox and additional software.
We’ll get into doing a scan from end to end, but let’s take a look at the Advanced Scan Wizard, shown in Figure 4-8. This will give you a quick look ahead to what we will be working with on a larger scale when we move to creating scans from start to finish.
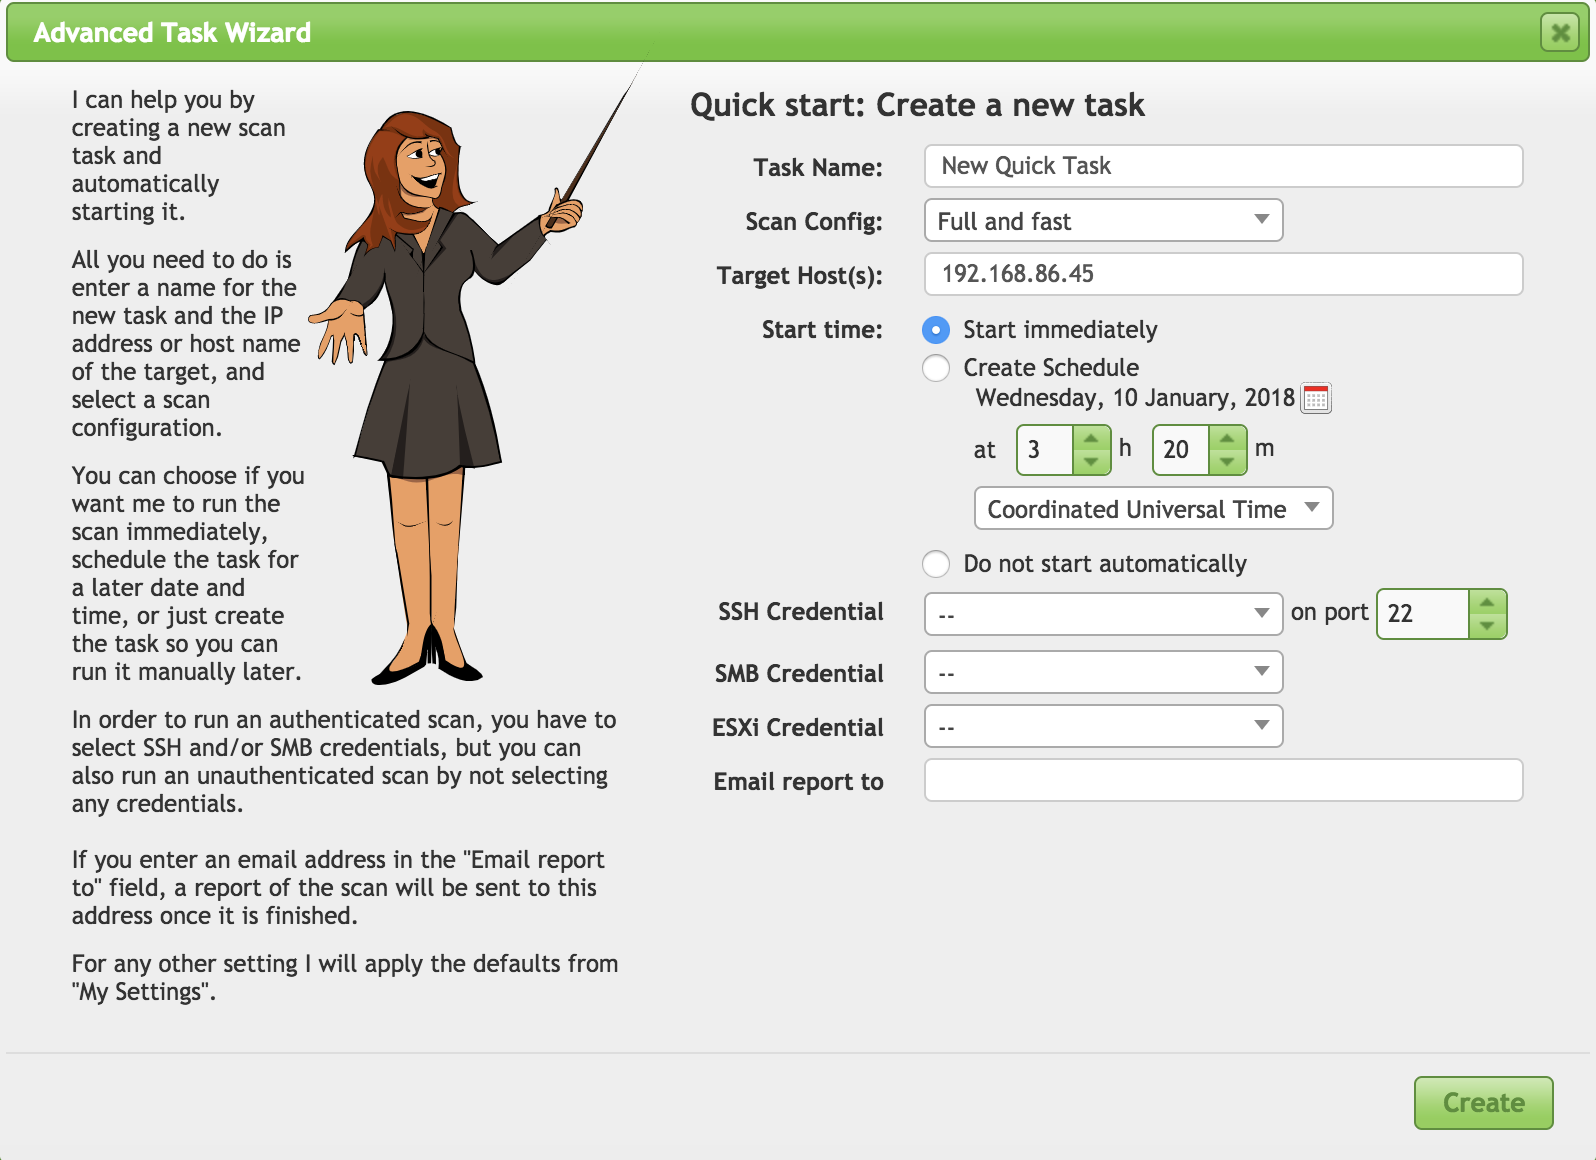
Figure 4-8. Advanced Scan Wizard
Creating a Scan
If you want more control of your scan, more steps are required. There are a few places to start, because there are several components you need to get in place before you can start the scan. A simple place to start is the same place in the interface where we were setting up local scans. You need to establish targets. If you want to run local scans as part of your overall scan, you would set up your credentials as we did earlier, going to the Configuration menu and selecting Credentials. Once you have set whatever credentials you need, you can go to Configuration/Targets to access the dialog box that allows you to specify targets.
From there, you add in or configure any credentials you may have and you have your targets set up. You need to think about what kind of scan you want to do. This is where you need to go to Scan Configs, also under the Configuration menu. This is something else we looked at quickly under “Local Vulnerabilities”. OpenVAS does come with scan configs built in, and you can see the list in Figure 4-9. These are canned configurations that you won’t be able to make changes to. Also in this list, you will see a couple of configurations I created. If you want something different from what the canned scans offer you, you need to either clone one of these and edit it, or create your own.
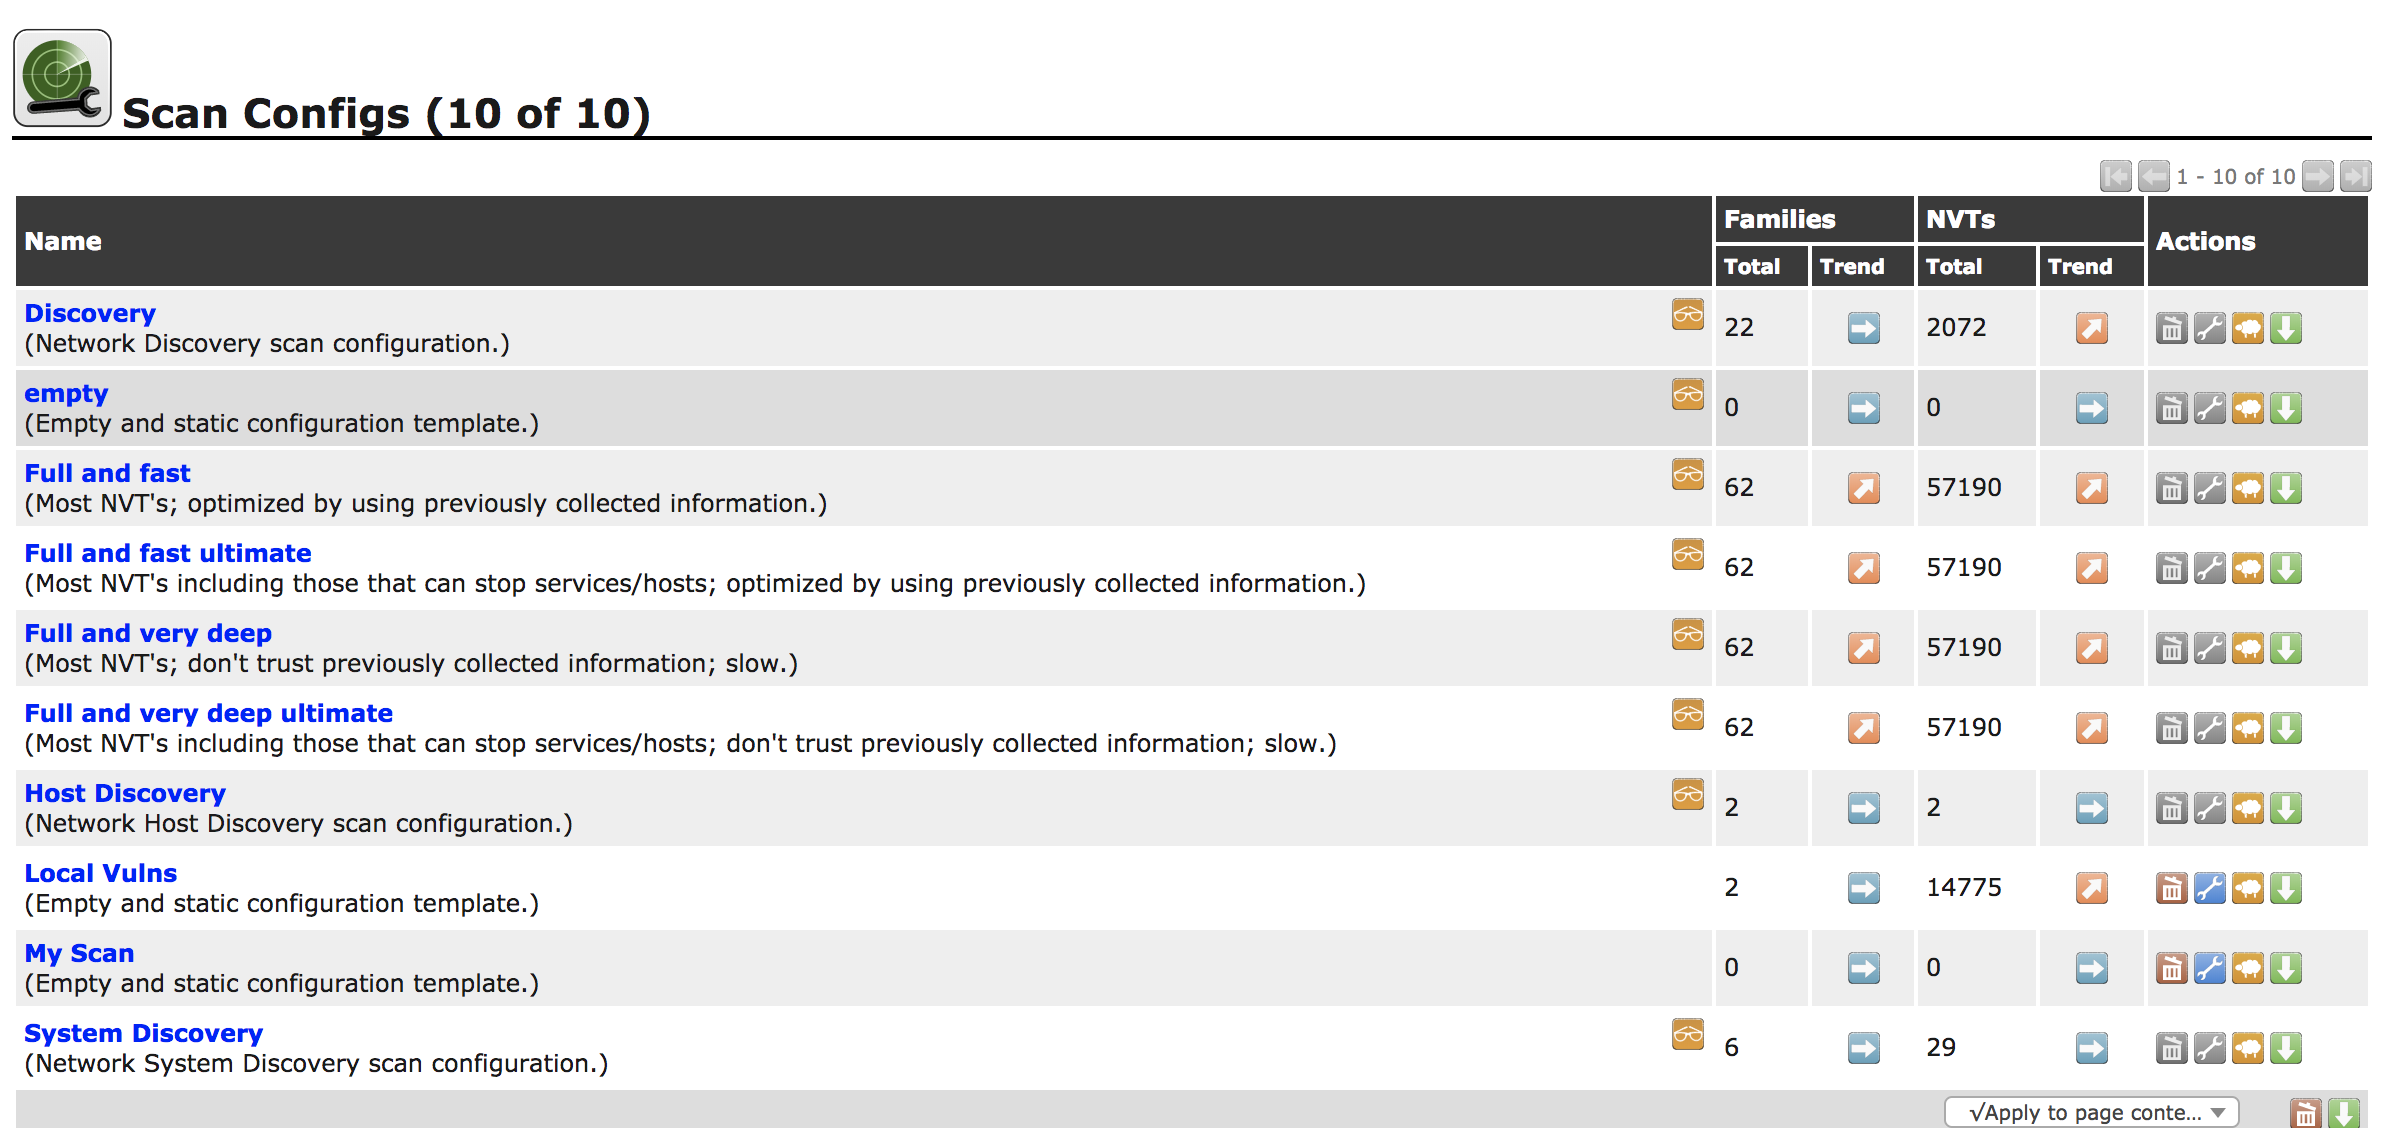
Figure 4-9. List of scans
When you want to create your own scan configuration, you can start with a blank configuration or a full and fast configuration. Once you have decided where you want to start, you can begin selecting the scan families you want to include in your scan configuration. Additionally, you can alter the way the scanner behaves. You can see a set of configuration settings in Figure 4-10 that will change the way the scan is run and the locations it uses. One area to point out specifically here is the Safe Checks setting. This indicates that the only checks to run are ones that are known to be safe, meaning they aren’t as likely to cause problems with the target systems. This does mean that some checks won’t get run, and they may be the checks that test the very vulnerabilities you are most concerned with. After all, if just probing for a vulnerability can cause problems on the remote system, that’s something the company you are working with should be aware of.
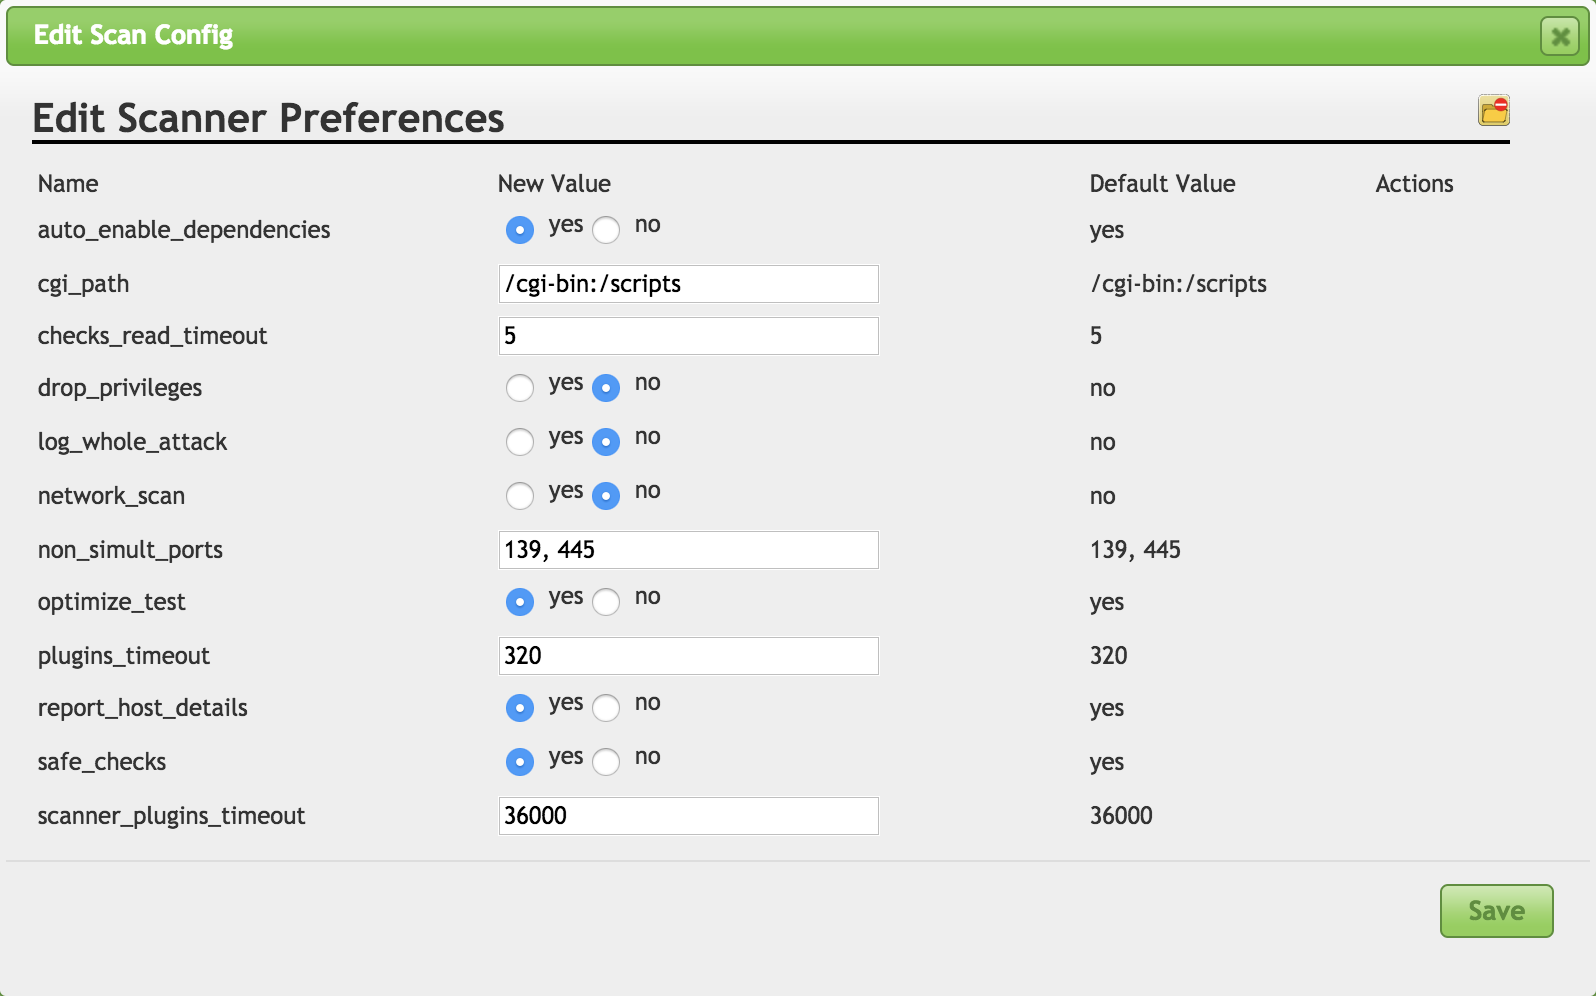
Figure 4-10. Scanner preferences
Vulnerability scanners don’t necessarily exploit vulnerabilities. However, just poking at software to evaluate its reaction can be enough to cause application crashes. In the case of the operating system, as with network stack problems, you may be talking about crashing the operating system and causing a denial of service, even if that’s not what you were looking to do. This is an area where you need to make sure you are clear up front with the people you are doing the testing for. If they are expecting clean testing, and you are working in cooperation with them, you need to be clear that sometimes, even if you aren’t going for outages, outages will happen. Safe Checks is a setting to be careful of, and you should be very aware of what you are doing when you turn it off. Safe Checks disables tests that may have the potential to cause damage to the remote service, potentially disabling it, for instance.
Although you can also adjust additional settings, after you have set your scan configuration and your targets, you are ready to go. Before you get started here, you may want to consider setting some schedules. This can be helpful if you want to be working with a company and doing the testing off-hours. If you are doing security testing or a penetration test, you likely want to monitor the scan. However, if this is a routine scan, you may want to set it to run overnight so as not to affect day-to-day operations of the business. While you may not be impacting running services or systems, you will be generating network traffic and using up resources on systems. This will have some impact if you were to do it while the business were operational.
Let’s assume, though, that you have your configurations in place. You just want to get a scan started with everything you have configured. From here, you need to go to the Scans menu and select Tasks. Then click the New Task icon. This brings up another dialog box, which you can see in Figure 4-11. In this dialog box, you give the task a name (not shown in screenshot), which then shows the additional options, and then you can select your targets and your scan config. You can also select a schedule, if you created one.
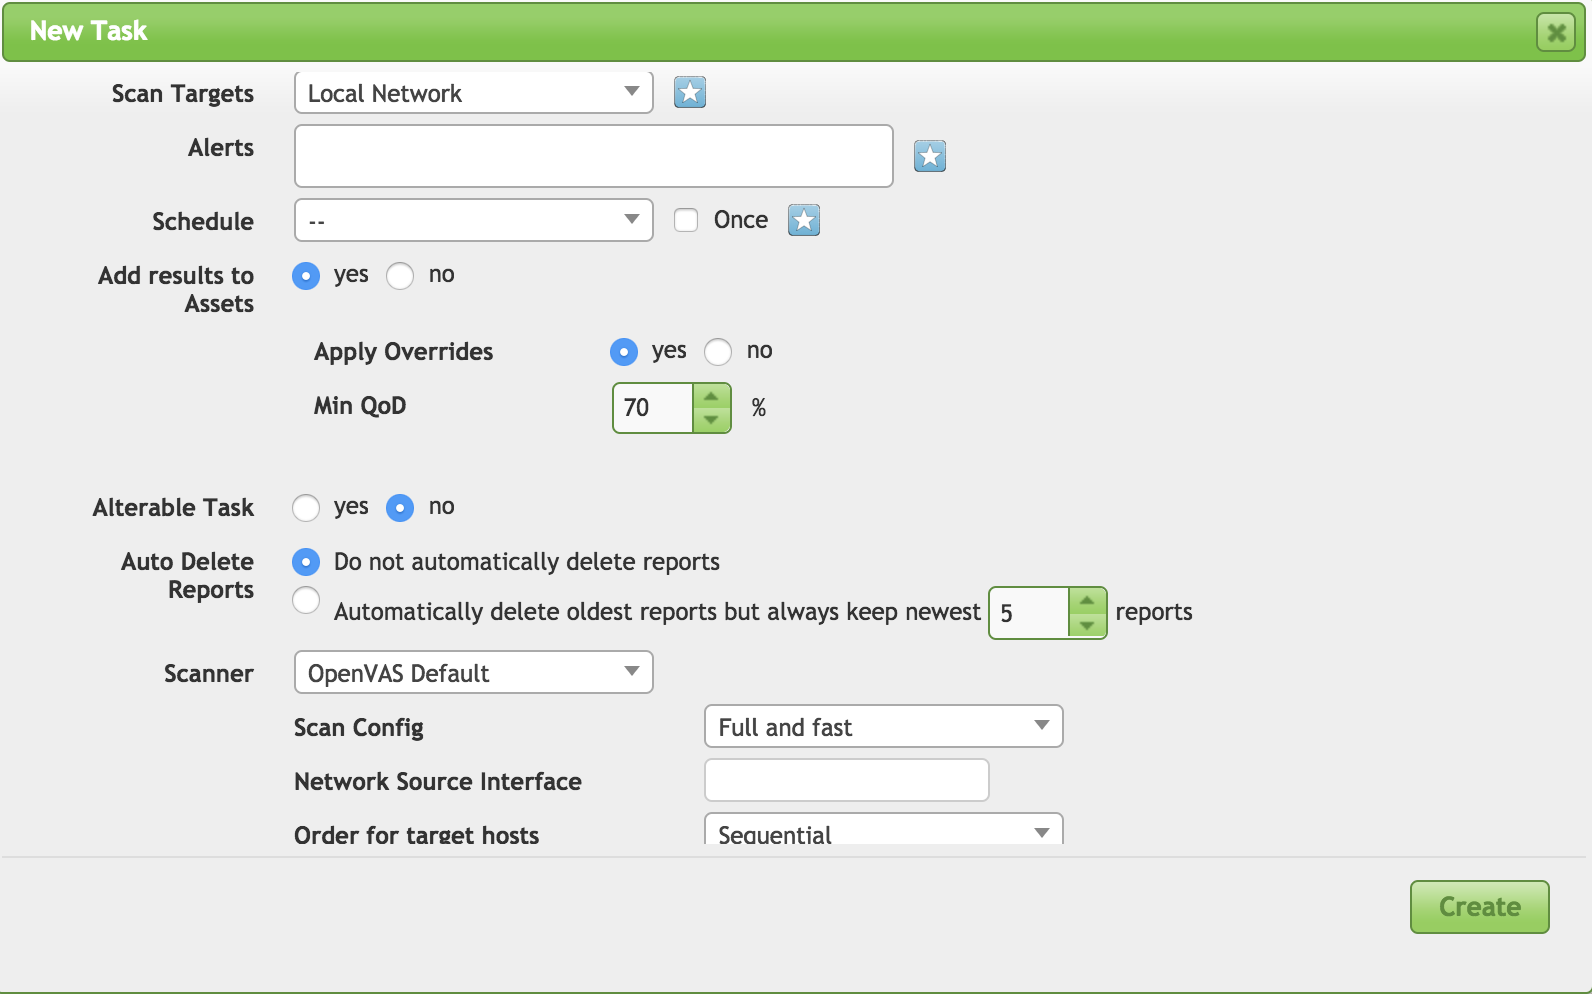
Figure 4-11. Creating a new scan
On our simple installation, we will have the choice of a single scanner to use. That’s the scanner on our Kali system. In a more complex setup, you may have multiple scanners to select from and manage all from a single interface. You will also be able to select the network interface you want to run the scan on. While this will commonly be handled by the routing tables on your system, you can indicate a specific source interface. This may be useful if you want all of your traffic to source from one IP address range, while you are managing from another interface.
Finally, you have the choice of storing reports within the OpenVAS server. You can indicate how many you want to store so you can compare one scan result to another to demonstrate progress. Ultimately, the goal of all of your testing, including vulnerability scanning, is to improve the security posture of your target. If the organization is getting your recommendations and then not doing anything with them, that’s worse than not running the scans at all. What happens when you present a report to the organization you are working for is that they become aware of the vulnerabilities you have identified. This information can then be used against them if they don’t do anything with what you have told them.
OpenVAS Reports
The report is the most important aspect of your work. You will be writing your own report when you are complete, but the report that is issued from the vulnerability scanner is helpful for you to understand where you might start looking. There are two things to be aware of when we start to look at vulnerability scanner reports. First, the vulnerability scanner uses specific signatures to determine whether the vulnerability is there. This may be something like banner grabbing to compare version numbers. You can’t be sure that the vulnerability exists because a tool like OpenVAS does not exploit the vulnerability. Second, and this is related, you can get false positives. Since the vulnerability scanner does not exploit the vulnerability, the best it can do is get a probability.
If you are not running a scan with credentials, you are going to miss detecting a lot of vulnerabilities. You will also have a higher potential for getting false positives. A false positive is an indication that the vulnerability exists when it doesn’t. This is why a report from OpenVAS or any other scanner isn’t sufficient. Since there is no guarantee that the vulnerability actually exists, you need to be able to validate the reports so your final report presents legitimate vulnerabilities that need to be remediated.
However, enough with the remonstration. Let’s get on with looking at the reports so we can start determining what is legitimately troubling and what may be less concerning. The first thing we need to do is go back to the OpenVAS web interface after the scan is complete, and scans of large networks with a lot of services can be very time-consuming, especially if you are doing deep scans. In the Scans menu, you will find the item Reports. From there, you get to the Report dashboard. That will give you a list of all the scans you have done as well as some graphs of the severity of the findings from your scans. You can see the Report dashboard in Figure 4-12.
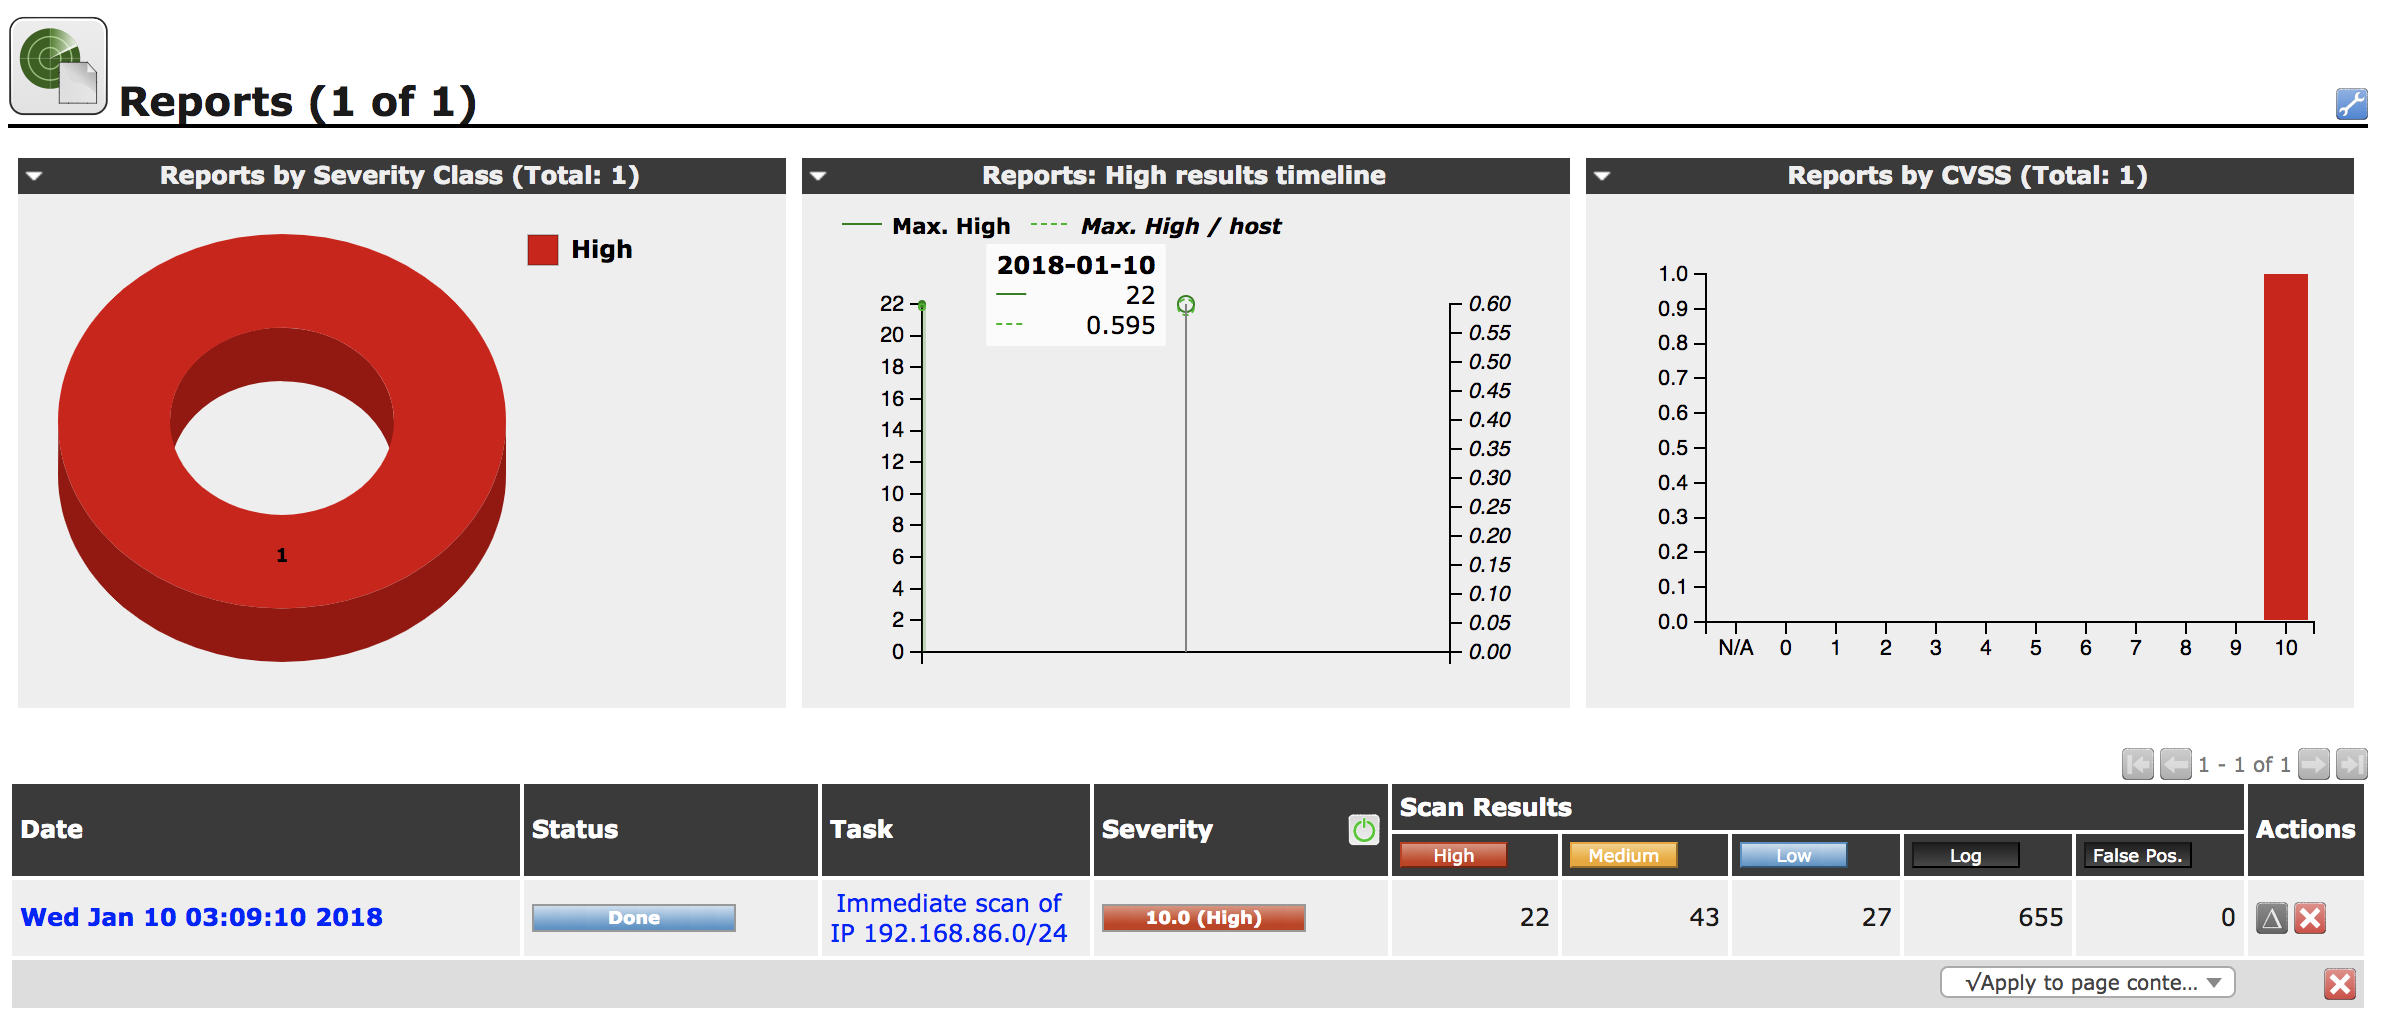
Figure 4-12. Report dashboard
When you select the scan you want the report from, you will be presented with a list of all vulnerabilities that were found. When I use the word report, it may sound like we are talking about an actual document, which you can certainly get, but really all we’re looking for is the list of findings and their details. We can get all of that just as easily from the web interface as we can from a document. I find it easier in most cases to be able to click back and forth from the list to the details as needed. Your own mileage will, of course, vary, depending on what’s most comfortable for you. Figure 4-13 shows the list of vulnerabilities resulting from the scan of my network. I like to keep some vulnerable systems around for fun and demonstration purposes. Having everything up-to-date wouldn’t yield us much to look at.
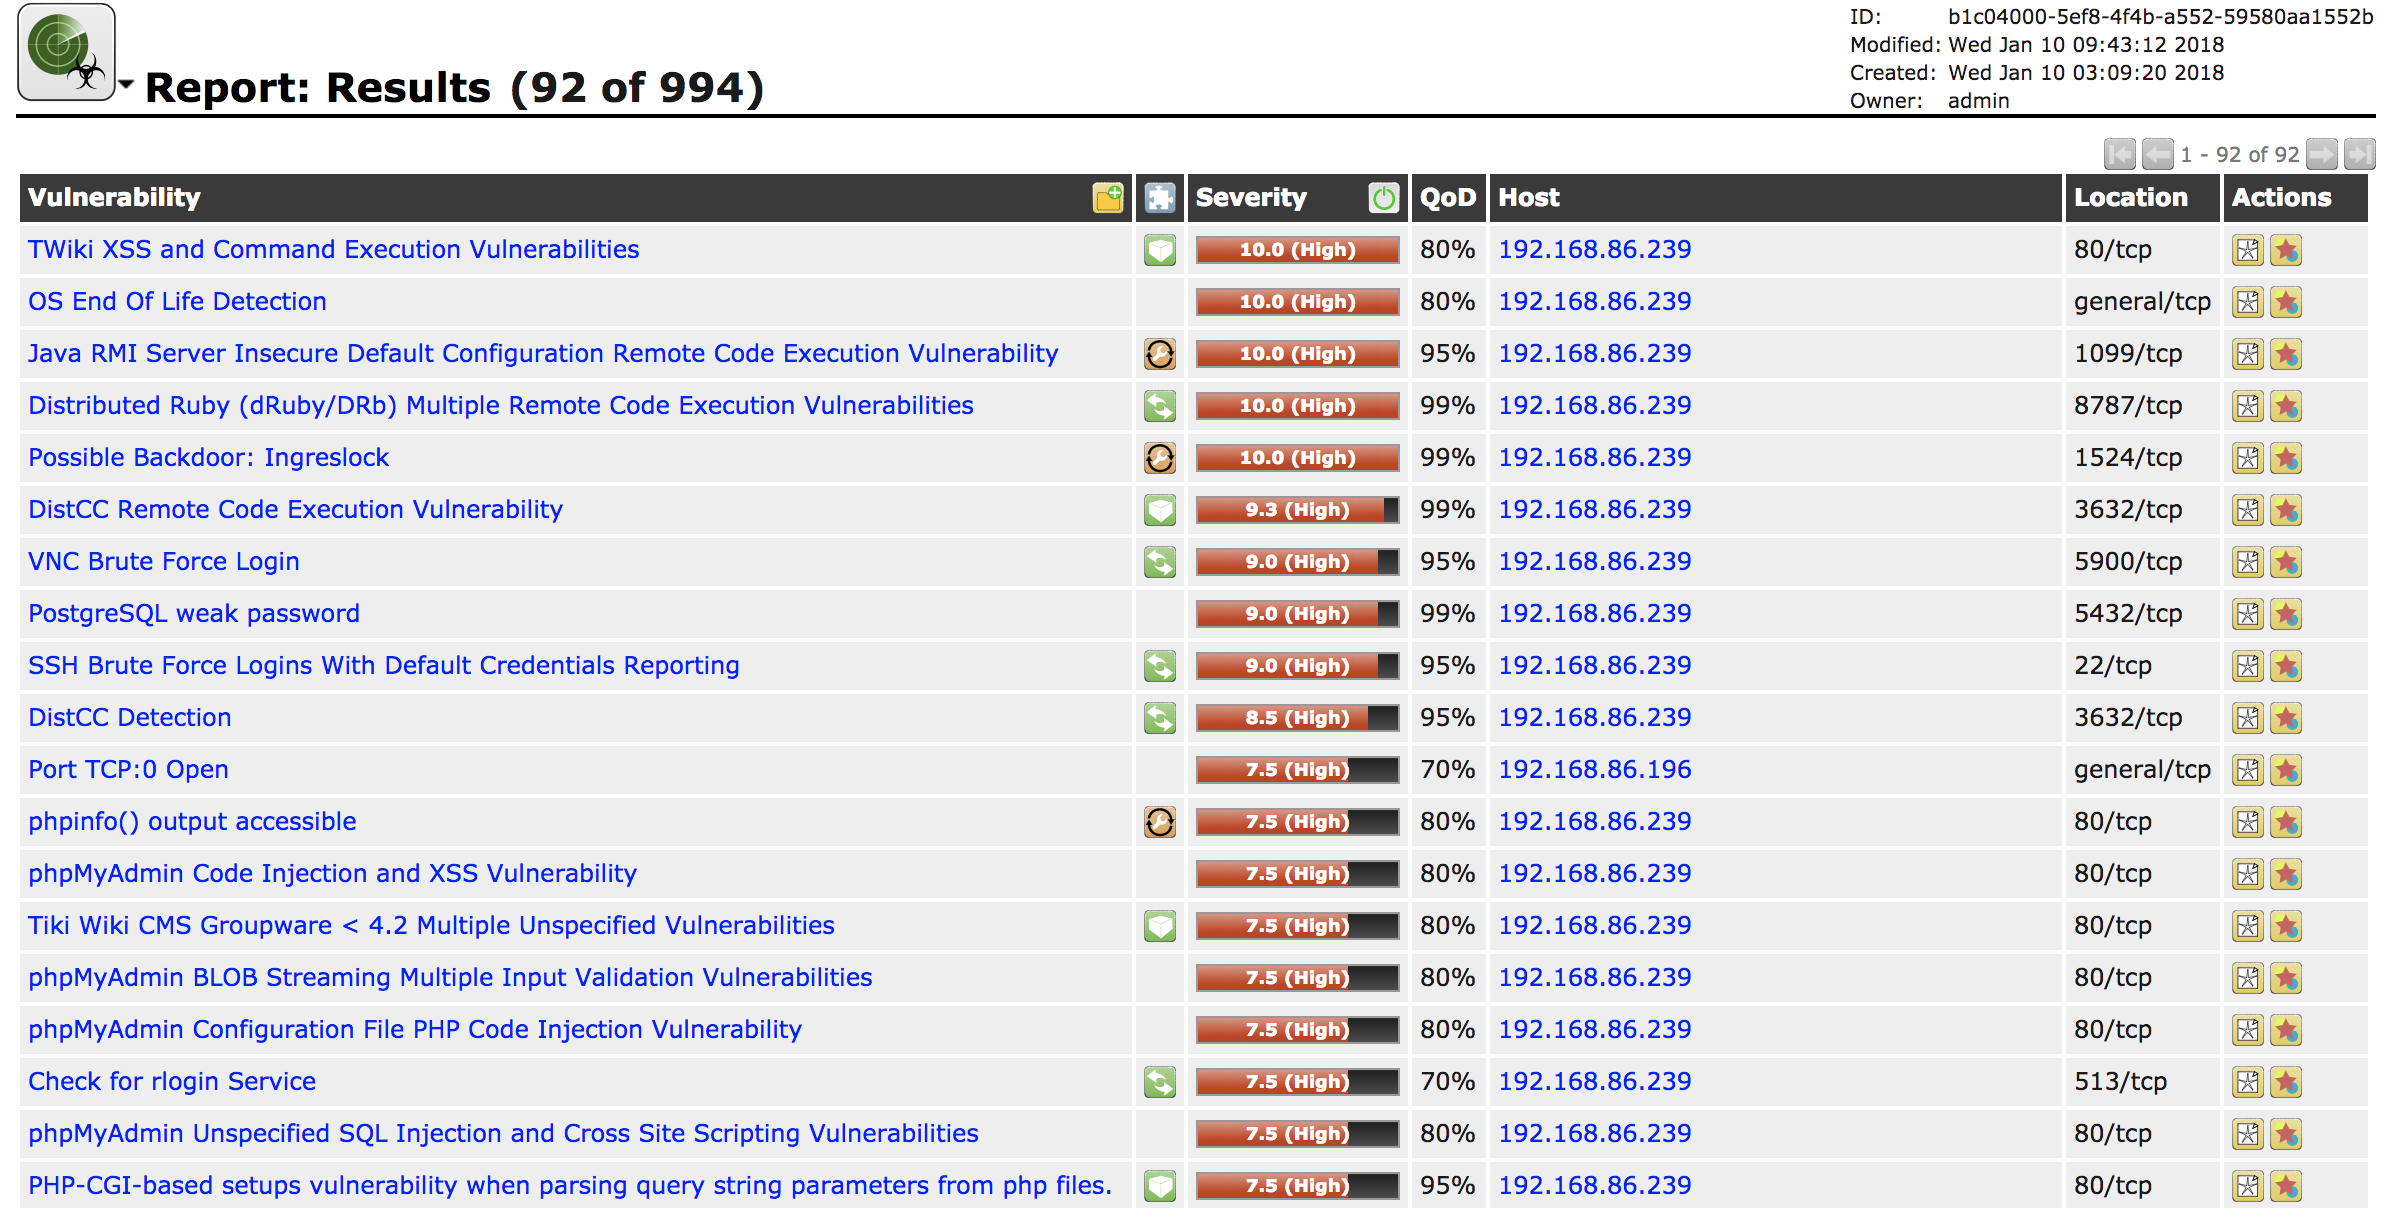
Figure 4-13. List of vulnerabilities
You’ll see seven columns. Some of these are fairly self-explanatory. The Vulnerability and Severity columns should be easy to understand. The vulnerability is a short description of the finding. The severity is worth talking about, though. This assessment is based on the impact that may result from the vulnerability being exploited. The issue with the severity provided by the vulnerability scanner is that it doesn’t take anything else into account. All it knows is the severity that goes with that vulnerability, regardless of any other mitigations that are in place that could limit the exposure to the vulnerability. This is where having a broader idea of the environment can help. As an example, let’s say there is an issue with a web server, like a vulnerability in PHP, a programming language for web development. However, the website could be configured with two-factor authentication and special access could be granted just for this scan. This means only authenticated users could get access to the site to exploit the vulnerability.
Just because mitigations are in place for issues that may reduce their overall impact on the organization doesn’t mean those issues should be ignored. All it means is that the bar is higher for an attacker, not that it’s impossible for the exploit to happen. Experience and a good understanding of the environment will help you to key in on your findings. The objective shouldn’t be to frighten the bejeebers out of people but instead to provide them with a reasonable expectation of where they sit from the standpoint of exposure to attack. Working with the organization will ideally get them to improve their overall security posture.
The next column to talk about is the QoD, or Quality of Detection, column. As noted earlier, the vulnerability scanner can’t be absolutely certain that the vulnerability exists. The QoD rating indicates how certain the scanner is that the vulnerability exists. The higher the score, the more certain the scanner is. If you have a high QoD and a high severity, this is probably a vulnerability that someone should be investigating. As an example, one of the findings is shown in Figure 4-14. This has a QoD of 99% and a severity of 10, which is as high as the scanner goes. OpenVAS considers this a serious issue that it believes is confirmed. This is shown by the output received from the system under test.
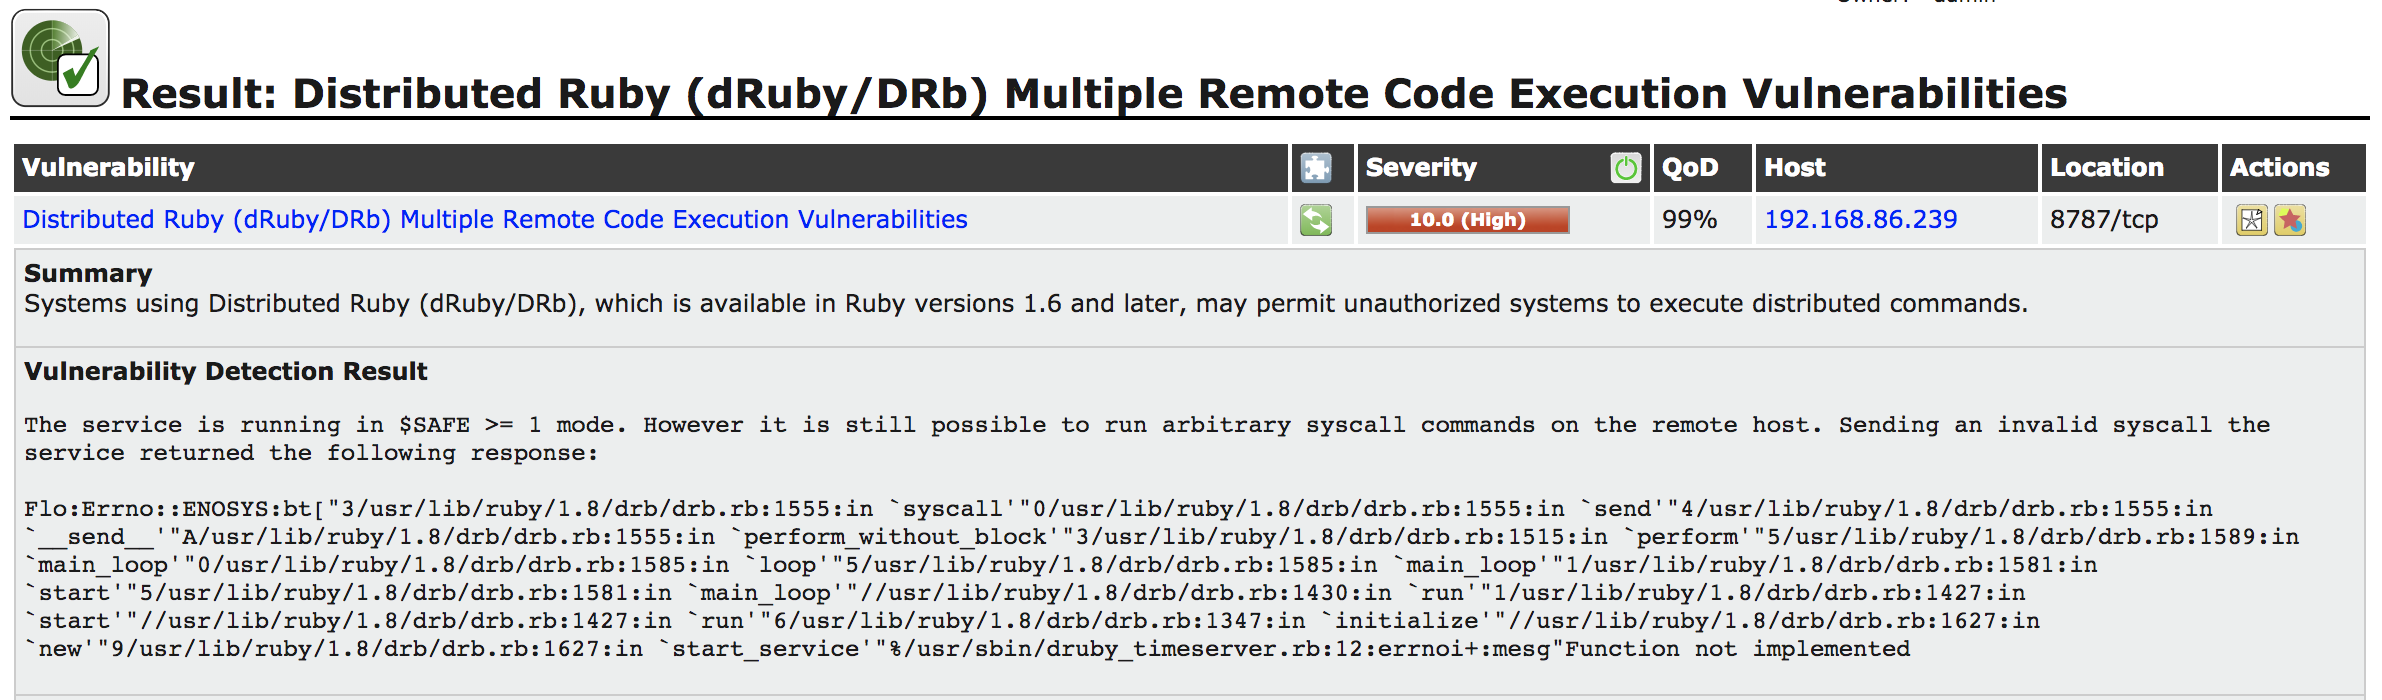
Figure 4-14. Ruby finding in OpenVAS
Each finding will tell you how the vulnerability was detected. In this case, OpenVAS found a Ruby-based web page and sent it a request, attempting to make a system call. The error message that resulted suggested to OpenVAS that these system calls are allowed through the application. Since system calls are used for important functions like reading and writing files, gaining access to hardware and other important functions, these calls could potentially provide access to the attacker or cause damage to files on the system. It’s because of that potential level of access that the severity was rated so high.
When you get a result like this, it’s worth trying as best as you can to duplicate it manually. This is where you may want to turn up the logging as high as you can. This can be done by going to the scanner preferences and turning on Log Whole Attack. You can also check the application log from the target application to see exactly what was done. Repeating the attack and then modifying it in useful ways can be important. For example, manual testing of the vulnerability identified in Figure 4-14 resulted in an error message indicating that the function was not implemented. What OpenVAS tried wasn’t completely successful, so additional testing and research is needed.
If you need help performing the additional testing, the findings will have a list of resources. These web pages will have more details on the vulnerability, which can help you understand the attack so you can work on duplicating it. Often, these resources point to the announcement of the vulnerability. They may also provide details from vendors about fixes or workarounds.
Another column to take a look at is the second column, which is labeled with just an icon. This is the column indicating the solution type. The solutions may include workarounds, vendor fixes, or mitigations. Each finding will provide additional details about the workarounds or fixes that may be possible. One of the vulnerabilities that was detected was features of an SMTP server that could lead an attacker to information about email addresses. Figure 4-15 shows one of the findings and its solution. This particular solution is a workaround. In this case, the workaround is to disable the two functions in the mail server.
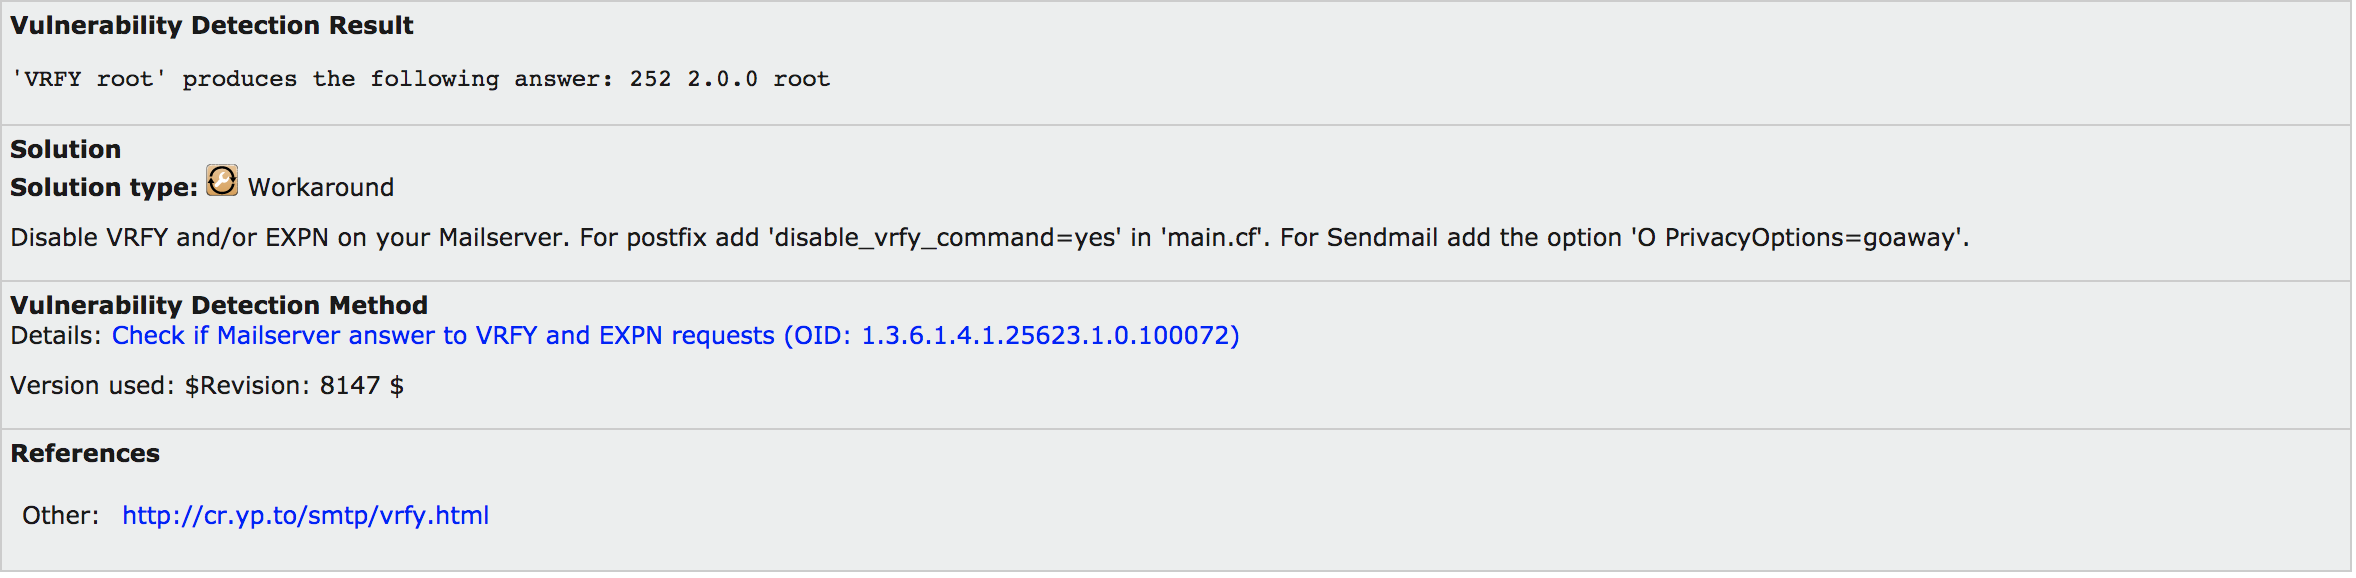
Figure 4-15. OpenVAS solution
This workaround provides specifics on how to configure two mail servers. This particular system uses Postfix, which is one of the details provided. However, other mail servers may also expose this vulnerability. If you need help with configuration of those servers, you will have to do additional research.
The final columns to look at are the Host column and the Location. The host tells you which system had the vulnerability. This is important so your organization knows which system it needs to be performing the configuration work on. The location tells you which port the targeted service runs on. This lets you know where you should be targeting your additional testing. When you provide details to the organization, the system that’s impacted is important to include. I also include any mitigations or fixes that may be available when I write reports for clients.
Network Device Vulnerabilities
OpenVAS is capable of testing network devices. If your network devices are accessible over the networks you are scanning, they can get touched by OpenVAS, which can detect the type of device and apply the appropriate tests. However, programs also are included with Kali that are specific to network devices and vendors. Cisco is a common networking equipment vendor. Unsurprisingly, various programs will perform testing on Cisco devices. The more targets available, the better chance that someone will be developing tools and exploits against those targets. Cisco has majority market share in routing and switching, so those devices make good targets for attacks.
Network devices are often managed over networks. This can be done through web interfaces using HTTP or they may also be done on a console through a protocol like SSH or—far less ideal but still possible—Telnet. Once you have any device on a network, it has the potential to be exploited. Using the tools available in Kali, you can start to identify potential vulnerabilities in the critical network infrastructure.
Auditing Devices
The first thing we will do is to use a tool to do some basic auditing of Cisco devices on the network. The Cisco Auditing Tool (CAT) is used to attempt logins to devices you provide. It does this given a provided word list to attempt logins with. The downside to using this tool is that it uses Telnet to attempt connections, rather than SSH, which would be more common on well-secured networks. Any management over Telnet can be intercepted and read in plain text because that’s how it’s transmitted. Since management of network devices will include passwords, it’s more common to use encrypted protocols like SSH for management.
CAT can also investigate a system by using the Simple Network Management Protocol (SNMP). The version of SNMP used by CAT is outdated. This is not to say that some devices don’t still use outdated versions of protocols like SNMP. SNMP can be used to gather information about configuration as well as system status. The older version of SNMP uses a community string for authentication, which is provided in clear text because the first version of SNMP doesn’t use encryption. CAT uses a word list of potential community strings, though it was common for the read-only community string to be public and the read-write community string to be private for a long time. They were the defaults in many cases, and unless the configuration of the system was changed, that’s what you would need to supply.
CAT is an easy program to run. It’s a Perl script that calls individual modules for SNMP and brute-force runs. As I’ve noted, it does require you to provide the hosts. You can provide a single host or a text file with a list of hosts in it. Example 4-6 shows the help output for CAT and how to run it against Cisco devices.
Example 4-6. CAT output
root@rosebud:~# CAT Cisco Auditing Tool - g0ne[null0]Usage: -h hostname(forscanning single hosts)-f hostfile(forscanning multiple hosts)-p port# (default port is 23)-w wordlist(word listforcommunity name guessing)-a passlist(word listforpassword guessing)-i[ioshist](CheckforIOS History bug)-l logfile(file to log to, default screen)-q quiet mode(no screen output)
The program cisco-torch can be used to scan for Cisco devices. One of the differences between this and CAT is that cisco-torch can be used to scan for available SSH ports/services. Additionally, Cisco devices can store and retrieve configurations from Trivial File Transfer Protocol (TFTP) servers. cisco-torch can be used to fingerprint both TFTP and Network Transfer Protocol (NTP) servers. This will help identify infrastructure related to both Cisco Internetwork Operating System (IOS) devices and the supporting infrastructure for those devices. IOS is the operating system that Cisco uses on its routers and enterprise switches. Example 4-7 shows a scan of a local network looking for Telnet, SSH, and Cisco web servers. All of these protocols can be used to remotely manage Cisco devices.
Note
Cisco has been using its IOS for decades now. IOS should not be confused with iOS, which is what Apple calls the operating system that controls its mobile devices.
Example 4-7. Output from cisco-torch
root@rosebud:~# cisco-torch -t -s -w 192.168.86.0/24 Using config file torch.conf... Loading include and plugin ...################################################################ Cisco Torch Mass Scanner ## Because we need it... ## http://www.arhont.com/cisco-torch.pl ################################################################List of targets contains256host(s)Will fork50additional scanner processes Range Scan from 192.168.86.12 to 192.168.86.17 17855: Checking 192.168.86.12 ... HUH db not found, it should be in fingerprint.db Skipping Telnet fingerprint Range Scan from 192.168.86.6 to 192.168.86.11 17854: Checking 192.168.86.6 ... HUH db not found, it should be in fingerprint.db Skipping Telnet fingerprint Range Scan from 192.168.86.18 to 192.168.86.23 17856: Checking 192.168.86.18 ...
Partially because of Cisco’s market share and the amount of time its devices have been used on the internet, Cisco devices have known vulnerabilities. Identifying devices isn’t the same as identifying vulnerabilities. As a result, we need to know what vulnerabilities may be on the devices we find. Fortunately, in addition to using OpenVAS for vulnerability scanning, a Perl script comes with Kali to look for Cisco vulnerabilities. This script, cge.pl, knows about specific vulnerabilities related to Cisco devices. Example 4-8 shows the list of vulnerabilities that can be tested with cge.pl as well as how to run the script, which takes a target and a vulnerability number.
Example 4-8. Running cge.pl for Cisco vulnerability scanning
root@rosebud:~# cge.pl Usage : perl cge.pl <target> <vulnerability number> Vulnerabilities list :[1]- Cisco 677/678 Telnet Buffer Overflow Vulnerability[2]- Cisco IOS Router Denial of Service Vulnerability[3]- Cisco IOS HTTP Auth Vulnerability[4]- Cisco IOS HTTP Configuration Arbitrary Administrative Access Vulnerability[5]- Cisco Catalyst SSH Protocol Mismatch Denial of Service Vulnerability[6]- Cisco675Web Administration Denial of Service Vulnerability[7]- Cisco Catalyst3500XL Remote Arbitrary Command Vulnerability[8]- Cisco IOS Software HTTP Request Denial of Service Vulnerability[9]- Cisco514UDP Flood Denial of Service Vulnerability[10]- CiscoSecure ACSforWindows NT Server Denial of Service Vulnerability[11]- Cisco Catalyst Memory Leak Vulnerability[12]- Cisco CatOS CiscoView HTTP Server Buffer Overflow Vulnerability[13]-0Encoding IDS Bypass Vulnerability(UTF)[14]- Cisco IOS HTTP Denial of Service Vulnerability
One final Cisco tool to look at is cisco-ocs. This is another Cisco scanner, but no parameters are needed to perform the testing. You don’t choose what cisco-ocs does; it just does it. All you need to do is provide the range of addresses. You can see a run of cisco-ocs in Example 4-9. After you tell it the range of addresses, and start and stop IP, the tool will start testing each address in turn for entry points and potential vulnerabilities.
Example 4-9. Running cisco-ocs
root@rosebud:~# cisco-ocs 192.168.86.1 192.168.86.254 ********************************* OCS v 0.2 ********************************** **** **** **** coded by OverIP **** **** overip@gmail.com **** **** under GPL License **** **** **** **** usage: ./ocs xxx.xxx.xxx.xxx yyy.yyy.yyy.yyy **** **** **** **** xxx.xxx.xxx.xxx=range start IP **** **** yyy.yyy.yyy.yyy=range end IP **** **** **** ******************************************************************************(192.168.86.1)Filtered Ports(192.168.86.2)Filtered Ports
As you can see, several programs are looking for Cisco devices and potential vulnerabilities. If you can find these devices, and they show either open ports to test logins or, even worse, vulnerabilities, it’s definitely worth flagging them as devices to look for exploits.
Database Vulnerabilities
Database servers commonly have a lot of sensitive information, though they are commonly on isolated networks. This is not always the case, however. Some organizations may also believe that isolating the database protects it, which is not true. If an attacker can get through the web server or the application server, both of those systems may have trusted connections to the database. This exploses a lot of information to attack. When you are working closely with a company, you may get direct access to the isolated network to look for vulnerabilities. Regardless of where the system resides, organizations should definitely be locking down their databases and remediating any vulnerabilities found.
Oracle is a large company that built its business on enterprise databases. If a company needs large databases with sensitive information, it may well have gone to Oracle. The program oscanner that comes installed in Kali scans Oracle databases to perform checks. The program uses a plug-in architecture to enable tests of Oracle databases, including trying to get the security identifiers (SIDs) from the database server, list accounts, crack passwords, and several other attacks. oscanner is written in Java, so it should be portable across multiple operating systems.
oscanner also comes with several lists, including list of accounts, users, and services. Some of the files don’t have a lot of possibilities in them, but they are starting points for attacks against Oracle. As with so many other tools you will run across, you will gather your own collection of service identifiers, users, and potential passwords as you go. You can add to these files for better testing of Oracle databases. As you test more and more systems and networks, you should be increasing the data possibilities you have for running checks. This will, over time, increase the possibility of success. Keep in mind that when you are running word lists for usernames and passwords, you are going to be successful only if the username or password configured on the system matches something in the word lists exactly.
Identifying New Vulnerabilities
Software has bugs. It’s the nature of the beast. Software, especially larger pieces of software, is complex. The more complexity, the more chance for error. Think about all of the choices that are made in the course of running a program. If you start calculating all the potential execution paths through a program, you will quickly get into large numbers. How many of those complete execution paths get tested when software testing is performed? Chances are, only a subset of the entire set of execution paths. Even if all the execution paths are being tested, what sorts of input are being tested?
Some software testing may be focused on functional testing. This is about verifying that the functionality specified is correct. This may be done by positive testing—making sure that what happens is expected to happen. There may also be some amount of negative testing. You want to make sure that your program fails politely if something unexpected happens. It’s this negative testing that can be difficult to accomplish, because if you have a set of data you expect, it’s only a partial set compared with everything that could possibly happen in the course of running a program, especially one that takes user input at some point.
Boundary testing occurs when you go after the bounds of expected input. You test the edges of the maximum or minimum values, and just outside the maximum or minimum—checking for errors and correct handling of the input.
Sending applications data they don’t expect is a way to identify bugs in a program. You may get error messages that provide information that may be useful, or you may get a program crash. One way of accomplishing this is to use a class of applications called fuzzers. A fuzzer generates random or variable data to provide to an application. The input is programmatically generated based on a set of rules.
Note
Fuzzing may be considered black-box testing by some people, because the fuzzing program has no knowledge of the inner workings of the service application. It sends in data, regardless of what the program is expecting the input to look like. Black-box testing is about viewing the software under test as a black box—the inner workings can’t be seen. Even if you have access to the source code, you are not developing the tests you run with a fuzzer with respect to the way the source code looks. From that standpoint, the application may as well be a black box, even if you have the source code.
Kali has a few fuzzers installed and more that can be installed. The first one to look at, sfuzz, used to send network traffic to servers. sfuzz has a collection of rules files that tells the program how to create the data that is being sent. Some of these are based on particular protocols. For instance, Example 4-10 shows the use of sfuzz to send SMTP traffic to an email server. The -T flag indicates that we are using TCP, and the -s flag says we are going to do sequence fuzzing rather than literal fuzzing. The -f flag says to use the file /usr/share/sfuzz-db/basic.smtp as input for the fuzzer to use. Finally, the -S and -p flags indicate the target IP address and port, respectively.
Example 4-10. Using sfuzz to fuzz an SMTP server
root@rosebud:~# sfuzz -T -s -f /usr/share/sfuzz-db/basic.smtp -S 127.0.0.1 -p 25[18:16:35]dumping options: filename: </usr/share/sfuzz-db/basic.smtp> state:<8>lineno:<14>literals:[30]sequences:[31]-- snip --[18:16:35]info: beginning fuzz - method: tcp, config from:[/usr/share/sfuzz-db/basic.smtp], out:[127.0.0.1:25][18:16:35]attempting fuzz -1(len: 50057).[18:16:35]info: tx fuzz -(50057bytes)- scanningforreply.[18:16:35]read:220rosebud.washere.com ESMTP Postfix(Debian/GNU)250rosebud.washere.com==========================================================================[18:16:35]attempting fuzz -2(len: 50057).[18:16:35]info: tx fuzz -(50057bytes)- scanningforreply.[18:16:35]read:220rosebud.washere.com ESMTP Postfix(Debian/GNU)250rosebud.washere.com==========================================================================[18:16:35]attempting fuzz -3(len: 50057).[18:16:35]info: tx fuzz -(50057bytes)- scanningforreply.[18:16:36]read:220rosebud.washere.com ESMTP Postfix(Debian/GNU)250rosebud.washere.com==========================================================================
One of the issues with using fuzzing attacks is that they may generate program crashes. While this is ultimately the intent of the exercise, the question is how to determine when the program has actually crashed. You can do it manually, of course, by running the program under test in a debugger session so the debugger catches the crash. The problem with this approach is that it may be hard to know which test case caused the crash and, while finding a bug is good, just getting a program crash isn’t enough to identify vulnerabilities or create exploits that take advantage of the vulnerability. A bug, after all, is not necessarily a vulnerability. It may simply be a bug. Software packages can be used to integrate program monitoring with application testing. You can use a program like valgrind to be able to instrument your analysis.
In some cases, you may find programs that are targeted at specific applications or protocols. Whereas sfuzz is a general-purpose fuzzing program that can go after multiple protocols, programs like protos-sip are designed specifically to test the SIP, a common protocol used in VoIP implementations. The protos-sip package is a Java application that was developed as part of a research program. The research turned into the creation of a company that sells software developed to fuzz network protocols.
Not all applications are services that listen on networks for input. Many applications take input in the form of files. Even something like sfuzz that takes definitions as input, takes those definitions in the form of files. Certainly word processing, spreadsheet programs, presentation programs, and a wide variety of other types of software use files. Some fuzzers are developed for the purpose of testing applications that take files as input.
One program that you can use to do a wider range of fuzz testing is zzuf. This program can manipulate input into a program so as to feed it unexpected data. Example 4-11 shows a run of zzuf against the program pdf-parser, which is a Python script used to gather information out of a PDF file. What we are doing is passing the run of the program into zzuf as a command-line parameter after we have told zzuf what to do. You’ll notice that we immediately start getting errors. In this case, we get a stack trace, showing us details about the program. As it’s a Python script and the source is available, this isn’t a big problem, but this is an error that the program isn’t directly handling.
Example 4-11. Fuzzing pdf-parser with zzuf
root@rosebud:~# zzuf -s 0:10 -c -C0-T3pdf-parser -a fuzzing.pdf Traceback(most recent call last): File"/usr/bin/pdf-parser", line 1417, in <module> Main()File"/usr/bin/pdf-parser", line 1274, in Mainobject=oPDFParser.GetObject()File"/usr/bin/pdf-parser", line 354, in GetObject self.objectId=eval(self.token[1])File"<string>", line 1 1
On the command line for zzuf, we are telling it to use seed values (-s) and to fuzz input only on the command line. Any program that reads in configuration files for its operation wouldn’t have those configuration files altered in the course of running. We’re looking to alter only the input from the file we are specifying. Specifying -C 0 tells zzuf not to stop after the first crash. Finally, -T 3 says we should timeout after 3 seconds so as not to get the testing hung up.
Using a tool like this can provide a lot of potential for identifying bugs in applications that read and process files. As a general-purpose program, zzuf has potential even beyond the limited capacities shown here. Beyond file fuzzing, it can be used for network fuzzing. If you are interested in locating vulnerabilities, a little time using zzuf could be well spent.
Summary
Vulnerabilities are the potentially open doors that attacks can come through by using exploits. Identifying vulnerabilities is an important task for someone doing security testing, since remediating vulnerabilities is an important element in an organization’s security program. Here are some ideas to take away:
-
A vulnerability is a weakness in a piece of software or a system. A vulnerability is a bug, but a bug may not be a vulnerability.
-
An exploit is a means of taking advantage of a vulnerability to obtain something the attacker shouldn’t have access to.
-
OpenVAS is an open source vulnerability scanner that can be used to scan for both remote vulnerabilities and local vulnerabilities.
-
Local vulnerabilities require someone to have some sort of authenticated access, which may make them less critical to some people, but they are still essential to remediate since they can be used to allow escalation of privileges.
-
Network devices are also open to vulnerabilities and can provide an attacker access to alter traffic flows. Scanning for vulnerabilities in the network devices can be done using OpenVAS or other specific tools, including those focused on Cisco devices.
-
Identifying vulnerabilities that don’t exist can take some work, but tools like fuzzers can be useful in triggering program crashes, which may be vulnerabilities.
Useful Resources
-
Mateusz Jurczyk’s Black Hat slide deck, “Effective File Format Fuzzing”
-
Michael Sutton and Adam Greene’s Black Hat slide deck, “The Art of File Format Fuzzing”
-
Hanno Böck’s tutorial, “Beginner’s Guide to Fuzzing”
-
Deja vu Security’s tutorial, “Tutorial: File Fuzzing”
Get Learning Kali Linux now with the O’Reilly learning platform.
O’Reilly members experience books, live events, courses curated by job role, and more from O’Reilly and nearly 200 top publishers.

