Chapter 1. Starting Up Ruby on Rails
What we call the beginning is often the end. And to make an end is to make a beginning. The end is where we start from.
T. S. Eliot
Before you can use Rails, you have to install it. Even if it’s already installed on your computer, you may need to consider upgrading it. In this chapter, we’ll take a look at some ways of installing Ruby, Rails, and the supporting infrastructure. Please feel free to jump to whatever pieces of this section interest you and skip past those that don’t. Once the software is working, we’ll generate the basic Rails application, which will at least let you know if Rails is working. However you decide to set up Rails, in the end you’re going to have a structure like that shown in Figure 1-1.
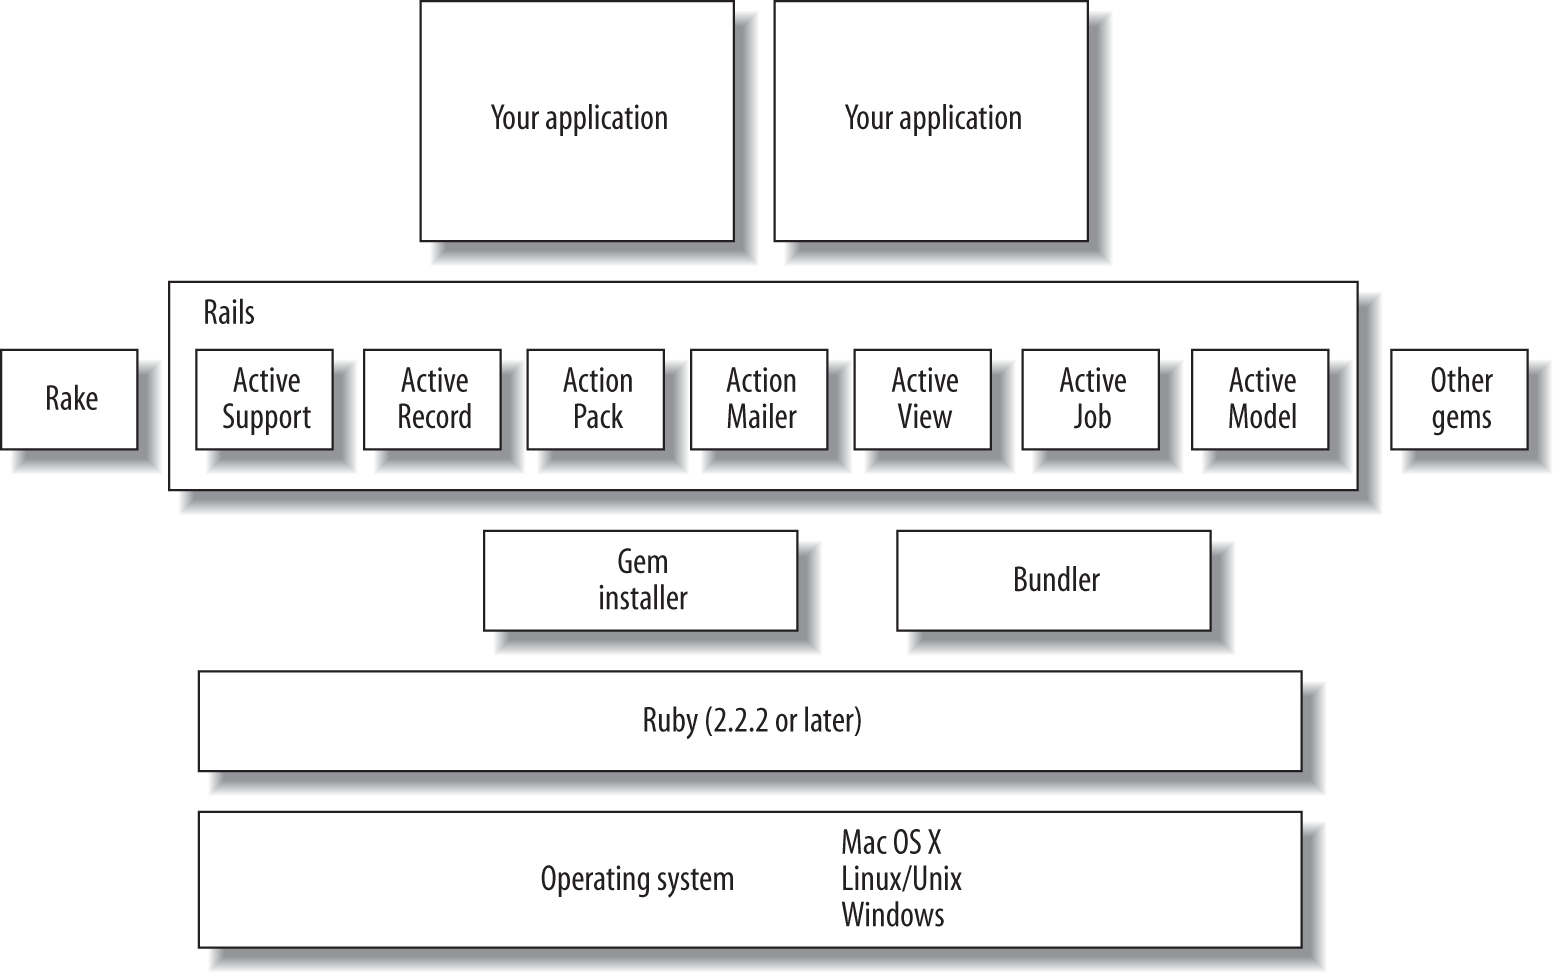
Figure 1-1. The many components of a Rails installation
Note
All of these options are free. You don’t need to spend any money to use Rails, unless maybe you feel like buying a nice text editor.
If You Run Windows, You’re Lucky
Windows users have two options for getting a basic installation of Rails and supporting tools—everything you need to use this book—far more easily than anyone else: EngineYard’s RailsInstaller and Bitnami’s Ruby Stack. Each of these installers provides all the key components in a one-click installation. Visit the site and download the installer; after that, you should be ready to move ahead to “Starting Up Rails”.
Really, it’s that easy! (Well, except that you may have to tell Windows Defender not to block the port Rails uses to present the site. It’s also possible that you’ll have to install developer tools on newer versions of Windows.)
Rails on Windows might be considered a bridge to full Rails development. You will find that many gems do not work on Windows, so if you want to take the next step in Rails development, consider moving to OS X or Linux operating systems. Ubuntu is a wonderful OS; a dual-boot environment with Windows is a good way to get started using Linux while not entirely cutting ties with Windows.
Note
As this book was going to print, RailsInstaller included installs for Windows and OS X along with the MySQL database. Bitnami offers installers for Windows, Mac, and Linux, and includes both MySQL and Postgres databases with its install.
Getting Started at the Command Line
Installing Rails by hand requires installing Ruby (preferably 2.2.2 or later), installing Gems, and then installing Rails. You will eventually also need to install SQLite, MySQL, or another relational database, though SQLite is already present on OS X and in many Linux distributions.
Ruby comes standard on a number of Linux and OS X platforms. To see whether it’s there, and what version it has, enter ruby -v at the command prompt. You’ll want Ruby 2.2.2 or later, so you may need to update it to a more recent version:
-
On OS X, the preinstalled version of Ruby will vary widely depending on your OS X version. The following table summarizes which Ruby versions are included.
OS X version Ruby version included Yosemite (10.10) and Mavericks (10.9)
Ruby 2.0.0
Snow Leopard (10.6), Lion (10.7), and Mountain Lion (10.8)
Ruby 1.8.7
Leopard (10.5)
Ruby 1.8.6
Older versions
Ruby 1.8.2
-
If you’re on Tiger (10.4) or an earlier version of OS X, you’ll need to update Ruby itself, a challenge that’s beyond the scope of this book. You may want to investigate the Homebrew guide. For a more comprehensive installation, check out the excellent tutorials from RailsGirls. (You should ignore the versions of Rails installed with OS X—they’re guaranteed to be out of date. You’ll need to update Ruby to version 2.2.2 to use Rails 5.)
-
Most distributions of Linux include Ruby, but you’ll want to use your package manager to make sure it’s updated to 2.2.2. Some, notably Ubuntu and Debian, will name the
gemcommandgem1.9. -
For Windows, unless you’re a hardened tinkerer, it’s much easier to use RailsInstaller or Bitnami. If you’re feeling strong, the one-click RubyInstaller is probably your easiest option, though there are other alternatives, including Cygwin, which brings a lot of the Unix environment to Windows.
A saner long-term approach to installing Ruby and Rails includes also installing rvm, the Ruby version manager, which frees you from having to worry about what version of Ruby your system decided it should have as well as giving you better options for managing a clean work environment. (It was created by Wayne E. Seguin, the same person who created RailsInstaller.) If that doesn’t seem right to you, you can also find out more on how to install Ruby on a variety of platforms at the Ruby website.
Note
If rvm isn’t for you, you may also want to explore rbenv, a much smaller and simpler approach to switching between versions of Ruby.
RubyGems (often just called Gems) is also starting to come standard on a number of platforms and has shipped with OS X versions since Leopard (10.5). However, if you need to install Gems, see the RubyGems User Guide’s instructions.
Warning
If you use MacPorts, apt-get, or a similar package installer, you may want to use it only to install Ruby, and then proceed from the command line. You certainly can install Gems and Rails with these tools, but Gems can update itself, which can make for very confusing package update issues.
Once you have RubyGems installed, Rails and its many dependencies are just a command away (though the output has grown more verbose with every version of Rails):
marklocklear$ gem install rails
Fetching: i18n-0.7.0.gem (100%)
Successfully installed i18n-0.7.0
Fetching: thread_safe-0.3.5.gem (100%)
Successfully installed thread_safe-0.3.5
Fetching: tzinfo-1.2.2.gem (100%)
Successfully installed tzinfo-1.2.2
Fetching: concurrent-ruby-1.0.2.gem (100%)
Successfully installed concurrent-ruby-1.0.2
Fetching: activesupport-5.0.0.gem (100%)
Successfully installed activesupport-5.0.0
Fetching: rack-2.0.1.gem (100%)
Successfully installed rack-2.0.1
Fetching: rack-test-0.6.3.gem (100%)
Successfully installed rack-test-0.6.3
Fetching: mini_portile2-2.1.0.gem (100%)
Successfully installed mini_portile2-2.1.0
Installing ri documentation for sprockets-rails-3.1.1
Parsing documentation for rails-5.0.0
Installing ri documentation for rails-5.0.0
...
37 gems installed
You may need to use sudo, which gives your command the power of the root (administrative) account, if you’re working in an environment that requires root access for the installation; otherwise, you can just type gem install rails. That will install the latest version of Rails, which may be more recent than 5.0.1, as well as all of its dependencies. gem install rails will install the latest official release of Rails, which at present is 5.0.1. It will not install any Rails betas. (To see which version of Rails is installed, enter rails -v at the command line.)
You may also need to install the sqlite3 gem, which isn’t automatically installed by the Rails gem but is needed for development. That’s gem install sqlite3.
If you’re ever wondering which gems (and which versions of gems) are installed, type gem list --local. For more information on gems, just type gem, or visit the Ruby Gems website.
Note
You can see the documentation that gems have installed by running the command gem server, and visiting the URL (usually http://localhost:8808) that command reports. When you’re done, you can turn off the server with Ctrl-C.
Once you have Rails installed, you can create a Rails application easily from the command line. Here’s what it looks like in its extended glory, but you don’t need to read it every time:
marklocklear$ rails new hello01
      create
      create  README.md
      create  Rakefile
      create  config.ru
      create  .gitignore
      create  Gemfile
      create  app
      create  app/assets/config/manifest.js
      create  app/assets/javascripts/application.js
      create  app/assets/javascripts/cable.js
      create  app/assets/stylesheets/application.css
      create  app/channels/application_cable/channel.rb
      create  app/channels/application_cable/connection.rb
      create  app/controllers/application_controller.rb
      create  app/helpers/application_helper.rb
      create  app/jobs/application_job.rb
      create  app/mailers/application_mailer.rb
      create  app/models/application_record.rb
      create  app/views/layouts/application.html.erb
      create  app/views/layouts/mailer.html.erb
      create  app/views/layouts/mailer.text.erb
      create  app/assets/images/.keep
      create  app/assets/javascripts/channels
      create  app/assets/javascripts/channels/.keep
      create  app/controllers/concerns/.keep
      create  app/models/concerns/.keep
      create  bin
      create  bin/bundle
      create  bin/rails
      create  bin/rake
      create  bin/setup
      create  bin/update
      create  config
      create  config/routes.rb
      create  config/application.rb
      create  config/environment.rb
      create  config/secrets.yml
      create  config/cable.yml
      create  config/puma.rb
      create  config/spring.rb
      create  config/environments
      create  config/environments/development.rb
      create  config/environments/production.rb
      create  config/environments/test.rb
      create  config/initializers
      create  config/initializers/application_controller_renderer.rb
      create  config/initializers/assets.rb
      create  config/initializers/backtrace_silencers.rb
      create  config/initializers/cookies_serializer.rb
      create  config/initializers/cors.rb
      create  config/initializers/filter_parameter_logging.rb
      create  config/initializers/inflections.rb
      create  config/initializers/mime_types.rb
      create  config/initializers/new_framework_defaults.rb
      create  config/initializers/session_store.rb
      create  config/initializers/wrap_parameters.rb
      create  config/locales
      create  config/locales/en.yml
      create  config/boot.rb
      create  config/database.yml
      create  db
      create  db/seeds.rb
      create  lib
      create  lib/tasks
      create  lib/tasks/.keep
      create  lib/assets
      create  lib/assets/.keep
      create  log
      create  log/.keep
      create  public
      create  public/404.html
      create  public/422.html
      create  public/500.html
      create  public/apple-touch-icon-precomposed.png
      create  public/apple-touch-icon.png
      create  public/favicon.ico
      create  public/robots.txt
      create  test/fixtures
      create  test/fixtures/.keep
      create  test/fixtures/files
      create  test/fixtures/files/.keep
      create  test/controllers
      create  test/controllers/.keep
      create  test/mailers
      create  test/mailers/.keep
      create  test/models
      create  test/models/.keep
      create  test/helpers
      create  test/helpers/.keep
      create  test/integration
      create  test/integration/.keep
      create  test/test_helper.rb
      create  tmp
      create  tmp/.keep
      create  tmp/cache
      create  tmp/cache/assets
      create  vendor/assets/javascripts
      create  vendor/assets/javascripts/.keep
      create  vendor/assets/stylesheets
      create  vendor/assets/stylesheets/.keep
      remove  config/initializers/cors.rb
         run  bundle install
Fetching gem metadata from https://rubygems.org/
Fetching version metadata from https://rubygems.org/
Fetching dependency metadata from https://rubygems.org/
Resolving dependencies....
Installing rake 11.2.2
Using concurrent-ruby 1.0.2
Using i18n 0.7.0
Installing minitest 5.9.0
Using thread_safe 0.3.5
Using builder 3.2.2
Using erubis 2.7.0
Using mini_portile2 2.1.0
Using pkg-config 1.1.7
Using rack 2.0.1
Using nio4r 1.2.1
Using websocket-extensions 0.1.2
Using mime-types-data 3.2016.0521
Using arel 7.0.0
Using bundler 1.12.5
Installing byebug 9.0.5 with native extensions
Installing coffee-script-source 1.10.0
Installing execjs 2.7.0
Using method_source 0.8.2
Using thor 0.19.1
Installing debug_inspector 0.0.2 with native extensions
Installing ffi 1.9.13 with native extensions
Installing multi_json 1.12.1
Installing rb-fsevent 0.9.7
Installing puma 3.4.0 with native extensions
Installing sass 3.4.22
Installing tilt 2.0.5
Installing spring 1.7.2
Installing sqlite3 1.3.11 with native extensions
Installing turbolinks-source 5.0.0
Using tzinfo 1.2.2
Using nokogiri 1.6.8
Using rack-test 0.6.3
Using sprockets 3.6.3
Using websocket-driver 0.6.4
Using mime-types 3.1
Installing coffee-script 2.4.1
Installing uglifier 3.0.0
Installing rb-inotify 0.9.7
Installing turbolinks 5.0.0
Using activesupport 5.0.0
Using loofah 2.0.3
Using mail 2.6.4
Installing listen 3.0.8
Using rails-dom-testing 2.0.1
Using globalid 0.3.6
Using activemodel 5.0.0
Installing jbuilder 2.5.0
Using rails-html-sanitizer 1.0.3
Installing spring-watcher-listen 2.0.0
Using activejob 5.0.0
Using activerecord 5.0.0
Using actionview 5.0.0
Using actionpack 5.0.0
Using actioncable 5.0.0
Using actionmailer 5.0.0
Using railties 5.0.0
Using sprockets-rails 3.1.1
Installing coffee-rails 4.2.1
Installing jquery-rails 4.1.1
Installing web-console 3.3.1
Using rails 5.0.0
Installing sass-rails 5.0.5
Bundle complete! 15 Gemfile dependencies, 63 gems now installed.
Use `bundle show [gemname]` to see where a bundled gem is installed.
         run  bundle exec spring binstub --all
* bin/rake: spring inserted
* bin/rails: spring inserted
This also gets longer and longer with each new version of Rails. Also, the bundle install piece may pause for a long moment.
Note
Rails application directories are just ordinary directories. You can move them, obliterate them and start over, or do whatever you need to do with ordinary file management tools. Each application directory is also completely independent—the general “Rails environment” just generates these applications.
Starting Up Rails
To start Rails, you’ll need to move into the directory you just created—cd hello01—and then issue your first command to get the Puma server (which will be described shortly) busy running your application:
marklocklear$ rails server
=> Booting Puma
=> Rails 5.0.0 application starting in development on http://localhost:3000
=> Run `rails server -h` for more startup options
Puma starting in single mode...
* Version 3.4.0 (ruby 2.3.0-p0), codename: Owl Bowl Brawl
* Min threads: 5, max threads: 5
* Environment: development
* Listening on tcp://localhost:3000
Use Ctrl-C to stop
Rails is now running, and you can watch any errors it encounters through the extensive logging you’ll see in this window.
Note
By default, rails server binds only to localhost at 0.0.0.0 or 127.0.0.1, and the application isn’t visible from other computers. Normally, that’s a security feature, not a bug, though you can specify an address for the server to use with the -b option (and -p for a specific port) if you want to make it visible.
For more details on options for using rails server, just enter rails server -h.
If you now visit http://localhost:3000, you’ll see the welcome screen shown in Figure 1-2. When you’re ready to stop Rails, you can just press Ctrl-C.

Figure 1-2. The Rails welcome page
Note
You frequently can leave Rails running while coding. In development mode, you can make many changes to your application with the server running, and you won’t have to restart the server to see them. If you change configuration, add scopes, or install gems, though, you’ll need to restart.
Puma is written in Ruby and bundled with recent releases of Rails. It’s very convenient for Ruby development, with or without Rails. It’s an excellent testing server, but unlike earlier versions of Rails that used WEBrick, Puma can also be used in production.
If you’ve never used Ruby, now would be a good time to explore Appendix A, which teaches some key components of the language inside of a very simple Rails application.
Note
Depending on how you set up your Rails environment and how you use Bundler, described in Chapter 17, you may need to preface your calls to rails, rake, and similar mechanisms with bundle exec to make sure you’re running exactly the version of the tools you expect to be running. If this seems like a lot of extra typing, visit this blog post by Gabe Berke-Williams to learn about binstubs, a way to avoid this.
Test Your Knowledge
Quiz
-
What’s the name of the Ruby application packaging utility and how do you install Rails with it?
-
What is Puma, and why is it included with Rails?
-
Why should you install a particular version of Ruby on your platform when Ruby already comes installed?
Answers
-
RubyGems or just “gems,” which is run with the
gemcommand, is Ruby’s application packager. To install the latest version of Rails and all its dependencies, just typegem install rails. -
Puma is a web server, and allows you to run your application locally for testing and development.
-
Rails 5 only works with Ruby versions 2.2.2 and above.
Get Learning Rails 5 now with the O’Reilly learning platform.
O’Reilly members experience books, live events, courses curated by job role, and more from O’Reilly and nearly 200 top publishers.

